
:max_bytes(150000):strip_icc():format(webp)/001_2654847-5b99b903c9e77c005077d0d8.jpg)
"Surging Profits with Three Steps An Easy Way to Tally Your YouTube Earning"
Surging Profits with Three Steps: An Easy Way to Tally Your YouTube Earning
There have been lots of user queries similar to the one above about how to check YouTube income lately. Honestly, YouTube has made it easy for users to track their revenue analytics on the platform, thus making it easy for creators to track how much they make and other revenue data.
So, if you don’t know how to check YouTube income, don’t worry, this article will teach you the simple steps to check your YouTube. Plus, you’ll find out how your YouTube earnings are calculated. Just stick with us.
Part 1: Follow the steps below to check your YouTube earnings
The process of checking YouTube income is pretty straightforward. So, regardless of what device you’re using to check, we’ve briefly explained the step-by-step instructions to carry out your YouTube income check within a few clicks.
Check on a computer
To check YouTube income on your PC or Mac, you just have to do the following;
Step1 Open the browser app on your computer and sign in to your YouTube Studio .
Step2 Click Analytics from the left side of the screen.

Step3 On the Analytics screen, select Revenue from the top side of the screen to check your YouTube income.
There, you’ll find your YouTube income and other necessary data that you might need.
Check on a Mobile Device
The process of checking YouTube income on an Android or iOS device is also straightforward, and you can use either the YouTube app or the YouTube Studio app to perform the operation. The steps below explain the procedure;
YouTube App
Step1 Make sure you have the latest version of the YouTube app on your phone. If not, you can install it from Google Play Store or App Store.

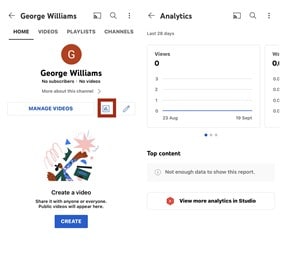
Step2 Log in to your YouTube account and tap on the Profile icon at the top side. Then, select Your Channel.

Step3 Tap the Analytics icon from the middle menu. Your YouTube channel income and other data will be displayed on your phone screen.
YouTube Studio App
Step1 Launch the YouTube Studio app on your Android or iPhone.
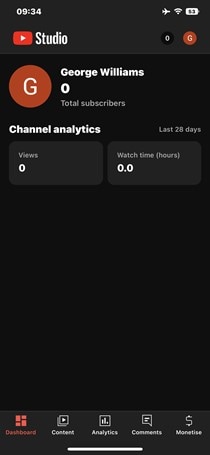
Step2 Tap Analytics from the bottom menu and select Revenue from the top of the screen.

The information that you’ll find in the YouTube revenue analytics includes the following;
- RPM (Revenue Per Mile); This is the metric that displays how much a creator has earned per 1000 video views.
- Playback-based CPM; This shows the average gross revenue per 1000 playbacks where an AD or more is displayed.
- Monthly Estimated Revenue; This report shows how much a YouTuber has earned from his/her channel in the last six months.
- Revenue Sources: Just as the name suggests, this shows you the data of how much is earned from each revenue source used on your YouTube channel.
- Transaction Revenue; The transaction revenue metric is a breakdown of how much a creator has earned from membership and merch.
- Top Earnings; It shows the data of the video with the highest estimated revenue.
- Ad Type; This displays the percentage of revenue earned from the different types of ads.
Part 2: How your YouTube earnings are calculated
Having known how to check YouTube income, if you’re still wondering how your earnings are calculated, here, we’ve discussed all the necessary information you need to know about how YouTube earnings are calculated.
YouTube earnings are calculated based on different factors. From CPC to CPM, estimated gross earnings per view, and more. Keep reading to find out more about how these factors affect your YouTube earnings;
CPM (Cost Per Mile): CPM is the amount an advertiser pays for every one thousand views of their ads. This means if an advertiser is paying you $10CPM, you’ll earn $10 on every 1000 views of their ads.
CPC (Cost Per Click): Most people think CPC is the same as CPM, but no they are not. Cost Per Click is the amount an advertiser pays for every viewer that clicks on their ads. If an advertiser is willing to pay $10, then you’ll earn $10 on every ad click.
Estimated Gross Earning Per Subscriber: You’ll notice whenever you watch a YouTube video, the creator always emphasizes you click the Subscribe button to get a notification on every new video he/she uploads. Well, they do this because the more subscribers they get, the more likely their videos appear in search results.
Also, if you have a huge Subscriber base, your videos tend to get more views, thereby increasing ad views, ad clicks, and your earnings.
All the factors explained above will determine how your YouTube earnings are calculated. However, keep in mind that you’ll receive only 55% of the total dollar advertisers pays while YouTube keeps the remaining 45%. If you get an average of $5 from an advertiser on every 1000 ad view, you’ll earn $5 x 55% which is approximately $2.75.
You can also calculate your YouTube channel total earnings by using the YouTube calculator .

Part 3: How do you increase your YouTube earnings?
1. Post quality videos
If your video is of low quality, then viewers might not find it interesting. For this reason, it’s important you post quality videos, and you need the Wondershare Filmora software for such an operation.
Filmora is one of the best video editing software that is trusted by millions of users globally because of its high efficiency. It supports lots of advanced tools that anyone can utilize to edit and spice up their videos. From adding transitions to applying effects, and more. It even offers a high-quality built-in preset that users can utilize for free to give their video the best quality they can ever think of.
Free Download For Win 7 or later(64-bit)
Free Download For macOS 10.14 or later
Step1 Install Filmora software on your computer.
Step2 Use the Import button to upload the video you created for your YouTube channel. You can also drag-n-drop it to the interface of the software.
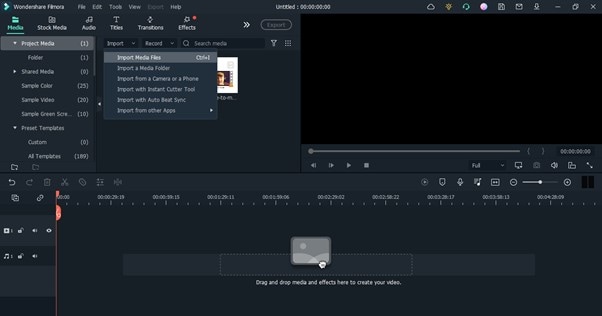
Step3 Drag-n-drop the video you uploaded to the Timeline.

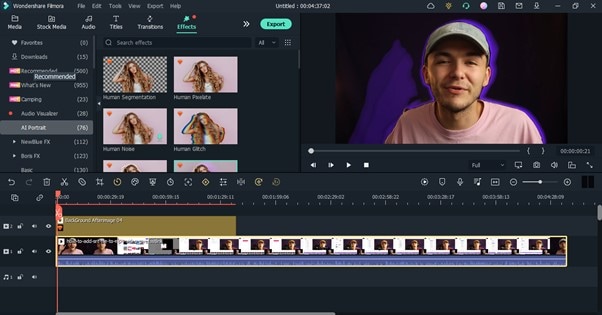
Step4 To remove unwanted background from your video, click Effects from the top side of the screen. Select AI Portrait from the left side of the screen and select a preferred AI Portrait effect that you’ll like to use in the video.

Step5 Next, drag-n-dop the chosen AI Portrait effect to the timeline. After that, adjust the AI Portrait effect from the timeline. You can also add multiple effects by dragging and dropping them to the timeline.
Step6 Double-click the AI Portrait effect from the Timeline. From the pop-up that appears, adjust the settings according to your requirements.

Step7 You can add Subscribe watermark by clicking the >> icon at the top of the screen, then select Element.

Choose the ‘Social Media Show Element 07’ Effects. Drag-n-drop the selected effect to the Timeline.

Step8 Preview the edited video. If you’re satisfied with the output, click the Export button at the top bar and choose Burn DVD from the drop-down list.

Step9 Enter file name in the box next to Label. Then, navigate to Folder Path and choose where you want the file to be saved. Afterward, click Export to Finish.

2. Upload videos regularly
Starting a YouTube channel can be quite hard from start, but make it a priority to upload at least two quality videos every week. Yes, the more quality videos you post, the more you attract the viewer to like your videos, and the higher your chances of getting new subscribers, thereby increasing your YouTube earnings.
3. Promote your Videos
Promoting your YouTube videos is a great way to increase your YouTube earnings. Once you post a new video on YouTube, you can share it to your other social media profiles or websites to increase views and attract new folks to watch the video. The more views you get the more money you’ll make.
Part 4: Hot FAQs on YouTube channel earnings check
Let’s take a look at some frequently asked questions from users like you.
1. Is monetizing on YouTube different from Google AdSense?
YouTube monetization involves making money from videos you upload on your YouTube channel. And Google AdSense is a means of monetizing your YouTube channel.
2. Why should you consider monetizing on YouTube creator?
Monetizing YouTube as a creator is a great way to earn passive income just by uploading videos. Research shows that an average YouTuber has the potential of earning $10,000 in revenue per year.
3. Which category is best for YouTube earnings?
The average CPM you earn from videos you upload on YouTube all depends on the niche of your video. The following are the best 5 categories best for YouTube earnings in 2022;
Make Money Online - $13.52
Social Media Marketing - $12.41
Finance & Investing - $12.25
Educational Videos - $9.89
Photography & Film Making - $7.31
Final Words
Checking YouTube income is not a big deal. This article has covered every necessary detail you need to know about checking your YouTube income on a PC or mobile phone. Also, if you don’t understand how YouTube earnings are calculated, we touched on that, and don’t hesitate to employ the tips discussed to increase your YouTube earnings.
Free Download For Win 7 or later(64-bit)
Free Download For macOS 10.14 or later
Part 1: Follow the steps below to check your YouTube earnings
The process of checking YouTube income is pretty straightforward. So, regardless of what device you’re using to check, we’ve briefly explained the step-by-step instructions to carry out your YouTube income check within a few clicks.
Check on a computer
To check YouTube income on your PC or Mac, you just have to do the following;
Step1 Open the browser app on your computer and sign in to your YouTube Studio .
Step2 Click Analytics from the left side of the screen.
Step3 On the Analytics screen, select Revenue from the top side of the screen to check your YouTube income.
There, you’ll find your YouTube income and other necessary data that you might need.
Check on a Mobile Device
The process of checking YouTube income on an Android or iOS device is also straightforward, and you can use either the YouTube app or the YouTube Studio app to perform the operation. The steps below explain the procedure;
YouTube App
Step1 Make sure you have the latest version of the YouTube app on your phone. If not, you can install it from Google Play Store or App Store.
Step2 Log in to your YouTube account and tap on the Profile icon at the top side. Then, select Your Channel.
Step3 Tap the Analytics icon from the middle menu. Your YouTube channel income and other data will be displayed on your phone screen.
YouTube Studio App
Step1 Launch the YouTube Studio app on your Android or iPhone.
Step2 Tap Analytics from the bottom menu and select Revenue from the top of the screen.
The information that you’ll find in the YouTube revenue analytics includes the following;
- RPM (Revenue Per Mile); This is the metric that displays how much a creator has earned per 1000 video views.
- Playback-based CPM; This shows the average gross revenue per 1000 playbacks where an AD or more is displayed.
- Monthly Estimated Revenue; This report shows how much a YouTuber has earned from his/her channel in the last six months.
- Revenue Sources: Just as the name suggests, this shows you the data of how much is earned from each revenue source used on your YouTube channel.
- Transaction Revenue; The transaction revenue metric is a breakdown of how much a creator has earned from membership and merch.
- Top Earnings; It shows the data of the video with the highest estimated revenue.
- Ad Type; This displays the percentage of revenue earned from the different types of ads.
Part 2: How your YouTube earnings are calculated
Having known how to check YouTube income, if you’re still wondering how your earnings are calculated, here, we’ve discussed all the necessary information you need to know about how YouTube earnings are calculated.
YouTube earnings are calculated based on different factors. From CPC to CPM, estimated gross earnings per view, and more. Keep reading to find out more about how these factors affect your YouTube earnings;
CPM (Cost Per Mile): CPM is the amount an advertiser pays for every one thousand views of their ads. This means if an advertiser is paying you $10CPM, you’ll earn $10 on every 1000 views of their ads.
CPC (Cost Per Click): Most people think CPC is the same as CPM, but no they are not. Cost Per Click is the amount an advertiser pays for every viewer that clicks on their ads. If an advertiser is willing to pay $10, then you’ll earn $10 on every ad click.
Estimated Gross Earning Per Subscriber: You’ll notice whenever you watch a YouTube video, the creator always emphasizes you click the Subscribe button to get a notification on every new video he/she uploads. Well, they do this because the more subscribers they get, the more likely their videos appear in search results.
Also, if you have a huge Subscriber base, your videos tend to get more views, thereby increasing ad views, ad clicks, and your earnings.
All the factors explained above will determine how your YouTube earnings are calculated. However, keep in mind that you’ll receive only 55% of the total dollar advertisers pays while YouTube keeps the remaining 45%. If you get an average of $5 from an advertiser on every 1000 ad view, you’ll earn $5 x 55% which is approximately $2.75.
You can also calculate your YouTube channel total earnings by using the YouTube calculator .
Part 3: How do you increase your YouTube earnings?
1. Post quality videos
If your video is of low quality, then viewers might not find it interesting. For this reason, it’s important you post quality videos, and you need the Wondershare Filmora software for such an operation.
Filmora is one of the best video editing software that is trusted by millions of users globally because of its high efficiency. It supports lots of advanced tools that anyone can utilize to edit and spice up their videos. From adding transitions to applying effects, and more. It even offers a high-quality built-in preset that users can utilize for free to give their video the best quality they can ever think of.
Free Download For Win 7 or later(64-bit)
Free Download For macOS 10.14 or later
Step1 Install Filmora software on your computer.
Step2 Use the Import button to upload the video you created for your YouTube channel. You can also drag-n-drop it to the interface of the software.
Step3 Drag-n-drop the video you uploaded to the Timeline.
Step4 To remove unwanted background from your video, click Effects from the top side of the screen. Select AI Portrait from the left side of the screen and select a preferred AI Portrait effect that you’ll like to use in the video.
Step5 Next, drag-n-dop the chosen AI Portrait effect to the timeline. After that, adjust the AI Portrait effect from the timeline. You can also add multiple effects by dragging and dropping them to the timeline.
Step6 Double-click the AI Portrait effect from the Timeline. From the pop-up that appears, adjust the settings according to your requirements.
Step7 You can add Subscribe watermark by clicking the >> icon at the top of the screen, then select Element.
Choose the ‘Social Media Show Element 07’ Effects. Drag-n-drop the selected effect to the Timeline.
Step8 Preview the edited video. If you’re satisfied with the output, click the Export button at the top bar and choose Burn DVD from the drop-down list.
Step9 Enter file name in the box next to Label. Then, navigate to Folder Path and choose where you want the file to be saved. Afterward, click Export to Finish.
2. Upload videos regularly
Starting a YouTube channel can be quite hard from start, but make it a priority to upload at least two quality videos every week. Yes, the more quality videos you post, the more you attract the viewer to like your videos, and the higher your chances of getting new subscribers, thereby increasing your YouTube earnings.
3. Promote your Videos
Promoting your YouTube videos is a great way to increase your YouTube earnings. Once you post a new video on YouTube, you can share it to your other social media profiles or websites to increase views and attract new folks to watch the video. The more views you get the more money you’ll make.
Part 4: Hot FAQs on YouTube channel earnings check
Let’s take a look at some frequently asked questions from users like you.
1. Is monetizing on YouTube different from Google AdSense?
YouTube monetization involves making money from videos you upload on your YouTube channel. And Google AdSense is a means of monetizing your YouTube channel.
2. Why should you consider monetizing on YouTube creator?
Monetizing YouTube as a creator is a great way to earn passive income just by uploading videos. Research shows that an average YouTuber has the potential of earning $10,000 in revenue per year.
3. Which category is best for YouTube earnings?
The average CPM you earn from videos you upload on YouTube all depends on the niche of your video. The following are the best 5 categories best for YouTube earnings in 2022;
Make Money Online - $13.52
Social Media Marketing - $12.41
Finance & Investing - $12.25
Educational Videos - $9.89
Photography & Film Making - $7.31
Final Words
Checking YouTube income is not a big deal. This article has covered every necessary detail you need to know about checking your YouTube income on a PC or mobile phone. Also, if you don’t understand how YouTube earnings are calculated, we touched on that, and don’t hesitate to employ the tips discussed to increase your YouTube earnings.
Free Download For Win 7 or later(64-bit)
Free Download For macOS 10.14 or later
From Video Lessons to Vivid, Engaging GIFs – No Download Needed
How to Convert YouTube Videos to GIFs

Shanoon Cox
Mar 27, 2024• Proven solutions
A GIF adds an extra element to any conversation and makes the reader feel connected to the post. Using GIF can turn useful if done rightly. It narrates a story in a single animated image for social media conversation. In this article, we will brief you about how to convert YouTube to gif, various GIF converters, their uses, and the pros and cons of each converter.
Let’s get started!
How to Convert a YouTube Video into GIFs?
1. YouTube to GIF Directly
Here is a quick way to convert the YouTube video to GIFs without typing a YouTube to GIF website.
Gif.com is a free and easy-to-use video editor available with multiple effects. This converter was created keeping in mind how people spend hours and money on paid platforms.
Follow the below steps to convert a YouTube video into gifs.
- In the YouTube video page, add gif before youtube.com. For example, I want to convert the YouTube video https://www.youtube.com/watch?v=40fuGLmwHwk to GIFs, here is how it looks like after adding gif at the beginning: https://www.gifyoutube.com/watch?v=40fuGLmwHwk . Press the enter button on your keyboard and you will enter the gifs.com directly.

- In gifs.com, you can play and pause the YouTube video and drag the bar to select a desired moment for gif. Press the “Create Gif” button on the top right side to convert the specific part of the YouTube video to gif.
- You will then be directed to the result page to see your GIF created using the YouTube video, and you can change the GIF title and the tag.
- Lastly, you need to copy the link and share it!
Pros of converting YouTube to GIFs with Gifs.com:
- The interface is easy to use and it provides lots of tools to adjust.
- Simple functionality.
Cons:
- The watermark on your created GIF can be removed only after purchasing the premium version.
- GIFs can be downloaded only by registered users.
2. FreeGifMaker.me
FreeGifMaker is one simple online tool that allows the creation of animated Gifs for free. A minimum of two pictures has to be uploaded out of ten. It takes few seconds and is super easy to make a GIF from a YouTube video. You can use FreeGifMaker.me in some easy steps.
- Open the website http://freegifmaker.me/youtube-to-gif/ on your desktop.
- Go to YouTube and copy the video URL you want to create a GIF of and paste it on the website mentioned above.
- Then click “Load YouTube Video” below the URL and wait for a few seconds while the tool checks the video source.
- Once the YouTube video is loaded, enter the gif duration, start time, and click on the “Make a GIF button.” It will redirect you to the result page.
- Pros:
- Conversion size is unlimited**.**
- There is no usage of ads.
- Easy to make Gifs.
- Cons:
- The upload speed is slow.
- The converter gives limited options for editing.
3. Wondershare Online UniConverter
Online UniConverter converts video into a high-quality animated GIF and allows editing. It is a simple converter with unique features.
If you want to convert your YouTube video into a GIF, follow the steps.
- You need to upload your video through the “Choose Files” option. You can also copy the link from YouTube.
- Wait for some time once you upload the file; you can then set your start time, end time, frame rate according to your needs.
- Lastly, click on “Create GIF” and download your GIF. You can also save it through the dropdown option available besides “Download.”
- Pros:
- Easy to handle.
- A wide range of customization tools is available.
- Zero ads.
- Cons:
- Upload speed is slow.
- Conversion size is limited.
4. GifRun
It is a video maker that started in 2013, and GifRun converts videos from YouTube, Facebook, and other sources to high-quality GIFs. You can create Gifs free of cost from GifRun.
Here is how you can use Gifrun.
- Open the website and paste the URL you want to convert into Gif. Later, press “Get Video” option below the URL box.
- In this step, you can adjust the duration, start time, add text, and also pause and preview the video. Once you’re done altering the video, click “Create GIF.”
- Lastly, click on the “Download” button beside the add text button, or share the link directly.
- Pros:
- Fast conversion and download.
- There is no upload limit.
- The video preview feature is available.
- Cons:
- UI is ad-infested.
- Supports YouTube videos only.
5. Makeagif
This GIF converter creates high-quality GIFs in no time. You need to paste the URL in Makeagif and nothing much. It can make GIFs from Instagram, Facebook, Twitter, and other platforms easily.
The only issue is that it supports one type of conversion with a maximum limit of 25MB.
Here is how you can make your favorite GIF in few steps.
- Open makeagif.com and paste the YouTube URL in the box available.
- Once you paste the URL, the website will automatically take you to the edit page to edit GIF length, start time, speed, and add caption and stickers. The next step is to select the category to which the video belongs available on the left side of the screen.
- After editing, click on “Continue to publishing” then “Create GIF” at the lower right corner of the screen. Voila! Your GIF is ready to use.
- Pros:
- The UI is user-friendly.
- Ads are minimal
- Various GIF conversions are supported.
- Cons:
- The conversion size is small.
- Batch conversions are not available.
6. ImgFlip
It is a creative GIF website supporting various videos from other websites such as Vimeo and YouTube. ImgFlip has innovative customization tools for cropping, reshaping, adding text and, a lot more, but you just need to be aware of the ads.
Want to know how to create GIF? Go through these simple steps.
- You can make GIFs both from Video and Images. To make GIF from a video, paste the YouTube URL in the box at the top, upload the tape from your device’s file.
- After pasting the URL, you will be given lots of customization options. Choose the effect of your choice for your GIF.
- Lastly, click on “Generate GIF” available on the right side of the screen. You can now share the GIF via your device or download it.
- Pros:
- Plenty of customization options.
- Fast conversion.
- Easy to upload and use.
- Cons:
- Ads pop up frequently.
- Offline conversion is unavailable.
7. GIPHY
It is a free GIF converter that helps you download free YouTube GIFs. You can also make GIFs from your photos, videos available on your device along with video URLs and images. The only problem is, to use Giphy you first have to log in to the app.
Follow the below steps to create a GIF from YouTube videos with Giphy:
- Open Giphy on your device and click on “Create” on the top right-side of your screen.
- Paste the URL in the space given below. A pop-up will tell you to log in. Log in to the website to continue.
- The video you choose should be less than 15 seconds and under 100MB. You will be given editing options from which you can select the start time and duration of your GIF along with Captions and Tags.
- In the end, press the “Create GIF” button to make the GIF. When it’s done, you will be redirected to the GIF page. You can then share your GIF on any social media site.
- Pros:
- Ads are absent
- Uploading is fast
- Wide range of free GIFs available
- Cons:
- Not perfect for green hands
8. Imgur
It is one of the best apps that offers tons of images, memes, and GIFs. You can make GIFs of less than 60 seconds with high quality, which you can share anywhere.
Here are three easy steps to make GIFs
- Visit the page “imgur.com/vidgif” and paste your YouTube URL there.
- Set a start time by clicking or dragging on the timeline. The total runtime is also adjustable, with 60 seconds as the maximum time for GIFs.
- Lastly, press on “Create GIF” to see the magic. The GIF is converted from the YouTube video.
- Pros:
- The users can share the post of their choice
- Users can save posts.
- Great collection of short GIFs and videos.
- Cons:
- During loading, the screen flashes.
9 VEED.IO
Veed is a simple YouTube video converter that makes your work super easy. It converts YouTube videos into GIFs with various editing options like crop, trim, text ads, and many more.
Check out how to use VEED in 3 steps.
- Start by pasting the URL of your YouTube video into VEED, Your video will be ready to convert into GIF.
- Now you are all set to edit your video. You have the option to crop and trim the video. You can also include different font styles, colors, and sizes of your choice.
- Lastly, download the GIF you made in VEED.
- Pros:
- Downloading the software is not mandatory.
- UI is simple and easy to navigate.
- The subtitle option is present.
- Cons:
- It takes a lot of time to upload video.
- Many basic tools.
10. Kapwing
Kapwing is a helpful video converter that can easily turn any video into GIFs with a click. It can also convert different files such as 3GP, GIF, WEBM.
To create beautiful GIFs with this video editor, follow these easy steps.
- Open Kapwing video editor and upload your video from YouTube.
- Choose the “Export dropdown” option and choose the format you wish to convert.
You can also preview the GIF and customize it as per your choice.
- In the final step, export the video by clicking the “Export Video” button. Save and download the newly created GIF and share it anywhere with your friends.
- Pros:
- Great editing tools.
- Easy to use.
- Cons:
- Available only on the website.
- Too many tools for the same purpose.
Final Thoughts
With the increased use of GIFs on social media, you can now easily convert your favorite YouTube videos into GIFs on your own. All you have to do is simply choose the tools mentioned above and share it with your friends.
Shanoon Cox
Shanoon Cox is a writer and a lover of all things video.
Follow @Shanoon Cox
Shanoon Cox
Mar 27, 2024• Proven solutions
A GIF adds an extra element to any conversation and makes the reader feel connected to the post. Using GIF can turn useful if done rightly. It narrates a story in a single animated image for social media conversation. In this article, we will brief you about how to convert YouTube to gif, various GIF converters, their uses, and the pros and cons of each converter.
Let’s get started!
How to Convert a YouTube Video into GIFs?
1. YouTube to GIF Directly
Here is a quick way to convert the YouTube video to GIFs without typing a YouTube to GIF website.
Gif.com is a free and easy-to-use video editor available with multiple effects. This converter was created keeping in mind how people spend hours and money on paid platforms.
Follow the below steps to convert a YouTube video into gifs.
- In the YouTube video page, add gif before youtube.com. For example, I want to convert the YouTube video https://www.youtube.com/watch?v=40fuGLmwHwk to GIFs, here is how it looks like after adding gif at the beginning: https://www.gifyoutube.com/watch?v=40fuGLmwHwk . Press the enter button on your keyboard and you will enter the gifs.com directly.
- In gifs.com, you can play and pause the YouTube video and drag the bar to select a desired moment for gif. Press the “Create Gif” button on the top right side to convert the specific part of the YouTube video to gif.
- You will then be directed to the result page to see your GIF created using the YouTube video, and you can change the GIF title and the tag.
- Lastly, you need to copy the link and share it!
Pros of converting YouTube to GIFs with Gifs.com:
- The interface is easy to use and it provides lots of tools to adjust.
- Simple functionality.
Cons:
- The watermark on your created GIF can be removed only after purchasing the premium version.
- GIFs can be downloaded only by registered users.
2. FreeGifMaker.me
FreeGifMaker is one simple online tool that allows the creation of animated Gifs for free. A minimum of two pictures has to be uploaded out of ten. It takes few seconds and is super easy to make a GIF from a YouTube video. You can use FreeGifMaker.me in some easy steps.
- Open the website http://freegifmaker.me/youtube-to-gif/ on your desktop.
- Go to YouTube and copy the video URL you want to create a GIF of and paste it on the website mentioned above.
- Then click “Load YouTube Video” below the URL and wait for a few seconds while the tool checks the video source.
- Once the YouTube video is loaded, enter the gif duration, start time, and click on the “Make a GIF button.” It will redirect you to the result page.
- Pros:
- Conversion size is unlimited**.**
- There is no usage of ads.
- Easy to make Gifs.
- Cons:
- The upload speed is slow.
- The converter gives limited options for editing.
3. Wondershare Online UniConverter
Online UniConverter converts video into a high-quality animated GIF and allows editing. It is a simple converter with unique features.
If you want to convert your YouTube video into a GIF, follow the steps.
- You need to upload your video through the “Choose Files” option. You can also copy the link from YouTube.
- Wait for some time once you upload the file; you can then set your start time, end time, frame rate according to your needs.
- Lastly, click on “Create GIF” and download your GIF. You can also save it through the dropdown option available besides “Download.”
- Pros:
- Easy to handle.
- A wide range of customization tools is available.
- Zero ads.
- Cons:
- Upload speed is slow.
- Conversion size is limited.
4. GifRun
It is a video maker that started in 2013, and GifRun converts videos from YouTube, Facebook, and other sources to high-quality GIFs. You can create Gifs free of cost from GifRun.
Here is how you can use Gifrun.
- Open the website and paste the URL you want to convert into Gif. Later, press “Get Video” option below the URL box.
- In this step, you can adjust the duration, start time, add text, and also pause and preview the video. Once you’re done altering the video, click “Create GIF.”
- Lastly, click on the “Download” button beside the add text button, or share the link directly.
- Pros:
- Fast conversion and download.
- There is no upload limit.
- The video preview feature is available.
- Cons:
- UI is ad-infested.
- Supports YouTube videos only.
5. Makeagif
This GIF converter creates high-quality GIFs in no time. You need to paste the URL in Makeagif and nothing much. It can make GIFs from Instagram, Facebook, Twitter, and other platforms easily.
The only issue is that it supports one type of conversion with a maximum limit of 25MB.
Here is how you can make your favorite GIF in few steps.
- Open makeagif.com and paste the YouTube URL in the box available.
- Once you paste the URL, the website will automatically take you to the edit page to edit GIF length, start time, speed, and add caption and stickers. The next step is to select the category to which the video belongs available on the left side of the screen.
- After editing, click on “Continue to publishing” then “Create GIF” at the lower right corner of the screen. Voila! Your GIF is ready to use.
- Pros:
- The UI is user-friendly.
- Ads are minimal
- Various GIF conversions are supported.
- Cons:
- The conversion size is small.
- Batch conversions are not available.
6. ImgFlip
It is a creative GIF website supporting various videos from other websites such as Vimeo and YouTube. ImgFlip has innovative customization tools for cropping, reshaping, adding text and, a lot more, but you just need to be aware of the ads.
Want to know how to create GIF? Go through these simple steps.
- You can make GIFs both from Video and Images. To make GIF from a video, paste the YouTube URL in the box at the top, upload the tape from your device’s file.
- After pasting the URL, you will be given lots of customization options. Choose the effect of your choice for your GIF.
- Lastly, click on “Generate GIF” available on the right side of the screen. You can now share the GIF via your device or download it.
- Pros:
- Plenty of customization options.
- Fast conversion.
- Easy to upload and use.
- Cons:
- Ads pop up frequently.
- Offline conversion is unavailable.
7. GIPHY
It is a free GIF converter that helps you download free YouTube GIFs. You can also make GIFs from your photos, videos available on your device along with video URLs and images. The only problem is, to use Giphy you first have to log in to the app.
Follow the below steps to create a GIF from YouTube videos with Giphy:
- Open Giphy on your device and click on “Create” on the top right-side of your screen.
- Paste the URL in the space given below. A pop-up will tell you to log in. Log in to the website to continue.
- The video you choose should be less than 15 seconds and under 100MB. You will be given editing options from which you can select the start time and duration of your GIF along with Captions and Tags.
- In the end, press the “Create GIF” button to make the GIF. When it’s done, you will be redirected to the GIF page. You can then share your GIF on any social media site.
- Pros:
- Ads are absent
- Uploading is fast
- Wide range of free GIFs available
- Cons:
- Not perfect for green hands
8. Imgur
It is one of the best apps that offers tons of images, memes, and GIFs. You can make GIFs of less than 60 seconds with high quality, which you can share anywhere.
Here are three easy steps to make GIFs
- Visit the page “imgur.com/vidgif” and paste your YouTube URL there.
- Set a start time by clicking or dragging on the timeline. The total runtime is also adjustable, with 60 seconds as the maximum time for GIFs.
- Lastly, press on “Create GIF” to see the magic. The GIF is converted from the YouTube video.
- Pros:
- The users can share the post of their choice
- Users can save posts.
- Great collection of short GIFs and videos.
- Cons:
- During loading, the screen flashes.
9 VEED.IO
Veed is a simple YouTube video converter that makes your work super easy. It converts YouTube videos into GIFs with various editing options like crop, trim, text ads, and many more.
Check out how to use VEED in 3 steps.
- Start by pasting the URL of your YouTube video into VEED, Your video will be ready to convert into GIF.
- Now you are all set to edit your video. You have the option to crop and trim the video. You can also include different font styles, colors, and sizes of your choice.
- Lastly, download the GIF you made in VEED.
- Pros:
- Downloading the software is not mandatory.
- UI is simple and easy to navigate.
- The subtitle option is present.
- Cons:
- It takes a lot of time to upload video.
- Many basic tools.
10. Kapwing
Kapwing is a helpful video converter that can easily turn any video into GIFs with a click. It can also convert different files such as 3GP, GIF, WEBM.
To create beautiful GIFs with this video editor, follow these easy steps.
- Open Kapwing video editor and upload your video from YouTube.
- Choose the “Export dropdown” option and choose the format you wish to convert.
You can also preview the GIF and customize it as per your choice.
- In the final step, export the video by clicking the “Export Video” button. Save and download the newly created GIF and share it anywhere with your friends.
- Pros:
- Great editing tools.
- Easy to use.
- Cons:
- Available only on the website.
- Too many tools for the same purpose.
Final Thoughts
With the increased use of GIFs on social media, you can now easily convert your favorite YouTube videos into GIFs on your own. All you have to do is simply choose the tools mentioned above and share it with your friends.
Shanoon Cox
Shanoon Cox is a writer and a lover of all things video.
Follow @Shanoon Cox
Also read:
- [Updated] A Novice's Pathway to Writing YouTube Video Plans
- 2024 Approved Build Your Wealth on YouTube A Guide to Creating Content Without Ads
- [New] Enjoy a Stream of Nine Complete Christmas Capsules on YouTube
- Dynamic Slideshows Embedding YouTube Content
- MP3 Mastery Guide Top 10 Video-to-Audio Picks
- Diving Into the World of YouTube Search Engine Rankings for 2024
- Bridge Gaps in Generations of Viewers 6 Interactive Tests to Find Your YouTube Match
- 2024 Approved Evaluating the Financial Returns for Maker's on YouTube Shorts
- [New] Breakdown of the Top 9 Free Branding Platforms for YouTube Channels
- Becoming a Filmora FCC The Pathway Explained for 2024
- [Updated] Driving Engagement and Growth The Role of Brand in YouTube Success
- In 2024, Elevate Your YouTube Content With 7 Premium, Free Audio Sounds
- Enriching YouTube Content with Improved Sound Quality for 2024
- Massive Followings The Highest Subscribers Chart
- In 2024, Dissecting & Defeating Dreadful Greenscreen A Mac Editor's Directive
- [New] Best Screener Tech Perfect for Creating Viral YouTube Moments
- 2024 Approved Enhance Your Online Presence with These 50 Complimentary Banners
- 2024 Approved A Complete Guide to YouTube's Live Image Lore
- [Updated] Decoding the Functionality of YouTube's Media Hub
- Essential Methods to Record Your FB Live Events for 2024
- 2024 Approved Wide Screen Woes? Fixing Amazon Prime Video Aspect Ratio Issues
- [Updated] Tailoring Video Content for IGTV with Horizontal Footage for 2024
- In 2024, Why Your WhatsApp Location is Not Updating and How to Fix On Realme Note 50 | Dr.fone
- Facebook Content at Your Fingertips Best Downloader Apps for iOS for 2024
- [New] 2024 Approved Choosing Between Bandicam & Camtasia
- In 2024, How To Remove Screen Lock PIN On Realme GT Neo 5 SE Like A Pro 5 Easy Ways
- New In 2024, The Ultimate Guide to Creating Viral WhatsApp Status Videos
- Capture Still Shots From Video Using Photos on Windows 10 for 2024
- 3 Easy Solutions to Hard Reset Realme GT 5 (240W) | Dr.fone
- [New] 2024 Approved Pro Video Capture Solutions on Mac Beyond the Bandicamp Era
- [Updated] FREE Best 10 Video Editing Apps to Edit and Make Instagram Reels for 2024
- [Updated] 2024 Approved Incorporating On-Screen Words A TikTok Video Transformation
- Recover your photos after A38 has been deleted.
- The Ultimate Mac Video Editor How to Produce a Pro-Quality Movie for 2024
- Updated Exploring Options for MP3 Download Cat Noises and More
- You May Want to Change the Speed of Certain Portions of Your Video. This Article Enlightens You on How to Splice and Speed up the Video in Simple Ways for 2024
- Apply These Techniques to Improve How to Detect Fake GPS Location On Nokia C12 Pro | Dr.fone
- Title: "Surging Profits with Three Steps An Easy Way to Tally Your YouTube Earning"
- Author: Steven
- Created at : 2024-05-25 20:27:31
- Updated at : 2024-05-26 20:27:31
- Link: https://youtube-clips.techidaily.com/surging-profits-with-three-steps-an-easy-way-to-tally-your-youtube-earning/
- License: This work is licensed under CC BY-NC-SA 4.0.
