
"Streamlining Video Production Merging YouTube Editing & iMovie's Best Practices"
Streamlining Video Production: Merging YouTube Editing & iMovie’s Best Practices
Easy Way to Edit YouTube Videos in iMovie

Richard Bennett
Mar 27, 2024• Proven solutions
iMovie is the built-in video editor that allows you to combine several video clips. It is available for both Mac and iOS devices. This app was first released in 1999 when it came with the iMac DV model.
With the use of the iMovie, you are able to create movies that include sound effects, menus, transitions, titles, themes, and music, just to name a few. The resulting movie can be saved onto physical media or as a file on the hard drive.
If you are a Mac user, then you can easily edit YouTube videos in iMovie. All you need to do is to follow the simple steps below. In this article, you will learn how to import videos, organize videos, add YouTube titles and add transitions.
Part 1. Steps on Editing YouTube Videos Using iMovie
To edit a video for YouTube with iMovie, you can follow these steps.
Step 1: Import Video Clips into iMovie
If you have recorded the video clips with the use of a videocam, then connect the camera to the Mac and open the app. You can import the videos by manually selecting the clips that will be part of the YouTube video.
Note: If you want to import videos that you have already published on your YouTube channel, then you can download them from the channel, and save them as MP4. However, if the videos were uploaded by other users, then you need to use a video converter, this article will let you know the 8 best video converters to convert video to MP4.
Step 2: Edit the Video Clips
Once you have all the clips that you need, the next step is to edit YouTube videos in iMovie. When you import the clips, you have created an Event in the app. If you want to include a clip in your final video, just drag the file to the project browser, where you can edit the video.

You can also add videos from other Events into the current project. You can select the parts of the video by dragging across the video from the chosen start to stop points. Edit the video until you are satisfied with the results.
Step 3: Enhance the Video
Once you have edited the video, you can then add background music, themes, sound effects, onscreen text, transitions between clips, and photos. The best thing about iMovie is that it comes with a sound effects library. It also allows you to upload audio from your iTunes library, iLife, and GarageBand.
iMovie allows you to add text to any part of the video, whether it is a title screen at the start, credits at the end, and everything in between. Try to enhance the video until you think it is ready to be uploaded to YouTube.
- Add YouTube title : If you want to add a title for YouTube Video, all you need to do is click Title in the toolbar, and then highlight My Movie on the left. From here, enter the title you like.
- Organize videos : You also can rearrange video clips in the timeline. Just drag the video on the timeline to wherever you want.
- Add transitions : If you have more than one video clip, you definitely need transitions between them. Click the Transitions tab, and then select one transition you like. In the end, drag it to stop between two clips.
Step 4: Export and Upload the Video to YouTube

When you edit YouTube videos in iMovie, you have the option to export the video straight to the video streaming website. All you need to do is to click on the Share button found at the top of the screen. Then select YouTube. Add your YouTube account in iMovie by entering your username and password. Then you choose a title, description, and tags for the video.
You can choose the resolution and size of the video that includes HD 720p and HD 1080p, mobile, medium, and large. Click on Publish to upload the video to YouTube. Uploading the video will take several minutes to a couple of hours, depending on the resolution and size of the video.
Part 2. A Better Choice to Edit YouTube Videos
There’s a better way to edit YouTube videos. It involves the use of Wondershare Filmora . It is user-friendly and allows beginners to make videos professional-looking videos.


This software has more than 300 video effects for family, weddings, love, and travel, etc. You can also add animated captions to photos that will help tell the story. It comes with an array of intro and credit templates that will enhance your video.
Lastly, you can easily share the resulting movie on YouTube, DVD, other devices, and a lot more.
Richard Bennett
Richard Bennett is a writer and a lover of all things video.
Follow @Richard Bennett
Richard Bennett
Mar 27, 2024• Proven solutions
iMovie is the built-in video editor that allows you to combine several video clips. It is available for both Mac and iOS devices. This app was first released in 1999 when it came with the iMac DV model.
With the use of the iMovie, you are able to create movies that include sound effects, menus, transitions, titles, themes, and music, just to name a few. The resulting movie can be saved onto physical media or as a file on the hard drive.
If you are a Mac user, then you can easily edit YouTube videos in iMovie. All you need to do is to follow the simple steps below. In this article, you will learn how to import videos, organize videos, add YouTube titles and add transitions.
Part 1. Steps on Editing YouTube Videos Using iMovie
To edit a video for YouTube with iMovie, you can follow these steps.
Step 1: Import Video Clips into iMovie
If you have recorded the video clips with the use of a videocam, then connect the camera to the Mac and open the app. You can import the videos by manually selecting the clips that will be part of the YouTube video.
Note: If you want to import videos that you have already published on your YouTube channel, then you can download them from the channel, and save them as MP4. However, if the videos were uploaded by other users, then you need to use a video converter, this article will let you know the 8 best video converters to convert video to MP4.
Step 2: Edit the Video Clips
Once you have all the clips that you need, the next step is to edit YouTube videos in iMovie. When you import the clips, you have created an Event in the app. If you want to include a clip in your final video, just drag the file to the project browser, where you can edit the video.
You can also add videos from other Events into the current project. You can select the parts of the video by dragging across the video from the chosen start to stop points. Edit the video until you are satisfied with the results.
Step 3: Enhance the Video
Once you have edited the video, you can then add background music, themes, sound effects, onscreen text, transitions between clips, and photos. The best thing about iMovie is that it comes with a sound effects library. It also allows you to upload audio from your iTunes library, iLife, and GarageBand.
iMovie allows you to add text to any part of the video, whether it is a title screen at the start, credits at the end, and everything in between. Try to enhance the video until you think it is ready to be uploaded to YouTube.
- Add YouTube title : If you want to add a title for YouTube Video, all you need to do is click Title in the toolbar, and then highlight My Movie on the left. From here, enter the title you like.
- Organize videos : You also can rearrange video clips in the timeline. Just drag the video on the timeline to wherever you want.
- Add transitions : If you have more than one video clip, you definitely need transitions between them. Click the Transitions tab, and then select one transition you like. In the end, drag it to stop between two clips.
Step 4: Export and Upload the Video to YouTube
When you edit YouTube videos in iMovie, you have the option to export the video straight to the video streaming website. All you need to do is to click on the Share button found at the top of the screen. Then select YouTube. Add your YouTube account in iMovie by entering your username and password. Then you choose a title, description, and tags for the video.
You can choose the resolution and size of the video that includes HD 720p and HD 1080p, mobile, medium, and large. Click on Publish to upload the video to YouTube. Uploading the video will take several minutes to a couple of hours, depending on the resolution and size of the video.
Part 2. A Better Choice to Edit YouTube Videos
There’s a better way to edit YouTube videos. It involves the use of Wondershare Filmora . It is user-friendly and allows beginners to make videos professional-looking videos.
This software has more than 300 video effects for family, weddings, love, and travel, etc. You can also add animated captions to photos that will help tell the story. It comes with an array of intro and credit templates that will enhance your video.
Lastly, you can easily share the resulting movie on YouTube, DVD, other devices, and a lot more.
Richard Bennett
Richard Bennett is a writer and a lover of all things video.
Follow @Richard Bennett
Launching Successful Online Gaming Shows on YouTube
How to Live Stream on YouTube Gaming?
Richard Bennett
Mar 27, 2024• Proven solutions
1. Live Stream on YouTube Gaming with OBS
You need to follow these simple Step s to use OBS for YouTube Live Streaming:
**Step 1:**First of all you need to login to your YouTube account. You might be aware of the fact that same YouTube account is used for YouTube gaming needs.
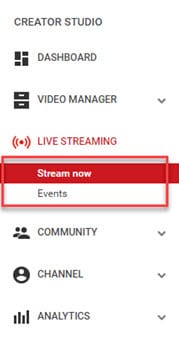
**Step 2:**Once entered inside your account then you need to visit the Go live streaming options and then from drop down menu simply choose Stream Now option.
**Step 3:**It is time to fill the details on screen; put impressive words for your live stream description so that it can grab attention of more viewers. Then select category as ‘Gaming’.

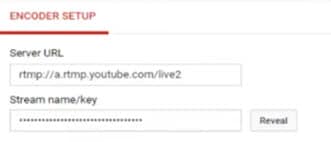
**Step 4:**Now you need to copy the stream key.
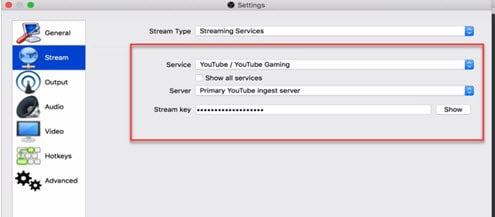
**Step 5:**Now open your OBS tool and then select YouTube as your active game streaming service. Users here need to paste that copied streaming key of Step 5 into the space provided on OBS settings page.
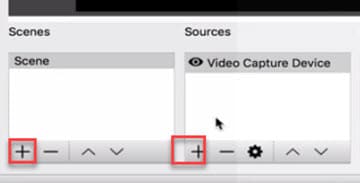
**Step 6:**It is time to make your desktop a video source.
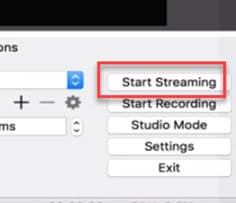
**Step 7:**Once all these settings are completed then you need to hit the start streaming option.
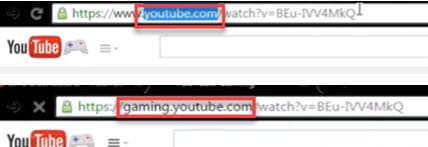
**Step 8:**The service may take few seconds to bring your live on YouTube and after this small duration you will be connected to your channel with your streamed content. Then change your url from youtube.com to gaming.youtube.com
**Step 9:**You are all set to be live on your YouTube gaming profile.
2. Live Stream on YouTube with Elgato Game Capture HD
A: Basic Settings for Elgato Game Capture HD
The Step s below will help you to get ready for streaming with all basic settings that are required by Elgato Game Capture HD tool.
**Step 1:**First of all, you need to open your browser, search for Elgato Game Capture HD software on its official website and then download it for your system. Get it installed.
**Step 2:**Once installation process is complete then launch your software.
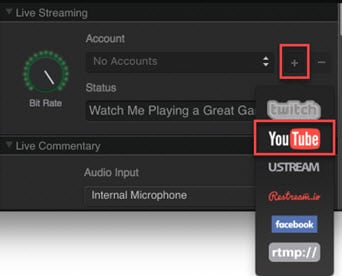
**Step 3:**Now you need to hit the add button on screen and select YouTube from drop down menu.
Step 4: It is time to sign in with your Google Account.
**Step 5:**After sign up process, allow the Elgato Game Capture tool to make connection with your YouTube account.

**Step 6:**Soon you will be able to access you account from Elgato platform.

**Step 7:**It is time to make adjustments for streaming settings.
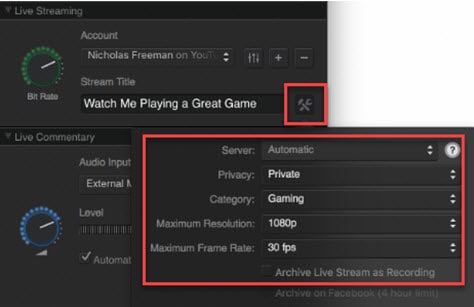
B: Test your Bandwidth and make adjustments for Stream settings
It is essential to check speed of your internet connection during live streaming because if it goes slow then your content will become annoying to viewers and it will decay the reputation of your channel. So prefer to use following Step s to complete the basic settings and to test your internet connection.
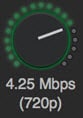
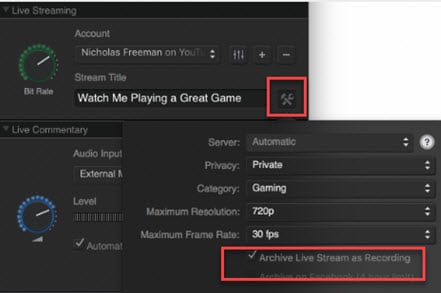
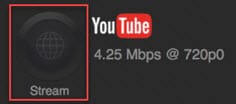
**Step 1:**Open your browser and then visit the speedtest.net platform. You can also use other similar kind of websites to ensure the speed of your internet. Note that you will find a Bit Rate dial in the live streaming section, here you can make adjustments for bit rates to bring it to desired level.
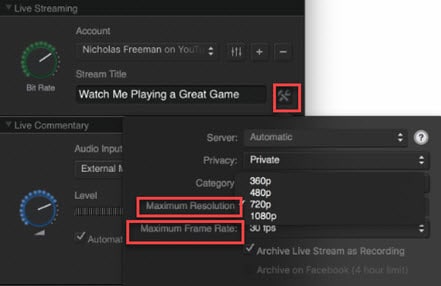
**Step 2:**It is also possible to make customized settings for frame rate and resolution as per need of your stream content.
**Step 3:**One can also prefer to archive his streaming.
**Step 4:**As soon as you have completed all above settings then you need to hit the stream button on screen.
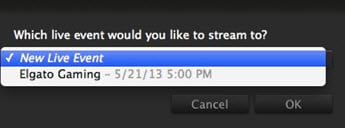
**Step 5:**Soon your software will ask you to select the event that you want to stream, choose your desired event and then press Ok. Soon you will be live on YouTube.
Richard Bennett
Richard Bennett is a writer and a lover of all things video.
Follow @Richard Bennett
Richard Bennett
Mar 27, 2024• Proven solutions
1. Live Stream on YouTube Gaming with OBS
You need to follow these simple Step s to use OBS for YouTube Live Streaming:
**Step 1:**First of all you need to login to your YouTube account. You might be aware of the fact that same YouTube account is used for YouTube gaming needs.
**Step 2:**Once entered inside your account then you need to visit the Go live streaming options and then from drop down menu simply choose Stream Now option.
**Step 3:**It is time to fill the details on screen; put impressive words for your live stream description so that it can grab attention of more viewers. Then select category as ‘Gaming’.
**Step 4:**Now you need to copy the stream key.
**Step 5:**Now open your OBS tool and then select YouTube as your active game streaming service. Users here need to paste that copied streaming key of Step 5 into the space provided on OBS settings page.
**Step 6:**It is time to make your desktop a video source.
**Step 7:**Once all these settings are completed then you need to hit the start streaming option.
**Step 8:**The service may take few seconds to bring your live on YouTube and after this small duration you will be connected to your channel with your streamed content. Then change your url from youtube.com to gaming.youtube.com
**Step 9:**You are all set to be live on your YouTube gaming profile.
2. Live Stream on YouTube with Elgato Game Capture HD
A: Basic Settings for Elgato Game Capture HD
The Step s below will help you to get ready for streaming with all basic settings that are required by Elgato Game Capture HD tool.
**Step 1:**First of all, you need to open your browser, search for Elgato Game Capture HD software on its official website and then download it for your system. Get it installed.
**Step 2:**Once installation process is complete then launch your software.
**Step 3:**Now you need to hit the add button on screen and select YouTube from drop down menu.
Step 4: It is time to sign in with your Google Account.
**Step 5:**After sign up process, allow the Elgato Game Capture tool to make connection with your YouTube account.
**Step 6:**Soon you will be able to access you account from Elgato platform.
**Step 7:**It is time to make adjustments for streaming settings.
B: Test your Bandwidth and make adjustments for Stream settings
It is essential to check speed of your internet connection during live streaming because if it goes slow then your content will become annoying to viewers and it will decay the reputation of your channel. So prefer to use following Step s to complete the basic settings and to test your internet connection.
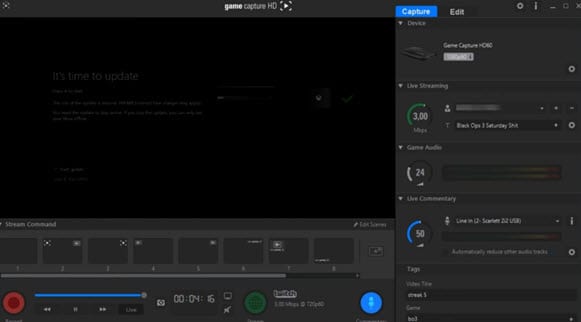
**Step 1:**Open your browser and then visit the speedtest.net platform. You can also use other similar kind of websites to ensure the speed of your internet. Note that you will find a Bit Rate dial in the live streaming section, here you can make adjustments for bit rates to bring it to desired level.
**Step 2:**It is also possible to make customized settings for frame rate and resolution as per need of your stream content.
**Step 3:**One can also prefer to archive his streaming.
**Step 4:**As soon as you have completed all above settings then you need to hit the stream button on screen.
**Step 5:**Soon your software will ask you to select the event that you want to stream, choose your desired event and then press Ok. Soon you will be live on YouTube.
Richard Bennett
Richard Bennett is a writer and a lover of all things video.
Follow @Richard Bennett
Richard Bennett
Mar 27, 2024• Proven solutions
1. Live Stream on YouTube Gaming with OBS
You need to follow these simple Step s to use OBS for YouTube Live Streaming:
**Step 1:**First of all you need to login to your YouTube account. You might be aware of the fact that same YouTube account is used for YouTube gaming needs.
**Step 2:**Once entered inside your account then you need to visit the Go live streaming options and then from drop down menu simply choose Stream Now option.
**Step 3:**It is time to fill the details on screen; put impressive words for your live stream description so that it can grab attention of more viewers. Then select category as ‘Gaming’.
**Step 4:**Now you need to copy the stream key.
**Step 5:**Now open your OBS tool and then select YouTube as your active game streaming service. Users here need to paste that copied streaming key of Step 5 into the space provided on OBS settings page.
**Step 6:**It is time to make your desktop a video source.
**Step 7:**Once all these settings are completed then you need to hit the start streaming option.
**Step 8:**The service may take few seconds to bring your live on YouTube and after this small duration you will be connected to your channel with your streamed content. Then change your url from youtube.com to gaming.youtube.com
**Step 9:**You are all set to be live on your YouTube gaming profile.
2. Live Stream on YouTube with Elgato Game Capture HD
A: Basic Settings for Elgato Game Capture HD
The Step s below will help you to get ready for streaming with all basic settings that are required by Elgato Game Capture HD tool.
**Step 1:**First of all, you need to open your browser, search for Elgato Game Capture HD software on its official website and then download it for your system. Get it installed.
**Step 2:**Once installation process is complete then launch your software.
**Step 3:**Now you need to hit the add button on screen and select YouTube from drop down menu.
Step 4: It is time to sign in with your Google Account.
**Step 5:**After sign up process, allow the Elgato Game Capture tool to make connection with your YouTube account.
**Step 6:**Soon you will be able to access you account from Elgato platform.
**Step 7:**It is time to make adjustments for streaming settings.
B: Test your Bandwidth and make adjustments for Stream settings
It is essential to check speed of your internet connection during live streaming because if it goes slow then your content will become annoying to viewers and it will decay the reputation of your channel. So prefer to use following Step s to complete the basic settings and to test your internet connection.
**Step 1:**Open your browser and then visit the speedtest.net platform. You can also use other similar kind of websites to ensure the speed of your internet. Note that you will find a Bit Rate dial in the live streaming section, here you can make adjustments for bit rates to bring it to desired level.
**Step 2:**It is also possible to make customized settings for frame rate and resolution as per need of your stream content.
**Step 3:**One can also prefer to archive his streaming.
**Step 4:**As soon as you have completed all above settings then you need to hit the stream button on screen.
**Step 5:**Soon your software will ask you to select the event that you want to stream, choose your desired event and then press Ok. Soon you will be live on YouTube.
Richard Bennett
Richard Bennett is a writer and a lover of all things video.
Follow @Richard Bennett
Also read:
- [New] Creative Video Ends Top 6 Budget-Friendly Options
- [New] Cutting-Edge Voice Altering Apps for Vloggers
- 2024 Approved Dividing Opinions Is Mirrorless Better than DSLR for Vids?
- Breaking Language Barriers: Mastering Complex Word Sounds
- Building Your Virtual Persona with Minimal Hassle for 2024
- Evaluating Mr. Beast's Monetary World
- How to Change Netflix Location to Get More Country Version On Realme Narzo N55 | Dr.fone
- How To Upgrade or Downgrade iPhone 12 mini? | Dr.fone
- In 2024, Elevate Your Game with Immediate, Skilled Valorant Thumbnails
- In 2024, FRP Hijacker by Hagard Download and Bypass your Lava FRP Locks
- Laughing Along to Mimicked Melodies for 2024
- Top Picks Downloading Templates From YouTube Vids
- Title: Streamlining Video Production Merging YouTube Editing & iMovie's Best Practices
- Author: Steven
- Created at : 2024-12-05 17:55:47
- Updated at : 2024-12-10 16:58:40
- Link: https://youtube-clips.techidaily.com/streamlining-video-production-merging-youtube-editing-and-imovies-best-practices/
- License: This work is licensed under CC BY-NC-SA 4.0.