
:max_bytes(150000):strip_icc():format(webp)/laptop-569944733df78cafda90169f.jpg)
Streamline Your Online Presence with Twitch/YouTube Integration
Streamline Your Online Presence with Twitch/YouTube Integration
Create High-Quality Video - Wondershare Filmora
An easy and powerful YouTube video editor
Numerous video and audio effects to choose from
Detailed tutorials provided by the official channel
Amidst many online applications is Twitch. This live streaming platform takes your experience to another level. You can use it to make crafts, play games, attract broadcasters, and many more. Twitch was launched in 2011, and since then, it has attracted millions of users, managing a database of about 4 million broadcasters by early 2020. With it, users can stream their activities as others watch in real-time. Just browse a category to find a stream.
You can also follow streamers that you like on the platform and get updates and notifications immediately after they are posted. But how do you start a career on a platform like Twitch? You need to broadcast and gather a large following. You can use built-in audiences from other platforms like Facebook. Let’s dive into the core of the matter and look at how to upload Twitch streams to YouTube and build your platform.

In this article
02 What is the benefit of uploading your Twitch Streams to YouTube
03 How to upload your Twitch Streams to YouTube
What is Twitch VOD?
Twitch Video on Demand (VOD) is a recording of previously streamed content. It provides briefings if you missed catching the Twitch live stream. Just watch the VOD from your favorite streamer and be engaged the best way possible. However, VODs don’t last forever. They are removed after two weeks of broadcast. But streamers with Partner Status can have their VODs last up to 60 days.
- How to enable Twitch VOD?
VODs are the best form to archive streams that your fans missed. Even though they are not enabled by default, you can manually enable them and not let your fans miss any important event from your channel. They’ll find it under the “Videos” tab on any Twitch channel. Follow these steps to enable VOD on your channel.
Step 1. Go to your profile icon in the top right corner of Twitch
Check in the “Channel & Video” section and locate the “Stream Key & Preferences” menu.

Step 2. Click on “Creator Dashboard”
Remember, you can enable VODs from your creator dashboard. Just go under the “Settings” tab and click on the “Stream section” of the creator dashboard. Check under the subtitle “VOD Settings” and get the option to store past broadcasts. You can also toggle the slider to store your past broadcasts.

Step 3 Click on the “Settings” tab on the left-hand side and go to Stream
You’ll get various drop-down menu options. Click on the “Settings” tab and choose the “Stream” option. The system will navigate to a new page, thus setting your preferences for VODs and clips.
Step 4. Go to “VOD Settings” and toggle on the “Store Past Broadcast.”
Ensure you have the toggle option turned ON under the “VOD Settings.” If it’s “ON,” you’ll realize the toggle will be purple, with a checkmark in it. Twitch will be confirmed to be enabled if it’s purple.

- Frequently Asked Question about Twitch VOD
These are some questions frequently asked by Twitch users.
1. How long will Twitch store my VOD
Your Twitch can either be stored for 14 or 60 days, depending on your level. For Twitch Prime, Twitch Partner or a Twitch Turbo user has their past broadcasts automatically saved for 60 days before deletion. But if you are not connected to these three options, your past broadcasts will be saved for only 14 days before deletion.
Since your past broadcasts cannot be live for more than 60 days, you have the option to download the video to your computer before the validity days expire and Twitch deletes it. You can use an External Hard drive to save the past broadcast content. Likewise, it is possible to turn your past broadcast content into Highlight and, in turn, permanently store them on Twitch.
2. What is the difference between Twitch VOD, Highlights, and Clips
Twitch VOD is a previously saved video of your live stream content. You choose to save either part or the entire content of your previously streamed content. More so, you don’t need any additional requirements to use VOD.
Highlights are short videos that have been edited from your past broadcast content. You can save them on Twitch permanently. Streamers majorly use highlights to save video game achievements. Unlike VOD Twitch that can be saved up to 60 days, Highlights usually lasts no more than 3 minutes.
- To make Highlights on Twitch, first, navigate to your Dashboard.
- Then scroll down and click on “Content” > “Video Producer.
- Next, press on “All Videos” to change them to “Past Broadcasts.”
- Now press the “Highlight” button, and Twitch will immediately open a new tab for “Twitch Highlighter Tool.”
- Then select the video part to include as “Highlight” and press the “Create Highlights” button.
- Wait a while for the process to be completed, and Voila! You have your Highlights created.
When it comes to Twitch Clip, you can capture special moments in a stream you are currently watching. On the same note, you can share clips with friends and other users on social media platforms. Such shared clips contain a link where others view the source or video from.
The clips you create will automatically be saved on the streamer’s channel on the “Clips” page, where other viewers can see them too. Nonetheless, you can download “clips” to your computer and, in turn, upload them whenever you want to. And note that you can help your stream grow via “Clips” by letting your viewers clip and share your stream moments.
- To create “Clips” on Twitch, identify which Streamers channel you wish to create a clip from.
- Then click on the “Clapper board” icon. Next, edit your clip between 5 and 60 seconds long.
- Finally, create a title and publish your Clip. You’ll also enjoy the privilege to share your clip’s link to other social media networks.
What is the benefit of uploading your Twitch Streams to YouTube
You stand to gain a lot when you upload your Twitch Streams to YouTube.
1) To enlighten your followers
Your followers will see your streams and make the best decisions. Viewers can check out your recordings and other highlights from past streams. It will help them decide whether they like what they see and probably join your live streams.
2) Twitch provides content for you to share and monetize on YouTube
Since Twitch streaming is more popular nowadays, many people throng it for content. It is not wise to rely entirely on Twitch to discover as a Twitch Streamer. Posting to YouTube will make it known within a short time. You would have announced your streams most nobly and kept your followers up to date, attracting new ones as well.
3) To keep your followers engaged even when you are offline
Even though live streaming is important, some viewers may not attend the live sessions due to different time zones or other commitments. In this regard, when uploaded to YouTube, Twitch will give them a chance to watch your content just whenever they log in. They, therefore, have the option to watch a Twitch VOD of the live stream they missed.
How to upload your Twitch Streams to YouTube
Check how to upload Twitch streams to YouTube from the Twitch website.
Step 1. Identify the little arrow next to your name on the Twitch website and click on it. Then click on the “Video Producer” to take you to a list of your Twitch videos.

Step 2. Check out and click on the “three-dots” on the video you wish to upload to YouTube. Click on the “Export” tab.
Step 3. A menu will then pop up. Here, you can fill in the description, title, and tags that you would like to appear on the YouTube video. There is an option for Twitch to split your video automatically. If you wish so, then tick the “Checkbox” to enable it. Then click on the “Start Export” option to export your Twitch streams to YouTube.

Bouns! Edit Your Twitch Video with Filmora
The quality of your video matters when it comes to uploading Twitch Streams to YouTube. Using a third-party tool to edit your video is the first step in ensuring your videos communicate meaningful content. Filmora comes in handy to bring your imaginations to life. Use it for simple creation without limits, even for beginners.
- Use it to track moving objects in video clips
- Easily match any image of the selected clip
- Its powerful tools let you edit your video by cropping, splitting, adjusting speed, etc
- The video keyframe easily indicates the beginning and end of the parameters
For Win 7 or later (64-bit)
For macOS 10.12 or later
Conclusion
● Don’t just focus on how to upload Twitch streams to YouTube but also consider the quality of video you are posting to YouTube. Remember, your video quality will speak much more of you than any other description. So, strive to produce quality videos using the best tool, Filmora. The app is easy to use and will elevate your views and imaginations through your video in the most impactful way.
Amidst many online applications is Twitch. This live streaming platform takes your experience to another level. You can use it to make crafts, play games, attract broadcasters, and many more. Twitch was launched in 2011, and since then, it has attracted millions of users, managing a database of about 4 million broadcasters by early 2020. With it, users can stream their activities as others watch in real-time. Just browse a category to find a stream.
You can also follow streamers that you like on the platform and get updates and notifications immediately after they are posted. But how do you start a career on a platform like Twitch? You need to broadcast and gather a large following. You can use built-in audiences from other platforms like Facebook. Let’s dive into the core of the matter and look at how to upload Twitch streams to YouTube and build your platform.
In this article
02 What is the benefit of uploading your Twitch Streams to YouTube
03 How to upload your Twitch Streams to YouTube
What is Twitch VOD?
Twitch Video on Demand (VOD) is a recording of previously streamed content. It provides briefings if you missed catching the Twitch live stream. Just watch the VOD from your favorite streamer and be engaged the best way possible. However, VODs don’t last forever. They are removed after two weeks of broadcast. But streamers with Partner Status can have their VODs last up to 60 days.
- How to enable Twitch VOD?
VODs are the best form to archive streams that your fans missed. Even though they are not enabled by default, you can manually enable them and not let your fans miss any important event from your channel. They’ll find it under the “Videos” tab on any Twitch channel. Follow these steps to enable VOD on your channel.
Step 1. Go to your profile icon in the top right corner of Twitch
Check in the “Channel & Video” section and locate the “Stream Key & Preferences” menu.
Step 2. Click on “Creator Dashboard”
Remember, you can enable VODs from your creator dashboard. Just go under the “Settings” tab and click on the “Stream section” of the creator dashboard. Check under the subtitle “VOD Settings” and get the option to store past broadcasts. You can also toggle the slider to store your past broadcasts.
Step 3 Click on the “Settings” tab on the left-hand side and go to Stream
You’ll get various drop-down menu options. Click on the “Settings” tab and choose the “Stream” option. The system will navigate to a new page, thus setting your preferences for VODs and clips.
Step 4. Go to “VOD Settings” and toggle on the “Store Past Broadcast.”
Ensure you have the toggle option turned ON under the “VOD Settings.” If it’s “ON,” you’ll realize the toggle will be purple, with a checkmark in it. Twitch will be confirmed to be enabled if it’s purple.
- Frequently Asked Question about Twitch VOD
These are some questions frequently asked by Twitch users.
1. How long will Twitch store my VOD
Your Twitch can either be stored for 14 or 60 days, depending on your level. For Twitch Prime, Twitch Partner or a Twitch Turbo user has their past broadcasts automatically saved for 60 days before deletion. But if you are not connected to these three options, your past broadcasts will be saved for only 14 days before deletion.
Since your past broadcasts cannot be live for more than 60 days, you have the option to download the video to your computer before the validity days expire and Twitch deletes it. You can use an External Hard drive to save the past broadcast content. Likewise, it is possible to turn your past broadcast content into Highlight and, in turn, permanently store them on Twitch.
2. What is the difference between Twitch VOD, Highlights, and Clips
Twitch VOD is a previously saved video of your live stream content. You choose to save either part or the entire content of your previously streamed content. More so, you don’t need any additional requirements to use VOD.
Highlights are short videos that have been edited from your past broadcast content. You can save them on Twitch permanently. Streamers majorly use highlights to save video game achievements. Unlike VOD Twitch that can be saved up to 60 days, Highlights usually lasts no more than 3 minutes.
- To make Highlights on Twitch, first, navigate to your Dashboard.
- Then scroll down and click on “Content” > “Video Producer.
- Next, press on “All Videos” to change them to “Past Broadcasts.”
- Now press the “Highlight” button, and Twitch will immediately open a new tab for “Twitch Highlighter Tool.”
- Then select the video part to include as “Highlight” and press the “Create Highlights” button.
- Wait a while for the process to be completed, and Voila! You have your Highlights created.
When it comes to Twitch Clip, you can capture special moments in a stream you are currently watching. On the same note, you can share clips with friends and other users on social media platforms. Such shared clips contain a link where others view the source or video from.
The clips you create will automatically be saved on the streamer’s channel on the “Clips” page, where other viewers can see them too. Nonetheless, you can download “clips” to your computer and, in turn, upload them whenever you want to. And note that you can help your stream grow via “Clips” by letting your viewers clip and share your stream moments.
- To create “Clips” on Twitch, identify which Streamers channel you wish to create a clip from.
- Then click on the “Clapper board” icon. Next, edit your clip between 5 and 60 seconds long.
- Finally, create a title and publish your Clip. You’ll also enjoy the privilege to share your clip’s link to other social media networks.
What is the benefit of uploading your Twitch Streams to YouTube
You stand to gain a lot when you upload your Twitch Streams to YouTube.
1) To enlighten your followers
Your followers will see your streams and make the best decisions. Viewers can check out your recordings and other highlights from past streams. It will help them decide whether they like what they see and probably join your live streams.
2) Twitch provides content for you to share and monetize on YouTube
Since Twitch streaming is more popular nowadays, many people throng it for content. It is not wise to rely entirely on Twitch to discover as a Twitch Streamer. Posting to YouTube will make it known within a short time. You would have announced your streams most nobly and kept your followers up to date, attracting new ones as well.
3) To keep your followers engaged even when you are offline
Even though live streaming is important, some viewers may not attend the live sessions due to different time zones or other commitments. In this regard, when uploaded to YouTube, Twitch will give them a chance to watch your content just whenever they log in. They, therefore, have the option to watch a Twitch VOD of the live stream they missed.
How to upload your Twitch Streams to YouTube
Check how to upload Twitch streams to YouTube from the Twitch website.
Step 1. Identify the little arrow next to your name on the Twitch website and click on it. Then click on the “Video Producer” to take you to a list of your Twitch videos.
Step 2. Check out and click on the “three-dots” on the video you wish to upload to YouTube. Click on the “Export” tab.
Step 3. A menu will then pop up. Here, you can fill in the description, title, and tags that you would like to appear on the YouTube video. There is an option for Twitch to split your video automatically. If you wish so, then tick the “Checkbox” to enable it. Then click on the “Start Export” option to export your Twitch streams to YouTube.
Bouns! Edit Your Twitch Video with Filmora
The quality of your video matters when it comes to uploading Twitch Streams to YouTube. Using a third-party tool to edit your video is the first step in ensuring your videos communicate meaningful content. Filmora comes in handy to bring your imaginations to life. Use it for simple creation without limits, even for beginners.
- Use it to track moving objects in video clips
- Easily match any image of the selected clip
- Its powerful tools let you edit your video by cropping, splitting, adjusting speed, etc
- The video keyframe easily indicates the beginning and end of the parameters
For Win 7 or later (64-bit)
For macOS 10.12 or later
Conclusion
● Don’t just focus on how to upload Twitch streams to YouTube but also consider the quality of video you are posting to YouTube. Remember, your video quality will speak much more of you than any other description. So, strive to produce quality videos using the best tool, Filmora. The app is easy to use and will elevate your views and imaginations through your video in the most impactful way.
Revealing the Secrets: Accessing Forgotten YouTube Vids
You may have noticed that some videos in your YouTube playlist are unavailable. This is because the platform allows content creators to categorize their videos into public, private, or unlisted based on their preferences.
To help you uncover the content that you otherwise wouldn’t have access to, we’ve compiled a detailed guide to show you how to find YouTube hidden videos. We’ve also explained why so many unlisted videos are now labeled as private.
So, let’s get started with our guide without any further delay!
4 Types of Videos on YouTube
Firstly, let’s learn about the background of the types of YouTube videos. YouTube videos fall into the following four broad categories:
Public Videos: YouTube contains videos on many themes and topics. It makes it impossible to watch all uploaded content under a specific category.
So, whenever you search for a video or theme, a list of content is displayed in the search result: “Public Videos.” It means that they are visible to everyone around the globe (depending on the terms and conditions). Moreover, you can share, like, unlike, download, or add these videos to your playlists for later watching.
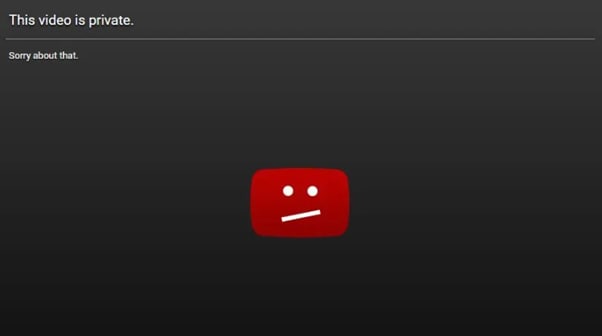
Private Videos: Private videos on YouTube can only be seen by people invited by the person who uploaded the video. This means that only those with access to the video’s shareable link can watch it.
Private videos are not visible to the public or to people who are not logged into YouTube. Hence, it is a great way to share sensitive or personal information with a select group.
Unlisted Video Unlisted videos on YouTube are not publicly visible on the site. They can only be seen by people who have the URL. This category works as a bridge between private and public videos. It is accessible only through sharable links without appealing in any YouTube public playlist or search result.
You might upload an unlisted video to YouTube if you do not want everyone to see it. However, you still want to share it with specific people, like your friends or family. You might also use an unlisted video to test out a new idea before making it public on the video-sharing platform.
Age-Restricted Videos: Age-restricted videos on YouTube are not suitable for all audiences. It may contain content that includes violence, profanity, sexual content, and other inappropriate material. YouTube requires that users be at least 18 years old to view these types of videos.
If you search on YouTube and come across an age-restricted video, you will be asked to confirm your age before viewing its content.

How To Find Unlisted YouTube Videos
Now that we’ve learned about the four types of YouTube content, let’s discuss how you can find unlisted YouTube videos:
How To Find Other People’s Unlisted YouTube Videos?
Since unavailable videos in YouTube playlists are hidden from general public viewers, you cannot find them on YouTube or Google search results.
However, the following workaround can help you watch these YouTube videos without facing much trouble:
Step 1: First, open a browser on your PC and visit the Unlisted Videos website. This platform contains over 600,000 unlisted YouTube videos from 2016 and earlier. You can also submit your unlisted video on the site.

Step 2: Use the search bar at the top of your screen to search for other people’s YouTube playlists. You can also click the “All Video” or “Random Videos” option to find the hidden content of a user.
How To See Unlisted Videos on My YouTube Channel?
To see your unlisted videos on your YouTube channel, do the following steps in sequence:
Step 1: In the first step, install the YouTube Studio app on your mobile device or visit its website using a browser on your computer. Next, launch the app and sign in to your channel’s account using your email and password.
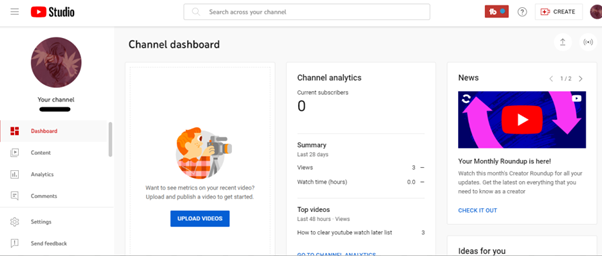
Step 2: In the next step, tap/ click the “Content” tab and tap/click the “Funnel” icon at the top of the video list to access the visibility options.
Step 3:
- Now, choose the “Visibility” option.
- Select “Unlisted” to change the visibility.
- Click the “Save” option to apply changes.
- See the hidden videos on your channel.

Since YouTube has marked the videos uploaded before 2017 as private as of July 2021, you can find your old unlisted videos under the “Private” list. To access it, choose “Private” as the visibility option.
How To Find Unlisted YouTube Videos with Google
Sometimes, unlisted YouTube videos appear on Google when someone shares the link to them on a public forum or website.
To confirm this, open a browser on your computer or a mobile device, head to the Google website, and search for your query. With some luck, you can find these unlisted YouTube videos in the search results.
You May Want to Know: Why Are So Many Unlisted Videos Now Private?
All unlisted videos uploaded to YouTube before January 2017 were switched to private. Therefore, if you have any older unlisted videos added to your Playlist or embedded on your website, you won’t be able to access them now.
However, the channel’s owner can restore access to the video by switching it back to unlisted or public. If now, the video will be labeled as “Private” indefinitely or until its settings are changed.
Conclusion
In this detailed guide, we’ve explored the four types of videos on YouTube and how to find YouTube hidden videos in three different ways. We’ve also explained why so many videos are now listed as “Private” and inaccessible.
Hopefully, you’ve found this article helpful and can now access the unlisted videos on YouTube without hassle.
You may have noticed that some videos in your YouTube playlist are unavailable. This is because the platform allows content creators to categorize their videos into public, private, or unlisted based on their preferences.
To help you uncover the content that you otherwise wouldn’t have access to, we’ve compiled a detailed guide to show you how to find YouTube hidden videos. We’ve also explained why so many unlisted videos are now labeled as private.
So, let’s get started with our guide without any further delay!
4 Types of Videos on YouTube
Firstly, let’s learn about the background of the types of YouTube videos. YouTube videos fall into the following four broad categories:
Public Videos: YouTube contains videos on many themes and topics. It makes it impossible to watch all uploaded content under a specific category.
So, whenever you search for a video or theme, a list of content is displayed in the search result: “Public Videos.” It means that they are visible to everyone around the globe (depending on the terms and conditions). Moreover, you can share, like, unlike, download, or add these videos to your playlists for later watching.
Private Videos: Private videos on YouTube can only be seen by people invited by the person who uploaded the video. This means that only those with access to the video’s shareable link can watch it.
Private videos are not visible to the public or to people who are not logged into YouTube. Hence, it is a great way to share sensitive or personal information with a select group.
Unlisted Video Unlisted videos on YouTube are not publicly visible on the site. They can only be seen by people who have the URL. This category works as a bridge between private and public videos. It is accessible only through sharable links without appealing in any YouTube public playlist or search result.
You might upload an unlisted video to YouTube if you do not want everyone to see it. However, you still want to share it with specific people, like your friends or family. You might also use an unlisted video to test out a new idea before making it public on the video-sharing platform.
Age-Restricted Videos: Age-restricted videos on YouTube are not suitable for all audiences. It may contain content that includes violence, profanity, sexual content, and other inappropriate material. YouTube requires that users be at least 18 years old to view these types of videos.
If you search on YouTube and come across an age-restricted video, you will be asked to confirm your age before viewing its content.
How To Find Unlisted YouTube Videos
Now that we’ve learned about the four types of YouTube content, let’s discuss how you can find unlisted YouTube videos:
How To Find Other People’s Unlisted YouTube Videos?
Since unavailable videos in YouTube playlists are hidden from general public viewers, you cannot find them on YouTube or Google search results.
However, the following workaround can help you watch these YouTube videos without facing much trouble:
Step 1: First, open a browser on your PC and visit the Unlisted Videos website. This platform contains over 600,000 unlisted YouTube videos from 2016 and earlier. You can also submit your unlisted video on the site.
Step 2: Use the search bar at the top of your screen to search for other people’s YouTube playlists. You can also click the “All Video” or “Random Videos” option to find the hidden content of a user.
How To See Unlisted Videos on My YouTube Channel?
To see your unlisted videos on your YouTube channel, do the following steps in sequence:
Step 1: In the first step, install the YouTube Studio app on your mobile device or visit its website using a browser on your computer. Next, launch the app and sign in to your channel’s account using your email and password.
Step 2: In the next step, tap/ click the “Content” tab and tap/click the “Funnel” icon at the top of the video list to access the visibility options.
Step 3:
- Now, choose the “Visibility” option.
- Select “Unlisted” to change the visibility.
- Click the “Save” option to apply changes.
- See the hidden videos on your channel.
Since YouTube has marked the videos uploaded before 2017 as private as of July 2021, you can find your old unlisted videos under the “Private” list. To access it, choose “Private” as the visibility option.
How To Find Unlisted YouTube Videos with Google
Sometimes, unlisted YouTube videos appear on Google when someone shares the link to them on a public forum or website.
To confirm this, open a browser on your computer or a mobile device, head to the Google website, and search for your query. With some luck, you can find these unlisted YouTube videos in the search results.
You May Want to Know: Why Are So Many Unlisted Videos Now Private?
All unlisted videos uploaded to YouTube before January 2017 were switched to private. Therefore, if you have any older unlisted videos added to your Playlist or embedded on your website, you won’t be able to access them now.
However, the channel’s owner can restore access to the video by switching it back to unlisted or public. If now, the video will be labeled as “Private” indefinitely or until its settings are changed.
Conclusion
In this detailed guide, we’ve explored the four types of videos on YouTube and how to find YouTube hidden videos in three different ways. We’ve also explained why so many videos are now listed as “Private” and inaccessible.
Hopefully, you’ve found this article helpful and can now access the unlisted videos on YouTube without hassle.
Also read:
- How to Add Timestamps to YouTube Video to Increase Views
- Boosting YouTube Income Using Studio Anywhere, Anyhow
- Income in the Cloud Making Money on YouTube Without Relying on Ads
- Exclusive YouTube Snippet Access - High Quality, Free Download!
- [New] Controlling Who Can Leave a Comment on Your YouTube Videos
- [Updated] Analyzing Whether YouTube Premium Is Right for You
- In 2024, Best Starting Points on YouTube Top 16 Opener List for Growth
- Digital Detox How to Turn Off Youtube on Computers and Phones
- DIY Audio Excellence No Mic Necessary
- Mastering the Art of YouTube Video Submissions for Maximum Reach
- Unravel the Secrets to Sequential Video Viewing (No Charges)
- Unleash Creativity - Exclusive Free YouTube Banner Templates
- First Steps in Digital Content Top 10 Easy-to-Make YouTube Projects
- Content Curation YouTube Vs. TikTok Showdown for 2024
- Starting Up The Guide to YouTube Fame in Gaming
- 2024 Approved Broadcast Brilliance with Cost-Effective Templates
- [New] Effortless Online Audio Accessibility Ideal Tools for iPhone & YouTube
- 2024 Approved Beyond the Buffering A Ranked List of Top 27 Video Streamers Excluding YouTube
- Achieving Affiliate Success with Online Videos
- The Novice's Guide to Building a YouTube Studio Setup
- YouTube Thumbnails Reimagined - 3 Neon Border Techniques
- [New] Carminati (Ajay) Mastering the Art and Science of Online Income
- In 2024, Captivating Audiences Adopting YouTube Vlogger Charisma
- [Updated] Channel Prominence Mastery A Comprehensive YouTube Guide
- [New] Converting Your Favourite Tracks Bridging Spotify with YouTube Music
- Wave Your Wands, Cut the Filmmaking Magic
- 2024 Approved Decoding the Visual Language of YouTube Thumbnails
- [New] Best Alternative Top 10 FLV to YouTube Converter Apps
- Efficiently Achieving Color Background Separation
- Do YouTubers Get Paid Monthly for 2024
- In 2024, Behind the Scenes Unveiling the Best 9 Camera Additions for Mobile Films
- Perfect Shots A Guide to Capturing Engaging YouTube Content
- Beyond Borders Blurring Techniques for Global Audienes for 2024
- Boosting YouTube Interaction with Emojis
- Step-by-Step Guide to Producing Quality Mobile Videos
- [Updated] Deciphering Digital Dominance A Detailed Examination of YouTube Engagement Metrics
- Amplify Your Video Content with Precision Insights From Social Blade & YouTube
- Creating Compelling Content with Powerful YouTube Titles for 2024
- Hone Your Message Effective Use of Templates for Shorts
- Decoding YouTube’s Economic Strategy The Rise of Short Videos for 2024
- [New] Adding Tag to YouTube Video? Better Read This First
- Culinary Callings Innovative Naming for Foodie Channels for 2024
- [Updated] Enhancing Your Visual Mark Implementing Neon-Edged YouTubes
- Commanding YouTube Realm Through Strategic Creator Studio Utilization for 2024
- Mastering YouTube Video Edits with FinalCut Pro
- Scalable Earnings via YouTube Beauty Channels
- In 2024, How to Change/Fake Your Apple iPhone 7 Plus Location on Viber | Dr.fone
- The Undisclosed Aspects What You Don’t Notice as a Story Viewer for 2024
- New Major Update Alert Filmora X Now Compatible with ARM Processors for 2024
- Recover your messages after Xiaomi has been deleted
- [Updated] ClearShot Suite - High-Quality Windows for 2024
- [New] In 2024, Master Classic PS2 Games on Android with Our Top Picks
- How To Bypass ZTE Nubia Flip 5G FRP In 3 Different Ways
- How to Change Lock Screen Wallpaper on Oppo Reno 11F 5G
- From Basics to Advanced Crafting Powerful Instagram Hashtags for 2024
- In 2024, Pokemon Go No GPS Signal? Heres Every Possible Solution On Vivo T2 5G | Dr.fone
- Maximizing Your Online Influence for Earnings Through Brand Collaborations on YouTube
- In 2024, Sync Across Platforms Downloading and Storing GIFs From Facebook
- In 2024, A Step-by-Step Guide to Finding Your Apple ID From Your iPhone 14 Plus
- The 6 Best SIM Unlock Services That Actually Work On Your Vivo Y28 5G Device
- [New] 2024 Approved FB Chronicles Merging Music and Memories
- In 2024, Why Your WhatsApp Location is Not Updating and How to Fix On Vivo T2x 5G | Dr.fone
- In 2024, Complete Fixes To Solve iPhone 12 Pro Randomly Asking for Apple ID Password
- [New] ProfessionalScreenX Insider’s Take on Software
- Updated Delving Into Crickets Vocalizations and Echoes
- All You Need To Know About Mega Greninja For Vivo Y100i | Dr.fone
- Title: Streamline Your Online Presence with Twitch/YouTube Integration
- Author: Steven
- Created at : 2024-05-25 20:26:34
- Updated at : 2024-05-26 20:26:34
- Link: https://youtube-clips.techidaily.com/streamline-your-online-presence-with-twitchyoutube-integration/
- License: This work is licensed under CC BY-NC-SA 4.0.
