
:max_bytes(150000):strip_icc()/disk-savvy-64086b20709f40489ed600c512718578.png)
"Streamline Your Content on YouTube A Detailed Tutorial"
Streamline Your Content on YouTube: A Detailed Tutorial
How To Upload Videos to YouTube [a Step-by-Step Guide]

Richard Bennett
Mar 27, 2024• Proven solutions
Want to learn how to upload videos to YouTube? Millions of people watch YouTube every day. Creating and posting YouTube videos can be a lot of fun, and if you get a lot of views and become popular you can also make money. YouTube videos are a creative way to connect with people all around the world.
These simple steps can assist you in learning how to upload YouTube videos from a desktop computer. You are going to Learn:
Edit YouTube with Powerful Video Editor
As a YouTuber, it is necessary to have an easy-to-use video editor, especially for beginners. Download Filmora for free and start your editing journey happily.


Part 1: Basic Rules You Need to Know Before Uploading
Clicking the ‘upload’ button is easy, but during the upload process, there are things you can do to help your video get views and maintain its quality. You should also keep an eye on the length and file size limits. The more basic things you need to consider carefully when you upload are the title, description, and tags of your video. These are part of what determines if and where your video comes up in people’s search results. There are also slightly more advanced video specs, like your video’s resolution, which will be helpful for you to understand as somebody who will be producing video content frequently. These sorts of specs will affect how long it takes your videos to upload and how much of the quality they maintain.
1. How Long Can my Video Be?
By default, your YouTube videos can only be 15 minutes long. You can post longer videos by going to the upload page and clicking on ‘Increase your Limit’ at the bottom. After you have followed the steps to verify your account you will be able to post videos that are a maximum of 11 hours long.
2. How Big a File Can I Upload?
Your file size was capped at 20GB, initially. If you follow the same steps for posting videos longer than 15 minutes then you can also increase your maximum file size to 128GB.
3. Other Basics
After you click the ‘upload’ button on YouTube you are taken to a page where you choose a category for your video and add a title, description, and tags. These are all important for getting hits so you should put some thought into them.
Title: Keep your title under 70 characters so none of it disappears into a ‘…’. The best titles make people curious or elicit an emotional response. Terms like ‘video’, ‘how-to’, and ‘tutorial’ are often typed into people’s searches so if they apply to your video it can help to put them in the title.
Description: A short synopsis of your video which includes your most important keyword. You have about three lines before your text is hidden by a ‘show more’ tab. If you are including the URL of your channel or other videos then you should make sure they are above the ‘show more’.
Tags: Use a lot of them. These are the keywords and terms people will be searching for when they find your video. YouTube will suggest some after you start adding. A quick way to find good keywords to use is to search for videos similar to yours and check out their tags. A while ago YouTube started hiding video tags by default but you can download a free, YouTube-certified, extension for Google Chrome which will allow you to see them from vidIQ.com.
4. Digging Deeper
To get your viewers to subscribe to your channel you will need to make sure your videos are not losing quality when you upload them. Here are some things to be aware of if you want your videos to look great on YouTube.
Resolution: the number of pixels in your image. For example when a video has a resolution of 1080p that means it has a grid of pixels that is 1920 x 1080. The more pixels you have the sharper your image.
Bitrate: Bitrate is a measurement of how compressed your file is, and the less compressed it is the more information there is per frame. Higher bitrates mean larger file sizes.
Your resolution and bitrate should complement each other. If you have a higher bitrate than is needed for your video’s resolution your file will be unnecessarily large. If your bitrate is too low for your resolution then you will not see the quality you expect.
YouTube has a list of recommended resolutions and bitrates at support.google.com/youtube/answer/1722171.
Aspect Ratio: the dimensions of your video, in terms of width and height. YouTube’s aspect ratio is 16:9, so your videos should also be 16:9. If they are not then you will get black bars on either side of your video after you upload it. The most common way that people end up with the wrong aspect ratio is by creating videos on their smartphones and holding them up and down instead of sideways.
Part 2: Steps to Upload Videos to YouTube
Uploading YouTube Video on Desktop:
1. Sign in to your YouTube account
2. Hit the upload button
3. Select your video type (Public, Private, Unlisted)
4. Manage the upload
5. Choose your thumbnail
Step 1: Sign in to your YouTube account
In order to upload videos to YouTube, the very first thing you need to do is sign in. The sign-in button is located at the top right corner of the YouTube homepage. If you have multiple accounts registered to one device, you will be asked to choose one to log in to.

Step 2: Hit the upload button
It is a simple step that you will have to follow right after you log in to YouTube. As soon as you enter YouTube, after using your Google account and password for login, you will find the upload button in the top right corner of the screen. Click on this button and it will take you to the dedicated upload page.
Step 3: Select your video type (Public, Private, Unlisted)
Choose your audience. If you wish to make your video available to everyone on YouTube, simply go to the privacy settings and choose the “Public” option from the drop-down menu.
If you do not want your video to be searchable, but still want to be able to easily share a link to it with your friends and family, choose the “Unlisted” option.
Those who wish to keep their video personal can choose the “Private” option from the drop-down menu. You can still share a private video with a limited number of people (as long as they have Google accounts).
The “Scheduled” option is available for choosing a future date and time to make the video available to viewers. Once you have selected your privacy level, simply upload your video from your device storage.

Step 4: Manage the upload
As soon as you have confirmed your video upload, you will find a progress bar on the screen. It will take some time depending on factors such as the resolution of the video and how long it is. In the meanwhile, you can write a title, description and add relevant tags for your video so that YouTube knows what search results to include it in and viewers can find it. Remember that YouTube is the second biggest search engine on the Internet, so take some time to optimize your keywords .
Step 5: Choose your thumbnail
Once your video uploading is complete, it is time to choose a creative thumbnail for your video. The system provides you with three options to choose from automatically, all of which will be screenshots from your video. It is usually better toupload your own custom thumbnail , as thumbnails are a very important factor in attracting viewers. Hit the “Done” button or use the “Publish” button to finalize your upload.
That’s how to upload a video on YouTube! Any questions?
Richard Bennett
Richard Bennett is a writer and a lover of all things video.
Follow @Richard Bennett
Richard Bennett
Mar 27, 2024• Proven solutions
Want to learn how to upload videos to YouTube? Millions of people watch YouTube every day. Creating and posting YouTube videos can be a lot of fun, and if you get a lot of views and become popular you can also make money. YouTube videos are a creative way to connect with people all around the world.
These simple steps can assist you in learning how to upload YouTube videos from a desktop computer. You are going to Learn:
Edit YouTube with Powerful Video Editor
As a YouTuber, it is necessary to have an easy-to-use video editor, especially for beginners. Download Filmora for free and start your editing journey happily.
Part 1: Basic Rules You Need to Know Before Uploading
Clicking the ‘upload’ button is easy, but during the upload process, there are things you can do to help your video get views and maintain its quality. You should also keep an eye on the length and file size limits. The more basic things you need to consider carefully when you upload are the title, description, and tags of your video. These are part of what determines if and where your video comes up in people’s search results. There are also slightly more advanced video specs, like your video’s resolution, which will be helpful for you to understand as somebody who will be producing video content frequently. These sorts of specs will affect how long it takes your videos to upload and how much of the quality they maintain.
1. How Long Can my Video Be?
By default, your YouTube videos can only be 15 minutes long. You can post longer videos by going to the upload page and clicking on ‘Increase your Limit’ at the bottom. After you have followed the steps to verify your account you will be able to post videos that are a maximum of 11 hours long.
2. How Big a File Can I Upload?
Your file size was capped at 20GB, initially. If you follow the same steps for posting videos longer than 15 minutes then you can also increase your maximum file size to 128GB.
3. Other Basics
After you click the ‘upload’ button on YouTube you are taken to a page where you choose a category for your video and add a title, description, and tags. These are all important for getting hits so you should put some thought into them.
Title: Keep your title under 70 characters so none of it disappears into a ‘…’. The best titles make people curious or elicit an emotional response. Terms like ‘video’, ‘how-to’, and ‘tutorial’ are often typed into people’s searches so if they apply to your video it can help to put them in the title.
Description: A short synopsis of your video which includes your most important keyword. You have about three lines before your text is hidden by a ‘show more’ tab. If you are including the URL of your channel or other videos then you should make sure they are above the ‘show more’.
Tags: Use a lot of them. These are the keywords and terms people will be searching for when they find your video. YouTube will suggest some after you start adding. A quick way to find good keywords to use is to search for videos similar to yours and check out their tags. A while ago YouTube started hiding video tags by default but you can download a free, YouTube-certified, extension for Google Chrome which will allow you to see them from vidIQ.com.
4. Digging Deeper
To get your viewers to subscribe to your channel you will need to make sure your videos are not losing quality when you upload them. Here are some things to be aware of if you want your videos to look great on YouTube.
Resolution: the number of pixels in your image. For example when a video has a resolution of 1080p that means it has a grid of pixels that is 1920 x 1080. The more pixels you have the sharper your image.
Bitrate: Bitrate is a measurement of how compressed your file is, and the less compressed it is the more information there is per frame. Higher bitrates mean larger file sizes.
Your resolution and bitrate should complement each other. If you have a higher bitrate than is needed for your video’s resolution your file will be unnecessarily large. If your bitrate is too low for your resolution then you will not see the quality you expect.
YouTube has a list of recommended resolutions and bitrates at support.google.com/youtube/answer/1722171.
Aspect Ratio: the dimensions of your video, in terms of width and height. YouTube’s aspect ratio is 16:9, so your videos should also be 16:9. If they are not then you will get black bars on either side of your video after you upload it. The most common way that people end up with the wrong aspect ratio is by creating videos on their smartphones and holding them up and down instead of sideways.
Part 2: Steps to Upload Videos to YouTube
Uploading YouTube Video on Desktop:
1. Sign in to your YouTube account
2. Hit the upload button
3. Select your video type (Public, Private, Unlisted)
4. Manage the upload
5. Choose your thumbnail
Step 1: Sign in to your YouTube account
In order to upload videos to YouTube, the very first thing you need to do is sign in. The sign-in button is located at the top right corner of the YouTube homepage. If you have multiple accounts registered to one device, you will be asked to choose one to log in to.
Step 2: Hit the upload button
It is a simple step that you will have to follow right after you log in to YouTube. As soon as you enter YouTube, after using your Google account and password for login, you will find the upload button in the top right corner of the screen. Click on this button and it will take you to the dedicated upload page.
Step 3: Select your video type (Public, Private, Unlisted)
Choose your audience. If you wish to make your video available to everyone on YouTube, simply go to the privacy settings and choose the “Public” option from the drop-down menu.
If you do not want your video to be searchable, but still want to be able to easily share a link to it with your friends and family, choose the “Unlisted” option.
Those who wish to keep their video personal can choose the “Private” option from the drop-down menu. You can still share a private video with a limited number of people (as long as they have Google accounts).
The “Scheduled” option is available for choosing a future date and time to make the video available to viewers. Once you have selected your privacy level, simply upload your video from your device storage.
Step 4: Manage the upload
As soon as you have confirmed your video upload, you will find a progress bar on the screen. It will take some time depending on factors such as the resolution of the video and how long it is. In the meanwhile, you can write a title, description and add relevant tags for your video so that YouTube knows what search results to include it in and viewers can find it. Remember that YouTube is the second biggest search engine on the Internet, so take some time to optimize your keywords .
Step 5: Choose your thumbnail
Once your video uploading is complete, it is time to choose a creative thumbnail for your video. The system provides you with three options to choose from automatically, all of which will be screenshots from your video. It is usually better toupload your own custom thumbnail , as thumbnails are a very important factor in attracting viewers. Hit the “Done” button or use the “Publish” button to finalize your upload.
That’s how to upload a video on YouTube! Any questions?
Richard Bennett
Richard Bennett is a writer and a lover of all things video.
Follow @Richard Bennett
The Ultimate Shortcut for Endless YouTube Video Repetition
How to Loop a YouTube Video: The Ultimate Guide 2024

Shanoon Cox
Mar 27, 2024• Proven solutions
You must have watched a thrilling YouTube video and repeated it several times. The challenge to most of us is how to loop a YouTube video automatically while at the comfort of our seats.
This guide will show you three methods on how to put a YouTube video on loop easily on your laptop, iPhone or desktop. And how to loop a video differs from one device to another. Moreover, there are many different types you play over and over again; a favorite sermon, yoga tutorials, a motivational speech, and the list is endless.
In the last sections of this article, I’ll introduce you to the best YouTube video loopers that will keep replaying videos infinitely.
To keep playing your YouTube videos on loop in a very simple way, just keep reading:
How to Loop YouTube Video: for Both Computer and Phone
- Option 1: Using the YouTube in-built loop technique
- Option 2: Using playlist to set video loop
- Option 3: Editing URL
- Option 4: Using Looping sites
- Option 5: Using Looping Apps
- Option 6: Using Google Chrome extension
How to Loop YouTube Video: for Both Computer and Phone
Every human being has his/her most favorite types of videos. What’s yours? To date, how many times have replayed them? Majority of internet users have access to both smartphones and computers. So, are there YouTube video looping techniques applicable to both computers and phones?
The answer is, Yes.
Stop using the reverse button to replay your videos on YouTube and use the options below.
Read More to Get : How to Download YouTube Videos without Any Software Easily >>
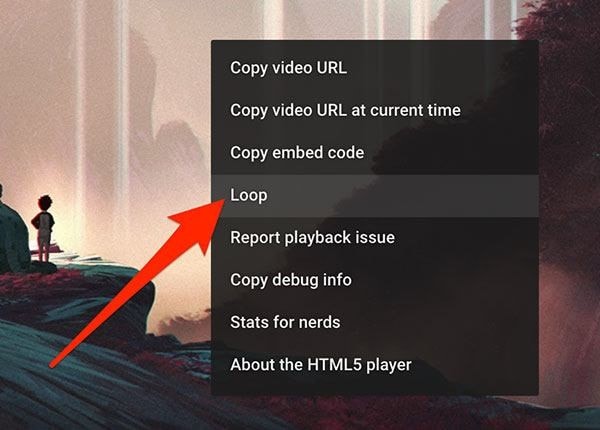
Option 1: Using the YouTube in-built loop technique: right-click technique
This is the easiest and most used technique to create YouTube video loops.
For Computer Users:
Step 1: Open the YouTube app on your computer or laptop and select the video to replay in a loop. Click to start enjoying your video.
Step 2: While the video is on the play, right-click the video and a prompt action suggestion box will pop up. Click the “loop” option and the playing video will be replay.
Step 3: To remove the YouTube embedded autoplay loop, click the loop option and you are done.
For Phone Users:
To loop YouTube videos using the In-built loop technique on iPhone, the procedure isn’t much different from that of a computer. Here are the steps;
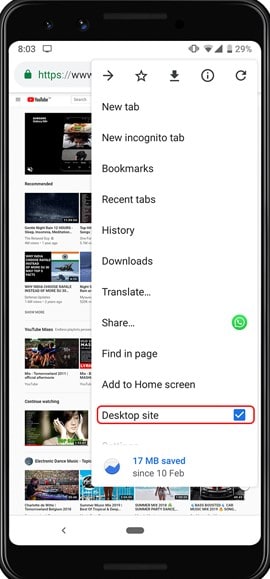
Step 1: Open YouTube videos using m.youtube.com on your phone. Using m.youtube.com prevents opening the video directly from the YouTube app.
Step 2: Browse the video you would like to set loops. Got it? Now start playing the YouTube video.
Step 3: At the top right corner of the video are 3 dots menu. Click the dots and scroll down to the “desktop site” option and select it.
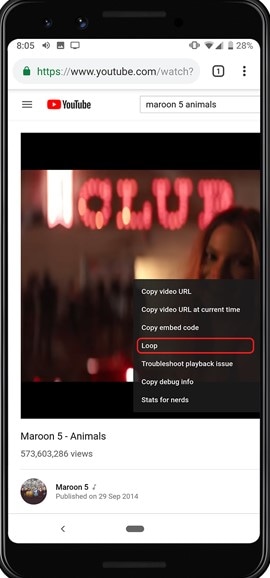
Step 4: While on the mobile browser version, long-press the playing video to open the video menu. Click the “loop” option. Now your Youtube replay loop is set.
Option 2: Using playlist to set video loop
To play two YouTube videos at once, this is the method to use. Before you can begin the process of setting videos on repeat, you have to sign in first.
Step 1: Select the videos to play on repeat.
Step 2: Sign in to your YouTube.
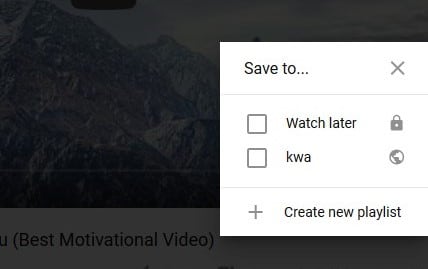
Step 3: After signing in to YouTube, click the “**+**” icon at the bottom of the video. Select the “create new playlist” to add the chosen videos. Name your playlist and choose to view public or private.
Step 4: Back to the main YouTube app; click the shown three bars and a long list of options pop up.
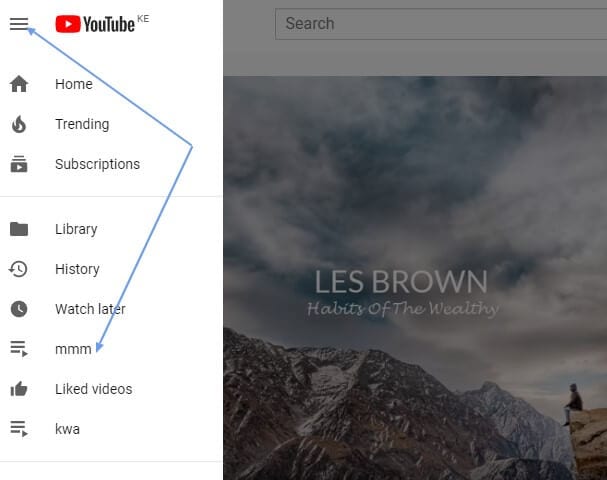
Step 5: Select the playlist “mmm” and then click “play all”.

Option 3: Editing URL
This is among the least known method of creating a video loop. It involves editing the video URL of YouTube to replay. URL is usually divided in to different sections. This is the simplest option as involves only deleting the hypertext transfer protocol (https) and the World Wide Web (www) and inserting the word “repeat” immediately after “Youtube”.
This is how to do it:
Step 1: Search for the video to set on replay.
In our case, let’s choose - https://www.youtube.com/watch?v=xo1VInw-SKc
Step 2: Delete the first part “**https://www.**” in the address bar.
The remaining sections will be- youtube.com/watch?v=xo1VInw-SKc
Step 3: After “Youtube” and before “.com” write “repeat”.
So it looks like this “youtuberepeat.com/watch/?v=xo1VInw-SKc” in your address bar.
Step 4: Click to play and your video will start playing in a loop in the ListenOnRepeat app.
2. Loop YouTube video with Youtubeloop.net
Step 1: Click to open any of the above looping sites .i.e. Youtubeloop.net
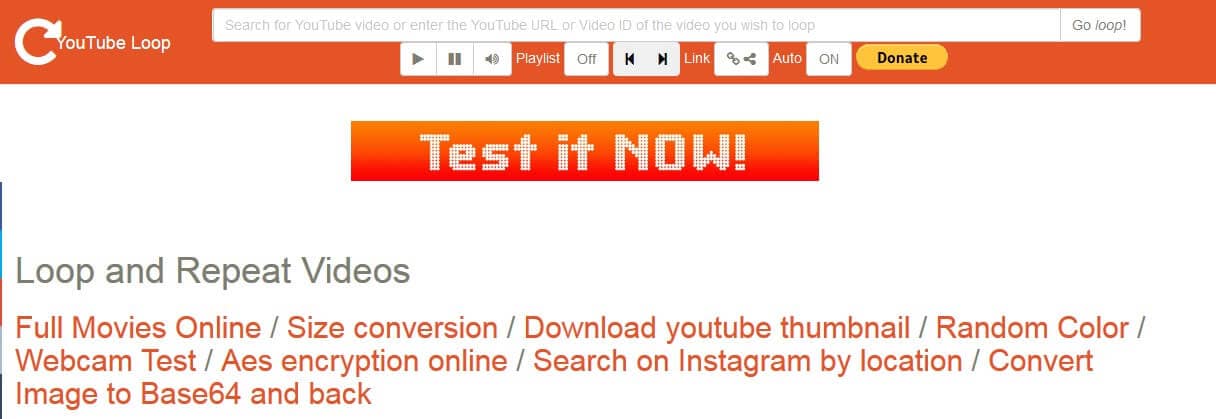
Step 2: Search for the video to set on loop.
Step 3: Copy- paste the video URL to the top blank space of the site.
Step 4: Click “_Go loop_” at the top right and the video is ready to play in a loop.
How To Loop YouTube Videos On Phone
The most suitable method you can use to set YouTube replay loop is by downloading video looper apps. There a lot of video looping apps for android and smartphones in the market today.
Apps are developed to simplify how we do things and make them more fun. To use video loopers on phones, you only need to download and install it. Next is to search the video to loop and with the slider, loop part of YouTube video that most fascinates you.
Whether you want to play a video on loop on an android phone, iPhone, iOS or tablet, there is mobile app compatible with your phone. This is how to loop your video on an android phone.
Option 5: Using Looping Apps To Set YouTube video loops
#App 1: Musepic

The Musepic looper app allows you to set video loops at any point within the play. Select the sections to loop and slide the loop button. You can now watch the YouTube embed autoplay loop for as long as you want.
In this case, we’ll use the Musepic app which is a third-party app available for download. It’s accessible via Google Play Store.
Step 1: Open your phones Google Play Store and search for the free version of the Musepic app. It has In-app purchases which you can use to add more features. Download and install.
Step 2: Click the first apps page option “Search-Find your videos” to select the video to set play on repeat. The best part of this app is the auto-suggestion of the videos you are likely to replay.
Step 3: Musepic app openly shows YouTube video looper controls. Click the selected video to start playing. Among the top, applicable features include loop button, sticky button and time slider.
#App 2: Repeat Player
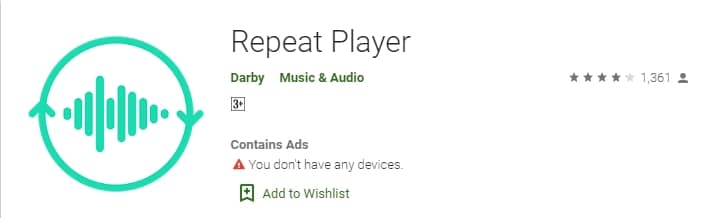
With Repeat Player installed on your phone, you can all 3gp, mp3, mp4 and xmf audios in loops the whole day. Its functions are oversimplified. Among the important features in this app include setting video loops in intervals, playback speed control and sleep timer control.
This app requires android 4.1 and up to function.
Just download the app and at the top 4bars, tap to select the video to loop. Use the two red slides to set the video repeat loop.
#App 3: Loop Player - A B Repeat Player
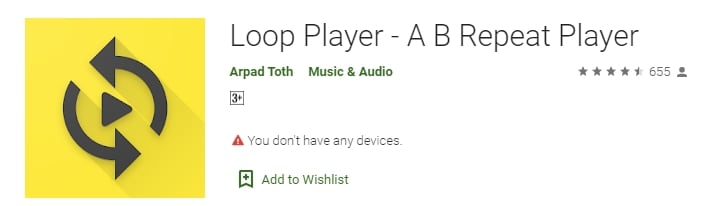
If you want to loop part of the YouTube video, Loop Player has two sliders to select the exact parts to repeat. It’s simple to use and is compatible with 4.2+ android phones.
To use this app, download and install it to your phone. Upload the video to loop and with slider A and B, set the video where to repeat.
Loop Player can be used to play background music, change playback speed and save an unlimited number of loops.
How to Loop YouTube Video: Only on PC
There is no much is required to set videos on repeat. The best and easy-to-use option is using Google Chrome Extensions. They are best suited for playing YouTube videos on loop online.
Option 6: Using Google Chrome extension
The number of free-to-use online Google Chrome extensions to set YouTube video loops continues to increase every day. To set YouTube repeat loops online, you just open the extension, copy video URL and you are ready to watch. One disadvantage of this option is you cannot set part of a video to replay on loop.
Here the top extensions;
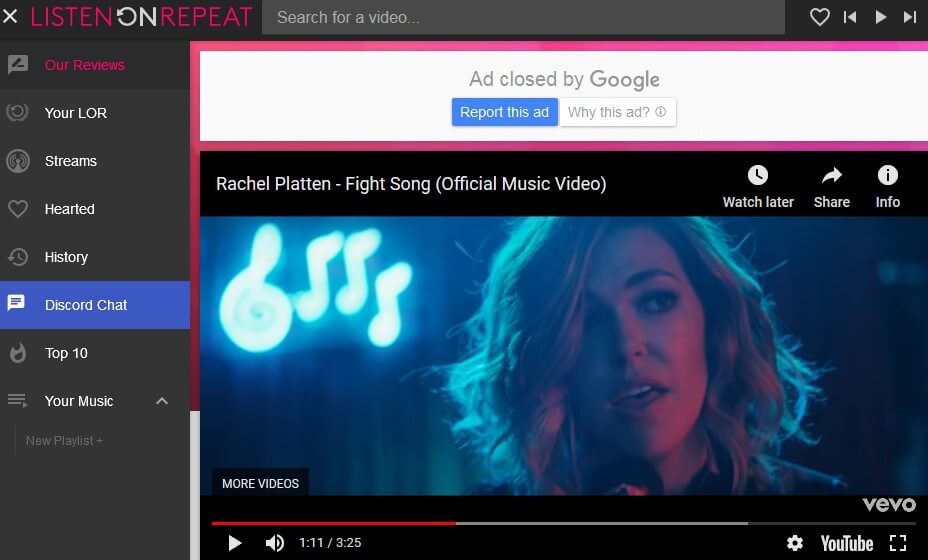
#Extension 1: ListenOnRepea

This is the best app when you want to loop part of the YouTube video. Use the timing slider at the bottom of the video to select the part to loop.
ListenOnRepeat is available on Google Play and suitable for android 4.1+. If you are looking for music video loops app, this will never disappoint you. It’s simple and easy to use.
You can watch the top trending videos as suggested in its community section every day.
Only one thing will disappoint you; you can never multiple videos at once.
Step 1: Download ListenOnRepeat from Google Chrome extension.
Step 2: After you’ve downloaded and installed, search the video you want to watch repeatedly at the search bar at the top of the app.
Step 3: Click the selected video and it will be replayed continuously.
#Extension 2: Kapwing
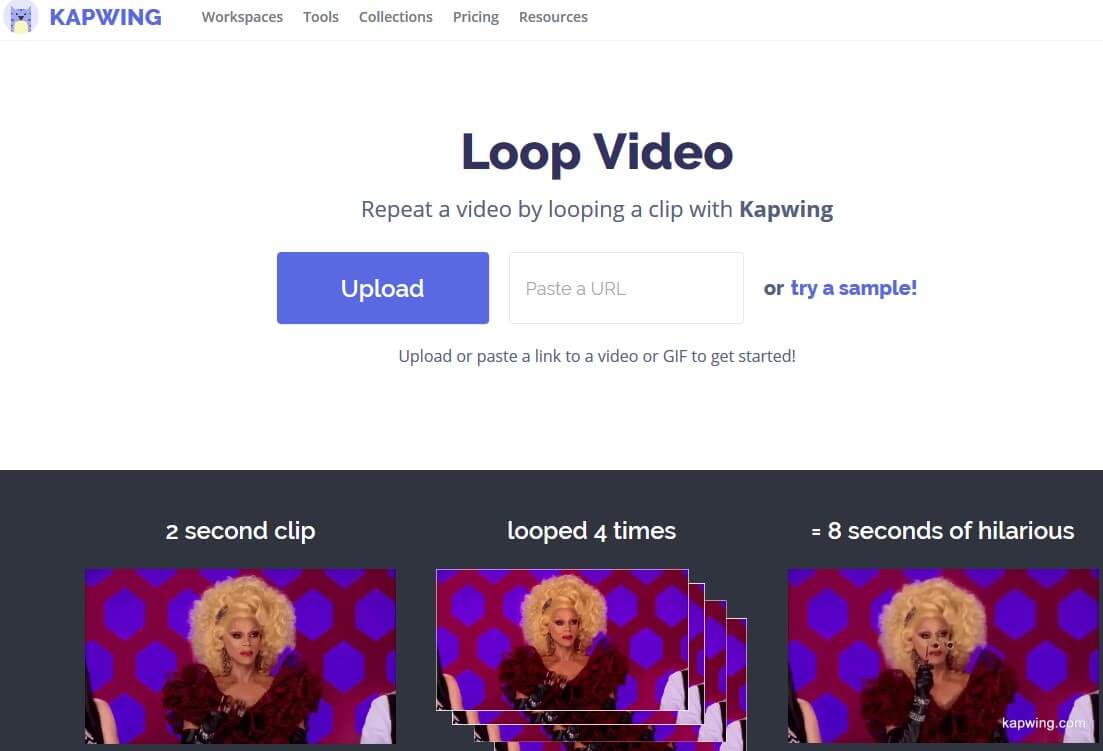
Kapwing is the extension to go for if you want to make YouTube videos longer, create a loop on your snaps and make a cinemagraph.
Some of the advanced features are on paid plans and just a few are available for free. You can trim and cut any unwanted parts of the video to replay. This extension allows you to set the number of loops to watch.
Like the other Google Chrome extension video lopper, open the extension, search for URL to watch on repeat and pest its URL and it will play on loop.
#Extension 3: InfiniteLooper
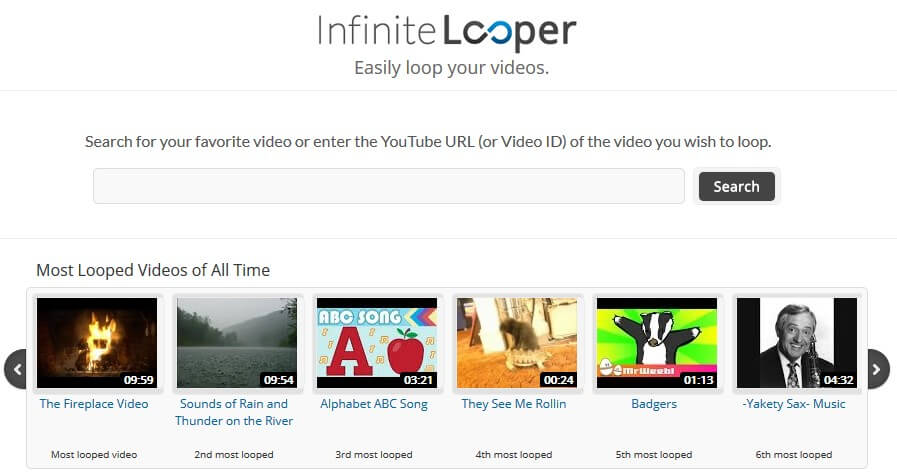
This app will make you glued to the computer with infinite loops on the best part of the YouTube video. Whether you want to watch the full video on repeat or a specific part, the infinite loop should be your choice.
However, this is not a to- go-for app if you intend to watch the video later without spending a single byte. To solve this problem, use a video downloader and with Filmora edit the video as much as you want then save it to your library.
It’s not common to be attracted to only one video. InfiniteLooper designers never thought of this. You have to use other technologies to play two YouTube videos at once.
Read More to Get : Best Video Websites Like YouTube >>
Screen Record Looping Videos With Filmora
But with Filmora Screen Recorder , you can watch as many videos as you want on Infinite Looper as you record them. Filmora is compatible with Win10, Win8, and Win7. You can buy this application or download it for free and upgrade it later.

Since InfiniteLooper allows only one video, use Filmora to record several videos, edit them and create up to 100 layers. This way, you’ll watch the 100 video loops in one video. Download and Try it Today!
Conclusion
Before you can decide to play a YouTube video repeatedly, there is a great reason. The fascination in it is so captivating that you require humble time as you watch it. A simple and seamless YouTube video looper best suits such videos.
Time to learn how to loop a YouTube video is of no essence during such moments. To disconnect your soul from that captivating video, try using video loopers that are complex and signing in to gain access to use is mandatory.
As new apps and features emerge every day, which is your best YouTube video looper and how do you put videos on repeat mode? You can leave a comment or suggestion below.
Shanoon Cox
Shanoon Cox is a writer and a lover of all things video.
Follow @Shanoon Cox
Shanoon Cox
Mar 27, 2024• Proven solutions
You must have watched a thrilling YouTube video and repeated it several times. The challenge to most of us is how to loop a YouTube video automatically while at the comfort of our seats.
This guide will show you three methods on how to put a YouTube video on loop easily on your laptop, iPhone or desktop. And how to loop a video differs from one device to another. Moreover, there are many different types you play over and over again; a favorite sermon, yoga tutorials, a motivational speech, and the list is endless.
In the last sections of this article, I’ll introduce you to the best YouTube video loopers that will keep replaying videos infinitely.
To keep playing your YouTube videos on loop in a very simple way, just keep reading:
How to Loop YouTube Video: for Both Computer and Phone
- Option 1: Using the YouTube in-built loop technique
- Option 2: Using playlist to set video loop
- Option 3: Editing URL
- Option 4: Using Looping sites
- Option 5: Using Looping Apps
- Option 6: Using Google Chrome extension
How to Loop YouTube Video: for Both Computer and Phone
Every human being has his/her most favorite types of videos. What’s yours? To date, how many times have replayed them? Majority of internet users have access to both smartphones and computers. So, are there YouTube video looping techniques applicable to both computers and phones?
The answer is, Yes.
Stop using the reverse button to replay your videos on YouTube and use the options below.
Read More to Get : How to Download YouTube Videos without Any Software Easily >>
Option 1: Using the YouTube in-built loop technique: right-click technique
This is the easiest and most used technique to create YouTube video loops.
For Computer Users:
Step 1: Open the YouTube app on your computer or laptop and select the video to replay in a loop. Click to start enjoying your video.
Step 2: While the video is on the play, right-click the video and a prompt action suggestion box will pop up. Click the “loop” option and the playing video will be replay.
Step 3: To remove the YouTube embedded autoplay loop, click the loop option and you are done.
For Phone Users:
To loop YouTube videos using the In-built loop technique on iPhone, the procedure isn’t much different from that of a computer. Here are the steps;
Step 1: Open YouTube videos using m.youtube.com on your phone. Using m.youtube.com prevents opening the video directly from the YouTube app.
Step 2: Browse the video you would like to set loops. Got it? Now start playing the YouTube video.
Step 3: At the top right corner of the video are 3 dots menu. Click the dots and scroll down to the “desktop site” option and select it.
Step 4: While on the mobile browser version, long-press the playing video to open the video menu. Click the “loop” option. Now your Youtube replay loop is set.
Option 2: Using playlist to set video loop
To play two YouTube videos at once, this is the method to use. Before you can begin the process of setting videos on repeat, you have to sign in first.
Step 1: Select the videos to play on repeat.
Step 2: Sign in to your YouTube.
Step 3: After signing in to YouTube, click the “**+**” icon at the bottom of the video. Select the “create new playlist” to add the chosen videos. Name your playlist and choose to view public or private.
Step 4: Back to the main YouTube app; click the shown three bars and a long list of options pop up.
Step 5: Select the playlist “mmm” and then click “play all”.
Option 3: Editing URL
This is among the least known method of creating a video loop. It involves editing the video URL of YouTube to replay. URL is usually divided in to different sections. This is the simplest option as involves only deleting the hypertext transfer protocol (https) and the World Wide Web (www) and inserting the word “repeat” immediately after “Youtube”.
This is how to do it:
Step 1: Search for the video to set on replay.
In our case, let’s choose - https://www.youtube.com/watch?v=xo1VInw-SKc
Step 2: Delete the first part “**https://www.**” in the address bar.
The remaining sections will be- youtube.com/watch?v=xo1VInw-SKc
Step 3: After “Youtube” and before “.com” write “repeat”.
So it looks like this “youtuberepeat.com/watch/?v=xo1VInw-SKc” in your address bar.
Step 4: Click to play and your video will start playing in a loop in the ListenOnRepeat app.
2. Loop YouTube video with Youtubeloop.net
Step 1: Click to open any of the above looping sites .i.e. Youtubeloop.net
Step 2: Search for the video to set on loop.
Step 3: Copy- paste the video URL to the top blank space of the site.
Step 4: Click “_Go loop_” at the top right and the video is ready to play in a loop.
How To Loop YouTube Videos On Phone
The most suitable method you can use to set YouTube replay loop is by downloading video looper apps. There a lot of video looping apps for android and smartphones in the market today.
Apps are developed to simplify how we do things and make them more fun. To use video loopers on phones, you only need to download and install it. Next is to search the video to loop and with the slider, loop part of YouTube video that most fascinates you.
Whether you want to play a video on loop on an android phone, iPhone, iOS or tablet, there is mobile app compatible with your phone. This is how to loop your video on an android phone.
Option 5: Using Looping Apps To Set YouTube video loops
#App 1: Musepic
The Musepic looper app allows you to set video loops at any point within the play. Select the sections to loop and slide the loop button. You can now watch the YouTube embed autoplay loop for as long as you want.
In this case, we’ll use the Musepic app which is a third-party app available for download. It’s accessible via Google Play Store.
Step 1: Open your phones Google Play Store and search for the free version of the Musepic app. It has In-app purchases which you can use to add more features. Download and install.
Step 2: Click the first apps page option “Search-Find your videos” to select the video to set play on repeat. The best part of this app is the auto-suggestion of the videos you are likely to replay.
Step 3: Musepic app openly shows YouTube video looper controls. Click the selected video to start playing. Among the top, applicable features include loop button, sticky button and time slider.
#App 2: Repeat Player
With Repeat Player installed on your phone, you can all 3gp, mp3, mp4 and xmf audios in loops the whole day. Its functions are oversimplified. Among the important features in this app include setting video loops in intervals, playback speed control and sleep timer control.
This app requires android 4.1 and up to function.
Just download the app and at the top 4bars, tap to select the video to loop. Use the two red slides to set the video repeat loop.
#App 3: Loop Player - A B Repeat Player
If you want to loop part of the YouTube video, Loop Player has two sliders to select the exact parts to repeat. It’s simple to use and is compatible with 4.2+ android phones.
To use this app, download and install it to your phone. Upload the video to loop and with slider A and B, set the video where to repeat.
Loop Player can be used to play background music, change playback speed and save an unlimited number of loops.
How to Loop YouTube Video: Only on PC
There is no much is required to set videos on repeat. The best and easy-to-use option is using Google Chrome Extensions. They are best suited for playing YouTube videos on loop online.
Option 6: Using Google Chrome extension
The number of free-to-use online Google Chrome extensions to set YouTube video loops continues to increase every day. To set YouTube repeat loops online, you just open the extension, copy video URL and you are ready to watch. One disadvantage of this option is you cannot set part of a video to replay on loop.
Here the top extensions;
#Extension 1: ListenOnRepea
This is the best app when you want to loop part of the YouTube video. Use the timing slider at the bottom of the video to select the part to loop.
ListenOnRepeat is available on Google Play and suitable for android 4.1+. If you are looking for music video loops app, this will never disappoint you. It’s simple and easy to use.
You can watch the top trending videos as suggested in its community section every day.
Only one thing will disappoint you; you can never multiple videos at once.
Step 1: Download ListenOnRepeat from Google Chrome extension.
Step 2: After you’ve downloaded and installed, search the video you want to watch repeatedly at the search bar at the top of the app.
Step 3: Click the selected video and it will be replayed continuously.
#Extension 2: Kapwing
Kapwing is the extension to go for if you want to make YouTube videos longer, create a loop on your snaps and make a cinemagraph.
Some of the advanced features are on paid plans and just a few are available for free. You can trim and cut any unwanted parts of the video to replay. This extension allows you to set the number of loops to watch.
Like the other Google Chrome extension video lopper, open the extension, search for URL to watch on repeat and pest its URL and it will play on loop.
#Extension 3: InfiniteLooper
This app will make you glued to the computer with infinite loops on the best part of the YouTube video. Whether you want to watch the full video on repeat or a specific part, the infinite loop should be your choice.
However, this is not a to- go-for app if you intend to watch the video later without spending a single byte. To solve this problem, use a video downloader and with Filmora edit the video as much as you want then save it to your library.
It’s not common to be attracted to only one video. InfiniteLooper designers never thought of this. You have to use other technologies to play two YouTube videos at once.
Read More to Get : Best Video Websites Like YouTube >>
Screen Record Looping Videos With Filmora
But with Filmora Screen Recorder , you can watch as many videos as you want on Infinite Looper as you record them. Filmora is compatible with Win10, Win8, and Win7. You can buy this application or download it for free and upgrade it later.
Since InfiniteLooper allows only one video, use Filmora to record several videos, edit them and create up to 100 layers. This way, you’ll watch the 100 video loops in one video. Download and Try it Today!
Conclusion
Before you can decide to play a YouTube video repeatedly, there is a great reason. The fascination in it is so captivating that you require humble time as you watch it. A simple and seamless YouTube video looper best suits such videos.
Time to learn how to loop a YouTube video is of no essence during such moments. To disconnect your soul from that captivating video, try using video loopers that are complex and signing in to gain access to use is mandatory.
As new apps and features emerge every day, which is your best YouTube video looper and how do you put videos on repeat mode? You can leave a comment or suggestion below.
Shanoon Cox
Shanoon Cox is a writer and a lover of all things video.
Follow @Shanoon Cox
Also read:
- Audio Upheavals Top Rhythmic Disruptors for Devices for 2024
- 2024 Approved Effective Call-to-Actions Boosting Video Engagement
- [New] Emulating Old Hollywood Style in Modern Videos
- [New] Alternative Cinema Highlights Audiences
- The Components That Lift You in YouTube Viewership
- [Updated] Discover the Top 30 Free Intro Creators on YouTube
- Unified Titling Strategy From Shorts to Apps
- [Updated] Electrical Upgrades
- In 2024, Crafting a Simplified YouTube Auto-Subscribe URL
- Smartphone Strategies to Create Dynamic and Effective YouTube Thumbnails
- In 2024, Best Talker Alteration Apps for Video Content Makers
- Integrating Twitch Live with YouTube Channel Success
- Efficiency at Fingertips Swiftly Upload Videos From iPhone/iPad to YouTube
- Ultimate List of 16 Starter Videos for More Watchers
- In 2024, Essential Tips for YouTube Audio Optimization
- [New] Enlightenment Echoes Best Ed Tutorials YT
- In 2024, A Comparative Analysis Android's Finest Video Downloaders
- [New] Elevating Video Marketing Understanding Keywords on Platforms Like YouTube
- Tutorial Tracking Down Your YouTube Comments
- Disruptive Beatscape Best Rhythm Altering Tools for 2024
- Self-Animated Wonders Cutting Edge Techniques for You
- [New] Building Awesome Channel Art for Your YouTube Presence
- Top 10 Most Viewed Videos on YouTube of All Time
- In 2024, Charting the Course to Earnings with YouTube Videos
- Customizing YouTube Viewing Policies for Your Content
- Beyond Boundaries Channel Youtube for Exciting Green Screens
- [Updated] Audio-to-Video Bridge Easy 3-Step Guide for MP3 to YouTube Uploads
- Choosing YouTube Premium What Makes It Worth the Price, In 2024
- [Updated] Essential Video Concepts Fueling Creativity in YouTube Channels
- 2024 Approved Access YouTube Tracks Without Spending a Dime 25+ No-Cost Audio Extractors
- Video Vanishing Act Cutting Duration on YouTube
- Reach Everyone by Pairing YouTube & Twitch Streams
- In 2024, Diving Into Viral Video Dialogues
- The Ultimate Guide to Reviving Your Stalled YouTube Channel
- Achieving Financial Gain Through YouTube Videos
- YouTube's Role in Today's Dynamic Educational Landscape
- Exclusive Game Recordings Tools
- [Updated] Audio Aesthetics High-Quality DJ Template Videos Downloaded
- Elevate Your YouTube Channel Perfecting Video Scriptwriting Skills
- [Updated] Cash Creation in Content A Deep Dive Into Vids and Videos
- Affordable Minecraft Video Graphics
- Updated 2024 Approved Trim and Edit Videos for Free on Windows 10 Top Options
- 2024 Approved The Complete Handbook for Capturing and Organizing Skype Call Data
- [New] In 2024, Mac Users' Manual Recording High-Quality Audio with Audacity
- [New] In 2024, Step-by-Step Guide to Boost Your Social Media Presence with Instagram Hashtags
- New 2024 Approved Unveiling the Premier Choices of Mac MP3 Information Manipulators
- How To Enable USB Debugging on a Locked Tecno Camon 20 Phone
- How To Fix Unresponsive Touch Screen on Realme GT Neo 5 SE | Dr.fone
- How To Unlock Any Itel P55 Phone Password Using Emergency Call
- What Legendaries Are In Pokemon Platinum On Tecno Camon 20? | Dr.fone
- 10 Easy-to-Use FRP Bypass Tools for Unlocking Google Accounts On Lava Yuva 3 Pro
- New Online Movie Trailer Design Studios for 2024
- [Updated] In 2024, Superior Mark Extraction Tools for TikTok Clips
- [New] Avatar Makeover Building Your Cartoon Personality
- Guide to Discovering MP3 Files with Kitty Calls and Meows
- How to Bypass FRP from Oppo A59 5G?
- How to Perform Hard Reset on Lava Agni 2 5G? | Dr.fone
- 10 Most Popular TikTok Challenges Deserves A Try for 2024
- [Updated] In 2024, Tech Tutorial Capturing and Saving Live TV
- [Updated] How to Share Vimeo Video in Instagram Stories
- The Power of iRecorder in Action
- How to Reset Gmail Password on Nokia C12 Devices
- 2024 Approved The Ultimate Guide to Video Stabilization Apps for iPhone and Android
- [Updated] In 2024, Dive Into Instagram Filters 2023'S Latest Trends
- How to Change Netflix Location to Get More Country Version On Samsung Galaxy F04 | Dr.fone
- [Updated] 2024 Approved Navigating Backward Image Hunt on the World's Largest Social Site
- In 2024, How to Fake Snapchat Location without Jailbreak On Samsung Galaxy A05s | Dr.fone
- Life360 Learn How Everything Works On Lava Blaze 2 | Dr.fone
- Gionee F3 Pro Messages Recovery - Recover Deleted Messages from Gionee F3 Pro
- In 2024, Which Pokémon can Evolve with a Moon Stone For Apple iPhone 13 Pro Max? | Dr.fone
- 2024 Approved Meme Madness Twitter's Funniest Video Threads
- [Updated] In 2024, Unlocking the Potential of Your Phone & DSLR for IGTV Videos
- Pros of Expanded Ram in Minecraft Gaming World
- Updated 2024 Approved Tasteful Audio Enhancer for Video-Based Platforms
- 2024 Approved Ace Your Gift Shopping The Ultimate Guide to Selecting Specialty Stores
- 2024 Approved Watermark-Free Video Editing 8 Free Trimming Solutions
- 2024 Approved Seamless PPT Showcase Across Tablets & Laptops for GMeet
- Why Apple Account Disabled From your Apple iPhone 8 Plus? How to Fix
- Title: "Streamline Your Content on YouTube A Detailed Tutorial"
- Author: Steven
- Created at : 2024-05-25 20:26:28
- Updated at : 2024-05-26 20:26:28
- Link: https://youtube-clips.techidaily.com/streamline-your-content-on-youtube-a-detailed-tutorial/
- License: This work is licensed under CC BY-NC-SA 4.0.
