
:max_bytes(150000):strip_icc()/using-amazon-alexa-app-for-echo-dot-3rd-generation_t20_YELgBm-03cb8e88e0644a5a949e0ef9e69cfde7.jpg)
"Streamline Your Content Efficiently Adding YouTube Captions"
Streamline Your Content: Efficiently Adding YouTube Captions
How To Add Captions to YouTube Videos

Richard Bennett
Mar 27, 2024• Proven solutions
By captioning your YouTube videos you help to make them accessible to more potential viewers. Subtitles are useful to viewers who have hearing impairments, whose first language is different from yours, or who are unable to watch your video with sound. Closed captioning can also be useful for you as a YouTuber because it helps with your SEO, or search engine optimization. Practicing better SEO can get your videos ranked higher in search results. Google and YouTube both index subtitles and transcripts much like they do your video’s description, unless you use automated captions.
This article will first explain how you can turn on subtitles for the videos you watch and then walk you through adding captions to your own videos.
How To Turn On Captions on YouTube
In order for you to be able to view subtitles for a YouTube video the uploader of the video will need to have added them, unless you change your account settings to display automatic captions.

To toggle subtitles on and off click on the Closed Captioning icon in the bottom right of your video player.
If the creator of the video has not added captions then you can enable automatic captions by going into your Account Settings and selecting Playback. Check the box next to Always Show Captions, and then check Show Automatic Captions by Speech Recognition. These captions may be flawed, but you will still be able to see the more accurate user submitted captions on videos that have them. The Always Show Captions feature may be useful not only to the hearing impaired, but to users who do not speak the same language as the video producer.
If you want to change the language of the subtitles click on the settings icon (the one that looks like a gear) next to the closed captioning icon and choose your language next to Subtitles/CC . If the language you want is not there select Auto-Translate and then pick a language. Google Translate will be used to generate subtitles in your chosen language.
Adding YouTube Captions in 4 Steps
1. Go to Video Manager in your Creator Studio and then look at your videos. Decide which one you want to add captions to.
2. Click on the drop-down menu next to the video you want to add captions to and choose Subtitles and CC.
3. Select Add New Subtitles or CC.
4. Choose whether to create your captions, upload a file that has them, transcribe your video, use automatic captioning, or use captioning software.
Create Subtitles or Closed Captions will allow you to create your subtitles on YouTube.
Upload A File allows you to upload a pre-made subtitle file from your computer. Supported file types include SubRip (.srt) and SubViewer (.sbv). You cannot use a word or PDF document for your subtitles.
Transcribe and Set Timings is where you can type a transcript of your video and set timings to sync it to your video. This differs from Create Subtitles or Closed Captions in that your transcript is all typed in to one text field.
Use Automatic Captioning will automatically use speech recognition technology to create captions. You can edit these auto-generated captions later if there are mistakes.
Use Captioning Software or Services is what you choose if you want to use a program or service to create the subtitles for your video.
The easiest way to add subtitles to your videos is to use Automatic Captioning. However, Automatic Captioning is imperfect and may result in your viewers getting a sloppy, skewed, interpretation of your video. Automatic captions are also not indexed by YouTube and Google the way subtitles you create or upload are. This means that they will not have any value to your SEO strategy. If you do not input your own captions or transcript you are missing out on an opportunity for better search engine rankings. Automatic Captions are great if you do not have time to input subtitles and need a temporary solution, though.
Richard Bennett
Richard Bennett is a writer and a lover of all things video.
Follow @Richard Bennett
Richard Bennett
Mar 27, 2024• Proven solutions
By captioning your YouTube videos you help to make them accessible to more potential viewers. Subtitles are useful to viewers who have hearing impairments, whose first language is different from yours, or who are unable to watch your video with sound. Closed captioning can also be useful for you as a YouTuber because it helps with your SEO, or search engine optimization. Practicing better SEO can get your videos ranked higher in search results. Google and YouTube both index subtitles and transcripts much like they do your video’s description, unless you use automated captions.
This article will first explain how you can turn on subtitles for the videos you watch and then walk you through adding captions to your own videos.
How To Turn On Captions on YouTube
In order for you to be able to view subtitles for a YouTube video the uploader of the video will need to have added them, unless you change your account settings to display automatic captions.
To toggle subtitles on and off click on the Closed Captioning icon in the bottom right of your video player.
If the creator of the video has not added captions then you can enable automatic captions by going into your Account Settings and selecting Playback. Check the box next to Always Show Captions, and then check Show Automatic Captions by Speech Recognition. These captions may be flawed, but you will still be able to see the more accurate user submitted captions on videos that have them. The Always Show Captions feature may be useful not only to the hearing impaired, but to users who do not speak the same language as the video producer.
If you want to change the language of the subtitles click on the settings icon (the one that looks like a gear) next to the closed captioning icon and choose your language next to Subtitles/CC . If the language you want is not there select Auto-Translate and then pick a language. Google Translate will be used to generate subtitles in your chosen language.
Adding YouTube Captions in 4 Steps
1. Go to Video Manager in your Creator Studio and then look at your videos. Decide which one you want to add captions to.
2. Click on the drop-down menu next to the video you want to add captions to and choose Subtitles and CC.
3. Select Add New Subtitles or CC.
4. Choose whether to create your captions, upload a file that has them, transcribe your video, use automatic captioning, or use captioning software.
Create Subtitles or Closed Captions will allow you to create your subtitles on YouTube.
Upload A File allows you to upload a pre-made subtitle file from your computer. Supported file types include SubRip (.srt) and SubViewer (.sbv). You cannot use a word or PDF document for your subtitles.
Transcribe and Set Timings is where you can type a transcript of your video and set timings to sync it to your video. This differs from Create Subtitles or Closed Captions in that your transcript is all typed in to one text field.
Use Automatic Captioning will automatically use speech recognition technology to create captions. You can edit these auto-generated captions later if there are mistakes.
Use Captioning Software or Services is what you choose if you want to use a program or service to create the subtitles for your video.
The easiest way to add subtitles to your videos is to use Automatic Captioning. However, Automatic Captioning is imperfect and may result in your viewers getting a sloppy, skewed, interpretation of your video. Automatic captions are also not indexed by YouTube and Google the way subtitles you create or upload are. This means that they will not have any value to your SEO strategy. If you do not input your own captions or transcript you are missing out on an opportunity for better search engine rankings. Automatic Captions are great if you do not have time to input subtitles and need a temporary solution, though.
Richard Bennett
Richard Bennett is a writer and a lover of all things video.
Follow @Richard Bennett
Enhance Your Videos - Discover the Top 10 Efficient Cutter Apps
YouTube is one of the most popular video-sharing social media websites. It offers a wide range of media, including music videos, trailers, live broadcasts, games, and how-to videos. It also has the greatest societal influence because most artists, musicians, and significant corporations utilize this platform to promote their work.
However, because of the growing consumer interest in media content, many providers utilize it to advertise businesses and products. These paid marketing videos aren’t always relevant to the material you want to see. With these circumstances in mind, this article will help you find an excellent YouTube Video Trimmer Online, which you may use to clip and trim YouTube videos.
In this article
01 Part 1: Best YouTube Video Trimmer Online
02 Part 2: FAQs About Online YouTube Video Trimmer
Part 1: Best YouTube Video Trimmer Online
YouTube is amongst the most frequently used social media platform. People get their content ideas and teach others about them. However, videos might contain some unnecessary parts, and it can be a problem if you want to save the video. The following YouTube trimmers online can assist you.
1. Filmora Instant Cutter Tool [Offline but More Powerful]
Before you try the below online tools, Filmora Instant Cutter tool will be another choice when you need more powerful features. It lets you input huge video clips in formats and rapidly reduce or combine them without re-encoding. This is a very valuable tool when working with high-resolution movies. It supports MP4/MOV and MTS/M2TS video files.It maintains the quality of the video It supports 4K UHD video formats It allows you to merge the videos You can trim massive files with ease.
You can download Youtube videos first and then make trimming or add effects on it.
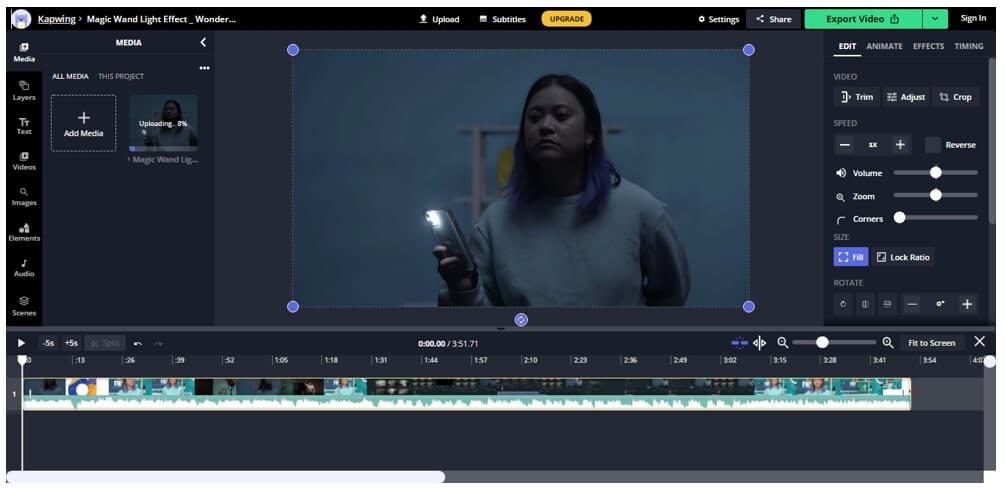
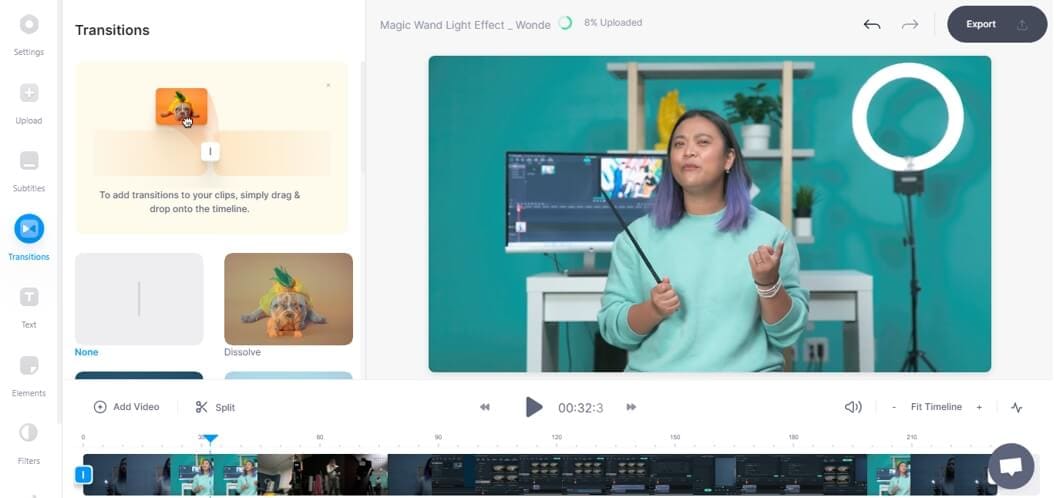
2. Kapwing
Kapwing is an online video editor that helps you edit videos without downloading the software. It features several editing tools with an easy-to-use interface. There’s no need to register yourself for editing the videos through Kapwing. That’s why it has millions of users worldwide.
Kapwing’s Video Trimmer makes it simple to trim YouTube videos. The service includes the same video cutting functionality as before but with a much prettier UI. After pasting the YouTube video URL to crop, you may use the easy-to-use timestamp slider to decide the sections of the YouTube video to edit.
Pros
- Different templates
- Multiple editing features
- Easy-to-use interface
- Fast
Cons
- Leaves a watermark if you don’t sign up
Find out more online video editors without a watermark.
3. VEED .iO
VEED.io video editor is a simple yet powerful video-editing program that allow s users to make stunning videos. VEED may be an important element of your sales funnel. With this program, you may edit, enhance, and add a lot of creativity to presentations, marketing videos, review videos, or video blogging.
You need to choose a file and start trimming it. After that, download the video with its easy-to-use interface. You need to sign up for editing the video with the VEED online tool. Moreover, there’s no watermark in the exported video.
Pros
- Fast and straightforward
- Multiple output options
- No watermark
Cons
- Minor bugs
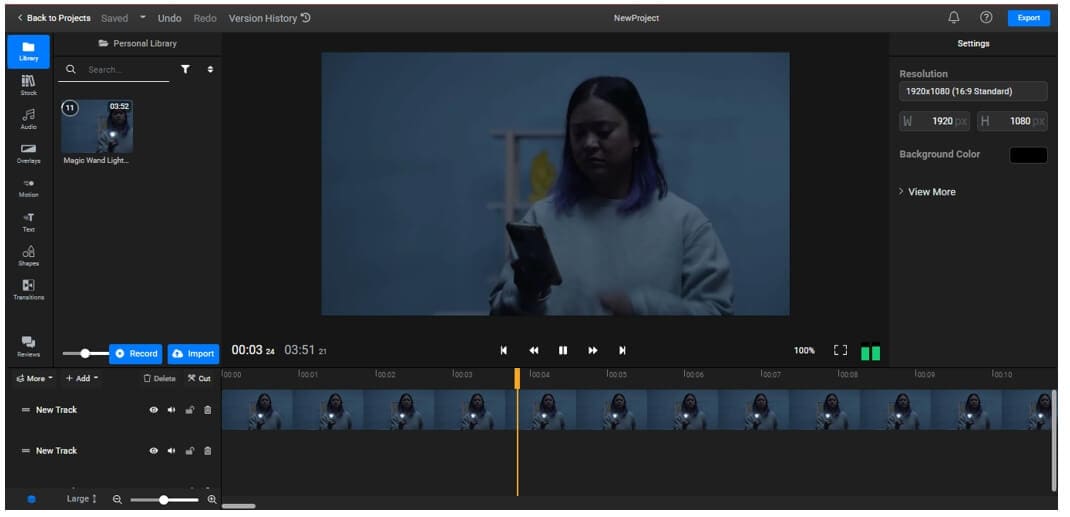
4. Flixier
Flixier provides powerful video editing software with 1-minute exports to any device, easy collaboration, and enough cloud storage, all in one window. Flixier enables users to export any video, independent of technology. Cloud storage and complete version history are available, including feedback comments, sophisticated exporting, and email notifications.
Select a file and begin cutting it. Then, using the simple interface, download the video. No sign-up is required for the Flixier online tool to modify the video. In addition, there is no watermark in the exported video.
Pros
- 4x faster
- Cloud storage and history
- No registration
- Supports multiple operating systems
Cons
- Exports video up to one minute
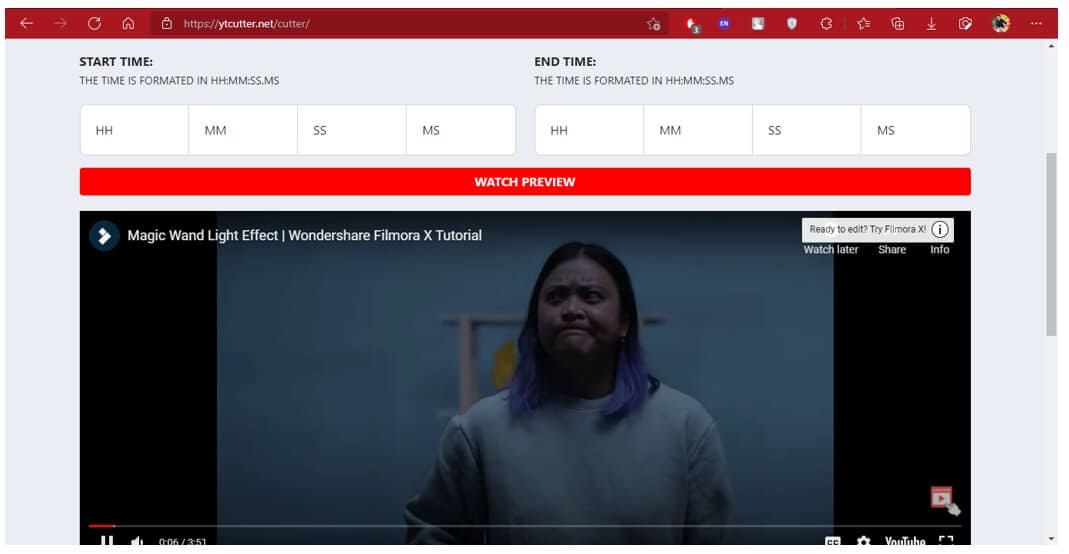
5. YTCutter.net
It is one of the best YouTube to mp3 converters online with trimmer available. YTCutter.net has various editing features that help you easily trim and modify the videos. It allows you to watch the video in preview mode before downloading it. It does not leave any watermark on the exported video.
You may extract favourite moments from YouTube videos with this ad-supported web tool. The app’s operation is rather simple. You have to paste a YouTube URL and set the start and end times. After that, you may download the cropped video, audio, or GIF. However, you need to register yourself for downloading the video through this tool.
Pros
- No watermark
- Simple interface
- Several editing features
Cons
- Requires an account to save the video to your profile or your device
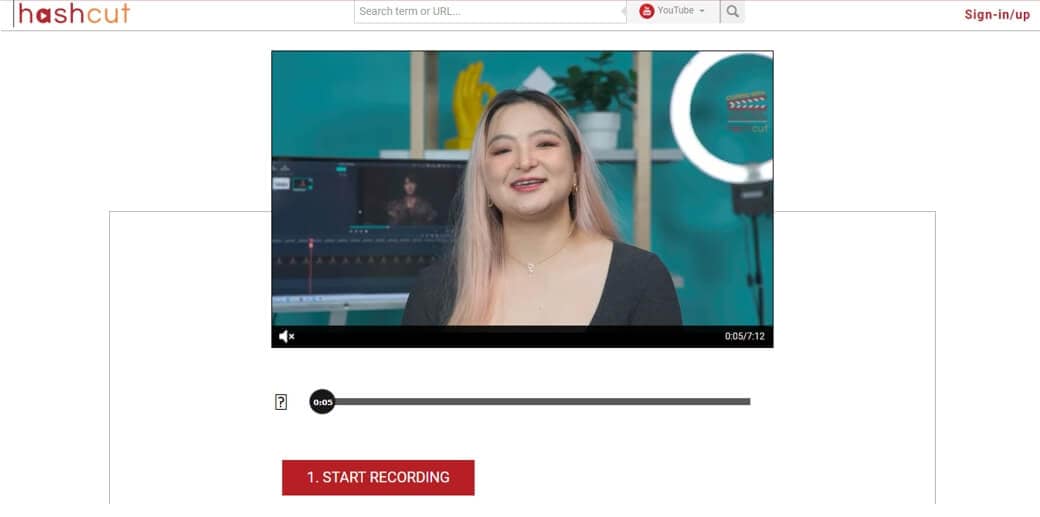
6. HashCut
HashCut is a unique YouTube online trimmer that allows you to save the highlights. It is possible to extract a segment from a YouTube video by tracing the section you require. Even better, you may customize the text and stickers with your tastes.
To begin, open your favourite web browser and navigate to the online YouTube trimmer. Paste the URL and specify the start and finish points of the clip you wish to obtain. Then, save the video. Furthermore, you may use its many capabilities to enhance the video, such as previewing footage, adding annotation, and embedding stickers on the film. It requires sign-up to edit the video and leaves a watermark on the exported one.
Pros
- Adds text and animations
- Chrome extension
- Preview Mode
- Embeds stickers
Cons
- Slow uploading procedure
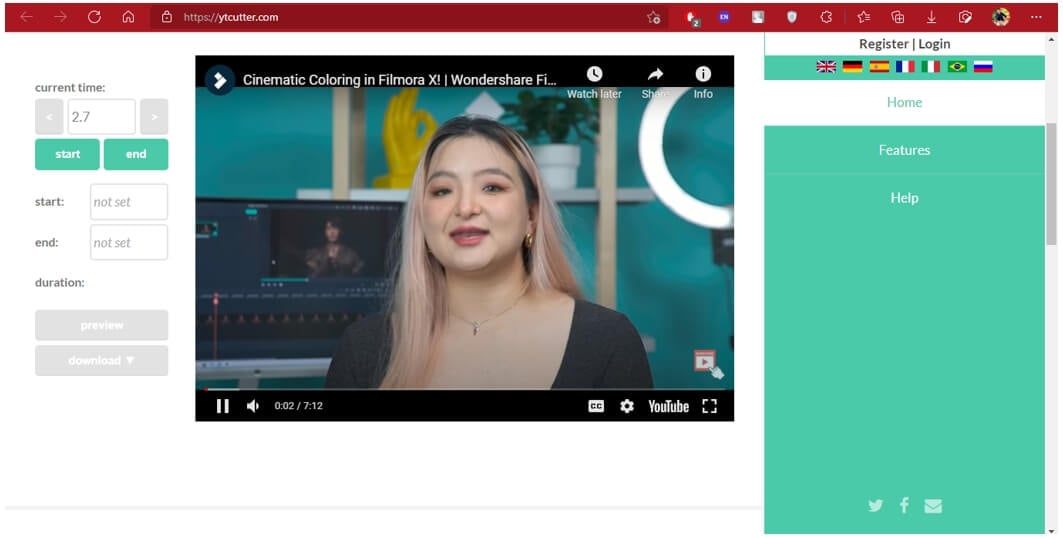
7. YT Cutter
As the name indicates, YT Cutter is a YouTube video trimmer and downloader online that allows you to remove specific segments from YouTube videos. It can operate successfully online without any registration. Furthermore, you may accurately clip YouTube videos to 0.1 seconds, capture screenshots, and output files to video, animation GIF, or audio.
Paste the URL into the YT Cutter search field and wait for the video to refresh. Then, press the start and finish buttons to give your movie a beginning and an endpoint. Then, save the movie to your device in the format of your choice. Moreover, it does not leave any watermark on the exported video.
Pros
- No watermark
- User-friendly interface
- Supports multiple output formats
Cons
- Limited input formats
8. YouTube4kDownloader
Because of its simple interface, YouTube4kdownloader is a thorough and simple online YouTube video trimmer. It has a tool that allows you to trim or edit video segments from YouTube videos. One of its cutting features includes the ability to go to the beginning and conclusion of the choice for fast and easy clip trimming.
It also features a play and stop button that allows you to crop a specific scene from a YouTube video. Aside from that, it demonstrates three methods for sharing the cropped video link, including copying the plugin, the URL or media link, and watching the trimmed video on the YouTube website. It does not require sign-up for editing the video and leaves a watermark on the exported one.
Pros
- Trim specific segments
- No sign-up
- No watermark
Cons
- Completely web-based
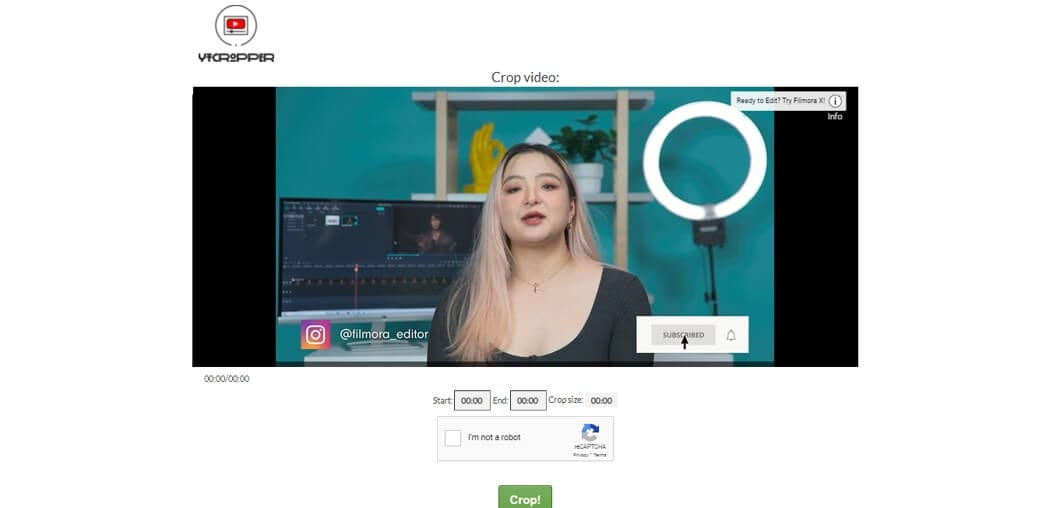
9. YT Cropper
Another YouTube video clipper online is YT Cropper, allowing users to extract particular clips from YouTube videos. Its Drag function allows users to choose a beginning and finishing point for the clips, and the markers will assist users in locating the clips that can be obtained that they desire. Users can make use of a one-of-a-kind feature known as looping.
Copy and paste the URL into the search field. Wait for the system to evaluate the video. Finally, use the markers to crop a select scene from a YouTube video. Then, to evaluate your clips, click the trim button. No sign-up and watermark are required for this YouTube trimmer.
Pros
- Looping feature
- Drag and drop function
- Easy trimming
Cons
- Slow
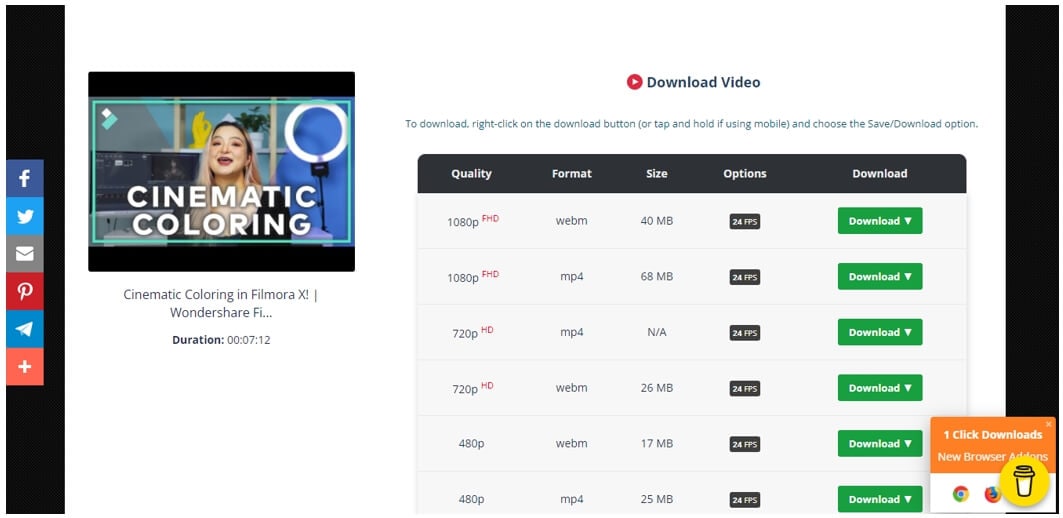
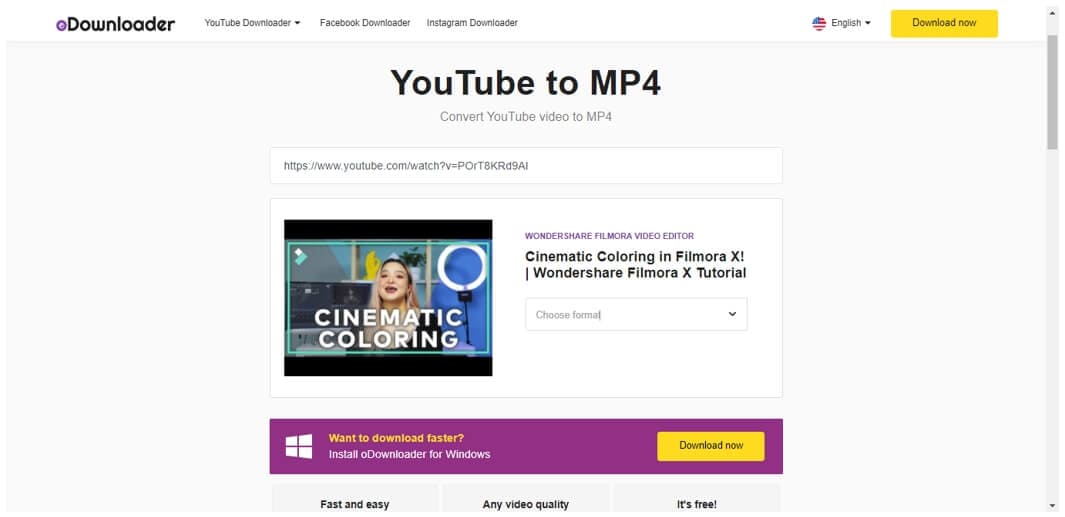
10. Odownloader
Odownloader Is another ad-supported YouTube trimmer that allows you to chop YouTube videos quickly. It allows you to download either audio alone or complete video. You may also choose between .webm and.mp4 formats.
Paste the link or URL into the search field and wait for the video to refresh. Then, press the start and finish buttons to give your movie a beginning and an endpoint. Then, save the movie to your device in the format of your choice. Moreover, it does not leave any watermark on the exported video.
Pros
- Exports in audio format as well
- Multiple output formats
- Easy-to-use
Cons
- Several ads
11. VideoCrops
It allows users to crop YouTube videos by dragging the two marks to the beginning and conclusion of the clip. It provides a high level of security, as only the users can access their data, which cannot be viewed by other users or on any site.
Cropping a video entails three steps. The video is first downloaded to the server. This may potentially take some time, depending on the length of the video. Second, the video has been trimmed. Finally, the video is saved as.MP4. You should also consider that this is a free site with limited resources.
Pros
- Easy trimming
- No watermark
- Free website
- High-level security
Cons
- Limited resources

Part 2: FAQs About Online YouTube Video Trimmer
Does YouTube have a trimmer?
Yes, you may cut videos after they’ve been uploaded to the YouTube site. You may chop off the beginning, middle, or ending of your movie on a computer. It is not necessary to re-upload a video to cut it. The video’s URL, view counts, and comments will remain unchanged. This functionality is only accessible for less than 6 hours long videos.
What is the difference between cut and trim in video editing?
Cutting is the process of separating pieces of a clip. You can reuse these portions in another video or delete them entirely. On the other hand, trimming is the process of eliminating or expanding the duration of a video clip’s front or tail regions in video editing.
Conclusion
Numerous programs will swiftly upload and trim your tiny movies, ideal for folks who make YouTube videos. Then, some tools can handle huge and bulky files and are ideal for file output and video quality. It’s a shame that some of these tools need payment to access their additional editing features. However, you have an excellent YouTube Video Trimmer Online, which is completely free and listed in detail within this article.
02 Part 2: FAQs About Online YouTube Video Trimmer
Part 1: Best YouTube Video Trimmer Online
YouTube is amongst the most frequently used social media platform. People get their content ideas and teach others about them. However, videos might contain some unnecessary parts, and it can be a problem if you want to save the video. The following YouTube trimmers online can assist you.
1. Filmora Instant Cutter Tool [Offline but More Powerful]
Before you try the below online tools, Filmora Instant Cutter tool will be another choice when you need more powerful features. It lets you input huge video clips in formats and rapidly reduce or combine them without re-encoding. This is a very valuable tool when working with high-resolution movies. It supports MP4/MOV and MTS/M2TS video files.It maintains the quality of the video It supports 4K UHD video formats It allows you to merge the videos You can trim massive files with ease.
You can download Youtube videos first and then make trimming or add effects on it.
2. Kapwing
Kapwing is an online video editor that helps you edit videos without downloading the software. It features several editing tools with an easy-to-use interface. There’s no need to register yourself for editing the videos through Kapwing. That’s why it has millions of users worldwide.
Kapwing’s Video Trimmer makes it simple to trim YouTube videos. The service includes the same video cutting functionality as before but with a much prettier UI. After pasting the YouTube video URL to crop, you may use the easy-to-use timestamp slider to decide the sections of the YouTube video to edit.
Pros
- Different templates
- Multiple editing features
- Easy-to-use interface
- Fast
Cons
- Leaves a watermark if you don’t sign up
Find out more online video editors without a watermark.
3. VEED .iO
VEED.io video editor is a simple yet powerful video-editing program that allow s users to make stunning videos. VEED may be an important element of your sales funnel. With this program, you may edit, enhance, and add a lot of creativity to presentations, marketing videos, review videos, or video blogging.
You need to choose a file and start trimming it. After that, download the video with its easy-to-use interface. You need to sign up for editing the video with the VEED online tool. Moreover, there’s no watermark in the exported video.
Pros
- Fast and straightforward
- Multiple output options
- No watermark
Cons
- Minor bugs
4. Flixier
Flixier provides powerful video editing software with 1-minute exports to any device, easy collaboration, and enough cloud storage, all in one window. Flixier enables users to export any video, independent of technology. Cloud storage and complete version history are available, including feedback comments, sophisticated exporting, and email notifications.
Select a file and begin cutting it. Then, using the simple interface, download the video. No sign-up is required for the Flixier online tool to modify the video. In addition, there is no watermark in the exported video.
Pros
- 4x faster
- Cloud storage and history
- No registration
- Supports multiple operating systems
Cons
- Exports video up to one minute
5. YTCutter.net
It is one of the best YouTube to mp3 converters online with trimmer available. YTCutter.net has various editing features that help you easily trim and modify the videos. It allows you to watch the video in preview mode before downloading it. It does not leave any watermark on the exported video.
You may extract favourite moments from YouTube videos with this ad-supported web tool. The app’s operation is rather simple. You have to paste a YouTube URL and set the start and end times. After that, you may download the cropped video, audio, or GIF. However, you need to register yourself for downloading the video through this tool.
Pros
- No watermark
- Simple interface
- Several editing features
Cons
- Requires an account to save the video to your profile or your device
6. HashCut
HashCut is a unique YouTube online trimmer that allows you to save the highlights. It is possible to extract a segment from a YouTube video by tracing the section you require. Even better, you may customize the text and stickers with your tastes.
To begin, open your favourite web browser and navigate to the online YouTube trimmer. Paste the URL and specify the start and finish points of the clip you wish to obtain. Then, save the video. Furthermore, you may use its many capabilities to enhance the video, such as previewing footage, adding annotation, and embedding stickers on the film. It requires sign-up to edit the video and leaves a watermark on the exported one.
Pros
- Adds text and animations
- Chrome extension
- Preview Mode
- Embeds stickers
Cons
- Slow uploading procedure
7. YT Cutter
As the name indicates, YT Cutter is a YouTube video trimmer and downloader online that allows you to remove specific segments from YouTube videos. It can operate successfully online without any registration. Furthermore, you may accurately clip YouTube videos to 0.1 seconds, capture screenshots, and output files to video, animation GIF, or audio.
Paste the URL into the YT Cutter search field and wait for the video to refresh. Then, press the start and finish buttons to give your movie a beginning and an endpoint. Then, save the movie to your device in the format of your choice. Moreover, it does not leave any watermark on the exported video.
Pros
- No watermark
- User-friendly interface
- Supports multiple output formats
Cons
- Limited input formats
8. YouTube4kDownloader
Because of its simple interface, YouTube4kdownloader is a thorough and simple online YouTube video trimmer. It has a tool that allows you to trim or edit video segments from YouTube videos. One of its cutting features includes the ability to go to the beginning and conclusion of the choice for fast and easy clip trimming.
It also features a play and stop button that allows you to crop a specific scene from a YouTube video. Aside from that, it demonstrates three methods for sharing the cropped video link, including copying the plugin, the URL or media link, and watching the trimmed video on the YouTube website. It does not require sign-up for editing the video and leaves a watermark on the exported one.
Pros
- Trim specific segments
- No sign-up
- No watermark
Cons
- Completely web-based
9. YT Cropper
Another YouTube video clipper online is YT Cropper, allowing users to extract particular clips from YouTube videos. Its Drag function allows users to choose a beginning and finishing point for the clips, and the markers will assist users in locating the clips that can be obtained that they desire. Users can make use of a one-of-a-kind feature known as looping.
Copy and paste the URL into the search field. Wait for the system to evaluate the video. Finally, use the markers to crop a select scene from a YouTube video. Then, to evaluate your clips, click the trim button. No sign-up and watermark are required for this YouTube trimmer.
Pros
- Looping feature
- Drag and drop function
- Easy trimming
Cons
- Slow
10. Odownloader
Odownloader Is another ad-supported YouTube trimmer that allows you to chop YouTube videos quickly. It allows you to download either audio alone or complete video. You may also choose between .webm and.mp4 formats.
Paste the link or URL into the search field and wait for the video to refresh. Then, press the start and finish buttons to give your movie a beginning and an endpoint. Then, save the movie to your device in the format of your choice. Moreover, it does not leave any watermark on the exported video.
Pros
- Exports in audio format as well
- Multiple output formats
- Easy-to-use
Cons
- Several ads
11. VideoCrops
It allows users to crop YouTube videos by dragging the two marks to the beginning and conclusion of the clip. It provides a high level of security, as only the users can access their data, which cannot be viewed by other users or on any site.
Cropping a video entails three steps. The video is first downloaded to the server. This may potentially take some time, depending on the length of the video. Second, the video has been trimmed. Finally, the video is saved as.MP4. You should also consider that this is a free site with limited resources.
Pros
- Easy trimming
- No watermark
- Free website
- High-level security
Cons
- Limited resources
Part 2: FAQs About Online YouTube Video Trimmer
Does YouTube have a trimmer?
Yes, you may cut videos after they’ve been uploaded to the YouTube site. You may chop off the beginning, middle, or ending of your movie on a computer. It is not necessary to re-upload a video to cut it. The video’s URL, view counts, and comments will remain unchanged. This functionality is only accessible for less than 6 hours long videos.
What is the difference between cut and trim in video editing?
Cutting is the process of separating pieces of a clip. You can reuse these portions in another video or delete them entirely. On the other hand, trimming is the process of eliminating or expanding the duration of a video clip’s front or tail regions in video editing.
Conclusion
Numerous programs will swiftly upload and trim your tiny movies, ideal for folks who make YouTube videos. Then, some tools can handle huge and bulky files and are ideal for file output and video quality. It’s a shame that some of these tools need payment to access their additional editing features. However, you have an excellent YouTube Video Trimmer Online, which is completely free and listed in detail within this article.
Also read:
- Avoiding Blur Techniques for Hand-Held Stability for 2024
- Audio Visual Transcription Tool for 2024
- In 2024, Enhancing YouTube Music Soundscape
- Transformative Youtube Decks via Tailored Templates
- Quick Ways to Reshuffle YouTube Tracks on PC/Phone/TV
- 2024 Approved Earnings Insights for Video Content Surpassing 1 Million Views
- [New] Choosing Platforms YouTube Shorts Vs. TikTok – Best for Minis
- [Updated] Discover the Best No-Cost Soundtracks for Video Production
- [New] Digital Dominance Who Has the Largest Fanbase?
- [Updated] Eradicating Grayscale Issues with YouTube Video
- 2024 Approved Cutting-Edge Computers Notebook Recommendations for Editors
- Your Ultimate YT Shorts Companion
- Beyond the Algorithm Top 27 Alternative Streaming Services Reviewed
- 2024 Approved Elevate Your Channels Optimal Use of Templated Content in YT Descs
- Digital Domain Decisions Short-Form Content
- Best YouTube Video to Text Converters Online
- 2024 Approved Amplify Viewership with These Top 10 YouTube Reaction Strategies
- A Comprehensive List of Top Video-Making Software (iPhone, Android)
- Perfect Visual Experience on YouTube with Professional Techniques
- Deciphering Highlighted Discussion Threads
- [New] Decoding Your YouTube's View-Zero Dilemma 10 Insights
- In 2024, Essential Tips for WireCast Live Streaming to Youtube
- 2024 Approved Dish on Titles Creative Concepts for Cookery Vids
- [New] Decoding Monetization How Much Creators Earn Per Ad on YouTube?
- Must-See ASMR Talents Online
- In 2024, 7 Best Zero-Cost Web-Based Film Makers
- The Ultimate Gear List for Any Aspiring Vlogger - Top 12 Cameras
- [New] Audio Enhancement for Online Video Creators
- What Every Independent YouTuber Should Know About MCNs
- Mastering Online Channel Name Creation Tips & Tricks
- [New] Creating Customized URLs for Channel Subscribers
- Your Guide to Making Millions on YouTube From Novice to Big Earnings
- The Ultimate Mobile Experience Apple, Android and YouTube
- Framework Developing Transformative Lifestyle Broadcasts
- 2024 Approved Create Effective YouTube Advertisements on a Budget
- Amplifying Your YouTube Presence Through Consistent Content Release for 2024
- Mastering Video Thumbnail Creation for Maximum Clicks
- [New] A Complete Guide to YouTube's Live Image Lore
- Streamline Your YouTube Videos in Windows Movie Maker
- Demystifying Mukbang A Comprehensive Production Guide
- [New] Elevating Your Content Insights Into Viewership Lead
- Learn the Safest Ways to Extract and Convert YouTube Tracks to MP3
- [New] Dive Into YouTube's Top VR Experiences
- In 2024, Breaking Down Barriers with Shared YouTube Curations
- Quick & Easy Audio Extraction Top 6 Free Apps to Convert YouTube Videos to MP3
- Perfecting Pics & Videos on iPhones and Androids with Best Apps
- Architect of Audiovisual Brilliance
- [New] Comprehensive Strategies for Tracking YT Traffic and Gains
- In 2024, Deep Dive The Economy and Impact of Online Stars
- How To Bypass Poco C51 FRP In 3 Different Ways
- How to Remove Apple ID from Apple iPhone 8 without Password?
- In 2024, How to Unlock Itel Bootloader Easily
- [Updated] Elevate Your Discord Community with These 30 Bots for 2024
- Forgot iPhone 14 Password? – Here are the Best Solutions | Stellar
- In 2024, Top 10 Password Cracking Tools For Samsung Galaxy A15 4G
- Stand Out in a Sea of TikTok Profiles Top PFPs for 2024
- [Updated] 2024 Approved Getting Acquainted The Google Meet Pathway
- [Updated] Top Tech to Document Your Google Meet Participation for 2024
- In 2024, Acknowledgments Galore Cost-Effective Templates Here
- [Updated] Elevate Your Gaming Experience Nintendo Switch and Steam Synergy
- Proven Ways in How To Hide Location on Life360 For Oppo K11x | Dr.fone
- Gradual Aesthetic Launch
- In 2024, 15 Best Strongest Pokémon To Use in Pokémon GO PvP Leagues For Realme 11 5G | Dr.fone
- [New] In 2024, Radeon Relive Download
- New Effortless Audio Conversion Leading Free Apps for Textualizing Voice Input on Smartphones & Tablets for 2024
- Reliable User Guide to Fix Xiaomi 13T Pro Running Slow and Freezing | Dr.fone
- New In 2024, Discover the Best VSDC Video Editor Alternatives for Mac Computers
- [Updated] The Art of Muting Background Sounds in Skype
- New Video to Image How to Convert Videos to Photos ? 10 Converters
- [New] Top Instagram Follower Finder Apps Safety First (iOS/Android)
- [New] Crafting Spectaculous 1080P Streams on FB Groups
- How Can I Catch the Regional Pokémon without Traveling On Vivo V27 | Dr.fone
- How to Create a Digital Signature Online for Word 2013 document
- In 2024, How to Fake Snapchat Location without Jailbreak On Oppo K11x | Dr.fone
- In 2024, How to Detect and Remove Spyware on Apple iPhone 6s Plus? | Dr.fone
- [New] Supercharge Your Social Media Best Apps for Post & Followers for 2024
- [New] Elevate Your Edits Creating Stellar TikTok React Videos in Filmora's Pro Features for 2024
- [New] VisionMeter Recording Suite for 2024
- Updated 8 Best Motion Graphics Online Tools for Your Inspiration
- 15 Best Strongest Pokémon To Use in Pokémon GO PvP Leagues For Infinix Smart 8 Pro | Dr.fone
- Detailed guide of ispoofer for pogo installation On Oppo Reno 8T | Dr.fone
- [Updated] 2023 | 20 Best Practices for Facebook Video Advertising for 2024
- [Updated] A Step-by-Step Approach to Saving Your Screen While Streaming for 2024
- In 2024, Complete Directory Assortment of Podcast Resource Centers
- Reasons for Samsung Galaxy A15 5G Stuck on Startup Screen and Ways To Fix Them | Dr.fone
- Updated 2024 Approved AVS Video Editor 2023 A Detailed Review of Its Capabilities and Limitation
- Combine Movie Tracks in YouTube Repertoire
- Best Pokemons for PVP Matches in Pokemon Go For Oppo A2 | Dr.fone
- [New] In 2024, How to Create Insta Highlight Cover Photos An Ultimate Guide
- [Updated] Premium Editing Platform Tailored to Vimeo
- [Updated] Interactive Inspection Kits Facebook Live for 2024
- 2024 Approved Elevating Live Game Coverage Tips and Tricks
- In 2024, Top 15 Augmented Reality Games Like Pokémon GO To Play On Motorola Moto E13 | Dr.fone
- How To Recover iPhone 12 Data From iTunes? | Dr.fone
- [New] Snicker Sphere Hot Gags and Joke Artists of TikTok
- Securing Conversation Logs How to Store MB Chats and Calls Safely
- Title: "Streamline Your Content Efficiently Adding YouTube Captions"
- Author: Steven
- Created at : 2024-05-25 20:26:28
- Updated at : 2024-05-26 20:26:28
- Link: https://youtube-clips.techidaily.com/streamline-your-content-efficiently-adding-youtube-captions/
- License: This work is licensed under CC BY-NC-SA 4.0.
