
"Step Into the Spectrum Incorporating Neons in Video Summaries"
Step Into the Spectrum: Incorporating Neons in Video Summaries
Your YouTube video, or any other clip published on any forum, gets a larger number of hits if it has an attractive thumbnail. And, the fact is, a thumbnail becomes 10x more attractive when the main character that the image has have a neon border around it.
With that said, in the following sections, you will learn a couple of methods on how to add a YouTube thumbnail border around the main characters and/or objects that are significant to the clip.
In this article
01 Add Glowing Neon Border to YouTube Thumbnail with Filmora
02 Add a Glowing Neon Border in YouTube Thumbnail with Canva
03 Outline a Person in a YouTube Thumbnail with Photoshop
Part 1: How to Add Neon Border to YouTube Thumbnail for Free with Filmora
Being one of the most versatile and intuitive post-production tools available in the market today, Wondershare Filmora X allows you to add a neon border to a YouTube thumbnail quite conveniently. You can learn how to get this done on Windows or Mac by following the steps given below.
For Win 7 or later (64-bit)
For macOS 10.12 or later
Step 1: Define Project Settings and Add Image to the Timeline
Launch Wondershare Filmora X on your PC (a MacBook Pro M1 is used here), ensure that the project aspect ratio is set to 16:9 (Widescreen) on the splash screen, and click New Project. On the main interface, click the Preview quality and display settings icon from the upper-right area of the Timeline, click Change Project Aspect Ratio, click to select 1280 x 720 (HD) from the Resolution menu of the Project Settings box, and click OK to save the custom project settings.

Then select My Media from the menu bar if not already selected, click Project Media from the navigation pane, and click Import from the Media box to select and import the image of the main character or object that you want to use in the thumbnail.

Now, drag the image from the Media box to the Timeline at the bottom.

Step 2: Clear Image Background, Add Border, and Add Custom Background
Go to Effects from the menu bar, click to select the Default tab and then AI Portrait from the navigation pane, and click and drag the Human Segmentation preset from the right box, and place it over the image track in the Timeline.

Double-click the image layer, scroll down the upper-left box to the Video Effects section, and use the Edge Thickness and Edge Feather sliders to adjust the character’s edges to make them as realistic as possible. Click OK when done.

Next, click and drag the Human Border preset over the image track in the Timeline, and follow the same procedure to customize the border. This will give the character a neon border effect.

Now, use the method explained earlier to import a custom image for the background, and drag and place it under the previous track in the Timeline.

If you are running the latest version of Filmora, you will find there are some neon light effects available under AI Portrait as well.

Step 3: Add Titles to Thumbnail
Go to Titles from the menu bar, click to select the Default tab and then Lower 3rds from the navigation pane, and click and drag your preferred lower-third preset from the right window to a separate layer in the Timeline. Double-click the lower-third layer, and use the available options in the upper-left window to change the text, its color, etc., and drag the textbox to place it to your preferred position on the image as well. Click OK to save the changes.
Next, click to select Titles from the navigation pane, and drag your preferred title from the right window to the upper-most track in the Timeline. Now use the method explained earlier to edit the text, its color, position, etc. to make it look professional.

For more tips and tricks for creating YouTube thumbnail, you can check this You Tube thumbnail creating guide.
Step 4: Get the Neon Border Thumbnail
Click the Snapshot (Camera) icon from the upper-right area of the Timeline, go to My Media from the menu bar, right-click the thumbnail of the screenshot you captured, and click Reveal in Finder (on Mac) or Reveal in Explorer (on Windows) to get to the folder the YouTube thumbnail border is saved in.

Part 2: How to Add a Glowing Neon Border in Your YouTube Thumbnail with Canva
Canva is another intuitive editing program that works on the web interface rather than having you download and install an app on your PC. You can add a neon border for YouTube thumbnails using Canva by following the instructions given below:
Step 1: Define Project Settings and Add a Background
After signing in to your Canva account, click Create a design from the top-right corner of the page, click Custom size from the bottom, define 1280 and 720 in the Width and Height fields on the box that appears respectively, and click Create new design.

Now, click to select Background from the navigation bar on the left (if the Background tool is not visible, click More and then choose Background from the expanded list), and click to select a background from the images available in the center pane.

Step 2: Upload an Image and Add Effects
Click Uploads from the navigation bar, click the More icon from the right of the Upload media button present at the top of the center pane, choose your preferred method to upload the image (with the transparent background) that you want to use, upload the image, and drag it from the center pane to the Canvas.
Note: You can use any of the tools available online to remove the background from your image for free.

To add a YouTube thumbnail border, make sure that the image that you added to the Canvas is selected, click the Duplicate icon from the upper-right area, and use the scaling handles of the copy of the image to increase its size a bit. Reposition the image back to its original location as well.
Then, click Edit image from the upper-left corner of the Canvas, click Duotone from the Edit image pane at the center, if need be, click See all, choose your preferred duotone effect to apply on the image, choose your preferred highlight and shadow colors from the box that appears next, and click Back from the top of the pane.

Next, click See all next to the Adjust section from the center pane, and drag the Blur slider to the right to increase the blur effect on the image.

Step 3: Position the Layers
While keeping the duplicate image selected, click the Position button from the upper-right area of the Canvas, and click Background to send the second image behind the first one to get the neon border effect for the photo.

Part 3: How to Outline a Person in a YouTube Thumbnail with Photoshop
Because YouTube thumbnails are nothing but static images, creating YouTube thumbnail border with Adobe Photoshop is comparatively easier. The process of doing this is given below:
Step 1: Define Document Preferences and Import an Image
Launch Adobe Photoshop on your PC, click Create new, and on the New Document customization box, define the width and height values to 1280 and 720 pixels respectively. Select Transparent from the Background Contents menu as well if not already selected. Click Create from the bottom to create a new Photoshop document with the specified document settings. Next, open the folder that contains the source image, drag the photo to Photoshop, and press Enter to place the photo.

Step 2: Remove Background from the Image
Make sure that the image layer is selected in the Layers panel on the right, go to Select from the menu bar at the top, and click Subject. From the bottom of the Layers panel, click the Add a mask icon to get rid of the background, leaving only the human on the Canvas.

Step 3: Add a Custom Background and an Outline Around the Subject
Use the method explained earlier to import a background image of your choice to Photoshop. Drag the background image layer to the bottom in the Layers panel. Double-click the masked layer, click to select Stroke from the left pane of the Layer Style box, and use the options available on the right to manage the size, color, position, etc. of the stroke that has been added around the human subject. Click OK when done, and then export the image normally to use it as a YouTube thumbnail border.

Summary
It is important to know that the default resolution of a YouTube thumbnail is 1280 x 720 pixels that is usually written and referred to as 720p. While adding a YouTube thumbnail border, it is also imperative to have a good sense of color combination and fonts. Furthermore, a decent tool like Wondershare Filmora X must be used to add an appealing neon border around the main subject in the thumbnail image easily and quickly.
02 Add a Glowing Neon Border in YouTube Thumbnail with Canva
03 Outline a Person in a YouTube Thumbnail with Photoshop
Part 1: How to Add Neon Border to YouTube Thumbnail for Free with Filmora
Being one of the most versatile and intuitive post-production tools available in the market today, Wondershare Filmora X allows you to add a neon border to a YouTube thumbnail quite conveniently. You can learn how to get this done on Windows or Mac by following the steps given below.
For Win 7 or later (64-bit)
For macOS 10.12 or later
Step 1: Define Project Settings and Add Image to the Timeline
Launch Wondershare Filmora X on your PC (a MacBook Pro M1 is used here), ensure that the project aspect ratio is set to 16:9 (Widescreen) on the splash screen, and click New Project. On the main interface, click the Preview quality and display settings icon from the upper-right area of the Timeline, click Change Project Aspect Ratio, click to select 1280 x 720 (HD) from the Resolution menu of the Project Settings box, and click OK to save the custom project settings.
Then select My Media from the menu bar if not already selected, click Project Media from the navigation pane, and click Import from the Media box to select and import the image of the main character or object that you want to use in the thumbnail.
Now, drag the image from the Media box to the Timeline at the bottom.
Step 2: Clear Image Background, Add Border, and Add Custom Background
Go to Effects from the menu bar, click to select the Default tab and then AI Portrait from the navigation pane, and click and drag the Human Segmentation preset from the right box, and place it over the image track in the Timeline.
Double-click the image layer, scroll down the upper-left box to the Video Effects section, and use the Edge Thickness and Edge Feather sliders to adjust the character’s edges to make them as realistic as possible. Click OK when done.
Next, click and drag the Human Border preset over the image track in the Timeline, and follow the same procedure to customize the border. This will give the character a neon border effect.
Now, use the method explained earlier to import a custom image for the background, and drag and place it under the previous track in the Timeline.
If you are running the latest version of Filmora, you will find there are some neon light effects available under AI Portrait as well.
Step 3: Add Titles to Thumbnail
Go to Titles from the menu bar, click to select the Default tab and then Lower 3rds from the navigation pane, and click and drag your preferred lower-third preset from the right window to a separate layer in the Timeline. Double-click the lower-third layer, and use the available options in the upper-left window to change the text, its color, etc., and drag the textbox to place it to your preferred position on the image as well. Click OK to save the changes.
Next, click to select Titles from the navigation pane, and drag your preferred title from the right window to the upper-most track in the Timeline. Now use the method explained earlier to edit the text, its color, position, etc. to make it look professional.
For more tips and tricks for creating YouTube thumbnail, you can check this You Tube thumbnail creating guide.
Step 4: Get the Neon Border Thumbnail
Click the Snapshot (Camera) icon from the upper-right area of the Timeline, go to My Media from the menu bar, right-click the thumbnail of the screenshot you captured, and click Reveal in Finder (on Mac) or Reveal in Explorer (on Windows) to get to the folder the YouTube thumbnail border is saved in.
Part 2: How to Add a Glowing Neon Border in Your YouTube Thumbnail with Canva
Canva is another intuitive editing program that works on the web interface rather than having you download and install an app on your PC. You can add a neon border for YouTube thumbnails using Canva by following the instructions given below:
Step 1: Define Project Settings and Add a Background
After signing in to your Canva account, click Create a design from the top-right corner of the page, click Custom size from the bottom, define 1280 and 720 in the Width and Height fields on the box that appears respectively, and click Create new design.
Now, click to select Background from the navigation bar on the left (if the Background tool is not visible, click More and then choose Background from the expanded list), and click to select a background from the images available in the center pane.
Step 2: Upload an Image and Add Effects
Click Uploads from the navigation bar, click the More icon from the right of the Upload media button present at the top of the center pane, choose your preferred method to upload the image (with the transparent background) that you want to use, upload the image, and drag it from the center pane to the Canvas.
Note: You can use any of the tools available online to remove the background from your image for free.
To add a YouTube thumbnail border, make sure that the image that you added to the Canvas is selected, click the Duplicate icon from the upper-right area, and use the scaling handles of the copy of the image to increase its size a bit. Reposition the image back to its original location as well.
Then, click Edit image from the upper-left corner of the Canvas, click Duotone from the Edit image pane at the center, if need be, click See all, choose your preferred duotone effect to apply on the image, choose your preferred highlight and shadow colors from the box that appears next, and click Back from the top of the pane.
Next, click See all next to the Adjust section from the center pane, and drag the Blur slider to the right to increase the blur effect on the image.
Step 3: Position the Layers
While keeping the duplicate image selected, click the Position button from the upper-right area of the Canvas, and click Background to send the second image behind the first one to get the neon border effect for the photo.
Part 3: How to Outline a Person in a YouTube Thumbnail with Photoshop
Because YouTube thumbnails are nothing but static images, creating YouTube thumbnail border with Adobe Photoshop is comparatively easier. The process of doing this is given below:
Step 1: Define Document Preferences and Import an Image
Launch Adobe Photoshop on your PC, click Create new, and on the New Document customization box, define the width and height values to 1280 and 720 pixels respectively. Select Transparent from the Background Contents menu as well if not already selected. Click Create from the bottom to create a new Photoshop document with the specified document settings. Next, open the folder that contains the source image, drag the photo to Photoshop, and press Enter to place the photo.
Step 2: Remove Background from the Image
Make sure that the image layer is selected in the Layers panel on the right, go to Select from the menu bar at the top, and click Subject. From the bottom of the Layers panel, click the Add a mask icon to get rid of the background, leaving only the human on the Canvas.
Step 3: Add a Custom Background and an Outline Around the Subject
Use the method explained earlier to import a background image of your choice to Photoshop. Drag the background image layer to the bottom in the Layers panel. Double-click the masked layer, click to select Stroke from the left pane of the Layer Style box, and use the options available on the right to manage the size, color, position, etc. of the stroke that has been added around the human subject. Click OK when done, and then export the image normally to use it as a YouTube thumbnail border.
Summary
It is important to know that the default resolution of a YouTube thumbnail is 1280 x 720 pixels that is usually written and referred to as 720p. While adding a YouTube thumbnail border, it is also imperative to have a good sense of color combination and fonts. Furthermore, a decent tool like Wondershare Filmora X must be used to add an appealing neon border around the main subject in the thumbnail image easily and quickly.
Locate Lively YouTube Conversations
Best Free YouTube Comment Finder You Should Try

Richard Bennett
Mar 27, 2024• Proven solutions
Are you trying to make more people notice your YouTube video? According to surveys, YouTube is the second most popular search engine after Google, with more than 100 hours of video uploaded every minute.
For a YouTube influencer, comments play a crucial role, and so is comment modification.
Now, YouTube has not yet come up with a complete comment modification kit. With the existing tools and free comment finder applications combined, it has become easier to remove improper, unprofessional or offensive comments and engage with genuine followers on YouTube.
This thread is a guide for selecting the best YouTube comment finder and a tutorial to use existing YouTube tools to control comments.
Part 1: Best Free YouTube Comments Finder
YouTube Comment Finder is an SEO feature that allows you to look at the best catchphrases for any mainstream YouTube video. Here are some of the best apps that offer the feature.
YT Comment Finder is one of the most user-friendly and straightforward comment finder tools available on the internet. It is free to use and produces incredible results. Let us see how it works.
- To visit the website, click on the link below https://ytcomment.kmcat.uk/
- A search bar will be visible on the homepage. You can enter the title of the video you wish to search comments for, or the URL of the YouTube channel or a video URL, and then click the Search

- In the next step, you will find a complete list of videos with the same title. Choose your video and click on Search This Video**.**
- A new search bar will appear for any comments you choose to look up.

With YTComment, you can see the basic information about the YouTube video or channel, and to find a comment, all you have to do is type in a word you want to search, and you’ll get a list of all the comments relevant to that term or its synonyms as well.
2. YouTube First Comment Finder
Although YouTube has settings to know about the first comment in a video, that is only accessible to the creator and is a big burden process. With YouTube First Comment Finder, you’re just a click away.
- Open the website through this link https://first-comment.com/
- Paste the URL of your YouTube video in the search box. Click on the FIND There you go! The name of the first commenter of the video will come right in front of you, and you can even see what the comment is and the date of commenting.
- Unique Feature: This website comes with a tutorial and you can find out the first comment of the YouTube quickly with it. However, the feature of this tool is limited.
3. Hadzy
It is one of the most user-friendly and ad-free random comment pickers available for YouTube. Hadzy is quick and can handle more comments than other sites. Hadzy YouTube comment picker is popular among most of the Tubers.
- To open Hadzy, click on the link https://hadzy.com/
- Simply copy and paste the YouTube video’s URL into the homepage’s search bar.
- A pop-up will appear with all the details about the video. You just need to click on Load Data.
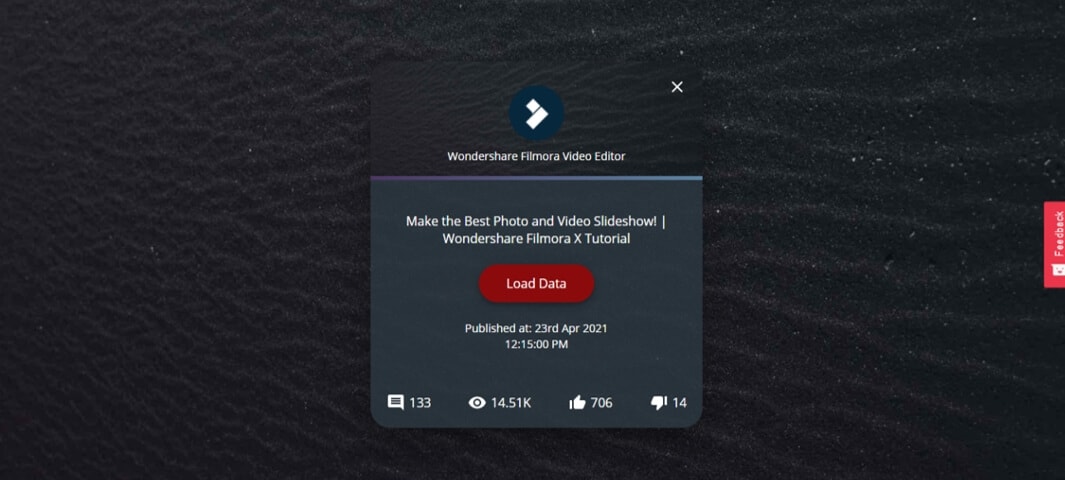
- In the next step, you will be redirected to another pop-up with two buttons- ‘View Comments’ and ‘View Statistics.’ Click on View Comments to check the first, second and all the other comments in ascending order.
- Unique feature 1: By clicking the View Statistics button, you can get a track of the popular words used in the comment section and the top questions asked by your followers.
- Unique feature 2: Along with the comment, details of the user, time of commenting, and many more things can be extracted from Hadzy.
Part 2: How to Find the First Comments You Have Posted on YouTube?
There are times when you regret what you’ve commented on in the past or wish to go back and look up your first message on YouTube. However, it is not always possible to recall the channel or video where you left the comment.
So, is there a way or a tool that can make it just a doodle? Certainly yes. Did you know that you can check for any previous comments you’ve made on YouTube regardless of how old it is?
Everything you have to do now follows the steps below. For the following methods, it is preferable to use a browser rather than the YouTube App.
- Go to the homepage of YouTube. At the top left corner, Click on the three-lined icon. Click on History next. You will be redirected to your account’s history section.
- At the right corner, choose History type as ‘community.’ Below that, click on the ‘Comments’ option. Finally, a new tab would open with all your YouTube comment history.

By these basic steps, enjoy editing or deleting your comments and replies directly on YouTube!
However, you will have to scroll down a long way before you hit the end to see your first comment posted on YouTube.
Part 3: How to Find the Latest Comments you have received on YouTube?
You do not get notifications about comments left on your YouTube videos at times. Mostly, it’s due to your notification preferences. When you enable comment notifications, you’ll be informed of all the latest comments on your videos. And this, in turn, allows you to keep track of your followers and engage with them more easily.
YouTube is a vast platform, and there are quite a few modifications hidden everywhere. To know everything is not always possible. Now that you are here let’s see how to locate the most recent comment you’ve got on YouTube.
Step 1: Enable Comment Notifications
- Open the homepage of YouTube, scroll down to ‘Settings’ and click on it. You will be redirected to the Setting page.
- From the bar in the left corner, select Notifications and scroll down and enable ‘Activity on my Channel.’
These steps are convenient both for pc as well as a mobile app. Just follow three steps, Setting-Notifications-Activity on your Channel.
Step 2: Check the Notification Bar
- Click on the bell icon at the top right corner and there you would receive notifications regarding all the comment activities. Click on the particular notification to go to that comment.
Bonus: How to Change the Comments View Order?
Did you know you can also customize your comment section as per your need? On the watch page for your video, you can rearrange the order of the comments. You may sort the comments by top comments or by date added. It’s just simple steps ahead.
- First of all, you need to sign in to YouTube Studio: http://studio.youtube.com ,
- From the left bar, select Content, click a video’s thumbnail, and click on Show More in video details page.
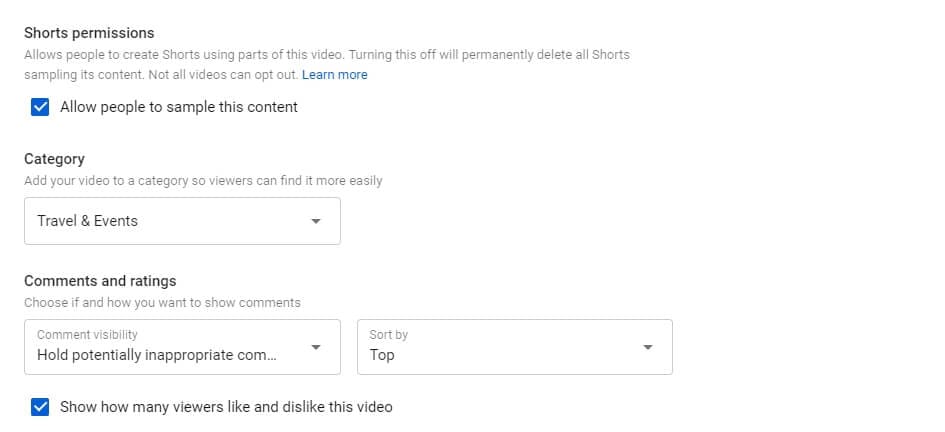
- Under ‘Comments and ratings,’ select Sort by, and then choose between “Top” and “Newest.”
- Save the changes, and you are done!
Conclusion
YouTube comments play a predominant role in handling your business as a YouTuber. It’s reasonable to believe that the search algorithm considers comments on your videos to be a significant indicator of their efficiency, and therefore gives them higher rankings for specific searches.
The higher your video content’s exposure on the internet, the more you’ll be included in YouTube or Google searches.
YouTube Comments Finder helps you keep track of the good and bad comments in your videos and definitely helps improve the SEO of your Channel. Thanks to YouTube’s advanced tools and websites like Hadzy, YouTube comment Finder, YT Comment Finder and YouTube First Comment Finder, managing third-party interaction is a lot simpler today.
Richard Bennett
Richard Bennett is a writer and a lover of all things video.
Follow @Richard Bennett
Richard Bennett
Mar 27, 2024• Proven solutions
Are you trying to make more people notice your YouTube video? According to surveys, YouTube is the second most popular search engine after Google, with more than 100 hours of video uploaded every minute.
For a YouTube influencer, comments play a crucial role, and so is comment modification.
Now, YouTube has not yet come up with a complete comment modification kit. With the existing tools and free comment finder applications combined, it has become easier to remove improper, unprofessional or offensive comments and engage with genuine followers on YouTube.
This thread is a guide for selecting the best YouTube comment finder and a tutorial to use existing YouTube tools to control comments.
Part 1: Best Free YouTube Comments Finder
YouTube Comment Finder is an SEO feature that allows you to look at the best catchphrases for any mainstream YouTube video. Here are some of the best apps that offer the feature.
YT Comment Finder is one of the most user-friendly and straightforward comment finder tools available on the internet. It is free to use and produces incredible results. Let us see how it works.
- To visit the website, click on the link below https://ytcomment.kmcat.uk/
- A search bar will be visible on the homepage. You can enter the title of the video you wish to search comments for, or the URL of the YouTube channel or a video URL, and then click the Search
- In the next step, you will find a complete list of videos with the same title. Choose your video and click on Search This Video**.**
- A new search bar will appear for any comments you choose to look up.
With YTComment, you can see the basic information about the YouTube video or channel, and to find a comment, all you have to do is type in a word you want to search, and you’ll get a list of all the comments relevant to that term or its synonyms as well.
2. YouTube First Comment Finder
Although YouTube has settings to know about the first comment in a video, that is only accessible to the creator and is a big burden process. With YouTube First Comment Finder, you’re just a click away.
- Open the website through this link https://first-comment.com/
- Paste the URL of your YouTube video in the search box. Click on the FIND There you go! The name of the first commenter of the video will come right in front of you, and you can even see what the comment is and the date of commenting.
- Unique Feature: This website comes with a tutorial and you can find out the first comment of the YouTube quickly with it. However, the feature of this tool is limited.
3. Hadzy
It is one of the most user-friendly and ad-free random comment pickers available for YouTube. Hadzy is quick and can handle more comments than other sites. Hadzy YouTube comment picker is popular among most of the Tubers.
- To open Hadzy, click on the link https://hadzy.com/
- Simply copy and paste the YouTube video’s URL into the homepage’s search bar.
- A pop-up will appear with all the details about the video. You just need to click on Load Data.
- In the next step, you will be redirected to another pop-up with two buttons- ‘View Comments’ and ‘View Statistics.’ Click on View Comments to check the first, second and all the other comments in ascending order.
- Unique feature 1: By clicking the View Statistics button, you can get a track of the popular words used in the comment section and the top questions asked by your followers.
- Unique feature 2: Along with the comment, details of the user, time of commenting, and many more things can be extracted from Hadzy.
Part 2: How to Find the First Comments You Have Posted on YouTube?
There are times when you regret what you’ve commented on in the past or wish to go back and look up your first message on YouTube. However, it is not always possible to recall the channel or video where you left the comment.
So, is there a way or a tool that can make it just a doodle? Certainly yes. Did you know that you can check for any previous comments you’ve made on YouTube regardless of how old it is?
Everything you have to do now follows the steps below. For the following methods, it is preferable to use a browser rather than the YouTube App.
- Go to the homepage of YouTube. At the top left corner, Click on the three-lined icon. Click on History next. You will be redirected to your account’s history section.
- At the right corner, choose History type as ‘community.’ Below that, click on the ‘Comments’ option. Finally, a new tab would open with all your YouTube comment history.
By these basic steps, enjoy editing or deleting your comments and replies directly on YouTube!
However, you will have to scroll down a long way before you hit the end to see your first comment posted on YouTube.
Part 3: How to Find the Latest Comments you have received on YouTube?
You do not get notifications about comments left on your YouTube videos at times. Mostly, it’s due to your notification preferences. When you enable comment notifications, you’ll be informed of all the latest comments on your videos. And this, in turn, allows you to keep track of your followers and engage with them more easily.
YouTube is a vast platform, and there are quite a few modifications hidden everywhere. To know everything is not always possible. Now that you are here let’s see how to locate the most recent comment you’ve got on YouTube.
Step 1: Enable Comment Notifications
- Open the homepage of YouTube, scroll down to ‘Settings’ and click on it. You will be redirected to the Setting page.
- From the bar in the left corner, select Notifications and scroll down and enable ‘Activity on my Channel.’
These steps are convenient both for pc as well as a mobile app. Just follow three steps, Setting-Notifications-Activity on your Channel.
Step 2: Check the Notification Bar
- Click on the bell icon at the top right corner and there you would receive notifications regarding all the comment activities. Click on the particular notification to go to that comment.
Bonus: How to Change the Comments View Order?
Did you know you can also customize your comment section as per your need? On the watch page for your video, you can rearrange the order of the comments. You may sort the comments by top comments or by date added. It’s just simple steps ahead.
- First of all, you need to sign in to YouTube Studio: http://studio.youtube.com ,
- From the left bar, select Content, click a video’s thumbnail, and click on Show More in video details page.
- Under ‘Comments and ratings,’ select Sort by, and then choose between “Top” and “Newest.”
- Save the changes, and you are done!
Conclusion
YouTube comments play a predominant role in handling your business as a YouTuber. It’s reasonable to believe that the search algorithm considers comments on your videos to be a significant indicator of their efficiency, and therefore gives them higher rankings for specific searches.
The higher your video content’s exposure on the internet, the more you’ll be included in YouTube or Google searches.
YouTube Comments Finder helps you keep track of the good and bad comments in your videos and definitely helps improve the SEO of your Channel. Thanks to YouTube’s advanced tools and websites like Hadzy, YouTube comment Finder, YT Comment Finder and YouTube First Comment Finder, managing third-party interaction is a lot simpler today.
Richard Bennett
Richard Bennett is a writer and a lover of all things video.
Follow @Richard Bennett
Also read:
- 2024 Approved Earning Equations Decoding the Mathematics Behind YouTube Income Monitoring
- Enchanting Backgrounds for YouTube Thumbnails for 2024
- [New] Conquering Low-Light Challenges in Filming
- [New] Top 10 VR Videos on YouTube to Have Immersive Experience
- Customize Your Video's Appeal YouTube Thumbnail Tips & Tricks for 2024
- The Rise and Challenges of Video Streaming Profits
- Quantifiable Quirks Yearly Graphed Tidbits From YT (2017)
- In 2024, Embrace 9 Festive Feasts Watch Holiday Epics at Zero Cost Online
- Extracting YouTube Images Online, Desktop Tools & Terminal Tactics
- [New] Easy Access to No-Cost Music for Video Makers
- Pro Video Essentials Selecting Superior Camera Lenses
- [New] Celebrating Clickers Channel & Buttons Incentives
- In-Depth Video Metrics at Your Fingertips Social Blade for YouTube
- In 2024, Breaking Into Livestrances A Gamers' Guide to YouTube Success
- [New] A Step-by-Step Expedition to YouTube's Unseen Layers
- In 2024, Educators' Guide to Thriving YouTube Channels – 10 Must-Know Secrets
- In 2024, Does Paying Regularly For YouTube Premium Give You More Than Just An Ad-Free View?
- Frame by Frame The Smartphone Storyteller's Path to YouTubes Thumbnails
- In 2024, Engage, Enchant, Excel The Quintessential 5 Strategies for YouTube Marketing
- Strategies to Maximize Mobile Income From YouTube
- [Updated] Elevate Your Youtube Presence with Audio
- In 2024, Beauty's Brightest Stars YouTube Personalities to Follow
- In 2024, Achieve Optimum Stability Incorrances for Tripods in Vlog Shoots
- Enjoy Uninterrupted Viewing Top 20 YouTube Download Apps
- Adapting Your Favorite Songs From Spotify to YouTube Music Service
- 2024 Approved Cultivate Creativity 20+ Inspiring YouTube Concepts
- 2024 Approved Does Your Channel Benefit From Regular YouTube Payments?
- In 2024, 15 Best Free YouTube Introduction Tools
- Channel Growth Essential Steps for YouTube Backlink Creation
- 2024 Approved Blending Past and Present Film Aesthetics
- [New] Essential Guide The 8 Best Zero Price Video Cutting Software
- Channel Building Blueprint Reaching 1K Subs Rapidly
- Perfecting the Craft of YouTube Short Video Making
- In 2024, Earning Mastery Youtube Short Video Tips
- 2024 Approved Boost Visibility Selecting the Right YouTube Thumbnail Dimensions
- Simply Save Your Streamed Content with These Premium Tools
- [Updated] Eco-Effect Filmmaking YouTube's Guide to Green Magic
- [New] Complete Overview V-YouTubers in the Digital Arena
- [Updated] Enhancing User Experience A Quick How-To for YouTube CC & Subtitles
- Audio Enhancement for Online Video Creators for 2024
- The Pinnacle Selector Your Personal Video Vault
- [New] Navigating the World of TikTok Promotion Methodologies and Outstanding Examples
- SBV to SRT How to Convert YouTube SBV Subtitle to SRT Format
- How to Detect and Stop mSpy from Spying on Your Apple iPhone 12 Pro | Dr.fone
- In 2024, Proven Ways in How To Hide Location on Life360 For Oppo A18 | Dr.fone
- In 2024, Street Smart Showdown Top Hand-to-Hand Video Games
- New In 2024, The Best Way to Trim VLC Videos on Mac Maintain Original Quality
- Gmail Not Working on Nokia C12 7 Common Problems & Fixes | Dr.fone
- Read This Guide to Find a Reliable Alternative to Fake GPS On Infinix Note 30 | Dr.fone
- [Updated] 2024 Approved Your Guide to the Funniest & Most Touching Memes on Instagram
- Itel P55+ Not Receiving Texts? 10 Hassle-Free Solutions Here | Dr.fone
- 2024 Approved Stream Like a Pro 3 Key Strategies for LOL Gamers
- 3 Ways for Android Pokemon Go Spoofing On Nokia C12 Plus | Dr.fone
- A Step-by-Step Guide on Using ADB and Fastboot to Remove FRP Lock on your Vivo V27
- [New] In 2024, Streamlining Multi-Camera Setup with OBS
- Is GSM Flasher ADB Legit? Full Review To Bypass Your Google Pixel FoldFRP Lock
- How to Fix iPhone 12 Storage Not Loading/Showing | Stellar
- [Updated] Comprehensive Guide YouTube to MPEG Transcoding
- [New] In 2024, A Comprehensive Guide to Changing Avatars & Statuses on Discord
- In 2024, Top 11 Free Apps to Check IMEI on Nokia C12 Pro Phones
- In 2024, The Pathway to Popularity Masterful IGTV Video Posts
- In 2024, Ultimate guide to get the meltan box pokemon go For Honor X50i+ | Dr.fone
- From Basic to Breathtaking Transforming Your Discord Avatar for 2024
- [New] In 2024, Innovative Approaches to Elevate ROI in Your FB Ads with Animation
- Reliable User Guide to Fix Xiaomi Redmi 12 5G Running Slow and Freezing | Dr.fone
- [New] Deciphering the Benefits In-Depth Look at Bandicam's Capabilities for 2024
- Updated In 2024, Color Enhancement in Final Cut Pro A Step-by-Step Guide
- [Updated] The Ultimate List of Prime Video Favorites on Twittersphere for 2024
- New In 2024, Remove Drums From a Song Online Easy Tips and Tricks
- Title: "Step Into the Spectrum Incorporating Neons in Video Summaries"
- Author: Steven
- Created at : 2024-05-25 20:25:30
- Updated at : 2024-05-26 20:25:30
- Link: https://youtube-clips.techidaily.com/step-into-the-spectrum-incorporating-neons-in-video-summaries/
- License: This work is licensed under CC BY-NC-SA 4.0.
