
:max_bytes(150000):strip_icc()/gettyimages-612441534-2000-915697f3325a4f2f9c1f2822c925a493.jpg)
"Shot Securement Keeping Cameras Still on Arms Only"
Shot Securement: Keeping Cameras Still on Arms Only
DIY Tripods| How to Stabilize Your Camera without Buying a Tripod

Richard Bennett
Oct 26, 2023• Proven solutions
When you’re trying to grow a channel on YouTube it can feel like equipment is a barrier, but it shouldn’t be. If you can’t afford a high-end tripod, for example, there are loads of ways to get by without one.
DIY Your Video with Wondershare Filmora
Wondershare Filmora has the best video stabilization tool is your videos have a bad frame or were recorded in dim lights. If a video is shot in bad weather or unfriendly situation where you don’t have all the equipment required for a quality recording, Wondershare Filmora can help you in the background to edit your videos like a pro. And it has all the relevant tools like effects, transitions, background removal, overlays, and background music that could turn your normal video to a professional one.


Here are 3 of our favorite DIY tripods.
DIY smartphone tripod using binder clips or hair clips
You’re a solo operation and your best camera is on your phone. That’s pretty common.
If you have a DSLR then you can set it down on any stable surface while filming yourself, but your phone can’t stand up by itself. It needs something or someone to hold it. Do you just accept that and shoot everything as a selfie?
No. No, you don’t, because there are common household items that can help you out of this problem. For this DIY tripod, you need either 2 binder clips or 2 ‘claw clips’ (also called ‘hair jaws’).
Hold your phone in landscape mode (horizontally, so it’s long rather than tall) and attach clips to the bottom corners. If you are worried about scratching your screen, fold up some paper to place between your clip and your phone.
Here it is with binder clips:

And here it is with hair clips:

Now you can set your smartphone upon any stable surface, like a table or a stack of books.
Here are some more cool ideas!
DIY adjustable tripod using books and a towel
You’ve probably heard a million times that you can stabilize your camera by sitting it down on any stable surface – on your desk, on a stack of books, up in a tree, etc. This is very true!
But if you can use any stable surface, why do people buy tripods?
Because it isn’t convenient to rearrange your furniture whenever you want to make a video, and also because tripods are adjustable. You can change their height, you can use them to pan or tilt, and it’s pretty easy to move them a bit forwards or backward while you’re setting up your shot.
To get similar functions from the ‘any stable surface’ solution you can use a table, a stack of books, and a towel.
- Set up the area where you’re going to sit while you’re filming on one end of the table.
- Put the towel down over the approximate spot you want your camera to be.
- Stack your books on top of the towel.
- Put your camera on top of the books.
Now if your camera isn’t up high enough, or is too high, you can adjust it just by adding or taking away books. If you want to move it closer or farther away from you, just pull the towel forwards or backward.
DIY gripping ‘Gorillapod’ using wire and tape
Gorillapod’s are cool because you can use them like normal tripods, carry them around like selfie sticks, or attach them to things like fences and posts. Here’s how you can make something similar using wire, electrical tape or duct tape, and a 1/4 bolt.
Your wire should be fairly stiff and you’ll need three pieces the same length, which should be at least 10 inches. Old clothes hangers work well. This needs to be something strong enough to support the weight of your camera, but soft enough that it’s not impossible for you to bend.

All of your supplies plus the finished product.
Readying your legs
Step 1: Bend 2 inches at one end of each wire into a ‘U’ shape. You will probably need pliers for this.
Step 2: Pick up one of your pieces of wire and wrap one end with electrical tape. Go around 5-10 times (to prevent it from coming undone at the end) and then, without cutting your tape, start moving up and wrapping the rest of your wire. Stop before your ‘U’ section.
Repeat this with the other two wires.
Attaching your legs
Step 1: Place the ‘U’ section of a leg against your bolt. The bolt’s threading should be pointing away from the leg. Now, use your tape to attach them. Wind it around 2 or 3 times, then repeat the process with both of the other legs individually.
Step 2: After all the legs are attached, wrap some more tape around all 3 as tightly as you can.
Your camera will mount onto the bolt! You’ll be able to use this as a normal table-top tripod or use the flexible legs to grab onto different things like a Gorillapod. Read more at Instructables.
Note: make sure the bolt is a fit for your camera before you get too far into this process.
Richard Bennett
Richard Bennett is a writer and a lover of all things video.
Follow @Richard Bennett
Richard Bennett
Oct 26, 2023• Proven solutions
When you’re trying to grow a channel on YouTube it can feel like equipment is a barrier, but it shouldn’t be. If you can’t afford a high-end tripod, for example, there are loads of ways to get by without one.
DIY Your Video with Wondershare Filmora
Wondershare Filmora has the best video stabilization tool is your videos have a bad frame or were recorded in dim lights. If a video is shot in bad weather or unfriendly situation where you don’t have all the equipment required for a quality recording, Wondershare Filmora can help you in the background to edit your videos like a pro. And it has all the relevant tools like effects, transitions, background removal, overlays, and background music that could turn your normal video to a professional one.
Here are 3 of our favorite DIY tripods.
DIY smartphone tripod using binder clips or hair clips
You’re a solo operation and your best camera is on your phone. That’s pretty common.
If you have a DSLR then you can set it down on any stable surface while filming yourself, but your phone can’t stand up by itself. It needs something or someone to hold it. Do you just accept that and shoot everything as a selfie?
No. No, you don’t, because there are common household items that can help you out of this problem. For this DIY tripod, you need either 2 binder clips or 2 ‘claw clips’ (also called ‘hair jaws’).
Hold your phone in landscape mode (horizontally, so it’s long rather than tall) and attach clips to the bottom corners. If you are worried about scratching your screen, fold up some paper to place between your clip and your phone.
Here it is with binder clips:
And here it is with hair clips:
Now you can set your smartphone upon any stable surface, like a table or a stack of books.
Here are some more cool ideas!
DIY adjustable tripod using books and a towel
You’ve probably heard a million times that you can stabilize your camera by sitting it down on any stable surface – on your desk, on a stack of books, up in a tree, etc. This is very true!
But if you can use any stable surface, why do people buy tripods?
Because it isn’t convenient to rearrange your furniture whenever you want to make a video, and also because tripods are adjustable. You can change their height, you can use them to pan or tilt, and it’s pretty easy to move them a bit forwards or backward while you’re setting up your shot.
To get similar functions from the ‘any stable surface’ solution you can use a table, a stack of books, and a towel.
- Set up the area where you’re going to sit while you’re filming on one end of the table.
- Put the towel down over the approximate spot you want your camera to be.
- Stack your books on top of the towel.
- Put your camera on top of the books.
Now if your camera isn’t up high enough, or is too high, you can adjust it just by adding or taking away books. If you want to move it closer or farther away from you, just pull the towel forwards or backward.
DIY gripping ‘Gorillapod’ using wire and tape
Gorillapod’s are cool because you can use them like normal tripods, carry them around like selfie sticks, or attach them to things like fences and posts. Here’s how you can make something similar using wire, electrical tape or duct tape, and a 1/4 bolt.
Your wire should be fairly stiff and you’ll need three pieces the same length, which should be at least 10 inches. Old clothes hangers work well. This needs to be something strong enough to support the weight of your camera, but soft enough that it’s not impossible for you to bend.
All of your supplies plus the finished product.
Readying your legs
Step 1: Bend 2 inches at one end of each wire into a ‘U’ shape. You will probably need pliers for this.
Step 2: Pick up one of your pieces of wire and wrap one end with electrical tape. Go around 5-10 times (to prevent it from coming undone at the end) and then, without cutting your tape, start moving up and wrapping the rest of your wire. Stop before your ‘U’ section.
Repeat this with the other two wires.
Attaching your legs
Step 1: Place the ‘U’ section of a leg against your bolt. The bolt’s threading should be pointing away from the leg. Now, use your tape to attach them. Wind it around 2 or 3 times, then repeat the process with both of the other legs individually.
Step 2: After all the legs are attached, wrap some more tape around all 3 as tightly as you can.
Your camera will mount onto the bolt! You’ll be able to use this as a normal table-top tripod or use the flexible legs to grab onto different things like a Gorillapod. Read more at Instructables.
Note: make sure the bolt is a fit for your camera before you get too far into this process.
Richard Bennett
Richard Bennett is a writer and a lover of all things video.
Follow @Richard Bennett
Essential 10 Boosters for Multi-Device Use
Best 10 YouTube Volume Boosters for Windows, macOS, Android, and iPhone

Shanoon Cox
Mar 27, 2024• Proven solutions
Have you ever listened to a YouTube video on max volume but still the sound wasn’t audible - even after turning up the YouTube volume as well as device audio? It is super annoying and inconvenient when you increase volume to max yet the video remains inaudible. YouTube volume issue could be due to various reasons such as poor audio quality of the built-in speakers or low original video sound. Well, there is a simple way to combat this problem i.e., sound booster. You can set different volume levels for the YouTube app on your PC or smartphone’s native volume controls. There are different YouTube volume boosters for Android, Windows, macOS, and iOS devices.
From listening to your favorite podcast to watching vlogs with your friends, you can use the best volume booster apps to increase the media sound volume and quality!
- Part 1: Best YouTube Volume Boosters for Windows and macOS
- Part 2: Best YouTube Volume Boosters for Android and iOS
- Part 3: Best YouTube Video Editing Software-Wondershare Filmora (Bonus Tip)
Part 1: Best YouTube Volume Boosters for Windows and macOS
Let’s introduce the best YouTube volume boosters for Windows and macOS:
1. FxSound (Windows and Mac)
FxSound is a very powerful tool that is made for Windows and macOS to enhance and boost the quality and volume of sound. This app comes with many features. For example, this audio software provides better sound quality, volume booster, and sound effects. Now you can listen to music, watch movies and play games without any distortion. Easily boost base, get customized effects and play with custom presets. You can download this app for your PC for free through the official website. People like this equalizer because it can make any audio format sound good even if it is 100 years old!

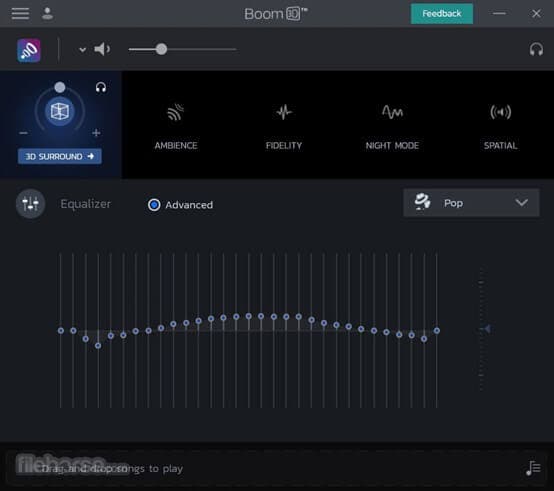
2. Boom 3D (Windows and macOS)
Boom 3D is a very popular app among many Windows and macOS users. This software is designed to help improve the audio on speakers or headphones that are connected to your computer. Boom 3D audio booster software also works with the Bluetooth devices that are connected to your PC. It can make any sound louder, clearer, and much better without buying any external devices. It provides us a 3D audio experience and works with any music player, video player, etc.!
3. Chrome Volume Booster Plugin (Windows)
This plugin has been rated 5 stars on the chrome web store as it is the best plugin for boosting up your volume on windows PC. This booster is so easy to download; you just have to go to the chrome web store and add the extension to your Google Chrome Browser. After adding it you can simply click on the icon and boost your volume up to 1000%! This plugin is free in the chrome store, just add it and choose how much louder you want your sound to be.

4. Letasoft Sound Booster (Windows)
Letasoft Sound Booster can only be used on windows. You can download it through the official website of Letasoft. It comes with a 14 days free trial period but after that, you have to buy their license to keep using it. This software is made to be used as an extra amplifier to boost up the volume of your audio or video if you think it is too low. The Letasoft Sound Booster app is very easy to use as you can control the volume from the slider. Moreover, it auto-starts and has no sound distortion.

5. Froyosoft Sound Booster (Mac)
Froyosoft Sound Booster is made for macOS users so they can boost video and audio file volumes. Individual application volumes can also be adjusted with the help of the Froyosoft Sound Booster. The good thing about this booster is that it is free for all users and it is 100% safe - you will not get any virus on your PC. You can download it from their website and increase the volume as high as you want to. So, get ready to get a clear and enhanced sound with the help of this app!

Part 2: Best YouTube Volume Boosters for Android and iOS
Following are the best YouTube sound boosters for Android and iOS devices:
1. AmpMe (Android and iOS)
With the help of AmpMe, you can start your little party through music apps. You don’t just get to listen to music but you can also chat with your friends - yup that’s right, it is a two-in-one app! The AmpMe app helps you to play the same music with your friends at the same time. It is one of the best volume booster apps that is available for both Android and iOS. It uses Bluetooth to connect with several devices, and the more the devices the higher the volume of the music. AmpMe offers a free trial and it costs $9.99 per week.

2. Super Volume Booster (Android)
To enjoy your music more than ever, you need a good volume enhancer. And, what can be better than an app that is free and boosts your audio? Android users are in luck because Super Volume Booster is a user-friendly app that allows you to increase the volume of YouTube and other apps. It gives you the best music experience. Moreover, it is clean, simple and has a one-touch operation. Not to forget that it has amazing reviews on Playstore. This app also increases the bass and also supports headphones and Bluetooth.

3. Volume Booster GOODEV (Android)
Volume Booster GOODEV is another app that boosts up the audio for you from 20 to 30% more! If you want to listen to an audiobook, watch a YouTube video or a movie on Netflix, volume Booster GOODEV can help you increase the volume of any media on any app! The volume can get so high that it might be dangerous for your ears so be careful. It offers a sound equalizer and is simple to use.

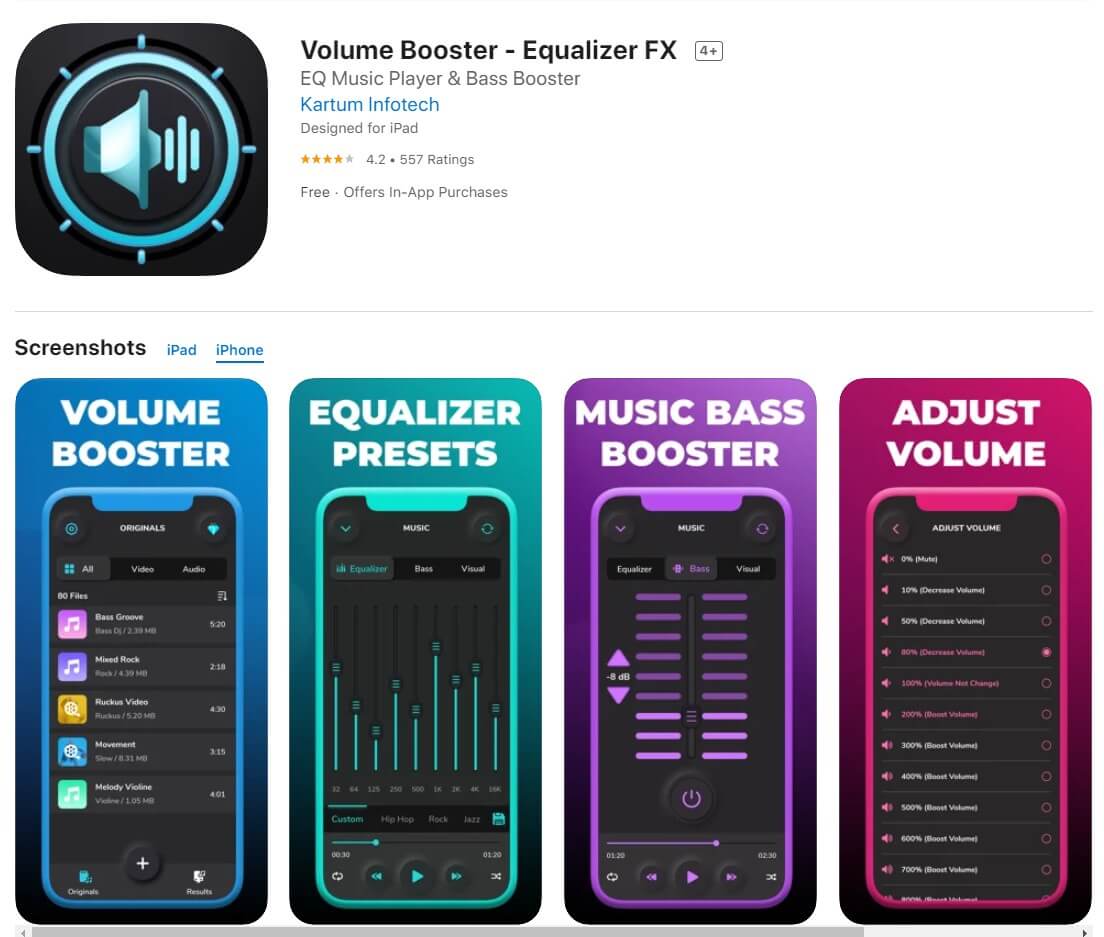
4. Volume Booster - Equalizer FX (iOS)
Volume Booster Equalizer FX can increase your volume higher than the default audio controller. With the help of this app, your device’s speaker will give the best result. You can adjust the sound effect levels according to your need. It makes the sound quality better and boosts up the volume with a single tap. You can get a weekly, monthly or yearly subscription. It is a great premium YouTube Volume booster for all iOS devices.
5. Max Volume Booster (iOS)
Max Volume Booster, as the name shows, boosts the volume to the maximum. You can find this app in the AppStore for free but it offers a premium version as well. With the help of the premium version, you can get an ad-free experience with no time limit. You can decrease or increase the volume based on your needs. Max Volume Booster gives you the experience and you will get addicted to it because it is a high-quality YouTube volume booster.

Part 3: Best YouTube Video Editing Software-Wondershare Filmora (Bonus Tip)
Wondershare Filmora is one of the most popular and user-friendly video editing software available. From beginners to pros, this app world for all. With Filmora you can create home videos, vlogs, Instagram reels, tutorials, guides, podcasts, and more! Wondershare Filmora is also the best YouTube video editor you will find! From editing to volume booster, you will find all the tools to create the perfect YouTube videos.
Here are some of the key features of Filmora that can help YouTubers make their YouTube videos:
- Offers multiple drawing video editing tools like speed control, volume booster, and color grading
- Offers special effects to enhance the appearance of your videos
- Allows you to custom create different animations
- Green Screen feature to help you change backgrounds and make the perfect videos
- Cross-platform accessibility as you can use it on both Windows and Mac
- Supports multiple file formats
- Ultra 4k HD support for the best quality of videos
- Free download and super easy to use with an intuitive interface
- Anyone can use it whether beginner or pro
- Online customer support available 24/7
Summing up
Stop worrying about low audio. Use one of the YouTube volume booster apps mentioned in this article. If you are making vlogs, tutorials, and other YouTube content, you can increase volume and create ideal videos with Wondershare video editor. So, to create the perfect videos with high-quality sound get Wondershare Filmora!
Shanoon Cox
Shanoon Cox is a writer and a lover of all things video.
Follow @Shanoon Cox
Shanoon Cox
Mar 27, 2024• Proven solutions
Have you ever listened to a YouTube video on max volume but still the sound wasn’t audible - even after turning up the YouTube volume as well as device audio? It is super annoying and inconvenient when you increase volume to max yet the video remains inaudible. YouTube volume issue could be due to various reasons such as poor audio quality of the built-in speakers or low original video sound. Well, there is a simple way to combat this problem i.e., sound booster. You can set different volume levels for the YouTube app on your PC or smartphone’s native volume controls. There are different YouTube volume boosters for Android, Windows, macOS, and iOS devices.
From listening to your favorite podcast to watching vlogs with your friends, you can use the best volume booster apps to increase the media sound volume and quality!
- Part 1: Best YouTube Volume Boosters for Windows and macOS
- Part 2: Best YouTube Volume Boosters for Android and iOS
- Part 3: Best YouTube Video Editing Software-Wondershare Filmora (Bonus Tip)
Part 1: Best YouTube Volume Boosters for Windows and macOS
Let’s introduce the best YouTube volume boosters for Windows and macOS:
1. FxSound (Windows and Mac)
FxSound is a very powerful tool that is made for Windows and macOS to enhance and boost the quality and volume of sound. This app comes with many features. For example, this audio software provides better sound quality, volume booster, and sound effects. Now you can listen to music, watch movies and play games without any distortion. Easily boost base, get customized effects and play with custom presets. You can download this app for your PC for free through the official website. People like this equalizer because it can make any audio format sound good even if it is 100 years old!
2. Boom 3D (Windows and macOS)
Boom 3D is a very popular app among many Windows and macOS users. This software is designed to help improve the audio on speakers or headphones that are connected to your computer. Boom 3D audio booster software also works with the Bluetooth devices that are connected to your PC. It can make any sound louder, clearer, and much better without buying any external devices. It provides us a 3D audio experience and works with any music player, video player, etc.!
3. Chrome Volume Booster Plugin (Windows)
This plugin has been rated 5 stars on the chrome web store as it is the best plugin for boosting up your volume on windows PC. This booster is so easy to download; you just have to go to the chrome web store and add the extension to your Google Chrome Browser. After adding it you can simply click on the icon and boost your volume up to 1000%! This plugin is free in the chrome store, just add it and choose how much louder you want your sound to be.
4. Letasoft Sound Booster (Windows)
Letasoft Sound Booster can only be used on windows. You can download it through the official website of Letasoft. It comes with a 14 days free trial period but after that, you have to buy their license to keep using it. This software is made to be used as an extra amplifier to boost up the volume of your audio or video if you think it is too low. The Letasoft Sound Booster app is very easy to use as you can control the volume from the slider. Moreover, it auto-starts and has no sound distortion.
5. Froyosoft Sound Booster (Mac)
Froyosoft Sound Booster is made for macOS users so they can boost video and audio file volumes. Individual application volumes can also be adjusted with the help of the Froyosoft Sound Booster. The good thing about this booster is that it is free for all users and it is 100% safe - you will not get any virus on your PC. You can download it from their website and increase the volume as high as you want to. So, get ready to get a clear and enhanced sound with the help of this app!
Part 2: Best YouTube Volume Boosters for Android and iOS
Following are the best YouTube sound boosters for Android and iOS devices:
1. AmpMe (Android and iOS)
With the help of AmpMe, you can start your little party through music apps. You don’t just get to listen to music but you can also chat with your friends - yup that’s right, it is a two-in-one app! The AmpMe app helps you to play the same music with your friends at the same time. It is one of the best volume booster apps that is available for both Android and iOS. It uses Bluetooth to connect with several devices, and the more the devices the higher the volume of the music. AmpMe offers a free trial and it costs $9.99 per week.
2. Super Volume Booster (Android)
To enjoy your music more than ever, you need a good volume enhancer. And, what can be better than an app that is free and boosts your audio? Android users are in luck because Super Volume Booster is a user-friendly app that allows you to increase the volume of YouTube and other apps. It gives you the best music experience. Moreover, it is clean, simple and has a one-touch operation. Not to forget that it has amazing reviews on Playstore. This app also increases the bass and also supports headphones and Bluetooth.
3. Volume Booster GOODEV (Android)
Volume Booster GOODEV is another app that boosts up the audio for you from 20 to 30% more! If you want to listen to an audiobook, watch a YouTube video or a movie on Netflix, volume Booster GOODEV can help you increase the volume of any media on any app! The volume can get so high that it might be dangerous for your ears so be careful. It offers a sound equalizer and is simple to use.
4. Volume Booster - Equalizer FX (iOS)
Volume Booster Equalizer FX can increase your volume higher than the default audio controller. With the help of this app, your device’s speaker will give the best result. You can adjust the sound effect levels according to your need. It makes the sound quality better and boosts up the volume with a single tap. You can get a weekly, monthly or yearly subscription. It is a great premium YouTube Volume booster for all iOS devices.
5. Max Volume Booster (iOS)
Max Volume Booster, as the name shows, boosts the volume to the maximum. You can find this app in the AppStore for free but it offers a premium version as well. With the help of the premium version, you can get an ad-free experience with no time limit. You can decrease or increase the volume based on your needs. Max Volume Booster gives you the experience and you will get addicted to it because it is a high-quality YouTube volume booster.
Part 3: Best YouTube Video Editing Software-Wondershare Filmora (Bonus Tip)
Wondershare Filmora is one of the most popular and user-friendly video editing software available. From beginners to pros, this app world for all. With Filmora you can create home videos, vlogs, Instagram reels, tutorials, guides, podcasts, and more! Wondershare Filmora is also the best YouTube video editor you will find! From editing to volume booster, you will find all the tools to create the perfect YouTube videos.
Here are some of the key features of Filmora that can help YouTubers make their YouTube videos:
- Offers multiple drawing video editing tools like speed control, volume booster, and color grading
- Offers special effects to enhance the appearance of your videos
- Allows you to custom create different animations
- Green Screen feature to help you change backgrounds and make the perfect videos
- Cross-platform accessibility as you can use it on both Windows and Mac
- Supports multiple file formats
- Ultra 4k HD support for the best quality of videos
- Free download and super easy to use with an intuitive interface
- Anyone can use it whether beginner or pro
- Online customer support available 24/7
Summing up
Stop worrying about low audio. Use one of the YouTube volume booster apps mentioned in this article. If you are making vlogs, tutorials, and other YouTube content, you can increase volume and create ideal videos with Wondershare video editor. So, to create the perfect videos with high-quality sound get Wondershare Filmora!
Shanoon Cox
Shanoon Cox is a writer and a lover of all things video.
Follow @Shanoon Cox
Also read:
- [Updated] A Practical Approach to Creating Captivating YouTube Shorts Templates
- Free YouTube Sound Ripper Collection Top 17 Extractors Revealed
- Overcoming Video Shadows YouTube Fix Tips
- 2024 Approved Channel Elevation Strategy – Quickly Reach Your 10K View Quota
- The Smudge Solution Blurring Visions in Video Content
- Mastering Cross-Platform Viewership Strategies for Successful Multi-Streams
- 2024 Approved Access the Archived Unique Methods for Viewing Old YouTube
- [Updated] Conquering the Fan Base YouTube's Pathway to More Followers
- Maximizing Impact with Customized Youtube Audiences
- Endless Entertainment Loop YouTube Content on TV
- Luminous Techniques for Engaging Vlogs
- Unique Channels Generating Top-Notch Video Naming
- 2024 Approved Captivate Viewers The Art of Crafting Short Videos
- 2024 Approved Enter the World of Online Promotion Exclusive Free YouTube Banner Access
- Chorus of Creators Guidelines for Sharing Sounds Online for 2024
- Deep Dive Into Rank Tracker Software - Optimize Your Channel's Success for 2024
- [New] Engaging Audience From Anywhere Phone-Based Filming Techniques
- In 2024, Craft Engaging Streams for Success The Ultimate Youtube Broadcast Blueprint Using WireCast
- 2024 Approved Audiovisual Experts' Choices The Ultimate Video Editing Gear
- 2024 Approved Digital Cash Kings Leading YouTube Creators
- Monetizing Video How Much Does a Single Streamer Earn?
- Forget YouTube? Here Are the Best 10 Mobile Video Sites
- Soundscapes in HD Techniques for Precision Recording
- YouTube's Prime Stream Essential Tech, Equipment Guide for Creators
- In 2024, Effortlessly Create Engaging YouTube Thumbnails
- [New] Content Distribution Excellence Vimeo vs YouTube
- [Updated] Decoding the Earnings Algorithm of TSeries Online Channel
- In 2024, Epicurean Envoys The Best Food Vloggers to Watch
- Acclaimed Creators Superior Insta HLV Page Builders
- Top 15 Apps To Hack WiFi Password On Xiaomi Redmi 12 5G
- [Updated] Essential Game Picks Ghost of Tsushima Rival Edition, In 2024
- [Updated] FBX Methods for Perfect Gaming Saves for 2024
- [New] In 2024, Advanced Steps to Record Silent Videos
- New The Complete Manual of GarageBand Audio Sessions for 2024
- In 2024, 6 Methods to Mirror Apple iPhone 13 Pro to your Windows PC | Dr.fone
- 2024 Approved Stop Motion Animation 101 A Beginners Guide to Software and Techniques
- [New] In 2024, Thriving in Twitter Live TV Mode
- Bypassing Google Account With vnROM Bypass For Honor Magic Vs 2
- How to Quickly Fix Bluetooth Not Working on Oppo Find X7 Ultra | Dr.fone
- [New] In 2024, The Ultimate List of Popular BookTok Picks for Your Reading Spree
- [New] Conquerors of the Past The Prime 7 Battle Simulations for 2024
- [New] Stardew Value Maximized Top 7 Customization Excellence
- New Audio Offloading for Windows 10 Videos A Budget-Friendly Method for 2024
- In 2024, How to Unlock iPhone 12 Pro without Passcode or Face ID
- Title: "Shot Securement Keeping Cameras Still on Arms Only"
- Author: Steven
- Created at : 2024-05-25 20:22:59
- Updated at : 2024-05-26 20:22:59
- Link: https://youtube-clips.techidaily.com/shot-securement-keeping-cameras-still-on-arms-only/
- License: This work is licensed under CC BY-NC-SA 4.0.
