
"Securely Transforming YouTube Videos Top 3 Reliable Methods"
Securely Transforming YouTube Videos: Top 3 Reliable Methods
How to Convert YouTube to MP3 in 3 Ways [Safe]

Benjamin Arango
Mar 27, 2024• Proven solutions
There is a wide range of prominent tools available in the digital market to convert YouTube to MP3 files. The basic idea behind these tools is that you can extract the audio content from your favorite youtube video and save it to an mp3 file. The RIP of the audio process differs from the program built-in within the application. Many sound professionals opt for an mp3 file format because of its smaller file size, high-frequency audio quality, etc.
After you convert youtube to mp3, you will be able to listen to the background music or audio offline and the MP3 file format guarantees flawless audio quality for you.
You may also like: Best Free Youtube to MP3 Converters You Should Know
Three Ways to Convert YouTube Videos to MP3
Now it is a perfect time to explore unique ways to convert youtube to mp3 files. I will share three different ways in this article. Let’s take a quick look at it below:
- **1. How to Convert YouTube to MP3 by an Online YouTube to MP3 Tool
- **2. How to Convert YouTube to MP3 by q Video Converter
- **3. How to Convert YouTube to MP3 by a Video Editing Software
1. How to Convert YouTube to MP3 by an Online YouTube to MP3 Tool
It is a free service and allows you to convert any videos within the one-hour time limit. The whole conversion process completes within a few minutes effectively. There is no need to register to avail of this online service. You can save the converted files at your desired location and play it during your comfort zone. This online application is compatible with PC, gadgets, tablets, etc.
- Get YtMp3 tool: Click Hereon your browser and step into the online YouTube converter platform
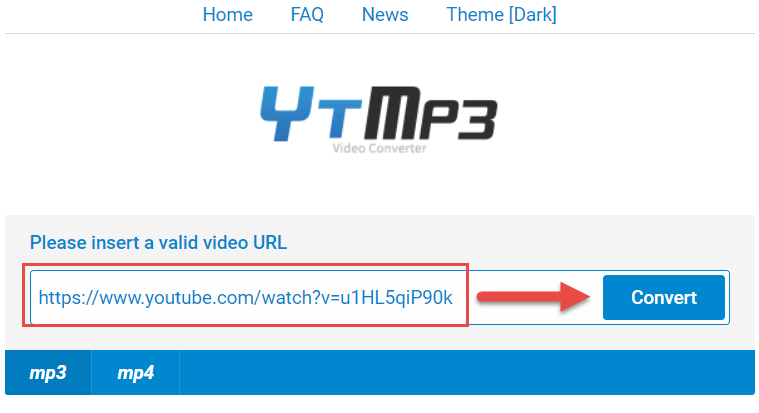
- **Paste the URL: Now copy your favorite track URL from YouTube and paste it on the box. Then hit the ‘Convert’ button beside the pasted URL. You have to wait for a few minutes until the conversion process completes.
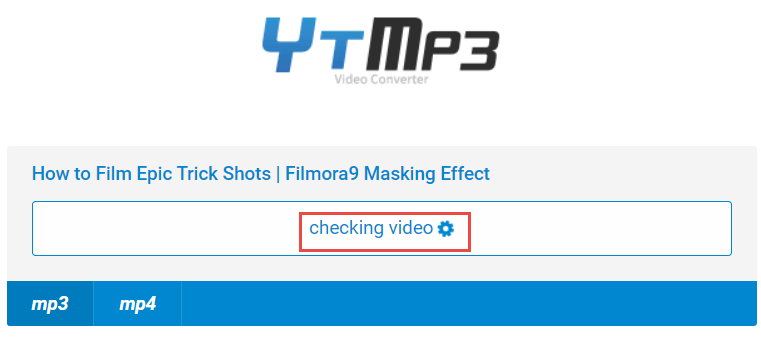
- **Download mp3: Immediately you must tap the ‘Download‘ button and choose the desired location by navigating between drives and folders to save the converted MP3 files. You can also choose the ‘Dropbox’ option to store it on the virtual location for easy retrieval.

Tips:
The converted YouTube video in the MP3 file format is available for further transfer to other external gadgets. Make use of the MP3 files according to your convenience without any limitations.
2. How to Convert YouTube to MP3 by a Video Converter
If you take a deeper look at the converter tools at the online platform you will end with piles of collection of software. The key factor which you must bear in your mind is the reliability of the conversion program. Wondershare Uniconverter is an ultimate tool and it meets the expectations of the users without any compromises. Let’s see how to convert youtube to mp3 with this video converter:
- Click Here to download and install Wondershare Uniconverter on your computer
- Visit your favorite YouTube channel and copy the link of your favorite tract at its address bar.
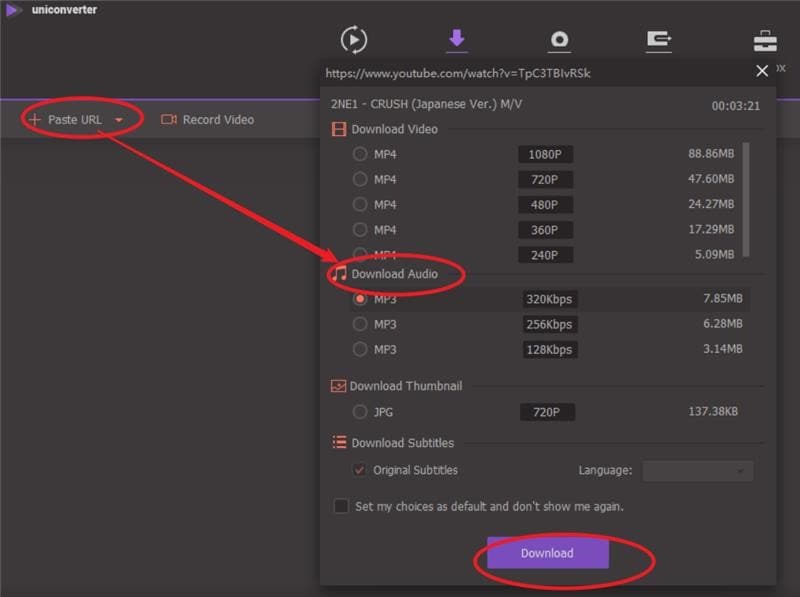
- Launch Wondershare Uniconverter, then click the ‘Paste UR L‘ option at the top left side of the screen and select ‘Download MP3‘ from the drop-down icon. The audio extraction process commences immediately.
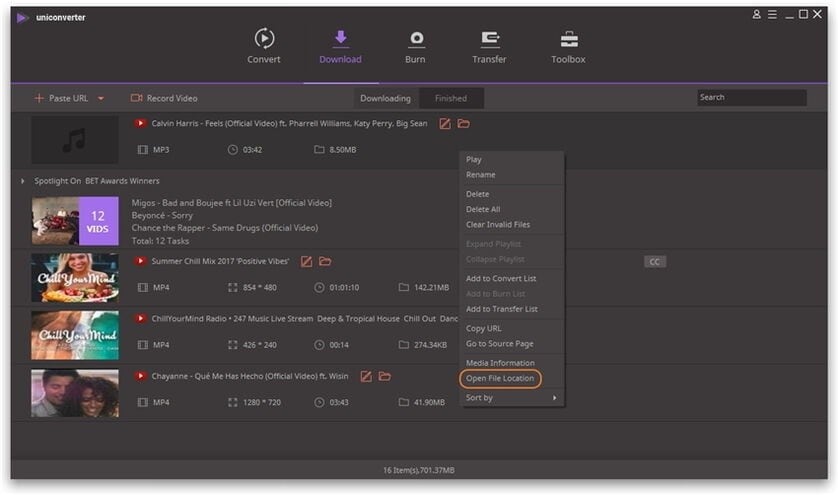
- After the download completes, you must hit the ‘Finished’ tab at the top of the screen to obtain the audio view. If you want to find out the folder details then you have to right-click and choose ‘Open File Location‘. This action takes you to the folder where the MP3 is available to carry out further tasks on it.
3. How to Convert YouTube to MP3 by a Video Editing Software
This method gives you access to convert Youtube to mp3 using a Video Editor. Wondershare Filmora not only offers many basic and professional editing tools and video effects but also can convert youtube to mp3. If you need further editing for mp3 after converting, Filmora will be the right one for you.
Here are the guidelines to convert YouTube to MP3 using Filmora:
Note:
This is a video editing software, and cannot convert a Youtube URL to an mp3 directly. You should convert the youtube URL to a local video in mp4 or other supported video formats first. You can read Convert Youtube to MP4 Guide and try some Youtube video downloaders to convert Youtube to mp4.
- Once you convert Youtube to mp4, please download Filmora below and install it on your computer
 Download Mac Version ](https://tools.techidaily.com/wondershare/filmora/download/ )
- Open Filmora, then go to File-Import-Media to load the converted mp4 video to the Media Library

- Add or drag the video to the timeline(If you need to further edit or cut your video, you can double click the video on the track, and get more video and audio editing tools as you like, such as audio fade in/out and volume adjustment).
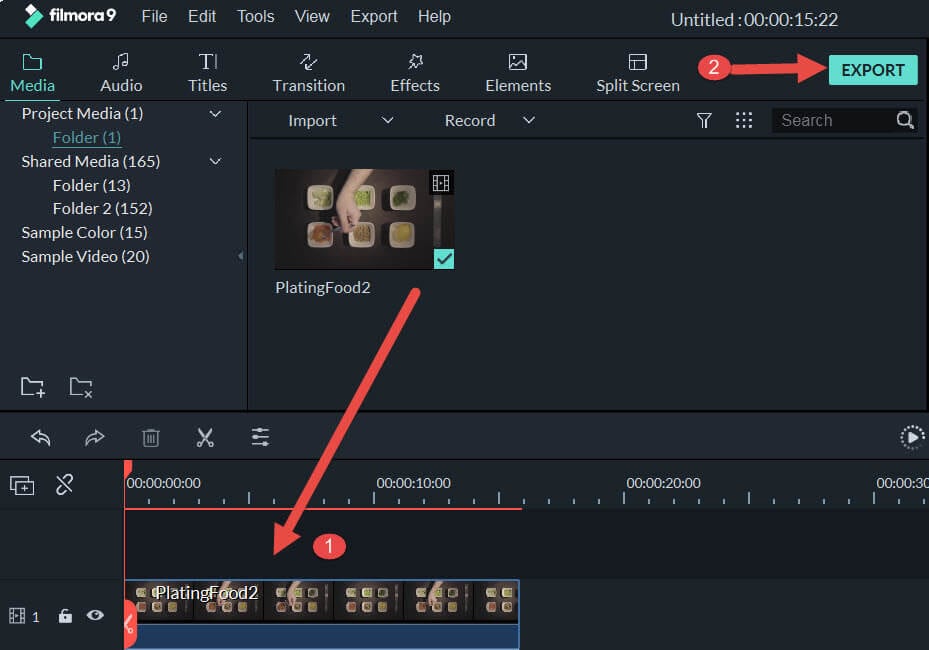
- Then hit the ‘Export‘ button and select ‘MP3’ format from the expanded list. You can click Settings in the export panel to customize the output audio settings, such as the audio bitrate for higher audio quality.

Warnings
Authorized Download—YouTube allows only legal download and conversion of videos on its platform. You can work on your videos on YouTube without any issues. You must own the copyrights if you want to download third person videos. As per the legal policy of YouTube, unauthorized download is strictly prohibited.
To sum up
There are multiple methods to convert youtube to mp3 effectively. The great challenge you may face while choosing the perfect app which fits your needs optimally. It is highly recommended to follow the YouTube copyrights guides and carryout legal downloads without any issues.
Stay tuned for more exciting facts on video converters. Leave your valuable comments and suggestions on this article.
Benjamin Arango
Benjamin Arango is a writer and a lover of all things video.
Follow @Benjamin Arango
Benjamin Arango
Mar 27, 2024• Proven solutions
There is a wide range of prominent tools available in the digital market to convert YouTube to MP3 files. The basic idea behind these tools is that you can extract the audio content from your favorite youtube video and save it to an mp3 file. The RIP of the audio process differs from the program built-in within the application. Many sound professionals opt for an mp3 file format because of its smaller file size, high-frequency audio quality, etc.
After you convert youtube to mp3, you will be able to listen to the background music or audio offline and the MP3 file format guarantees flawless audio quality for you.
You may also like: Best Free Youtube to MP3 Converters You Should Know
Three Ways to Convert YouTube Videos to MP3
Now it is a perfect time to explore unique ways to convert youtube to mp3 files. I will share three different ways in this article. Let’s take a quick look at it below:
- **1. How to Convert YouTube to MP3 by an Online YouTube to MP3 Tool
- **2. How to Convert YouTube to MP3 by q Video Converter
- **3. How to Convert YouTube to MP3 by a Video Editing Software
1. How to Convert YouTube to MP3 by an Online YouTube to MP3 Tool
It is a free service and allows you to convert any videos within the one-hour time limit. The whole conversion process completes within a few minutes effectively. There is no need to register to avail of this online service. You can save the converted files at your desired location and play it during your comfort zone. This online application is compatible with PC, gadgets, tablets, etc.
- Get YtMp3 tool: Click Hereon your browser and step into the online YouTube converter platform
- **Paste the URL: Now copy your favorite track URL from YouTube and paste it on the box. Then hit the ‘Convert’ button beside the pasted URL. You have to wait for a few minutes until the conversion process completes.
- **Download mp3: Immediately you must tap the ‘Download‘ button and choose the desired location by navigating between drives and folders to save the converted MP3 files. You can also choose the ‘Dropbox’ option to store it on the virtual location for easy retrieval.
Tips:
The converted YouTube video in the MP3 file format is available for further transfer to other external gadgets. Make use of the MP3 files according to your convenience without any limitations.
2. How to Convert YouTube to MP3 by a Video Converter
If you take a deeper look at the converter tools at the online platform you will end with piles of collection of software. The key factor which you must bear in your mind is the reliability of the conversion program. Wondershare Uniconverter is an ultimate tool and it meets the expectations of the users without any compromises. Let’s see how to convert youtube to mp3 with this video converter:
- Click Here to download and install Wondershare Uniconverter on your computer
- Visit your favorite YouTube channel and copy the link of your favorite tract at its address bar.
- Launch Wondershare Uniconverter, then click the ‘Paste UR L‘ option at the top left side of the screen and select ‘Download MP3‘ from the drop-down icon. The audio extraction process commences immediately.
- After the download completes, you must hit the ‘Finished’ tab at the top of the screen to obtain the audio view. If you want to find out the folder details then you have to right-click and choose ‘Open File Location‘. This action takes you to the folder where the MP3 is available to carry out further tasks on it.
3. How to Convert YouTube to MP3 by a Video Editing Software
This method gives you access to convert Youtube to mp3 using a Video Editor. Wondershare Filmora not only offers many basic and professional editing tools and video effects but also can convert youtube to mp3. If you need further editing for mp3 after converting, Filmora will be the right one for you.
Here are the guidelines to convert YouTube to MP3 using Filmora:
Note:
This is a video editing software, and cannot convert a Youtube URL to an mp3 directly. You should convert the youtube URL to a local video in mp4 or other supported video formats first. You can read Convert Youtube to MP4 Guide and try some Youtube video downloaders to convert Youtube to mp4.
- Once you convert Youtube to mp4, please download Filmora below and install it on your computer
Download Mac Version ](https://tools.techidaily.com/wondershare/filmora/download/ )
- Open Filmora, then go to File-Import-Media to load the converted mp4 video to the Media Library
- Add or drag the video to the timeline(If you need to further edit or cut your video, you can double click the video on the track, and get more video and audio editing tools as you like, such as audio fade in/out and volume adjustment).
- Then hit the ‘Export‘ button and select ‘MP3’ format from the expanded list. You can click Settings in the export panel to customize the output audio settings, such as the audio bitrate for higher audio quality.
Warnings
Authorized Download—YouTube allows only legal download and conversion of videos on its platform. You can work on your videos on YouTube without any issues. You must own the copyrights if you want to download third person videos. As per the legal policy of YouTube, unauthorized download is strictly prohibited.
To sum up
There are multiple methods to convert youtube to mp3 effectively. The great challenge you may face while choosing the perfect app which fits your needs optimally. It is highly recommended to follow the YouTube copyrights guides and carryout legal downloads without any issues.
Stay tuned for more exciting facts on video converters. Leave your valuable comments and suggestions on this article.
Benjamin Arango
Benjamin Arango is a writer and a lover of all things video.
Follow @Benjamin Arango
Snap Into Position: Handhran Balancing Tricks
DIY Tripods| How to Stabilize Your Camera without Buying a Tripod

Richard Bennett
Oct 26, 2023• Proven solutions
When you’re trying to grow a channel on YouTube it can feel like equipment is a barrier, but it shouldn’t be. If you can’t afford a high-end tripod, for example, there are loads of ways to get by without one.
DIY Your Video with Wondershare Filmora
Wondershare Filmora has the best video stabilization tool is your videos have a bad frame or were recorded in dim lights. If a video is shot in bad weather or unfriendly situation where you don’t have all the equipment required for a quality recording, Wondershare Filmora can help you in the background to edit your videos like a pro. And it has all the relevant tools like effects, transitions, background removal, overlays, and background music that could turn your normal video to a professional one.

Here are 3 of our favorite DIY tripods.
DIY smartphone tripod using binder clips or hair clips
You’re a solo operation and your best camera is on your phone. That’s pretty common.
If you have a DSLR then you can set it down on any stable surface while filming yourself, but your phone can’t stand up by itself. It needs something or someone to hold it. Do you just accept that and shoot everything as a selfie?
No. No, you don’t, because there are common household items that can help you out of this problem. For this DIY tripod, you need either 2 binder clips or 2 ‘claw clips’ (also called ‘hair jaws’).
Hold your phone in landscape mode (horizontally, so it’s long rather than tall) and attach clips to the bottom corners. If you are worried about scratching your screen, fold up some paper to place between your clip and your phone.
Here it is with binder clips:

And here it is with hair clips:

Now you can set your smartphone upon any stable surface, like a table or a stack of books.
Here are some more cool ideas!
DIY adjustable tripod using books and a towel
You’ve probably heard a million times that you can stabilize your camera by sitting it down on any stable surface – on your desk, on a stack of books, up in a tree, etc. This is very true!
But if you can use any stable surface, why do people buy tripods?
Because it isn’t convenient to rearrange your furniture whenever you want to make a video, and also because tripods are adjustable. You can change their height, you can use them to pan or tilt, and it’s pretty easy to move them a bit forwards or backward while you’re setting up your shot.
To get similar functions from the ‘any stable surface’ solution you can use a table, a stack of books, and a towel.
- Set up the area where you’re going to sit while you’re filming on one end of the table.
- Put the towel down over the approximate spot you want your camera to be.
- Stack your books on top of the towel.
- Put your camera on top of the books.
Now if your camera isn’t up high enough, or is too high, you can adjust it just by adding or taking away books. If you want to move it closer or farther away from you, just pull the towel forwards or backward.
DIY gripping ‘Gorillapod’ using wire and tape
Gorillapod’s are cool because you can use them like normal tripods, carry them around like selfie sticks, or attach them to things like fences and posts. Here’s how you can make something similar using wire, electrical tape or duct tape, and a 1/4 bolt.
Your wire should be fairly stiff and you’ll need three pieces the same length, which should be at least 10 inches. Old clothes hangers work well. This needs to be something strong enough to support the weight of your camera, but soft enough that it’s not impossible for you to bend.

All of your supplies plus the finished product.
Readying your legs
Step 1: Bend 2 inches at one end of each wire into a ‘U’ shape. You will probably need pliers for this.
Step 2: Pick up one of your pieces of wire and wrap one end with electrical tape. Go around 5-10 times (to prevent it from coming undone at the end) and then, without cutting your tape, start moving up and wrapping the rest of your wire. Stop before your ‘U’ section.
Repeat this with the other two wires.
Attaching your legs
Step 1: Place the ‘U’ section of a leg against your bolt. The bolt’s threading should be pointing away from the leg. Now, use your tape to attach them. Wind it around 2 or 3 times, then repeat the process with both of the other legs individually.
Step 2: After all the legs are attached, wrap some more tape around all 3 as tightly as you can.
Your camera will mount onto the bolt! You’ll be able to use this as a normal table-top tripod or use the flexible legs to grab onto different things like a Gorillapod. Read more at Instructables.
Note: make sure the bolt is a fit for your camera before you get too far into this process.
Richard Bennett
Richard Bennett is a writer and a lover of all things video.
Follow @Richard Bennett
Richard Bennett
Oct 26, 2023• Proven solutions
When you’re trying to grow a channel on YouTube it can feel like equipment is a barrier, but it shouldn’t be. If you can’t afford a high-end tripod, for example, there are loads of ways to get by without one.
DIY Your Video with Wondershare Filmora
Wondershare Filmora has the best video stabilization tool is your videos have a bad frame or were recorded in dim lights. If a video is shot in bad weather or unfriendly situation where you don’t have all the equipment required for a quality recording, Wondershare Filmora can help you in the background to edit your videos like a pro. And it has all the relevant tools like effects, transitions, background removal, overlays, and background music that could turn your normal video to a professional one.
Here are 3 of our favorite DIY tripods.
DIY smartphone tripod using binder clips or hair clips
You’re a solo operation and your best camera is on your phone. That’s pretty common.
If you have a DSLR then you can set it down on any stable surface while filming yourself, but your phone can’t stand up by itself. It needs something or someone to hold it. Do you just accept that and shoot everything as a selfie?
No. No, you don’t, because there are common household items that can help you out of this problem. For this DIY tripod, you need either 2 binder clips or 2 ‘claw clips’ (also called ‘hair jaws’).
Hold your phone in landscape mode (horizontally, so it’s long rather than tall) and attach clips to the bottom corners. If you are worried about scratching your screen, fold up some paper to place between your clip and your phone.
Here it is with binder clips:
And here it is with hair clips:
Now you can set your smartphone upon any stable surface, like a table or a stack of books.
Here are some more cool ideas!
DIY adjustable tripod using books and a towel
You’ve probably heard a million times that you can stabilize your camera by sitting it down on any stable surface – on your desk, on a stack of books, up in a tree, etc. This is very true!
But if you can use any stable surface, why do people buy tripods?
Because it isn’t convenient to rearrange your furniture whenever you want to make a video, and also because tripods are adjustable. You can change their height, you can use them to pan or tilt, and it’s pretty easy to move them a bit forwards or backward while you’re setting up your shot.
To get similar functions from the ‘any stable surface’ solution you can use a table, a stack of books, and a towel.
- Set up the area where you’re going to sit while you’re filming on one end of the table.
- Put the towel down over the approximate spot you want your camera to be.
- Stack your books on top of the towel.
- Put your camera on top of the books.
Now if your camera isn’t up high enough, or is too high, you can adjust it just by adding or taking away books. If you want to move it closer or farther away from you, just pull the towel forwards or backward.
DIY gripping ‘Gorillapod’ using wire and tape
Gorillapod’s are cool because you can use them like normal tripods, carry them around like selfie sticks, or attach them to things like fences and posts. Here’s how you can make something similar using wire, electrical tape or duct tape, and a 1/4 bolt.
Your wire should be fairly stiff and you’ll need three pieces the same length, which should be at least 10 inches. Old clothes hangers work well. This needs to be something strong enough to support the weight of your camera, but soft enough that it’s not impossible for you to bend.
All of your supplies plus the finished product.
Readying your legs
Step 1: Bend 2 inches at one end of each wire into a ‘U’ shape. You will probably need pliers for this.
Step 2: Pick up one of your pieces of wire and wrap one end with electrical tape. Go around 5-10 times (to prevent it from coming undone at the end) and then, without cutting your tape, start moving up and wrapping the rest of your wire. Stop before your ‘U’ section.
Repeat this with the other two wires.
Attaching your legs
Step 1: Place the ‘U’ section of a leg against your bolt. The bolt’s threading should be pointing away from the leg. Now, use your tape to attach them. Wind it around 2 or 3 times, then repeat the process with both of the other legs individually.
Step 2: After all the legs are attached, wrap some more tape around all 3 as tightly as you can.
Your camera will mount onto the bolt! You’ll be able to use this as a normal table-top tripod or use the flexible legs to grab onto different things like a Gorillapod. Read more at Instructables.
Note: make sure the bolt is a fit for your camera before you get too far into this process.
Richard Bennett
Richard Bennett is a writer and a lover of all things video.
Follow @Richard Bennett
Also read:
- [New] Charting the Peak #1 Shorter Videos Downloader Hub
- [New] Streamlining the Process of PPT Recording
- [Updated] Affordable MCB Theme Images for Channels
- [Updated] Designing Youtube Ads That Grab Attention A Compreeher Guide
- [Updated] DIY YouTube Trailer Production via Filmora Software
- 2024 Approved Discover the Top 3 Alternative Video Portals
- Creating Unique YouTube Music Mixtapes
- Cutting Edge Science Education Through YT Channels
- Download Your Favorite Videos Without Limits
- Harry Potter Cinematic Journey: A Structured Viewing Schedule
- How To Restore Deleted Photos From Your SD Card Without Software - A Comprehensive Guide
- In 2024, Best Video Apps Review YouTube iPhones & Androids
- In 2024, Cold Climates, Hot Wins Beijing Highlights
- In 2024, HarmonyHub Pro Downloads & Reviews
- Instagram Sound Essentials for Personalization
- Step-by-Step Tutorial: Enjoying Apple's Stunning 3D Experience on the Meta Quest 3
- The Essential Guide to Zero-Cost Webinars on YouTube
- Updated 10 Best Music Video Makers to Make Fantastic MV
- Will the iPogo Get You Banned and How to Solve It On Itel A05s | Dr.fone
- Title: Securely Transforming YouTube Videos Top 3 Reliable Methods
- Author: Steven
- Created at : 2024-12-03 16:00:57
- Updated at : 2024-12-10 17:37:36
- Link: https://youtube-clips.techidaily.com/securely-transforming-youtube-videos-top-3-reliable-methods/
- License: This work is licensed under CC BY-NC-SA 4.0.