:max_bytes(150000):strip_icc()/deletereddit-70a19e794b404761b17965e41006ba24.jpg)
Reimagine YouTube Snapshots With Luminous Outlines

Reimagine YouTube Snapshots With Luminous Outlines
Your YouTube video, or any other clip published on any forum, gets a larger number of hits if it has an attractive thumbnail. And, the fact is, a thumbnail becomes 10x more attractive when the main character that the image has have a neon border around it.
With that said, in the following sections, you will learn a couple of methods on how to add a YouTube thumbnail border around the main characters and/or objects that are significant to the clip.
In this article
01 Add Glowing Neon Border to YouTube Thumbnail with Filmora
02 Add a Glowing Neon Border in YouTube Thumbnail with Canva
03 Outline a Person in a YouTube Thumbnail with Photoshop
Part 1: How to Add Neon Border to YouTube Thumbnail for Free with Filmora
Being one of the most versatile and intuitive post-production tools available in the market today, Wondershare Filmora X allows you to add a neon border to a YouTube thumbnail quite conveniently. You can learn how to get this done on Windows or Mac by following the steps given below.
For Win 7 or later (64-bit)
For macOS 10.12 or later
Step 1: Define Project Settings and Add Image to the Timeline
Launch Wondershare Filmora X on your PC (a MacBook Pro M1 is used here), ensure that the project aspect ratio is set to 16:9 (Widescreen) on the splash screen, and click New Project. On the main interface, click the Preview quality and display settings icon from the upper-right area of the Timeline, click Change Project Aspect Ratio, click to select 1280 x 720 (HD) from the Resolution menu of the Project Settings box, and click OK to save the custom project settings.

Then select My Media from the menu bar if not already selected, click Project Media from the navigation pane, and click Import from the Media box to select and import the image of the main character or object that you want to use in the thumbnail.

Now, drag the image from the Media box to the Timeline at the bottom.

Step 2: Clear Image Background, Add Border, and Add Custom Background
Go to Effects from the menu bar, click to select the Default tab and then AI Portrait from the navigation pane, and click and drag the Human Segmentation preset from the right box, and place it over the image track in the Timeline.

Double-click the image layer, scroll down the upper-left box to the Video Effects section, and use the Edge Thickness and Edge Feather sliders to adjust the character’s edges to make them as realistic as possible. Click OK when done.

Next, click and drag the Human Border preset over the image track in the Timeline, and follow the same procedure to customize the border. This will give the character a neon border effect.

Now, use the method explained earlier to import a custom image for the background, and drag and place it under the previous track in the Timeline.

If you are running the latest version of Filmora, you will find there are some neon light effects available under AI Portrait as well.

Step 3: Add Titles to Thumbnail
Go to Titles from the menu bar, click to select the Default tab and then Lower 3rds from the navigation pane, and click and drag your preferred lower-third preset from the right window to a separate layer in the Timeline. Double-click the lower-third layer, and use the available options in the upper-left window to change the text, its color, etc., and drag the textbox to place it to your preferred position on the image as well. Click OK to save the changes.
Next, click to select Titles from the navigation pane, and drag your preferred title from the right window to the upper-most track in the Timeline. Now use the method explained earlier to edit the text, its color, position, etc. to make it look professional.

For more tips and tricks for creating YouTube thumbnail, you can check this You Tube thumbnail creating guide.
Step 4: Get the Neon Border Thumbnail
Click the Snapshot (Camera) icon from the upper-right area of the Timeline, go to My Media from the menu bar, right-click the thumbnail of the screenshot you captured, and click Reveal in Finder (on Mac) or Reveal in Explorer (on Windows) to get to the folder the YouTube thumbnail border is saved in.

Part 2: How to Add a Glowing Neon Border in Your YouTube Thumbnail with Canva
Canva is another intuitive editing program that works on the web interface rather than having you download and install an app on your PC. You can add a neon border for YouTube thumbnails using Canva by following the instructions given below:
Step 1: Define Project Settings and Add a Background
After signing in to your Canva account, click Create a design from the top-right corner of the page, click Custom size from the bottom, define 1280 and 720 in the Width and Height fields on the box that appears respectively, and click Create new design.

Now, click to select Background from the navigation bar on the left (if the Background tool is not visible, click More and then choose Background from the expanded list), and click to select a background from the images available in the center pane.

Step 2: Upload an Image and Add Effects
Click Uploads from the navigation bar, click the More icon from the right of the Upload media button present at the top of the center pane, choose your preferred method to upload the image (with the transparent background) that you want to use, upload the image, and drag it from the center pane to the Canvas.
Note: You can use any of the tools available online to remove the background from your image for free.

To add a YouTube thumbnail border, make sure that the image that you added to the Canvas is selected, click the Duplicate icon from the upper-right area, and use the scaling handles of the copy of the image to increase its size a bit. Reposition the image back to its original location as well.
Then, click Edit image from the upper-left corner of the Canvas, click Duotone from the Edit image pane at the center, if need be, click See all, choose your preferred duotone effect to apply on the image, choose your preferred highlight and shadow colors from the box that appears next, and click Back from the top of the pane.

Next, click See all next to the Adjust section from the center pane, and drag the Blur slider to the right to increase the blur effect on the image.

Step 3: Position the Layers
While keeping the duplicate image selected, click the Position button from the upper-right area of the Canvas, and click Background to send the second image behind the first one to get the neon border effect for the photo.

Part 3: How to Outline a Person in a YouTube Thumbnail with Photoshop
Because YouTube thumbnails are nothing but static images, creating YouTube thumbnail border with Adobe Photoshop is comparatively easier. The process of doing this is given below:
Step 1: Define Document Preferences and Import an Image
Launch Adobe Photoshop on your PC, click Create new, and on the New Document customization box, define the width and height values to 1280 and 720 pixels respectively. Select Transparent from the Background Contents menu as well if not already selected. Click Create from the bottom to create a new Photoshop document with the specified document settings. Next, open the folder that contains the source image, drag the photo to Photoshop, and press Enter to place the photo.

Step 2: Remove Background from the Image
Make sure that the image layer is selected in the Layers panel on the right, go to Select from the menu bar at the top, and click Subject. From the bottom of the Layers panel, click the Add a mask icon to get rid of the background, leaving only the human on the Canvas.

Step 3: Add a Custom Background and an Outline Around the Subject
Use the method explained earlier to import a background image of your choice to Photoshop. Drag the background image layer to the bottom in the Layers panel. Double-click the masked layer, click to select Stroke from the left pane of the Layer Style box, and use the options available on the right to manage the size, color, position, etc. of the stroke that has been added around the human subject. Click OK when done, and then export the image normally to use it as a YouTube thumbnail border.

Summary
It is important to know that the default resolution of a YouTube thumbnail is 1280 x 720 pixels that is usually written and referred to as 720p. While adding a YouTube thumbnail border, it is also imperative to have a good sense of color combination and fonts. Furthermore, a decent tool like Wondershare Filmora X must be used to add an appealing neon border around the main subject in the thumbnail image easily and quickly.
02 Add a Glowing Neon Border in YouTube Thumbnail with Canva
03 Outline a Person in a YouTube Thumbnail with Photoshop
Part 1: How to Add Neon Border to YouTube Thumbnail for Free with Filmora
Being one of the most versatile and intuitive post-production tools available in the market today, Wondershare Filmora X allows you to add a neon border to a YouTube thumbnail quite conveniently. You can learn how to get this done on Windows or Mac by following the steps given below.
For Win 7 or later (64-bit)
For macOS 10.12 or later
Step 1: Define Project Settings and Add Image to the Timeline
Launch Wondershare Filmora X on your PC (a MacBook Pro M1 is used here), ensure that the project aspect ratio is set to 16:9 (Widescreen) on the splash screen, and click New Project. On the main interface, click the Preview quality and display settings icon from the upper-right area of the Timeline, click Change Project Aspect Ratio, click to select 1280 x 720 (HD) from the Resolution menu of the Project Settings box, and click OK to save the custom project settings.

Then select My Media from the menu bar if not already selected, click Project Media from the navigation pane, and click Import from the Media box to select and import the image of the main character or object that you want to use in the thumbnail.

Now, drag the image from the Media box to the Timeline at the bottom.

Step 2: Clear Image Background, Add Border, and Add Custom Background
Go to Effects from the menu bar, click to select the Default tab and then AI Portrait from the navigation pane, and click and drag the Human Segmentation preset from the right box, and place it over the image track in the Timeline.

Double-click the image layer, scroll down the upper-left box to the Video Effects section, and use the Edge Thickness and Edge Feather sliders to adjust the character’s edges to make them as realistic as possible. Click OK when done.

Next, click and drag the Human Border preset over the image track in the Timeline, and follow the same procedure to customize the border. This will give the character a neon border effect.

Now, use the method explained earlier to import a custom image for the background, and drag and place it under the previous track in the Timeline.

If you are running the latest version of Filmora, you will find there are some neon light effects available under AI Portrait as well.

Step 3: Add Titles to Thumbnail
Go to Titles from the menu bar, click to select the Default tab and then Lower 3rds from the navigation pane, and click and drag your preferred lower-third preset from the right window to a separate layer in the Timeline. Double-click the lower-third layer, and use the available options in the upper-left window to change the text, its color, etc., and drag the textbox to place it to your preferred position on the image as well. Click OK to save the changes.
Next, click to select Titles from the navigation pane, and drag your preferred title from the right window to the upper-most track in the Timeline. Now use the method explained earlier to edit the text, its color, position, etc. to make it look professional.

For more tips and tricks for creating YouTube thumbnail, you can check this You Tube thumbnail creating guide.
Step 4: Get the Neon Border Thumbnail
Click the Snapshot (Camera) icon from the upper-right area of the Timeline, go to My Media from the menu bar, right-click the thumbnail of the screenshot you captured, and click Reveal in Finder (on Mac) or Reveal in Explorer (on Windows) to get to the folder the YouTube thumbnail border is saved in.

Part 2: How to Add a Glowing Neon Border in Your YouTube Thumbnail with Canva
Canva is another intuitive editing program that works on the web interface rather than having you download and install an app on your PC. You can add a neon border for YouTube thumbnails using Canva by following the instructions given below:
Step 1: Define Project Settings and Add a Background
After signing in to your Canva account, click Create a design from the top-right corner of the page, click Custom size from the bottom, define 1280 and 720 in the Width and Height fields on the box that appears respectively, and click Create new design.

Now, click to select Background from the navigation bar on the left (if the Background tool is not visible, click More and then choose Background from the expanded list), and click to select a background from the images available in the center pane.

Step 2: Upload an Image and Add Effects
Click Uploads from the navigation bar, click the More icon from the right of the Upload media button present at the top of the center pane, choose your preferred method to upload the image (with the transparent background) that you want to use, upload the image, and drag it from the center pane to the Canvas.
Note: You can use any of the tools available online to remove the background from your image for free.

To add a YouTube thumbnail border, make sure that the image that you added to the Canvas is selected, click the Duplicate icon from the upper-right area, and use the scaling handles of the copy of the image to increase its size a bit. Reposition the image back to its original location as well.
Then, click Edit image from the upper-left corner of the Canvas, click Duotone from the Edit image pane at the center, if need be, click See all, choose your preferred duotone effect to apply on the image, choose your preferred highlight and shadow colors from the box that appears next, and click Back from the top of the pane.

Next, click See all next to the Adjust section from the center pane, and drag the Blur slider to the right to increase the blur effect on the image.

Step 3: Position the Layers
While keeping the duplicate image selected, click the Position button from the upper-right area of the Canvas, and click Background to send the second image behind the first one to get the neon border effect for the photo.

Part 3: How to Outline a Person in a YouTube Thumbnail with Photoshop
Because YouTube thumbnails are nothing but static images, creating YouTube thumbnail border with Adobe Photoshop is comparatively easier. The process of doing this is given below:
Step 1: Define Document Preferences and Import an Image
Launch Adobe Photoshop on your PC, click Create new, and on the New Document customization box, define the width and height values to 1280 and 720 pixels respectively. Select Transparent from the Background Contents menu as well if not already selected. Click Create from the bottom to create a new Photoshop document with the specified document settings. Next, open the folder that contains the source image, drag the photo to Photoshop, and press Enter to place the photo.

Step 2: Remove Background from the Image
Make sure that the image layer is selected in the Layers panel on the right, go to Select from the menu bar at the top, and click Subject. From the bottom of the Layers panel, click the Add a mask icon to get rid of the background, leaving only the human on the Canvas.

Step 3: Add a Custom Background and an Outline Around the Subject
Use the method explained earlier to import a background image of your choice to Photoshop. Drag the background image layer to the bottom in the Layers panel. Double-click the masked layer, click to select Stroke from the left pane of the Layer Style box, and use the options available on the right to manage the size, color, position, etc. of the stroke that has been added around the human subject. Click OK when done, and then export the image normally to use it as a YouTube thumbnail border.

Summary
It is important to know that the default resolution of a YouTube thumbnail is 1280 x 720 pixels that is usually written and referred to as 720p. While adding a YouTube thumbnail border, it is also imperative to have a good sense of color combination and fonts. Furthermore, a decent tool like Wondershare Filmora X must be used to add an appealing neon border around the main subject in the thumbnail image easily and quickly.
02 Add a Glowing Neon Border in YouTube Thumbnail with Canva
03 Outline a Person in a YouTube Thumbnail with Photoshop
Part 1: How to Add Neon Border to YouTube Thumbnail for Free with Filmora
Being one of the most versatile and intuitive post-production tools available in the market today, Wondershare Filmora X allows you to add a neon border to a YouTube thumbnail quite conveniently. You can learn how to get this done on Windows or Mac by following the steps given below.
For Win 7 or later (64-bit)
For macOS 10.12 or later
Step 1: Define Project Settings and Add Image to the Timeline
Launch Wondershare Filmora X on your PC (a MacBook Pro M1 is used here), ensure that the project aspect ratio is set to 16:9 (Widescreen) on the splash screen, and click New Project. On the main interface, click the Preview quality and display settings icon from the upper-right area of the Timeline, click Change Project Aspect Ratio, click to select 1280 x 720 (HD) from the Resolution menu of the Project Settings box, and click OK to save the custom project settings.

Then select My Media from the menu bar if not already selected, click Project Media from the navigation pane, and click Import from the Media box to select and import the image of the main character or object that you want to use in the thumbnail.

Now, drag the image from the Media box to the Timeline at the bottom.

Step 2: Clear Image Background, Add Border, and Add Custom Background
Go to Effects from the menu bar, click to select the Default tab and then AI Portrait from the navigation pane, and click and drag the Human Segmentation preset from the right box, and place it over the image track in the Timeline.

Double-click the image layer, scroll down the upper-left box to the Video Effects section, and use the Edge Thickness and Edge Feather sliders to adjust the character’s edges to make them as realistic as possible. Click OK when done.

Next, click and drag the Human Border preset over the image track in the Timeline, and follow the same procedure to customize the border. This will give the character a neon border effect.

Now, use the method explained earlier to import a custom image for the background, and drag and place it under the previous track in the Timeline.

If you are running the latest version of Filmora, you will find there are some neon light effects available under AI Portrait as well.

Step 3: Add Titles to Thumbnail
Go to Titles from the menu bar, click to select the Default tab and then Lower 3rds from the navigation pane, and click and drag your preferred lower-third preset from the right window to a separate layer in the Timeline. Double-click the lower-third layer, and use the available options in the upper-left window to change the text, its color, etc., and drag the textbox to place it to your preferred position on the image as well. Click OK to save the changes.
Next, click to select Titles from the navigation pane, and drag your preferred title from the right window to the upper-most track in the Timeline. Now use the method explained earlier to edit the text, its color, position, etc. to make it look professional.

For more tips and tricks for creating YouTube thumbnail, you can check this You Tube thumbnail creating guide.
Step 4: Get the Neon Border Thumbnail
Click the Snapshot (Camera) icon from the upper-right area of the Timeline, go to My Media from the menu bar, right-click the thumbnail of the screenshot you captured, and click Reveal in Finder (on Mac) or Reveal in Explorer (on Windows) to get to the folder the YouTube thumbnail border is saved in.

Part 2: How to Add a Glowing Neon Border in Your YouTube Thumbnail with Canva
Canva is another intuitive editing program that works on the web interface rather than having you download and install an app on your PC. You can add a neon border for YouTube thumbnails using Canva by following the instructions given below:
Step 1: Define Project Settings and Add a Background
After signing in to your Canva account, click Create a design from the top-right corner of the page, click Custom size from the bottom, define 1280 and 720 in the Width and Height fields on the box that appears respectively, and click Create new design.

Now, click to select Background from the navigation bar on the left (if the Background tool is not visible, click More and then choose Background from the expanded list), and click to select a background from the images available in the center pane.

Step 2: Upload an Image and Add Effects
Click Uploads from the navigation bar, click the More icon from the right of the Upload media button present at the top of the center pane, choose your preferred method to upload the image (with the transparent background) that you want to use, upload the image, and drag it from the center pane to the Canvas.
Note: You can use any of the tools available online to remove the background from your image for free.

To add a YouTube thumbnail border, make sure that the image that you added to the Canvas is selected, click the Duplicate icon from the upper-right area, and use the scaling handles of the copy of the image to increase its size a bit. Reposition the image back to its original location as well.
Then, click Edit image from the upper-left corner of the Canvas, click Duotone from the Edit image pane at the center, if need be, click See all, choose your preferred duotone effect to apply on the image, choose your preferred highlight and shadow colors from the box that appears next, and click Back from the top of the pane.

Next, click See all next to the Adjust section from the center pane, and drag the Blur slider to the right to increase the blur effect on the image.

Step 3: Position the Layers
While keeping the duplicate image selected, click the Position button from the upper-right area of the Canvas, and click Background to send the second image behind the first one to get the neon border effect for the photo.

Part 3: How to Outline a Person in a YouTube Thumbnail with Photoshop
Because YouTube thumbnails are nothing but static images, creating YouTube thumbnail border with Adobe Photoshop is comparatively easier. The process of doing this is given below:
Step 1: Define Document Preferences and Import an Image
Launch Adobe Photoshop on your PC, click Create new, and on the New Document customization box, define the width and height values to 1280 and 720 pixels respectively. Select Transparent from the Background Contents menu as well if not already selected. Click Create from the bottom to create a new Photoshop document with the specified document settings. Next, open the folder that contains the source image, drag the photo to Photoshop, and press Enter to place the photo.

Step 2: Remove Background from the Image
Make sure that the image layer is selected in the Layers panel on the right, go to Select from the menu bar at the top, and click Subject. From the bottom of the Layers panel, click the Add a mask icon to get rid of the background, leaving only the human on the Canvas.

Step 3: Add a Custom Background and an Outline Around the Subject
Use the method explained earlier to import a background image of your choice to Photoshop. Drag the background image layer to the bottom in the Layers panel. Double-click the masked layer, click to select Stroke from the left pane of the Layer Style box, and use the options available on the right to manage the size, color, position, etc. of the stroke that has been added around the human subject. Click OK when done, and then export the image normally to use it as a YouTube thumbnail border.

Summary
It is important to know that the default resolution of a YouTube thumbnail is 1280 x 720 pixels that is usually written and referred to as 720p. While adding a YouTube thumbnail border, it is also imperative to have a good sense of color combination and fonts. Furthermore, a decent tool like Wondershare Filmora X must be used to add an appealing neon border around the main subject in the thumbnail image easily and quickly.
02 Add a Glowing Neon Border in YouTube Thumbnail with Canva
03 Outline a Person in a YouTube Thumbnail with Photoshop
Part 1: How to Add Neon Border to YouTube Thumbnail for Free with Filmora
Being one of the most versatile and intuitive post-production tools available in the market today, Wondershare Filmora X allows you to add a neon border to a YouTube thumbnail quite conveniently. You can learn how to get this done on Windows or Mac by following the steps given below.
For Win 7 or later (64-bit)
For macOS 10.12 or later
Step 1: Define Project Settings and Add Image to the Timeline
Launch Wondershare Filmora X on your PC (a MacBook Pro M1 is used here), ensure that the project aspect ratio is set to 16:9 (Widescreen) on the splash screen, and click New Project. On the main interface, click the Preview quality and display settings icon from the upper-right area of the Timeline, click Change Project Aspect Ratio, click to select 1280 x 720 (HD) from the Resolution menu of the Project Settings box, and click OK to save the custom project settings.

Then select My Media from the menu bar if not already selected, click Project Media from the navigation pane, and click Import from the Media box to select and import the image of the main character or object that you want to use in the thumbnail.

Now, drag the image from the Media box to the Timeline at the bottom.

Step 2: Clear Image Background, Add Border, and Add Custom Background
Go to Effects from the menu bar, click to select the Default tab and then AI Portrait from the navigation pane, and click and drag the Human Segmentation preset from the right box, and place it over the image track in the Timeline.

Double-click the image layer, scroll down the upper-left box to the Video Effects section, and use the Edge Thickness and Edge Feather sliders to adjust the character’s edges to make them as realistic as possible. Click OK when done.

Next, click and drag the Human Border preset over the image track in the Timeline, and follow the same procedure to customize the border. This will give the character a neon border effect.

Now, use the method explained earlier to import a custom image for the background, and drag and place it under the previous track in the Timeline.

If you are running the latest version of Filmora, you will find there are some neon light effects available under AI Portrait as well.

Step 3: Add Titles to Thumbnail
Go to Titles from the menu bar, click to select the Default tab and then Lower 3rds from the navigation pane, and click and drag your preferred lower-third preset from the right window to a separate layer in the Timeline. Double-click the lower-third layer, and use the available options in the upper-left window to change the text, its color, etc., and drag the textbox to place it to your preferred position on the image as well. Click OK to save the changes.
Next, click to select Titles from the navigation pane, and drag your preferred title from the right window to the upper-most track in the Timeline. Now use the method explained earlier to edit the text, its color, position, etc. to make it look professional.

For more tips and tricks for creating YouTube thumbnail, you can check this You Tube thumbnail creating guide.
Step 4: Get the Neon Border Thumbnail
Click the Snapshot (Camera) icon from the upper-right area of the Timeline, go to My Media from the menu bar, right-click the thumbnail of the screenshot you captured, and click Reveal in Finder (on Mac) or Reveal in Explorer (on Windows) to get to the folder the YouTube thumbnail border is saved in.

Part 2: How to Add a Glowing Neon Border in Your YouTube Thumbnail with Canva
Canva is another intuitive editing program that works on the web interface rather than having you download and install an app on your PC. You can add a neon border for YouTube thumbnails using Canva by following the instructions given below:
Step 1: Define Project Settings and Add a Background
After signing in to your Canva account, click Create a design from the top-right corner of the page, click Custom size from the bottom, define 1280 and 720 in the Width and Height fields on the box that appears respectively, and click Create new design.

Now, click to select Background from the navigation bar on the left (if the Background tool is not visible, click More and then choose Background from the expanded list), and click to select a background from the images available in the center pane.

Step 2: Upload an Image and Add Effects
Click Uploads from the navigation bar, click the More icon from the right of the Upload media button present at the top of the center pane, choose your preferred method to upload the image (with the transparent background) that you want to use, upload the image, and drag it from the center pane to the Canvas.
Note: You can use any of the tools available online to remove the background from your image for free.

To add a YouTube thumbnail border, make sure that the image that you added to the Canvas is selected, click the Duplicate icon from the upper-right area, and use the scaling handles of the copy of the image to increase its size a bit. Reposition the image back to its original location as well.
Then, click Edit image from the upper-left corner of the Canvas, click Duotone from the Edit image pane at the center, if need be, click See all, choose your preferred duotone effect to apply on the image, choose your preferred highlight and shadow colors from the box that appears next, and click Back from the top of the pane.

Next, click See all next to the Adjust section from the center pane, and drag the Blur slider to the right to increase the blur effect on the image.

Step 3: Position the Layers
While keeping the duplicate image selected, click the Position button from the upper-right area of the Canvas, and click Background to send the second image behind the first one to get the neon border effect for the photo.

Part 3: How to Outline a Person in a YouTube Thumbnail with Photoshop
Because YouTube thumbnails are nothing but static images, creating YouTube thumbnail border with Adobe Photoshop is comparatively easier. The process of doing this is given below:
Step 1: Define Document Preferences and Import an Image
Launch Adobe Photoshop on your PC, click Create new, and on the New Document customization box, define the width and height values to 1280 and 720 pixels respectively. Select Transparent from the Background Contents menu as well if not already selected. Click Create from the bottom to create a new Photoshop document with the specified document settings. Next, open the folder that contains the source image, drag the photo to Photoshop, and press Enter to place the photo.

Step 2: Remove Background from the Image
Make sure that the image layer is selected in the Layers panel on the right, go to Select from the menu bar at the top, and click Subject. From the bottom of the Layers panel, click the Add a mask icon to get rid of the background, leaving only the human on the Canvas.

Step 3: Add a Custom Background and an Outline Around the Subject
Use the method explained earlier to import a background image of your choice to Photoshop. Drag the background image layer to the bottom in the Layers panel. Double-click the masked layer, click to select Stroke from the left pane of the Layer Style box, and use the options available on the right to manage the size, color, position, etc. of the stroke that has been added around the human subject. Click OK when done, and then export the image normally to use it as a YouTube thumbnail border.

Summary
It is important to know that the default resolution of a YouTube thumbnail is 1280 x 720 pixels that is usually written and referred to as 720p. While adding a YouTube thumbnail border, it is also imperative to have a good sense of color combination and fonts. Furthermore, a decent tool like Wondershare Filmora X must be used to add an appealing neon border around the main subject in the thumbnail image easily and quickly.
One Youtube Showcase: Mastering Media Merging
How to Merge/Combine/Join YouTube (FLV) Videos

Richard Bennett
Mar 27, 2024• Proven solutions
YouTube is the most popular video sites in the world. You may have downloaded loads of videos from this website. But how to merge them together so that you can play all YouTube videos as one either on a PC, device, or TV? Here a professional YouTube merger is introduced in part 1 for you to easily complete the job. If you just want to merge the videos that have been already uploaded to YouTube, the YouTube Video Editor can help you with that.
Part 1: How to Merge Downloaded YouTube Videos
Part 2: How to Merge YouTube Videos Online
Part 1: How to Merge Downloaded YouTube Videos
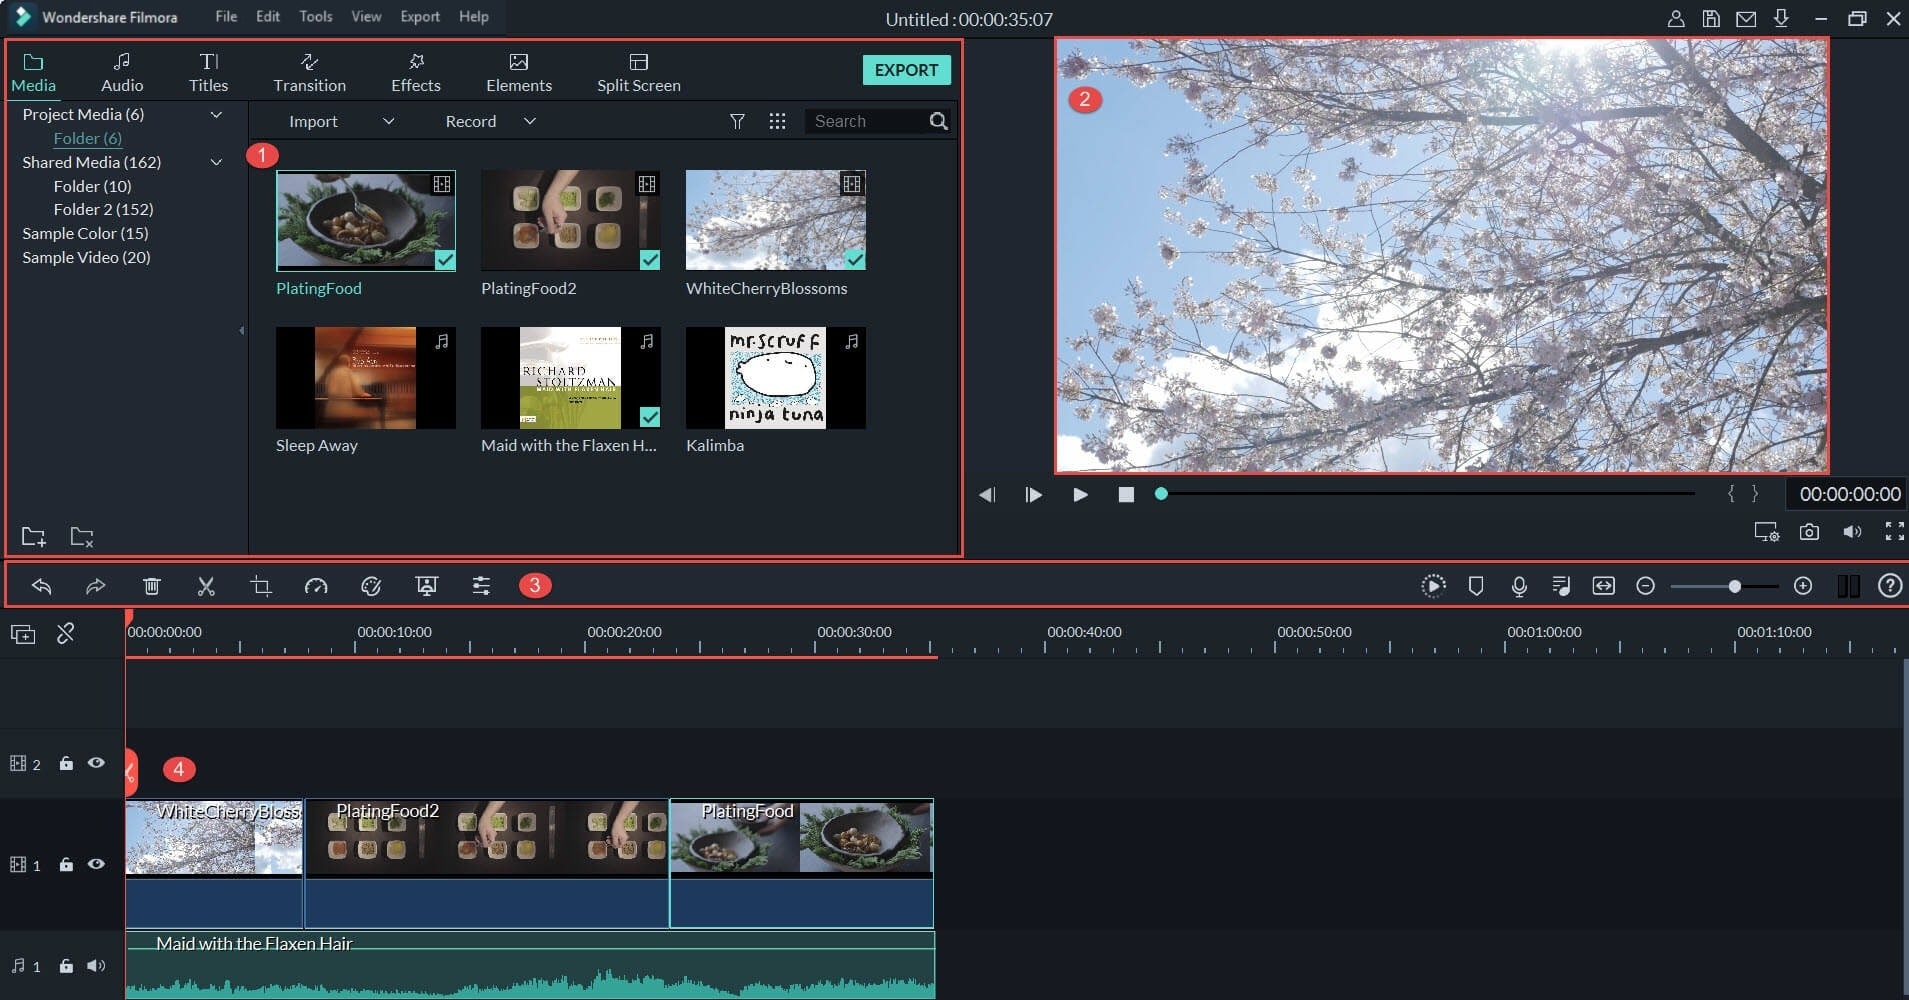
Tool you need: Wondershare Filmora video editor
Wondershare Filmora is an easy-to-use video editing tool. With it, YouTube videos will be automatically merged orderly without interrupts. On top of that, you can add transitions between two YouTube videos to make your videos more harmonious. It also enables you to easily make a picture-in-picture (PIP) video , which is definitely another creative way to merge YouTube videos.
Sounds good? Download it now and use this YouTube merger to merge all your YouTube videos.
Below is the details about how to merge YouTube video in Filmora
Step 1.Import YouTube files to the program
Download and install Wondershare Filmora. It gives good support to the downloaded YouTube videos (usually in FLV or MP4 format). You can either click “Import” on the primary windows and select YouTube video files from your computer, or simply drag and drop YouTube video files from File Explorer to the User’s Album.
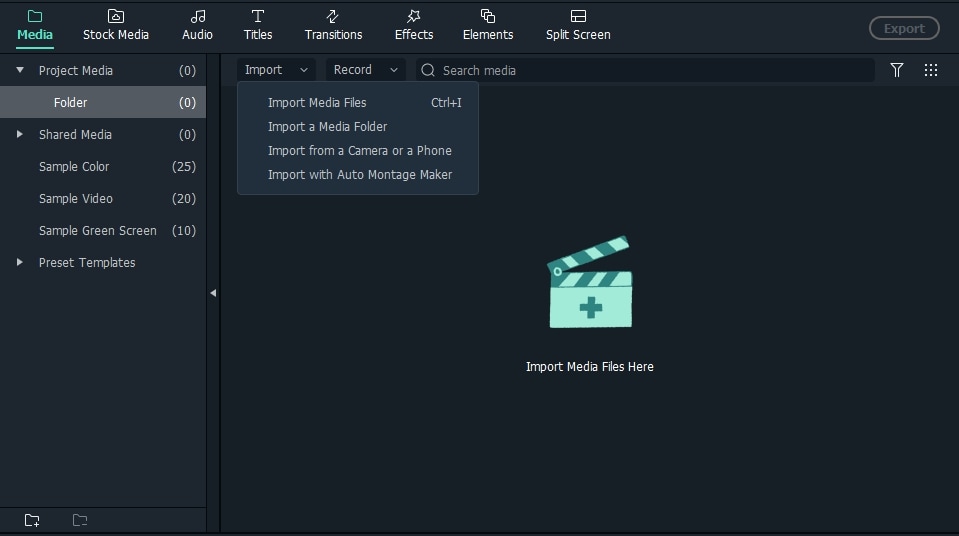
Step 2. Drag and drop YouTube videos to merge
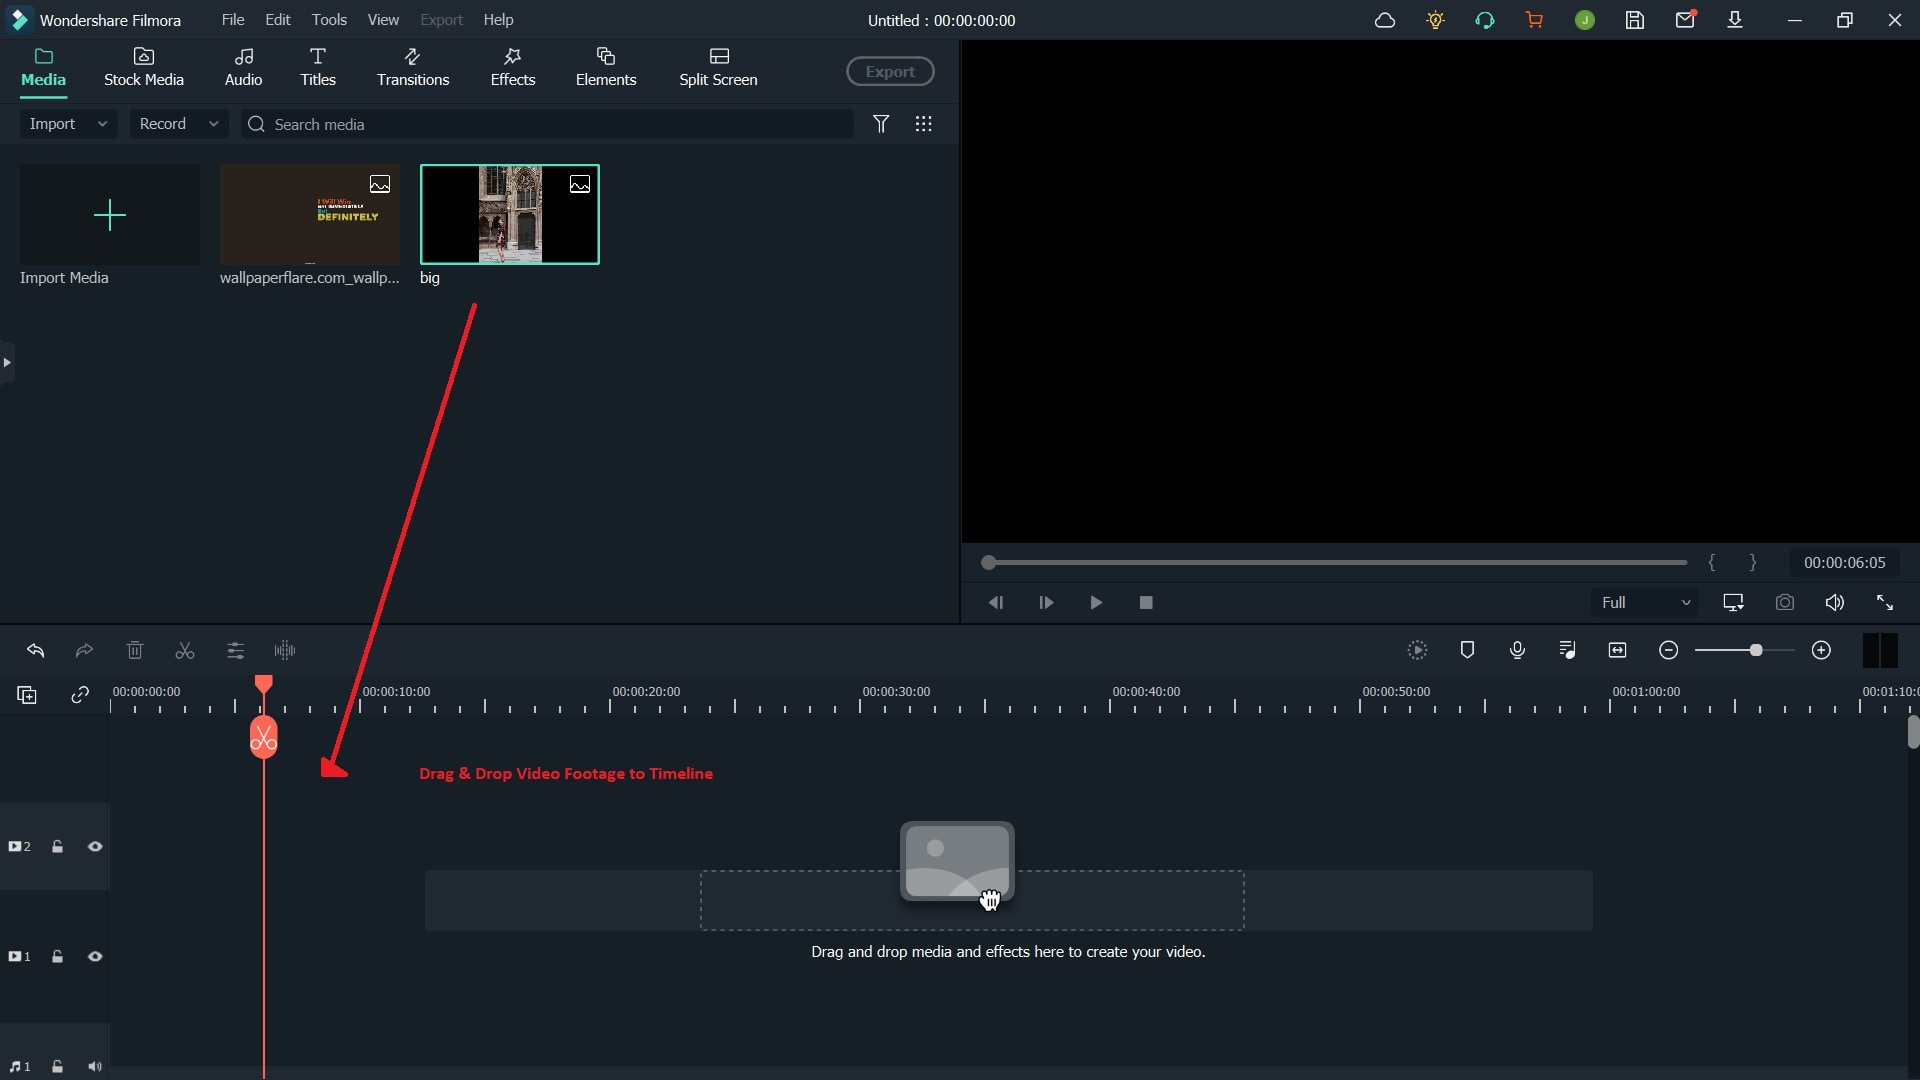
To merge YouTube videos, select multiple YouTube videos in the User’s Album by holding down Ctrl or Shift key, and then drag and drop them to the video track on the Timeline. All YouTube files will join one after another without interrupts and there is none transition by default, but you can add transitions between video clips as you want. This will be introduced in Step 3.
Step 3. Merge YouTube videos with transition
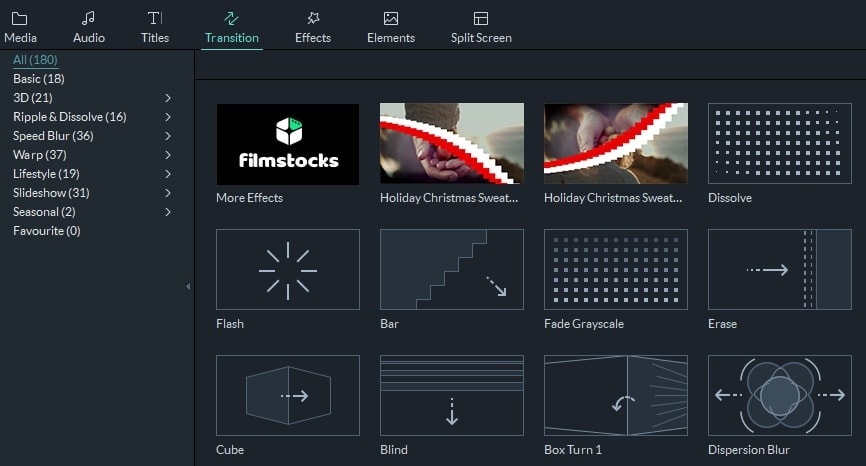
By adding transitions, YouTube videos will flow nicely from one to the next. To do so, switch to Transition tab, and drag the desired transition to the Timeline. Alternatively, right click any transition and choose “Apply to All” and “Random to All” from the popup menu to add transitions between YouTube videos in seconds.
Step 4. Merge multiple YouTube files into one
Make sure you are satisfied with everything. You can click Play button to preview how YouTube videos will be merged. If the result is good, click “Export” button to save the YouTube video as one.

Therefore, go to the “Format” tab and select one desired format and click Create to start merging YouTube videos. By the way, if you want to play the merged YouTube files on iPod, iPhone, iPad, choose “Device” and select your device from the list. You can also directly upload back to YouTube for sharing or burn to DVD for playing on TV.
Part 2: How to Merge YouTube Videos Online
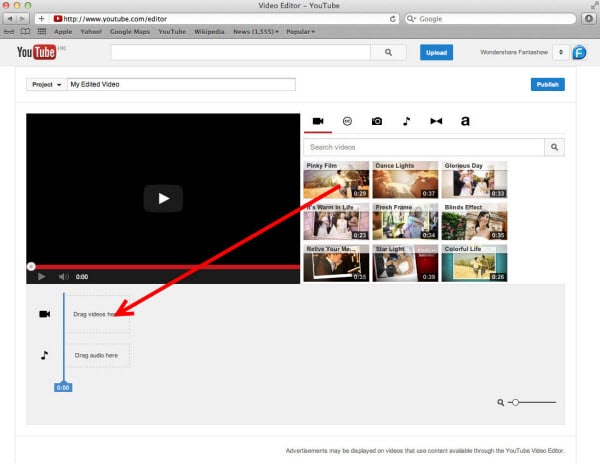
Tool you need: YouTube Video Editor
YouTube Video Editor is a browser-based video editor released by YouTube itself. It enables users to make minor edits to videos they’ve uploaded onto YouTube, as well as merge several clips together into one. It requires no additional software, or browser plug-ins (besides Adobe’s Flash), which makes it convenient to use. However, it lacks many basic features of modern day consumer video editing software and often crashes while dealing with large video files.

Get access to the editor
Sign in to your YouTube (or Google) account. Click “Upload”>> “Edit” to the Video Editor tab.

Place videos on the timeline
Simply drag the videos that need merge onto the timeline or hit the plus icon in the top right hand corner of each clip.

Save the settings
Review the result. If satisfied, hit the “Publish” button to save the settings.

Richard Bennett
Richard Bennett is a writer and a lover of all things video.
Follow @Richard Bennett
Richard Bennett
Mar 27, 2024• Proven solutions
YouTube is the most popular video sites in the world. You may have downloaded loads of videos from this website. But how to merge them together so that you can play all YouTube videos as one either on a PC, device, or TV? Here a professional YouTube merger is introduced in part 1 for you to easily complete the job. If you just want to merge the videos that have been already uploaded to YouTube, the YouTube Video Editor can help you with that.
Part 1: How to Merge Downloaded YouTube Videos
Part 2: How to Merge YouTube Videos Online
Part 1: How to Merge Downloaded YouTube Videos

Tool you need: Wondershare Filmora video editor
Wondershare Filmora is an easy-to-use video editing tool. With it, YouTube videos will be automatically merged orderly without interrupts. On top of that, you can add transitions between two YouTube videos to make your videos more harmonious. It also enables you to easily make a picture-in-picture (PIP) video , which is definitely another creative way to merge YouTube videos.
Sounds good? Download it now and use this YouTube merger to merge all your YouTube videos.
Below is the details about how to merge YouTube video in Filmora
Step 1.Import YouTube files to the program
Download and install Wondershare Filmora. It gives good support to the downloaded YouTube videos (usually in FLV or MP4 format). You can either click “Import” on the primary windows and select YouTube video files from your computer, or simply drag and drop YouTube video files from File Explorer to the User’s Album.

Step 2. Drag and drop YouTube videos to merge
To merge YouTube videos, select multiple YouTube videos in the User’s Album by holding down Ctrl or Shift key, and then drag and drop them to the video track on the Timeline. All YouTube files will join one after another without interrupts and there is none transition by default, but you can add transitions between video clips as you want. This will be introduced in Step 3.

Step 3. Merge YouTube videos with transition
By adding transitions, YouTube videos will flow nicely from one to the next. To do so, switch to Transition tab, and drag the desired transition to the Timeline. Alternatively, right click any transition and choose “Apply to All” and “Random to All” from the popup menu to add transitions between YouTube videos in seconds.

Step 4. Merge multiple YouTube files into one
Make sure you are satisfied with everything. You can click Play button to preview how YouTube videos will be merged. If the result is good, click “Export” button to save the YouTube video as one.

Therefore, go to the “Format” tab and select one desired format and click Create to start merging YouTube videos. By the way, if you want to play the merged YouTube files on iPod, iPhone, iPad, choose “Device” and select your device from the list. You can also directly upload back to YouTube for sharing or burn to DVD for playing on TV.
Part 2: How to Merge YouTube Videos Online

Tool you need: YouTube Video Editor
YouTube Video Editor is a browser-based video editor released by YouTube itself. It enables users to make minor edits to videos they’ve uploaded onto YouTube, as well as merge several clips together into one. It requires no additional software, or browser plug-ins (besides Adobe’s Flash), which makes it convenient to use. However, it lacks many basic features of modern day consumer video editing software and often crashes while dealing with large video files.

Get access to the editor
Sign in to your YouTube (or Google) account. Click “Upload”>> “Edit” to the Video Editor tab.

Place videos on the timeline
Simply drag the videos that need merge onto the timeline or hit the plus icon in the top right hand corner of each clip.

Save the settings
Review the result. If satisfied, hit the “Publish” button to save the settings.

Richard Bennett
Richard Bennett is a writer and a lover of all things video.
Follow @Richard Bennett
Richard Bennett
Mar 27, 2024• Proven solutions
YouTube is the most popular video sites in the world. You may have downloaded loads of videos from this website. But how to merge them together so that you can play all YouTube videos as one either on a PC, device, or TV? Here a professional YouTube merger is introduced in part 1 for you to easily complete the job. If you just want to merge the videos that have been already uploaded to YouTube, the YouTube Video Editor can help you with that.
Part 1: How to Merge Downloaded YouTube Videos
Part 2: How to Merge YouTube Videos Online
Part 1: How to Merge Downloaded YouTube Videos

Tool you need: Wondershare Filmora video editor
Wondershare Filmora is an easy-to-use video editing tool. With it, YouTube videos will be automatically merged orderly without interrupts. On top of that, you can add transitions between two YouTube videos to make your videos more harmonious. It also enables you to easily make a picture-in-picture (PIP) video , which is definitely another creative way to merge YouTube videos.
Sounds good? Download it now and use this YouTube merger to merge all your YouTube videos.
Below is the details about how to merge YouTube video in Filmora
Step 1.Import YouTube files to the program
Download and install Wondershare Filmora. It gives good support to the downloaded YouTube videos (usually in FLV or MP4 format). You can either click “Import” on the primary windows and select YouTube video files from your computer, or simply drag and drop YouTube video files from File Explorer to the User’s Album.

Step 2. Drag and drop YouTube videos to merge
To merge YouTube videos, select multiple YouTube videos in the User’s Album by holding down Ctrl or Shift key, and then drag and drop them to the video track on the Timeline. All YouTube files will join one after another without interrupts and there is none transition by default, but you can add transitions between video clips as you want. This will be introduced in Step 3.

Step 3. Merge YouTube videos with transition
By adding transitions, YouTube videos will flow nicely from one to the next. To do so, switch to Transition tab, and drag the desired transition to the Timeline. Alternatively, right click any transition and choose “Apply to All” and “Random to All” from the popup menu to add transitions between YouTube videos in seconds.

Step 4. Merge multiple YouTube files into one
Make sure you are satisfied with everything. You can click Play button to preview how YouTube videos will be merged. If the result is good, click “Export” button to save the YouTube video as one.

Therefore, go to the “Format” tab and select one desired format and click Create to start merging YouTube videos. By the way, if you want to play the merged YouTube files on iPod, iPhone, iPad, choose “Device” and select your device from the list. You can also directly upload back to YouTube for sharing or burn to DVD for playing on TV.
Part 2: How to Merge YouTube Videos Online

Tool you need: YouTube Video Editor
YouTube Video Editor is a browser-based video editor released by YouTube itself. It enables users to make minor edits to videos they’ve uploaded onto YouTube, as well as merge several clips together into one. It requires no additional software, or browser plug-ins (besides Adobe’s Flash), which makes it convenient to use. However, it lacks many basic features of modern day consumer video editing software and often crashes while dealing with large video files.

Get access to the editor
Sign in to your YouTube (or Google) account. Click “Upload”>> “Edit” to the Video Editor tab.

Place videos on the timeline
Simply drag the videos that need merge onto the timeline or hit the plus icon in the top right hand corner of each clip.

Save the settings
Review the result. If satisfied, hit the “Publish” button to save the settings.

Richard Bennett
Richard Bennett is a writer and a lover of all things video.
Follow @Richard Bennett
Richard Bennett
Mar 27, 2024• Proven solutions
YouTube is the most popular video sites in the world. You may have downloaded loads of videos from this website. But how to merge them together so that you can play all YouTube videos as one either on a PC, device, or TV? Here a professional YouTube merger is introduced in part 1 for you to easily complete the job. If you just want to merge the videos that have been already uploaded to YouTube, the YouTube Video Editor can help you with that.
Part 1: How to Merge Downloaded YouTube Videos
Part 2: How to Merge YouTube Videos Online
Part 1: How to Merge Downloaded YouTube Videos

Tool you need: Wondershare Filmora video editor
Wondershare Filmora is an easy-to-use video editing tool. With it, YouTube videos will be automatically merged orderly without interrupts. On top of that, you can add transitions between two YouTube videos to make your videos more harmonious. It also enables you to easily make a picture-in-picture (PIP) video , which is definitely another creative way to merge YouTube videos.
Sounds good? Download it now and use this YouTube merger to merge all your YouTube videos.
Below is the details about how to merge YouTube video in Filmora
Step 1.Import YouTube files to the program
Download and install Wondershare Filmora. It gives good support to the downloaded YouTube videos (usually in FLV or MP4 format). You can either click “Import” on the primary windows and select YouTube video files from your computer, or simply drag and drop YouTube video files from File Explorer to the User’s Album.

Step 2. Drag and drop YouTube videos to merge
To merge YouTube videos, select multiple YouTube videos in the User’s Album by holding down Ctrl or Shift key, and then drag and drop them to the video track on the Timeline. All YouTube files will join one after another without interrupts and there is none transition by default, but you can add transitions between video clips as you want. This will be introduced in Step 3.

Step 3. Merge YouTube videos with transition
By adding transitions, YouTube videos will flow nicely from one to the next. To do so, switch to Transition tab, and drag the desired transition to the Timeline. Alternatively, right click any transition and choose “Apply to All” and “Random to All” from the popup menu to add transitions between YouTube videos in seconds.

Step 4. Merge multiple YouTube files into one
Make sure you are satisfied with everything. You can click Play button to preview how YouTube videos will be merged. If the result is good, click “Export” button to save the YouTube video as one.

Therefore, go to the “Format” tab and select one desired format and click Create to start merging YouTube videos. By the way, if you want to play the merged YouTube files on iPod, iPhone, iPad, choose “Device” and select your device from the list. You can also directly upload back to YouTube for sharing or burn to DVD for playing on TV.
Part 2: How to Merge YouTube Videos Online

Tool you need: YouTube Video Editor
YouTube Video Editor is a browser-based video editor released by YouTube itself. It enables users to make minor edits to videos they’ve uploaded onto YouTube, as well as merge several clips together into one. It requires no additional software, or browser plug-ins (besides Adobe’s Flash), which makes it convenient to use. However, it lacks many basic features of modern day consumer video editing software and often crashes while dealing with large video files.

Get access to the editor
Sign in to your YouTube (or Google) account. Click “Upload”>> “Edit” to the Video Editor tab.

Place videos on the timeline
Simply drag the videos that need merge onto the timeline or hit the plus icon in the top right hand corner of each clip.

Save the settings
Review the result. If satisfied, hit the “Publish” button to save the settings.

Richard Bennett
Richard Bennett is a writer and a lover of all things video.
Follow @Richard Bennett
Also read:
- 11 Best Free YouTube Name Generators You Should Know for 2024
- 2024 Approved Discovering Ideal Hashtags for Your YouTube Videos
- Essential Tips for Incorporating Dynamic Cards in YouTube Videos
- Elevate to Success Top Hashtags for 6-Figure Views on YouTube for 2024
- In 2024, Enlightenment Echoes Best Ed Tutorials YT
- Elevate Thumbnail Imagery Fantasy Landscapes & Effects Guide
- Mobile Mastery in Thumbnail Creation for Engaging YouTube Videos
- Guide for Social Media Savvy Content Sharers
- [New] Easy-to-Navigate Top 10 YouTube Downloader Tools
- Seamless Sound Shift Best 10 YouTube Audio Converters
- Clearing Process for YouTube's Pending Video List
- The Editor's Playbook Mastering the Art of YouTube Cuts
- In 2024, Enhancing Clarity & Comprehensibility Adding On-Screen Captions in Video Projects
- 2024 Approved 6 Proven Techniques to Elevate Your YouTube Engagement and Reduce Churn
- In 2024, Dynamic Viewership Statistics Platforms
- Unlock the Power 8 Best No-Cost Software for Videographers & Editors
- 2024 Approved Co-Create Content to Maximize YouTube Follower Count
- In 2024, Enhancing Viewers' Staying Power Top 6 Strategies for YouTube Success
- [Updated] Chuckling Challenge Brainstroming 7 Humorous YouTube Videos
- How to Embed YouTube in Your GSlides Presentation
- Steps to Prevent Thumbnail Absence on Shorts Videos
- In 2024, Backwards Play Mastering YouTube Video Reversals
- Grasping YouTube SEO A Guide to Keyword Discovery
- Boost Traffic with Effective Tools for YouTube Videos for 2024
- [New] Creator Payment Frequency on YouTube Platform
- In 2024, Curating Historical Wisdom The Ultimate Student-Friendly Channel List (#1-10)
- 2024 Approved Bring Your GSlides to Life with YouTube Media
- Visual Branding Mastery Implementing Watermarks & Logos Into Video Content
- [Updated] Discover Engaging YouTube Threads
- 2024 Approved Digital Dynamos 8 YouTube Channels Surging Forward
- In 2024, Charting the Course From Scale to Submillions in Youtube
- 2024 Approved Elite Tech for Saving Your On-Camera Video Memories
- Hashtag Mastery Pathway to 6-Figure Youtube Impact
- [Updated] Comedy Crusade YouTube's Hottest Laughter Leaders
- [Updated] Elevate Your YouTube Presence with These 8 Free Courses
- [Updated] Elevating YouTube Creativity Ideal Concepts and Themes for Channels
- 2024 Approved Avoid the Backtrack Blunder with These Tips
- In 2024, Does Airplane Mode Turn off GPS Location On Tecno Camon 20 Premier 5G? | Dr.fone
- The Essentials for Dominating Instagram Stories
- Designing Your Perfect TikTok Outro for 2024
- In 2024, How to use Snapchat Location Spoofer to Protect Your Privacy On Infinix Hot 30i? | Dr.fone
- In 2024, Process of Screen Sharing Oppo A18 to PC- Detailed Steps | Dr.fone
- [Updated] Probing Into Verified Selfies' Significance in Modern Social Media for 2024
- [New] Utilizing the Virtual Whiteboard in Webinars Cross-Platform Tips and Tricks
- In 2024, What Legendaries Are In Pokemon Platinum On Vivo Y100A? | Dr.fone
- Clarity Unleashed In-Depth Review of the HP Z32 X Display for 2024
- How To Recover Lost Data from iPhone 11? | Dr.fone
- [New] In 2024, Enhancing Communication Strategies for Effective Call Logging
- In 2024, Mastery Over Buffering in Vimeo Streams (Revised Tips)
- [New] In 2024, Transformative Discord Journey with These Essential Upgrades
- In 2024, How to Track WhatsApp Messages on Apple iPhone SE (2022) Without Them Knowing? | Dr.fone
- Mastering iPhone's Simple Recording Features Quickly
- Apply These Techniques to Improve How to Detect Fake GPS Location On Honor X9a | Dr.fone
- [Updated] Professional Methodology Enabling Countdown Functionality in OBS for 2024
- In 2024, How Many Attempts To Unlock Apple iPhone 13 | Dr.fone
- Title: Reimagine YouTube Snapshots With Luminous Outlines
- Author: Steven
- Created at : 2024-05-25 20:21:03
- Updated at : 2024-05-26 20:21:03
- Link: https://youtube-clips.techidaily.com/reimagine-youtube-snapshots-with-luminous-outlines/
- License: This work is licensed under CC BY-NC-SA 4.0.


