
:max_bytes(150000):strip_icc()/ScreenShot2022-04-22at1.17.11PM-f27a0b83d95b4fa38c82c2941d549102.png)
"Professional Choice High-Quality Laptops for Media Workers"
Professional Choice: High-Quality Laptops for Media Workers
The Best Laptops for Video Editing

Richard Bennett
Oct 26, 2023• Proven solutions
This article lists the 3 best laptops for video editing in 2018.
Whether you’re an industry professional or an avid YouTuber, you know how important it is to produce quality videos consistently.
The quality of the videos you create will depend on your creativity, the editing software you use, and the hardware that software is installed on. And as you probably know, it can be tough to work fast and get good results when your hardware or laptop isn’t strong enough to power your software properly and allow you to work at the pace you want.
The best laptops for video editing in 2018 have three things in common. First, they have top-of-the-line display technology for color accuracy, color depth, and clarity. Next, they have discrete (dedicated) Graphic Processing Units (GPUs) with accompanying RAM to enable them to handle video processing fast without compromising other system functions. And finally, they have Intel core i7 CPU processors and Solid-State Drives (SSD) for faster overall performance.
THE TOP 3 LAPTOPS FOR EDITING VIDEO IN 2018
The top 3 laptops below are quite impressive. They have the right mix of power and function that video editing requires.
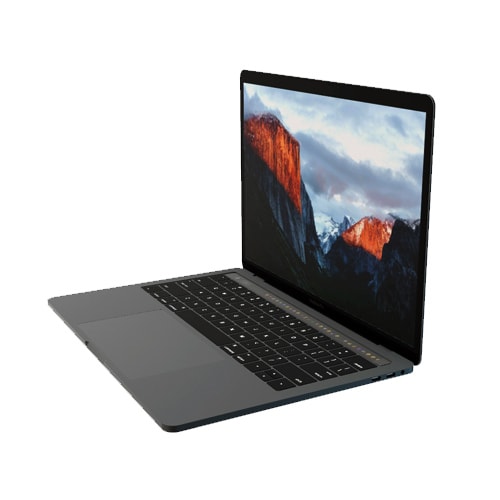
1.MACBOOK PRO WITH TOUCH BAR
PRICE: $1500 - $1800
SYSTEM SPECS:
CPU: Intel Core i7 Processor
GRAPHICS: Radeon Pro 555 with 2GB memory – 560 with 4GB memory
RAM: 16GB
SCREEN: 15.4” Retina Display
RES: 2880 x 1800px
STORAGE: 128 – 256GB SSD
PROS
- OLED Touch Bar
- Thunderbolt 3 ports
- Large Trackpad
CONS:
- No other input ports available besides Thunderbolt 3
- Expensive
The MacBook Pro with Touch Bar is the best video editing laptop produced by Apple. It has a wide 15.4” screen with thin bezels, and its proprietary OLED Touch bar amps up its flexibility and functionality considerably. The Touch Bar is set-up to show different shortcuts for different apps. It works quite well with Photoshop and will show thumbnails, filter options, a color picker, and more while you’re editing videos or stills.
Working with large 4K video files is much easier with the MacBook Pro. It’s fitted with Thunderbolt 3 Ports which have the highest data and video bandwidth available for USB-C connections. With these Thunderbolt ports, you can also use high-speed and high-power peripherals without a hitch. This laptop also has an extra-wide touchpad or Trackpad (as Apple calls it) which expands your physical working surface while also making it easier to do detailed video editing.
Unfortunately, if you need a variety of ports like most videographers, working with the MacBook Pro could be a challenge as it only has Thunderbolt 3 ports. If this is the laptop you prefer, you’ll need to buy additional connection hardware to work with different input devices. And while this laptop impresses in many ways, it’s also quite expensive. There are certainly other laptops on the market which can give you similar performance at a lower cost.
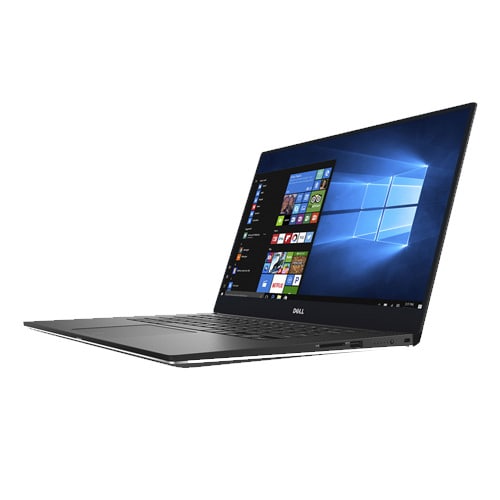
2. DELL XPS 15
PRICE: $999 - $1300
SYSTEM SPECS:
CPU: Intel Core i7 Processor
GRAPHICS: NVIDIA GeForce GTX 1050
RAM: 8 - 16GB
SCREEN: 15.6”
RES: FHD - 4k UHD 3840 x 2160px
STORAGE: 256GB – 1TB SSD
PROS
- 4k InfinityEdge display
- Good battery life
- Has multiple input ports
CONS:
- Webcam is oddly positioned
The Dell XPS 15 is one laptop that hits the sweet spot for many videographers. It’s considered the closest competitor to the MacBook Pro reviewed above. In fact, many would argue that it tops the MacBook Pro when it comes to speed, color accuracy, and color depth. Its 15.6” screen has very thin bezels for minimal distraction and immersive work experience. At 4K resolution and displaying a wide range of the sRGB gamut, video editing with the Dell XPS 15 promises to be both smooth and enjoyable.
The Dell XPS 15 is certainly more affordable, while still delivering excellent graphics performance. It features an Intel i7 processor and the NVIDIA GeForce GTX 1050 graphics processor. This makes it remarkably fast for video editing, as well as energy-efficient. People who work with different input devices will also like that this laptop has legacy adapters (USB, HDMI, ethernet) alongside a USB type C port.
The biggest downside to the Dell XPS 15 laptop is its oddly positioned webcam. It feels awkward and can be an inconvenience to use since you’ll have to adjust your position significantly while making video calls or recording for your YouTube channel.
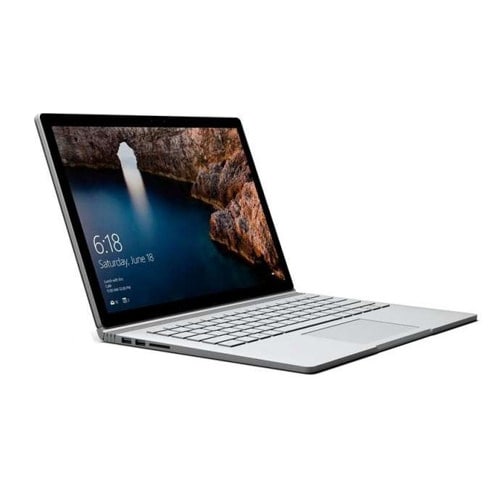
3. MICROSOFT SURFACE BOOK 2
PRICE: $1499 - $2499
SYSTEM SPECS:
CPU: Intel Core i7 Processor
GRAPHICS: Intel HD 620 or Nvidia GTX 1050 / GTX 1060
RAM: 16GB
SCREEN: 15.0”
RES: 3240 x 2160px
STORAGE: 256GB, 512GB – 1TB SSD
PROS
- Detachable screen
- Has multiple input ports (USB Type-A, USB Type-C, SD card reader)
- Works with a Stylus
CONS:
- Expensive
- Fulcrum hinge
The Microsoft Surface Book 2 is a laptop and a tablet thanks to its detachable screen. At a resolution of 3240 x 2160px, its screen is nearly 4k and can handle Full HD and HD footage with ease. Add to this its capacity to show a considerable portion of the sRGB gamut and its easy-to-use stylus and you can see why this 2-in-1 combo from Microsoft is one of the top 3 laptops for video editing in 2018.
Surface Book 2 also has the right combination of power and storage capacity that video editing requires. It boasts a state-of-the-art NVIDIA graphics processor and an Intel i7 processor for a smooth workflow no matter the size or level of detail involved in your video editing project.
On the downside, this laptop is undoubtedly very expensive. Compared to the function and power you can get from the DELL XPS 15, it’s hard to justify paying nearly $2500 for the Surface Book 2. Its detachable screen, supported by a fulcrum hinge, also comes at a price. It makes the laptop a bit bulky at one end when it’s folded. This in turn can make day-to-day handling a bit more tricky than it has to be.
CONCLUSION
If you’re searching for a good laptop to help you improve the quality of your videos in 2018, look no further than these 3. They have all the power, function, and storage capacity you need to handle any project with ease. Just be mindful of your budget and consider which extras are worth the expense. Go for the MacBook Pro with Touch Bar if customizing your workflow is a priority. Opt for the Dell XPS 15 if you want the best combination of display quality and graphics processing. Finally, consider the Surface Book 2 if you need the flexibility of a 2-in-1 device.
What do you think is the best laptop for video editing?
Equip Your Laptop with the Best Video Editing Software


Richard Bennett
Richard Bennett is a writer and a lover of all things video.
Follow @Richard Bennett
Richard Bennett
Oct 26, 2023• Proven solutions
This article lists the 3 best laptops for video editing in 2018.
Whether you’re an industry professional or an avid YouTuber, you know how important it is to produce quality videos consistently.
The quality of the videos you create will depend on your creativity, the editing software you use, and the hardware that software is installed on. And as you probably know, it can be tough to work fast and get good results when your hardware or laptop isn’t strong enough to power your software properly and allow you to work at the pace you want.
The best laptops for video editing in 2018 have three things in common. First, they have top-of-the-line display technology for color accuracy, color depth, and clarity. Next, they have discrete (dedicated) Graphic Processing Units (GPUs) with accompanying RAM to enable them to handle video processing fast without compromising other system functions. And finally, they have Intel core i7 CPU processors and Solid-State Drives (SSD) for faster overall performance.
THE TOP 3 LAPTOPS FOR EDITING VIDEO IN 2018
The top 3 laptops below are quite impressive. They have the right mix of power and function that video editing requires.
1.MACBOOK PRO WITH TOUCH BAR
PRICE: $1500 - $1800
SYSTEM SPECS:
CPU: Intel Core i7 Processor
GRAPHICS: Radeon Pro 555 with 2GB memory – 560 with 4GB memory
RAM: 16GB
SCREEN: 15.4” Retina Display
RES: 2880 x 1800px
STORAGE: 128 – 256GB SSD
PROS
- OLED Touch Bar
- Thunderbolt 3 ports
- Large Trackpad
CONS:
- No other input ports available besides Thunderbolt 3
- Expensive
The MacBook Pro with Touch Bar is the best video editing laptop produced by Apple. It has a wide 15.4” screen with thin bezels, and its proprietary OLED Touch bar amps up its flexibility and functionality considerably. The Touch Bar is set-up to show different shortcuts for different apps. It works quite well with Photoshop and will show thumbnails, filter options, a color picker, and more while you’re editing videos or stills.
Working with large 4K video files is much easier with the MacBook Pro. It’s fitted with Thunderbolt 3 Ports which have the highest data and video bandwidth available for USB-C connections. With these Thunderbolt ports, you can also use high-speed and high-power peripherals without a hitch. This laptop also has an extra-wide touchpad or Trackpad (as Apple calls it) which expands your physical working surface while also making it easier to do detailed video editing.
Unfortunately, if you need a variety of ports like most videographers, working with the MacBook Pro could be a challenge as it only has Thunderbolt 3 ports. If this is the laptop you prefer, you’ll need to buy additional connection hardware to work with different input devices. And while this laptop impresses in many ways, it’s also quite expensive. There are certainly other laptops on the market which can give you similar performance at a lower cost.
2. DELL XPS 15
PRICE: $999 - $1300
SYSTEM SPECS:
CPU: Intel Core i7 Processor
GRAPHICS: NVIDIA GeForce GTX 1050
RAM: 8 - 16GB
SCREEN: 15.6”
RES: FHD - 4k UHD 3840 x 2160px
STORAGE: 256GB – 1TB SSD
PROS
- 4k InfinityEdge display
- Good battery life
- Has multiple input ports
CONS:
- Webcam is oddly positioned
The Dell XPS 15 is one laptop that hits the sweet spot for many videographers. It’s considered the closest competitor to the MacBook Pro reviewed above. In fact, many would argue that it tops the MacBook Pro when it comes to speed, color accuracy, and color depth. Its 15.6” screen has very thin bezels for minimal distraction and immersive work experience. At 4K resolution and displaying a wide range of the sRGB gamut, video editing with the Dell XPS 15 promises to be both smooth and enjoyable.
The Dell XPS 15 is certainly more affordable, while still delivering excellent graphics performance. It features an Intel i7 processor and the NVIDIA GeForce GTX 1050 graphics processor. This makes it remarkably fast for video editing, as well as energy-efficient. People who work with different input devices will also like that this laptop has legacy adapters (USB, HDMI, ethernet) alongside a USB type C port.
The biggest downside to the Dell XPS 15 laptop is its oddly positioned webcam. It feels awkward and can be an inconvenience to use since you’ll have to adjust your position significantly while making video calls or recording for your YouTube channel.
3. MICROSOFT SURFACE BOOK 2
PRICE: $1499 - $2499
SYSTEM SPECS:
CPU: Intel Core i7 Processor
GRAPHICS: Intel HD 620 or Nvidia GTX 1050 / GTX 1060
RAM: 16GB
SCREEN: 15.0”
RES: 3240 x 2160px
STORAGE: 256GB, 512GB – 1TB SSD
PROS
- Detachable screen
- Has multiple input ports (USB Type-A, USB Type-C, SD card reader)
- Works with a Stylus
CONS:
- Expensive
- Fulcrum hinge
The Microsoft Surface Book 2 is a laptop and a tablet thanks to its detachable screen. At a resolution of 3240 x 2160px, its screen is nearly 4k and can handle Full HD and HD footage with ease. Add to this its capacity to show a considerable portion of the sRGB gamut and its easy-to-use stylus and you can see why this 2-in-1 combo from Microsoft is one of the top 3 laptops for video editing in 2018.
Surface Book 2 also has the right combination of power and storage capacity that video editing requires. It boasts a state-of-the-art NVIDIA graphics processor and an Intel i7 processor for a smooth workflow no matter the size or level of detail involved in your video editing project.
On the downside, this laptop is undoubtedly very expensive. Compared to the function and power you can get from the DELL XPS 15, it’s hard to justify paying nearly $2500 for the Surface Book 2. Its detachable screen, supported by a fulcrum hinge, also comes at a price. It makes the laptop a bit bulky at one end when it’s folded. This in turn can make day-to-day handling a bit more tricky than it has to be.
CONCLUSION
If you’re searching for a good laptop to help you improve the quality of your videos in 2018, look no further than these 3. They have all the power, function, and storage capacity you need to handle any project with ease. Just be mindful of your budget and consider which extras are worth the expense. Go for the MacBook Pro with Touch Bar if customizing your workflow is a priority. Opt for the Dell XPS 15 if you want the best combination of display quality and graphics processing. Finally, consider the Surface Book 2 if you need the flexibility of a 2-in-1 device.
What do you think is the best laptop for video editing?
Equip Your Laptop with the Best Video Editing Software
Richard Bennett
Richard Bennett is a writer and a lover of all things video.
Follow @Richard Bennett
Go Backwards: A Step-by-Step for Reversing YouTube Videos
If you have ever created a playlist on YouTube, you may have noticed that the order of the videos is automatically set and based on when they were added to the list. However, it would help if you played them in reverse order.
Surprisingly, there is no built-in way to do this on YouTube. However, four simple workarounds only take a few minutes to complete.
So, keep reading to learn how to reverse a YouTube playlist so you can watch the videos in the order you want!
How to Reverse a YouTube Playlist?
Below we’ve provided four different solutions to help you reverse your YouTube playlist on your computer:
Using Chrome Web Extension
One of the most straightforward and convenient methods of reversing the YouTube playlist is to install a Chrome browser extension that will let you play any playlist in the opposite order.
The “Iridium for YouTube” and “Improve YouTube” extensions on your Google Chrome can play any YouTube video queue or playlist in reverse.
Here’s how to install the “Iridium for YouTube” extension on your Chrome browser to reverse the playlist:
Step 1: In the first step, launch a browser on your computer and click the three dots (ellipsis icon) in the top-right corner of the screen. Scroll down, select “More Tools,” and click Extensions.”

Step 2:
- Now, click the three horizontal-line”Menu”icon.
- Click the”Open Chrome Web Store”option.
- Search for theIridium for YouTubeextension using the search bar.

Step 3:
- Open the extension page.
- Click”Add to Chrome.”
- Click the”Add Extension”option in the pop-up menu.

Step 4:Open a new page, visit YouTube , and a pop-up window will appear. Select”Close”to terminate it, and clickthe”Menu”(hamburger) icon in the top left corner of the screen. Next, scroll down and open your savedPlaylistthat you want to reverse.

Step 5: Click the “Play All” option in the details section of the playlist and click the Iridium button on the right side of the screen. This will open a new tab with different settings for your playlist. Go to the Video tab, and under the “Playlist” header, toggle the button next to “Enable reverse playlist control” to change the settings.

That’s about it. You will now be able to watch a YouTube playlist in reverse order.
Using The Third Website
Several trusted and reliable third-party websites, such as “Playlist. tools,” can help you reverse your YouTube playlists quickly. The platform is free and fully dedicated to instantly changing the order of your Playlist.
Here’s how you can use the Playlist.tools to reverse your videos’ order in a playlist on YouTube:
Step 1: Launch a browser on your laptop or desktop, head to theYouTube website, and click the three-line “Menu” icon. Now, scroll down to access the playlist you want to reverse, click the “Share” icon, and click “Copy” to save the URL to your clipboard.
Step 2: In the next step, open a new tab and visit the “Playlist.Tools” website. Now, paste the copied playlist URL in the provided text box, and the platform will start retrieving it.

Step 3: Finally, click the “Sort” icon and select descending order to reverse your playlist. You can always return to the original sequence by clicking the “Original Sequence” option in the top right corner of the screen.
Changing the Ordering in Settings
If you are a content creator on YouTube and want to reverse the videos’ order in a playlist on your channel, do the following steps in sequence:
Step 1: In the first step, launch the YouTube app on your device or visit the YouTube website on a browser. Go to “Library” and open the playlist of your choice.
Step 2: Hover over the video, and you will see two horizontal lines next to it. Click/tap & hold the video and drag it to a new location to change its order.
You can also utilize the “Sort” option to reverse the playlist. To do so, click “Sort” at the top of the playlist above the videos and select “Date Published (Oldest)” to change the order.

A Bonus Tip for YouTube Creator: Make Your Own YouTube Channel Trailer
As a YouTube content creator, you need to set your videos’ order in your Playlist. Besides, the video’s trailer also influences your audiences’ browsing and watching experience. To help you with this part in case you are in need, we have prepared a video tutorial for you - How To Make Your Own YouTube Channel Trailer. If you have any interests, please don’t miss it, and see how to make a fantastic video trailer with a user-friendly video editor Wondershare Filmora :
Adding Playlist to Your Private Playlist
If you want to reverse a YouTube playlist order, you can create a new private playlist. This quick and easy method will help you get the desired results.
For this method to work, you don’t need to download any third-party app or use a website; all you have to do is open YouTube on any browser or use the YouTube app in the following way:
Step 1: In the first step, launch the YouTube app on your device or visit the YouTube website (if you are logged out, sign into your account using your credentials).
Step 2: In the next step, click your Profile at the top right of the screen and select the “Your Channel” option from the drop-down menu to access your YouTube channel.
Step 3: Scroll down on your channel’s dashboard, select a video, and click the three dots next to it. Next, click “Add to Playlist” from the drop-down list and select the “Create a New Playlist” option to make a new one.

Next, provide a name, set the privacy settings to “Private,” and click “Create.”
Step 4: In the final step, head to the Playlist tab, click “View Full Playlist” to open the new playlist, and click the “three dots” in the details area on the left. Next, select “Playlist Settings” and toggle the button next to “Add new videos to top of playlist” to enable it.
You can now add more videos to your playlist, and each one will be added to the top. This method helps you arrange the YouTube playlist as you desire.
The Bottom Line
In this article, we’ve provided four different step-by-step solutions to show you how to reverse a YouTube playlist on your PC and mobile device using Chrome extension, a third-party website, changing settings, and adding videos to a new private playlist.
Hopefully, you’ve found this article helpful and can now watch your favorite playlist in the order you like without any issues.
If you have ever created a playlist on YouTube, you may have noticed that the order of the videos is automatically set and based on when they were added to the list. However, it would help if you played them in reverse order.
Surprisingly, there is no built-in way to do this on YouTube. However, four simple workarounds only take a few minutes to complete.
So, keep reading to learn how to reverse a YouTube playlist so you can watch the videos in the order you want!
How to Reverse a YouTube Playlist?
Below we’ve provided four different solutions to help you reverse your YouTube playlist on your computer:
Using Chrome Web Extension
One of the most straightforward and convenient methods of reversing the YouTube playlist is to install a Chrome browser extension that will let you play any playlist in the opposite order.
The “Iridium for YouTube” and “Improve YouTube” extensions on your Google Chrome can play any YouTube video queue or playlist in reverse.
Here’s how to install the “Iridium for YouTube” extension on your Chrome browser to reverse the playlist:
Step 1: In the first step, launch a browser on your computer and click the three dots (ellipsis icon) in the top-right corner of the screen. Scroll down, select “More Tools,” and click Extensions.”
Step 2:
- Now, click the three horizontal-line”Menu”icon.
- Click the”Open Chrome Web Store”option.
- Search for theIridium for YouTubeextension using the search bar.
Step 3:
- Open the extension page.
- Click”Add to Chrome.”
- Click the”Add Extension”option in the pop-up menu.
Step 4:Open a new page, visit YouTube , and a pop-up window will appear. Select”Close”to terminate it, and clickthe”Menu”(hamburger) icon in the top left corner of the screen. Next, scroll down and open your savedPlaylistthat you want to reverse.
Step 5: Click the “Play All” option in the details section of the playlist and click the Iridium button on the right side of the screen. This will open a new tab with different settings for your playlist. Go to the Video tab, and under the “Playlist” header, toggle the button next to “Enable reverse playlist control” to change the settings.
That’s about it. You will now be able to watch a YouTube playlist in reverse order.
Using The Third Website
Several trusted and reliable third-party websites, such as “Playlist. tools,” can help you reverse your YouTube playlists quickly. The platform is free and fully dedicated to instantly changing the order of your Playlist.
Here’s how you can use the Playlist.tools to reverse your videos’ order in a playlist on YouTube:
Step 1: Launch a browser on your laptop or desktop, head to theYouTube website, and click the three-line “Menu” icon. Now, scroll down to access the playlist you want to reverse, click the “Share” icon, and click “Copy” to save the URL to your clipboard.
Step 2: In the next step, open a new tab and visit the “Playlist.Tools” website. Now, paste the copied playlist URL in the provided text box, and the platform will start retrieving it.
Step 3: Finally, click the “Sort” icon and select descending order to reverse your playlist. You can always return to the original sequence by clicking the “Original Sequence” option in the top right corner of the screen.
Changing the Ordering in Settings
If you are a content creator on YouTube and want to reverse the videos’ order in a playlist on your channel, do the following steps in sequence:
Step 1: In the first step, launch the YouTube app on your device or visit the YouTube website on a browser. Go to “Library” and open the playlist of your choice.
Step 2: Hover over the video, and you will see two horizontal lines next to it. Click/tap & hold the video and drag it to a new location to change its order.
You can also utilize the “Sort” option to reverse the playlist. To do so, click “Sort” at the top of the playlist above the videos and select “Date Published (Oldest)” to change the order.
A Bonus Tip for YouTube Creator: Make Your Own YouTube Channel Trailer
As a YouTube content creator, you need to set your videos’ order in your Playlist. Besides, the video’s trailer also influences your audiences’ browsing and watching experience. To help you with this part in case you are in need, we have prepared a video tutorial for you - How To Make Your Own YouTube Channel Trailer. If you have any interests, please don’t miss it, and see how to make a fantastic video trailer with a user-friendly video editor Wondershare Filmora :
Adding Playlist to Your Private Playlist
If you want to reverse a YouTube playlist order, you can create a new private playlist. This quick and easy method will help you get the desired results.
For this method to work, you don’t need to download any third-party app or use a website; all you have to do is open YouTube on any browser or use the YouTube app in the following way:
Step 1: In the first step, launch the YouTube app on your device or visit the YouTube website (if you are logged out, sign into your account using your credentials).
Step 2: In the next step, click your Profile at the top right of the screen and select the “Your Channel” option from the drop-down menu to access your YouTube channel.
Step 3: Scroll down on your channel’s dashboard, select a video, and click the three dots next to it. Next, click “Add to Playlist” from the drop-down list and select the “Create a New Playlist” option to make a new one.
Next, provide a name, set the privacy settings to “Private,” and click “Create.”
Step 4: In the final step, head to the Playlist tab, click “View Full Playlist” to open the new playlist, and click the “three dots” in the details area on the left. Next, select “Playlist Settings” and toggle the button next to “Add new videos to top of playlist” to enable it.
You can now add more videos to your playlist, and each one will be added to the top. This method helps you arrange the YouTube playlist as you desire.
The Bottom Line
In this article, we’ve provided four different step-by-step solutions to show you how to reverse a YouTube playlist on your PC and mobile device using Chrome extension, a third-party website, changing settings, and adding videos to a new private playlist.
Hopefully, you’ve found this article helpful and can now watch your favorite playlist in the order you like without any issues.
Also read:
- Decoding YouTube's Top MP3 Conversion Apps for 2024
- Enabling/Disabling YouTube Video Comments for 2024
- Learn to Purge Your Device's YouTube Content Easily
- [New] Best 5 Headsets A YouTube Gamer's Guide
- [New] Content Creation Crossroads IGTV Vs. YouTube - Which One Fits Best?
- Capture It Right Essential Camera Lenses for Video Blogging
- Optimizing YouTube Auditory Experience for Viewers
- [Updated] Comparing Digital Platform Profits DailyMovement to YouTube Revenue
- The Smart Guide for Streaming and Saving on iDevices to YouTube Platform
- 2024 Approved How to Convert YouTube to MP4 Safely?
- [Updated] All About Virtual Idols and Their Rise
- From YouTube to TikTok Crafting the Perfect Cross-Platform Strategy
- How to Capitalize on Youtube Shorts Must-Knows, Earning Prospects
- [New] Enhancing Your YouTube Presence with Split-Screen Techniques
- [New] Avoid Blandness in Your Vids Top Recommended YouTube Thumbnail Heights
- [Updated] A Novice's Pathway to Writing YouTube Video Plans
- Beginner's Guide to Choosing Lenses and Cameras for YouTube Vloggers
- Limelight Rhythms The Crème De La Crop of YT Short Scores
- Essential YouTube Equipment For Starting Your Channel - What Do You Really Need for 2024
- [Updated] Essential Strategies for Viewing Your Subscribers
- [Updated] Convert Spotify Playlist To YouTube 5 Best Tools
- Taming the Black Screen Demon of YouTube
- A Beginner's Guide to YouTube SEO Keywords
- Engage, Enchant Elevate Your Unboxing Content
- In 2024, A Visual Voyage Through Youtube's 2017 Data Deluge
- [New] AJay The Creative Content Creator's Profitable Venture on YouTube
- 2024 Approved Enhance Engagement Top Tools and Tips for Properly Tagged Videos
- Edit with Ease The Top 10 YouTube Video Trimmers Guide
- [New] A Comprehensive Guide to Making GIFs From YouTube Tracks
- Crafting the Perfect Aesthetic with Controlled Lighting for 2024
- In 2024, Chuckle Factory Designing 7 Video Ideas for Humorists
- 2024 Approved A Deep Dive Into Effective YouTube Banner Techniques
- [Updated] A 20-Second Symphony Understanding Music's Compact Formats
- Mastering the Art of FreeFire A Gaming Youtuber’s Guide
- Decisive Content Reduction Find the Best Video Cutters for 2024
- In 2024, Dual-Watch Dynamics Navigating YouTube in Parallel
- Joke Junctions Brainstorming 7 Hilarious YouTube Storylines
- In 2024, Android Audio Archive A Curated List of Top 6 Free Music Downloading Apps
- [Updated] Earnings Exploration How YouTube Turns Viewers Into Cash
- Crafting Quality Videos A Guide to Apple Device Screen Recording
- Simplify Your Video Sharing with Our YouTube Upload Strategy
- [New] Cross-Platform Dimensions Titling for YTB Shorts & Beyond
- From Capture to Screen The Complete Process of Uploading 360 Vids on YouTube
- Easy Way to Edit YouTube Videos in iMovie
- [Updated] Cutting Through the Clutter How to Stream Top-Notch Upside-Down Content on Youtube
- [Updated] Discover 10 Amazing World Wanderlust Channels
- Mastering YouTube Playlist Downloads A Comprehensive Guide
- 2024 Approved Bite-Sized Tips for Aspiring Video Editors
- Updated The Editors Guide to Beat Matching Seamless Integration of Music and Motion in FCPX for 2024
- 2024 Approved The Complete Guide to Audio Manipulation in Avidemux
- How to Bypass Apple iPhone XR Passcode Easily Video Inside
- Can Life360 Track You When Your Xiaomi 13T Pro is off? | Dr.fone
- Crafting Captivating Instagram Puzzles A Step-by-Step Approach
- [New] In 2024, Premier Audio Recording Tools - #11 Edition
- Definitive Top 5 Agile Camcorders for Adventure
- AddROM Bypass An Android Tool to Unlock FRP Lock Screen For your Xiaomi Civi 3 Disney 100th Anniversary Edition
- In 2024, Ultimate Guide to Catch the Regional-Located Pokemon For Tecno Spark 20 Pro+ | Dr.fone
- [Updated] 2024 Approved Securing Gaming Triumphs Record, Save & Archive PS4 Games
- [New] In 2024, The Ultimate Key to Capturing and Preserving Your Favorite Streamed Shows
- [New] 2024 Approved ClearView Screenshot Perfect Windows/Mac Imaging
- New In 2024, Top 5 Best Free MOV Video Joiners
- In 2024, A Quick Guide to Samsung Galaxy XCover 7 FRP Bypass Instantly
- Still Using Pattern Locks with Vivo? Tips, Tricks and Helpful Advice
- In 2024, Streamlining Your Zoom Collaboration Calendar
- Edit and Send Fake Location on Telegram For your Xiaomi Civi 3 in 3 Ways | Dr.fone
- [Updated] In 2024, Live Feed Perfection Top Free Screen Capture Apps Reviewed
- Fake the Location to Get Around the MLB Blackouts on Apple iPhone 15 Plus | Dr.fone
- How To Do Xiaomi Redmi A2+ Screen Sharing | Dr.fone
- 2024 Approved GoPro Editing Software Best 15 Action Cam Video Editors
- Perfecting Audio Precision Key EQ Settings Explored for 2024
- The Loom Chronicles Crafting Visual Stories for 2024
- [Updated] 2024 Approved LiveCam Rivals Meet
- What are Location Permissions Life360 On Vivo Y27 5G? | Dr.fone
- In 2024, Two Ways to Track My Boyfriends Xiaomi Civi 3 without Him Knowing | Dr.fone
- New Advanced Audio Configuration Tips for Devices for 2024
- Title: "Professional Choice High-Quality Laptops for Media Workers"
- Author: Steven
- Created at : 2024-05-25 20:19:15
- Updated at : 2024-05-26 20:19:15
- Link: https://youtube-clips.techidaily.com/professional-choice-high-quality-laptops-for-media-workers/
- License: This work is licensed under CC BY-NC-SA 4.0.
