
:max_bytes(150000):strip_icc()/EmirMemedovski-a14e9770dd044a20ba8c691f0ee1c000.jpg)
Pro Video Editing Selections for Social Media
Pro Video Editing Selections for Social Media
The Best Video Editors for YouTube

Richard Bennett
Oct 26, 2023• Proven solutions
Check out our most updated post on this topic: Top 10 Video Editors for YouTube in 2018.
Part 1: Filmora

Filmora ’s intuitive interface was designed to make video editing a fast and simple process. The less effort you have to put into the technical side of editing, the more energy you can devote to being creative.
In the main screen of Filmora, you are never more than a couple clicks away from any basic, advanced, or creative feature you want to use. The built-in music library, a wide selection of text and title options, filters, overlays, animated elements, and split-screen options can all be accessed from a clearly labeled toolbar above the timeline.
Besides fun things like filters, Filmora also has powerful tools like advanced color grading and an audio equalizer. Either of these features can be accessed in two clicks from the main editing screen. With your audio or video clip selected, simply click the editing icon and then either Advanced (for expanded color editing options) or Customize (for the audio equalizer).
Even features like picture-in-picture (PIP) and green screen are easy to use in Filmora. The PIP tracks are right under the main video track in your timeline. Although there is only one when you start a project, you can have up to ten. These PIP tracks can be used to layer photos and videos over top of each other. One of the most popular uses for the PIP track is facecam videos. After you drag your facecam footage into the PIP track, you can easily shrink it and move it to the corner of your main video.
The green screen has its own designated icon on the main toolbar. Simply select a clip or image in one of your PIP tracks and click it to access the feature.
Filmora is always adding new features to make editing even easier for online video creators. A few of the other tools included in Filmora are speed control, text customization, tilt-shift, ripple delete, and an audio mixer.


Part 2: Video Editing Software Comparisons
Here is a ‘top 4’ list of other popular video editors. The list will discuss their best features and how they measure up to Filmora.
Section 1: PC Video Editors
Here are two of the most popular editing programs for Windows computers:
Windows Movie Maker

Image source: intowindows
PC users can download Windows Movie Maker for free, which has made it a popular choice among video creators that are just starting out. Movie Maker has different timeline tracks for things like videos and music, and it is very easy to trim or cut up all of your media clips. The ability to sharpen some of your blurrier images, speed control, and a simple title generator, and some basic transitions are some of the program’s more noteworthy features.
Movie Maker does not come close to matching Filmora’s range of features, but it is easy to use. It could be a good option for video creators who have no room in their budget for paid software. Videos made in Movie Maker will be simple, but that is all some people need.
Vegas Movie Studio
Vegas Movie Studio, which used to be Sony Vegas, is a big step up from Movie Maker. While editing your clips, you can adjust their brightness, contrast, and color balance. On the audio side of things, Vegas has a great audio restoration tool you can use to get rid of unwanted background noises.
Although it does not have filters, overlays, and animated elements like Filmora, Vegas does have some very modern-looking titles and transition effects.
The biggest advantage that Filmora has over Vegas is that it is a lot easier to use. Vegas has some great features, but accessing and using them is not something you can just jump into doing. Filmora is so intuitive that most users can just open it up and start applying effects.
Vegas is very reasonably priced at $49.95 USD, but it is only $10 more for the ease and effect variety of Filmora.
Section 2: Mac Video Editors
Here are two of the most popular video editors for the Mac OS:
iMovie
iMovie comes free with Mac computers, and it is a huge step up from Windows Movie Maker. It has some really nice audio editing tools, like an equalizer and the ability to set fade in and fade out times (which Filmora also has). When you are editing video clips, iMovie provides you with a stabilization tool, speed controls, and even some filters and overlays. There are text and title options available as well, although they are very basic.
The main difference between Filmora and iMovie is variety. Filmora has a huge range of titles in different styles; iMovie has everyday fonts with all the traditional credit/title animations. iMovie has close to the same amount of features as Filmora, but there is always less variety in those features, and they tend to feel dated.
The main difference between iMovie and every other editor on this list is the layout. The timeline is located in the top left portion of the screen, not stretched across the bottom, and the clips/sounds do not sit in different tracks. The iMovie interface is not actually very complicated, but it will be an adjustment for anybody used to a more traditional editing experience.
Final Cut Pro X
Final Cut Pro is Apple’s attempt at a professional-grade editing program. It is much more advanced than iMovie and offers 64-bit architecture and background rendering. Background rendering means that your imported clips are prepared for playback before you actually move them into your timeline, making the editing process a lot faster.
Final Cut Pro also boasts a huge selection of editing tools.
Like iMovie, Final Cut Pro does not use a traditional timeline. This will make it easier to learn for users upgrading from iMovie, but potentially more difficult for users coming from any other program. Final Cut Pro would be competition for Adobe Premiere if it were available on anything except the latest Mac OS.
Final Cut Pro X costs $300, making it a significant investment.
Section 3: Online Video Editors
WeVideo
WeVideo is a fairly simple cloud-based video editor. Its most useful feature is that it gives your team the ability to edit collaboratively. Multiple editors can upload footage and create their own edits of the project.
WeVideo has all of the most basic editing features – the abilities to trim clips, add transitions, and give your project a soundtrack. Other than the potential for collaboration, though, it has nothing that free programs like iMovie, and even Windows Movie Maker, do not have.
There are a few different pricing options for WeVideo. You can use it for free, but your storage space and the number of features you have access to will be very limited. Your videos will also be watermarked. Also, both the free and $19 packages limit your video resolution to 720p. You will need to pay at least $39 for 1080p, and it will cost you $69 to get rid of all the storage limits.
If you are going to pay $69 for video editing software, you are much better off using Filmora.
Section 4: The Pro-Choice
Adobe Premiere
Adobe Premiere is a professional editing software. In terms of functionality, it has every program on this list, including Filmora, beat. It has very powerful video and audio editing tools, and the program can be customized to suit the needs of particular projects.
Because it is designed for professionals and veteran editors, Premiere is far from a simple program. If you have not edited a video before, or are used to a simpler program, it will take you a long time to become good at using Premiere (it might be a good idea to find an online course).
It does have a few features designed to save time, such as an automatic audio syncing tool and the ability to apply changes you have made to one clip across multiple other clips. The Premiere is probably the best program for professional video editors, but Filmora’s ease of use gives it an edge with amateur video creators.
Conclusion
Filmora is the best video editing software for YouTubers and other online video creators. Windows Movie Maker and iMovie are decent basic programs for creators on a budget, and Premiere is an excellent program for professionals, but if your goal is to create awesome videos for YouTube, then Filmora is the best tool for the job.
If you want to find a video editing solution that empowers your imagination and creativity yet takes less effort, please try this robust and user-friendly video editing software Wondershare Filmora. It provides special effects, stock photo & video, sound library, etc., which will definitely enhance your productivity and helps to make money by making videos much accessible.
Richard Bennett
Richard Bennett is a writer and a lover of all things video.
Follow @Richard Bennett
Richard Bennett
Oct 26, 2023• Proven solutions
Check out our most updated post on this topic: Top 10 Video Editors for YouTube in 2018.
Part 1: Filmora
Filmora ’s intuitive interface was designed to make video editing a fast and simple process. The less effort you have to put into the technical side of editing, the more energy you can devote to being creative.
In the main screen of Filmora, you are never more than a couple clicks away from any basic, advanced, or creative feature you want to use. The built-in music library, a wide selection of text and title options, filters, overlays, animated elements, and split-screen options can all be accessed from a clearly labeled toolbar above the timeline.
Besides fun things like filters, Filmora also has powerful tools like advanced color grading and an audio equalizer. Either of these features can be accessed in two clicks from the main editing screen. With your audio or video clip selected, simply click the editing icon and then either Advanced (for expanded color editing options) or Customize (for the audio equalizer).
Even features like picture-in-picture (PIP) and green screen are easy to use in Filmora. The PIP tracks are right under the main video track in your timeline. Although there is only one when you start a project, you can have up to ten. These PIP tracks can be used to layer photos and videos over top of each other. One of the most popular uses for the PIP track is facecam videos. After you drag your facecam footage into the PIP track, you can easily shrink it and move it to the corner of your main video.
The green screen has its own designated icon on the main toolbar. Simply select a clip or image in one of your PIP tracks and click it to access the feature.
Filmora is always adding new features to make editing even easier for online video creators. A few of the other tools included in Filmora are speed control, text customization, tilt-shift, ripple delete, and an audio mixer.
Part 2: Video Editing Software Comparisons
Here is a ‘top 4’ list of other popular video editors. The list will discuss their best features and how they measure up to Filmora.
Section 1: PC Video Editors
Here are two of the most popular editing programs for Windows computers:
Windows Movie Maker
Image source: intowindows
PC users can download Windows Movie Maker for free, which has made it a popular choice among video creators that are just starting out. Movie Maker has different timeline tracks for things like videos and music, and it is very easy to trim or cut up all of your media clips. The ability to sharpen some of your blurrier images, speed control, and a simple title generator, and some basic transitions are some of the program’s more noteworthy features.
Movie Maker does not come close to matching Filmora’s range of features, but it is easy to use. It could be a good option for video creators who have no room in their budget for paid software. Videos made in Movie Maker will be simple, but that is all some people need.
Vegas Movie Studio
Vegas Movie Studio, which used to be Sony Vegas, is a big step up from Movie Maker. While editing your clips, you can adjust their brightness, contrast, and color balance. On the audio side of things, Vegas has a great audio restoration tool you can use to get rid of unwanted background noises.
Although it does not have filters, overlays, and animated elements like Filmora, Vegas does have some very modern-looking titles and transition effects.
The biggest advantage that Filmora has over Vegas is that it is a lot easier to use. Vegas has some great features, but accessing and using them is not something you can just jump into doing. Filmora is so intuitive that most users can just open it up and start applying effects.
Vegas is very reasonably priced at $49.95 USD, but it is only $10 more for the ease and effect variety of Filmora.
Section 2: Mac Video Editors
Here are two of the most popular video editors for the Mac OS:
iMovie
iMovie comes free with Mac computers, and it is a huge step up from Windows Movie Maker. It has some really nice audio editing tools, like an equalizer and the ability to set fade in and fade out times (which Filmora also has). When you are editing video clips, iMovie provides you with a stabilization tool, speed controls, and even some filters and overlays. There are text and title options available as well, although they are very basic.
The main difference between Filmora and iMovie is variety. Filmora has a huge range of titles in different styles; iMovie has everyday fonts with all the traditional credit/title animations. iMovie has close to the same amount of features as Filmora, but there is always less variety in those features, and they tend to feel dated.
The main difference between iMovie and every other editor on this list is the layout. The timeline is located in the top left portion of the screen, not stretched across the bottom, and the clips/sounds do not sit in different tracks. The iMovie interface is not actually very complicated, but it will be an adjustment for anybody used to a more traditional editing experience.
Final Cut Pro X
Final Cut Pro is Apple’s attempt at a professional-grade editing program. It is much more advanced than iMovie and offers 64-bit architecture and background rendering. Background rendering means that your imported clips are prepared for playback before you actually move them into your timeline, making the editing process a lot faster.
Final Cut Pro also boasts a huge selection of editing tools.
Like iMovie, Final Cut Pro does not use a traditional timeline. This will make it easier to learn for users upgrading from iMovie, but potentially more difficult for users coming from any other program. Final Cut Pro would be competition for Adobe Premiere if it were available on anything except the latest Mac OS.
Final Cut Pro X costs $300, making it a significant investment.
Section 3: Online Video Editors
WeVideo
WeVideo is a fairly simple cloud-based video editor. Its most useful feature is that it gives your team the ability to edit collaboratively. Multiple editors can upload footage and create their own edits of the project.
WeVideo has all of the most basic editing features – the abilities to trim clips, add transitions, and give your project a soundtrack. Other than the potential for collaboration, though, it has nothing that free programs like iMovie, and even Windows Movie Maker, do not have.
There are a few different pricing options for WeVideo. You can use it for free, but your storage space and the number of features you have access to will be very limited. Your videos will also be watermarked. Also, both the free and $19 packages limit your video resolution to 720p. You will need to pay at least $39 for 1080p, and it will cost you $69 to get rid of all the storage limits.
If you are going to pay $69 for video editing software, you are much better off using Filmora.
Section 4: The Pro-Choice
Adobe Premiere
Adobe Premiere is a professional editing software. In terms of functionality, it has every program on this list, including Filmora, beat. It has very powerful video and audio editing tools, and the program can be customized to suit the needs of particular projects.
Because it is designed for professionals and veteran editors, Premiere is far from a simple program. If you have not edited a video before, or are used to a simpler program, it will take you a long time to become good at using Premiere (it might be a good idea to find an online course).
It does have a few features designed to save time, such as an automatic audio syncing tool and the ability to apply changes you have made to one clip across multiple other clips. The Premiere is probably the best program for professional video editors, but Filmora’s ease of use gives it an edge with amateur video creators.
Conclusion
Filmora is the best video editing software for YouTubers and other online video creators. Windows Movie Maker and iMovie are decent basic programs for creators on a budget, and Premiere is an excellent program for professionals, but if your goal is to create awesome videos for YouTube, then Filmora is the best tool for the job.
If you want to find a video editing solution that empowers your imagination and creativity yet takes less effort, please try this robust and user-friendly video editing software Wondershare Filmora. It provides special effects, stock photo & video, sound library, etc., which will definitely enhance your productivity and helps to make money by making videos much accessible.
Richard Bennett
Richard Bennett is a writer and a lover of all things video.
Follow @Richard Bennett
Mastering Online Promotion: Top 5 Proven Methods for Maximum Impact on YouTube
YouTube is undoubtedly the most famous video sharing platform in the world. More than 5 billion videos are watched every single minute on YouTube. And the ever-growing user base has propelled YouTube to the status of 2nd most popular social media platform in the world, and the second most visited website after Google in 2021.
YouTube marketing is great for both businesses and individuals who want to make careers out of YouTube. Many businesses make use of YouTube ads to get their products to their customers and it’s really effective. However, you can make more organic traffic using YouTube video marketing. With a successful YouTube video marketing strategy, you can generate leads without any ad investments.
And in this guide, we will discuss some YouTube video marketing tips that will help you get more subscribers and build your brand outreach.
Tip #1: Create A Roadmap Leading To Your Main Goal
A roadmap is basically a level by level approach to your vision. Instead of just looking at the end plan, you are building your platform up through short attainable goals. There is immense power in setting short term goals. Some serious questions that you should ask yourself are:
Step 1: Start with the question of why you need a YouTube channel in the first place! Decide on what your channel should be about and how the viewers are going to benefit from it.
Step 2: The next step is to prepare a content plan. Here must decide the type of videos and how often it will be published on your channel.
Step 3: What is your target in terms of subscribers and traffic conversion. Do you plan to take the audience to a separate landing or are you planning on making money solely from YouTube?
Planning out such specifics will help you build your platform gradually to the main goal.
Tip #2: Do tests within your strategy
Understanding the audience preferences is paramount to the success of YouTube channels. There are some important tests that you can do to understand the genre that you are targeting.
a. Test video duration
Nobody likes to see a 2 hour long YouTube video unless it’s super interesting. Thankfully, there have been studies that have been conducted to measure the audience reaction to videos of different lengths.
By default, when you create a YouTube account, the maximum upload length is restricted to just 15 minutes. You can go past this limit by verifying your account on YouTube.
When you look at the most trending videos on YouTube, they generally fall within 10 minutes. The average video size on YouTube is 4.4 minutes .
For example, let us look at YouTube videos that explain the same concept, but with different video lengths and see if the audience engagement differs with the videos. we have ensured that both videos are from channels who have a similar subscriber count in order to eliminate disproportionality that arises from viewer base.
This video gives an excellent explanation of the string theory. The Video is From TED-Ed and you can see the audience response in the comments where they praise Physicist Brian Greene for his talk. Note that the video has 2.4 million views.
Now, look at the above video that explains String Theory in less than half the time from TED-Ed. Notice how the video has more than four times the views with an impressive 10 million views. It comes to show that if you can condense your content in such a way that you can get the maximum meaning across in minimum time, you will rack up more views!
b. Test different formats/scenarios
Having a monotonous nature throughout your videos can be quite tiring for the viewer after some time. Make sure to mix things up a bit by introducing new types of video formats or scenarios that keeps the users engaged.
Such a format change will also be invaluable in testing the audience reaction to the different types of videos that you make. These new formats can be in the form of a separate video series that is different from your main content. It can also be something that directly engages the viewers like a live video stream, Ask Me Anything or Q&A type of content, etc.
For example, let us take one among the most popular cooking channels on YouTube – Tasty. If you were to browse through their content, you can see how they got their fame with cookery videos that are short and sweet like the one below:
However, they do not just stick to that same format all the time. you can also see how they mix in lengthier videos of different format. For example:
And many videos that aren’t specifically cooking at all!
And it is evident that these new formats have also become crowd favorites. Now do all their videos hit the 1 million mark? No, that just shows they are constantly testing out the waters go ahead with what works and discard what doesn’t!
c. Try Giveaways and gifts
You can boost the viewership and subscriber count for your channel by setting up occasional giveaways or gifts to the viewers. Make sure that you set the winning criteria to have the viewers subscribe to the channel.
For example, let’s take another popular YouTube channel Unbox Therapy. On Jun 27, 2018, the channel did an announcement that they were giving 106 OnePlus 6 smartphones!
And the result of the announcement was evident in the subscribers count.
From June 23rd to June 27th, 2018, Unbox therapy had gained 12,583 subscribers. However, from the announcement date that is June 27th to June 30th, 2018, the channel saw an increase of a whopping 52,173 subscribers ! Till date, the video has over 14 million views
We do not advise you to try this out when you are just starting your YouTube career. Only venture out to such investments when you are stable when it comes to earnings.
Tip#3: Ask your audience for Feedback
All your videos must be created with the audience in mind. However, sometimes what you may think would work might not fit well with the audience. Hence, it is imperative that you understand their likes and dislikes.
And the best way to improve your videos is to take suggestions from the audience themselves. You can ask them specific questions on how to improve your videos or what they want to see in your future creations. Take notes on what they have to offer and start building your content taking in those suggestions.
There is also another facet to incorporating audience feedback as it projects your YouTube channel to be responsive to the audience, something that is vital to building a strong and loyal viewer base on YouTube.
Tip #4: Analyse your YouTube videos traffic sources
YouTube has made it easier for you to track the sources from which your videos are getting the views. Sign in to YouTube Studio Beta and the click Reach from the Analytics menu provided on the left panel. Now click on Traffic source types.
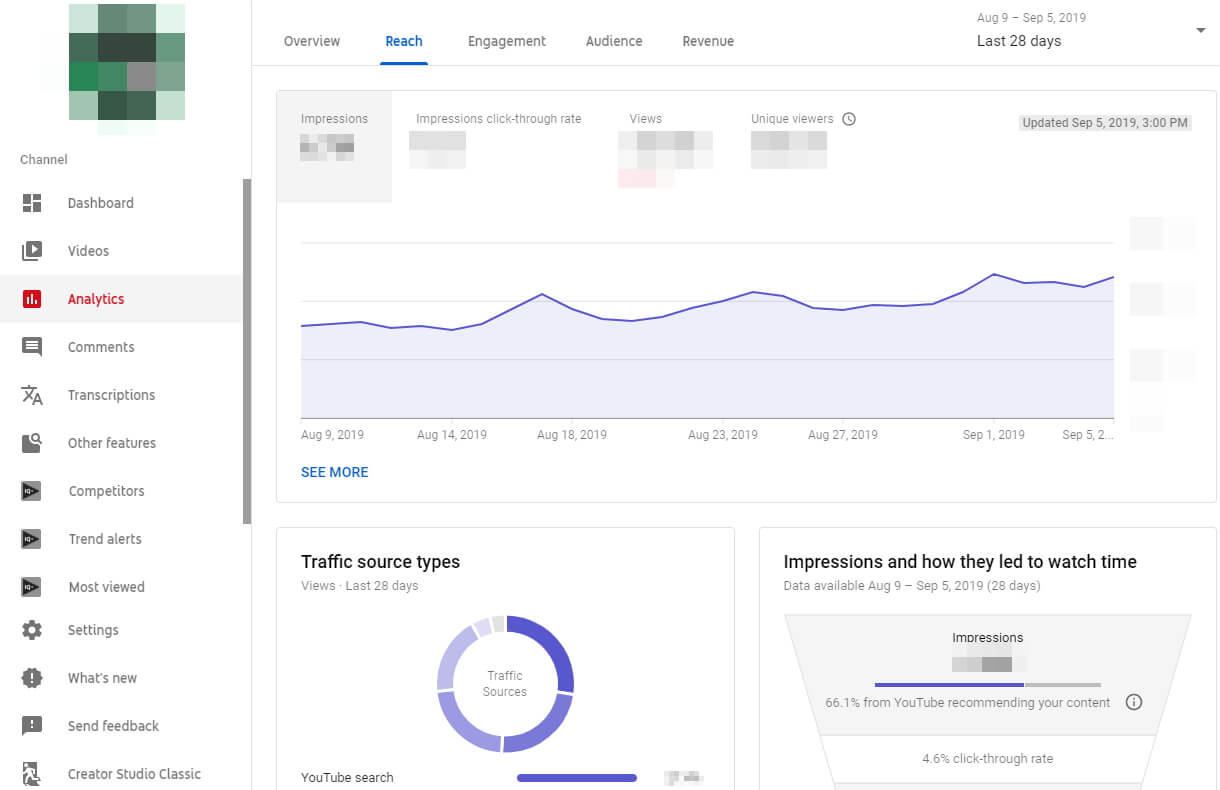
In this window, you can see the different sources that led viewers to your video. Generally, it can be a mix of websites, YouTube recommendation’s, YouTube search, etc. Metrics like Watch Time gives you an idea of how long viewers watch your videos and Audience Retention shows how consistent they are at watching them. These are just two of the many metrics you can use to your advantage.
Analyzing YouTube videos will help you structure your future videos in a way that it is more susceptible to being clicked.
Tip #5: Track the effectiveness of your videos
You must have an eye on the metrics that your videos garner over the days. While the number of views, likes, and dislikes are great indicators in determining the popularity of the videos, but there are many more factors at play.
Your video ranking is important as it determines the position of your videos when a keyword is typed into the search box. The ranks are calculated by the YouTube algorithm, but you have a certain degree of power in raising the ranks by leveraging the following parameters of the video;
Thumbnail: The first thing that the viewer is going it see when they are browsing through a list of videos is the thumbnail. Make sure that it is attractive and stands out!
Title: The next element that gets the most attention from both the user and the YouTube algorithm is the title. Ensure that the main keyword you are targeting is included in the title.
Description: This is where you can play a lot with keywords, both short and long tail. Be very descriptive about your video, but do not just use a big chunk of text. The description must be succinct and informative. It can also have links to your landing page or sponsors.
Tags: Tags are words or phrases that are used to help YouTube better understand the video. Make sure the tags that you are giving are related to the video that they represent.
Category: YouTube has some predefined categories and the videos that you upload must be put in the right one to get maximum reach.
Subtitles: Subtitles do not carry much weight in terms of SEO or ranking, but they are a much-appreciated addition in the audience point of view.
Yes, it can be quite meticulous but the results are worth the effort. Having a rank tracker like the one from SE Ranking or Tubebuddy can be quite handy at times like these. The software basically tracks everything about your videos and presents them in a neatly organized dashboard, which is cuts the effort significantly for YouTube marketers.
Do not leave the video by itself to garner views, it often fails to register any results because elements like the title, description and the keywords play an important role in getting the videos to the users.
You may also like: How to Convert YouTube to MP4 Safely? [Step by Step Guide] >>
Tip #6: Choose a suitable video creator
Creating attractive videos is a key to make success in Youtube video marketing. So you will need to have a suitable video editor to help you. There are quite a few choices in marketing now, such as Adobe Premiere Pro. However, there is a better choice for most average users - Filmora Video Editor , which provides powerful video editing features and huge transitions, effects, and filters resources.
To know more about Filmora Video Editor, visit its page: https://filmora.wondershare.com/video-editor/

Conclusion
YouTube marketing has evolved over the years to a point where you need a carefully crafted plan to have a successful YouTube career. In this guide, we have mentioned some useful YouTube marketing tips that will help you alo12ng the way.
The greatest takeaway from this guide should be that you must be patient and have persistence. Do not stop what you are doing just because you didn’t see any results on day one. Keep the fire burning and you will reach there in no time!
This video gives an excellent explanation of the string theory. The Video is From TED-Ed and you can see the audience response in the comments where they praise Physicist Brian Greene for his talk. Note that the video has 2.4 million views.
Now, look at the above video that explains String Theory in less than half the time from TED-Ed. Notice how the video has more than four times the views with an impressive 10 million views. It comes to show that if you can condense your content in such a way that you can get the maximum meaning across in minimum time, you will rack up more views!
b. Test different formats/scenarios
Having a monotonous nature throughout your videos can be quite tiring for the viewer after some time. Make sure to mix things up a bit by introducing new types of video formats or scenarios that keeps the users engaged.
Such a format change will also be invaluable in testing the audience reaction to the different types of videos that you make. These new formats can be in the form of a separate video series that is different from your main content. It can also be something that directly engages the viewers like a live video stream, Ask Me Anything or Q&A type of content, etc.
For example, let us take one among the most popular cooking channels on YouTube – Tasty. If you were to browse through their content, you can see how they got their fame with cookery videos that are short and sweet like the one below:
However, they do not just stick to that same format all the time. you can also see how they mix in lengthier videos of different format. For example:
And many videos that aren’t specifically cooking at all!
And it is evident that these new formats have also become crowd favorites. Now do all their videos hit the 1 million mark? No, that just shows they are constantly testing out the waters go ahead with what works and discard what doesn’t!
c. Try Giveaways and gifts
You can boost the viewership and subscriber count for your channel by setting up occasional giveaways or gifts to the viewers. Make sure that you set the winning criteria to have the viewers subscribe to the channel.
For example, let’s take another popular YouTube channel Unbox Therapy. On Jun 27, 2018, the channel did an announcement that they were giving 106 OnePlus 6 smartphones!
And the result of the announcement was evident in the subscribers count.
From June 23rd to June 27th, 2018, Unbox therapy had gained 12,583 subscribers. However, from the announcement date that is June 27th to June 30th, 2018, the channel saw an increase of a whopping 52,173 subscribers ! Till date, the video has over 14 million views
We do not advise you to try this out when you are just starting your YouTube career. Only venture out to such investments when you are stable when it comes to earnings.
Tip#3: Ask your audience for Feedback
All your videos must be created with the audience in mind. However, sometimes what you may think would work might not fit well with the audience. Hence, it is imperative that you understand their likes and dislikes.
And the best way to improve your videos is to take suggestions from the audience themselves. You can ask them specific questions on how to improve your videos or what they want to see in your future creations. Take notes on what they have to offer and start building your content taking in those suggestions.
There is also another facet to incorporating audience feedback as it projects your YouTube channel to be responsive to the audience, something that is vital to building a strong and loyal viewer base on YouTube.
Tip #4: Analyse your YouTube videos traffic sources
YouTube has made it easier for you to track the sources from which your videos are getting the views. Sign in to YouTube Studio Beta and the click Reach from the Analytics menu provided on the left panel. Now click on Traffic source types.
In this window, you can see the different sources that led viewers to your video. Generally, it can be a mix of websites, YouTube recommendation’s, YouTube search, etc. Metrics like Watch Time gives you an idea of how long viewers watch your videos and Audience Retention shows how consistent they are at watching them. These are just two of the many metrics you can use to your advantage.
Analyzing YouTube videos will help you structure your future videos in a way that it is more susceptible to being clicked.
Tip #5: Track the effectiveness of your videos
You must have an eye on the metrics that your videos garner over the days. While the number of views, likes, and dislikes are great indicators in determining the popularity of the videos, but there are many more factors at play.
Your video ranking is important as it determines the position of your videos when a keyword is typed into the search box. The ranks are calculated by the YouTube algorithm, but you have a certain degree of power in raising the ranks by leveraging the following parameters of the video;
Thumbnail: The first thing that the viewer is going it see when they are browsing through a list of videos is the thumbnail. Make sure that it is attractive and stands out!
Title: The next element that gets the most attention from both the user and the YouTube algorithm is the title. Ensure that the main keyword you are targeting is included in the title.
Description: This is where you can play a lot with keywords, both short and long tail. Be very descriptive about your video, but do not just use a big chunk of text. The description must be succinct and informative. It can also have links to your landing page or sponsors.
Tags: Tags are words or phrases that are used to help YouTube better understand the video. Make sure the tags that you are giving are related to the video that they represent.
Category: YouTube has some predefined categories and the videos that you upload must be put in the right one to get maximum reach.
Subtitles: Subtitles do not carry much weight in terms of SEO or ranking, but they are a much-appreciated addition in the audience point of view.
Yes, it can be quite meticulous but the results are worth the effort. Having a rank tracker like the one from SE Ranking or Tubebuddy can be quite handy at times like these. The software basically tracks everything about your videos and presents them in a neatly organized dashboard, which is cuts the effort significantly for YouTube marketers.
Do not leave the video by itself to garner views, it often fails to register any results because elements like the title, description and the keywords play an important role in getting the videos to the users.
You may also like: How to Convert YouTube to MP4 Safely? [Step by Step Guide] >>
Tip #6: Choose a suitable video creator
Creating attractive videos is a key to make success in Youtube video marketing. So you will need to have a suitable video editor to help you. There are quite a few choices in marketing now, such as Adobe Premiere Pro. However, there is a better choice for most average users - Filmora Video Editor , which provides powerful video editing features and huge transitions, effects, and filters resources.
To know more about Filmora Video Editor, visit its page: https://filmora.wondershare.com/video-editor/
Conclusion
YouTube marketing has evolved over the years to a point where you need a carefully crafted plan to have a successful YouTube career. In this guide, we have mentioned some useful YouTube marketing tips that will help you alo12ng the way.
The greatest takeaway from this guide should be that you must be patient and have persistence. Do not stop what you are doing just because you didn’t see any results on day one. Keep the fire burning and you will reach there in no time!
Also read:
- [Updated] Essential Information for Choosing the Best Video Platform
- Designing a YouTube Subscription Shortcut URL
- Epic Editing Illusions YouTube Edition for 2024
- Video Success Stories Maximizing Income with YouTube AdSense
- In 2024, A Step-by-Step Aspect Ratio Guide for YouTube Creators
- Integrating Video Content YouTube & Google Slides
- Elevate Your Video Voyage Navigating the World of YouTube Links for 2024
- Enhancing User Engagement How to Use YouTube Tags Effectively
- Innovative Ways to Craft Free and Stylish YouTube Video Titles
- In 2024, 17 Best Lights and Lighting Equipment for YouTube
- Naming Success Strategies for Engaging Titles
- YT Thumbnail Mastery Guide to Your Video's Best Images
- In 2024, Creating Content, Earning Currency Launching Your Vlog
- 2024 Approved Choreographing Climactic Crescendos
- [Updated] Elevate Your Content The Secrets to Increased Subscribers
- In 2024, Discover How to Design Dynamic YouTube Music Playlists
- 2024 Approved Discover the Best Tools & Tips to Accurately Tag Your Videos
- In 2024, Diving Into Viral Video Dialogues
- 2024 Approved Easy-Access Luxury - Free Access to Your Dreamset of 50 Banners
- Unlocking the Audience'eat Top 10 Strategies to Make Your YouTube Videos a Hit!
- [New] AJay The Creative Content Creator's Profitable Venture on YouTube
- Thumbnail Insight Top Picks for Maximizing Video Visibility
- Leverage Audience Engagement Through Strategic Posting
- 2024 Approved DIY YouTube Intros & Ends Without Breaking the Bank
- Breakthrough in Video Production Advanced Techniques for Uploading 360° Content on YouTube for 2024
- [Updated] 10 Key Tactics to Amplify Your YouTube Presence and Engagement
- In 2024, 2 Ways to Increase Your YouTube Audience Fast
- Enhancing Mobile Cinematography - The Top 9 Accessories Reviewed for 2024
- Practical Steps for Disabling YouTube Channels on Devices
- Unveiling the Secrets of Mobile Monetization on YouTube for Creators
- 2024 Approved Best 10 YouTube Channels for Industry Insights
- [Updated] Best YouTube Video Ideas to Spark Inspiration [For YouTube Channels]
- [Updated] 10 Best YouTube Keyword Tools to Get More Views
- Creating Impressive 3D Beginnings on YouTube for 2024
- Making a Mark with Effective YouTube Channel Graphics
- [New] Brief but Impactful Music Shorts on YouTube Unveiled
- [Updated] Crafting Engaging Channels Using TubeBuddy's Framework
- 2024 Approved Easy Replay on iPhone Set Videos Cycling
- Enhancing YouTube Videos Proper Lighting Methods
- Streamline Your Impact The Most Effective Video Formats for YouTube
- Dive Into Making YouTube Shorts Comprehensive Video Guide for 2024
- New In 2024, Techniques for Silencing Audio Tracking in Videos
- 2024 Approved Capturing Every Move in Games with FBX
- The Ultimate Guide to Affordable, Free Screen Capture
- [Updated] 2024 Approved Navigating the Netizen's Realm YouTube Videos FB
- [New] 2024 Approved The Most Gripping Stories in Short Videos by TikTok's Elites
- Experience Gaming Excellence with KineMaster on Android
- In 2024, How to Make Money on TikTok in 8 Ways [Cannot Miss]
- Reasons for Vivo Y36i Stuck on Boot Screen and Ways To Fix Them | Dr.fone
- Complete Guide to Hard Reset Your Sony Xperia 5 V | Dr.fone
- Game On Video Recording Revolution for 2024
- Bypass Lengthy Videos on TikTok for 2024
- New Maximize Your Visuals Free Commercial Image Solutions
- In 2024, How to Watch Hulu Outside US On Motorola Defy 2 | Dr.fone
- [New] 2024 Approved Guide to Effective Video Capturing via Screencastify
- [Updated] Best Phones for Video Stability Optimal Image Stabilization Included
- 2024 Approved 10 Best Free LUTs Roundup - Download Links Galore
- 2024 Approved The Ultimate Guide to Finding a Trustworthy YouTube MP3 Converter
- How To Restore Missing Call Logs from OnePlus
- Leading Video Call Options Safe Small Enterprises Guide
- 2024 Approved Extracting Audio From Instagram A Step-by-Step Guide
- Updated Unveiling the Premier Anime Character Recasting Stars for 2024
- [Updated] MiniCam Record Evaluation & Backup Software for 2024
- 2024 Approved A Detailed Analysis DJi's Raptor 4 VR Goggle Features
- In 2024, Easily Unlock Your Oppo Find X6 Pro Device SIM
- [New] Cam Protection The Ultimate 10 Guide for 2024
- Title: Pro Video Editing Selections for Social Media
- Author: Steven
- Created at : 2024-05-25 20:19:08
- Updated at : 2024-05-26 20:19:08
- Link: https://youtube-clips.techidaily.com/pro-video-editing-selections-for-social-media/
- License: This work is licensed under CC BY-NC-SA 4.0.
