
:max_bytes(150000):strip_icc()/ImagefromiOS1-d1c97c13048a4fc88627e315957d98d8.jpg)
"Premier Convert Kits Transforming YouTube Vids Into Text"
Premier Convert Kits: Transforming YouTube Vids Into Text
Have you ever wondered why there is a need to transcribe YouTube videos? Well, let us enlighten you! Turning content from YouTube to text is essential for numerous content creators as it allows them to gain more views. Recent studies have shown that around 33% of the audience watching YouTube videos do not necessarily watch them in English. So, by converting them to text, translation becomes a whole lot easier and subtitles can be generated more efficiently.
In this article, we will explore the procedure through how one can convert a YouTube video to text, and learn about numerous effective online YouTube video to text software.
In this article
01 How to Convert YouTube Video to Texts by Copy/Paste YouTube Transcript
02 Best YouTube Video to Text Converters Online
Part 1: How to Convert YouTube Video to Texts by Copy/Paste YouTube Transcript
When people think “Get the transcript from YouTube” they believe it is going to be a daunting and lengthy procedure. Well, let us tell you that it is certainly not! All you have to do is follow the steps outlined below to transcribe YouTube video to text - that too through the YouTube player itself.
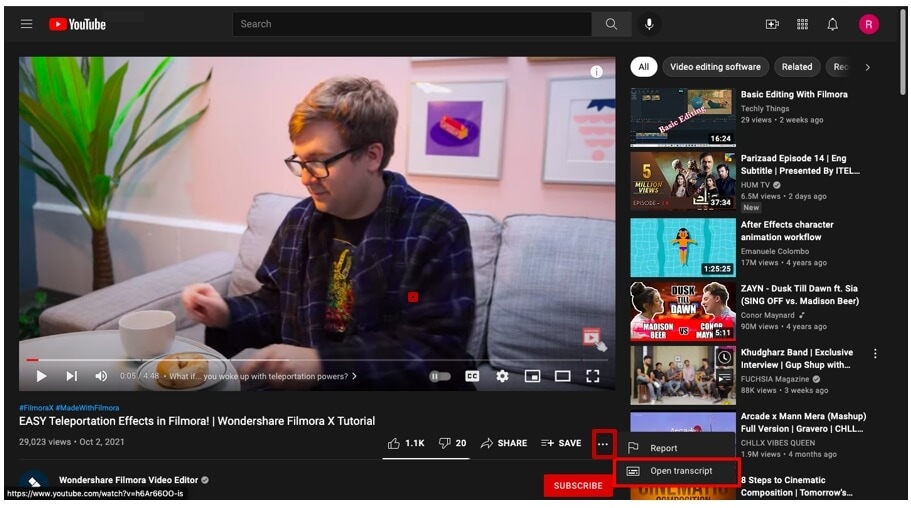
First what you have to do is open YouTube and select any video for which you require the transcript. Once you have selected the video, wait for it to load and then click the three dots located beneath the video, as shown in the image below.
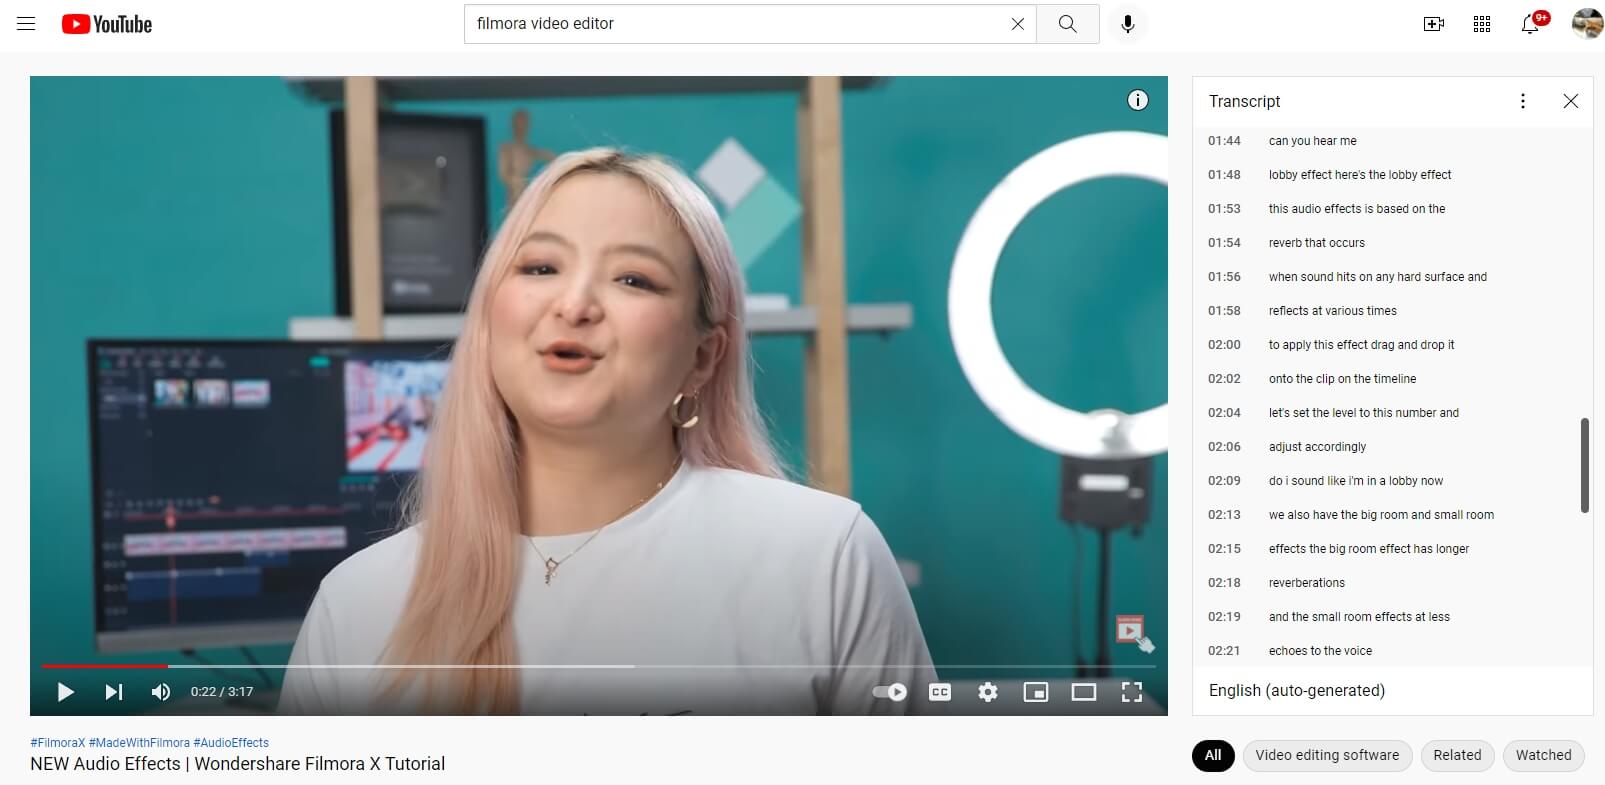
Following that, a menu will appear, just select the “Open Transcript” option and the transcription will open on the top right side of your screen.
Simply select the entire transcript using your mouse, then copy and paste it into a new Word Document or Google Document. If you don’t need the timestamps, you can click the three-dot icon to toggle timestamps off.

By following the steps outlined above, you can convert a YouTube video to text in less than five seconds!
Part 2: Best YouTube Video to Text Converters Online
Aside from the basic method of getting the transcription from YouTube itself, many individuals make use of effective YouTube video to text converter online free. This allows them to get the complete video into text, small parts of the video to text, as well as options to convert the text into multiple languages. Below are some of the best software to convert YouTube video to text online.
1. Inqscribe
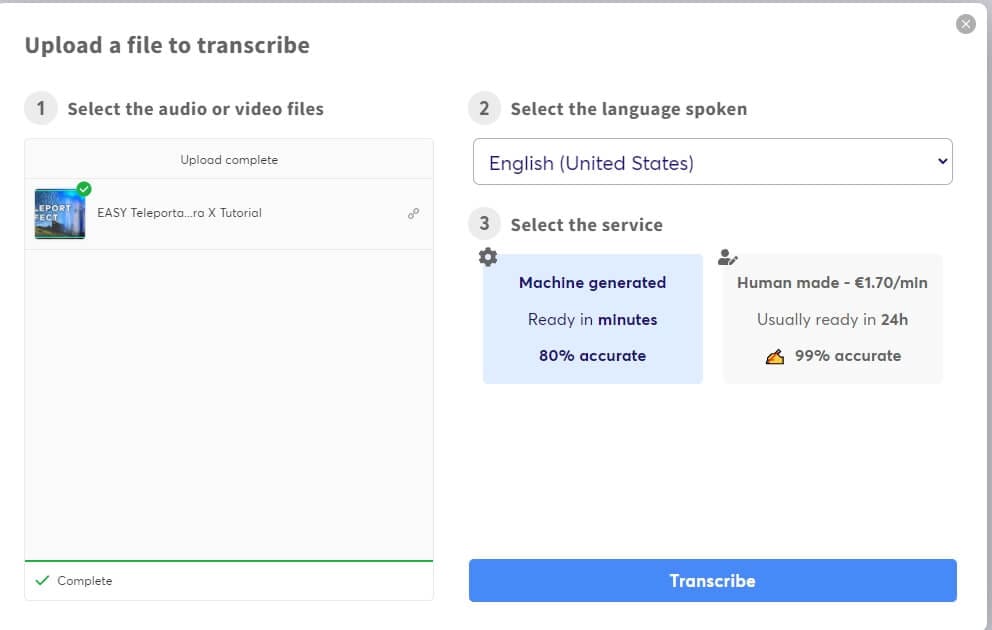
This high-quality cross-platform tool allows users to transcribe audio and video files into text . Whether it is a meeting recording or a YouTube video - you can convert them all to text. Making use of this free online software is extremely easy, all one has to do is just upload their file and click the process. Then the system will automatically transcribe the video into a text document for you. The software is uni code so all file formats are supported such as txt, XML, HTML, WebVTT, and more. The only drawback of this online software is that video files that are larger than a certain limit cannot be accepted.
2. Sonix
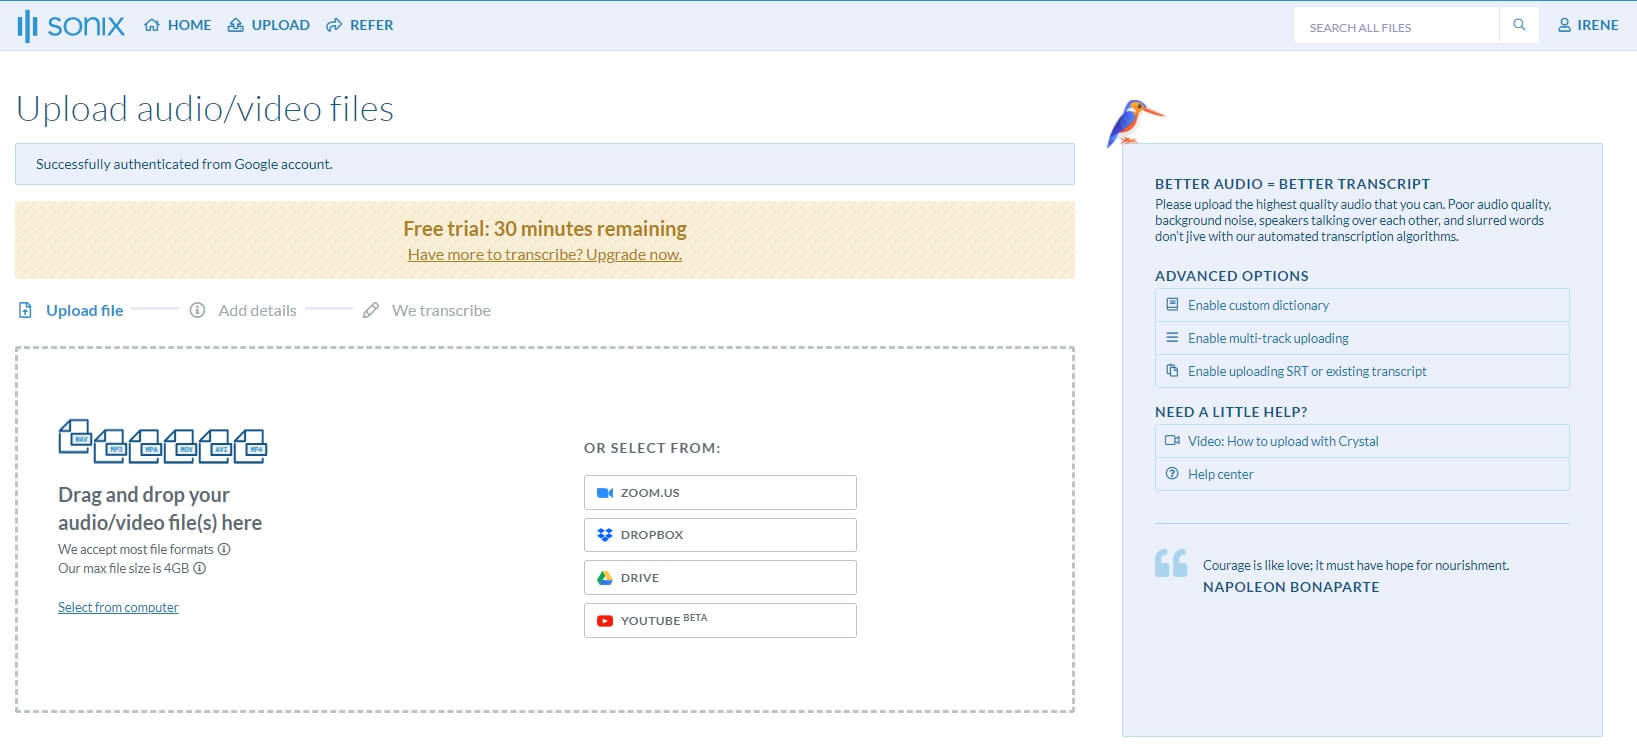
For individuals who have premium quality audio transcription, a tool by the name of Sonix is the right choice for you. This tool enables users to turn all types of YouTube videos into text. All they have to do is simply download the YouTube video they need to transcribe and then upload it to the online interface. From there, this software uses its comprehensive text reader to convert the video to text. This platform supports more than 40 different language choice inputs and outputs. Users are allowed to transcribe up to five videos for free, then they must pay a subscription fee.
3. Otter
This video-to-text converter works best in real-time. Simply play the audio of a YouTube video and let Otter do its magic. In real-time it will convert audio into text. Moreover, if you would like to only convert some parts of the audio to text, that is possible with this tool as well.
All you need to do is play the audio accordingly and the text will automatically generate itself. The AVI (Ambient Voice Intelligence) of this tool allows it to accurately understand what the audio is saying to transcribe the video. While many do find this tool handy, learning how to use it can be a tiny bit tedious and confusing.
Note: Currently, Otter doesn’t support uploading YouTube video link, you may need to download the YouTube video first and then upload it from desktop.
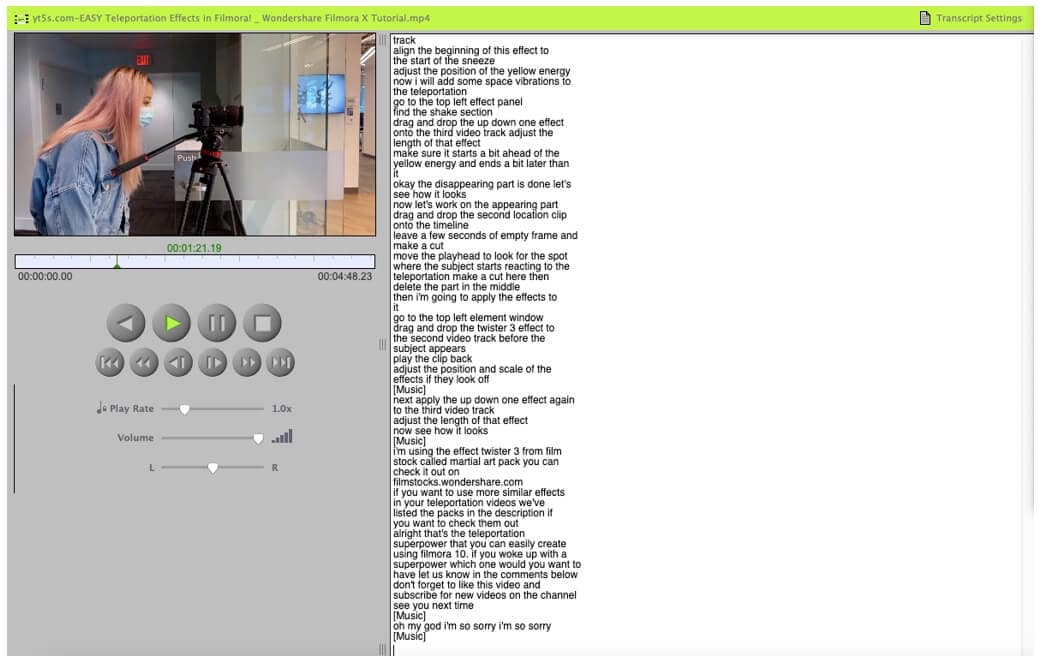
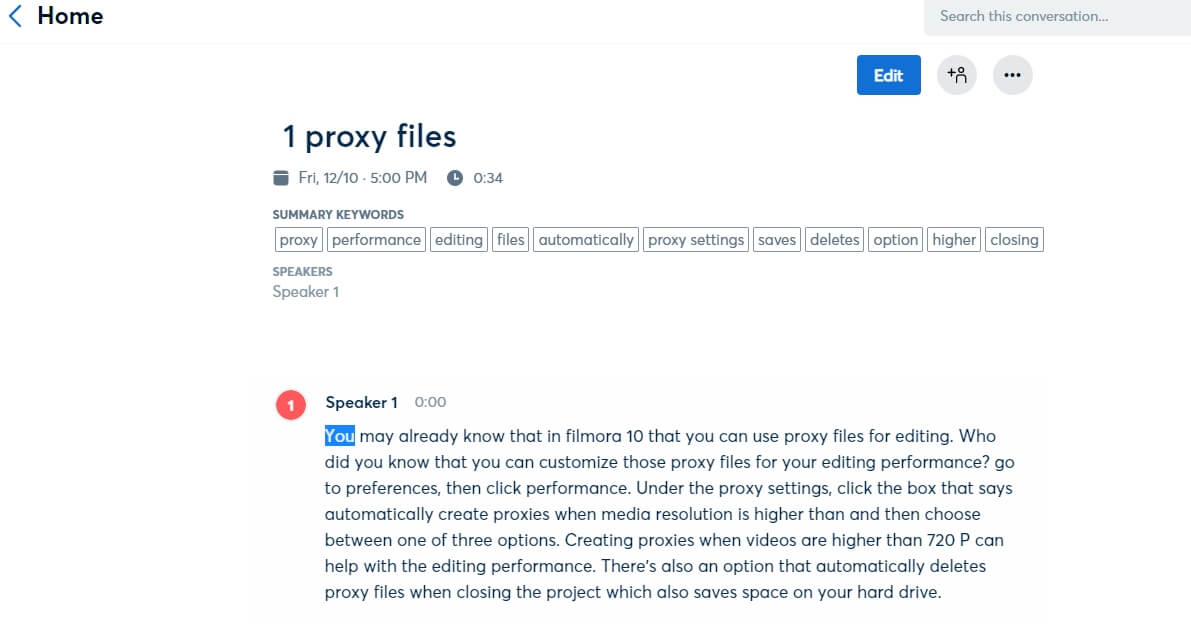
4. oTranscribe
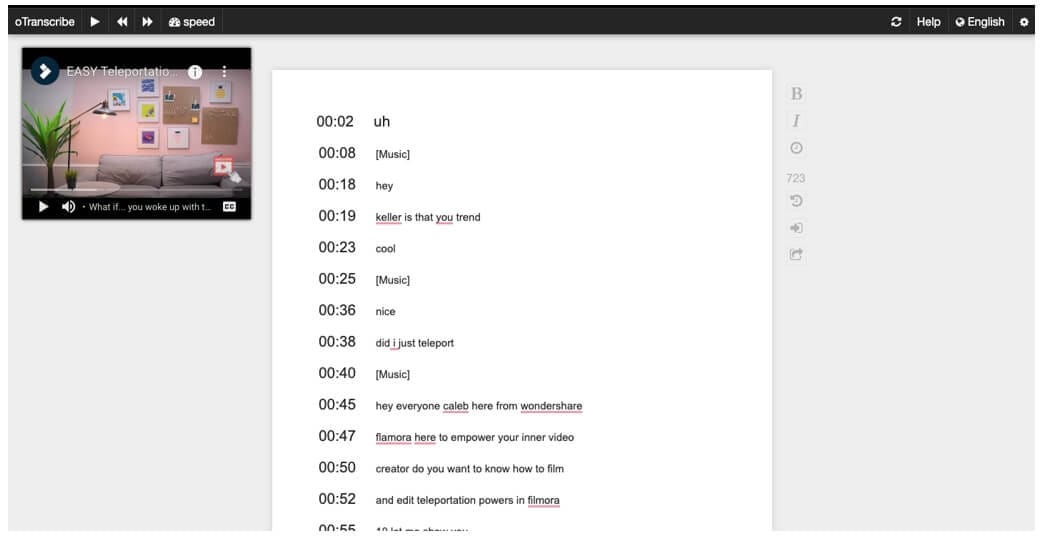
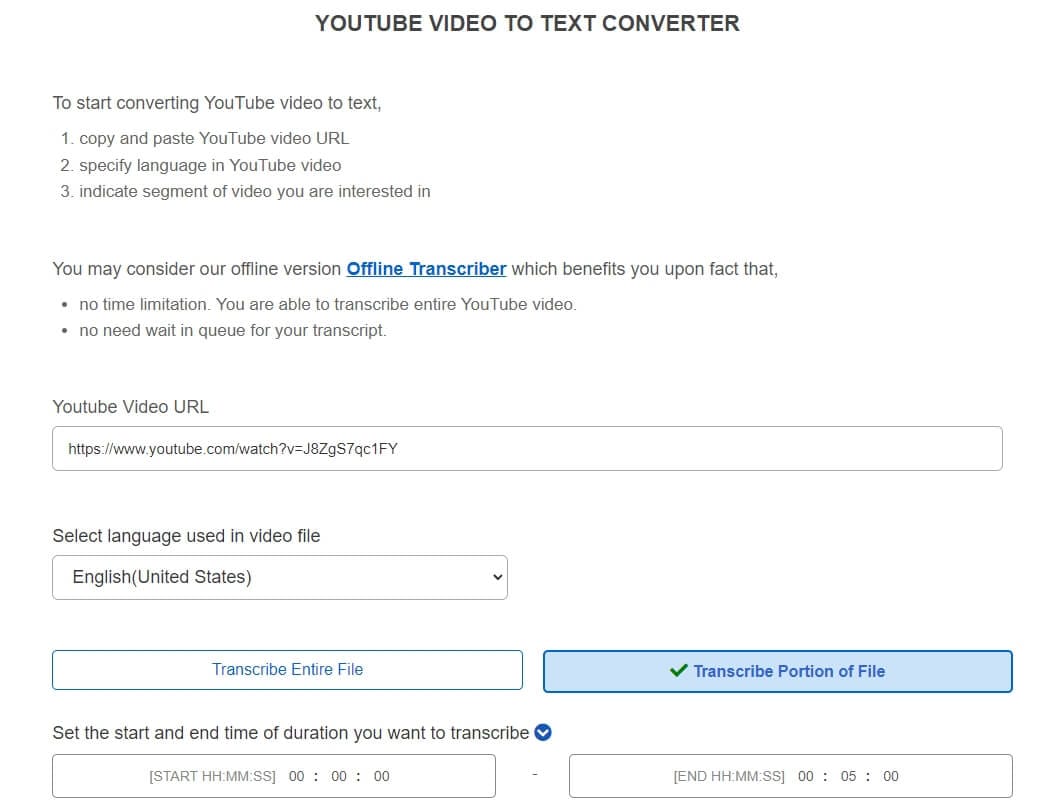
This online transcription tool is extremely easy and convenient to use - and it is entirely free! All you need to do is head on over to its homepage and drop a link to the YouTube video that you would like to transcribe. Then from there, you can access the video and text all at the same time, without having to switch between videos.
The best part is that you can record and translate text according to your need, cut and miss parts that you do not require. This tool supports all file formats which just adds to convince. The only challenge is that it will only accept videos and translate them into English.
5. Go Transcribe
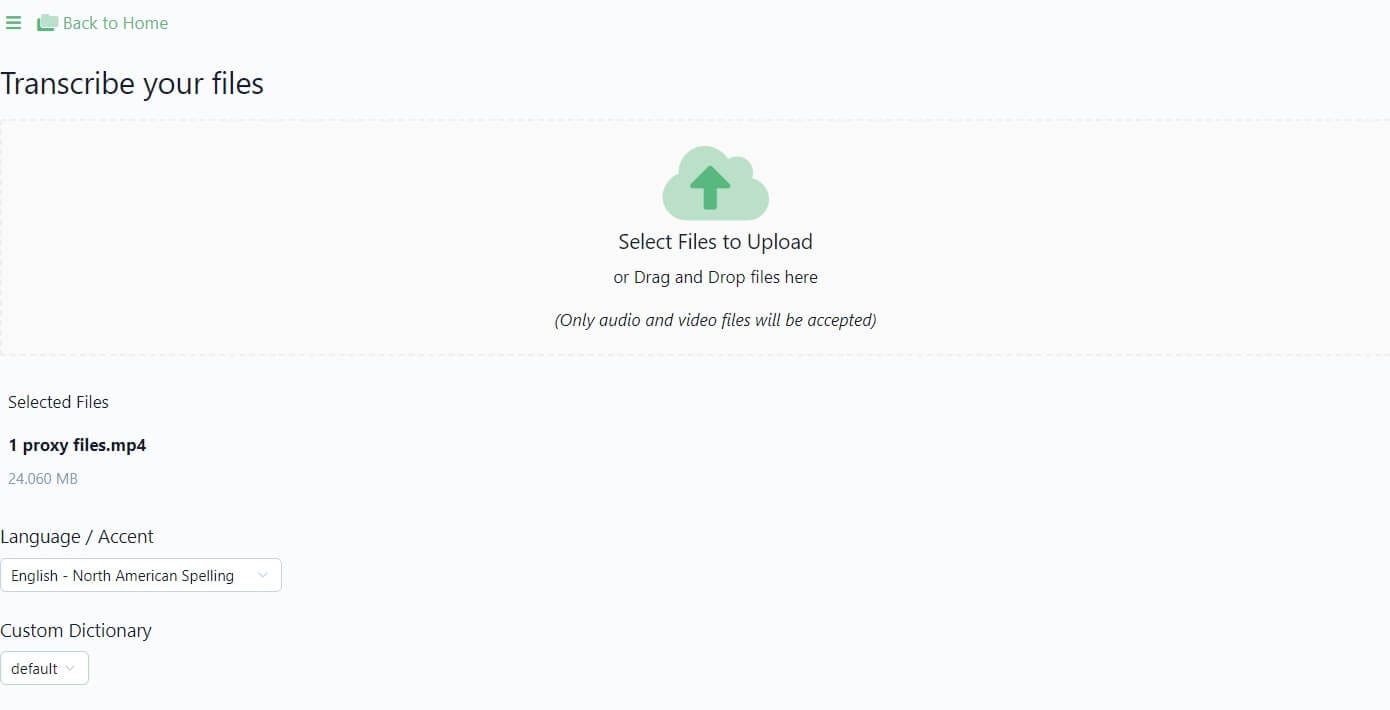
If you are looking to convert any sort of video format to text, then Go Transcribe might just be the tool that you require. This tool makes use of the latest voice technology to convert videos to text - and gives you the output in the form of an SRT, PDF, or DOC, which are all editable. All you need to do is upload the video in one of the formats below,
- 3PG
- FLV
- AVI
- MOV
- MPG
- MPEG
Then simply click the processing options and your video will be generated into a text file within minutes. However, this software may require a subscription fee.
files. Moreover, the output format is PDF which individuals cannot edit unless they convert the PDF to a TXT file online using different software.
6. Trint
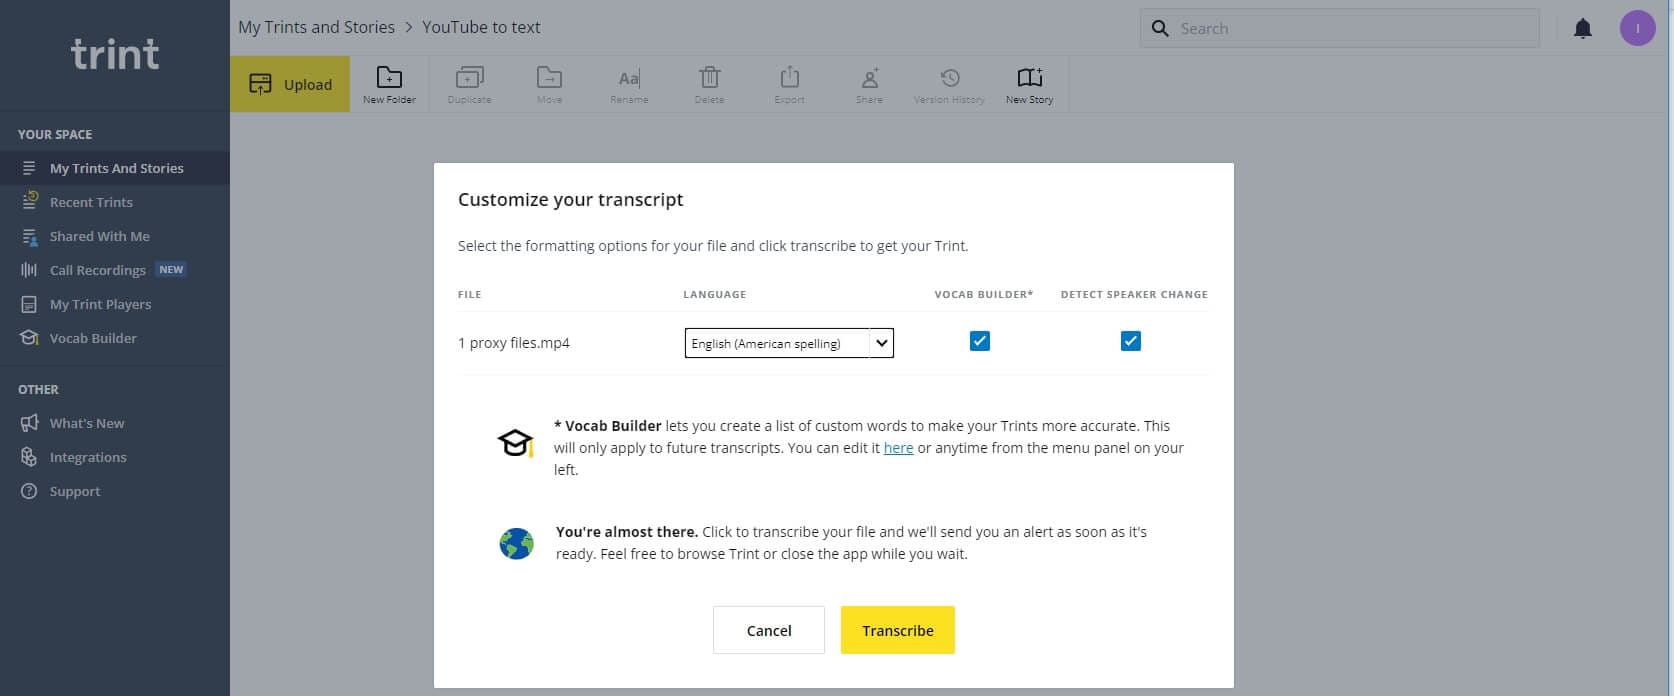
Turn your speech to text through magic - or in other words, through state-of-the-art technology. Trint is an online transcription tool that allows individuals to turn video files into text. People can download and upload numerous video files at once and turn them into text documents.
This is an extremely handy tool to have considering it comes with numerous options such as editing the text, only inducing certain parts of the video in the text, and so much more. This tool only has one shortcoming, it only accepts English language videos.
7. Happy Scribe
If you are wondering how, you will convert YouTube video to text, then we have just the answer for you. Make use of Happy Scribe to automatically transcribe all sorts of audio and video into comprehensive and readable text. You can get numerous features and options in this tool such as advanced grammatical functions as well as timestamps.
If your videos are in different languages, do not worry because Happy Scribe has more than 60 language formats. However, to make use of added features, individuals will need to pay for the tool and upgrade to the pro version.
8. 360Converter
360Converter, as its name suggests is a video to text converter which individuals can use online and offline. All you need to do is download and then upload the YouTube video that you would like to transcribe and the tool will automatically generate the text for you. The supported video formats include 3GP, MP4, MOV, AVI, and many more. This tool uses advanced technology to get accurate language and grammatical transcriptions, so everything is word to word - the exact same as the video. While this tool is extremely user-friendly, many state that it takes a while to process videos to text.
Key Takeaways!
Technology has come a long way which is why we now have numerous options available online to help us convert YouTube videos to text in less than 5-10 minutes. All you have to do is upload the file and let the tool do its magic! You can transcribe in different languages, segments, and so much more now!
Transform Long Videos into Short Ones Instantly
Turn long videos into viral clips. Effortlessly transform lengthy videos into engaging, shareable clips.

02 Best YouTube Video to Text Converters Online
Part 1: How to Convert YouTube Video to Texts by Copy/Paste YouTube Transcript
When people think “Get the transcript from YouTube” they believe it is going to be a daunting and lengthy procedure. Well, let us tell you that it is certainly not! All you have to do is follow the steps outlined below to transcribe YouTube video to text - that too through the YouTube player itself.
First what you have to do is open YouTube and select any video for which you require the transcript. Once you have selected the video, wait for it to load and then click the three dots located beneath the video, as shown in the image below.
Following that, a menu will appear, just select the “Open Transcript” option and the transcription will open on the top right side of your screen.
Simply select the entire transcript using your mouse, then copy and paste it into a new Word Document or Google Document. If you don’t need the timestamps, you can click the three-dot icon to toggle timestamps off.
By following the steps outlined above, you can convert a YouTube video to text in less than five seconds!
Part 2: Best YouTube Video to Text Converters Online
Aside from the basic method of getting the transcription from YouTube itself, many individuals make use of effective YouTube video to text converter online free. This allows them to get the complete video into text, small parts of the video to text, as well as options to convert the text into multiple languages. Below are some of the best software to convert YouTube video to text online.
1. Inqscribe
This high-quality cross-platform tool allows users to transcribe audio and video files into text . Whether it is a meeting recording or a YouTube video - you can convert them all to text. Making use of this free online software is extremely easy, all one has to do is just upload their file and click the process. Then the system will automatically transcribe the video into a text document for you. The software is uni code so all file formats are supported such as txt, XML, HTML, WebVTT, and more. The only drawback of this online software is that video files that are larger than a certain limit cannot be accepted.
2. Sonix
For individuals who have premium quality audio transcription, a tool by the name of Sonix is the right choice for you. This tool enables users to turn all types of YouTube videos into text. All they have to do is simply download the YouTube video they need to transcribe and then upload it to the online interface. From there, this software uses its comprehensive text reader to convert the video to text. This platform supports more than 40 different language choice inputs and outputs. Users are allowed to transcribe up to five videos for free, then they must pay a subscription fee.
3. Otter
This video-to-text converter works best in real-time. Simply play the audio of a YouTube video and let Otter do its magic. In real-time it will convert audio into text. Moreover, if you would like to only convert some parts of the audio to text, that is possible with this tool as well.
All you need to do is play the audio accordingly and the text will automatically generate itself. The AVI (Ambient Voice Intelligence) of this tool allows it to accurately understand what the audio is saying to transcribe the video. While many do find this tool handy, learning how to use it can be a tiny bit tedious and confusing.
Note: Currently, Otter doesn’t support uploading YouTube video link, you may need to download the YouTube video first and then upload it from desktop.
4. oTranscribe
This online transcription tool is extremely easy and convenient to use - and it is entirely free! All you need to do is head on over to its homepage and drop a link to the YouTube video that you would like to transcribe. Then from there, you can access the video and text all at the same time, without having to switch between videos.
The best part is that you can record and translate text according to your need, cut and miss parts that you do not require. This tool supports all file formats which just adds to convince. The only challenge is that it will only accept videos and translate them into English.
5. Go Transcribe
If you are looking to convert any sort of video format to text, then Go Transcribe might just be the tool that you require. This tool makes use of the latest voice technology to convert videos to text - and gives you the output in the form of an SRT, PDF, or DOC, which are all editable. All you need to do is upload the video in one of the formats below,
- 3PG
- FLV
- AVI
- MOV
- MPG
- MPEG
Then simply click the processing options and your video will be generated into a text file within minutes. However, this software may require a subscription fee.
files. Moreover, the output format is PDF which individuals cannot edit unless they convert the PDF to a TXT file online using different software.
6. Trint
Turn your speech to text through magic - or in other words, through state-of-the-art technology. Trint is an online transcription tool that allows individuals to turn video files into text. People can download and upload numerous video files at once and turn them into text documents.
This is an extremely handy tool to have considering it comes with numerous options such as editing the text, only inducing certain parts of the video in the text, and so much more. This tool only has one shortcoming, it only accepts English language videos.
7. Happy Scribe
If you are wondering how, you will convert YouTube video to text, then we have just the answer for you. Make use of Happy Scribe to automatically transcribe all sorts of audio and video into comprehensive and readable text. You can get numerous features and options in this tool such as advanced grammatical functions as well as timestamps.
If your videos are in different languages, do not worry because Happy Scribe has more than 60 language formats. However, to make use of added features, individuals will need to pay for the tool and upgrade to the pro version.
8. 360Converter
360Converter, as its name suggests is a video to text converter which individuals can use online and offline. All you need to do is download and then upload the YouTube video that you would like to transcribe and the tool will automatically generate the text for you. The supported video formats include 3GP, MP4, MOV, AVI, and many more. This tool uses advanced technology to get accurate language and grammatical transcriptions, so everything is word to word - the exact same as the video. While this tool is extremely user-friendly, many state that it takes a while to process videos to text.
Key Takeaways!
Technology has come a long way which is why we now have numerous options available online to help us convert YouTube videos to text in less than 5-10 minutes. All you have to do is upload the file and let the tool do its magic! You can transcribe in different languages, segments, and so much more now!
Transform Long Videos into Short Ones Instantly
Turn long videos into viral clips. Effortlessly transform lengthy videos into engaging, shareable clips.
Time Traveling Through Retro Filmmaking Techniques
How to Create Vintage Videos: A Comprehensive Tutorial

Richard Bennett
Mar 27, 2024• Proven solutions
“Every accomplishment starts with a decision to try.” – A Vintage Thought

Vintage videos are ultimately the retro videos you have ever imagined. The look is highly inspirational in itself. The vintage effect in photography and videos results in a must-see look that everyone wants to capture all day long. The meaning of vintage is ‘the time when something of quality was produced.’ When something is called retro, it means old, recognized, and essential. Vintage also resembles love apart from videos and photos. All in all, it’s a positive and result-oriented thing to carry on in your videos. And this is what we want to mention in this post relating to the creation of vintage videos.
Here are some vintage-style video ideas for you to have a look at.
- Part 1: What to Consider When Shooting a Vintage Video?
- Part 2: How to Create a Stunning Vintage Video?
- Part 3: Tips to Make Your Vintage Videos Stand Out
What to Consider When Shooting a Vintage Video?
Vintage videos are kind of old school vibes and must be shooting accordingly by keeping in mind the following points. These are a sort of expert tips given by photographers based on their practical experience. First of all, you have to understand that a video can be made vintage, but you can’t change the actual environment of shooting. Some editing always involves there in every project out there. Still, the tips given below will help you a lot in creating a retro look.
Use Vintage Lenses
The very first helpful tip is to use a vintage lens. They allow chromatic aberration by distorting colors around the frame. Furthermore, you can find various kinds of lenses in terms of a vintage effect.
Decrease Contrast
Do the correct color grading by reducing the contrast a little bit. You must not level the retro videos in black or white or like-new videos. You can simply add a contrasting effect and then reduce it to have that vintage look.
Keep it a little soft
If you have ever noticed, the vintage videos are a little soft and look like degraded with time. It’s a result of decreased sharpness in the camera’s menu settings. You can even add a slight blur to the final video or simply use recognized software made for video editing .
Brighten up the black levels
Lots of black points in the video are not ideal for a vintage effect. The suitable approach is to bring up black levels and make it dark gray instead of inky black. This look can be achieved either by levels effect or curves effect in your editing software.
Reduce Saturation levels
Bringing down the saturation levels is another tip to create a vintage effect. The old videos are also absent in bright colors. Don’t go too crazy about reduction as 20%-30% saturation level is more than enough.
How to Create a Stunning Vintage Video?
What you need to get started as both beginner and professional is Wondershare Filmora Video Editor. It is a highly recommended software to create vintage videos. The intuitive user interface and lots of editing functions are helpful for a video editor. It has both primary as well as advanced editing programs to check. It has various advanced color tuning tools to promote the making of original videos. It features tint, temperature, Vignette, 3D Luts, Lights, and so on.


Steps for the vintage effect to videos on Wondershare Filmora Video Editor
Step 1: Upload video & make specific changes

The very step is to add the video by clicking the + icon. We have added the three sample videos from the library of Wondershare Filmora itself. Adjust them in the timeline as per your requirements.
After doing all the essential editing functions, click on the Effects tab given at the upper-left corner. Simply type the word Old in the Search tab.
The Old Video filter will immediately appear in the list of filters. Tap the “+” icon in Old Video filter to add to the timeline. Drag its ends right or left to adjust the duration.
Step 2: Apply White & Black Filters

The second step is to apply the Black & White filters. Go to the Effects tab and explore five Black & White filters available. Each of these filters is quite different and must be applied accordingly. Check the aesthetic of your video clip before any filter application to retro videos.
Step 3: Add the Sun Kissed or Sepia Tone Rise Filters to the video clip

There are various other categories of filters you can apply, such as Retro, Sun Kissed, and Sepia Tone, etc. The features of Filmora also present several subcategories such as Faux Film or Shake.

On the other hand, the subcategory of Sepia Tone features Sun-Kissed & Rise Filters to stimulate sepia-tinted texture and recreate the old visual style. The Sun Kissed filter presents brown and red colors to give that warm image atmosphere.
Step 4: Desaturate Video Clip

Now, you need to desaturate the video clip with Ash & Willow filters. We have typed Ash in the Search bar, and you can see the filter below. These filters are essential to desaturate the video with preset contrast, brightness, or exposure values.

Then, we have combined the black & white filter with an overlay of Film Reel Horizontal. It will help you sell the effect and make the video look more authentic. However, the only application of Black & White or Ash & Willow filters is not going to make any creative thing in terms of vintage videos. You have to mix overlays with features such as Random Dust or Film Reel Horizontal.
Step 5: Apply Black & White and Old Film Color Correction Presets to the video
You can also access the Advanced color correction Tab of Filmora from the Color button. It also features Preset and Adjusts Tabs to desaturate footage. The Preset presents a variety of options, including Black & White and Old Film. You just need to right-click the particular preset and select the Apply option.

Tips to Make Your Vintage Videos Stand Out
Following the helpful tips would assist you in creating awesome retro videos.
- You can use various vintage apps such as Retro VHS, RTRO Camera, 8mm, Camcorder, VSCO, etc. Or, despite using these limited apps, you can directly use our preferred video editing software called Wondershare Filmora.
- If you use a specific vintage camera, keep it on low highlights and low contrasts. Use color grading, as we have discussed above. They help to provide the ultimate old-school effect.
- Always keep low saturation settings for shooting vintage videos. Take control over Saturation, Hue, and Luminance of video.
- Add overlays and respective filters to recreate a required vintage look. You must add things that dust, scratch, and grain the heck out from the video that you have created.
- Lower the frame rate or FPS to create an excellent vintage look. You can make it to 18 or 14 FPS depending upon the aesthetic requirements.
- Keep an eye on black and white filters you have used. It’s because more of a black and white can ruin the actual vintage experience.
Conclusion
So, this is an ultimate tutorial on the creation of vintage videos. We Hope you have admired the steps and our recommended video editing software. Vintage means grand, and thus you should make it amazing as well. It is the reason we have stated all facts regarding the vintage effect in our post above. Wondering how to add such effect in FCPX? check this article:How to Create a Vignette in Final Cut Pro X?
Surely give a read and thank us later!
Richard Bennett
Richard Bennett is a writer and a lover of all things video.
Follow @Richard Bennett
Richard Bennett
Mar 27, 2024• Proven solutions
“Every accomplishment starts with a decision to try.” – A Vintage Thought
Vintage videos are ultimately the retro videos you have ever imagined. The look is highly inspirational in itself. The vintage effect in photography and videos results in a must-see look that everyone wants to capture all day long. The meaning of vintage is ‘the time when something of quality was produced.’ When something is called retro, it means old, recognized, and essential. Vintage also resembles love apart from videos and photos. All in all, it’s a positive and result-oriented thing to carry on in your videos. And this is what we want to mention in this post relating to the creation of vintage videos.
Here are some vintage-style video ideas for you to have a look at.
- Part 1: What to Consider When Shooting a Vintage Video?
- Part 2: How to Create a Stunning Vintage Video?
- Part 3: Tips to Make Your Vintage Videos Stand Out
What to Consider When Shooting a Vintage Video?
Vintage videos are kind of old school vibes and must be shooting accordingly by keeping in mind the following points. These are a sort of expert tips given by photographers based on their practical experience. First of all, you have to understand that a video can be made vintage, but you can’t change the actual environment of shooting. Some editing always involves there in every project out there. Still, the tips given below will help you a lot in creating a retro look.
Use Vintage Lenses
The very first helpful tip is to use a vintage lens. They allow chromatic aberration by distorting colors around the frame. Furthermore, you can find various kinds of lenses in terms of a vintage effect.
Decrease Contrast
Do the correct color grading by reducing the contrast a little bit. You must not level the retro videos in black or white or like-new videos. You can simply add a contrasting effect and then reduce it to have that vintage look.
Keep it a little soft
If you have ever noticed, the vintage videos are a little soft and look like degraded with time. It’s a result of decreased sharpness in the camera’s menu settings. You can even add a slight blur to the final video or simply use recognized software made for video editing .
Brighten up the black levels
Lots of black points in the video are not ideal for a vintage effect. The suitable approach is to bring up black levels and make it dark gray instead of inky black. This look can be achieved either by levels effect or curves effect in your editing software.
Reduce Saturation levels
Bringing down the saturation levels is another tip to create a vintage effect. The old videos are also absent in bright colors. Don’t go too crazy about reduction as 20%-30% saturation level is more than enough.
How to Create a Stunning Vintage Video?
What you need to get started as both beginner and professional is Wondershare Filmora Video Editor. It is a highly recommended software to create vintage videos. The intuitive user interface and lots of editing functions are helpful for a video editor. It has both primary as well as advanced editing programs to check. It has various advanced color tuning tools to promote the making of original videos. It features tint, temperature, Vignette, 3D Luts, Lights, and so on.
Steps for the vintage effect to videos on Wondershare Filmora Video Editor
Step 1: Upload video & make specific changes
The very step is to add the video by clicking the + icon. We have added the three sample videos from the library of Wondershare Filmora itself. Adjust them in the timeline as per your requirements.
After doing all the essential editing functions, click on the Effects tab given at the upper-left corner. Simply type the word Old in the Search tab.
The Old Video filter will immediately appear in the list of filters. Tap the “+” icon in Old Video filter to add to the timeline. Drag its ends right or left to adjust the duration.
Step 2: Apply White & Black Filters
The second step is to apply the Black & White filters. Go to the Effects tab and explore five Black & White filters available. Each of these filters is quite different and must be applied accordingly. Check the aesthetic of your video clip before any filter application to retro videos.
Step 3: Add the Sun Kissed or Sepia Tone Rise Filters to the video clip
There are various other categories of filters you can apply, such as Retro, Sun Kissed, and Sepia Tone, etc. The features of Filmora also present several subcategories such as Faux Film or Shake.
On the other hand, the subcategory of Sepia Tone features Sun-Kissed & Rise Filters to stimulate sepia-tinted texture and recreate the old visual style. The Sun Kissed filter presents brown and red colors to give that warm image atmosphere.
Step 4: Desaturate Video Clip
Now, you need to desaturate the video clip with Ash & Willow filters. We have typed Ash in the Search bar, and you can see the filter below. These filters are essential to desaturate the video with preset contrast, brightness, or exposure values.
Then, we have combined the black & white filter with an overlay of Film Reel Horizontal. It will help you sell the effect and make the video look more authentic. However, the only application of Black & White or Ash & Willow filters is not going to make any creative thing in terms of vintage videos. You have to mix overlays with features such as Random Dust or Film Reel Horizontal.
Step 5: Apply Black & White and Old Film Color Correction Presets to the video
You can also access the Advanced color correction Tab of Filmora from the Color button. It also features Preset and Adjusts Tabs to desaturate footage. The Preset presents a variety of options, including Black & White and Old Film. You just need to right-click the particular preset and select the Apply option.
Tips to Make Your Vintage Videos Stand Out
Following the helpful tips would assist you in creating awesome retro videos.
- You can use various vintage apps such as Retro VHS, RTRO Camera, 8mm, Camcorder, VSCO, etc. Or, despite using these limited apps, you can directly use our preferred video editing software called Wondershare Filmora.
- If you use a specific vintage camera, keep it on low highlights and low contrasts. Use color grading, as we have discussed above. They help to provide the ultimate old-school effect.
- Always keep low saturation settings for shooting vintage videos. Take control over Saturation, Hue, and Luminance of video.
- Add overlays and respective filters to recreate a required vintage look. You must add things that dust, scratch, and grain the heck out from the video that you have created.
- Lower the frame rate or FPS to create an excellent vintage look. You can make it to 18 or 14 FPS depending upon the aesthetic requirements.
- Keep an eye on black and white filters you have used. It’s because more of a black and white can ruin the actual vintage experience.
Conclusion
So, this is an ultimate tutorial on the creation of vintage videos. We Hope you have admired the steps and our recommended video editing software. Vintage means grand, and thus you should make it amazing as well. It is the reason we have stated all facts regarding the vintage effect in our post above. Wondering how to add such effect in FCPX? check this article:How to Create a Vignette in Final Cut Pro X?
Surely give a read and thank us later!
Richard Bennett
Richard Bennett is a writer and a lover of all things video.
Follow @Richard Bennett
Also read:
- Perfecting Your YouTube Closings - Essential Insights & Tips
- Vinyl Virtuoso Access to Premium DJ Video Samples
- 2024 Approved Earning as a Video Game Geek
- 2024 Approved Dive Deep Into Duality Mastering Multi-Video Watching on YouTube
- 2024 Approved Channeling Musical Charm Crafting Custom Playlists on Youtube
- Sifting Through the Differences IGTV Vs. YouTube in a Direct Comparison
- Preferred News Feeds 10 Leading YouTube Channels
- 2024 Approved Decoding Digital Dollars An Effective Way to Understand YouTube Revenue Dynamics
- 10 Video App Powerhouses That Don't Play by YouTube’s Rules for 2024
- Maximizing Engagement with Proper YT Thumbnail Size
- Blueprint for Buzzing Outro
- Discovering Income Monetization Through YouTube Sponsored Videos, In 2024
- In 2024, Achieving Pristine Video Quality on YouTube
- 2024 Approved Crafting an Engaging Online Presence The Complete Guide to YouTube Submissions
- Perfecting Your Video's Farewell Scene
- In 2024, Elevating Video Popularity on YouTube
- [Updated] Dive Into Digital Fandom Top 6 Interactive Questionnaires to Identify Your YouTube Spirituality
- [Updated] In 2024, Master Your Media on Vimeo with Top-Ranked Editors
- Updated Top 8 Digital Audio Workstations (DAWs) Revolutionizing Contemporary Rap and R&B Creation
- Updated Create Talking Cartoon Images Using Top Tools
- [Updated] 2024 Approved Trending Laughs The Latest TikTok Humor Hits
- Gaming's Finest Bike Battles Compiled for 2024
- Updated Best Ways to Merge FLV Files Windows, Mac,Android, iPhone & Online for 2024
- Visual Narratives Instagram Carousel
- 7 Ways to Unlock a Locked Realme 11X 5G Phone
- How to Get and Use Pokemon Go Promo Codes On Apple iPhone 14 | Dr.fone
- Guide to Mirror Your OnePlus Nord N30 5G to Other Android devices | Dr.fone
- [Updated] In 2024, From Amateur to Professional Transform Your Minecraft Recordings with Mac
- [Updated] Ace Driving Realism Series (Best 5)
- [New] 2024 Approved Tutorial Extracting Audio From Vimeo Video
- How to Solve Windows 11 Photos App Crashes Effectively
- Title: "Premier Convert Kits Transforming YouTube Vids Into Text"
- Author: Steven
- Created at : 2024-05-25 20:18:31
- Updated at : 2024-05-26 20:18:31
- Link: https://youtube-clips.techidaily.com/premier-convert-kits-transforming-youtube-vids-into-text/
- License: This work is licensed under CC BY-NC-SA 4.0.
