
:max_bytes(150000):strip_icc()/GettyImages-1410830296-0eb6a85d89ad44aa885fcd486e8fed32.jpg)
Perfecting the Craft of YouTube Short Video Making
Perfecting the Craft of YouTube Short Video Making
YouTube Shorts Ultimate Guide in 2024

Richard Bennett
Mar 27, 2024• Proven solutions
Since smartphones are cheap and easily available in the market today, and there is also a huge range of contents to view online, a majority of users prefer watching videos that are both short enough to convey the message within a few seconds, and can be seen on your phone’s screen with decent picture quality. Considering this, Google lately came up with a Tik Tok-style app calledYouTube shorts that can be accessed right from your Android or iPhone as long as you are using the YouTube app, and are signed in to your Google account.
That said, in the following sections you will learn everything about the YouTube Shorts app, and how it could help you gain more viewers for your YouTube channel.
- Part 1: What Is YouTube Shorts?
- Part 2: How to Make and Upload a YouTube Shorts Video with Shorts App?
- Part 3: Creating Vertical YouTube Shorts Video in Filmora [Step by Step Tutorial]
Part 1: What Is YouTube Shorts?
A short and quick answer to the question is, YouTube Shorts is a Tik Tok competitor developed by Google and can be accessed via the YouTube app on an Android or iOS device. In order to use the YouTube Shorts app, all you need to do is, sign in to your YouTube account on the YouTube app, and you are good to go.
1. YouTube Shorts Release History
At the time of this writing, YouTube Shorts is still in the Beta phase, and there is a lot more that the developers at Google have yet to explore and discover. However, for now, the fully functional variant of the program is available only for users in India on Android and iOS platforms.
2. YouTube Shorts Target Audience
A majority of people who can be called the target audience for YouTube Shorts are the artists and creators looking forward to getting noticed. Some of them could also be among those who wish to become an influencer, or get their YouTube channel more subscribers to be able to become eligible for YouTube Partnership Program.
And of course, the viewers and subscribers cannot be left alone when talking about the target audiences of YouTube Shorts as without them, there’s no point in creating short videos in the first place.
The type of contents that the viewers expect to see as YouTube Shorts could include:
- Entertainment – While movies are of longer duration, roasting the characters in it, or explaining some other stuff to the subscribers could be one of the things that could keep the viewers engaged
- Gaming – Some extraordinary gaming tips, tricks, and skills can be demonstrated in a short video
- How-To – A couple of brief how-to illustrations can yet be another attraction for DIY-loving viewers
- Science and Technology – A short introduction of upcoming gadgets or applications along with their usability can be explained within the timeframe of 60 seconds as well
In addition to the above, a few other categories could be People and Places, Music, Domestic and Wild Animals, Education, etc.
3. YouTube Shorts Content Requirements
While creating YouTube Shorts, there are certain guidelines that must be followed. These points include:
- YouTube Shorts videos must not be more than 60 seconds long
- The videos must be vertically shot, and must not be in the landscape orientation
- You can have multiple short videos clubbed together. However, the total length of the final video must not exceed 60 seconds in duration
- While posting YouTube Shorts videos, the title or the description must contain ‘#shorts’ in it
Certain things that you must keep in mind while creating YouTube Shorts include:
- YouTube Shorts cannot be monetized. However, they can serve as a good medium to attract and redirect the audiences to your main YouTube channel which may contain several videos that are eligible for monetization.
- The number of views and the total playtime of the YouTube Shorts videos DO affect your YouTube channel statistics
4. Where People Can Find YouTube Shorts
As mentioned earlier, YouTube Shorts can be accessed by launching the YouTube app on your Android or iOS device. You can use YouTube Shorts by clicking the + (Add) icon present at the bottom. Once the YouTube Shorts app is initialized, you can easily create and publish short videos by following the simple on-screen instructions.
Part 2: How to Make and Upload a YouTube Shorts Video with Shorts App?
You can follow the instructions given below to make and upload a YouTube Shorts video using the YouTube Shorts app:
Step 1: Record a Video with YouTube Shorts

Launch the YouTube app on your Android or iOS smart device (Samsung Galaxy Note 10+ is used here for demonstration), make sure that you are signed in to your Google account, tap the + (Add) button present at the bottom of the screen, tap Create a Short on the popup box that appears next, tap the Record button on the next window to start the recording. Once you are done, tap the Stop button to stop the recording.
Step 2: Edit the Video
Tap Music from the bottom of the screen to add background music to the video. The music that you can use in your short videos must be either created by you, or you should have permission to use them. However, the audio files that the Music library contains is made available by Google, is royalty-free, and can be used throughout the platform.

Likewise, you can tap Text to add captions as well. As for the text type, the app offers various formatting options such as alignment (left, center, and right), text highlighter, font changer, and even color selector. Further, the Speed and Timer icons at the top-right area allow you to manage the playback speed anywhere between 0.3x to 3x, and automatically stop the recording after the set time limit respectively. Once everything is set up, tap NEXT from the top-right corner to proceed to the next step.
Step 3: Pick Target Audience Type
On the Add details window, tap Select audience, and on the Select audience window, tap to select the appropriate radio button to define whether the video is suitable for kids. Tap the Back button once the target audience is selected.

Step 4: Add Details and Upload the Video
Enter a title for the video in the Title field. Make sure to include #shorts to help YouTube understand that you are preparing a YouTube Shorts video. Next, tap UPLOAD from the upper-right corner of the screen to submit the video for review. Once YouTube reviews the recording and finds it appropriate, it will be published on the portal, and will be visible throughout and even under the Shorts category of the main page.

Part 3: How to Create a Vertical YouTube Shorts Video in Filmora?
The YouTube Shorts app is pretty convenient to access and use alright. However, it doesn’t allow you to fine edit the videos. The app doesn’t even have many filtering options such as Effects, Elements, etc. to make your videos more engaging.
With that said, you can always use an efficient third-party program like Wondershare Filmora to create professionally-looking YouTube Shorts videos to attract your viewers.
When talking about Wondershare Filmora, it is a production and post-production app available for both Windows and Mac computers, and gives tough competition to some of the globally accepted similar programs like Adobe Premiere Pro, Final Cut Pro X, etc. Furthermore, Filmora has its own built-in screen, webcam, and voice recording features that can be used to prepare interactive videos, game walkthroughs, and voiceovers as needed.
For Win 7 or later (64-bit)
 Secure Download
For macOS 10.12 or later
Secure Download
The following step-by-step guide teaches you how to use Wondershare Filmora to create a vertical YouTube Shorts video:
Note: Before proceeding to the instructions, make sure that you have already recorded a vertical video using your cellphone, and that it has been transferred to your PC.
Step 1: Add the Video to Timeline
Launch Wondershare Filmora on your Windows or Mac PC (a Windows 10 computer is used here for demonstration), go to File > New Project, and click 9:16 (Portrait). Click anywhere inside the Media box, and select and import the source vertical video from your PC to Filmora.
Next, hover the mouse over the clip in the Media box, click the + button that appears at the bottom-right corner of the thumbnail, and in the resolution confirmation box that comes up next, click the button under the Match to Media section to add the video in the correct orientation to the Timeline at the bottom.
Step 2: Edit the Video
Select the clip in the Timeline, and use the Split, Crop, Speed, etc. buttons above the Timeline itself to remove the unwanted portions from the clip, manage its playback speed, and do other fine-tuning tasks.

You can even click the Edit button, and use the available editing features like Motion Tracking and Stabilization to add text or objects to a moving body in the video and stabilize the clip if the camera shook during the recording session respectively. Click OK to save the changes when done.

Note: To be able to remain compliant with the YouTube Shorts policies, make sure that the video length is no longer than 60 seconds.
Step 3: Beautify the Video

Click Titles from the standard toolbox at the top, choose your preferred text category from the list in the left, hover the mouse over a decent preset in the right window, and click the + button at the bottom-right corner of the thumbnail to add the preset on top of the media track in the Timeline. Next, you can double-click the preset track in the Timeline to modify the text and make granular modifications to it as needed. Click OK to save the changes.
Similarly, you can select the Effects and Elements tools to add effects and elements to the video as needed. To add background music, you can go to the Audio tool, and pick your preferred preset from the available options. A custom music can be added by going to the Media tool, and importing an audio file from your PC using the method explained in Step 1.

After this, optionally, you can go to Split Screen from the standard toolbar at the top, and use your preferred Split Screen preset to club multiple video clips into one screen. In Filmora, you can add as many as 6 screens in a video.
For Win 7 or later (64-bit)
Secure Download
For macOS 10.12 or later
Secure Download
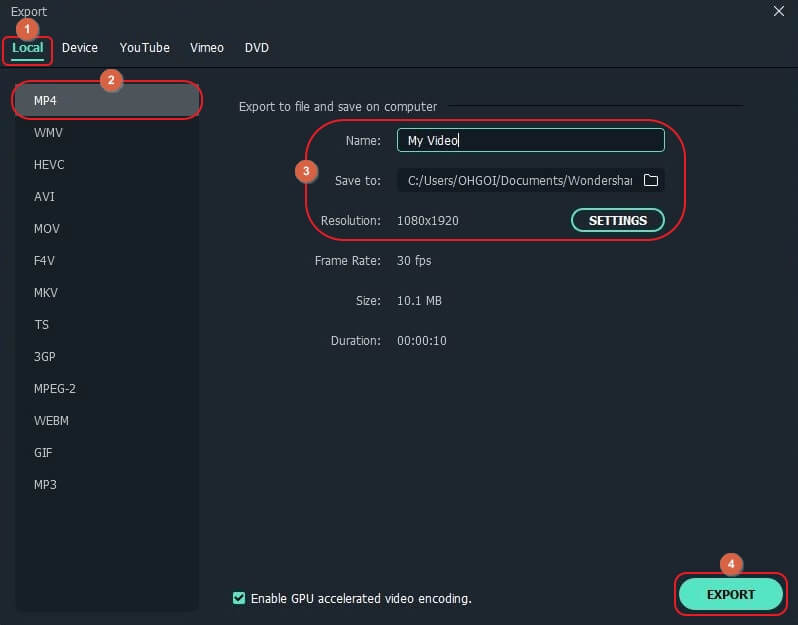
Step 4: Render the Final Output
Once everything is set up, click EXPORT from the top of the window, go to the Local tab on the Export window, select MP4 from the formats list in the left, give a name and configure other settings from the available options in the right, and click EXPORT from the bottom-right corner to create a YouTube Shorts video. Once the clip is generated, you can upload the video to YouTube using #Shorts in the title or description to publish the video under the YouTube Shorts section.
FAQs About YouTube Shorts
- Where to download the YouTube Shorts app?
The YouTube Shorts app is already present in the YouTube app that your Android or iOS smartphone has. All you need to do to access it is, sign in to your Google account, tap the + button at the bottom, and tap Create a Short in the popup box that comes up.
- What if YouTube Shorts is not showing on my YouTube app?
Make sure that your YouTube app is updated to its latest version. If the app is already updated, and YouTube Shorts is still unavailable, the chances are that Google hasn’t rolled the app in your region. Since YouTube Shorts is still in its Beta phase, only the region of India can use all the functions of the app at the time of this writing. In such a case, you are suggested to wait until the YouTube Shorts app is made available for your location.
- What’s the YouTube Shorts video duration?
A YouTube Shorts video can be of only up to 60 seconds.
- What’s the YouTube Shorts size limitation?
YouTube hasn’t provided any information related to this as of now. However, you can rest assure that a 60 seconds long video file wouldn’t be too large for YouTube to handle.
- How many subs do you need to access Shorts?
YouTube Shorts is available for everyone regardless of the number of subscribers the channel has.
- Can you make money on Shorts?
Unfortunately, NO. Although you cannot monetize the recordings published as YouTube Shorts, they can be a good source to drive subscribers to your main YouTube channel that may have the videos that can be monetized.
Richard Bennett
Richard Bennett is a writer and a lover of all things video.
Follow @Richard Bennett
Richard Bennett
Mar 27, 2024• Proven solutions
Since smartphones are cheap and easily available in the market today, and there is also a huge range of contents to view online, a majority of users prefer watching videos that are both short enough to convey the message within a few seconds, and can be seen on your phone’s screen with decent picture quality. Considering this, Google lately came up with a Tik Tok-style app calledYouTube shorts that can be accessed right from your Android or iPhone as long as you are using the YouTube app, and are signed in to your Google account.
That said, in the following sections you will learn everything about the YouTube Shorts app, and how it could help you gain more viewers for your YouTube channel.
- Part 1: What Is YouTube Shorts?
- Part 2: How to Make and Upload a YouTube Shorts Video with Shorts App?
- Part 3: Creating Vertical YouTube Shorts Video in Filmora [Step by Step Tutorial]
Part 1: What Is YouTube Shorts?
A short and quick answer to the question is, YouTube Shorts is a Tik Tok competitor developed by Google and can be accessed via the YouTube app on an Android or iOS device. In order to use the YouTube Shorts app, all you need to do is, sign in to your YouTube account on the YouTube app, and you are good to go.
1. YouTube Shorts Release History
At the time of this writing, YouTube Shorts is still in the Beta phase, and there is a lot more that the developers at Google have yet to explore and discover. However, for now, the fully functional variant of the program is available only for users in India on Android and iOS platforms.
2. YouTube Shorts Target Audience
A majority of people who can be called the target audience for YouTube Shorts are the artists and creators looking forward to getting noticed. Some of them could also be among those who wish to become an influencer, or get their YouTube channel more subscribers to be able to become eligible for YouTube Partnership Program.
And of course, the viewers and subscribers cannot be left alone when talking about the target audiences of YouTube Shorts as without them, there’s no point in creating short videos in the first place.
The type of contents that the viewers expect to see as YouTube Shorts could include:
- Entertainment – While movies are of longer duration, roasting the characters in it, or explaining some other stuff to the subscribers could be one of the things that could keep the viewers engaged
- Gaming – Some extraordinary gaming tips, tricks, and skills can be demonstrated in a short video
- How-To – A couple of brief how-to illustrations can yet be another attraction for DIY-loving viewers
- Science and Technology – A short introduction of upcoming gadgets or applications along with their usability can be explained within the timeframe of 60 seconds as well
In addition to the above, a few other categories could be People and Places, Music, Domestic and Wild Animals, Education, etc.
3. YouTube Shorts Content Requirements
While creating YouTube Shorts, there are certain guidelines that must be followed. These points include:
- YouTube Shorts videos must not be more than 60 seconds long
- The videos must be vertically shot, and must not be in the landscape orientation
- You can have multiple short videos clubbed together. However, the total length of the final video must not exceed 60 seconds in duration
- While posting YouTube Shorts videos, the title or the description must contain ‘#shorts’ in it
Certain things that you must keep in mind while creating YouTube Shorts include:
- YouTube Shorts cannot be monetized. However, they can serve as a good medium to attract and redirect the audiences to your main YouTube channel which may contain several videos that are eligible for monetization.
- The number of views and the total playtime of the YouTube Shorts videos DO affect your YouTube channel statistics
4. Where People Can Find YouTube Shorts
As mentioned earlier, YouTube Shorts can be accessed by launching the YouTube app on your Android or iOS device. You can use YouTube Shorts by clicking the + (Add) icon present at the bottom. Once the YouTube Shorts app is initialized, you can easily create and publish short videos by following the simple on-screen instructions.
Part 2: How to Make and Upload a YouTube Shorts Video with Shorts App?
You can follow the instructions given below to make and upload a YouTube Shorts video using the YouTube Shorts app:
Step 1: Record a Video with YouTube Shorts
Launch the YouTube app on your Android or iOS smart device (Samsung Galaxy Note 10+ is used here for demonstration), make sure that you are signed in to your Google account, tap the + (Add) button present at the bottom of the screen, tap Create a Short on the popup box that appears next, tap the Record button on the next window to start the recording. Once you are done, tap the Stop button to stop the recording.
Step 2: Edit the Video
Tap Music from the bottom of the screen to add background music to the video. The music that you can use in your short videos must be either created by you, or you should have permission to use them. However, the audio files that the Music library contains is made available by Google, is royalty-free, and can be used throughout the platform.
Likewise, you can tap Text to add captions as well. As for the text type, the app offers various formatting options such as alignment (left, center, and right), text highlighter, font changer, and even color selector. Further, the Speed and Timer icons at the top-right area allow you to manage the playback speed anywhere between 0.3x to 3x, and automatically stop the recording after the set time limit respectively. Once everything is set up, tap NEXT from the top-right corner to proceed to the next step.
Step 3: Pick Target Audience Type
On the Add details window, tap Select audience, and on the Select audience window, tap to select the appropriate radio button to define whether the video is suitable for kids. Tap the Back button once the target audience is selected.
Step 4: Add Details and Upload the Video
Enter a title for the video in the Title field. Make sure to include #shorts to help YouTube understand that you are preparing a YouTube Shorts video. Next, tap UPLOAD from the upper-right corner of the screen to submit the video for review. Once YouTube reviews the recording and finds it appropriate, it will be published on the portal, and will be visible throughout and even under the Shorts category of the main page.
Part 3: How to Create a Vertical YouTube Shorts Video in Filmora?
The YouTube Shorts app is pretty convenient to access and use alright. However, it doesn’t allow you to fine edit the videos. The app doesn’t even have many filtering options such as Effects, Elements, etc. to make your videos more engaging.
With that said, you can always use an efficient third-party program like Wondershare Filmora to create professionally-looking YouTube Shorts videos to attract your viewers.
When talking about Wondershare Filmora, it is a production and post-production app available for both Windows and Mac computers, and gives tough competition to some of the globally accepted similar programs like Adobe Premiere Pro, Final Cut Pro X, etc. Furthermore, Filmora has its own built-in screen, webcam, and voice recording features that can be used to prepare interactive videos, game walkthroughs, and voiceovers as needed.
For Win 7 or later (64-bit)
Secure Download
For macOS 10.12 or later
Secure Download
The following step-by-step guide teaches you how to use Wondershare Filmora to create a vertical YouTube Shorts video:
Note: Before proceeding to the instructions, make sure that you have already recorded a vertical video using your cellphone, and that it has been transferred to your PC.
Step 1: Add the Video to Timeline
Launch Wondershare Filmora on your Windows or Mac PC (a Windows 10 computer is used here for demonstration), go to File > New Project, and click 9:16 (Portrait). Click anywhere inside the Media box, and select and import the source vertical video from your PC to Filmora.
Next, hover the mouse over the clip in the Media box, click the + button that appears at the bottom-right corner of the thumbnail, and in the resolution confirmation box that comes up next, click the button under the Match to Media section to add the video in the correct orientation to the Timeline at the bottom.
Step 2: Edit the Video
Select the clip in the Timeline, and use the Split, Crop, Speed, etc. buttons above the Timeline itself to remove the unwanted portions from the clip, manage its playback speed, and do other fine-tuning tasks.
You can even click the Edit button, and use the available editing features like Motion Tracking and Stabilization to add text or objects to a moving body in the video and stabilize the clip if the camera shook during the recording session respectively. Click OK to save the changes when done.
Note: To be able to remain compliant with the YouTube Shorts policies, make sure that the video length is no longer than 60 seconds.
Step 3: Beautify the Video
Click Titles from the standard toolbox at the top, choose your preferred text category from the list in the left, hover the mouse over a decent preset in the right window, and click the + button at the bottom-right corner of the thumbnail to add the preset on top of the media track in the Timeline. Next, you can double-click the preset track in the Timeline to modify the text and make granular modifications to it as needed. Click OK to save the changes.
Similarly, you can select the Effects and Elements tools to add effects and elements to the video as needed. To add background music, you can go to the Audio tool, and pick your preferred preset from the available options. A custom music can be added by going to the Media tool, and importing an audio file from your PC using the method explained in Step 1.
After this, optionally, you can go to Split Screen from the standard toolbar at the top, and use your preferred Split Screen preset to club multiple video clips into one screen. In Filmora, you can add as many as 6 screens in a video.
For Win 7 or later (64-bit)
Secure Download
For macOS 10.12 or later
Secure Download
Step 4: Render the Final Output
Once everything is set up, click EXPORT from the top of the window, go to the Local tab on the Export window, select MP4 from the formats list in the left, give a name and configure other settings from the available options in the right, and click EXPORT from the bottom-right corner to create a YouTube Shorts video. Once the clip is generated, you can upload the video to YouTube using #Shorts in the title or description to publish the video under the YouTube Shorts section.
FAQs About YouTube Shorts
- Where to download the YouTube Shorts app?
The YouTube Shorts app is already present in the YouTube app that your Android or iOS smartphone has. All you need to do to access it is, sign in to your Google account, tap the + button at the bottom, and tap Create a Short in the popup box that comes up.
- What if YouTube Shorts is not showing on my YouTube app?
Make sure that your YouTube app is updated to its latest version. If the app is already updated, and YouTube Shorts is still unavailable, the chances are that Google hasn’t rolled the app in your region. Since YouTube Shorts is still in its Beta phase, only the region of India can use all the functions of the app at the time of this writing. In such a case, you are suggested to wait until the YouTube Shorts app is made available for your location.
- What’s the YouTube Shorts video duration?
A YouTube Shorts video can be of only up to 60 seconds.
- What’s the YouTube Shorts size limitation?
YouTube hasn’t provided any information related to this as of now. However, you can rest assure that a 60 seconds long video file wouldn’t be too large for YouTube to handle.
- How many subs do you need to access Shorts?
YouTube Shorts is available for everyone regardless of the number of subscribers the channel has.
- Can you make money on Shorts?
Unfortunately, NO. Although you cannot monetize the recordings published as YouTube Shorts, they can be a good source to drive subscribers to your main YouTube channel that may have the videos that can be monetized.
Richard Bennett
Richard Bennett is a writer and a lover of all things video.
Follow @Richard Bennett
Emotionally-Enhanced YouTube Commentary
How to Add Emojis on YouTube Comments
Richard Bennett
Mar 27, 2024• Proven solutions
Emojis are a great way to make your videos and comments stand out from the rest. You may also be able to catch the attention of millennials and improve your YouTube and Google ranking. Beginners can use emojis as a great strategy to improve YouTube SEO performance and get ahead of others. Experts suggest using emojis wisely; that is not to overload or spam whole titles or comments with smileys!
Here are some great ways to add YouTube comments emojis:
Part 1: How to Type Emojis in a YouTube Comment on Windows
Here are several ways to type emojis in YouTube comments. Follow the instructions below to write YouTube comments with emojis:
1. Adding Emojis to YouTube Videos on Windows with Keyboard
If you are using Windows 10, then you can use the keyboard shortcut to open the emoji icons. Press Windows + ; (semi-colon) or Windows + . (period) to open the emoji keyboard. And you will see the emojis.
Currently, there are 6 types of emojis you can add on Windows, including smiley faces and animals, people, celebrities and objects, foods and plants, transportation and places, and symbols.
You can then click the emoji that you’d like to add to the YouTube video directly.
2. Copy and Paste Emojis from Websites
One of the easiest ways to add emojis to YouTube comments is to copy-paste them from an emoji database. You can right-click on the emoji and then select “copy.”
Now, go to your YouTube comment and right-click again. Scroll down and click on “paste” to use the emoji.
Here are some of the best websites to download emojis that you may need. In these websites, you can get a range of smileys and icons to use for your YouTube comments. You can start with smiley faces that help you express many emotions. Then you can get emojis of objects like cars, mountains, drinks, fruits, bells, guitars, and more.
The list is just endless, and you will never face any shortage of emojis.
Part 2: How to Add Emojis to YouTube Comments on Mac?
Mac users enjoy a wide selection of emojis without any hassles and can easily add emojis to comments they type on YouTube. Just follow the steps below to add emoji to YouTube comments.
You can select any emoji from the emoji resources website and ctrl-click your mouse to copy it. Now, navigate to your YouTube comment and ctrl-click your mouse. Click on “paste” to add the smiley to your comments.
If you want to use your keyboard, select the emoji and press “Command” and “C.” Now, press “Command” and “V” to paste the emoji in your YouTube comment.
Your emoji is now added to your YouTube comments.
You can also use your Mac’s inbuilt emojis in your YouTube comments. Start typing your YouTube comment and then use your keyboard shortcut Command + Control + Space to access the emoji list.
You can now double-click on any emoji to include it in your comment. The free emoji lists are full of smileys, animal faces, everyday objects and things, sports emojis, vehicles, and more. and more. You will find an emoji to suit every comment you type on YouTube.
If your Mac has a Touch Bar, then you can tap the smile face and then tap an emoji to add to YouTube video comments.
YouTuber Javier Mercedes has made a quick tutorial and introduced many more ways to typing emojis on Mac. Check it below and find the best way based on your preferences.
Part 3: How to Add Emoji to YouTube Comments with TubeBuddy?
TubeBuddy is a suite of tools for YouTubers to grow their success. You can access a range of tools, including YouTube comments emojis to improve your visual appeal. It is a free browser extension that you can add to Chrome, Opera, Firefox, and more.
TubeBuddy provides a large collection of emojis and smileys for you to use in your YouTube comments. Additionally, you don’t need to copy-paste anything. The plugin lets you insert emojis from a list with a click. Here are the steps to add emojis to YouTube comments using TubeBuddy:
Step 1: Install TubeBuddy
Visit the TubeBuddy website and install the plugin for your browser. TubeBuddy is available on both Chrome, FireFox, Opera, and Edge, as well as iOS and Android devices.
Step 2: Sign in to YouTube
Sign in to your YouTube account to allow TubeBuddy access to your comments. You will find the TubeBuddy icon beside the YouTube search bar on your browser.
Step 3: Add Emojis at Commenting
A window with a list of emojis will appear on YouTube as you type your comments. You can select any emoji and add it to your comments.
Types of Emojis in TubeBuddy
TubeBuddy is home to a large collection of emojis. You won’t find many emojis anywhere else on the internet. All emojis are grouped under categories like smileys, places, food and drinks, buildings, and more.
You can quickly select a category and then add emoji to YouTube comments. The tool also adds new emojis daily.
Bonus: How to Add Emojis to YouTube Video Title and Description?
You can add cool emojis to your video titles and descriptions for more innovation. People will also be more likely to choose your video as they pop-out on the search results or playlists.
Here is how you can add emojis to YouTube video titles and descriptions:
You can access any list of YouTube comments emojis and select the one you like. Then use your mouse to copy the emoji and paste it into your YouTube titles and description. Or press “Ctrl” + “C” for Windows and “Command” + “C” for Mac to copy your emoji.
Now go to your title or description and press “Ctrl” + “V” for Windows and “Command” + “V” for Mac to paste the emoji.
FAQs about YouTube Video Comments
- Are Emojis Harmful to Use for YouTube?
We all have heard rumors of using emojis in YouTube video titles or comments may damage views or reputation. However, it’s not true, and emojis have no negative consequences on YouTube.
Rather, you can attract more viewers and even improve YouTube SEO by using emojis. Google also allows emojis in search results, and data shows they rank better. You can use emojis for YouTube with complete peace of mind.
In my opinion, there will be no harmful effects on your views, subscribers, or credibility. Instead, you may be able to appeal to a younger crowd and get more clicks.
- Will adding Emojis Impact YouTube SEO?
Many people don’t use emojis in their YouTube videos, fearing a negative impact. But all the rumors out there are just rumors without any truth. YouTube doesn’t penalize you in any way if you use emojis in comments, titles, or descriptions. You will not experience any penal actions by including emojis on YouTube.
Google is also friendly with emojis, and many websites use them to stand apart from the crowd. Using emojis on YouTube can be an excellent way to improve your SEO performance. Your videos will also have a chance to show up on Google results and YouTube. Emojis also help your videos look innovative to draw in more views.
Final Thoughts
Using emojis in YouTube comments is a great way to boost the popularity of your videos. You can also use emojis in your video titles and descriptions to appear more innovative. Additionally, emojis can improve your YouTube SEO performance and even help you rank on Google search results.
Copy-pasting emojis is a simple way to use them, but you can also go for other methods. TubeBuddy is a great choice if you want to eliminate the whole copy-paste scenario and include more types of emojis in your comments directly.
Richard Bennett
Richard Bennett is a writer and a lover of all things video.
Follow @Richard Bennett
Richard Bennett
Mar 27, 2024• Proven solutions
Emojis are a great way to make your videos and comments stand out from the rest. You may also be able to catch the attention of millennials and improve your YouTube and Google ranking. Beginners can use emojis as a great strategy to improve YouTube SEO performance and get ahead of others. Experts suggest using emojis wisely; that is not to overload or spam whole titles or comments with smileys!
Here are some great ways to add YouTube comments emojis:
Part 1: How to Type Emojis in a YouTube Comment on Windows
Here are several ways to type emojis in YouTube comments. Follow the instructions below to write YouTube comments with emojis:
1. Adding Emojis to YouTube Videos on Windows with Keyboard
If you are using Windows 10, then you can use the keyboard shortcut to open the emoji icons. Press Windows + ; (semi-colon) or Windows + . (period) to open the emoji keyboard. And you will see the emojis.
Currently, there are 6 types of emojis you can add on Windows, including smiley faces and animals, people, celebrities and objects, foods and plants, transportation and places, and symbols.
You can then click the emoji that you’d like to add to the YouTube video directly.
2. Copy and Paste Emojis from Websites
One of the easiest ways to add emojis to YouTube comments is to copy-paste them from an emoji database. You can right-click on the emoji and then select “copy.”
Now, go to your YouTube comment and right-click again. Scroll down and click on “paste” to use the emoji.
Here are some of the best websites to download emojis that you may need. In these websites, you can get a range of smileys and icons to use for your YouTube comments. You can start with smiley faces that help you express many emotions. Then you can get emojis of objects like cars, mountains, drinks, fruits, bells, guitars, and more.
The list is just endless, and you will never face any shortage of emojis.
Part 2: How to Add Emojis to YouTube Comments on Mac?
Mac users enjoy a wide selection of emojis without any hassles and can easily add emojis to comments they type on YouTube. Just follow the steps below to add emoji to YouTube comments.
You can select any emoji from the emoji resources website and ctrl-click your mouse to copy it. Now, navigate to your YouTube comment and ctrl-click your mouse. Click on “paste” to add the smiley to your comments.
If you want to use your keyboard, select the emoji and press “Command” and “C.” Now, press “Command” and “V” to paste the emoji in your YouTube comment.
Your emoji is now added to your YouTube comments.
You can also use your Mac’s inbuilt emojis in your YouTube comments. Start typing your YouTube comment and then use your keyboard shortcut Command + Control + Space to access the emoji list.
You can now double-click on any emoji to include it in your comment. The free emoji lists are full of smileys, animal faces, everyday objects and things, sports emojis, vehicles, and more. and more. You will find an emoji to suit every comment you type on YouTube.
If your Mac has a Touch Bar, then you can tap the smile face and then tap an emoji to add to YouTube video comments.
YouTuber Javier Mercedes has made a quick tutorial and introduced many more ways to typing emojis on Mac. Check it below and find the best way based on your preferences.
Part 3: How to Add Emoji to YouTube Comments with TubeBuddy?
TubeBuddy is a suite of tools for YouTubers to grow their success. You can access a range of tools, including YouTube comments emojis to improve your visual appeal. It is a free browser extension that you can add to Chrome, Opera, Firefox, and more.
TubeBuddy provides a large collection of emojis and smileys for you to use in your YouTube comments. Additionally, you don’t need to copy-paste anything. The plugin lets you insert emojis from a list with a click. Here are the steps to add emojis to YouTube comments using TubeBuddy:
Step 1: Install TubeBuddy
Visit the TubeBuddy website and install the plugin for your browser. TubeBuddy is available on both Chrome, FireFox, Opera, and Edge, as well as iOS and Android devices.
Step 2: Sign in to YouTube
Sign in to your YouTube account to allow TubeBuddy access to your comments. You will find the TubeBuddy icon beside the YouTube search bar on your browser.
Step 3: Add Emojis at Commenting
A window with a list of emojis will appear on YouTube as you type your comments. You can select any emoji and add it to your comments.
Types of Emojis in TubeBuddy
TubeBuddy is home to a large collection of emojis. You won’t find many emojis anywhere else on the internet. All emojis are grouped under categories like smileys, places, food and drinks, buildings, and more.
You can quickly select a category and then add emoji to YouTube comments. The tool also adds new emojis daily.
Bonus: How to Add Emojis to YouTube Video Title and Description?
You can add cool emojis to your video titles and descriptions for more innovation. People will also be more likely to choose your video as they pop-out on the search results or playlists.
Here is how you can add emojis to YouTube video titles and descriptions:
You can access any list of YouTube comments emojis and select the one you like. Then use your mouse to copy the emoji and paste it into your YouTube titles and description. Or press “Ctrl” + “C” for Windows and “Command” + “C” for Mac to copy your emoji.
Now go to your title or description and press “Ctrl” + “V” for Windows and “Command” + “V” for Mac to paste the emoji.
FAQs about YouTube Video Comments
- Are Emojis Harmful to Use for YouTube?
We all have heard rumors of using emojis in YouTube video titles or comments may damage views or reputation. However, it’s not true, and emojis have no negative consequences on YouTube.
Rather, you can attract more viewers and even improve YouTube SEO by using emojis. Google also allows emojis in search results, and data shows they rank better. You can use emojis for YouTube with complete peace of mind.
In my opinion, there will be no harmful effects on your views, subscribers, or credibility. Instead, you may be able to appeal to a younger crowd and get more clicks.
- Will adding Emojis Impact YouTube SEO?
Many people don’t use emojis in their YouTube videos, fearing a negative impact. But all the rumors out there are just rumors without any truth. YouTube doesn’t penalize you in any way if you use emojis in comments, titles, or descriptions. You will not experience any penal actions by including emojis on YouTube.
Google is also friendly with emojis, and many websites use them to stand apart from the crowd. Using emojis on YouTube can be an excellent way to improve your SEO performance. Your videos will also have a chance to show up on Google results and YouTube. Emojis also help your videos look innovative to draw in more views.
Final Thoughts
Using emojis in YouTube comments is a great way to boost the popularity of your videos. You can also use emojis in your video titles and descriptions to appear more innovative. Additionally, emojis can improve your YouTube SEO performance and even help you rank on Google search results.
Copy-pasting emojis is a simple way to use them, but you can also go for other methods. TubeBuddy is a great choice if you want to eliminate the whole copy-paste scenario and include more types of emojis in your comments directly.
Richard Bennett
Richard Bennett is a writer and a lover of all things video.
Follow @Richard Bennett
Also read:
- [Updated] 1-5 Best URL Trimmer Tools for YouTube Videos
- Best Mic Matches for Video Editors for 2024
- Essential Guide for Prime Webcams in YouTube Live Broadcasts for 2024
- In 2024, Craft Stellar YouTube Thumbnails with These 8 Software Alternatives
- 2024 Approved How to Edit Videos for YouTube on PC
- Elevate Your Videography - 7 Free Sound Effects Collection for 2024
- [New] Amplify Your Online Influence with These Best 5 YouTube Marketing Techniques
- 10 Expert Suggestions to Make Your YT Shorts Stand Out
- 2024 Approved Digital Design Trends to Avoid in Your YouTube Banners
- Curating Creator Rewards on Video Platforms for 2024
- Binge-Worthy Content Crafting Episodes That Viewers Love
- 2024 Approved Curated Cinematic Journeys The Best YT Film Selections
- 2024 Approved Dish to Screen Your Recipe Video Blueprint
- [New] Balancing Creativity and Logic in Gaming Videos
- In 2024, Everlasting Deactivation Tactics Against YouTube's Sneaky Snack
- [New] 8 Essential Tools for Your YouTube-to-AVI Needs
- Enhance Your YouTube Presence with These Top 10 Editors
- Calculating Earnings Ad Revenues in the World of YouTube?
- [Updated] Decoding YouTube Premium Complete Information Inside
- [New] Dish on Titles Crafting Captivating Cookery Channel Names
- Streaming Success Updated YouTube Revenue Policies
- Gamers’ Sound Selection Top 5 Noise-Canceling Earbuds
- Charting Success with YouTube Income Streams
- Tap Into Endless Creativity – Our Compilation of over 50 FREE Advertising Masterpieces
- Dissecting the Financial Strategy of T-Series in Video Platforms
- Decoding Shorts Into Professional-Grade MP4 Videos for 2024
- Cutting-Edge Editing Meets Online Video Sharing
- 2024 Approved Demystifying YouTube Premium Membership Benefits
- In 2024, Cultivate 1,000 Fanbase Followers Quickly
- 2024 Approved Elevate Your Video Profiles Using Smart Templates
- Enhancing Online Privacy YouTube's Access Controls
- Does Buying YouTube Likes Help Boost Your Channel?
- How To Transfer WhatsApp From iPhone 12 Pro Max to other iPhone 13 Pro devices? | Dr.fone
- [New] 2024 Approved Pixel Perfect Playback Fixing Blurry Videos on Smartphones
- In 2024, How to Crop a Video in Windows Media Player
- [Updated] 2024 Approved Top 15 Apps for High-Quality Windows Video Capture
- In 2024, From Zero to Zoom Expert Launching Successful Webinars
- In 2024, Top Tweet Talent Social Media’s 10 Gems
- Simple ways to get lost files back from Honor Magic 6
- Updated In 2024, Free Video Compression Made Easy 10 Best Online Tools
- Best Low-End Screen Recorder Options Summarized for 2024
- Best Android Data Recovery - undelete lost call logs from Motorola Edge 2023
- Title: Perfecting the Craft of YouTube Short Video Making
- Author: Steven
- Created at : 2024-05-25 20:17:42
- Updated at : 2024-05-26 20:17:42
- Link: https://youtube-clips.techidaily.com/perfecting-the-craft-of-youtube-short-video-making/
- License: This work is licensed under CC BY-NC-SA 4.0.
