
"Optimize Engagement & Analytics - Harnessing TubeBuddy's Insights"
Optimize Engagement & Analytics - Harnessing TubeBuddy’s Insights
The Benefits of TubeBuddy | Manage Your YouTube Channel More Easily

Richard Bennett
Nov 01, 2022• Proven solutions
TubeBuddy is a YouTube certified extension for your Google Chrome browser. When you visit YouTube after installing TubeBuddy a whole new set of useful tools becomes available.
TubeBuddy’s tools were designed to save you time and effort when performing some of the more mundane tasks involved in running a YouTube channel, like adding cards. Many of TubeBuddy’s tools are completely free to use, but others might require a paid license. There are three levels of licensing: $9, $19, or $39 per month.
The Benefits of Using TubeBuddy for YouTube
- Increased Productivity
- Bulk Tools for Annotations, Cards, Thumbnails and More
- Quick Optimization for Your Video’s Tags
- Useful Data
Benefits of TubeBuddy
YouTubers who use TubeBuddy are able to spend less time on busy-work and more time on coming up with creative video ideas. Here are some of the ways TubeBuddy can help you, especially if you have a large or mid-sized channel:
1. Increased Productivity
Most of TubeBuddy’s Productivity Tools are available for free, but some require a $9 per month Pro license.
You can use these tools to get your videos ready for posting faster, embed them off-YouTube more easily, and save time by creating canned responses or templates for cards and annotations.
For example, you might find yourself creating the same YouTube Card over and over again to include it in every video you make. Creating a template through TubeBuddy will save you this effort.
Another great productivity tool is the Video Topic Planner. You can save video ideas you come up with, or ideas viewers have suggested to you, and arrange them in a queue so you never forget what you are planning to make next.
2. Bulk Tools for Annotations, Cards, Thumbnails and More
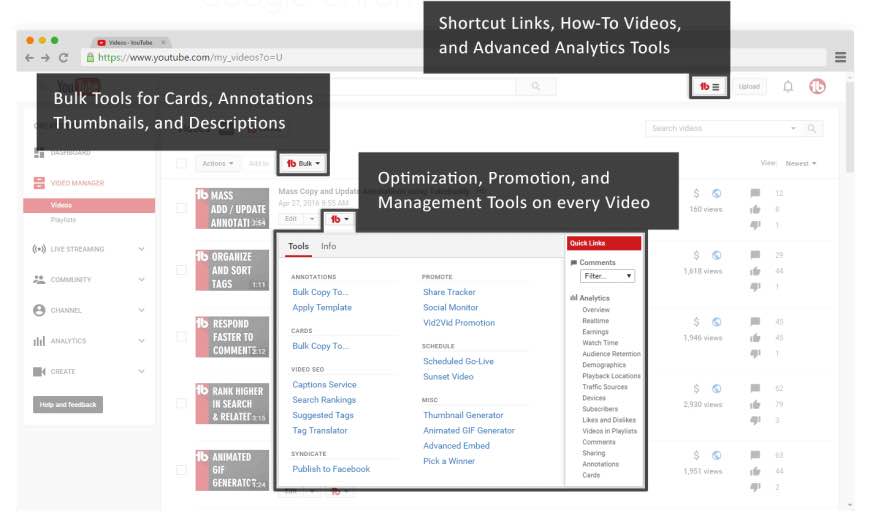
Most of TubeBuddy’s bulk processing tools require a $19 per month Star license.
Two of the most time-saving tools in this section are the Bulk Copy tools for cards and annotations. They will save you from having to recreate the same ones over and over. Then, using the Bulk Update tools, you will be able to make changes to all of your cards or annotations at once.
For example: if you use a YouTube Card to link to your personal website and include it in every video, and then you change your website, you change the link in all of your existing cards at once.
Another useful Bulk tool is Bulk Thumbnail Overlays, which will allow you to add a logo to all of your existing video thumbnails at once.
3. Quick Optimization for Your Video’s Tags
The SEO Tools in TubeBuddy will help you find the best tags for your videos and suggest tags you might want to target. Many of these tools are free, but others require a $19 Star license.
One of the best free tools in this category is View and Copy Video Tags. It allows you to see and copy the tags of other people’s videos. You will be able to see which keywords your competitors are targeting (and look for opportunities to target them more effectively). This can also save you a lot of time writing out tags that should really be the same as the ones on an existing video.
4. Useful Data
The most useful piece of data under Data and Research Tools is the Best Time to Publish. How many views you get on a video could vary greatly depending on when you post, and the best times to post vary depending on the demographics of your audience. This free tool from TubeBuddy will show you when you should be uploading.
Another interesting tool, which is unfortunately only available with $39 licenses, is the Competitor Scoreboard. It allows creators to compare their channels stats to those of their rival channels.
Have you ever tried TubeBuddy for YouTube?
Richard Bennett
Richard Bennett is a writer and a lover of all things video.
Follow @Richard Bennett
Richard Bennett
Nov 01, 2022• Proven solutions
TubeBuddy is a YouTube certified extension for your Google Chrome browser. When you visit YouTube after installing TubeBuddy a whole new set of useful tools becomes available.
TubeBuddy’s tools were designed to save you time and effort when performing some of the more mundane tasks involved in running a YouTube channel, like adding cards. Many of TubeBuddy’s tools are completely free to use, but others might require a paid license. There are three levels of licensing: $9, $19, or $39 per month.
The Benefits of Using TubeBuddy for YouTube
- Increased Productivity
- Bulk Tools for Annotations, Cards, Thumbnails and More
- Quick Optimization for Your Video’s Tags
- Useful Data
Benefits of TubeBuddy
YouTubers who use TubeBuddy are able to spend less time on busy-work and more time on coming up with creative video ideas. Here are some of the ways TubeBuddy can help you, especially if you have a large or mid-sized channel:
1. Increased Productivity
Most of TubeBuddy’s Productivity Tools are available for free, but some require a $9 per month Pro license.
You can use these tools to get your videos ready for posting faster, embed them off-YouTube more easily, and save time by creating canned responses or templates for cards and annotations.
For example, you might find yourself creating the same YouTube Card over and over again to include it in every video you make. Creating a template through TubeBuddy will save you this effort.
Another great productivity tool is the Video Topic Planner. You can save video ideas you come up with, or ideas viewers have suggested to you, and arrange them in a queue so you never forget what you are planning to make next.
2. Bulk Tools for Annotations, Cards, Thumbnails and More
Most of TubeBuddy’s bulk processing tools require a $19 per month Star license.
Two of the most time-saving tools in this section are the Bulk Copy tools for cards and annotations. They will save you from having to recreate the same ones over and over. Then, using the Bulk Update tools, you will be able to make changes to all of your cards or annotations at once.
For example: if you use a YouTube Card to link to your personal website and include it in every video, and then you change your website, you change the link in all of your existing cards at once.
Another useful Bulk tool is Bulk Thumbnail Overlays, which will allow you to add a logo to all of your existing video thumbnails at once.
3. Quick Optimization for Your Video’s Tags
The SEO Tools in TubeBuddy will help you find the best tags for your videos and suggest tags you might want to target. Many of these tools are free, but others require a $19 Star license.
One of the best free tools in this category is View and Copy Video Tags. It allows you to see and copy the tags of other people’s videos. You will be able to see which keywords your competitors are targeting (and look for opportunities to target them more effectively). This can also save you a lot of time writing out tags that should really be the same as the ones on an existing video.
4. Useful Data
The most useful piece of data under Data and Research Tools is the Best Time to Publish. How many views you get on a video could vary greatly depending on when you post, and the best times to post vary depending on the demographics of your audience. This free tool from TubeBuddy will show you when you should be uploading.
Another interesting tool, which is unfortunately only available with $39 licenses, is the Competitor Scoreboard. It allows creators to compare their channels stats to those of their rival channels.
Have you ever tried TubeBuddy for YouTube?
Richard Bennett
Richard Bennett is a writer and a lover of all things video.
Follow @Richard Bennett
The Future of Development: Understanding the Impact of Next-Gen Frameworks
How to Edit YouTube Videos in Final Cut Pro
Richard Bennett
Mar 27, 2024• Proven solutions
With its user friendly interface and versatile features, Fincal Cut Pro is definitely one of the best choices for making videos for Mac users. Using it isn’t that hard, but it’s definitely not a walk in the park, so we’ve taken the liberty to provide you with a comprehensive yet concise guide on how to edit YouTube videos with Final Cut Pro.
Even though FCP is good software, there’s no denying that it’s pretty pricy and a little bit complicated for most beginners. Wondershare Filmora for Mac is definitely better alternatives for Final Cut Pro. It’s a lot more user-friendly and requires no previous experience in video editing. With Wondershare Filmora, you can ignite your YouTube videos with over 300 effects like Fashion, Beauty, Block Buster, Travel, etc.


How to Edit YouTube Videos in Final Cut Pro
In this section, we are going to take a quick look at the steps that you need to take in order to properly edit YouTube videos in Final Cut Pro. Without any further ado, let’s take a look.
Step 1: Importing the video clip into FCP
This is, of course, the first thing that you need to do. Regardless of whether the original footage was taken by your smart phone, taken from the Internet or you’ve left it over from some past event that’s long overdue, you can easily import it into the FCP in order to edit it. FCP supports a variety of different formats, so it’s a good idea to try and import the video even if you are not quite sure about its extension. In order to do so, open the program, go to the File button, click on Import and select the file or the folder. This is going to get you to a regular finder window which would enable you to pick the clip that you want to do. If it’s not highlighted or you aren’t able to select it, the software doesn’t support it, and it’s not compatible.

Keep in mind that if you want to import videos which have been published already, you can download them directly from the channel as MP4 files. If you want to store videos from different channels, you can use the Wondershare Video Converter Ultimate in order to get them converted and stored on your computer in a format that is supported by FCP.
Step 2: Edit YouTube Videos in Final Cut Pro
That’s the fun part. There are a few things that you can do with Final Cut Pro, and they are all quite professional.
- First, you can sync an audio track with your video as the DSLR cameras usually have terrible quality of the sound. This is why you want to get the audio recorded separately. The only thing you need to do is select the audio clip and click on the Synchronize Clips, and you are good to go.

- Furthermore, you can do proper color balancing with the program quickly and incredibly easy. Go on Modify and then click on Balance Color and the software is going to take care of the rest on its own.

- You can also create previews when the video ends. In order to do so, you need to import your main clip, select a solid background color and place the preview video above it. You will then be able to trim and edit it conveniently. Adjust the scale and the position and you are good to go. Afterwards, you can also apply annotation on top of the preview.
Step 3: Upload to YouTube from the software directly

This one is rather easy. Here is the sequence that you need to do. Go to File -> Share -> Master File -> Setting -> File -> Share -> YouTube. That’s basically it. Then you need to sign in to your YouTube account and simply click on Next -> Publish and the entire thing is done. That’s all you need to do in order to quickly and conveniently upload your video to YouTube directly from the FCP.
Check this video tutorial to see how YouTube creators edit their YouTubes videos with Final Cut Pro
Richard Bennett
Richard Bennett is a writer and a lover of all things video.
Follow @Richard Bennett
Richard Bennett
Mar 27, 2024• Proven solutions
With its user friendly interface and versatile features, Fincal Cut Pro is definitely one of the best choices for making videos for Mac users. Using it isn’t that hard, but it’s definitely not a walk in the park, so we’ve taken the liberty to provide you with a comprehensive yet concise guide on how to edit YouTube videos with Final Cut Pro.
Even though FCP is good software, there’s no denying that it’s pretty pricy and a little bit complicated for most beginners. Wondershare Filmora for Mac is definitely better alternatives for Final Cut Pro. It’s a lot more user-friendly and requires no previous experience in video editing. With Wondershare Filmora, you can ignite your YouTube videos with over 300 effects like Fashion, Beauty, Block Buster, Travel, etc.
How to Edit YouTube Videos in Final Cut Pro
In this section, we are going to take a quick look at the steps that you need to take in order to properly edit YouTube videos in Final Cut Pro. Without any further ado, let’s take a look.
Step 1: Importing the video clip into FCP
This is, of course, the first thing that you need to do. Regardless of whether the original footage was taken by your smart phone, taken from the Internet or you’ve left it over from some past event that’s long overdue, you can easily import it into the FCP in order to edit it. FCP supports a variety of different formats, so it’s a good idea to try and import the video even if you are not quite sure about its extension. In order to do so, open the program, go to the File button, click on Import and select the file or the folder. This is going to get you to a regular finder window which would enable you to pick the clip that you want to do. If it’s not highlighted or you aren’t able to select it, the software doesn’t support it, and it’s not compatible.
Keep in mind that if you want to import videos which have been published already, you can download them directly from the channel as MP4 files. If you want to store videos from different channels, you can use the Wondershare Video Converter Ultimate in order to get them converted and stored on your computer in a format that is supported by FCP.
Step 2: Edit YouTube Videos in Final Cut Pro
That’s the fun part. There are a few things that you can do with Final Cut Pro, and they are all quite professional.
- First, you can sync an audio track with your video as the DSLR cameras usually have terrible quality of the sound. This is why you want to get the audio recorded separately. The only thing you need to do is select the audio clip and click on the Synchronize Clips, and you are good to go.
- Furthermore, you can do proper color balancing with the program quickly and incredibly easy. Go on Modify and then click on Balance Color and the software is going to take care of the rest on its own.
- You can also create previews when the video ends. In order to do so, you need to import your main clip, select a solid background color and place the preview video above it. You will then be able to trim and edit it conveniently. Adjust the scale and the position and you are good to go. Afterwards, you can also apply annotation on top of the preview.
Step 3: Upload to YouTube from the software directly
This one is rather easy. Here is the sequence that you need to do. Go to File -> Share -> Master File -> Setting -> File -> Share -> YouTube. That’s basically it. Then you need to sign in to your YouTube account and simply click on Next -> Publish and the entire thing is done. That’s all you need to do in order to quickly and conveniently upload your video to YouTube directly from the FCP.
Check this video tutorial to see how YouTube creators edit their YouTubes videos with Final Cut Pro
Richard Bennett
Richard Bennett is a writer and a lover of all things video.
Follow @Richard Bennett
Also read:
- [New] Acoustic Mastery Secrets for Exceptional Audio Capture
- [New] Earning Potential in Gaming Videos
- [New] Empowering Users to Tackle Instagram Video Snags
- [New] In 2024, How to Produce Compelling Haul Content on a Budget
- [New] In 2024, Revolutionary Chromatic Shots with UHD Blade Tech
- [Updated] Eliminating Robotic Ratings to Grow Views
- A Step-by-Step Guide to Autoplaying Youtube in Facebook Groups and Pages
- Apple's Vision Unveiled: Introducing Your New Household Robot Assistant
- Cutting Edge Professional Guide to YouTube Editing for 2024
- Minecraft Logo Designs for YouTube Channels
- The Art of Mac-Mixer Synchronization for 2024
- Updated 2024 Approved Best Free Video Cutters and Joiners for Beginners
- WEB용 NEF 페이로드를 자유성 JPEG으로 바꾸기 - Movavi의 단계별 가이드
- Title: Optimize Engagement & Analytics - Harnessing TubeBuddy's Insights
- Author: Steven
- Created at : 2024-12-12 16:22:07
- Updated at : 2024-12-16 17:27:14
- Link: https://youtube-clips.techidaily.com/optimize-engagement-and-analytics-harnessing-tubebuddys-insights/
- License: This work is licensed under CC BY-NC-SA 4.0.