
:max_bytes(150000):strip_icc()/best-instagram-captions-4171697-ae21b04e6866470c80a50c9bef1cc26e.png)
"Next-Level Shooting Lens Selections for Online Creators"
Next-Level Shooting: Lens Selections for Online Creators
Best Camera Lenses for YouTube

Richard Bennett
Mar 27, 2024• Proven solutions
A DSLR is the ideal camera for some vlogs, and using a DSLR means you get to customize the look of your vlog by choosing the perfect lens. Choosing the best camera lens for your YouTube channel can be tricky because there are so many options. This article will walk you through some of them, and make two recommendations of great vlogging lenses. If you already have a good understanding of how camera lenses work then feel free to scroll down to the lens recs.
Part 1. Understanding Lenses: Zoom lens, Fixed lens, aperture, f-stop
There are two main categories of camera lenses: ‘zoom’ – lenses that allow you to zoom in and out – and ‘fixed’. If your lenses are tools then zoom lenses are Swiss army knives; they are very versatile. Fixed lenses, also called prime lenses, have more specific purposes. Do you need a tool that can do a lot of things, or a tool that is perfect for one specific job? Sometimes it is useful to have access to both.
We have explained the differences between Fixed lens and Zoom lens and advantages of using each lens, check this article: Zoom Lens vs. Fixed Lenses: Which one is best for YouTuber? for the detailed information.
Before we get into the recommendations here is a little background information on lenses in general:
Beginner’s Guide to Aperture and F-Stops
In order to be able to select the lens you’ll be using to record your YouTube videos, you first need to understand a few very basic concepts, such as aperture or f-stops.
1.What is a lens’s aperture?
The aperture of your lens is the hole through which light reaches your camera’s sensor, or the film if you are using a film camera. The wider your aperture is the more light you are letting into your camera. In low light it is better to have a wide aperture, and when you are working with a lot of light it is better to have a narrow aperture so your footage is not overexposed.
Aperture is simply an opening in the lens that lets the light through. If you want to increase the amount of the light that is reaching the camera’s sensor you need to open up the aperture blades that are located in the lens. The f-values like f/1.2 or f/1.8 indicate that the aperture is wide open and that the camera is receiving the maximum amount of light a lens you’re using can provide.
2.What is an ‘f-stop’?
Light passes through your lens’s aperture on its way to your camera’s sensor, and the f-stop of your lens relates to the amount of light it lets in. The lower your f-stop, the wider your aperture, and the more light you are letting into your camera. The more light you let into your camera the easier it is to achieve a blurred background. A lot of vloggers love blurring their backgrounds because it is a quick way to disguising the rooms they are shooting in.
F-stops are written like ‘f/1.8’ or ‘f/4’ on your lens. For more information on f-stops and blurring your background read “The Best Bokeh Lens - How to Get the Blurred Background for YouTube Videos” and watch Tasha’s video.
F-stops or f-numbers indicate how open the aperture is, so for example if your camera is displaying f/32 value it means that your camera is letting very little light to get through to the camera’s sensor. The f-number depends on a few other parameters such as shutter speed, exposure or ISO values. Large apertures provide a shallow depth of field which creates a smooth and artistic background blur, while a small aperture enables you to keep both the background and the foreground of your shot in focus.
Part 2: Types of Camera Lenses
The visual aspect of a video may not be the only thing you’ll have to dedicate special attention to while recording your YouTube video, but it is surely one of the most important factors of the video production process. A lens you are using will largely contribute to the aesthetics of the video. That’s why you need to know which type of lens will deliver the best results when shooting different types of scenes. Here are some of the most common types of lenses you’ll encounter.
Standard lenses
These lenses are featured in almost all camera kits, so the chances are that if you have a DSLR camera you already have a standard, mid-range lens. These lenses commonly have a fixed 50mm focal length, although zoom lenses with focal lengths in the range between 35mm and 75mm are also considered standard. You can use them to capture medium shots, single or multiple figure shots, and in some cases establishing shots, because they offer enough versatility to cover a multitude of different scenes. Standard lenses often have large apertures, which makes them quite useful if you often shoot videos under light conditions you can’t control.
Macro lenses
Details, product shots or any other subject that can be filmed from close proximity looks better if they are recorded with macro lenses. The high contrast and sharpness these lenses provide allow you to create stunning close-ups of all hosts, guests or actors in your YouTube videos. What’s more, if you are presenting a new product to your audience you can use the macro lens to make some captivating shots that will attract more audience. Zoom lenses can also be used for macro photography and video, although prime macro lenses produce better results.
Telephoto lenses
The subjects of your videos don’t always have to be in your immediate surroundings, because telephoto lenses let you capture scenes that are several miles away from you. Wildlife or sports videographers frequently use telephoto lenses because they don’t have another way of getting close to their subjects. However, telephoto lenses with 70-300mm focal length can also be used to take stunning portraits or close up shots. The biggest downside of telephoto lenses is their weight because the lenses with higher focal lengths can weigh up to 10lbs, which makes them a bit inconvenient to always carry with you.
Wide-angle lenses
Recording videos of vast open spaces, breathtaking vistas or beautiful city views is much easier if you have a wide-angle lens. The short focal length allows the lens to have a wider field of view which covers more space than standard or telephoto lenses. Wide-angle lenses also have lower apertures than lenses with longer focal lengths which results in images that have a shallow depth of field. Ultra-wide lenses like fisheye distort the view so the videos recorded with these lenses often suffer from the lack of realism.
Specialist lenses
YouTubers who are working on demanding projects can try to solve their troubles by using a specialist lens. Soft-focus lenses can help you take better portraits while tilt-shift lenses allow you to control the perspective. However, it is hard to imagine a scenario in which you’ll need a specialist lense if you are just starting out since even experienced videographers only use special lenses when they have absolutely no better way to record a scene.
Part 3: Recommended Best Camera Lenses for Shooting YouTube Videos
Here are a couple great lenses that might be good fits for you and your YouTube channel. The thing that makes them both ideal for vlogging is that they have low enough f-stops to blur out your background.
| Camera Lens | Type | Price | Aperture | Focal Length |
|---|---|---|---|---|
| Canon EF-S 10-18mm f/4.5-5.6 IS STM Lens | Wide angle | $279 | f/4.5-5.6 | 10 -18mm |
| Rokinon 8mm f/3.5 | Fisheye | $249 | f/3.5 | 8mm |
| Canon 50mm f/1.8 STM Lens | Prime | $125 | f/1.8 | 50mm |
| Canon EF 135mm f/2L USM Lens | Telephoto | $999 | f/2 | 135mm |
| Tamron SP AF 17-50mm f/2.8 | Standard Zoom | $299 | f/2.8 | 17 -50mm |
| Sony 30mm f/3.5 Macro | Macro | $278 | f/3.5 | 30mm |
1.Canon EF-S 10-18mm f/4.5-5.6 IS STM Lens
Canon released this lens in 2014 and shortly after it has gained the reputation of one of the most reliable wide to ultra-wide lenses for Canon cameras. Like most STM lenses, it offers incredibly fast autofocus technology that makes it a great choice for fast-paced action videos. The lens is equipped with an image stabilization system which guarantees that your videos are going to remain sharp even if the camera wasn’t perfectly still while you were recording. Somewhat smaller aperture range makes this lens poor choice for low light scenes, although you can get decent results if you manage to keep the camera still.
2. Rokinon 8mm Ultra Wide f/3.5 Fisheye Lens
Outdoor videos look much cooler when they are recorded with a wide-angle lens because the wider field of view enables you to capture more space in a shot. Fisheye lenses were made popular by GoPro cameras because they make the videos look more fun while producing high image quality. Rokinon 8mm lens allows you to adjust focus and aperture manually so you can fine-tune your shot before hitting the record button. To make things even better this model is compatible with a wide range of cameras including Pentax, Canon or Nikon DSLRs. It has a relatively fast aperture that enables it to deliver solid performances under low light conditions.
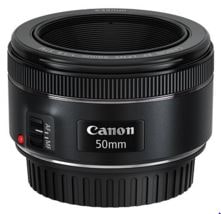
3.Canon EF 50mm f/1.8 STM Lens
The EF 50mm is a fixed lens with an f-stop of 1.8, which means it is great for blurring your background and performs well even in poorer lighting conditions. This is a really great lens for an opinion or beauty vlog, where you do not need to move around. You can stay put right where the focus is sharpest and stand out by blurring everything behind you. If you tend to reuse the same sets then you do not really need a zoom feature. If your shooting conditions rarely change then it is just as easy to use a reliable fixed lens like the EF 50mm since you will not need to be rethinking your set up and adjusting.
If you are looking for an inexpensive prime lens that lets you create sharp videos with shallow depth of field, you should look no further. This model is one of three Canon’s 50mm prime lenses, although the 50mm f/1.4 USM and 50mm f/1.2 ‘L’ USM models are much more expensive. You can use it to record a lot of different types of YouTube videos, like product reviews or makeup tutorials. The 50 mm f/1.8 STM lens doesn’t have image stabilization technology so you should try to be as still as you can possibly be when shooting handheld videos in order to avoid recording footage that has a lot of camera shakes.
4.Canon EF 135mm f/2L USM Lens
Recording moving objects from a distance requires you to have a lens that allows you to smoothly track their movements while keeping the subject in focus. The Canon EF 135mm f2/L USM lens is perhaps one of the best telephoto lenses on the market because it uses L glass that is widely accepted as the best in the industry. The Canon’s telephoto lens is compatible with ASP-C and Full Frame EF mount cameras. Keep in mind that this is also a prime lens and you can’t increase or decrease its focal length, but even so, it is a perfect choice for documentary-style videos.
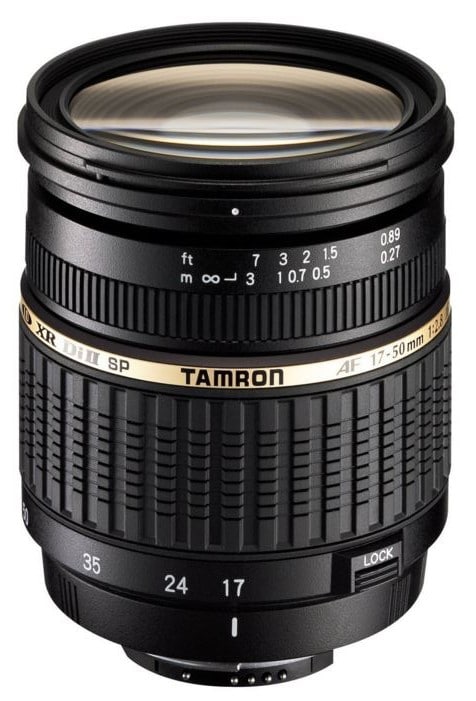
5.Tamron SP AF 17-50mm f/2.8 XR Di II LD Aspherical (IF) Lens
The Tamron’s standard zoom lens offers good value at a very reasonable price. The maximum aperture is f/2.8, while the minimum aperture value this lens supports is f/32, which means that its users can easily experiment with different depths of field. The lens is compatible with most Canon cameras so if you have a camera from another manufacturer you may have to use the lens adapter in order to mount it onto your camera. Like most standard zoom lenses, Tamron SP AF model is highly versatile and you can use it to record a wide range of different scenes.
A lot of zoom lenses do not have wide enough apertures to create blurred backgrounds, but this Tamron lens is an exception at f/2.8. This low f-stop also means that it performs better in poor lighting conditions than a lot of other zoom lenses. If your shooting conditions change a lot – if you often change locations, for example – then it will be good to have a sturdy, well-built, zoom lens like the AF 17-mm that can be quickly adapted to new angles and distances.
6.Sony 30mm f/3.5 Macro
All Sony’s APS-C format E mount cameras are compatible with this multi-purpose lens. When mounted the 30mm lens provides a 45mm focal length equivalent, which means that you can use it to take macro shots of products or to record medium or close-up shots. This is a prime lens, so changing the focal length isn’t really an option, but the 1:1 life-size magnification, as well as the 0.9-inch working distance, allow you to get close to the subjects in the video. The aperture range is between f/3.5 and f/22 which means that you can choose how shallow the depth of field in your shot should be.
If you are using a 4k camera to shoot your YouTube video, check out best camera lens for 4k professional production.
Richard Bennett
Richard Bennett is a writer and a lover of all things video.
Follow @Richard Bennett
Richard Bennett
Mar 27, 2024• Proven solutions
A DSLR is the ideal camera for some vlogs, and using a DSLR means you get to customize the look of your vlog by choosing the perfect lens. Choosing the best camera lens for your YouTube channel can be tricky because there are so many options. This article will walk you through some of them, and make two recommendations of great vlogging lenses. If you already have a good understanding of how camera lenses work then feel free to scroll down to the lens recs.
Part 1. Understanding Lenses: Zoom lens, Fixed lens, aperture, f-stop
There are two main categories of camera lenses: ‘zoom’ – lenses that allow you to zoom in and out – and ‘fixed’. If your lenses are tools then zoom lenses are Swiss army knives; they are very versatile. Fixed lenses, also called prime lenses, have more specific purposes. Do you need a tool that can do a lot of things, or a tool that is perfect for one specific job? Sometimes it is useful to have access to both.
We have explained the differences between Fixed lens and Zoom lens and advantages of using each lens, check this article: Zoom Lens vs. Fixed Lenses: Which one is best for YouTuber? for the detailed information.
Before we get into the recommendations here is a little background information on lenses in general:
Beginner’s Guide to Aperture and F-Stops
In order to be able to select the lens you’ll be using to record your YouTube videos, you first need to understand a few very basic concepts, such as aperture or f-stops.
1.What is a lens’s aperture?
The aperture of your lens is the hole through which light reaches your camera’s sensor, or the film if you are using a film camera. The wider your aperture is the more light you are letting into your camera. In low light it is better to have a wide aperture, and when you are working with a lot of light it is better to have a narrow aperture so your footage is not overexposed.
Aperture is simply an opening in the lens that lets the light through. If you want to increase the amount of the light that is reaching the camera’s sensor you need to open up the aperture blades that are located in the lens. The f-values like f/1.2 or f/1.8 indicate that the aperture is wide open and that the camera is receiving the maximum amount of light a lens you’re using can provide.
2.What is an ‘f-stop’?
Light passes through your lens’s aperture on its way to your camera’s sensor, and the f-stop of your lens relates to the amount of light it lets in. The lower your f-stop, the wider your aperture, and the more light you are letting into your camera. The more light you let into your camera the easier it is to achieve a blurred background. A lot of vloggers love blurring their backgrounds because it is a quick way to disguising the rooms they are shooting in.
F-stops are written like ‘f/1.8’ or ‘f/4’ on your lens. For more information on f-stops and blurring your background read “The Best Bokeh Lens - How to Get the Blurred Background for YouTube Videos” and watch Tasha’s video.
F-stops or f-numbers indicate how open the aperture is, so for example if your camera is displaying f/32 value it means that your camera is letting very little light to get through to the camera’s sensor. The f-number depends on a few other parameters such as shutter speed, exposure or ISO values. Large apertures provide a shallow depth of field which creates a smooth and artistic background blur, while a small aperture enables you to keep both the background and the foreground of your shot in focus.
Part 2: Types of Camera Lenses
The visual aspect of a video may not be the only thing you’ll have to dedicate special attention to while recording your YouTube video, but it is surely one of the most important factors of the video production process. A lens you are using will largely contribute to the aesthetics of the video. That’s why you need to know which type of lens will deliver the best results when shooting different types of scenes. Here are some of the most common types of lenses you’ll encounter.
Standard lenses
These lenses are featured in almost all camera kits, so the chances are that if you have a DSLR camera you already have a standard, mid-range lens. These lenses commonly have a fixed 50mm focal length, although zoom lenses with focal lengths in the range between 35mm and 75mm are also considered standard. You can use them to capture medium shots, single or multiple figure shots, and in some cases establishing shots, because they offer enough versatility to cover a multitude of different scenes. Standard lenses often have large apertures, which makes them quite useful if you often shoot videos under light conditions you can’t control.
Macro lenses
Details, product shots or any other subject that can be filmed from close proximity looks better if they are recorded with macro lenses. The high contrast and sharpness these lenses provide allow you to create stunning close-ups of all hosts, guests or actors in your YouTube videos. What’s more, if you are presenting a new product to your audience you can use the macro lens to make some captivating shots that will attract more audience. Zoom lenses can also be used for macro photography and video, although prime macro lenses produce better results.
Telephoto lenses
The subjects of your videos don’t always have to be in your immediate surroundings, because telephoto lenses let you capture scenes that are several miles away from you. Wildlife or sports videographers frequently use telephoto lenses because they don’t have another way of getting close to their subjects. However, telephoto lenses with 70-300mm focal length can also be used to take stunning portraits or close up shots. The biggest downside of telephoto lenses is their weight because the lenses with higher focal lengths can weigh up to 10lbs, which makes them a bit inconvenient to always carry with you.
Wide-angle lenses
Recording videos of vast open spaces, breathtaking vistas or beautiful city views is much easier if you have a wide-angle lens. The short focal length allows the lens to have a wider field of view which covers more space than standard or telephoto lenses. Wide-angle lenses also have lower apertures than lenses with longer focal lengths which results in images that have a shallow depth of field. Ultra-wide lenses like fisheye distort the view so the videos recorded with these lenses often suffer from the lack of realism.
Specialist lenses
YouTubers who are working on demanding projects can try to solve their troubles by using a specialist lens. Soft-focus lenses can help you take better portraits while tilt-shift lenses allow you to control the perspective. However, it is hard to imagine a scenario in which you’ll need a specialist lense if you are just starting out since even experienced videographers only use special lenses when they have absolutely no better way to record a scene.
Part 3: Recommended Best Camera Lenses for Shooting YouTube Videos
Here are a couple great lenses that might be good fits for you and your YouTube channel. The thing that makes them both ideal for vlogging is that they have low enough f-stops to blur out your background.
| Camera Lens | Type | Price | Aperture | Focal Length |
|---|---|---|---|---|
| Canon EF-S 10-18mm f/4.5-5.6 IS STM Lens | Wide angle | $279 | f/4.5-5.6 | 10 -18mm |
| Rokinon 8mm f/3.5 | Fisheye | $249 | f/3.5 | 8mm |
| Canon 50mm f/1.8 STM Lens | Prime | $125 | f/1.8 | 50mm |
| Canon EF 135mm f/2L USM Lens | Telephoto | $999 | f/2 | 135mm |
| Tamron SP AF 17-50mm f/2.8 | Standard Zoom | $299 | f/2.8 | 17 -50mm |
| Sony 30mm f/3.5 Macro | Macro | $278 | f/3.5 | 30mm |
1.Canon EF-S 10-18mm f/4.5-5.6 IS STM Lens
Canon released this lens in 2014 and shortly after it has gained the reputation of one of the most reliable wide to ultra-wide lenses for Canon cameras. Like most STM lenses, it offers incredibly fast autofocus technology that makes it a great choice for fast-paced action videos. The lens is equipped with an image stabilization system which guarantees that your videos are going to remain sharp even if the camera wasn’t perfectly still while you were recording. Somewhat smaller aperture range makes this lens poor choice for low light scenes, although you can get decent results if you manage to keep the camera still.
2. Rokinon 8mm Ultra Wide f/3.5 Fisheye Lens
Outdoor videos look much cooler when they are recorded with a wide-angle lens because the wider field of view enables you to capture more space in a shot. Fisheye lenses were made popular by GoPro cameras because they make the videos look more fun while producing high image quality. Rokinon 8mm lens allows you to adjust focus and aperture manually so you can fine-tune your shot before hitting the record button. To make things even better this model is compatible with a wide range of cameras including Pentax, Canon or Nikon DSLRs. It has a relatively fast aperture that enables it to deliver solid performances under low light conditions.
3.Canon EF 50mm f/1.8 STM Lens
The EF 50mm is a fixed lens with an f-stop of 1.8, which means it is great for blurring your background and performs well even in poorer lighting conditions. This is a really great lens for an opinion or beauty vlog, where you do not need to move around. You can stay put right where the focus is sharpest and stand out by blurring everything behind you. If you tend to reuse the same sets then you do not really need a zoom feature. If your shooting conditions rarely change then it is just as easy to use a reliable fixed lens like the EF 50mm since you will not need to be rethinking your set up and adjusting.
If you are looking for an inexpensive prime lens that lets you create sharp videos with shallow depth of field, you should look no further. This model is one of three Canon’s 50mm prime lenses, although the 50mm f/1.4 USM and 50mm f/1.2 ‘L’ USM models are much more expensive. You can use it to record a lot of different types of YouTube videos, like product reviews or makeup tutorials. The 50 mm f/1.8 STM lens doesn’t have image stabilization technology so you should try to be as still as you can possibly be when shooting handheld videos in order to avoid recording footage that has a lot of camera shakes.
4.Canon EF 135mm f/2L USM Lens
Recording moving objects from a distance requires you to have a lens that allows you to smoothly track their movements while keeping the subject in focus. The Canon EF 135mm f2/L USM lens is perhaps one of the best telephoto lenses on the market because it uses L glass that is widely accepted as the best in the industry. The Canon’s telephoto lens is compatible with ASP-C and Full Frame EF mount cameras. Keep in mind that this is also a prime lens and you can’t increase or decrease its focal length, but even so, it is a perfect choice for documentary-style videos.
5.Tamron SP AF 17-50mm f/2.8 XR Di II LD Aspherical (IF) Lens
The Tamron’s standard zoom lens offers good value at a very reasonable price. The maximum aperture is f/2.8, while the minimum aperture value this lens supports is f/32, which means that its users can easily experiment with different depths of field. The lens is compatible with most Canon cameras so if you have a camera from another manufacturer you may have to use the lens adapter in order to mount it onto your camera. Like most standard zoom lenses, Tamron SP AF model is highly versatile and you can use it to record a wide range of different scenes.
A lot of zoom lenses do not have wide enough apertures to create blurred backgrounds, but this Tamron lens is an exception at f/2.8. This low f-stop also means that it performs better in poor lighting conditions than a lot of other zoom lenses. If your shooting conditions change a lot – if you often change locations, for example – then it will be good to have a sturdy, well-built, zoom lens like the AF 17-mm that can be quickly adapted to new angles and distances.
6.Sony 30mm f/3.5 Macro
All Sony’s APS-C format E mount cameras are compatible with this multi-purpose lens. When mounted the 30mm lens provides a 45mm focal length equivalent, which means that you can use it to take macro shots of products or to record medium or close-up shots. This is a prime lens, so changing the focal length isn’t really an option, but the 1:1 life-size magnification, as well as the 0.9-inch working distance, allow you to get close to the subjects in the video. The aperture range is between f/3.5 and f/22 which means that you can choose how shallow the depth of field in your shot should be.
If you are using a 4k camera to shoot your YouTube video, check out best camera lens for 4k professional production.
Richard Bennett
Richard Bennett is a writer and a lover of all things video.
Follow @Richard Bennett
YouTube SEO Guide for Beginners Who Want More Views
The 12-step YouTube SEO Guide for Beginners Who Want More Views

Shanoon Cox
Oct 26, 2023• Proven solutions
The joy of creating on YouTube is often dampened by the disappointment of underperforming videos. You have published your content and it’s not getting the views you had hoped.
Well, let’s change that!
In this guide, I’m going to walk you through YouTube SEO from the very start to the very end.
Nothing complicated. No paid programs or expensive apps needed. We are going back to basics and get your videos discovered.
Ready?
Let’s Go!
Part 1: Research Your Topic and Competitors
Come up with a video idea . Can’t come up with one? Let me help. I heard you can make a mean scrambled egg, why don’t you show the world how you do it?
Excellent! Let’s go with that idea.
Wait, don’t go making the video yet. First, we have to do some research. We need to know what videos already exist out there.
Step 1: Find Related Videos
Do a quick search on YouTube to see what videos already exist on your topic.

Uh oh… your video will be competing against celebrities like Gordon Ramsay and Jamie Oliver.
Okay, don’t panic! There is a fantastic quote, credited to bestselling author, Jon Acuff , that goes:

While researching your competition, you will feel overwhelmed, but remember, you are at the beginning, and Gordon Ramsay and Jamie Oliver are not even at their middle, they are way passed the finish line. You still have a long journey to go, so don’t get discouraged, get inspired!
Watch those videos and understand what they are all about.
Understand that people watch YouTube for 3 key reasons:
- To be entertained
- To learn something new
- To be inspired
A video that can hit all 3 marks is going to be positioned for success. Don’t fret too much about the competition, as long as your content is good, you will see improvement.
So if you think this scrambled egg idea can hit those 3 marks, then I encourage you to go to the next step. If you don’t, let’s regroup and brainstorm some more YouTube video ideas .
Step 2: Find Keywords
Now that we’ve decided that we are sticking with the video idea, we are ready to do some keyword research. Keywords are the words and phrases people type in the YouTube search bar to discover videos.
Come up with as many relevant keywords as you can. Start by entering a keyword into the YouTube search bar. This will tell you what are the most popular searches associated with that keyword:
Once you have an idea of what people are searching for related to your topic, you’ll want to find more relevant keywords. I like to use the free app, Ubersuggest to do that.

This app gives you a whole list of long-tail keywords, which are 3-4-word phrases which is specific to what your video is about.
Some you will use to dig deeper in and other you will deem irrelevant to your videos. A good way of determining the value of a keyword is by the stats the application shows.
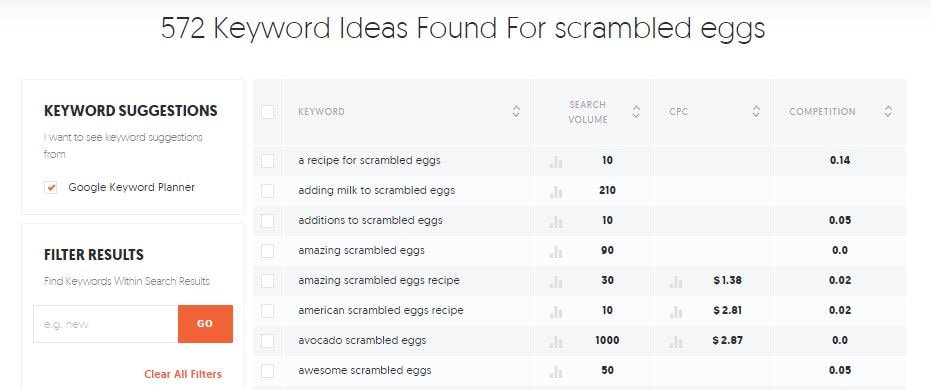
How to Read Keyword Suggestions
Once you have a list of keywords, you will see some numbers on the right-hand side. Here is what each one is about:
- Search volume is the number used to identify the popularity of the keyword. The higher the number the more people are searching for it.
- CPC is the value accredited by YouTube, determining how much advertisers are paying to target audiences who search for that keyword and click on the link.
- Competition is the number used to qualify how many other content are using that keyword.
The two categories that matter most to us right now is Search Volume and Competition. We want keywords with high search volume and low competition rate.
In the example above, you can see that the keyword “avocado scrambled eggs” has a Search Volume of 1,000 and a competition rate of 0.0. This is a good keyword to target, if you can incorporate an avocado to your dish… which of course you can!
Step 3: Write Title
I know you might want to deal with the Title, Description, and Tags after you’ve filmed and edited your video. But if you want to apply a YouTube SEO-focused strategy, then these should be addressed before you even pick up a camera as it can greatly dictate the content you end up creating.
A good YouTube title sparks curiosity, evokes emotional reaction, and promises value to your viewers.
Of course you can title your video simply: Making Scrambled Eggs
But does it spark curiosity? Not really… most people can make scrambled eggs.
Does it evoke any emotion? Maybe hunger… but even then, not really…
Finally, does it promise value? Well, assuming that most people can at least crack an egg into a pan, then hardly.
Your scrambled egg is special! Your video is special! We need to evoke that in the title — and as long as you are not writing any clickbait and deliver on what the title suggest, you can do this.
So, how about this: Are My Amazing Scrambled Eggs Better Than Gordon Ramsay’s?
Hmmm… Well, is it? We know that the Gordon Ramsay’s video has almost 30M views. Many people have already tried cooking it, I’m sure. There is only one way to find out, by encouraging others to try it over Gordon’s.
You don’t need to go for a somewhat contentious title like this, but that’s the idea, you want something that gets people curious, make them feel a certain way, and in the end, make them better for having watched your video.
See how a good title can guide the rest of your video?
Step 4: Write Description
You aren’t going to be writing the description for the viewers necessarily, you are going to be writing it for YouTube’s algorithms. The better YouTube understands what your video is about, the better they can show it to people searching for it.
This means you need to include the keywords you were researching at the beginning of your description, as YouTube will be using them to identify the content of your video. 1 or 2 keywords that best represent your video is enough. Don’t stuff the title with too many keywords or you’ll risk sounding like a robot.
But also use the description for practical uses too, if you have additional information such as supportive links, outline of the video’s content, a list of materials, step-by-step guide, or a recipe that you think your human viewers will find useful, you should input that in the description as well.
Step 5: Write Tags
Thank goodness we did the keyword research in Step 2, because coming up with tags is not as easy as it looks.
Pull 15 keywords from the list and keep it somewhere safe.
Note: The keywords you used in the title should be found in your tags, and since they are the most important ones, you should place them first.
Organize your keywords in the tag as such:
Have the specific keywords at the top, followed by more general keywords, and then branded ones:
Specific: How to make scrambled eggs
General: Scrambled eggs
Branded: Gordon Ramsay scrambled eggs
Part 2: Make The Best Darn Video Possible
It doesn’t matter how relevant your keywords are or how epic your title is, if you video sucks (i.e. your viewers click in and leave right away), YouTube will not show it in search.
Even if you haven’t created any videos yet, you can follow these next steps to ensure you are following the best practices to structure your video.
Step 6: Plan and Film the Hook
The first few seconds is where the largest percentage of your earned viewership will drop off. Odds are 20% of your viewers won’t even get past the first 10 seconds .
What you need is a hook, an intro that ensures this video is what they want to watch and let’s them know what they can expect.
Step 7: Film B-Roll
One static camera shot of you talking or cooking or giving a tutorial can cause your viewers to lose attention.
In order to keep your viewers interest, you will need b-roll, or supplemental footage you can cut to give you video more life.
While jump cuts (cuts made on a sequential clip of the same subject or in the same camera position) are fine, having additional footage to cut to will make your video feel more fluid.
So when you are filming your scrambled egg video, make sure you get some footage of you cracking the egg, scrambling it, and serving it on the plate.
Step 8: Encourage Viewers to Engage in Video
Liking, disliking, subscribing, and commenting on your video will all help your performance indirectly.
While YouTube wouldn’t rank your video higher simply because you have more likes subscribers, or comments, engagement from viewers help your video get discovered. If you get a like or comment from a YouTuber with a lot of subscribers, your video may be visible to those who are following that YouTuber for a while.
The best way to get engagement from your audience is to encourage them to like and subscribe or ask them a question or start a dialogue.
For example, in this scrambled egg video you are making, at the end you can ask, “So what do you think, is this better than Gordon Ramsay?”

Who knows, who will respond.
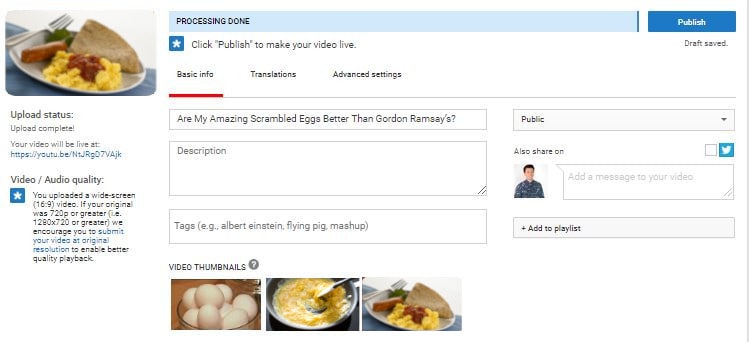
Step 9: Design a Thumbnail
You could have made a brilliant video, but if you have a poor quality thumbnail that is unattractive, then the overall performance of your video will suffer — and good SEO can only do so much after that.
Your viewers will absolutely judge your video by its cover so it’s important to put some thought into it and not solely rely on the three random thumbnail choices that YouTube picks for you.

Take a look at your competition. If they all look the same, do something different. Add text or a human face (preferably yours) to evoke emotion, as viewers are more likely to click into a video if they see an expressive image.
Don’t want to pay money for a photo editing software such as Photoshop?
You can use an online service called Canva or download GIMP , an open-source photo editor much like Photoshop, but far less powerful. These will help you get the job done as you are starting out.
Want to know more thumbnail maker? Check our picks of the best free YouTube thumbnail makers .
Part 3: Publishing With Attention to Optimization
Well done finishing the video! You are almost there… but not there yet.

Come on, keep going!
Step 10: Fill Out Your Videos Assets
The video is done, the thumbnail is designed, and you have all your title, description, and tags ready to go. This step is easy, upload the video, and fill out the assets, and give yourself a pat on the back.
Step 11: Add Transcripts
In addition to making your content accessible for people who don’t want to or can’t listen to the audio in your video, adding subtitles and closed captions will help YouTube understand the spoken content in your video.
While YouTube does have an automatic subtitle generator, it’s not reliable enough to be used for identifying the keywords you use in your video.
You can choose to write out the whole transcript of your video yourself, but if you are press on time, which of course you are, you can simply go and edit the automatic transcript already available in your video. By the way, you can also use some automatic transcription software.
Step 12: Add Video to Playlist
Finally the last thing you need to do for your video is to add it to a playlist. Even though it might be the first video in the playlist, it helps YouTube identify your video if you organize it in a playlist. As you accumulate more content, having videos in playlists makes content easier to find and keeps relevant videos together.
When viewers searches, having your videos in playlists increases the chance of it being discovered.
So if your first video is about scrambled eggs, maybe you next video can be about the awesome butter toasts.
I guess, you are on your way to making a pretty badass breakfast playlist. I personally can’t wait to see it!
If you treat SEO as an afterthought, only after your video is created, you are not using it to its full potential. If you follow these 12 steps during the course of your production, you will find that SEO doesn’t simply help your video perform at the end, but contributes in all the other phases of creating your video as well.
Besides considering YouTube SEO, you should make a good YouTube video as well. Filmora is a powerful video editing software that features lots of templates and effects. Get the free trial version below and have a try today.


Do you have any questions about SEO? Please leave us a comment below.
Shanoon Cox
Shanoon Cox is a writer and a lover of all things video.
Follow @Shanoon Cox
Shanoon Cox
Oct 26, 2023• Proven solutions
The joy of creating on YouTube is often dampened by the disappointment of underperforming videos. You have published your content and it’s not getting the views you had hoped.
Well, let’s change that!
In this guide, I’m going to walk you through YouTube SEO from the very start to the very end.
Nothing complicated. No paid programs or expensive apps needed. We are going back to basics and get your videos discovered.
Ready?
Let’s Go!
Part 1: Research Your Topic and Competitors
Come up with a video idea . Can’t come up with one? Let me help. I heard you can make a mean scrambled egg, why don’t you show the world how you do it?
Excellent! Let’s go with that idea.
Wait, don’t go making the video yet. First, we have to do some research. We need to know what videos already exist out there.
Step 1: Find Related Videos
Do a quick search on YouTube to see what videos already exist on your topic.
Uh oh… your video will be competing against celebrities like Gordon Ramsay and Jamie Oliver.
Okay, don’t panic! There is a fantastic quote, credited to bestselling author, Jon Acuff , that goes:
While researching your competition, you will feel overwhelmed, but remember, you are at the beginning, and Gordon Ramsay and Jamie Oliver are not even at their middle, they are way passed the finish line. You still have a long journey to go, so don’t get discouraged, get inspired!
Watch those videos and understand what they are all about.
Understand that people watch YouTube for 3 key reasons:
- To be entertained
- To learn something new
- To be inspired
A video that can hit all 3 marks is going to be positioned for success. Don’t fret too much about the competition, as long as your content is good, you will see improvement.
So if you think this scrambled egg idea can hit those 3 marks, then I encourage you to go to the next step. If you don’t, let’s regroup and brainstorm some more YouTube video ideas .
Step 2: Find Keywords
Now that we’ve decided that we are sticking with the video idea, we are ready to do some keyword research. Keywords are the words and phrases people type in the YouTube search bar to discover videos.
Come up with as many relevant keywords as you can. Start by entering a keyword into the YouTube search bar. This will tell you what are the most popular searches associated with that keyword:
Once you have an idea of what people are searching for related to your topic, you’ll want to find more relevant keywords. I like to use the free app, Ubersuggest to do that.
This app gives you a whole list of long-tail keywords, which are 3-4-word phrases which is specific to what your video is about.
Some you will use to dig deeper in and other you will deem irrelevant to your videos. A good way of determining the value of a keyword is by the stats the application shows.
How to Read Keyword Suggestions
Once you have a list of keywords, you will see some numbers on the right-hand side. Here is what each one is about:
- Search volume is the number used to identify the popularity of the keyword. The higher the number the more people are searching for it.
- CPC is the value accredited by YouTube, determining how much advertisers are paying to target audiences who search for that keyword and click on the link.
- Competition is the number used to qualify how many other content are using that keyword.
The two categories that matter most to us right now is Search Volume and Competition. We want keywords with high search volume and low competition rate.
In the example above, you can see that the keyword “avocado scrambled eggs” has a Search Volume of 1,000 and a competition rate of 0.0. This is a good keyword to target, if you can incorporate an avocado to your dish… which of course you can!
Step 3: Write Title
I know you might want to deal with the Title, Description, and Tags after you’ve filmed and edited your video. But if you want to apply a YouTube SEO-focused strategy, then these should be addressed before you even pick up a camera as it can greatly dictate the content you end up creating.
A good YouTube title sparks curiosity, evokes emotional reaction, and promises value to your viewers.
Of course you can title your video simply: Making Scrambled Eggs
But does it spark curiosity? Not really… most people can make scrambled eggs.
Does it evoke any emotion? Maybe hunger… but even then, not really…
Finally, does it promise value? Well, assuming that most people can at least crack an egg into a pan, then hardly.
Your scrambled egg is special! Your video is special! We need to evoke that in the title — and as long as you are not writing any clickbait and deliver on what the title suggest, you can do this.
So, how about this: Are My Amazing Scrambled Eggs Better Than Gordon Ramsay’s?
Hmmm… Well, is it? We know that the Gordon Ramsay’s video has almost 30M views. Many people have already tried cooking it, I’m sure. There is only one way to find out, by encouraging others to try it over Gordon’s.
You don’t need to go for a somewhat contentious title like this, but that’s the idea, you want something that gets people curious, make them feel a certain way, and in the end, make them better for having watched your video.
See how a good title can guide the rest of your video?
Step 4: Write Description
You aren’t going to be writing the description for the viewers necessarily, you are going to be writing it for YouTube’s algorithms. The better YouTube understands what your video is about, the better they can show it to people searching for it.
This means you need to include the keywords you were researching at the beginning of your description, as YouTube will be using them to identify the content of your video. 1 or 2 keywords that best represent your video is enough. Don’t stuff the title with too many keywords or you’ll risk sounding like a robot.
But also use the description for practical uses too, if you have additional information such as supportive links, outline of the video’s content, a list of materials, step-by-step guide, or a recipe that you think your human viewers will find useful, you should input that in the description as well.
Step 5: Write Tags
Thank goodness we did the keyword research in Step 2, because coming up with tags is not as easy as it looks.
Pull 15 keywords from the list and keep it somewhere safe.
Note: The keywords you used in the title should be found in your tags, and since they are the most important ones, you should place them first.
Organize your keywords in the tag as such:
Have the specific keywords at the top, followed by more general keywords, and then branded ones:
Specific: How to make scrambled eggs
General: Scrambled eggs
Branded: Gordon Ramsay scrambled eggs
Part 2: Make The Best Darn Video Possible
It doesn’t matter how relevant your keywords are or how epic your title is, if you video sucks (i.e. your viewers click in and leave right away), YouTube will not show it in search.
Even if you haven’t created any videos yet, you can follow these next steps to ensure you are following the best practices to structure your video.
Step 6: Plan and Film the Hook
The first few seconds is where the largest percentage of your earned viewership will drop off. Odds are 20% of your viewers won’t even get past the first 10 seconds .
What you need is a hook, an intro that ensures this video is what they want to watch and let’s them know what they can expect.
Step 7: Film B-Roll
One static camera shot of you talking or cooking or giving a tutorial can cause your viewers to lose attention.
In order to keep your viewers interest, you will need b-roll, or supplemental footage you can cut to give you video more life.
While jump cuts (cuts made on a sequential clip of the same subject or in the same camera position) are fine, having additional footage to cut to will make your video feel more fluid.
So when you are filming your scrambled egg video, make sure you get some footage of you cracking the egg, scrambling it, and serving it on the plate.
Step 8: Encourage Viewers to Engage in Video
Liking, disliking, subscribing, and commenting on your video will all help your performance indirectly.
While YouTube wouldn’t rank your video higher simply because you have more likes subscribers, or comments, engagement from viewers help your video get discovered. If you get a like or comment from a YouTuber with a lot of subscribers, your video may be visible to those who are following that YouTuber for a while.
The best way to get engagement from your audience is to encourage them to like and subscribe or ask them a question or start a dialogue.
For example, in this scrambled egg video you are making, at the end you can ask, “So what do you think, is this better than Gordon Ramsay?”
Who knows, who will respond.
Step 9: Design a Thumbnail
You could have made a brilliant video, but if you have a poor quality thumbnail that is unattractive, then the overall performance of your video will suffer — and good SEO can only do so much after that.
Your viewers will absolutely judge your video by its cover so it’s important to put some thought into it and not solely rely on the three random thumbnail choices that YouTube picks for you.
Take a look at your competition. If they all look the same, do something different. Add text or a human face (preferably yours) to evoke emotion, as viewers are more likely to click into a video if they see an expressive image.
Don’t want to pay money for a photo editing software such as Photoshop?
You can use an online service called Canva or download GIMP , an open-source photo editor much like Photoshop, but far less powerful. These will help you get the job done as you are starting out.
Want to know more thumbnail maker? Check our picks of the best free YouTube thumbnail makers .
Part 3: Publishing With Attention to Optimization
Well done finishing the video! You are almost there… but not there yet.
Come on, keep going!
Step 10: Fill Out Your Videos Assets
The video is done, the thumbnail is designed, and you have all your title, description, and tags ready to go. This step is easy, upload the video, and fill out the assets, and give yourself a pat on the back.
Step 11: Add Transcripts
In addition to making your content accessible for people who don’t want to or can’t listen to the audio in your video, adding subtitles and closed captions will help YouTube understand the spoken content in your video.
While YouTube does have an automatic subtitle generator, it’s not reliable enough to be used for identifying the keywords you use in your video.
You can choose to write out the whole transcript of your video yourself, but if you are press on time, which of course you are, you can simply go and edit the automatic transcript already available in your video. By the way, you can also use some automatic transcription software.
Step 12: Add Video to Playlist
Finally the last thing you need to do for your video is to add it to a playlist. Even though it might be the first video in the playlist, it helps YouTube identify your video if you organize it in a playlist. As you accumulate more content, having videos in playlists makes content easier to find and keeps relevant videos together.
When viewers searches, having your videos in playlists increases the chance of it being discovered.
So if your first video is about scrambled eggs, maybe you next video can be about the awesome butter toasts.
I guess, you are on your way to making a pretty badass breakfast playlist. I personally can’t wait to see it!
If you treat SEO as an afterthought, only after your video is created, you are not using it to its full potential. If you follow these 12 steps during the course of your production, you will find that SEO doesn’t simply help your video perform at the end, but contributes in all the other phases of creating your video as well.
Besides considering YouTube SEO, you should make a good YouTube video as well. Filmora is a powerful video editing software that features lots of templates and effects. Get the free trial version below and have a try today.
Do you have any questions about SEO? Please leave us a comment below.
Shanoon Cox
Shanoon Cox is a writer and a lover of all things video.
Follow @Shanoon Cox
Also read:
- Elevating Your Content Choosing Right YouTube Duos/Groups
- Perfecting MP4 Segments Best Tools For Mac Filmmakers
- Crafting Curls and Contours Creating a Personalized Beauty Channel
- Delving Into the World of Mukbang Videos for 2024
- [New] Earning Strategies for Successful Youtube Shorts What You Need & How Much?
- Hashtag Hacks for Amplifying Gamer Content
- Maximize Engagement Mastering Sound Editing for YouTube
- The Best of Home Workouts Top Yoga Channels Online
- Breakdown of Profit From a Million Youtube Watches for 2024
- Unlock YouTube's Small Screen Image Magic
- 2024 Approved Craft Visionary Videos From Start to Finish Using YouTube Studio Editor
- In 2024, Essential Tips for YouTube Audio Optimization
- What’s Beyond Google's YouTube? Top 27 Video Sharing Services Insights
- Seamless WebM Creation From YouTube Videos
- Will Real-Time Likes Elevate My Video Visibility?
- In 2024, Cross-Media Content Flow From YouTube to Thirty+ Others
- 2024 Approved Channeling Success The Essential Elements for Profitable Video Trailers
- Building Brands Together A Guide to Selecting YouTube Teams
- In 2024, A Global Perspective Your Favorite Travel Youtubers
- The Hidden Dynamics of Live Video Images on YouTube
- [New] Avoiding Invisibility Strategies for Effective Use of Youtube's Featured Channels
- Understanding T-Series YouTube Business Model
- [New] Cross-Platform Title Framework YTB to Other Apps
- Crafting a Simplified YouTube Auto-Subscribe URL
- [Updated] Enlightenment Streams Foremost Ed Resources Online
- A Comprehensive Guide to Personalizing Video Images for 2024
- Epicurean Eminence Best Online Chefs & Cooks
- [New] Demystifying the Process of Writing YouTube Video Content
- Aspect Ratio Insights for Engaging YouTube Thumbnails for 2024
- In 2024, Digital Dreamland Gamers' Income Evolution
- 2024 Approved Bridging the Gap Between Classic and Contemporary Videos
- In 2024, Crafting Captivating Animations Creating GIFs From Your Favorite YouTube Videos
- Essential Audio Tools Free, Superior DJ Templates Online
- Diverse Video Realms Sites Outshining Youtube for 2024
- 2024 Approved Android-Centric Top Downloads for YouTube Videos Explored
- [Updated] Channel Success Strategy Standard Studio or Beta Edge
- [Updated] Creating Compelling Sports Content From the Ground Up
- In 2024, Enhance Visibility The Power of Customized YouTube Templates
- [New] Convert & Share Simplified MP3 to YouTube Process [3 Phases]
- In 2024, Enhancing Visibility Popularize Your YouTube Short Videos
- 2024 Approved Amplify Your Video Content with Precision Insights From Social Blade & YouTube
- [New] Comparing YouTube and Dailymotion Notable Contrasts
- [Updated] Discover the Top 30 Free Intro Creators on YouTube
- In 2024, Easy Guide Turning Your Favorite YouTube Videos Into Animated GIFs
- [Updated] Does YouTube Offer Regular Viewers Money?
- Ace Your YouTube LIVE with These 7 Powerful Live Streaming Apps (iOS/Android OS)
- 20 Must-Have Video Tools For New Creators
- The Ultimate Streaming Showdown FB Live, YT Live, TweetSpaces
- [New] Crafting YouTube Video Trailers with Filmora's Guide
- How Do You Unlock your Apple iPhone 6? Learn All 4 Methods | Dr.fone
- [New] AV1 Decoding for Newcomers
- [Updated] Accelerating Your Ascension to Instagram A-List Status Our Fast Track Guide of 15 Must-Try Strategies
- In 2024, The Best in Show A Comprehensive Review of the 10 Most Effective Podcast to Text Apps
- [New] 2024 Approved Discover Snapchat's Biggest Drawings & Effects
- Content Creation in the Digital Age Audio vs Visual
- Windows Video Editing How to Create Stunning 3D Effects in Minutes for 2024
- How to Use Pokémon Emerald Master Ball Cheat On Realme C51 | Dr.fone
- New In 2024, Free Video Editing Solutions The Top 5 Online Video Mergers
- Boosting Speed for Periscope Live Video for 2024
- In 2024, Direct Streaming Use VLC for Webcam Video
- 2024 Approved Social Media's Literary Elite BookTok's Top 15 Recommendations
- [New] 2024 Approved Elevate Your Social Impact with These Hashtags
- The Strategic Pathway to Podcast Popularity with Effective SEO Techniques
- [Updated] SnapRecorder Expert Breakdowns for 2024
- Universal Unlock Pattern for Vivo Y77t
- Does Galaxy S21 FE 5G (2023) support MOV videos ?
- In 2024, Blending Words with Pictures Adding Text to Images, Windows/Mac
- Updated Read This Review to Learn Everything You Need to Know About Leeming LUT Pro and How to Apply Pro LUTs Using Different Video Editors
- In 2024, Free Video Conferencing Software Showcase Best 10 Picks for Commercial Use & Learning Environments
- Updated Cut MKV Files for Free Top 10 Editor Recommendations for 2024
- Leading Android MOBA Games Unveiled
- New In 2024, The Science of Screen Size Calculating Pixel Aspect Ratio
- Updated In 2024, PC Intro Maker Showdown Top 10 Tools Online, Offline, and More
- How To Fix Apple iPhone 12 Pro Max Unavailable Issue With Ease | Dr.fone
- Updated In 2024, Breaking Boundaries Running Windows and Mac Video Editing Software on Chromebook
- ASUS Leads the Charge with Their MG28UQ - The Future of 4K Monitors for 2024
- In 2024, What Legendaries Are In Pokemon Platinum On Samsung Galaxy S23? | Dr.fone
- [Updated] In-Depth Analysis of ShareX Criticism & Replacements
- Discovering Deeper Dives in Minecraft Gameplay
- In 2024, How To Fix Apple iPhone 13 Unavailable Issue With Ease
- In 2024, How to Bypass FRP from Oppo A78 5G?
- [Updated] How to Make Every Discord Livestree a Timeless Treasure for 2024
- S Top-Rated iPad Video Editors A Comprehensive Guide for 2024
- [Updated] Earning a Living with Social Media Snaps for 2024
- New Video Stabilization Made Easy A Premiere Pro Tutorial for 2024
- New Unlocking YouTube Audio A Simple Downloading Tutorial for 2024
- [Updated] In 2024, Best 6 Mac Video Snaggers Compiled Here
- Title: "Next-Level Shooting Lens Selections for Online Creators"
- Author: Steven
- Created at : 2024-05-25 20:16:11
- Updated at : 2024-05-26 20:16:11
- Link: https://youtube-clips.techidaily.com/next-level-shooting-lens-selections-for-online-creators/
- License: This work is licensed under CC BY-NC-SA 4.0.
