
!["[New] Essential YouTube Equipment For Starting Your Channel - What Do You Really Need?"](https://www.lifewire.com/thmb/G-iW0FJ22KzS4XxqQv7mqoC_hc8=/400x300/filters:no_upscale():max_bytes(150000):strip_icc()/Featured-MonopolyGO-Holding-iPhone-8605534-fc32a4de91374628b778efea2caafee1.jpg)
"[New] Essential YouTube Equipment For Starting Your Channel - What Do You Really Need?"
The Core Kit: Video Equipment Every Creator Needs
Essential YouTube Equipment For Starting Your Channel - What Do You Really Need?

Richard Bennett
Oct 26, 2023• Proven solutions
Check out our most updated guide on this topic: YouTube Equipment Starter Guide For Beginners .
The first thing to make sure of before starting a YouTube channel is having all that you need to record and upload high-quality videos regularly. That doesn’t mean you have to take out a loan and spend thousands to purchase a brand new camera and all other gadgets that professional filmmakers use.
The smartest way to get started is to go through a list of necessary equipment for YouTube and check whether or not you already own some of it. Once your channel starts growing, you can then start thinking about whether you want to invest in upgraded equipment. Here is a quick overview of all items that you need to start entertaining your online audience and gaining subscribers to your YouTube channel:
- Your YouTube Camera
- Microphones and Audio
- Lighting Gear for YouTube
- Tripods and Camera Stands
- Smartphone Camera Gear
YouTube Cameras
The short version: Use whatever you already have, even if it’s your phone or webcam. It’s nice to have sharp, fine-tuned, 4K footage, but viewers will forgive lower visual quality if your content is good.
The long version: You will need a camera, but there are a lot of different devices you can use including DSLRs, point and shoots, webcams, and your smartphone.
Your choice of camera will have a tremendous impact on the visual quality of your content and might drive your decisions regarding other pieces of equipment. However, you shouldn’t feel obliged to work with a top-notch camera from day one, especially since cheaper options can produce great results if used the right way.
On one end of the spectrum, you have basic smartphone cameras and web cameras, which are easy to come by and simple to operate. These days, high-end phones come equipped with quite powerful cameras that are more than sufficient for the needs of the average YouTuber. Better webcams can also do the job, although high-performance webcam models can get pretty expensive too. It is probably wise to resist the urge to start broadcasting with the built-in camera in your laptop and at least get a webcam or use your phone, but your computer’s camera is still always an option. Not having a better camera should never stop you from making YouTube videos.
If you already have a DSLR camera then it’s a good idea to familiarize yourself with it. You have far more freedom to adjust the settings and achieve a professional look for your videos with a DSLR, but that does mean it’ll take some time to become an expert at using it. Ultra-high resolution is not required for YouTube, but it certainly won’t hurt to have additional sharpness and more detail in the scene. If you’re shopping for a DSLR, look for one with a flip screen that allows you to quickly check what your viewers see.
YouTube Microphone and Audio
The short version: Audio quality is extremely important. If you can buy either a new camera or an external microphone, but not both, it might be better to go for the microphone. Click here for advice on upping your audio quality without an external microphone.
The long version: Sound capturing is every bit as important for your success as your video feed. In fact, poor audio can be even more damaging to your subscriber count than grainy video, since people won’t spend their time listening to something they have to put effort into understanding.
Again, most YouTube video makers have a limited budget at their disposal, so professional microphones are mostly off the table. However, investing in a directional microphone (‘shotgun mic’) that can pick up your voice clearly and without background noise is certainly a smart move. Such microphones can be pointed towards you while you speak, and since most YouTubers sit still while doing their shows there won’t be too much need for in-session adjustments.
If you’re not ready to invest in a shotgun mic, you can also find very inexpensive (often under $20) LAV mics. These small microphones can be pinned to your shirt, which allows them to record very clear dialogue because they’re so close to your mouth.
Lights for YouTube
The short version: You need as much light as you can get. Lighting kits can be affordable on Amazon, but you can also achieve a great look using daylight/windows and ‘daylight’ lightbulbs.
The long version: If you’ve ever tried to make a video indoors, you already know that it’s necessary to have additional light. Often just filming with the normal lights in a room will cause your footage to look dark and grainy, and possibly be tinted orange. To overcome these problems you need to increase the amount of light you have available.
Sometimes, it is enough to film near windows and/or bring more household lamps into your filming area. For any household lamps or lighting fixtures you use, make sure to put in white or ‘daylight’ lightbulbs instead of using the orange/tungsten bulbs that you might have for everyday use (this is how you avoid tinting things orange).
If you have the budget available to get some lighting equipment, you can find softbox lights or LED panel lights available fairly inexpensively online. Softbox lights are great because they provide even, diffused, light.
Another useful piece of lighting equipment to have is a reflector. A reflector is usually a piece of white, silver, or gold fabric stretched over a frame. You can use it to bounce light from one light source back towards yourself (this is a great way to fill shadows cast by your main light). Reflectors tend to be inexpensive, but you can also use white cardboard or tinfoil in place of purchasing a reflector.
Tripods and Camera Stands
The short version: You need something to hold your camera. If you mostly film in your own home that can be a desk or a stack of books, but if you make a lot of videos while you’re on the go you probably need a tripod or gimbal. Heavier cameras need heavier tripods.
The long version: While handheld cameras can deliver solid results for vloggers and casual streamers, viewers do expect reasonably stable footage. For many types of videos, the camera needs to be completely still and flatly positioned on a horizontal plane. Tripods and camera stands can cost very little, so it’s a good idea to look into getting some kind of stabilizer.
When you are choosing a tripod, pay attention to how much it weighs. If the camera that needs to be mounted on it is very heavy (like some DSLR models), you want to ensure that the structure itself weighs enough not to be easily tipped over. Too thin tripods can put your camera at risk, and that’s the last thing you want. Smaller cameras such as GoPros are more flexible in this regard and can be placed on a wider range of tripods.
Even if you are using a phone or a webcam to record YouTube videos, you should consider mounting the device on a stable stand. It is possible to find mini tripods ideal for smartphones for as little as $10. These tripods are small enough to carry in your pocket, so you will be prepared to start making a video no matter where your adventures take you. If you are using a web camera, you should attach it to the stand so that it won’t move accidentally after you touch the surface it is placed on.
Smartphone Camera Gear
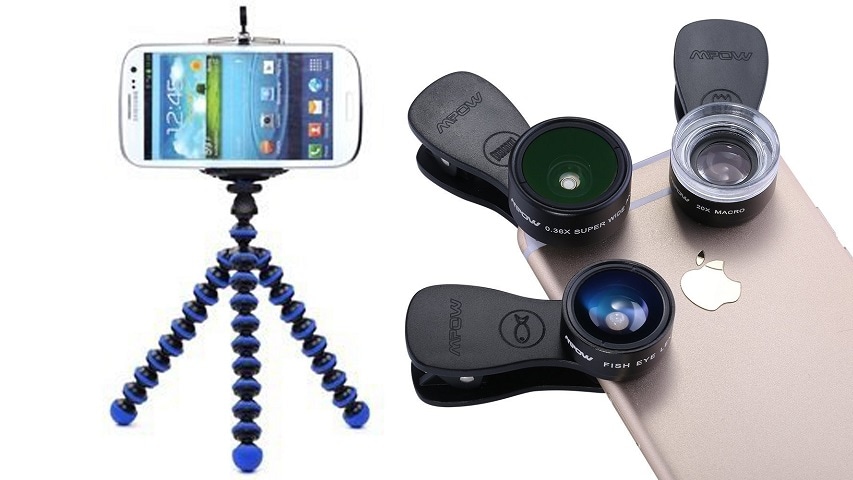
The short version: There’s a lot of gear out there designed with smartphone photos and videos in mind, including clip-on lenses, tripod mounts, phone-mounted LED lights, and inexpensive microphones that plug into the audio jack.
The long version: Recording your videos with a mobile phone can be a good decision. It all depends on the phone you have and the range of add-ons and apps that you complement it with. Almost every high-end model released in the past five years can shoot videos in 1080p or higher. Some can even produce 4K footage. If you perfect your smartphone filming technique, your YouTube videos could look as if they were made with pro equipment.
On the flip side, smartphone cameras typically perform poorly in low light. It is possible to download an app that lets you play around with settings to overcome this, but a phone-mounted LED light is probably a better solution. An external microphone might also be a necessity, but there are some good (inexpensive) options that can simply be plugged in through the headphone jack.
Another common downside of smartphone cameras is that most of them use digital zoom, which is vastly inferior to optical zoom. If you intend to shoot anything that’s further away than a few feet, you need a clip-on lens that goes on top of the built-in camera. This inexpensive device will give you a lot of freedom to work in space, and allow you to make spectacular shots even without high-end YouTube equipment.
Equipment with Easy-to-Use Video Editor


Richard Bennett
Richard Bennett is a writer and a lover of all things video.
Follow @Richard Bennett
Richard Bennett
Oct 26, 2023• Proven solutions
Check out our most updated guide on this topic: YouTube Equipment Starter Guide For Beginners .
The first thing to make sure of before starting a YouTube channel is having all that you need to record and upload high-quality videos regularly. That doesn’t mean you have to take out a loan and spend thousands to purchase a brand new camera and all other gadgets that professional filmmakers use.
The smartest way to get started is to go through a list of necessary equipment for YouTube and check whether or not you already own some of it. Once your channel starts growing, you can then start thinking about whether you want to invest in upgraded equipment. Here is a quick overview of all items that you need to start entertaining your online audience and gaining subscribers to your YouTube channel:
- Your YouTube Camera
- Microphones and Audio
- Lighting Gear for YouTube
- Tripods and Camera Stands
- Smartphone Camera Gear
YouTube Cameras
The short version: Use whatever you already have, even if it’s your phone or webcam. It’s nice to have sharp, fine-tuned, 4K footage, but viewers will forgive lower visual quality if your content is good.
The long version: You will need a camera, but there are a lot of different devices you can use including DSLRs, point and shoots, webcams, and your smartphone.
Your choice of camera will have a tremendous impact on the visual quality of your content and might drive your decisions regarding other pieces of equipment. However, you shouldn’t feel obliged to work with a top-notch camera from day one, especially since cheaper options can produce great results if used the right way.
On one end of the spectrum, you have basic smartphone cameras and web cameras, which are easy to come by and simple to operate. These days, high-end phones come equipped with quite powerful cameras that are more than sufficient for the needs of the average YouTuber. Better webcams can also do the job, although high-performance webcam models can get pretty expensive too. It is probably wise to resist the urge to start broadcasting with the built-in camera in your laptop and at least get a webcam or use your phone, but your computer’s camera is still always an option. Not having a better camera should never stop you from making YouTube videos.
If you already have a DSLR camera then it’s a good idea to familiarize yourself with it. You have far more freedom to adjust the settings and achieve a professional look for your videos with a DSLR, but that does mean it’ll take some time to become an expert at using it. Ultra-high resolution is not required for YouTube, but it certainly won’t hurt to have additional sharpness and more detail in the scene. If you’re shopping for a DSLR, look for one with a flip screen that allows you to quickly check what your viewers see.
YouTube Microphone and Audio
The short version: Audio quality is extremely important. If you can buy either a new camera or an external microphone, but not both, it might be better to go for the microphone. Click here for advice on upping your audio quality without an external microphone.
The long version: Sound capturing is every bit as important for your success as your video feed. In fact, poor audio can be even more damaging to your subscriber count than grainy video, since people won’t spend their time listening to something they have to put effort into understanding.
Again, most YouTube video makers have a limited budget at their disposal, so professional microphones are mostly off the table. However, investing in a directional microphone (‘shotgun mic’) that can pick up your voice clearly and without background noise is certainly a smart move. Such microphones can be pointed towards you while you speak, and since most YouTubers sit still while doing their shows there won’t be too much need for in-session adjustments.
If you’re not ready to invest in a shotgun mic, you can also find very inexpensive (often under $20) LAV mics. These small microphones can be pinned to your shirt, which allows them to record very clear dialogue because they’re so close to your mouth.
Lights for YouTube
The short version: You need as much light as you can get. Lighting kits can be affordable on Amazon, but you can also achieve a great look using daylight/windows and ‘daylight’ lightbulbs.
The long version: If you’ve ever tried to make a video indoors, you already know that it’s necessary to have additional light. Often just filming with the normal lights in a room will cause your footage to look dark and grainy, and possibly be tinted orange. To overcome these problems you need to increase the amount of light you have available.
Sometimes, it is enough to film near windows and/or bring more household lamps into your filming area. For any household lamps or lighting fixtures you use, make sure to put in white or ‘daylight’ lightbulbs instead of using the orange/tungsten bulbs that you might have for everyday use (this is how you avoid tinting things orange).
If you have the budget available to get some lighting equipment, you can find softbox lights or LED panel lights available fairly inexpensively online. Softbox lights are great because they provide even, diffused, light.
Another useful piece of lighting equipment to have is a reflector. A reflector is usually a piece of white, silver, or gold fabric stretched over a frame. You can use it to bounce light from one light source back towards yourself (this is a great way to fill shadows cast by your main light). Reflectors tend to be inexpensive, but you can also use white cardboard or tinfoil in place of purchasing a reflector.
Tripods and Camera Stands
The short version: You need something to hold your camera. If you mostly film in your own home that can be a desk or a stack of books, but if you make a lot of videos while you’re on the go you probably need a tripod or gimbal. Heavier cameras need heavier tripods.
The long version: While handheld cameras can deliver solid results for vloggers and casual streamers, viewers do expect reasonably stable footage. For many types of videos, the camera needs to be completely still and flatly positioned on a horizontal plane. Tripods and camera stands can cost very little, so it’s a good idea to look into getting some kind of stabilizer.
When you are choosing a tripod, pay attention to how much it weighs. If the camera that needs to be mounted on it is very heavy (like some DSLR models), you want to ensure that the structure itself weighs enough not to be easily tipped over. Too thin tripods can put your camera at risk, and that’s the last thing you want. Smaller cameras such as GoPros are more flexible in this regard and can be placed on a wider range of tripods.
Even if you are using a phone or a webcam to record YouTube videos, you should consider mounting the device on a stable stand. It is possible to find mini tripods ideal for smartphones for as little as $10. These tripods are small enough to carry in your pocket, so you will be prepared to start making a video no matter where your adventures take you. If you are using a web camera, you should attach it to the stand so that it won’t move accidentally after you touch the surface it is placed on.
Smartphone Camera Gear
The short version: There’s a lot of gear out there designed with smartphone photos and videos in mind, including clip-on lenses, tripod mounts, phone-mounted LED lights, and inexpensive microphones that plug into the audio jack.
The long version: Recording your videos with a mobile phone can be a good decision. It all depends on the phone you have and the range of add-ons and apps that you complement it with. Almost every high-end model released in the past five years can shoot videos in 1080p or higher. Some can even produce 4K footage. If you perfect your smartphone filming technique, your YouTube videos could look as if they were made with pro equipment.
On the flip side, smartphone cameras typically perform poorly in low light. It is possible to download an app that lets you play around with settings to overcome this, but a phone-mounted LED light is probably a better solution. An external microphone might also be a necessity, but there are some good (inexpensive) options that can simply be plugged in through the headphone jack.
Another common downside of smartphone cameras is that most of them use digital zoom, which is vastly inferior to optical zoom. If you intend to shoot anything that’s further away than a few feet, you need a clip-on lens that goes on top of the built-in camera. This inexpensive device will give you a lot of freedom to work in space, and allow you to make spectacular shots even without high-end YouTube equipment.
Equipment with Easy-to-Use Video Editor
Richard Bennett
Richard Bennett is a writer and a lover of all things video.
Follow @Richard Bennett
Brand Your Channel: Innovative Banner Templates for Gamers
Gaming videos have become increasingly popular on YouTube, especially among young people. It is not uncommon for older folk to enjoy this type of content, especially if they want to unwind after a long day. However, the industry is becoming pretty crowded, making it harder for content creators to stand out from the crowd.
An excellent way to get your target audience to notice you would be to design a killer YouTube banner that will immediately cause anyone scrolling past to click on your video. Stick around to learn how to create a great gaming YouTube banner with templates.
Importance of a Banner for Your YouTube Gaming Channel
Imagine a scenario where you want to open a brick-and-mortar store. One of the most important things you need to get out of the way is the business name. Once you have settled on a fitting name, you will then move on to create a sign to place outside your shop.
For example, a banner for your YouTube gaming channel plays a similar role to signage for a brick-and-mortar shop.
- An excellent banner helps you make a solid first impression on your viewers, some of who is viewing your content for the first time.
- Secondly, a well-designed banner reflects positively on your brand and helps you grow your audience at a steady rate.
- Thirdly, you can use your banner to give your viewers a rough idea of what your video is about without them clicking to watch. A suitable banner can cause anticipation to build within your viewers. Once the video is over, they won’t resist visiting your channel to see what else you offer.
Guide to YouTube Gaming Banner Size
We can liken a banner for your YouTube video to a book cover to a novel you have been dying to read. Therefore, it would be wise to get the size right if you want to create an excellent first impression for yourself. Ideally, the best size for a YouTube banner is 2560*1440 pixels or an aspect ratio of 16:9.
We urge you not to upload a banner smaller than 2048*1152 pixels, or else the image will appear cropped. Keep your banner within 1235*338 pixels and centered on the screen to be on the safe side.
This YouTube banner dimension is ideal for viewing on any device since your audience might use their smartphones or laptop to watch your videos on YouTube. Lastly, ensure you keep the file to a maximum of 6MB. We believe this file size is pretty generous.
Tips for Designing an Attractive Gaming YouTube Banner
Below are some tips that will help you create beautiful YouTube banners.
Simplicity is key: Contrary to popular belief, a simple banner looks more polished than a complex one. If your YouTube banner has too many elements, your viewers using their mobile phones might have a challenge viewing the image.
Ensure the graphics are high-quality : Nothing is as frustrating to your viewers as seeing a blurry or pixelated YouTube banner. However, high-quality graphics with a resolution of at least 1920*1080 pixels make your work look polished and attract more viewers to your channel.
Leverage the grid system: Some of your viewers might watch your videos from their smartphones, and others on their laptops or tablets. The grid system allows you to ensure the full banner will be visible no matter what device your audience will use to watch your gaming videos.
Add a CTA: At the end of the day, you are trying to grow your audience on your YouTube channel. You might also have other social media platforms where you post content. Since your banner is one of the first things your audience will see, you could include a short, easy-to-read, and understandable call to action. For instance, you could encourage them to “Subscribe Now!”
Incorporate your unique color scheme: By now, you already have a theme for your YouTube channel that your existing subscribers associate with you. As you design your YouTube banner, ensure you incorporate your theme colors, so new visitors know what colors to look out for as they scroll on the platform.
Why Use Templates To Create Gaming YouTube Banners?
First and foremost, a gaming youtube banner template takes the tedium out of creating a design from scratch. They are also systematized, meaning you can download a template specifically for YouTube that comes in the correct dimensions. Most importantly, templates designed for gaming YouTube banners are optimized to help you generate more organic traffic to your channel.
You probably have other expenses breathing down your neck. No need to add your YouTube banner to the list. A youtube gaming channel banner template a budget-friendly way to create stunning designs for your banner that actually look good. If you are lucky, you might find free programs to help you create gorgeous YouTube banners for your gaming channel.
Make YouTube Gaming Banners With Templates in Filmora
Now that you understand why a gaming channel banner template is essential for your YouTube channel, you might wonder where you can find some good ones to incorporate into your videos. Don’t worry because Filmora is precisely what you need.
Wondershare Filmora has a fantastic template feature that helps you make creative videos effortlessly. You can use the preset templates in the platform, saving you lots of time you would have spent designing your template from scratch. We guarantee you cannot exhaust the 1000+ templates this platform offers, meaning you are spoilt for choice!
If you want to customize your video, you can replace the stock videos that come with the preset templates with footage from your internal storage. In addition, Wondershare Filmora lets you share your favorite templates with other content creators who would also like to try making their own cool videos.
Free Download For Win 7 or later(64-bit)
Free Download For macOS 10.14 or later
Below is a detailed step-by-step guide on how to make a gaming YouTuber banner template with Wondershare Filmora.
Step 1. After creating a project with Filmora, click on the “File” tab, wait for a drop-down menu to appear, and select “Project Settings.”
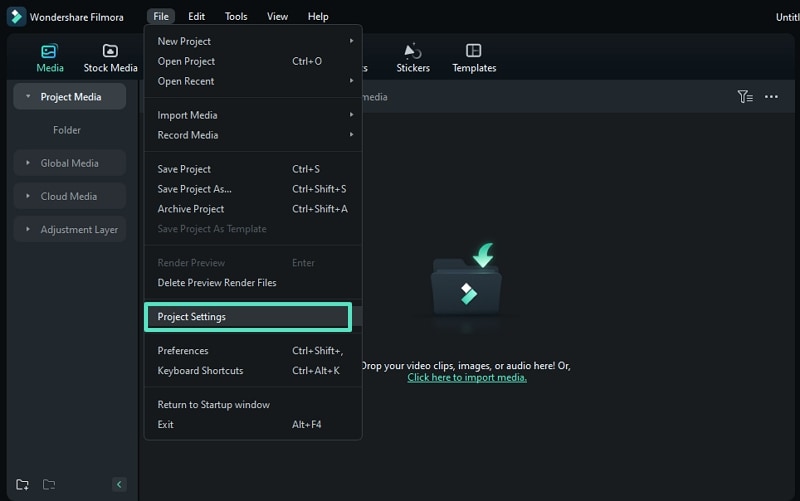
Step 2. Once a dialogue box appears, go to the “Resolution” tab and adjust the resolution to 2560*1140.
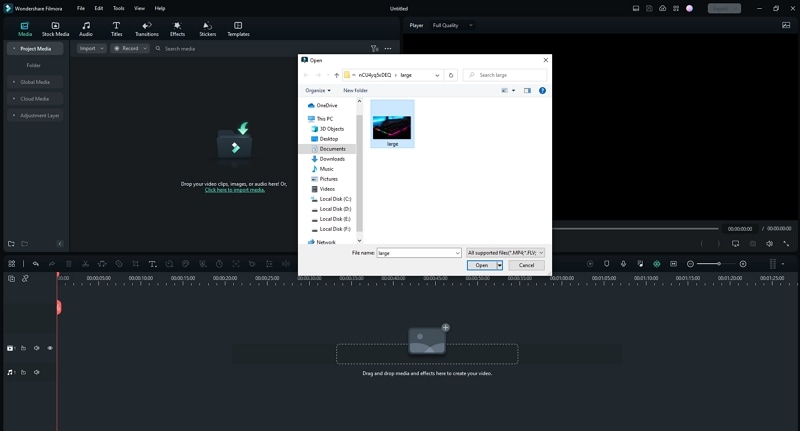
Step 3. Upload your footage or photo from your internal storage by clicking on the logo below.
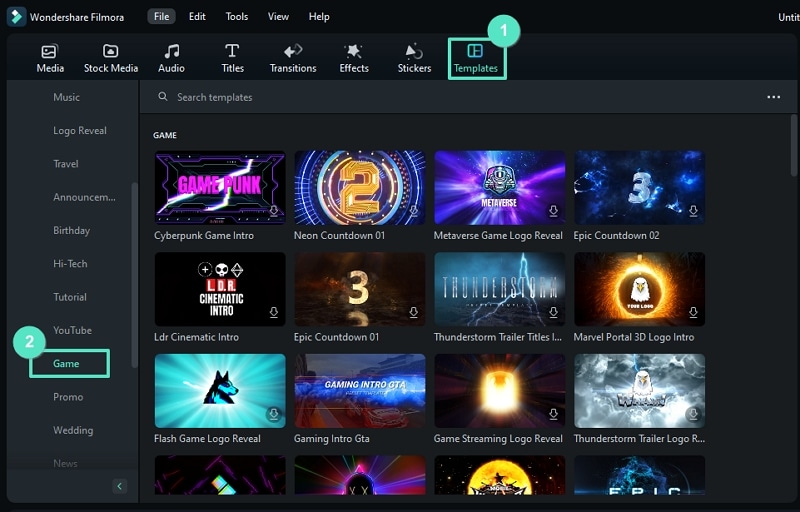
Step 4. Click on the “Template” tab at the top of the page and click “Game.” Browse the available templates till you see one you like.
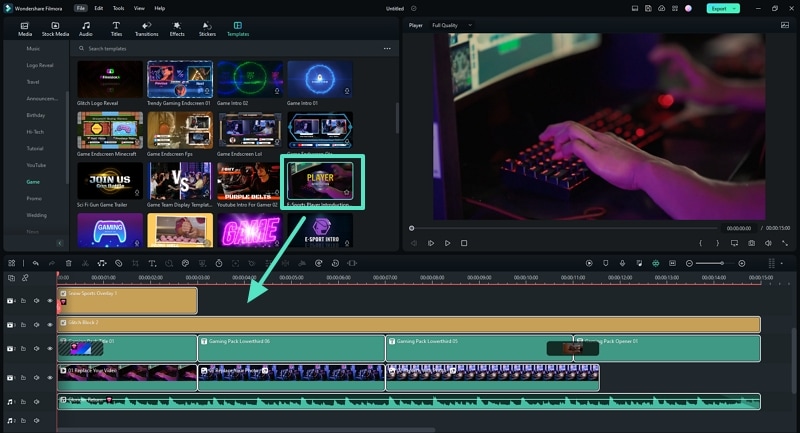
Step 5. Drag and drop the template you have chosen to the timeline as shown below.
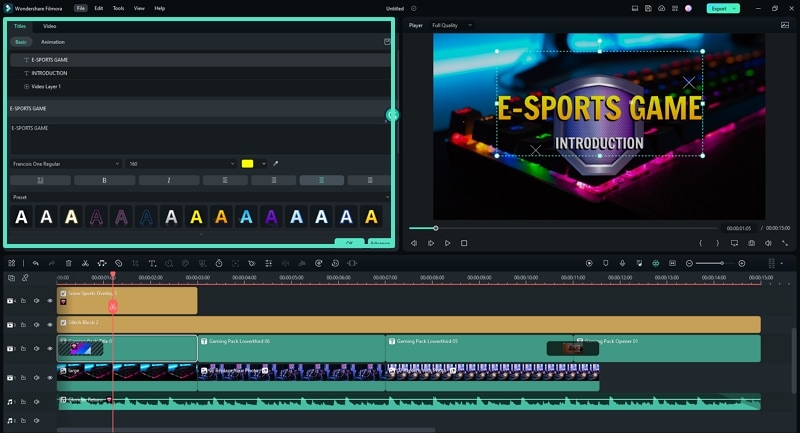
Step 6. Replace the sample footage in the template by dragging and dropping your own footage into the timeline.

Step 7. Customize the footage and change the settings until you are happy with the outcome. Edit the text using the tools provided in the platform.
Step 8. Take a screenshot of the final result.

Step 9. Specify the snapshot format and choose the storage location before saving a copy to your device.

Step 10. Once the snapshot appears in the Media Panel, right-click on it to open. Select “Reveal in Explorer” to locate the picture in your internal storage. You can now use the photo as your YouTube gaming banner.

5 Websites for Gaming Banner Templates Your YouTube
Wondershare Filmora is not the only platform you can use to create banner templates for your YouTube channel. Here is a list of 5 more websites you can try and a detailed breakdown of the remarkable features you are bound to enjoy.
1. Canva
The first alternative to Filmora on our list is Canva, which has thousands of professional, ready-made designs to wow your audience. You can work alone or with a dedicated team to ensure you design only the best banner for your channel to attract the masses to the kind of content you create.
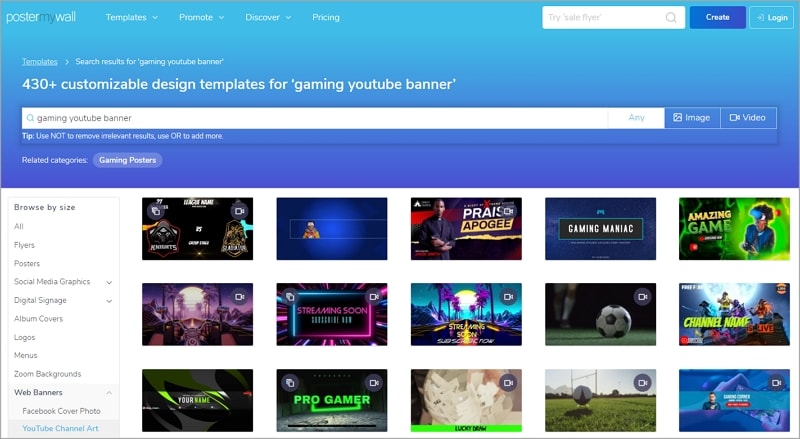
2. PosterMyWall
We couldn’t forget to include PosterMyWall to our list, which has pre-made templates you can customize to suit your needs. With PosterMyWall, you can save the time you could have used to design a banner from scratch to think of more content for your channel. The developers suggest various templates you might like, not to mention that you can sign up for free!
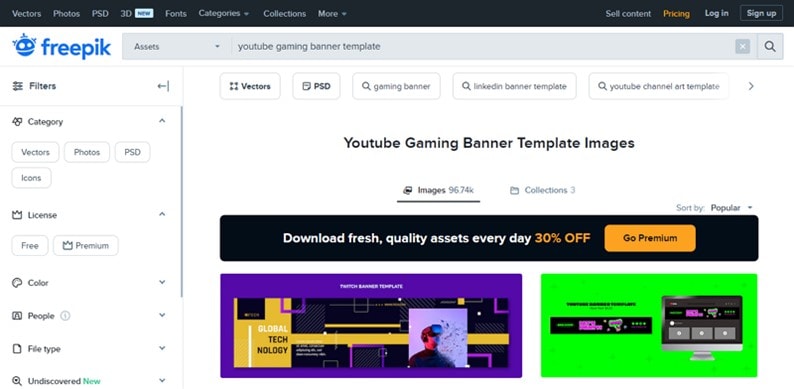
3. Freepik
Another suitable alternative to Filmora is Freepik. We guarantee you cannot exhaust all the numerous templates this platform offers. Each template is unique, with different color combinations and fonts to cater to the theme colors on your YouTube channel. You could opt for the free version or sign up for a Premium account and get 30% off.
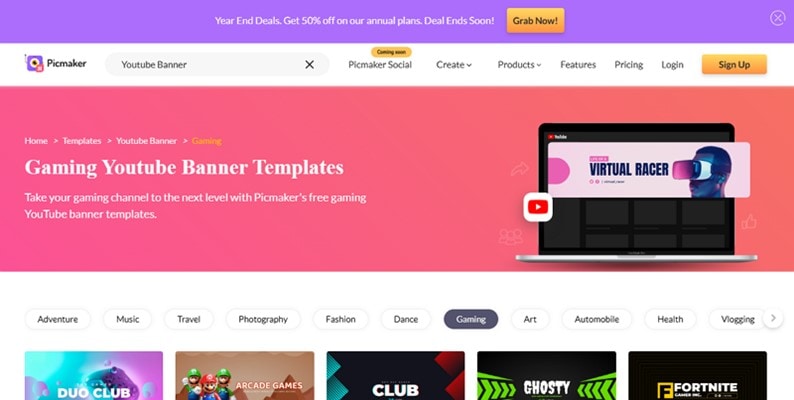
4. Pickmaker
The fourth alternative on our list is Pickmaker, a sure way to take your gaming channel to the next level. The templates are arranged in broad categories to help you pick the best one based on the type of content you post. In addition, you don’t have to part with your precious monies to start designing YouTube banners with Pickmaker.
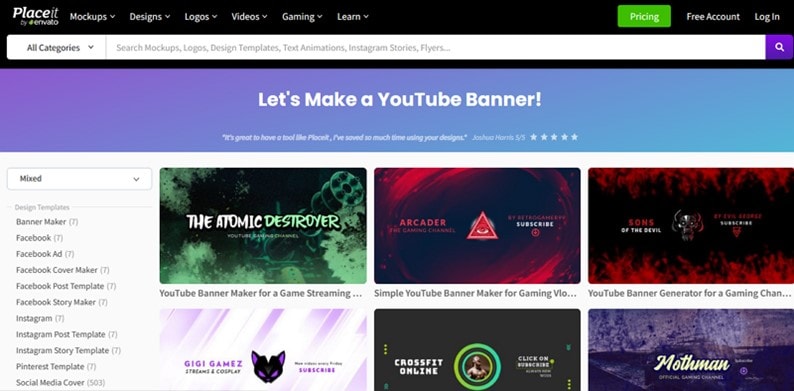
5. Placeit
Last but definitely not least is Placeit, which contains picturesque templates fitting for a gaming YouTube channel. We guarantee your audience won’t resist clicking on your videos once you use any of the templates within this platform. All you need to do is create a free account to enjoy the perks. Placeit makes your work easier by allowing you to indicate your favorite templates for use later.
Conclusion
Gaming content is far from boring, and neither should your banner. Remember, your audience will judge you based on your banner, the first content they interact with before they click to watch your video.
The better you can design your banner, the higher your chances of growing an audience that supports you by watching your content regularly. Once you have created an enticing banner, all that’s left is to ensure you have the content to match.
Free Download For macOS 10.14 or later
Below is a detailed step-by-step guide on how to make a gaming YouTuber banner template with Wondershare Filmora.
Step 1. After creating a project with Filmora, click on the “File” tab, wait for a drop-down menu to appear, and select “Project Settings.”
Step 2. Once a dialogue box appears, go to the “Resolution” tab and adjust the resolution to 2560*1140.
Step 3. Upload your footage or photo from your internal storage by clicking on the logo below.
Step 4. Click on the “Template” tab at the top of the page and click “Game.” Browse the available templates till you see one you like.
Step 5. Drag and drop the template you have chosen to the timeline as shown below.
Step 6. Replace the sample footage in the template by dragging and dropping your own footage into the timeline.
Step 7. Customize the footage and change the settings until you are happy with the outcome. Edit the text using the tools provided in the platform.
Step 8. Take a screenshot of the final result.
Step 9. Specify the snapshot format and choose the storage location before saving a copy to your device.
Step 10. Once the snapshot appears in the Media Panel, right-click on it to open. Select “Reveal in Explorer” to locate the picture in your internal storage. You can now use the photo as your YouTube gaming banner.
5 Websites for Gaming Banner Templates Your YouTube
Wondershare Filmora is not the only platform you can use to create banner templates for your YouTube channel. Here is a list of 5 more websites you can try and a detailed breakdown of the remarkable features you are bound to enjoy.
1. Canva
The first alternative to Filmora on our list is Canva, which has thousands of professional, ready-made designs to wow your audience. You can work alone or with a dedicated team to ensure you design only the best banner for your channel to attract the masses to the kind of content you create.
2. PosterMyWall
We couldn’t forget to include PosterMyWall to our list, which has pre-made templates you can customize to suit your needs. With PosterMyWall, you can save the time you could have used to design a banner from scratch to think of more content for your channel. The developers suggest various templates you might like, not to mention that you can sign up for free!
3. Freepik
Another suitable alternative to Filmora is Freepik. We guarantee you cannot exhaust all the numerous templates this platform offers. Each template is unique, with different color combinations and fonts to cater to the theme colors on your YouTube channel. You could opt for the free version or sign up for a Premium account and get 30% off.
4. Pickmaker
The fourth alternative on our list is Pickmaker, a sure way to take your gaming channel to the next level. The templates are arranged in broad categories to help you pick the best one based on the type of content you post. In addition, you don’t have to part with your precious monies to start designing YouTube banners with Pickmaker.
5. Placeit
Last but definitely not least is Placeit, which contains picturesque templates fitting for a gaming YouTube channel. We guarantee your audience won’t resist clicking on your videos once you use any of the templates within this platform. All you need to do is create a free account to enjoy the perks. Placeit makes your work easier by allowing you to indicate your favorite templates for use later.
Conclusion
Gaming content is far from boring, and neither should your banner. Remember, your audience will judge you based on your banner, the first content they interact with before they click to watch your video.
The better you can design your banner, the higher your chances of growing an audience that supports you by watching your content regularly. Once you have created an enticing banner, all that’s left is to ensure you have the content to match.
Also read:
- 2024 Approved Cutting Edge Screen Time YouTube's Top Movies List
- In 2024, Elevate Your Channel Techniques for Logo Insertion in Videos
- In 2024, Edit with Ease #10 Video-to-Mp3 Tools of the Trade
- From Good to Great Transformative Tactics with Studio
- Streamline Your Videos Top 10 YouTube-to-WebM Converters
- Decoding Revenue How Much Do Creators Earn on Youtube for 2024
- From Script to Spectacle Independent Effect Innovation
- Video Editing Essentials Building YouTube Trailers in Filmora
- In 2024, Best 8 YouTube Thumbnail Grabbers You Should Know
- [New] Easily Download Your Favorites Handpicked Tools Reviewed
- Elevate Engagement Top Video Release Slots for 2024
- Perfecting Pics & Videos on iPhones and Androids with Best Apps
- Effortless Transition From Spotify to YouTube Find the Best Apps for 2024
- The Roadmap to YouTube Success Top 10 Insights on Video Engagement
- 2024 Approved Directed Focus YouTube's Easy Ways for Smoother Borders
- 2024 Approved Earning Through YouTube An Overview
- In 2024, Dominate the Scene The Best Hashtag Tactics for YouTube Gamers
- 2024 Approved Craftsman of the Multimedia Medley
- A Step-by-Step Manual on Repetitive Watch Experiences in YT for 2024
- A Step-by-Step Guide to Edit YouTube Videos in FinalCut for 2024
- Infuse Vibrancy YouTube Thumbnails with Neon Borders
- Transform Your Games Into a Live Stream Spectacle
- [New] Best YouTube Names Generators [+ How to Brainstorm]
- In 2024, Enhancing Your YouTube Content with Right Camera Gear
- [New] Enhance Your Music Library Top 6 Free iOS Apps for Audio Conversion
- [New] Crafting Chorus in a Click Essential Insights Into Shortform Song Videos
- [New] Channeling Success The Essential Elements for Profitable Video Trailers
- The Modern Marketer's Guide to Video Sharing Exploring IGTV & YouTube
- Discovering the Ultimate 10-VR Video Experience on YouTube for 2024
- In 2024, A Comprehensive Look at Editing and Uploading Virtual Reality Videos to YouTube
- [Updated] Crafting Collabs for YouTube Channel Expansion
- OBS for a Clearer, Better Live Stream to YouTube
- Hourly Headliners The Leading YT Videos in the Last 24 Hours
- Learn the Easy Tricks for Eliminating Unwanted Youtube Content (PC/Mobile)
- 2024 Approved Charting Social Media Trends with Data Graphics
- [Updated] Earning Through YouTube Navigating Revenue Without Ads
- The Essentials of Earning on YouTube Platforms
- [Updated] 2024 Approved Navigating Devices for Google Meet Session
- Quick Steps to Change Weather Location on Apple iPhone X | Dr.fone
- In 2024, Mastering Slow-Mo in Snapchat A Comprehensive Tutorial
- New Open-Source Video Editing Revolution Top Free Tools for 2024
- New In 2024, The Ultimate List of Android Video Editing Apps for Beginners
- Unbeatable Video Splitters to Match Xplit
- Updated Free Online Video Editing Platforms Best iMovie Substitutes for 2024
- ACID Pro Reviewed Comparable Professional Tools Explored for 2024
- In 2024, Easy Guide to Nokia 130 Music FRP Bypass With Best Methods
- In 2024, Top 10 Best Spy Watches For your Vivo Y02T | Dr.fone
- Undelete lost data from Samsung Galaxy XCover 7
- [Updated] Bringing YouTube Home to Your Instagram Story
- [New] Easy Steps to Audit Your Favorite TikTok Sessions for 2024
- How to Cast Meizu 21 to Computer for iPhone and Android? | Dr.fone
- Is your Infinix Zero 5G 2023 Turbo working too slow? Heres how you can hard reset it | Dr.fone
- New 2024 Approved Easy Video Joiner Is Free Software that Is Created to Help Users to Join, Merge and Combine Different Video Clips to Form a Single Movie
- [Updated] Hidden ShotSnappers Advanced Techniques for Invisible Image Capturing on Snapchat for 2024
- New 2024 Approved Apple Has Released Its Choices for the Best App and Video Games of 2019 and Revealed some of the Hottest Trends on the App Store.Here Are the List of the Best and Most Popular iPhone Apps that Left Th
- How To Transfer WhatsApp From iPhone SE (2022) to other iPhone 14 Pro devices? | Dr.fone
- [New] 2024 Approved Boosting Engagement Navigate to These 8 Best Apps for Post Timers
- 2024 Approved Mastering Instagram's Latest Trends Reels and Stories
- [New] Bypassing Instagram's Video Roadblocks Effortlessly for 2024
- Laughter Lab Steps to Simple, Sharp Memes
- Mastering Your Digital Footprint Prime 2024 Cloud Solutions
- [New] In 2024, TikTok to Twitter Sharing Videos
- [Updated] In 2024, The Pro's Playbook Mastering the Art of Capturing PS4 Gaming
- How to Change Location on TikTok to See More Content On your Tecno Pop 7 Pro | Dr.fone
- How to Change Location on TikTok to See More Content On your Samsung Galaxy S23 | Dr.fone
- [New] Unlock IG Success with Expert Insights on Loop Videos
- New In 2024, Amplifying Your Auditory Experience Leading Providers of Sound Libraries
- New 2024 Approved Maximizing Your Game Performance A Guide to Mastering Morphvox Voice Modification in Live Streams
- Stories in Simplicity
- 2024 Approved Guide to Excellent Voice Recorders for Macs
- Title: "[New] Essential YouTube Equipment For Starting Your Channel - What Do You Really Need?"
- Author: Steven
- Created at : 2024-05-25 20:15:44
- Updated at : 2024-05-26 20:15:44
- Link: https://youtube-clips.techidaily.com/new-essential-youtube-equipment-for-starting-your-channel-what-do-you-really-need/
- License: This work is licensed under CC BY-NC-SA 4.0.
