![[New] Essential Tech for New Channel Launches](https://thmb.techidaily.com/0f399835ae801930fc09d856b55526ca68007b6aa28f7cfc8442056063114a14.jpg)
[New] Essential Tech for New Channel Launches
Essential Tech for New Channel Launches
The Best YouTube Equipment: What You Need to Start Your Channel 
Richard Bennett
Mar 27, 2024• Proven solutions
When you first started your vlog you likely looked for tips from well-established vloggers. Something that may have been surprising was the amount of equipment it takes to run a successful vlog. Besides your camera you need equipment for stabilizing it, for lighting your shots, and for recording better audio than your camera is capable of. If you still don’t know which camera to use, this article will tell you the best cameras for YouTube .
Do not be overwhelmed! There are loads of affordable options for YouTube equipment. There are even some tricks you can use to get by without some pieces of equipment until you are ready to make the investment.
Here are examples of some of the best YouTube equipment. Watch for the ‘Free Option!’ at the bottom of every section!
1. Stabilizers for YouTube
Selfie Stick: A lot of vloggers like to record from their phones, and selfie sticks make great stabilizers. You can put one end on the ground and use your selfie stick similarly to a monopod. Selfie sticks are also very affordable. The Cazbe Selfie Stick is only about $40. If you want to be a bit more sophisticated about your smartphone video then you might consider the KumbaCam 3 Axis Smart Phone Stabilizer, which is described as a ‘selfie stick on steroids’. It is a pricier option at $350.

Tripod: A tripod is what most people think of when they think of stabilizing their cameras. Tripods come in different weights and sizes, and there are even tripods specifically for smartphones. There is a wide range of pricing for tripods. Mid-range is about $50.

Free Option! Any Available Surface: Kitchen tables. Desks. Park benches. Trees. Your friend’s shoulder, if you ask nicely. Anything you can rest your camera on top of can be used to record a steady video.
2. Lighting for YouTube Videos
Softbox Lights: These are the kinds of lights that were probably used to take your school photos. They create soft, diffused, light and can be fairly affordable. The LimoStudio 700W Photography Softbox Lighting Kit is $167, and that is about the average.

LED Panel Light: LED panels produce high quality light. Prices vary. The Aputure Amaran AL-528S LED Video Light costs $358 (with stand). There are also LED panel lights which can be mounted onto your camera, like the Julius Studio NEW 160 LED 160 Dimmable Ultra High Power Panel Light which costs $111.

Free Option! The Sun: Natural light is always powerful enough to make your videos look great. Consider recording outside, or near a window in your house.
3. Audio Equipment for YouTube
Snoball: A Blue Snoball USB mic is an extremely affordable option at $60, although it does not have good range. You have to stay close to your computer if you use a Snoball.

Shotgun: You can get a shotgun mic to attach to your camera at a fairly decent price. The RØDE Video Shotgun Mic is only $140. You will not be able to stray far from your camera as it works best when you are close to it.

MP3 Recorder: A very high quality voice recorder is one way to record great audio and still be able to move freely. The Roland R-05 WAVE/MP3 Recorder is a great choice at $200.

LAV System: A lavalier, or lapel, mic system is a lot of vloggers’ favorite way to record dialogue because the mics are small and clip right on to your clothing. This is a more expensive option. The Sony LAV Wireless Mic System is $600.

Free Option! Audacity: Audacity is free audio recording/editing software that is popular with vloggers. If you do not have access to an external mic then you might be able to increase the quality of your sound recording using Audacity. You can download the latest version of Audacity for free from Audacityteam.org
4. Editing Your YouTube Videos
Filmora Video Editor: Filmora is a great program for beginners, but it is also powerful enough to satisfy more experienced vloggers. Filmora has both advanced tools like green screen or picture-in-picture, and a lot of fun features like filters, animated titles, and overlays.
 Download Mac Version ](https://tools.techidaily.com/wondershare/filmora/download/ )
Adobe Premiere Pro: Premiere is professional grade software that boasts an ‘industry-leading video production toolset’. You can get Premiere Pro as part of the single-app Creative Cloud plan for $19.99 a month.
Free Option Filmora’s mobile app, Filmora, is available for free for a limited time for both Android and iPhone. It has a ton of features, and a really intuitive interface designed specifically for the mobile format.

Richard Bennett
Richard Bennett is a writer and a lover of all things video.
Follow @Richard Bennett
Richard Bennett
Mar 27, 2024• Proven solutions
When you first started your vlog you likely looked for tips from well-established vloggers. Something that may have been surprising was the amount of equipment it takes to run a successful vlog. Besides your camera you need equipment for stabilizing it, for lighting your shots, and for recording better audio than your camera is capable of. If you still don’t know which camera to use, this article will tell you the best cameras for YouTube .
Do not be overwhelmed! There are loads of affordable options for YouTube equipment. There are even some tricks you can use to get by without some pieces of equipment until you are ready to make the investment.
Here are examples of some of the best YouTube equipment. Watch for the ‘Free Option!’ at the bottom of every section!
1. Stabilizers for YouTube
Selfie Stick: A lot of vloggers like to record from their phones, and selfie sticks make great stabilizers. You can put one end on the ground and use your selfie stick similarly to a monopod. Selfie sticks are also very affordable. The Cazbe Selfie Stick is only about $40. If you want to be a bit more sophisticated about your smartphone video then you might consider the KumbaCam 3 Axis Smart Phone Stabilizer, which is described as a ‘selfie stick on steroids’. It is a pricier option at $350.
Tripod: A tripod is what most people think of when they think of stabilizing their cameras. Tripods come in different weights and sizes, and there are even tripods specifically for smartphones. There is a wide range of pricing for tripods. Mid-range is about $50.
Free Option! Any Available Surface: Kitchen tables. Desks. Park benches. Trees. Your friend’s shoulder, if you ask nicely. Anything you can rest your camera on top of can be used to record a steady video.
2. Lighting for YouTube Videos
Softbox Lights: These are the kinds of lights that were probably used to take your school photos. They create soft, diffused, light and can be fairly affordable. The LimoStudio 700W Photography Softbox Lighting Kit is $167, and that is about the average.
LED Panel Light: LED panels produce high quality light. Prices vary. The Aputure Amaran AL-528S LED Video Light costs $358 (with stand). There are also LED panel lights which can be mounted onto your camera, like the Julius Studio NEW 160 LED 160 Dimmable Ultra High Power Panel Light which costs $111.
Free Option! The Sun: Natural light is always powerful enough to make your videos look great. Consider recording outside, or near a window in your house.
3. Audio Equipment for YouTube
Snoball: A Blue Snoball USB mic is an extremely affordable option at $60, although it does not have good range. You have to stay close to your computer if you use a Snoball.
Shotgun: You can get a shotgun mic to attach to your camera at a fairly decent price. The RØDE Video Shotgun Mic is only $140. You will not be able to stray far from your camera as it works best when you are close to it.
MP3 Recorder: A very high quality voice recorder is one way to record great audio and still be able to move freely. The Roland R-05 WAVE/MP3 Recorder is a great choice at $200.
LAV System: A lavalier, or lapel, mic system is a lot of vloggers’ favorite way to record dialogue because the mics are small and clip right on to your clothing. This is a more expensive option. The Sony LAV Wireless Mic System is $600.
Free Option! Audacity: Audacity is free audio recording/editing software that is popular with vloggers. If you do not have access to an external mic then you might be able to increase the quality of your sound recording using Audacity. You can download the latest version of Audacity for free from Audacityteam.org
4. Editing Your YouTube Videos
Filmora Video Editor: Filmora is a great program for beginners, but it is also powerful enough to satisfy more experienced vloggers. Filmora has both advanced tools like green screen or picture-in-picture, and a lot of fun features like filters, animated titles, and overlays.
Download Mac Version ](https://tools.techidaily.com/wondershare/filmora/download/ )
Adobe Premiere Pro: Premiere is professional grade software that boasts an ‘industry-leading video production toolset’. You can get Premiere Pro as part of the single-app Creative Cloud plan for $19.99 a month.
Free Option Filmora’s mobile app, Filmora, is available for free for a limited time for both Android and iPhone. It has a ton of features, and a really intuitive interface designed specifically for the mobile format.
Richard Bennett
Richard Bennett is a writer and a lover of all things video.
Follow @Richard Bennett
Cut to Perfection: Editing Video Duration on YouTube
How to Edit the Length of a Video on YouTube
Richard Bennett
Mar 27, 2024• Proven solutions
Apart from providing video hosting and sharing features, the YouTube platform also has an online editor which is going to provide you with the possibility to make changes and additions online without having to download any particular program. In this guide, we are going to show you how to make your video shorter or longer with YouTube online video editor.
A Better Alternative on How to Edit YouTube Video Length - Wondershare Filmora is a perfect alternative to edit every single clip frame by frame. Not just to shorten or lengthen the video. It offers quite a lot of opportunities. Watch the video below to know more:
Download Mac Version ](https://tools.techidaily.com/wondershare/filmora/download/ )
For instance, the application is offering non-linear ripple video editing. This is going to allow you to combine multiple video clips and pin them together conveniently. What is more, you can also apply PIP and Green Screen professional effects with just a few clicks. Sure, the YouTube video editor is a perfect solution for those who don’t want to achieve professional quality, but if you do, Wondershare Filmora is without a doubt the far better alternative. This is something that’s going to enable you to edit and re-touch your videos as well as to size them appropriately. Instead of dragging two bars together, you will be able to touch every single frame and size it according to your own particular needs. This is going to result in flawless videos.
How to Edit YouTube Video Length Using the built-in Video Editor
The YouTube video editor is easy to use, and you can easily learn how to do all sorts of changes to your video. Let’s see the things that you need to go through in order to edit the length.
Note: From 20th September 2017 users will no longer be able to use the complimentary editing suite. Check the best YouTube video editor alternatives from this complete guide.
Step 1 Get to the video editor

In order to do so, you would have to go ahead and login into your account. Then, go to the “My Channel” panel and select the video that you want to cut. Once you’ve done this, click on the “Video manager” option and click on the “create” tab which should be located on the right side for the page. There, you will be able to find the “Video Editor”. Of course, you can also add “/editor” to YouTube’s URL, and you would be good to go.
Step 2 Import Your Video
Once you’ve done all of the above, you would have to drag your video in order to cut it’s time. Keep in mind that the videos are made out of a maximum of 50 clips. The site is going to save every single video that you upload as a particular clip which could be properly combined with the rest in order to make one larger video. This is important.
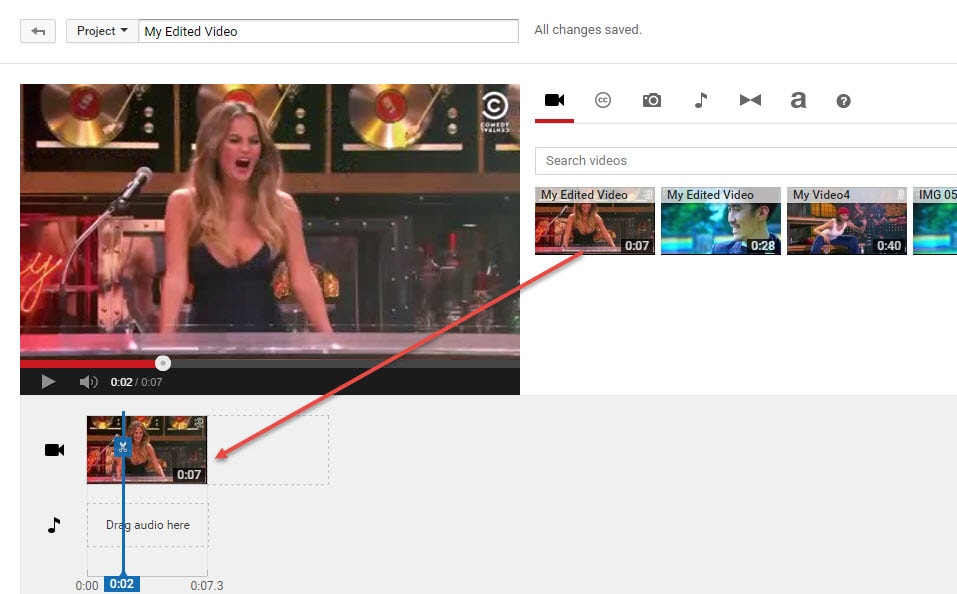
Step 3 Edit the Length
This is the part where you actually get to edit the length of your video. In order to do so effectively, you have to drag the bar at either end of your clip towards the other end in order to shorten the clip conveniently.
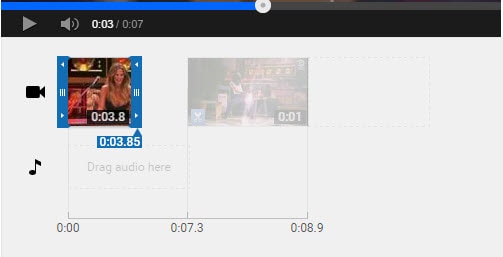
What is more, if you want to increase the length, you have to drag the bar to the opposite end – outwards. There is going to be an indicator which is going to appear at the bottom of the clip, and it’s going to show you the overall duration of the file, and it’s going to adjust itself as you slide the bars accordingly.
Step 4 Save the Clip
Of course, you would have to save the clip in order for the changes to reflect. Even though this might seem like a particularly obvious thing to do, you would be surprise to find out that a lot of people get everything done and then discard the changes by forgetting to save them and their effort goes to waste.
Richard Bennett
Richard Bennett is a writer and a lover of all things video.
Follow @Richard Bennett
Richard Bennett
Mar 27, 2024• Proven solutions
Apart from providing video hosting and sharing features, the YouTube platform also has an online editor which is going to provide you with the possibility to make changes and additions online without having to download any particular program. In this guide, we are going to show you how to make your video shorter or longer with YouTube online video editor.
A Better Alternative on How to Edit YouTube Video Length - Wondershare Filmora is a perfect alternative to edit every single clip frame by frame. Not just to shorten or lengthen the video. It offers quite a lot of opportunities. Watch the video below to know more:
Download Mac Version ](https://tools.techidaily.com/wondershare/filmora/download/ )
For instance, the application is offering non-linear ripple video editing. This is going to allow you to combine multiple video clips and pin them together conveniently. What is more, you can also apply PIP and Green Screen professional effects with just a few clicks. Sure, the YouTube video editor is a perfect solution for those who don’t want to achieve professional quality, but if you do, Wondershare Filmora is without a doubt the far better alternative. This is something that’s going to enable you to edit and re-touch your videos as well as to size them appropriately. Instead of dragging two bars together, you will be able to touch every single frame and size it according to your own particular needs. This is going to result in flawless videos.
How to Edit YouTube Video Length Using the built-in Video Editor
The YouTube video editor is easy to use, and you can easily learn how to do all sorts of changes to your video. Let’s see the things that you need to go through in order to edit the length.
Note: From 20th September 2017 users will no longer be able to use the complimentary editing suite. Check the best YouTube video editor alternatives from this complete guide.
Step 1 Get to the video editor
In order to do so, you would have to go ahead and login into your account. Then, go to the “My Channel” panel and select the video that you want to cut. Once you’ve done this, click on the “Video manager” option and click on the “create” tab which should be located on the right side for the page. There, you will be able to find the “Video Editor”. Of course, you can also add “/editor” to YouTube’s URL, and you would be good to go.
Step 2 Import Your Video
Once you’ve done all of the above, you would have to drag your video in order to cut it’s time. Keep in mind that the videos are made out of a maximum of 50 clips. The site is going to save every single video that you upload as a particular clip which could be properly combined with the rest in order to make one larger video. This is important.
Step 3 Edit the Length
This is the part where you actually get to edit the length of your video. In order to do so effectively, you have to drag the bar at either end of your clip towards the other end in order to shorten the clip conveniently.
What is more, if you want to increase the length, you have to drag the bar to the opposite end – outwards. There is going to be an indicator which is going to appear at the bottom of the clip, and it’s going to show you the overall duration of the file, and it’s going to adjust itself as you slide the bars accordingly.
Step 4 Save the Clip
Of course, you would have to save the clip in order for the changes to reflect. Even though this might seem like a particularly obvious thing to do, you would be surprise to find out that a lot of people get everything done and then discard the changes by forgetting to save them and their effort goes to waste.
Richard Bennett
Richard Bennett is a writer and a lover of all things video.
Follow @Richard Bennett
Also read:
- [New] 2024 Approved Mastering MP4 Enhancement The Ultimate SRT Integration
- [New] A Look Into MAGIX Graphic Designer
- [New] Engaging Viewers with Ease The Art of Confidently Filming for 2024
- [New] In 2024, Elevate Your Audio Mastery with Expert Audacity Usage
- [New] In 2024, Fixing Overencoded OBS Videos
- [Updated] Comedic Choreography Producing Funny Mock Films
- [Updated] In 2024, Turbulence Tamer for Mobile Cinematography
- Exploring Tom's Hardware: In-Depth Tech Insights
- In 2024, Crafting Compelling Proposals A FameBit Guide to Channel Ads
- Mini YouTube Content Explained
- Pokemon Go No GPS Signal? Heres Every Possible Solution On Oppo A1 5G | Dr.fone
- Swaying Scripts An Introduction to Bouncy Text Animations
- Title: [New] Essential Tech for New Channel Launches
- Author: Steven
- Created at : 2024-12-12 19:38:25
- Updated at : 2024-12-16 20:14:42
- Link: https://youtube-clips.techidaily.com/new-essential-tech-for-new-channel-launches/
- License: This work is licensed under CC BY-NC-SA 4.0.