
!["[New] Enrich Thumbnails Introducing Radiant Neon Elements"](https://www.lifewire.com/thmb/Wey1hmvaFNXkpGULggG7yXOy4ro=/300x200/filters:no_upscale():max_bytes(150000):strip_icc()/GettyImages-525956536-f1c8a23b12e2480cad7b8a4544b1c0d2.jpg)
"[New] Enrich Thumbnails Introducing Radiant Neon Elements"
Enrich Thumbnails: Introducing Radiant Neon Elements
Your YouTube video, or any other clip published on any forum, gets a larger number of hits if it has an attractive thumbnail. And, the fact is, a thumbnail becomes 10x more attractive when the main character that the image has have a neon border around it.
With that said, in the following sections, you will learn a couple of methods on how to add a YouTube thumbnail border around the main characters and/or objects that are significant to the clip.
In this article
01 Add Glowing Neon Border to YouTube Thumbnail with Filmora
02 Add a Glowing Neon Border in YouTube Thumbnail with Canva
03 Outline a Person in a YouTube Thumbnail with Photoshop
Part 1: How to Add Neon Border to YouTube Thumbnail for Free with Filmora
Being one of the most versatile and intuitive post-production tools available in the market today, Wondershare Filmora X allows you to add a neon border to a YouTube thumbnail quite conveniently. You can learn how to get this done on Windows or Mac by following the steps given below.
For Win 7 or later (64-bit)
For macOS 10.12 or later
Step 1: Define Project Settings and Add Image to the Timeline
Launch Wondershare Filmora X on your PC (a MacBook Pro M1 is used here), ensure that the project aspect ratio is set to 16:9 (Widescreen) on the splash screen, and click New Project. On the main interface, click the Preview quality and display settings icon from the upper-right area of the Timeline, click Change Project Aspect Ratio, click to select 1280 x 720 (HD) from the Resolution menu of the Project Settings box, and click OK to save the custom project settings.

Then select My Media from the menu bar if not already selected, click Project Media from the navigation pane, and click Import from the Media box to select and import the image of the main character or object that you want to use in the thumbnail.

Now, drag the image from the Media box to the Timeline at the bottom.

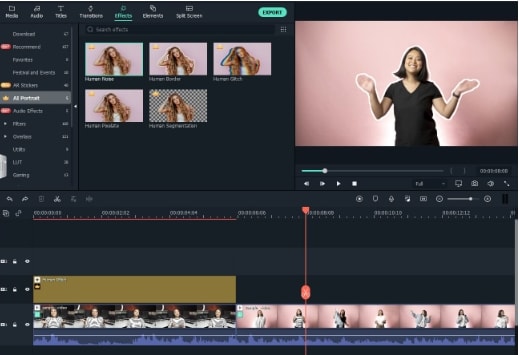
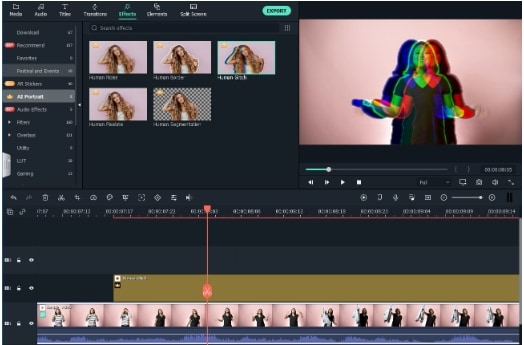
Step 2: Clear Image Background, Add Border, and Add Custom Background
Go to Effects from the menu bar, click to select the Default tab and then AI Portrait from the navigation pane, and click and drag the Human Segmentation preset from the right box, and place it over the image track in the Timeline.

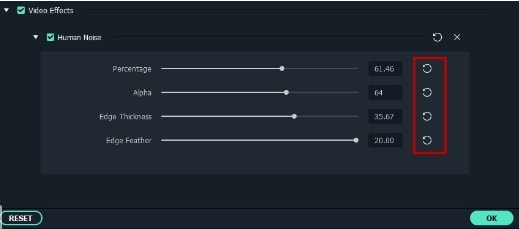
Double-click the image layer, scroll down the upper-left box to the Video Effects section, and use the Edge Thickness and Edge Feather sliders to adjust the character’s edges to make them as realistic as possible. Click OK when done.

Next, click and drag the Human Border preset over the image track in the Timeline, and follow the same procedure to customize the border. This will give the character a neon border effect.

Now, use the method explained earlier to import a custom image for the background, and drag and place it under the previous track in the Timeline.

If you are running the latest version of Filmora, you will find there are some neon light effects available under AI Portrait as well.

Step 3: Add Titles to Thumbnail
Go to Titles from the menu bar, click to select the Default tab and then Lower 3rds from the navigation pane, and click and drag your preferred lower-third preset from the right window to a separate layer in the Timeline. Double-click the lower-third layer, and use the available options in the upper-left window to change the text, its color, etc., and drag the textbox to place it to your preferred position on the image as well. Click OK to save the changes.
Next, click to select Titles from the navigation pane, and drag your preferred title from the right window to the upper-most track in the Timeline. Now use the method explained earlier to edit the text, its color, position, etc. to make it look professional.

For more tips and tricks for creating YouTube thumbnail, you can check this You Tube thumbnail creating guide.
Step 4: Get the Neon Border Thumbnail
Click the Snapshot (Camera) icon from the upper-right area of the Timeline, go to My Media from the menu bar, right-click the thumbnail of the screenshot you captured, and click Reveal in Finder (on Mac) or Reveal in Explorer (on Windows) to get to the folder the YouTube thumbnail border is saved in.

Part 2: How to Add a Glowing Neon Border in Your YouTube Thumbnail with Canva
Canva is another intuitive editing program that works on the web interface rather than having you download and install an app on your PC. You can add a neon border for YouTube thumbnails using Canva by following the instructions given below:
Step 1: Define Project Settings and Add a Background
After signing in to your Canva account, click Create a design from the top-right corner of the page, click Custom size from the bottom, define 1280 and 720 in the Width and Height fields on the box that appears respectively, and click Create new design.

Now, click to select Background from the navigation bar on the left (if the Background tool is not visible, click More and then choose Background from the expanded list), and click to select a background from the images available in the center pane.

Step 2: Upload an Image and Add Effects
Click Uploads from the navigation bar, click the More icon from the right of the Upload media button present at the top of the center pane, choose your preferred method to upload the image (with the transparent background) that you want to use, upload the image, and drag it from the center pane to the Canvas.
Note: You can use any of the tools available online to remove the background from your image for free.

To add a YouTube thumbnail border, make sure that the image that you added to the Canvas is selected, click the Duplicate icon from the upper-right area, and use the scaling handles of the copy of the image to increase its size a bit. Reposition the image back to its original location as well.
Then, click Edit image from the upper-left corner of the Canvas, click Duotone from the Edit image pane at the center, if need be, click See all, choose your preferred duotone effect to apply on the image, choose your preferred highlight and shadow colors from the box that appears next, and click Back from the top of the pane.

Next, click See all next to the Adjust section from the center pane, and drag the Blur slider to the right to increase the blur effect on the image.

Step 3: Position the Layers
While keeping the duplicate image selected, click the Position button from the upper-right area of the Canvas, and click Background to send the second image behind the first one to get the neon border effect for the photo.

Part 3: How to Outline a Person in a YouTube Thumbnail with Photoshop
Because YouTube thumbnails are nothing but static images, creating YouTube thumbnail border with Adobe Photoshop is comparatively easier. The process of doing this is given below:
Step 1: Define Document Preferences and Import an Image
Launch Adobe Photoshop on your PC, click Create new, and on the New Document customization box, define the width and height values to 1280 and 720 pixels respectively. Select Transparent from the Background Contents menu as well if not already selected. Click Create from the bottom to create a new Photoshop document with the specified document settings. Next, open the folder that contains the source image, drag the photo to Photoshop, and press Enter to place the photo.

Step 2: Remove Background from the Image
Make sure that the image layer is selected in the Layers panel on the right, go to Select from the menu bar at the top, and click Subject. From the bottom of the Layers panel, click the Add a mask icon to get rid of the background, leaving only the human on the Canvas.

Step 3: Add a Custom Background and an Outline Around the Subject
Use the method explained earlier to import a background image of your choice to Photoshop. Drag the background image layer to the bottom in the Layers panel. Double-click the masked layer, click to select Stroke from the left pane of the Layer Style box, and use the options available on the right to manage the size, color, position, etc. of the stroke that has been added around the human subject. Click OK when done, and then export the image normally to use it as a YouTube thumbnail border.

Summary
It is important to know that the default resolution of a YouTube thumbnail is 1280 x 720 pixels that is usually written and referred to as 720p. While adding a YouTube thumbnail border, it is also imperative to have a good sense of color combination and fonts. Furthermore, a decent tool like Wondershare Filmora X must be used to add an appealing neon border around the main subject in the thumbnail image easily and quickly.
02 Add a Glowing Neon Border in YouTube Thumbnail with Canva
03 Outline a Person in a YouTube Thumbnail with Photoshop
Part 1: How to Add Neon Border to YouTube Thumbnail for Free with Filmora
Being one of the most versatile and intuitive post-production tools available in the market today, Wondershare Filmora X allows you to add a neon border to a YouTube thumbnail quite conveniently. You can learn how to get this done on Windows or Mac by following the steps given below.
For Win 7 or later (64-bit)
For macOS 10.12 or later
Step 1: Define Project Settings and Add Image to the Timeline
Launch Wondershare Filmora X on your PC (a MacBook Pro M1 is used here), ensure that the project aspect ratio is set to 16:9 (Widescreen) on the splash screen, and click New Project. On the main interface, click the Preview quality and display settings icon from the upper-right area of the Timeline, click Change Project Aspect Ratio, click to select 1280 x 720 (HD) from the Resolution menu of the Project Settings box, and click OK to save the custom project settings.
Then select My Media from the menu bar if not already selected, click Project Media from the navigation pane, and click Import from the Media box to select and import the image of the main character or object that you want to use in the thumbnail.
Now, drag the image from the Media box to the Timeline at the bottom.
Step 2: Clear Image Background, Add Border, and Add Custom Background
Go to Effects from the menu bar, click to select the Default tab and then AI Portrait from the navigation pane, and click and drag the Human Segmentation preset from the right box, and place it over the image track in the Timeline.
Double-click the image layer, scroll down the upper-left box to the Video Effects section, and use the Edge Thickness and Edge Feather sliders to adjust the character’s edges to make them as realistic as possible. Click OK when done.
Next, click and drag the Human Border preset over the image track in the Timeline, and follow the same procedure to customize the border. This will give the character a neon border effect.
Now, use the method explained earlier to import a custom image for the background, and drag and place it under the previous track in the Timeline.
If you are running the latest version of Filmora, you will find there are some neon light effects available under AI Portrait as well.
Step 3: Add Titles to Thumbnail
Go to Titles from the menu bar, click to select the Default tab and then Lower 3rds from the navigation pane, and click and drag your preferred lower-third preset from the right window to a separate layer in the Timeline. Double-click the lower-third layer, and use the available options in the upper-left window to change the text, its color, etc., and drag the textbox to place it to your preferred position on the image as well. Click OK to save the changes.
Next, click to select Titles from the navigation pane, and drag your preferred title from the right window to the upper-most track in the Timeline. Now use the method explained earlier to edit the text, its color, position, etc. to make it look professional.
For more tips and tricks for creating YouTube thumbnail, you can check this You Tube thumbnail creating guide.
Step 4: Get the Neon Border Thumbnail
Click the Snapshot (Camera) icon from the upper-right area of the Timeline, go to My Media from the menu bar, right-click the thumbnail of the screenshot you captured, and click Reveal in Finder (on Mac) or Reveal in Explorer (on Windows) to get to the folder the YouTube thumbnail border is saved in.
Part 2: How to Add a Glowing Neon Border in Your YouTube Thumbnail with Canva
Canva is another intuitive editing program that works on the web interface rather than having you download and install an app on your PC. You can add a neon border for YouTube thumbnails using Canva by following the instructions given below:
Step 1: Define Project Settings and Add a Background
After signing in to your Canva account, click Create a design from the top-right corner of the page, click Custom size from the bottom, define 1280 and 720 in the Width and Height fields on the box that appears respectively, and click Create new design.
Now, click to select Background from the navigation bar on the left (if the Background tool is not visible, click More and then choose Background from the expanded list), and click to select a background from the images available in the center pane.
Step 2: Upload an Image and Add Effects
Click Uploads from the navigation bar, click the More icon from the right of the Upload media button present at the top of the center pane, choose your preferred method to upload the image (with the transparent background) that you want to use, upload the image, and drag it from the center pane to the Canvas.
Note: You can use any of the tools available online to remove the background from your image for free.
To add a YouTube thumbnail border, make sure that the image that you added to the Canvas is selected, click the Duplicate icon from the upper-right area, and use the scaling handles of the copy of the image to increase its size a bit. Reposition the image back to its original location as well.
Then, click Edit image from the upper-left corner of the Canvas, click Duotone from the Edit image pane at the center, if need be, click See all, choose your preferred duotone effect to apply on the image, choose your preferred highlight and shadow colors from the box that appears next, and click Back from the top of the pane.
Next, click See all next to the Adjust section from the center pane, and drag the Blur slider to the right to increase the blur effect on the image.
Step 3: Position the Layers
While keeping the duplicate image selected, click the Position button from the upper-right area of the Canvas, and click Background to send the second image behind the first one to get the neon border effect for the photo.
Part 3: How to Outline a Person in a YouTube Thumbnail with Photoshop
Because YouTube thumbnails are nothing but static images, creating YouTube thumbnail border with Adobe Photoshop is comparatively easier. The process of doing this is given below:
Step 1: Define Document Preferences and Import an Image
Launch Adobe Photoshop on your PC, click Create new, and on the New Document customization box, define the width and height values to 1280 and 720 pixels respectively. Select Transparent from the Background Contents menu as well if not already selected. Click Create from the bottom to create a new Photoshop document with the specified document settings. Next, open the folder that contains the source image, drag the photo to Photoshop, and press Enter to place the photo.
Step 2: Remove Background from the Image
Make sure that the image layer is selected in the Layers panel on the right, go to Select from the menu bar at the top, and click Subject. From the bottom of the Layers panel, click the Add a mask icon to get rid of the background, leaving only the human on the Canvas.
Step 3: Add a Custom Background and an Outline Around the Subject
Use the method explained earlier to import a background image of your choice to Photoshop. Drag the background image layer to the bottom in the Layers panel. Double-click the masked layer, click to select Stroke from the left pane of the Layer Style box, and use the options available on the right to manage the size, color, position, etc. of the stroke that has been added around the human subject. Click OK when done, and then export the image normally to use it as a YouTube thumbnail border.
Summary
It is important to know that the default resolution of a YouTube thumbnail is 1280 x 720 pixels that is usually written and referred to as 720p. While adding a YouTube thumbnail border, it is also imperative to have a good sense of color combination and fonts. Furthermore, a decent tool like Wondershare Filmora X must be used to add an appealing neon border around the main subject in the thumbnail image easily and quickly.
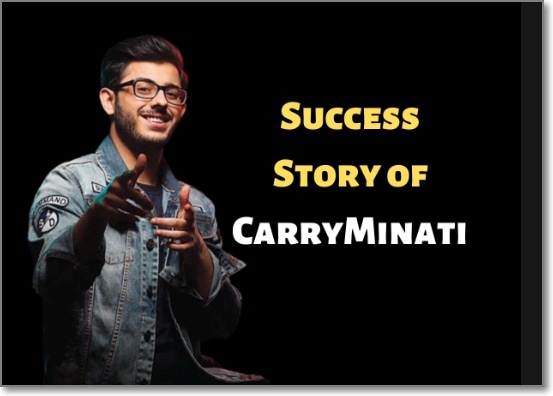
CarryMinati’s Income Blueprint: Journey Through 2023
If you have been following the who’s who of YouTube, then Ajey Nagar, also popularly known as CarryMinati is definitely not a new name for you and you must also be well aware of CarryMinati YouTube income. And, if you have not heard of this name before, then it is high time to know about this YouTube influencer who is an Asian and Indian sensation.
Getting excited, we too!!! So, in this article, we will learn all about who is Ajey Nagar, what is CarryMinati, what makes this man so popular, what is his CarryMinati monthly income, his personal life, and much more.
Part 1: Who is CarryMinati?
You may wonder who this simple-looking, young boy is, right?
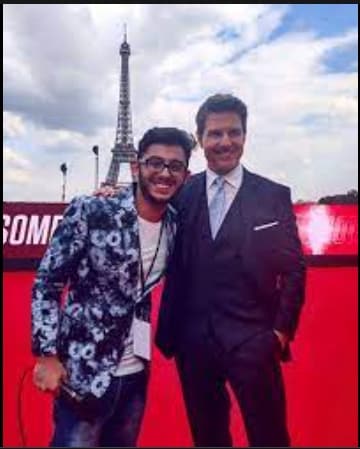
Yes, he is one of the India’s biggest YouTuber- Ajey Nagar. He shared a shoulder with Tom Cruise while promoting Mission Impossible 6 in Paris.
In this part of the topic, we are going to get deep knowledge about the personal, professional and financial information related to Carryminati.
| Nickname | CarryMinati |
|---|---|
| Real Name | Ajey Nagar |
| Net Worth (2022) | 31 Crores ($4 Million) |
| Monthly Income | Rs. 16+ Lakh |
| Yearly Income | Rs. 3+ Crore |
| Biography | |
| Date of Birth | 12th June 1999 |
| Gender | Male |
| Nationality | Indian |
| Height | 165 cm |
| Profession | YouTube |
| YouTube Channel | CarryMinati and CarryisLive |
| Awards and Recognition | Listed in TIME’s 10 next-generation leaders in the year 2019Listed in Forbes 30 Under 30 Asia in 2020 |
So, by now we know that CarryMinati aka Ajay Nagar is quite popular on YouTube. But, what does this popularity gets him in terms of money? Yes, this is an interesting question and the answer for this, you can check out in the next part of the topic.
Part 2: CarryMinati YouTube earning and stats
Let’s now deep digger into the financial aspects and other related stats related to CarryMinati. So, if you are eager to know how much CarryMinati earn from YouTube, we will give you to the nearest exact figures. Who does not like numbers, they are interesting facts, isn’tead.
A major part of Ajay Nagar’s income comes from YouTube videos and in addition to this, his popularity makes him earn from YouTube sponsors, collaborations, tie-up videos, brand endorsements, and advertising.
| Estimated Monthly Earnings in USD/Indian Rupees | Rs. 16+ Lakhs |
|---|---|
| Estimated yearly Earnings in USD/Indian Rupees | $ 4 Million/ Rs. 3+ Crores |
| Videos About | Roasting, Comedy, Sketches, Satire, and Gaming |
| Total Video Uploads | Over 176 |
| Subscribers | CarryMinati- 36.6millionCarryisLive- 11.3 million |
| Video Views | CarryMinati- 2.9 billion+CarryisLive- 1.3 billion+ |
| Last 30 Days Views | 35 M+ |
The statistics related to the views and income about CarryMinati are quite interesting and this makes everyone curious about what makes the channel and this person so popular on YouTube. If you too have been curious about the same, head to our next section.
Part 3: Why is Carry Minati trending on YouTube?
Just like the statistics, the facts related to CarryMinati’s popularity are equally interesting. Every YouTube channel or an influencer who is popular and trending have their own uniqueness and when it comes to CarrayMinati aka Ajay Nagar, there are several factors that makes him a sensation. Shortlisted some of them are as below.
Exclusive personality of Ajay Naga
Ajay Nagar has an exclusive personality that acts like a magnet that attracts viewers. His way of speaking and interacting with the audience has earned him a fan base across the globe.
Engaging and interactive video
The videos of CarryMinati are engaging and interactive which keeps the audience interested throughout.
Rib-tickling humour
The way the humour is added to the videos is simply amazing and definitely makes the viewers laugh a lot.
Relatable and authentic video content
Viewers of different ages and genres can easily relate to the videos created by CarryMinati and also found them to be authentic and different from the other channels.
Checkout his video on Social Media Culture that how interestingly he engages people with the relatable topics, and you will know what makes this man different from the others.
Most popular videos of CarryMinati
Though almost all videos by CarryMinati gain popularity, listed below are the top ones to date.
The End (The video was uploaded on 8th May 2020 and had over 65 million views with 8 lacs comments and over 10 million likes.) This was a roasting video by CarryMinati that gained immense popularity, but was later pulled down by YouTube stating it to be against the harassment policy of YouTube and for violating the guidelines of the community.

This video is about the Indian Film Industry and the awards given to the stars. Carryinati has interesting roasted the stars and receiving awards.
PUBG India: Life Battle Royale
https://www.youtube.com/embed/10y9yefd%5FxY
It is an interesting video of around 17 minutes where Ajay Nagar has acted along with other people to create a fun plot based of PUBG game.
Bonus Tip: How to be a YouTuber and Make Videos like Carryminati
We have learned that CarryMinati has become the name it is, all because of the excellent videos it creates. Though it may sound simple, video creation requires a lot of skills, patience, and the help of expert tools.
A lot of people have some excellent themes and ideas in their minds, but they do not know how to weave them all into an interesting video and here the need for an expert tool like Wondershare Filmora arises. So, if you also have some video creation plans in mind but have been holding them back, it’s time to bring them to reality using Filmora.
Wondershare Filmora is an excellent Windows and Mac-based software that helps in creating eye-catchy videos using multiple features supported by the program. From basic to advanced, no matter what type of video creation requirements you are looking for, Wondershare Filmora will take due care of the same.
Key features of the software
- Support to all types of video files and formats including 4K and also comes with a huge collection of stock footage.
- Support advanced features like PIP, green screen, split-screen, AI portrait, auto reframe, screen recorder, speed ramping, masking, and more.
- Allows adding visual effects and transitions and also allows uploading the created videos to YouTube and Facebook.
Wondershare Filmora supports a wide range of video editing features including basic editing, advanced editing, AI-based tools, and much more. The complete features can be checked in the Wondershare Filmora Video Editing Guide.
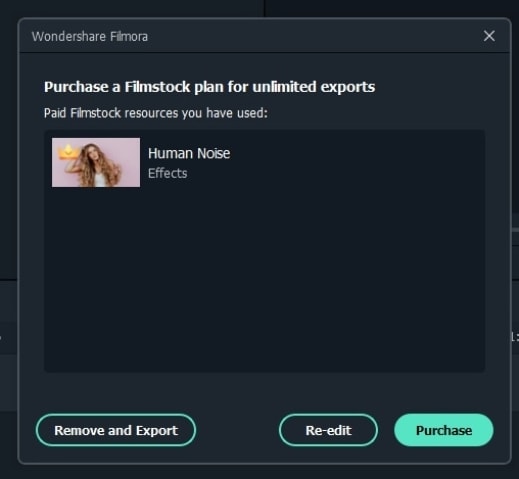
AI-based features are the highlight of this software and for your reference, listed below are the steps for the AI Portrait function. Using this feature, the background of a video can be removed easily without using the green screen or the chroma key.
Steps to use AI Portrait in Wondershare Filmora
Free Download For Win 7 or later(64-bit)
Free Download For macOS 10.14 or later
Step1 Launch the installed software on your system and add the media file to the software timeline.

Step2 Next, go to Effects > Ai Portrait, and the options of the features can be checked here. Click on the thumbnail and the feature can be viewed in the preview window.
Step3 Drag the selected Portrait to the timeline and from the pop-up window choose to Purchase the additional module. You can check the result by playing the video. If needed multiple AI Portraits can be added to the video.
Step4 If further customization is needed, you can even adjust the AI Portrait settings.
Step5 When finally, all the settings are done, click on the Export button to save the file.
Hot FAQs on CarryMinati
Below we have answered some hot frequently asked questions about CarryMinati.
1. Is Carry Minati married?
No, till date, CarryMinati aka Ajay Nagar is not married.
2. How much CarryMinati earn from 1 video?
Calculating the income from a YouTube video can be a complicated task that depends on several factors like views, likes, ads in the video, and more.
3. Which actors has Carry Minati interviewed?
Carry Minati has interviewed popular actors like Tom Cruise, Tessa Thompson, Henry Cavil, and others celebrities.
Final Words
Gone are the days when only high posts at big-shot companies can bring in money and proving this right is CarryMinati who is not only earning big but has also earned worldwide fans and has created a name for himself. With his comic skits and engaging videos, this popular YouTube influencer is growing and stretching his wings.
If you too have got inspired and looking forward to starting with some interesting videos, we suggest downloading Wondershare Filmora which will let you create a professional video with ease.
Free Download For Win 7 or later(64-bit)
Free Download For macOS 10.14 or later
So, by now we know that CarryMinati aka Ajay Nagar is quite popular on YouTube. But, what does this popularity gets him in terms of money? Yes, this is an interesting question and the answer for this, you can check out in the next part of the topic.
Part 2: CarryMinati YouTube earning and stats
Let’s now deep digger into the financial aspects and other related stats related to CarryMinati. So, if you are eager to know how much CarryMinati earn from YouTube, we will give you to the nearest exact figures. Who does not like numbers, they are interesting facts, isn’tead.
A major part of Ajay Nagar’s income comes from YouTube videos and in addition to this, his popularity makes him earn from YouTube sponsors, collaborations, tie-up videos, brand endorsements, and advertising.
| Estimated Monthly Earnings in USD/Indian Rupees | Rs. 16+ Lakhs |
|---|---|
| Estimated yearly Earnings in USD/Indian Rupees | $ 4 Million/ Rs. 3+ Crores |
| Videos About | Roasting, Comedy, Sketches, Satire, and Gaming |
| Total Video Uploads | Over 176 |
| Subscribers | CarryMinati- 36.6millionCarryisLive- 11.3 million |
| Video Views | CarryMinati- 2.9 billion+CarryisLive- 1.3 billion+ |
| Last 30 Days Views | 35 M+ |
The statistics related to the views and income about CarryMinati are quite interesting and this makes everyone curious about what makes the channel and this person so popular on YouTube. If you too have been curious about the same, head to our next section.
Part 3: Why is Carry Minati trending on YouTube?
Just like the statistics, the facts related to CarryMinati’s popularity are equally interesting. Every YouTube channel or an influencer who is popular and trending have their own uniqueness and when it comes to CarrayMinati aka Ajay Nagar, there are several factors that makes him a sensation. Shortlisted some of them are as below.
Exclusive personality of Ajay Naga
Ajay Nagar has an exclusive personality that acts like a magnet that attracts viewers. His way of speaking and interacting with the audience has earned him a fan base across the globe.
Engaging and interactive video
The videos of CarryMinati are engaging and interactive which keeps the audience interested throughout.
Rib-tickling humour
The way the humour is added to the videos is simply amazing and definitely makes the viewers laugh a lot.
Relatable and authentic video content
Viewers of different ages and genres can easily relate to the videos created by CarryMinati and also found them to be authentic and different from the other channels.
Checkout his video on Social Media Culture that how interestingly he engages people with the relatable topics, and you will know what makes this man different from the others.
Most popular videos of CarryMinati
Though almost all videos by CarryMinati gain popularity, listed below are the top ones to date.
The End (The video was uploaded on 8th May 2020 and had over 65 million views with 8 lacs comments and over 10 million likes.) This was a roasting video by CarryMinati that gained immense popularity, but was later pulled down by YouTube stating it to be against the harassment policy of YouTube and for violating the guidelines of the community.
This video is about the Indian Film Industry and the awards given to the stars. Carryinati has interesting roasted the stars and receiving awards.
PUBG India: Life Battle Royale
https://www.youtube.com/embed/10y9yefd%5FxY
It is an interesting video of around 17 minutes where Ajay Nagar has acted along with other people to create a fun plot based of PUBG game.
Bonus Tip: How to be a YouTuber and Make Videos like Carryminati
We have learned that CarryMinati has become the name it is, all because of the excellent videos it creates. Though it may sound simple, video creation requires a lot of skills, patience, and the help of expert tools.
A lot of people have some excellent themes and ideas in their minds, but they do not know how to weave them all into an interesting video and here the need for an expert tool like Wondershare Filmora arises. So, if you also have some video creation plans in mind but have been holding them back, it’s time to bring them to reality using Filmora.
Wondershare Filmora is an excellent Windows and Mac-based software that helps in creating eye-catchy videos using multiple features supported by the program. From basic to advanced, no matter what type of video creation requirements you are looking for, Wondershare Filmora will take due care of the same.
Key features of the software
- Support to all types of video files and formats including 4K and also comes with a huge collection of stock footage.
- Support advanced features like PIP, green screen, split-screen, AI portrait, auto reframe, screen recorder, speed ramping, masking, and more.
- Allows adding visual effects and transitions and also allows uploading the created videos to YouTube and Facebook.
Wondershare Filmora supports a wide range of video editing features including basic editing, advanced editing, AI-based tools, and much more. The complete features can be checked in the Wondershare Filmora Video Editing Guide.
AI-based features are the highlight of this software and for your reference, listed below are the steps for the AI Portrait function. Using this feature, the background of a video can be removed easily without using the green screen or the chroma key.
Steps to use AI Portrait in Wondershare Filmora
Free Download For Win 7 or later(64-bit)
Free Download For macOS 10.14 or later
Step1 Launch the installed software on your system and add the media file to the software timeline.
Step2 Next, go to Effects > Ai Portrait, and the options of the features can be checked here. Click on the thumbnail and the feature can be viewed in the preview window.
Step3 Drag the selected Portrait to the timeline and from the pop-up window choose to Purchase the additional module. You can check the result by playing the video. If needed multiple AI Portraits can be added to the video.
Step4 If further customization is needed, you can even adjust the AI Portrait settings.
Step5 When finally, all the settings are done, click on the Export button to save the file.
Hot FAQs on CarryMinati
Below we have answered some hot frequently asked questions about CarryMinati.
1. Is Carry Minati married?
No, till date, CarryMinati aka Ajay Nagar is not married.
2. How much CarryMinati earn from 1 video?
Calculating the income from a YouTube video can be a complicated task that depends on several factors like views, likes, ads in the video, and more.
3. Which actors has Carry Minati interviewed?
Carry Minati has interviewed popular actors like Tom Cruise, Tessa Thompson, Henry Cavil, and others celebrities.
Final Words
Gone are the days when only high posts at big-shot companies can bring in money and proving this right is CarryMinati who is not only earning big but has also earned worldwide fans and has created a name for himself. With his comic skits and engaging videos, this popular YouTube influencer is growing and stretching his wings.
If you too have got inspired and looking forward to starting with some interesting videos, we suggest downloading Wondershare Filmora which will let you create a professional video with ease.
Free Download For Win 7 or later(64-bit)
Free Download For macOS 10.14 or later
Also read:
- Top 5 3D Intro Makers for YouTube Videos
- Navigate the Vlogiverse 6 Curated Questionnaires for Discerning Viewers
- [New] Billion-Views Video Hall YouTube's Top Ever Watches
- [Updated] Best Tales for YouTube Triumph Top 3 Strategies
- [New] Cutting-Edge Techniques for Powerful YouTube Thumbnail Designs
- Expert Choices Best Video Cards for YouTube's Clearest Output
- Top Earnings Achiever in the Streaming World
- [Updated] Accelerate Your Channel Growth - Affordable Subscribers Available
- 2024 Approved Analyzing YouTube's Process for Selective Comment Showcasing
- [Updated] Effortless Free Extraction of YouTube Desktops
- Quickly Create a YouTube Animation for Your Subscribe Button with Filmora
- Audiences in Motion Analyzers
- Directly Connect YouTube Tunes to iMovie Seamlessly
- Decoding Digital Dynamics Unveiling the Secret Sauce for YouTube Success & Revenue for 2024
- Bite-Size Beats Characters in Soundscape
- [New] Elevate Videography Quality Top 7 Sound Effects Pick
- Charting the Course A Comprehensive Guide to YouTube Teaser Vids for 2024
- Lightning-Fast Lights Out – YouTube Videos Shattering 100MM Fastest
- In 2024, Boosting Your Youtube Shorts Profits Key Requirements & Earning Potential
- How to Record Good Audio Without a Microphone?
- In 2024, Amplify Your Music Experience with YouTube's Playlist Guide
- [New] Elevate Your Content with Effective Video SEO
- Creatives Making Marvel Virtual Worlds Vivid
- Best Practices in Extracting YouTube Media
- [New] Beyond Tubes The Ultimate Video Share Sites
- Comprehensive Directory Extracting Youtube Intros
- Unveiling the Secrets of Video Editing on YouTube
- Decoding Chroma Techniques From Raw Footage to Final Cut for 2024
- [New] In 2024, Chrome OS Best Free Video Capture Tools Compilation
- New Cease iPhones Acoustic Level Modulation
- [New] Unlocking the Art of Captions A Short Guide to Facebook Videos for 2024
- New Melody Mavens Exploring the Best Tunes – An Online, Up-to-Date Song Identifier for 2024
- [New] In 2024, Ultimate Screen Capture Review OBS vs Fraps
- [Updated] In 2024, Top 20 Hilarious TikTok Skits for Giggle Fests
- New Best Ideas on Using Green Screen with Filmora for 2024
- [New] Choosing a Streaming Powerhouse OBS or Wirecast?
- How to Mirror PC Screen to Itel S23+ Phones? | Dr.fone
- New In 2024, Turn Videos Into Toons A Step-by-Step Guide
- In 2024, How to Unlock Apple iPhone SE (2020) With an Apple Watch & What to Do if It Doesnt Work | Dr.fone
- New In 2024, 3 Methods to Combine 2 or 3 Videos Into 1
- In 2024, Aerial Units' Phylogeny
- Easy steps to recover deleted videos from Samsung Galaxy A15 5G
- In 2024, Why Your WhatsApp Live Location is Not Updating and How to Fix on your Samsung Galaxy A54 5G | Dr.fone
- [New] In 2024, Which Screen Grab Tool Wins? Insights Into OBS vs Fraps
- Updated In 2024, Unlock Perfect Facebook Videos A Beginners Guide to Aspect Ratios
- [New] In 2024, Go From Camera to Cellphone VT Adjustments in FCPX
- How to Fake Snapchat Location without Jailbreak On Vivo Y78+ | Dr.fone
- [Updated] Unveiling Effective Strategies for FB In-Stream Ad Setup for 2024
- In 2024, Can I use iTools gpx file to catch the rare Pokemon On Nubia Red Magic 8S Pro+ | Dr.fone
- [New] The Year’s Best TikTok Collaborations in Hip-Hop for 2024
- In 2024, How Many Attempts To Unlock Apple iPhone 12
- Title: "[New] Enrich Thumbnails Introducing Radiant Neon Elements"
- Author: Steven
- Created at : 2024-05-25 20:14:47
- Updated at : 2024-05-26 20:14:47
- Link: https://youtube-clips.techidaily.com/new-enrich-thumbnails-introducing-radiant-neon-elements/
- License: This work is licensed under CC BY-NC-SA 4.0.
