
![[New] Emulating Old Hollywood Style in Modern Videos](https://www.lifewire.com/thmb/yH3VN_03ATOTs4X95cBZDmRltms=/400x300/filters:no_upscale():max_bytes(150000):strip_icc()/unnamed2-00320a0b241647e8884ffa243fa78320.png)
[New] Emulating Old Hollywood Style in Modern Videos
Emulating Old Hollywood Style in Modern Videos
How to Create Vintage Videos: A Comprehensive Tutorial

Richard Bennett
Mar 27, 2024• Proven solutions
“Every accomplishment starts with a decision to try.” – A Vintage Thought

Vintage videos are ultimately the retro videos you have ever imagined. The look is highly inspirational in itself. The vintage effect in photography and videos results in a must-see look that everyone wants to capture all day long. The meaning of vintage is ‘the time when something of quality was produced.’ When something is called retro, it means old, recognized, and essential. Vintage also resembles love apart from videos and photos. All in all, it’s a positive and result-oriented thing to carry on in your videos. And this is what we want to mention in this post relating to the creation of vintage videos.
Here are some vintage-style video ideas for you to have a look at.
- Part 1: What to Consider When Shooting a Vintage Video?
- Part 2: How to Create a Stunning Vintage Video?
- Part 3: Tips to Make Your Vintage Videos Stand Out
What to Consider When Shooting a Vintage Video?
Vintage videos are kind of old school vibes and must be shooting accordingly by keeping in mind the following points. These are a sort of expert tips given by photographers based on their practical experience. First of all, you have to understand that a video can be made vintage, but you can’t change the actual environment of shooting. Some editing always involves there in every project out there. Still, the tips given below will help you a lot in creating a retro look.
Use Vintage Lenses
The very first helpful tip is to use a vintage lens. They allow chromatic aberration by distorting colors around the frame. Furthermore, you can find various kinds of lenses in terms of a vintage effect.
Decrease Contrast
Do the correct color grading by reducing the contrast a little bit. You must not level the retro videos in black or white or like-new videos. You can simply add a contrasting effect and then reduce it to have that vintage look.
Keep it a little soft
If you have ever noticed, the vintage videos are a little soft and look like degraded with time. It’s a result of decreased sharpness in the camera’s menu settings. You can even add a slight blur to the final video or simply use recognized software made for video editing .
Brighten up the black levels
Lots of black points in the video are not ideal for a vintage effect. The suitable approach is to bring up black levels and make it dark gray instead of inky black. This look can be achieved either by levels effect or curves effect in your editing software.
Reduce Saturation levels
Bringing down the saturation levels is another tip to create a vintage effect. The old videos are also absent in bright colors. Don’t go too crazy about reduction as 20%-30% saturation level is more than enough.
How to Create a Stunning Vintage Video?
What you need to get started as both beginner and professional is Wondershare Filmora Video Editor. It is a highly recommended software to create vintage videos. The intuitive user interface and lots of editing functions are helpful for a video editor. It has both primary as well as advanced editing programs to check. It has various advanced color tuning tools to promote the making of original videos. It features tint, temperature, Vignette, 3D Luts, Lights, and so on.


Steps for the vintage effect to videos on Wondershare Filmora Video Editor
Step 1: Upload video & make specific changes

The very step is to add the video by clicking the + icon. We have added the three sample videos from the library of Wondershare Filmora itself. Adjust them in the timeline as per your requirements.
After doing all the essential editing functions, click on the Effects tab given at the upper-left corner. Simply type the word Old in the Search tab.
The Old Video filter will immediately appear in the list of filters. Tap the “+” icon in Old Video filter to add to the timeline. Drag its ends right or left to adjust the duration.
Step 2: Apply White & Black Filters

The second step is to apply the Black & White filters. Go to the Effects tab and explore five Black & White filters available. Each of these filters is quite different and must be applied accordingly. Check the aesthetic of your video clip before any filter application to retro videos.
Step 3: Add the Sun Kissed or Sepia Tone Rise Filters to the video clip

There are various other categories of filters you can apply, such as Retro, Sun Kissed, and Sepia Tone, etc. The features of Filmora also present several subcategories such as Faux Film or Shake.

On the other hand, the subcategory of Sepia Tone features Sun-Kissed & Rise Filters to stimulate sepia-tinted texture and recreate the old visual style. The Sun Kissed filter presents brown and red colors to give that warm image atmosphere.
Step 4: Desaturate Video Clip

Now, you need to desaturate the video clip with Ash & Willow filters. We have typed Ash in the Search bar, and you can see the filter below. These filters are essential to desaturate the video with preset contrast, brightness, or exposure values.

Then, we have combined the black & white filter with an overlay of Film Reel Horizontal. It will help you sell the effect and make the video look more authentic. However, the only application of Black & White or Ash & Willow filters is not going to make any creative thing in terms of vintage videos. You have to mix overlays with features such as Random Dust or Film Reel Horizontal.
Step 5: Apply Black & White and Old Film Color Correction Presets to the video
You can also access the Advanced color correction Tab of Filmora from the Color button. It also features Preset and Adjusts Tabs to desaturate footage. The Preset presents a variety of options, including Black & White and Old Film. You just need to right-click the particular preset and select the Apply option.

Tips to Make Your Vintage Videos Stand Out
Following the helpful tips would assist you in creating awesome retro videos.
- You can use various vintage apps such as Retro VHS, RTRO Camera, 8mm, Camcorder, VSCO, etc. Or, despite using these limited apps, you can directly use our preferred video editing software called Wondershare Filmora.
- If you use a specific vintage camera, keep it on low highlights and low contrasts. Use color grading, as we have discussed above. They help to provide the ultimate old-school effect.
- Always keep low saturation settings for shooting vintage videos. Take control over Saturation, Hue, and Luminance of video.
- Add overlays and respective filters to recreate a required vintage look. You must add things that dust, scratch, and grain the heck out from the video that you have created.
- Lower the frame rate or FPS to create an excellent vintage look. You can make it to 18 or 14 FPS depending upon the aesthetic requirements.
- Keep an eye on black and white filters you have used. It’s because more of a black and white can ruin the actual vintage experience.
Conclusion
So, this is an ultimate tutorial on the creation of vintage videos. We Hope you have admired the steps and our recommended video editing software. Vintage means grand, and thus you should make it amazing as well. It is the reason we have stated all facts regarding the vintage effect in our post above. Wondering how to add such effect in FCPX? check this article:How to Create a Vignette in Final Cut Pro X?
Surely give a read and thank us later!
Richard Bennett
Richard Bennett is a writer and a lover of all things video.
Follow @Richard Bennett
Richard Bennett
Mar 27, 2024• Proven solutions
“Every accomplishment starts with a decision to try.” – A Vintage Thought
Vintage videos are ultimately the retro videos you have ever imagined. The look is highly inspirational in itself. The vintage effect in photography and videos results in a must-see look that everyone wants to capture all day long. The meaning of vintage is ‘the time when something of quality was produced.’ When something is called retro, it means old, recognized, and essential. Vintage also resembles love apart from videos and photos. All in all, it’s a positive and result-oriented thing to carry on in your videos. And this is what we want to mention in this post relating to the creation of vintage videos.
Here are some vintage-style video ideas for you to have a look at.
- Part 1: What to Consider When Shooting a Vintage Video?
- Part 2: How to Create a Stunning Vintage Video?
- Part 3: Tips to Make Your Vintage Videos Stand Out
What to Consider When Shooting a Vintage Video?
Vintage videos are kind of old school vibes and must be shooting accordingly by keeping in mind the following points. These are a sort of expert tips given by photographers based on their practical experience. First of all, you have to understand that a video can be made vintage, but you can’t change the actual environment of shooting. Some editing always involves there in every project out there. Still, the tips given below will help you a lot in creating a retro look.
Use Vintage Lenses
The very first helpful tip is to use a vintage lens. They allow chromatic aberration by distorting colors around the frame. Furthermore, you can find various kinds of lenses in terms of a vintage effect.
Decrease Contrast
Do the correct color grading by reducing the contrast a little bit. You must not level the retro videos in black or white or like-new videos. You can simply add a contrasting effect and then reduce it to have that vintage look.
Keep it a little soft
If you have ever noticed, the vintage videos are a little soft and look like degraded with time. It’s a result of decreased sharpness in the camera’s menu settings. You can even add a slight blur to the final video or simply use recognized software made for video editing .
Brighten up the black levels
Lots of black points in the video are not ideal for a vintage effect. The suitable approach is to bring up black levels and make it dark gray instead of inky black. This look can be achieved either by levels effect or curves effect in your editing software.
Reduce Saturation levels
Bringing down the saturation levels is another tip to create a vintage effect. The old videos are also absent in bright colors. Don’t go too crazy about reduction as 20%-30% saturation level is more than enough.
How to Create a Stunning Vintage Video?
What you need to get started as both beginner and professional is Wondershare Filmora Video Editor. It is a highly recommended software to create vintage videos. The intuitive user interface and lots of editing functions are helpful for a video editor. It has both primary as well as advanced editing programs to check. It has various advanced color tuning tools to promote the making of original videos. It features tint, temperature, Vignette, 3D Luts, Lights, and so on.
Steps for the vintage effect to videos on Wondershare Filmora Video Editor
Step 1: Upload video & make specific changes
The very step is to add the video by clicking the + icon. We have added the three sample videos from the library of Wondershare Filmora itself. Adjust them in the timeline as per your requirements.
After doing all the essential editing functions, click on the Effects tab given at the upper-left corner. Simply type the word Old in the Search tab.
The Old Video filter will immediately appear in the list of filters. Tap the “+” icon in Old Video filter to add to the timeline. Drag its ends right or left to adjust the duration.
Step 2: Apply White & Black Filters
The second step is to apply the Black & White filters. Go to the Effects tab and explore five Black & White filters available. Each of these filters is quite different and must be applied accordingly. Check the aesthetic of your video clip before any filter application to retro videos.
Step 3: Add the Sun Kissed or Sepia Tone Rise Filters to the video clip
There are various other categories of filters you can apply, such as Retro, Sun Kissed, and Sepia Tone, etc. The features of Filmora also present several subcategories such as Faux Film or Shake.
On the other hand, the subcategory of Sepia Tone features Sun-Kissed & Rise Filters to stimulate sepia-tinted texture and recreate the old visual style. The Sun Kissed filter presents brown and red colors to give that warm image atmosphere.
Step 4: Desaturate Video Clip
Now, you need to desaturate the video clip with Ash & Willow filters. We have typed Ash in the Search bar, and you can see the filter below. These filters are essential to desaturate the video with preset contrast, brightness, or exposure values.
Then, we have combined the black & white filter with an overlay of Film Reel Horizontal. It will help you sell the effect and make the video look more authentic. However, the only application of Black & White or Ash & Willow filters is not going to make any creative thing in terms of vintage videos. You have to mix overlays with features such as Random Dust or Film Reel Horizontal.
Step 5: Apply Black & White and Old Film Color Correction Presets to the video
You can also access the Advanced color correction Tab of Filmora from the Color button. It also features Preset and Adjusts Tabs to desaturate footage. The Preset presents a variety of options, including Black & White and Old Film. You just need to right-click the particular preset and select the Apply option.
Tips to Make Your Vintage Videos Stand Out
Following the helpful tips would assist you in creating awesome retro videos.
- You can use various vintage apps such as Retro VHS, RTRO Camera, 8mm, Camcorder, VSCO, etc. Or, despite using these limited apps, you can directly use our preferred video editing software called Wondershare Filmora.
- If you use a specific vintage camera, keep it on low highlights and low contrasts. Use color grading, as we have discussed above. They help to provide the ultimate old-school effect.
- Always keep low saturation settings for shooting vintage videos. Take control over Saturation, Hue, and Luminance of video.
- Add overlays and respective filters to recreate a required vintage look. You must add things that dust, scratch, and grain the heck out from the video that you have created.
- Lower the frame rate or FPS to create an excellent vintage look. You can make it to 18 or 14 FPS depending upon the aesthetic requirements.
- Keep an eye on black and white filters you have used. It’s because more of a black and white can ruin the actual vintage experience.
Conclusion
So, this is an ultimate tutorial on the creation of vintage videos. We Hope you have admired the steps and our recommended video editing software. Vintage means grand, and thus you should make it amazing as well. It is the reason we have stated all facts regarding the vintage effect in our post above. Wondering how to add such effect in FCPX? check this article:How to Create a Vignette in Final Cut Pro X?
Surely give a read and thank us later!
Richard Bennett
Richard Bennett is a writer and a lover of all things video.
Follow @Richard Bennett
Enhancing Profits: Creating Compelling Video Trailers
How to Create a YouTube Channel Trailer to Increase Revenue
Richard Bennett
Mar 27, 2024• Proven solutions
Many YouTube content creators assume that no one checks out their channel trailer . Some may not even know about the concept of a trailer, while others are not sure how to create one. We will explain the concept of a YouTube channel trailer, how to make a great trailer, and how to get more subscribers and views through a quality trailer on your YouTube channel.
- Part1: What is a YouTube Channel Trailer
- Part2: How to Add YouTube Trailer to Channel
- Part3: Best YouTube Trailer Maker
- Part4: 5 Tips for Creating a Great Trailer
Part 1: What is a YouTube Channel Trailer?
Think of a channel trailer as an introduction to a movie or television show. You can choose to show the trailer to anyone who is not subscribe to your channel, when they land on your channel page.
The objective of a trailer is to hook the audience, promote your personality and content, and convince them it will be worth their time to check out some of your videos. And you must do all these things within 30 to 45 seconds !
Most content creators can benefit from creating a channel trailer. Unless you are a famous personality through a sports/acting/television/singing career, people who land on your channel may have no idea who you are. A proper trailer gives them an introduction to your personality and content.
Part 2: How to Add YouTube Trailer to Channel
After you know how to create a YouTube trail, why not add your new created trailer to YouTube channel right now. Here is the right steps.
Step 1: Go to channel
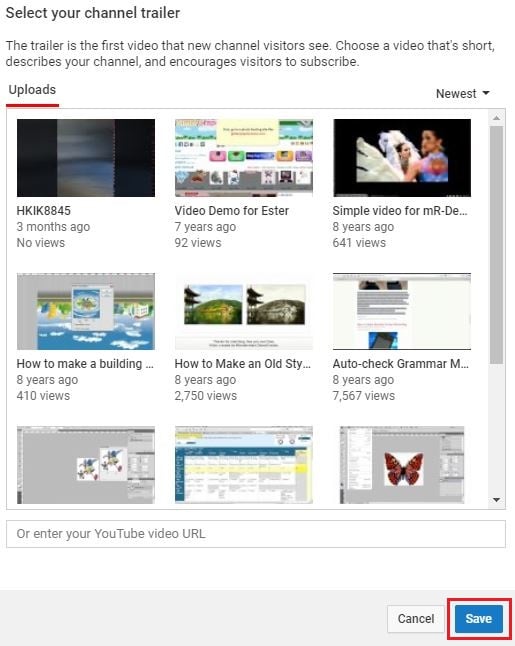
Log in your YouTube account. Then click your users icon to find My channel. At the top right corner, click CUSTOMIZE CHANNEL and then choose For new visitors.
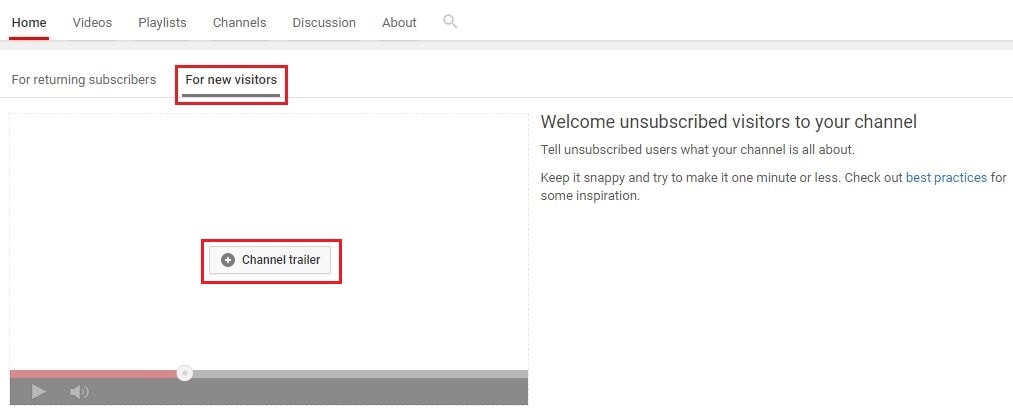
Step 2: Add trailer to YouTube
After clicking plus icon in the middle to add your amazing trailer, a playlist window will appear. Now select the trailer you want to use. Click Save. Then you will see a trailer is added. You can also change trailer or remove trailer.
Part 3: Best Channel YouTube Trailer Maker
1. Wondershare Filmora
Searching for a free and powerful video editing tool that you can use on both Windows and Mac computers? Wondershare Filmora may be the ideal program for you. It is very easy to use, even for beginners who do not have that much editing experience.
Features:
- It is free and very easy to add captions to the trailer video.
- There are many interesting options for adding video effects within the program.
- It features a modern interface that is intuitive and easy to operate. All the important controls and settings are easily accessible through the menus and submenus.
- The program operates smoothly, even on older machines.
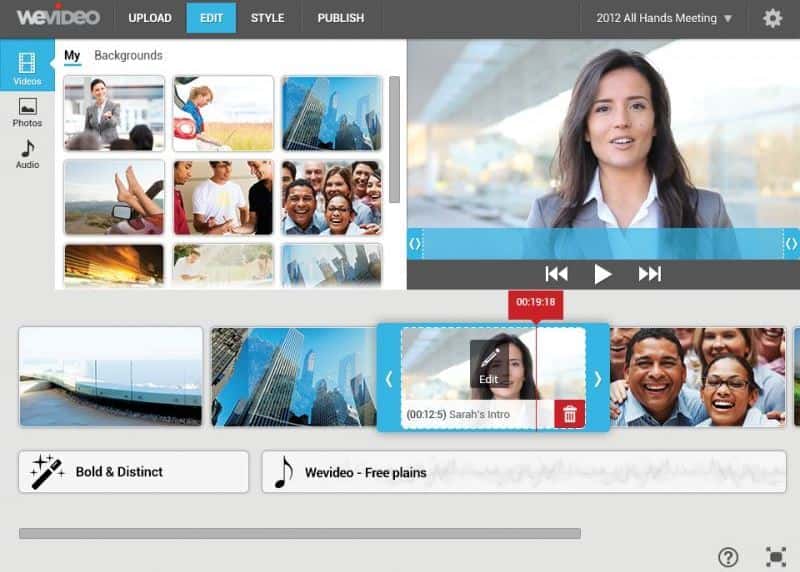
2. WeVideo
Hoping to edit content while you are on the go? By using a less powerful laptop, library computer or a friend’s device, you could edit your trailer within a couple hours. WeVideo is an online video editor that makes it so easy to edit videos in up to 4K resolution.
Features:
- The program is fast and very easy to use. It does not even require any downloads.
- As it is an online program, there are no compatibility issues with Windows, Mac or even Chromebook devices.
- It is possible to mix and match up to 600 different formats for graphics, audio, video and other effects.
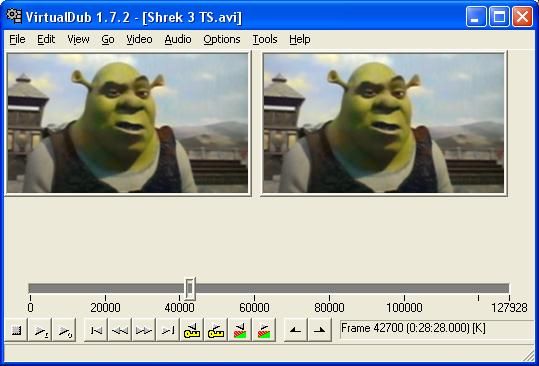
3. Virtual Dub
If you are seeking something that is open source and free, you may be interested in Virtual Dub. It is a completely free and open source program that you can use for quick capturing, encoding and editing video.
While it is not going to give you the same power and options as some of the other editors, it is a very simple tool that can be effective for specific use cases. If you are just hoping to record, encode and quickly put together a 30 second YouTube trailer, it is the ideal program.
Features:
- Offers the ability to capture videos on Windows, Mac and Linux computers.
- Works best with AVI files, but it is possible to use other video formats such as MKV and MP4 as well.
- It is possible to create video using a series of image files - or merge image files into existing video content.
Part 4: 5 Tips for Creating a Great Trailer
1. Let Viewers Know What is Coming
People appreciate routine. You can mention how many times a week you create content and the days when you publish. You can also have a brief overview of the type of videos you make, which will tell a new viewer what to expect if they subscribe to your channel!
2. Keep It Short
YouTube trailers that are more than a minute long will not succeed. People have a very short attention span. They want to be hooked immediately. 30 to 45 seconds is the sweet spot, with 30 seconds preferable! It may sound overwhelming to condense everything about your channel into 30 seconds, but that is where a great video script can help! However, sometimes both short videos and long videos work.
3. Use Some Fun Annotations
YouTube is great for having unique and helpful graphics on the screen while your video is playing. Having some fun and useful annotations, such as the days you make videos or a subscribe icon, during the intro video can be very helpful to new viewers. They also help to boost viewer engagement with your content!

4. Assume You Have New Viewers
Do not create a YouTube channel trailer with inside jokes or comments. This trailer is for people who know nothing about you or your channel. You are trying to hook them into your content, not provide a few laughs to existing subscribers.
5. Update Your Trailer Regularly
As a content creator, you may find that your brand changes every six months to a year. Maybe you change up your look, type of content, frequency of uploads or other parts of the channel. Ensure you are updating your trailer each time you make significant changes to your channel!
Conclusion
Creating a channel trailer for your YouTube page is a wonderful way to introduce a new audience to your content. They learn about you and the topics that you are passionate about. It convinces them to watch one of your videos and subscribe to your channel. And by using one of the YouTube Trailer Maker software options above, you will be creating quality trailers for your channel in no time!
Richard Bennett
Richard Bennett is a writer and a lover of all things video.
Follow @Richard Bennett
Richard Bennett
Mar 27, 2024• Proven solutions
Many YouTube content creators assume that no one checks out their channel trailer . Some may not even know about the concept of a trailer, while others are not sure how to create one. We will explain the concept of a YouTube channel trailer, how to make a great trailer, and how to get more subscribers and views through a quality trailer on your YouTube channel.
- Part1: What is a YouTube Channel Trailer
- Part2: How to Add YouTube Trailer to Channel
- Part3: Best YouTube Trailer Maker
- Part4: 5 Tips for Creating a Great Trailer
Part 1: What is a YouTube Channel Trailer?
Think of a channel trailer as an introduction to a movie or television show. You can choose to show the trailer to anyone who is not subscribe to your channel, when they land on your channel page.
The objective of a trailer is to hook the audience, promote your personality and content, and convince them it will be worth their time to check out some of your videos. And you must do all these things within 30 to 45 seconds !
Most content creators can benefit from creating a channel trailer. Unless you are a famous personality through a sports/acting/television/singing career, people who land on your channel may have no idea who you are. A proper trailer gives them an introduction to your personality and content.
Part 2: How to Add YouTube Trailer to Channel
After you know how to create a YouTube trail, why not add your new created trailer to YouTube channel right now. Here is the right steps.
Step 1: Go to channel
Log in your YouTube account. Then click your users icon to find My channel. At the top right corner, click CUSTOMIZE CHANNEL and then choose For new visitors.
Step 2: Add trailer to YouTube
After clicking plus icon in the middle to add your amazing trailer, a playlist window will appear. Now select the trailer you want to use. Click Save. Then you will see a trailer is added. You can also change trailer or remove trailer.
Part 3: Best Channel YouTube Trailer Maker
1. Wondershare Filmora
Searching for a free and powerful video editing tool that you can use on both Windows and Mac computers? Wondershare Filmora may be the ideal program for you. It is very easy to use, even for beginners who do not have that much editing experience.
Features:
- It is free and very easy to add captions to the trailer video.
- There are many interesting options for adding video effects within the program.
- It features a modern interface that is intuitive and easy to operate. All the important controls and settings are easily accessible through the menus and submenus.
- The program operates smoothly, even on older machines.
2. WeVideo
Hoping to edit content while you are on the go? By using a less powerful laptop, library computer or a friend’s device, you could edit your trailer within a couple hours. WeVideo is an online video editor that makes it so easy to edit videos in up to 4K resolution.
Features:
- The program is fast and very easy to use. It does not even require any downloads.
- As it is an online program, there are no compatibility issues with Windows, Mac or even Chromebook devices.
- It is possible to mix and match up to 600 different formats for graphics, audio, video and other effects.
3. Virtual Dub
If you are seeking something that is open source and free, you may be interested in Virtual Dub. It is a completely free and open source program that you can use for quick capturing, encoding and editing video.
While it is not going to give you the same power and options as some of the other editors, it is a very simple tool that can be effective for specific use cases. If you are just hoping to record, encode and quickly put together a 30 second YouTube trailer, it is the ideal program.
Features:
- Offers the ability to capture videos on Windows, Mac and Linux computers.
- Works best with AVI files, but it is possible to use other video formats such as MKV and MP4 as well.
- It is possible to create video using a series of image files - or merge image files into existing video content.
Part 4: 5 Tips for Creating a Great Trailer
1. Let Viewers Know What is Coming
People appreciate routine. You can mention how many times a week you create content and the days when you publish. You can also have a brief overview of the type of videos you make, which will tell a new viewer what to expect if they subscribe to your channel!
2. Keep It Short
YouTube trailers that are more than a minute long will not succeed. People have a very short attention span. They want to be hooked immediately. 30 to 45 seconds is the sweet spot, with 30 seconds preferable! It may sound overwhelming to condense everything about your channel into 30 seconds, but that is where a great video script can help! However, sometimes both short videos and long videos work.
3. Use Some Fun Annotations
YouTube is great for having unique and helpful graphics on the screen while your video is playing. Having some fun and useful annotations, such as the days you make videos or a subscribe icon, during the intro video can be very helpful to new viewers. They also help to boost viewer engagement with your content!
4. Assume You Have New Viewers
Do not create a YouTube channel trailer with inside jokes or comments. This trailer is for people who know nothing about you or your channel. You are trying to hook them into your content, not provide a few laughs to existing subscribers.
5. Update Your Trailer Regularly
As a content creator, you may find that your brand changes every six months to a year. Maybe you change up your look, type of content, frequency of uploads or other parts of the channel. Ensure you are updating your trailer each time you make significant changes to your channel!
Conclusion
Creating a channel trailer for your YouTube page is a wonderful way to introduce a new audience to your content. They learn about you and the topics that you are passionate about. It convinces them to watch one of your videos and subscribe to your channel. And by using one of the YouTube Trailer Maker software options above, you will be creating quality trailers for your channel in no time!
Richard Bennett
Richard Bennett is a writer and a lover of all things video.
Follow @Richard Bennett
Also read:
- In 2024, Epic Entertainment A Rundown of Hilarious YouTuber Hits
- In 2024, Becoming an Expert at YT Studio Navigation
- In 2024, Capture Clearness Without a Tripod Tool
- In 2024, Best 5 Headsets A YouTube Gamer's Guide
- Unveiling the World of Virtual Performing Artists
- How to Make a Thumbnail for Your YouTube Free Easily!
- [Updated] Enhancing Video Tracking Adding Timestamps in YouTube
- From Wanderlusts To Web Presence Your Strategy for Professional Blogging Success
- Master the Art of YouTube Outros with Pros and Resources
- Mastering Multitasking Sync Many YT Videos Simultaneously
- 2024 Approved 2023'S Standout YouTube Music Playback Gems
- Optimizing Channel Branding to Skyrocket Subscriber Numbers
- 2024 Approved Channel Catalysts Affiliates Aiding Budgeted Buzzers
- 2024 Approved Boost Your Videos' Impact with Top-Ranking Software Solutions
- A Guide to Free You From YouTube's Extra Bar Width
- Harness YouTube's Power 25 Steps to Prominence and Recognition
- Simplify Your Video Sharing with Our YouTube Upload Strategy
- 2024 Approved Audiovisual Rhythm Optimal DJ Content for Gatherings
- Foremost YouTube Networks for News Enthusiasts
- A Novice's Pathway to Writing YouTube Video Plans for 2024
- Initiating Your Online Journey A Step-by-Step Guide to YouTube
- Unlocking Content Potential Through YouTube Aspect Ratios
- In 2024, Detailed Guide Crafting Powerful Video Thumbnails for Content Marketing
- In 2024, Analyzing View Count to Cash Out on YouTube
- Step-by-Step Lyric Video Crafting with Lyric Video Maker
- The Guide to Starting a Successful YouTube Gaming Channel
- Easy YouTube Introduction Design Tips and Tricks for 2024
- [Updated] Cut The Cost, Not The Creativity Best Free Editing Tools (Top 9)
- In 2024, Effective Color Difference Filters in Film-Making
- Youtube Ascension From a Niche Channel to Million-Sub Haven
- Free, Safe Steps to Extract Audio From YouTube Videos
- Boosting Views Top 14 Gaming Video Ideas That Work
- Understanding VTuber Culture & Career Trajectory
- YouTube Name Genius Mastering Branding with Generators
- 2024 Approved Cinema Comes at a Cost-Free Price Your Ultimate YouTube Movie List
- [New] DSLR's Place Among Mirrorless Cameras for Videos
- Pivot Points Revolutionize Your YouTube Angles with Ease
- How to Become A YouTube Partner
- What Is YouTube Tag and How to Find Great Tags For Your Videos?
- [Updated] Engaging Viewers Best Practices & Pitfalls in Dayly Blogging
- Transformative Content Blocks Enhanced Youtube Decks
- In 2024, Culinary Comrades YouTube's Best Food Blogs
- Fake the Location to Get Around the MLB Blackouts on Vivo S17 Pro | Dr.fone
- 6 Methods for Switching from Apple iPhone SE to Samsung | Dr.fone
- New Adobe Premiere Pro CS6 for macOS Free Download and Install Guide for 2024
- Discover These Eight Handy Apps to Upload Reels on Instagram for 2024
- [Updated] Ultimate Relaxation Top 10 Mobile Idle Games
- Updated Discover the Top Online Waveform Generators for Audio Enthusiasts
- Complete Insight Into Sierra’s iCloud File Management
- The way to get back lost data from Realme Narzo 60 5G
- 7 Fixes for Unfortunately, Phone Has Stopped on Oppo Reno 10 Pro 5G | Dr.fone
- Obscured Oath Vs Illuminated Ideal Black vs Silver
- [New] TikTok Text Mastery Identify These Five Pioneering Font Generators for 2024
- Breaking Free Overcoming the Shadowban Phenomenon
- [Updated] Digital Artistry Top-Ranked Snapchat Creativity Enhancers for 2024
- Dynamic Face Effects Instantaneous Motion Blur for Striking Images with Picsart
- Title: [New] Emulating Old Hollywood Style in Modern Videos
- Author: Steven
- Created at : 2024-05-25 20:13:43
- Updated at : 2024-05-26 20:13:43
- Link: https://youtube-clips.techidaily.com/new-emulating-old-hollywood-style-in-modern-videos/
- License: This work is licensed under CC BY-NC-SA 4.0.
