
!["[New] Elevate Play Button Visuals Vivid Neon Lines Added"](https://www.lifewire.com/thmb/Zkql4VrA6Ie6ueLJLk0KayOXuBc=/400x300/filters:no_upscale():max_bytes(150000):strip_icc()/buygamesonquest-9a47b1c4edd0425993d28e43d66a881c.jpg)
"[New] Elevate Play Button Visuals Vivid Neon Lines Added"
Elevate Play Button Visuals: Vivid Neon Lines Added
Your YouTube video, or any other clip published on any forum, gets a larger number of hits if it has an attractive thumbnail. And, the fact is, a thumbnail becomes 10x more attractive when the main character that the image has have a neon border around it.
With that said, in the following sections, you will learn a couple of methods on how to add a YouTube thumbnail border around the main characters and/or objects that are significant to the clip.
In this article
01 Add Glowing Neon Border to YouTube Thumbnail with Filmora
02 Add a Glowing Neon Border in YouTube Thumbnail with Canva
03 Outline a Person in a YouTube Thumbnail with Photoshop
Part 1: How to Add Neon Border to YouTube Thumbnail for Free with Filmora
Being one of the most versatile and intuitive post-production tools available in the market today, Wondershare Filmora X allows you to add a neon border to a YouTube thumbnail quite conveniently. You can learn how to get this done on Windows or Mac by following the steps given below.
For Win 7 or later (64-bit)
For macOS 10.12 or later
Step 1: Define Project Settings and Add Image to the Timeline
Launch Wondershare Filmora X on your PC (a MacBook Pro M1 is used here), ensure that the project aspect ratio is set to 16:9 (Widescreen) on the splash screen, and click New Project. On the main interface, click the Preview quality and display settings icon from the upper-right area of the Timeline, click Change Project Aspect Ratio, click to select 1280 x 720 (HD) from the Resolution menu of the Project Settings box, and click OK to save the custom project settings.

Then select My Media from the menu bar if not already selected, click Project Media from the navigation pane, and click Import from the Media box to select and import the image of the main character or object that you want to use in the thumbnail.

Now, drag the image from the Media box to the Timeline at the bottom.

Step 2: Clear Image Background, Add Border, and Add Custom Background
Go to Effects from the menu bar, click to select the Default tab and then AI Portrait from the navigation pane, and click and drag the Human Segmentation preset from the right box, and place it over the image track in the Timeline.

Double-click the image layer, scroll down the upper-left box to the Video Effects section, and use the Edge Thickness and Edge Feather sliders to adjust the character’s edges to make them as realistic as possible. Click OK when done.

Next, click and drag the Human Border preset over the image track in the Timeline, and follow the same procedure to customize the border. This will give the character a neon border effect.

Now, use the method explained earlier to import a custom image for the background, and drag and place it under the previous track in the Timeline.

If you are running the latest version of Filmora, you will find there are some neon light effects available under AI Portrait as well.

Step 3: Add Titles to Thumbnail
Go to Titles from the menu bar, click to select the Default tab and then Lower 3rds from the navigation pane, and click and drag your preferred lower-third preset from the right window to a separate layer in the Timeline. Double-click the lower-third layer, and use the available options in the upper-left window to change the text, its color, etc., and drag the textbox to place it to your preferred position on the image as well. Click OK to save the changes.
Next, click to select Titles from the navigation pane, and drag your preferred title from the right window to the upper-most track in the Timeline. Now use the method explained earlier to edit the text, its color, position, etc. to make it look professional.

For more tips and tricks for creating YouTube thumbnail, you can check this You Tube thumbnail creating guide.
Step 4: Get the Neon Border Thumbnail
Click the Snapshot (Camera) icon from the upper-right area of the Timeline, go to My Media from the menu bar, right-click the thumbnail of the screenshot you captured, and click Reveal in Finder (on Mac) or Reveal in Explorer (on Windows) to get to the folder the YouTube thumbnail border is saved in.

Part 2: How to Add a Glowing Neon Border in Your YouTube Thumbnail with Canva
Canva is another intuitive editing program that works on the web interface rather than having you download and install an app on your PC. You can add a neon border for YouTube thumbnails using Canva by following the instructions given below:
Step 1: Define Project Settings and Add a Background
After signing in to your Canva account, click Create a design from the top-right corner of the page, click Custom size from the bottom, define 1280 and 720 in the Width and Height fields on the box that appears respectively, and click Create new design.

Now, click to select Background from the navigation bar on the left (if the Background tool is not visible, click More and then choose Background from the expanded list), and click to select a background from the images available in the center pane.

Step 2: Upload an Image and Add Effects
Click Uploads from the navigation bar, click the More icon from the right of the Upload media button present at the top of the center pane, choose your preferred method to upload the image (with the transparent background) that you want to use, upload the image, and drag it from the center pane to the Canvas.
Note: You can use any of the tools available online to remove the background from your image for free.

To add a YouTube thumbnail border, make sure that the image that you added to the Canvas is selected, click the Duplicate icon from the upper-right area, and use the scaling handles of the copy of the image to increase its size a bit. Reposition the image back to its original location as well.
Then, click Edit image from the upper-left corner of the Canvas, click Duotone from the Edit image pane at the center, if need be, click See all, choose your preferred duotone effect to apply on the image, choose your preferred highlight and shadow colors from the box that appears next, and click Back from the top of the pane.

Next, click See all next to the Adjust section from the center pane, and drag the Blur slider to the right to increase the blur effect on the image.

Step 3: Position the Layers
While keeping the duplicate image selected, click the Position button from the upper-right area of the Canvas, and click Background to send the second image behind the first one to get the neon border effect for the photo.

Part 3: How to Outline a Person in a YouTube Thumbnail with Photoshop
Because YouTube thumbnails are nothing but static images, creating YouTube thumbnail border with Adobe Photoshop is comparatively easier. The process of doing this is given below:
Step 1: Define Document Preferences and Import an Image
Launch Adobe Photoshop on your PC, click Create new, and on the New Document customization box, define the width and height values to 1280 and 720 pixels respectively. Select Transparent from the Background Contents menu as well if not already selected. Click Create from the bottom to create a new Photoshop document with the specified document settings. Next, open the folder that contains the source image, drag the photo to Photoshop, and press Enter to place the photo.

Step 2: Remove Background from the Image
Make sure that the image layer is selected in the Layers panel on the right, go to Select from the menu bar at the top, and click Subject. From the bottom of the Layers panel, click the Add a mask icon to get rid of the background, leaving only the human on the Canvas.

Step 3: Add a Custom Background and an Outline Around the Subject
Use the method explained earlier to import a background image of your choice to Photoshop. Drag the background image layer to the bottom in the Layers panel. Double-click the masked layer, click to select Stroke from the left pane of the Layer Style box, and use the options available on the right to manage the size, color, position, etc. of the stroke that has been added around the human subject. Click OK when done, and then export the image normally to use it as a YouTube thumbnail border.

Summary
It is important to know that the default resolution of a YouTube thumbnail is 1280 x 720 pixels that is usually written and referred to as 720p. While adding a YouTube thumbnail border, it is also imperative to have a good sense of color combination and fonts. Furthermore, a decent tool like Wondershare Filmora X must be used to add an appealing neon border around the main subject in the thumbnail image easily and quickly.
02 Add a Glowing Neon Border in YouTube Thumbnail with Canva
03 Outline a Person in a YouTube Thumbnail with Photoshop
Part 1: How to Add Neon Border to YouTube Thumbnail for Free with Filmora
Being one of the most versatile and intuitive post-production tools available in the market today, Wondershare Filmora X allows you to add a neon border to a YouTube thumbnail quite conveniently. You can learn how to get this done on Windows or Mac by following the steps given below.
For Win 7 or later (64-bit)
For macOS 10.12 or later
Step 1: Define Project Settings and Add Image to the Timeline
Launch Wondershare Filmora X on your PC (a MacBook Pro M1 is used here), ensure that the project aspect ratio is set to 16:9 (Widescreen) on the splash screen, and click New Project. On the main interface, click the Preview quality and display settings icon from the upper-right area of the Timeline, click Change Project Aspect Ratio, click to select 1280 x 720 (HD) from the Resolution menu of the Project Settings box, and click OK to save the custom project settings.
Then select My Media from the menu bar if not already selected, click Project Media from the navigation pane, and click Import from the Media box to select and import the image of the main character or object that you want to use in the thumbnail.
Now, drag the image from the Media box to the Timeline at the bottom.
Step 2: Clear Image Background, Add Border, and Add Custom Background
Go to Effects from the menu bar, click to select the Default tab and then AI Portrait from the navigation pane, and click and drag the Human Segmentation preset from the right box, and place it over the image track in the Timeline.
Double-click the image layer, scroll down the upper-left box to the Video Effects section, and use the Edge Thickness and Edge Feather sliders to adjust the character’s edges to make them as realistic as possible. Click OK when done.
Next, click and drag the Human Border preset over the image track in the Timeline, and follow the same procedure to customize the border. This will give the character a neon border effect.
Now, use the method explained earlier to import a custom image for the background, and drag and place it under the previous track in the Timeline.
If you are running the latest version of Filmora, you will find there are some neon light effects available under AI Portrait as well.
Step 3: Add Titles to Thumbnail
Go to Titles from the menu bar, click to select the Default tab and then Lower 3rds from the navigation pane, and click and drag your preferred lower-third preset from the right window to a separate layer in the Timeline. Double-click the lower-third layer, and use the available options in the upper-left window to change the text, its color, etc., and drag the textbox to place it to your preferred position on the image as well. Click OK to save the changes.
Next, click to select Titles from the navigation pane, and drag your preferred title from the right window to the upper-most track in the Timeline. Now use the method explained earlier to edit the text, its color, position, etc. to make it look professional.
For more tips and tricks for creating YouTube thumbnail, you can check this You Tube thumbnail creating guide.
Step 4: Get the Neon Border Thumbnail
Click the Snapshot (Camera) icon from the upper-right area of the Timeline, go to My Media from the menu bar, right-click the thumbnail of the screenshot you captured, and click Reveal in Finder (on Mac) or Reveal in Explorer (on Windows) to get to the folder the YouTube thumbnail border is saved in.
Part 2: How to Add a Glowing Neon Border in Your YouTube Thumbnail with Canva
Canva is another intuitive editing program that works on the web interface rather than having you download and install an app on your PC. You can add a neon border for YouTube thumbnails using Canva by following the instructions given below:
Step 1: Define Project Settings and Add a Background
After signing in to your Canva account, click Create a design from the top-right corner of the page, click Custom size from the bottom, define 1280 and 720 in the Width and Height fields on the box that appears respectively, and click Create new design.
Now, click to select Background from the navigation bar on the left (if the Background tool is not visible, click More and then choose Background from the expanded list), and click to select a background from the images available in the center pane.
Step 2: Upload an Image and Add Effects
Click Uploads from the navigation bar, click the More icon from the right of the Upload media button present at the top of the center pane, choose your preferred method to upload the image (with the transparent background) that you want to use, upload the image, and drag it from the center pane to the Canvas.
Note: You can use any of the tools available online to remove the background from your image for free.
To add a YouTube thumbnail border, make sure that the image that you added to the Canvas is selected, click the Duplicate icon from the upper-right area, and use the scaling handles of the copy of the image to increase its size a bit. Reposition the image back to its original location as well.
Then, click Edit image from the upper-left corner of the Canvas, click Duotone from the Edit image pane at the center, if need be, click See all, choose your preferred duotone effect to apply on the image, choose your preferred highlight and shadow colors from the box that appears next, and click Back from the top of the pane.
Next, click See all next to the Adjust section from the center pane, and drag the Blur slider to the right to increase the blur effect on the image.
Step 3: Position the Layers
While keeping the duplicate image selected, click the Position button from the upper-right area of the Canvas, and click Background to send the second image behind the first one to get the neon border effect for the photo.
Part 3: How to Outline a Person in a YouTube Thumbnail with Photoshop
Because YouTube thumbnails are nothing but static images, creating YouTube thumbnail border with Adobe Photoshop is comparatively easier. The process of doing this is given below:
Step 1: Define Document Preferences and Import an Image
Launch Adobe Photoshop on your PC, click Create new, and on the New Document customization box, define the width and height values to 1280 and 720 pixels respectively. Select Transparent from the Background Contents menu as well if not already selected. Click Create from the bottom to create a new Photoshop document with the specified document settings. Next, open the folder that contains the source image, drag the photo to Photoshop, and press Enter to place the photo.
Step 2: Remove Background from the Image
Make sure that the image layer is selected in the Layers panel on the right, go to Select from the menu bar at the top, and click Subject. From the bottom of the Layers panel, click the Add a mask icon to get rid of the background, leaving only the human on the Canvas.
Step 3: Add a Custom Background and an Outline Around the Subject
Use the method explained earlier to import a background image of your choice to Photoshop. Drag the background image layer to the bottom in the Layers panel. Double-click the masked layer, click to select Stroke from the left pane of the Layer Style box, and use the options available on the right to manage the size, color, position, etc. of the stroke that has been added around the human subject. Click OK when done, and then export the image normally to use it as a YouTube thumbnail border.
Summary
It is important to know that the default resolution of a YouTube thumbnail is 1280 x 720 pixels that is usually written and referred to as 720p. While adding a YouTube thumbnail border, it is also imperative to have a good sense of color combination and fonts. Furthermore, a decent tool like Wondershare Filmora X must be used to add an appealing neon border around the main subject in the thumbnail image easily and quickly.
Permanent Ousting Technique for the Quick Video Feature
How to Disable/Remove YouTube Shorts Permanently?

Shanoon Cox
Nov 07, 2023• Proven solutions
YouTube Shorts is undoubtedly one of the most trending features, just like TikTok, which has also followed it for many years and created a vast user base. Creating such a short duration video is quick, grabs attention, and gets spread like a fire.
But, do you know that inclusion of YouTube shorts replaces the explore option to make proper adjustments for YouTube Shorts under the application. Not only this, many users dislike getting disturbed by such a short duration video while searching for some beneficial, informative, or detailed information.
If any of such cases, attune with you, and you want to know how to disable YouTube Shorts or remove Shorts from the YouTube platform. Then, this is the right place.
In this article, you will learn the process of disabling YouTube Shorts or removing YouTube shorts permanently. Just remain stick with the guidelines, and soon you will become able to do the same with easy steps.
- Method 1: Three dots option
- Method 2: Settings menu of YouTube
- Method 3: Can go with YouTube browser
- Method 4: Factory reset
- Method 5: Link to downgrade the YouTube
- Method 6: Removing all update
- Method 7: Try YouTube Vanced
Easy Ways to Disable/Remove YouTube Shorts
Now, as you have reached this section, you should be curious, what are the steps or methods with the help of which you would be able to disable YouTube Shorts. Don’t worry. Here, we shall cover all the methods of removing shorts from YouTube in detail.
You can choose either of them as per your suitability or the one which best suits you. Some of these methods are pretty easy to follow, or you might need to follow some steps for some. But the main essence is, following any method will show how to remove shorts from YouTube. So, now go with the methods one by one and follow the guidelines to remove shorts from YouTube.
Method 1: Three dots option
One of the primary things you can do with any short videos is to click on the three dots next to each of such videos if you are not particularly willing to see something. Doing so will open the pop-up window, which will give you the option of “Not interested”. Click on this option. That’s it. Next time, such a video will not appear to you while surfing videos on YouTube.
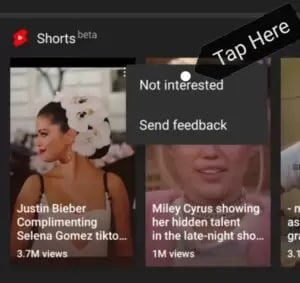
Here, no doubt the method is simple, but this method needs repetitiveness. As, whenever you see Shorts videos, you need to click on three dots to remove that.
Method 2: Settings menu of YouTube
At your YouTube homepage at the top end, you will see the profile icon. If you click on it, that will lead you towards the Settings menu of YouTube.
From there, you need to select “General”, which will show up some options. Here, click on the Shorts option to turn it off.
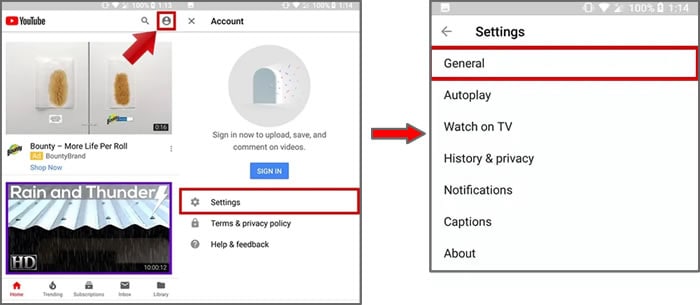
This way, by simply following and managing settings, you can easily disable YouTube shorts from the platform.
Now, restart your device to apply the removal process of YouTube shorts from there entirely. Thus, the next time you open the application, you will find that there exists no such YouTube shorts video as this option will disable YouTube Shorts.
Try Filmora to Create Funny yet Trendy YouTube Shorts!
As a YouTube fan, you can also create interesting video by yourself with Filmora YouTube Video Editor. You can add cool visual effects and popular emojis to decorate your video. Plus, there is a vast media library to add audio and filter! You are free to create popular YouTube Shorts and post it on YouTube or other social media directly.
Create YouTube Shorts Free Create YouTube Shorts Free Learn More >


Method 3: Can go with YouTube browser
Hey guys, there is one more trick. Whenever you want to access YouTube, instead of going through the application, try to open YouTube website either from your mobile or PC browser window. You would wonder why so and what difference it will make. The fact is that the Shorts tab has not yet been incorporated under the browser version of YouTube.
So friends, try this to avoid seeing YouTube Shorts videos either from phone or desktop. This is not only simple but also device-free. And even if you do not have a YouTube application, you can use this trick to solve your concern.
Method 4: Factory reset
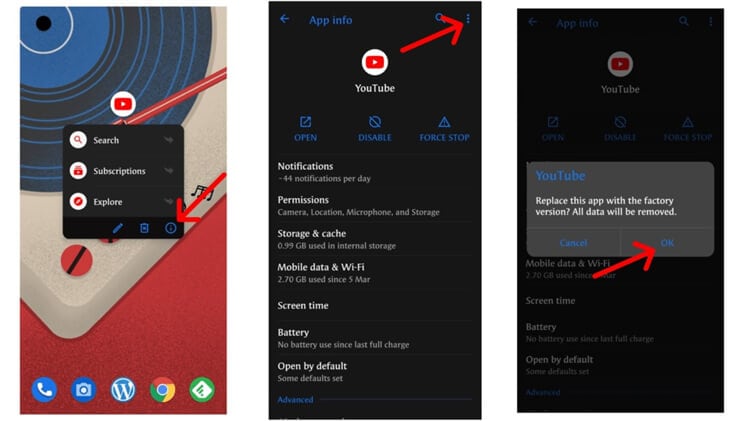
If you disagree with the shorts video and want to get off of it entirely. This trick might help you. For this, visit the YouTube app on your mobile and press on it for some time. Doing so will lead you to the info section under the settings.
When you click on the Uninstall option, the YouTube version will get downgraded to the factory version. This is the version that is a pre-installed version of YouTube that comes with the device.
Also, if you have not updated your YouTube app, then don’t go with that. However, you will receive notifications many times that you should update your application. Just ignore it, especially if you are not willing to add the Shorts video option on your YouTube application.
Method 5: Link to downgrade the YouTube
Friends, for every problem, there exists some solution. And, if you are finding it difficult to factory reset the YouTube, you can download the downgraded version of YouTube. This is the version that does not contain the YouTube Shorts feature. Do like this:
- Visit the Link and download the downgraded version.
- Install by allowing unknown resources also.
- Then, disable the auto-update of the YouTube option also.
Note: While downloading and installing this version, you need to allow installation from unknown sources.
Filmora YouTube Video Editor
Get started easily with Filmora’s powerful performance, intuitive interface, and countless effects! Create YouTube Shorts with ease!
Make YouTube Shorts Make YouTube Shorts Make YouTube Shorts

Method 6: Removing all update
There exists one more simple trick to understand how to turn off YouTube Shorts. That is to remove all update options. How to do that, follow the below-mentioned steps you can do so.
On your smartphone, open the Settings > Apps or Manage Apps option > choose YouTube app> at the top right end, click on three dots there > click on Uninstall Updates. That will replace your YouTube app with that of the older version of YouTube.
Using this method, you can remove shorts easily from YouTube. And, it is not going to take much amount of time. So, go and follow the steps.
Method 7: Try YouTube Vanced
Wait, the list is not over yet. If none of the previous methods work, try YouTube Vanced, the advanced and premium version of YouTube to get rid of YouTube Shorts. Well, not only that, but YouTube Vanced also comes up with multiple services that you can enjoy along with it, such as disabling YouTube Shorts, blocking ads, stories, or any of the sponsored features.
If not sure how to go about it, then let’s have a look over the following steps that will guide you to get YouTube Vanced.
Step 1: Download YouTube Vanced
First, download the YouTube Vanced application from its website.
Step 2: Install and complete the setup process
After that, complete the installation process and follow the on-screen direction rightly to make it work effectively for you.
Note: If you are downloading from the website, not from the app store, then there might appear the warning. So ignore that and go with the downloading and installation process.
Step 3: Open application and visit settings
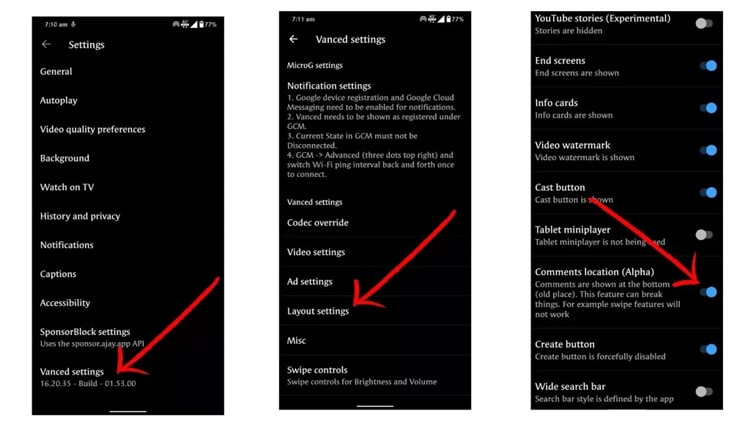
Once you have launched the application, under the settings, you need to go for the Vanced settings option> there opt for “Ad settings” > at the end of the page, switch on the Shorts shelf.
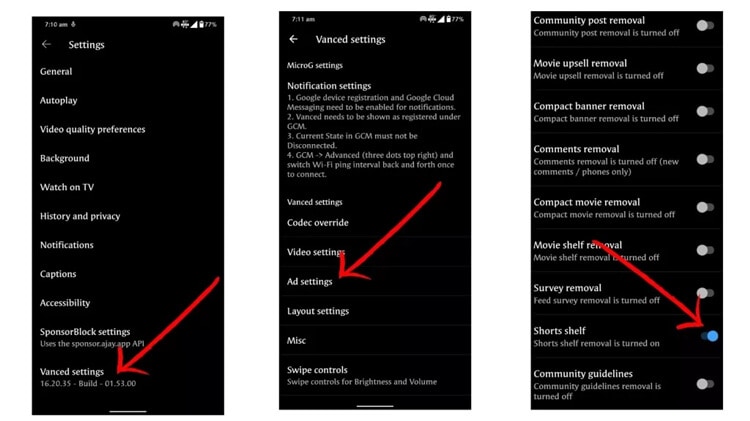
Doing so will disable the YouTube Shorts option from the Home screen.
Alternatively, remove the YouTube Shorts button also from the screen. Under the “Vanced settings” > Visit Layout settings > Switch on the Comments location option. That will further remove the Shorts button from the bottom end of the Home screen of the YouTube page.
Voila, now you can say that you get rid of those shorts videos by removing shorts from YouTube using YouTube Vanced option.
Thus, following the methods mentioned above gives you multiple ways to turn off shorts on YouTube. I hope that now you will be able to use YouTube without any concern or interference of YouTube Shorts videos.
![]()
A cross-platform for making videos anywhere for all creators

Why your video editing isn’t good enough? How about some creative inspo?
- 100 Million+ Users
- 150+ Countries and Regions
- 4 Million+ Social Media Followers
- 5 Million+ Stock Media for Use
* Secure Download

Conclusion
YouTube has always been the favorite choice for many users to explain videos under the same platform just a few steps away. Somehow, the YouTube Shorts will not be a good choice for those dedicated users who always explore YouTube for detailed videos or information.
Thus, keeping that issue in mind, this article assisted with both the ways to turn off YouTube shorts or remove YouTube shorts with simple steps.
So, friends, let’s not wait for anymore. Scroll up the article and get a detailed steps-wise guide and get a good grab of the process. So that your concern will get resolved, and soon you will be able to access the platform with the last look.
Shanoon Cox
Shanoon Cox is a writer and a lover of all things video.
Follow @Shanoon Cox
Shanoon Cox
Nov 07, 2023• Proven solutions
YouTube Shorts is undoubtedly one of the most trending features, just like TikTok, which has also followed it for many years and created a vast user base. Creating such a short duration video is quick, grabs attention, and gets spread like a fire.
But, do you know that inclusion of YouTube shorts replaces the explore option to make proper adjustments for YouTube Shorts under the application. Not only this, many users dislike getting disturbed by such a short duration video while searching for some beneficial, informative, or detailed information.
If any of such cases, attune with you, and you want to know how to disable YouTube Shorts or remove Shorts from the YouTube platform. Then, this is the right place.
In this article, you will learn the process of disabling YouTube Shorts or removing YouTube shorts permanently. Just remain stick with the guidelines, and soon you will become able to do the same with easy steps.
- Method 1: Three dots option
- Method 2: Settings menu of YouTube
- Method 3: Can go with YouTube browser
- Method 4: Factory reset
- Method 5: Link to downgrade the YouTube
- Method 6: Removing all update
- Method 7: Try YouTube Vanced
Easy Ways to Disable/Remove YouTube Shorts
Now, as you have reached this section, you should be curious, what are the steps or methods with the help of which you would be able to disable YouTube Shorts. Don’t worry. Here, we shall cover all the methods of removing shorts from YouTube in detail.
You can choose either of them as per your suitability or the one which best suits you. Some of these methods are pretty easy to follow, or you might need to follow some steps for some. But the main essence is, following any method will show how to remove shorts from YouTube. So, now go with the methods one by one and follow the guidelines to remove shorts from YouTube.
Method 1: Three dots option
One of the primary things you can do with any short videos is to click on the three dots next to each of such videos if you are not particularly willing to see something. Doing so will open the pop-up window, which will give you the option of “Not interested”. Click on this option. That’s it. Next time, such a video will not appear to you while surfing videos on YouTube.
Here, no doubt the method is simple, but this method needs repetitiveness. As, whenever you see Shorts videos, you need to click on three dots to remove that.
Method 2: Settings menu of YouTube
At your YouTube homepage at the top end, you will see the profile icon. If you click on it, that will lead you towards the Settings menu of YouTube.
From there, you need to select “General”, which will show up some options. Here, click on the Shorts option to turn it off.
This way, by simply following and managing settings, you can easily disable YouTube shorts from the platform.
Now, restart your device to apply the removal process of YouTube shorts from there entirely. Thus, the next time you open the application, you will find that there exists no such YouTube shorts video as this option will disable YouTube Shorts.
Try Filmora to Create Funny yet Trendy YouTube Shorts!
As a YouTube fan, you can also create interesting video by yourself with Filmora YouTube Video Editor. You can add cool visual effects and popular emojis to decorate your video. Plus, there is a vast media library to add audio and filter! You are free to create popular YouTube Shorts and post it on YouTube or other social media directly.
Create YouTube Shorts Free Create YouTube Shorts Free Learn More >
Method 3: Can go with YouTube browser
Hey guys, there is one more trick. Whenever you want to access YouTube, instead of going through the application, try to open YouTube website either from your mobile or PC browser window. You would wonder why so and what difference it will make. The fact is that the Shorts tab has not yet been incorporated under the browser version of YouTube.
So friends, try this to avoid seeing YouTube Shorts videos either from phone or desktop. This is not only simple but also device-free. And even if you do not have a YouTube application, you can use this trick to solve your concern.
Method 4: Factory reset
If you disagree with the shorts video and want to get off of it entirely. This trick might help you. For this, visit the YouTube app on your mobile and press on it for some time. Doing so will lead you to the info section under the settings.
When you click on the Uninstall option, the YouTube version will get downgraded to the factory version. This is the version that is a pre-installed version of YouTube that comes with the device.
Also, if you have not updated your YouTube app, then don’t go with that. However, you will receive notifications many times that you should update your application. Just ignore it, especially if you are not willing to add the Shorts video option on your YouTube application.
Method 5: Link to downgrade the YouTube
Friends, for every problem, there exists some solution. And, if you are finding it difficult to factory reset the YouTube, you can download the downgraded version of YouTube. This is the version that does not contain the YouTube Shorts feature. Do like this:
- Visit the Link and download the downgraded version.
- Install by allowing unknown resources also.
- Then, disable the auto-update of the YouTube option also.
Note: While downloading and installing this version, you need to allow installation from unknown sources.
Filmora YouTube Video Editor
Get started easily with Filmora’s powerful performance, intuitive interface, and countless effects! Create YouTube Shorts with ease!
Make YouTube Shorts Make YouTube Shorts Make YouTube Shorts
Method 6: Removing all update
There exists one more simple trick to understand how to turn off YouTube Shorts. That is to remove all update options. How to do that, follow the below-mentioned steps you can do so.
On your smartphone, open the Settings > Apps or Manage Apps option > choose YouTube app> at the top right end, click on three dots there > click on Uninstall Updates. That will replace your YouTube app with that of the older version of YouTube.
Using this method, you can remove shorts easily from YouTube. And, it is not going to take much amount of time. So, go and follow the steps.
Method 7: Try YouTube Vanced
Wait, the list is not over yet. If none of the previous methods work, try YouTube Vanced, the advanced and premium version of YouTube to get rid of YouTube Shorts. Well, not only that, but YouTube Vanced also comes up with multiple services that you can enjoy along with it, such as disabling YouTube Shorts, blocking ads, stories, or any of the sponsored features.
If not sure how to go about it, then let’s have a look over the following steps that will guide you to get YouTube Vanced.
Step 1: Download YouTube Vanced
First, download the YouTube Vanced application from its website.
Step 2: Install and complete the setup process
After that, complete the installation process and follow the on-screen direction rightly to make it work effectively for you.
Note: If you are downloading from the website, not from the app store, then there might appear the warning. So ignore that and go with the downloading and installation process.
Step 3: Open application and visit settings
Once you have launched the application, under the settings, you need to go for the Vanced settings option> there opt for “Ad settings” > at the end of the page, switch on the Shorts shelf.
Doing so will disable the YouTube Shorts option from the Home screen.
Alternatively, remove the YouTube Shorts button also from the screen. Under the “Vanced settings” > Visit Layout settings > Switch on the Comments location option. That will further remove the Shorts button from the bottom end of the Home screen of the YouTube page.
Voila, now you can say that you get rid of those shorts videos by removing shorts from YouTube using YouTube Vanced option.
Thus, following the methods mentioned above gives you multiple ways to turn off shorts on YouTube. I hope that now you will be able to use YouTube without any concern or interference of YouTube Shorts videos.
![]()
A cross-platform for making videos anywhere for all creators
Why your video editing isn’t good enough? How about some creative inspo?
- 100 Million+ Users
- 150+ Countries and Regions
- 4 Million+ Social Media Followers
- 5 Million+ Stock Media for Use
* Secure Download
Conclusion
YouTube has always been the favorite choice for many users to explain videos under the same platform just a few steps away. Somehow, the YouTube Shorts will not be a good choice for those dedicated users who always explore YouTube for detailed videos or information.
Thus, keeping that issue in mind, this article assisted with both the ways to turn off YouTube shorts or remove YouTube shorts with simple steps.
So, friends, let’s not wait for anymore. Scroll up the article and get a detailed steps-wise guide and get a good grab of the process. So that your concern will get resolved, and soon you will be able to access the platform with the last look.
Shanoon Cox
Shanoon Cox is a writer and a lover of all things video.
Follow @Shanoon Cox
Also read:
- A Filmmaker's Essential Guide to Free Royalty-Free Audiosites for 2024
- Unveiling the Ultimate List of Budget-Friendly Video Editors
- In 2024, Breakdown of Earnings How Much Does a Clicky Make?
- [Updated] Ace Your Youtube Livestreams Mastering Broadcast Techniques Using WireCast
- YouTube Thumbnails Demystified - Mac Edition
- [Updated] Building a Broad-Spectrum Audience with Multichannel Strategy
- In 2024, Buzzing Beats Essential Background Scores for Viral Video Shorts
- 2024 Approved Create Identity A Quick Walkthrough of Customizing Your YouTube Url
- Revenue War Diary Dailymotion vs YouTube Monetization Strategies
- [Updated] Dive Into the World of Dynamic and Entertaining Video Shopping Content
- 2024 Approved Build Your Wealth on YouTube A Guide to Creating Content Without Ads
- Building Engaging Learning Experiences YouTube as Your Classroom Screen for 2024
- Deciphering the Wealth of Mr. Beast for 2024
- Essential Errors to Dodge Beginner YouTuber's Guide
- Enhance Your YouTube Presence with These Top 10 Editors
- [Updated] Completely Erase Your Connection with YouTube Shorts
- Evaluating Whether Your Video Consumption Needs a Subscription Boost for 2024
- [Updated] Enhancing Viewability Creating Custom YouTube Thumbnails
- [New] Earning at Age Ten The Extraordinary Financial Rise of Ryan Kaji
- [New] Cultivate Creativity 20+ Inspiring YouTube Concepts
- Elevate Your Online Presence A Guide to Thriving YouTube Branding for 2024
- Crafting a Winning Strategy YouTube Keyword Mastery Explained
- [Updated] Breaking Boundaries Coordinated Video Watch Across Channels
- [Updated] Amplify YouTube Visibility Crafting Effective Descriptions & Tags
- AudioCut Editor Expert Video & Melody Mastery on PC
- In 2024, 10+ Top FREE YouTube Image Extractors
- In 2024, Bite-Sized Beatstories Role & Tune Fusion
- 2024 Approved Elevate Your Content Top Reasons and Solutions for Gaining Video Views
- A Detailed Guide on Faking Your Location in Mozilla Firefox On Samsung Galaxy F04 | Dr.fone
- 2024 Approved 10+ Best Free Webcam Software for Windows 10
- [Updated] Building Brand Identity with Instagram Video Content for 2024
- Updated 2024 Approved FCPX Visual Effects Freeze Frames, Slow Motion, and Advanced Editing
- How To Transfer WhatsApp From iPhone 11 Pro Max to Android? | Dr.fone
- [New] The Ultimate Handbook to TikTok Markers
- New 11 Best Voice Changer That You Should Know for 2024
- Screen Recording Simplified Unlocking Five Key Techniques for Minecraft on a Mac for 2024
- [New] Instantly Post Photos/Videos to Twitter, Skipping Retweets for 2024
- [Updated] In 2024, Unveiling Past Images 3 Approaches for FB Reverse Search
- Lock Your Realme GT Neo 5 Phone in Style The Top 5 Gesture Lock Screen Apps
- New Melodic Accompaniment to Frame the 24 Birthday Spectacle for 2024
- [New] Mastering Insta Exiting A Step-by-Step Guide for 2024
- In 2024, iSpoofer is not working On Poco X5 Pro? Fixed | Dr.fone
- [New] 2024 Approved The Future of Social Media Innovating with Facebook Reels
- [Updated] Essential Gaming Collection Best of Action-Adventure Classics
- The Full Laptop ScreenCapture Experience for 2024
- [New] Internet Aid Social Story Recorder
- Simplifying the Process of Watching FB Live on Roku
- Introduction of Virbo Online | Wondershare Virbo for 2024
- How To Check if Your Realme GT Neo 5 Is Unlocked
- Updated Step by Step to Rotate Videos in Davinci Resolve for 2024
- New Cohesion Through Channels The Process of Amalgamating Audio Sources Into One File
- [New] Comparing Leading Names in 4K YT Video to MP3 Tools
- Title: "[New] Elevate Play Button Visuals Vivid Neon Lines Added"
- Author: Steven
- Created at : 2024-05-25 20:12:01
- Updated at : 2024-05-26 20:12:01
- Link: https://youtube-clips.techidaily.com/new-elevate-play-button-visuals-vivid-neon-lines-added/
- License: This work is licensed under CC BY-NC-SA 4.0.
