
!["[New] Effortless Media Incorporation YouTube to Slides"](https://www.lifewire.com/thmb/CJ67ETb2O4uuEo78S2gUHwX4efQ=/400x300/filters:no_upscale():max_bytes(150000):strip_icc():format(webp)/TheWolfAmongUsBigby-793544cded2749488ae1d20113d8d73a.jpg)
"[New] Effortless Media Incorporation YouTube to Slides"
Effortless Media Incorporation: YouTube to Slides
Create High-Quality Video - Wondershare Filmora
An easy and powerful YouTube video editor
Numerous video and audio effects to choose from
Detailed tutorials provided by the official channel
Google Slide presentation is a powerful tool for creators to keep their audience engaged. This online platform lets you create and demonstrate your ideas. It will capture your viewers’ attention from the very beginning. It also doesn’t matter whatever learning style you engage. Adding YouTube videos to Google Slide will appeal to all levels of individuals.
More so, it is the best way to provide a break for both the audience and the creator. You can break Google Slide presentations with videos to offer some break. Viewers and the presenter get a breather in the process. The presenter can take a short break from speaking while the video plays. Let’s now dive into how to embed a YouTube video in Google Slides.

In this article
01 Why should we add a video to Google Slides?
02 How to add a YouTube video to Google Slide
03 How to choose the right video for your Slides?
Why should we add a video to Google Slides?
There is a great impact of adding video to Google Slides.
For attention
Videos will automatically awaken you, especially if your thoughts have started to sway during a presentation. A video has a direct way of showing creativity. The audience automatically connects the dots between the video and the presentation lines alike.
To stimulate discussion
A picture is worth a thousand words. There is a way that an added video will help the audience connect to the day’s topic. It will bring up several ideas and stir up discussion with the presenter.
Easy following
With videos embedded in Google Slide, viewers will find it easy to understand and digest. Videos automatically eliminate boredom and make any topic interesting.
How to add a YouTube video to Google Slide
Use these two methods to add a YouTube video to Google Slides. Via the Search and Direct link.
Method 1. Embed YouTube video to Google Slide by search and selection
Google has owned YouTube since the year 2006. You can, therefore, integrate Google’s products with YouTube easily.
Step 1. First, go to the slide where you want to embed your video.
Step 2. Then choose the “Insert” option from the menu bar and hit the “Video” option.

Step 3. It would be best if you now viewed the “YouTube” search bar to type in the video you want to embed. You can use keywords to search for the video in question and view instant search results.
Step 4. Then select the video you want to embed, and you’ll see it appear on the “Slide.”

Step 5. Format your video. Remember that the entire video will be embedded. You don’t necessarily need the whole video. It is time to select just a brief but relevant clip from the video to use. Then position your video to the right point using the axes from the exact starting point to the finished part you want the video to appear in.
Method 2. Embed YouTube video to Google Slide by direct link
You can engage this method if you want to include the entire video.
Step 1. Get the URL of the specific YouTube video that you want to use.

Step 2. Then go to your browser’s “Address bar” to copy the YouTube link.
Step 3. Next, open the “Presentation” slide to put your video to.
Step 4. Choose the “Insert” tab from the menu bar.
Step 5. Then hit on the “Video” option from the drop-down menu that appears.
Step 6. A new window will open automatically. Choose the “By URL” tab.
Step 7. Then paste the YouTube video URL in the “Paste YouTube URL Here” bar section.

Step 8. Wait for the video file to load and press the “Select” option. The video will immediately appear in the presentation slide. Just drag and drop the video in your preferred position.
Note: You can do a few edits inside the application. Set the timer when your video should start and when to stop. You can also adjust the video player size.
How to choose the right video for your Slides?
Not all videos will make an impact on your Google Slide. You need to use the best shot that adds value to your presentation. These guidelines will help you to settle on the best video.
Be Professional – choose the best video for your presentation. Remember that the video is part of the presentation and carries more weight. Settling for quality video will bring out the professionalism in you.
Relevant – how do you know that what you are showing your audience corresponds to the presentation piece? Ensure that the video you add has something to do with the Google Slide presentation topic. The two should naturally flow to make it easy to understand the whole concept.
Precise – your presentation is not about the video. The ideal length should not exceed 60 seconds. The longer the video, the greater the chance for your audience to lose track along the way.
Know every footage you are working with – this will help you pick the best shots for your presentation. So, learn every aspect of the video before settling down to use it.
Add new content – even though one content may suit several presentations, don’t rely on the same piece each time. Your audience will want to feel something fresh each time you are presenting. So, compose different videos for different scenarios to make that big impact.
Create an eye-catching video for your Slides with Filmora
The video quality matters when it comes to creating your Slides. The best video creator – Filmora – works in simple steps to give you an eye-catching video. It will create videos for all scenarios like marketing, tutorial, gaming, etc.
Key features of Filmora
- It offers you advanced video effects like filters, motion elements, etc
- You can multiply your fun with multiple screens with the Split Screen feature
- Easily change backgrounds using the Green Screen feature
- The speed control lets you fast forward or slow down a special moment
- Import your video clips to social media platforms
- You can also adjust the audio of your tracks using the Audio Mixer feature
Follow this guide to create a video for your slide with Filmora
Step 1. Launch Filmora
First, begin by downloading and installing Filmora on your computer device. Once installed, launch it and allow it to run. You can either create a new project or open an existing project to work on.
Step 2. Create a new project
Here, click on the “New Project” tab on the app’s welcome screen. The editor should load immediately. Then proceed to register the product. Just hit on the “Register” tab.
Step 3. Import video
Check the upper left corner of your screen to see the “Import” tab. Click on it and choose the “Import Media Files” option. Next, navigate to the location of your computer’s local list to select the clip or video you want to edit. Then, hit the “Import” button to add the video to the timeline for editing.
Step 4. Edit video
Drag and drop the raw footage to Filmora’s timeline to begin editing. Here, you can trim, add other video clips, merge, and add effects as you wish. Likewise, you can add opening titles, subtitles, and end credits to your video. More so, this tool offers different templates to use. Just drag and drop the templates you wish to use to a specific location on the timeline.
Step 5. Preview your file
Last but not least, you can preview your files. Click on the “Play” tab to start previewing your video clips. The main essence of this part is to allow you to make the necessary changes to your clips if there is a need.
Step 6. Export and Share
With Filmora, you can export your file to various social media platforms. But first, go to the “Output window” and select the video file format to use. This software supports several output formats to apply to any platform and device. Just click on the “Format” tab and choose the file format to use. Then also change the resolution and other parameters like frame rate and channel of your video in the “Settings” section. Finally, share your video to your YouTube channel and get ready to add the video to the Google Slide presentation.
For Win 7 or later (64-bit)
For macOS 10.12 or later
Conclusion
● You now know how to put a YouTube video in Google Slides the simple way. You can search for your YouTube videos or directly use the URL link. Whatever the case, remember that it’s the quality of your video that carries more weight. Thanks to the availability of third-party apps that you can use to create and improve the quality of your videos.
● Filmora is at your service to create high-resolution videos that you can export in any format to your YouTube channel. The tool is intuitive, and it won’t matter whether you haven’t tried it before. It is a perfect choice for both professionals and first-time users.
Google Slide presentation is a powerful tool for creators to keep their audience engaged. This online platform lets you create and demonstrate your ideas. It will capture your viewers’ attention from the very beginning. It also doesn’t matter whatever learning style you engage. Adding YouTube videos to Google Slide will appeal to all levels of individuals.
More so, it is the best way to provide a break for both the audience and the creator. You can break Google Slide presentations with videos to offer some break. Viewers and the presenter get a breather in the process. The presenter can take a short break from speaking while the video plays. Let’s now dive into how to embed a YouTube video in Google Slides.
In this article
01 Why should we add a video to Google Slides?
02 How to add a YouTube video to Google Slide
03 How to choose the right video for your Slides?
Why should we add a video to Google Slides?
There is a great impact of adding video to Google Slides.
For attention
Videos will automatically awaken you, especially if your thoughts have started to sway during a presentation. A video has a direct way of showing creativity. The audience automatically connects the dots between the video and the presentation lines alike.
To stimulate discussion
A picture is worth a thousand words. There is a way that an added video will help the audience connect to the day’s topic. It will bring up several ideas and stir up discussion with the presenter.
Easy following
With videos embedded in Google Slide, viewers will find it easy to understand and digest. Videos automatically eliminate boredom and make any topic interesting.
How to add a YouTube video to Google Slide
Use these two methods to add a YouTube video to Google Slides. Via the Search and Direct link.
Method 1. Embed YouTube video to Google Slide by search and selection
Google has owned YouTube since the year 2006. You can, therefore, integrate Google’s products with YouTube easily.
Step 1. First, go to the slide where you want to embed your video.
Step 2. Then choose the “Insert” option from the menu bar and hit the “Video” option.
Step 3. It would be best if you now viewed the “YouTube” search bar to type in the video you want to embed. You can use keywords to search for the video in question and view instant search results.
Step 4. Then select the video you want to embed, and you’ll see it appear on the “Slide.”
Step 5. Format your video. Remember that the entire video will be embedded. You don’t necessarily need the whole video. It is time to select just a brief but relevant clip from the video to use. Then position your video to the right point using the axes from the exact starting point to the finished part you want the video to appear in.
Method 2. Embed YouTube video to Google Slide by direct link
You can engage this method if you want to include the entire video.
Step 1. Get the URL of the specific YouTube video that you want to use.
Step 2. Then go to your browser’s “Address bar” to copy the YouTube link.
Step 3. Next, open the “Presentation” slide to put your video to.
Step 4. Choose the “Insert” tab from the menu bar.
Step 5. Then hit on the “Video” option from the drop-down menu that appears.
Step 6. A new window will open automatically. Choose the “By URL” tab.
Step 7. Then paste the YouTube video URL in the “Paste YouTube URL Here” bar section.
Step 8. Wait for the video file to load and press the “Select” option. The video will immediately appear in the presentation slide. Just drag and drop the video in your preferred position.
Note: You can do a few edits inside the application. Set the timer when your video should start and when to stop. You can also adjust the video player size.
How to choose the right video for your Slides?
Not all videos will make an impact on your Google Slide. You need to use the best shot that adds value to your presentation. These guidelines will help you to settle on the best video.
Be Professional – choose the best video for your presentation. Remember that the video is part of the presentation and carries more weight. Settling for quality video will bring out the professionalism in you.
Relevant – how do you know that what you are showing your audience corresponds to the presentation piece? Ensure that the video you add has something to do with the Google Slide presentation topic. The two should naturally flow to make it easy to understand the whole concept.
Precise – your presentation is not about the video. The ideal length should not exceed 60 seconds. The longer the video, the greater the chance for your audience to lose track along the way.
Know every footage you are working with – this will help you pick the best shots for your presentation. So, learn every aspect of the video before settling down to use it.
Add new content – even though one content may suit several presentations, don’t rely on the same piece each time. Your audience will want to feel something fresh each time you are presenting. So, compose different videos for different scenarios to make that big impact.
Create an eye-catching video for your Slides with Filmora
The video quality matters when it comes to creating your Slides. The best video creator – Filmora – works in simple steps to give you an eye-catching video. It will create videos for all scenarios like marketing, tutorial, gaming, etc.
Key features of Filmora
- It offers you advanced video effects like filters, motion elements, etc
- You can multiply your fun with multiple screens with the Split Screen feature
- Easily change backgrounds using the Green Screen feature
- The speed control lets you fast forward or slow down a special moment
- Import your video clips to social media platforms
- You can also adjust the audio of your tracks using the Audio Mixer feature
Follow this guide to create a video for your slide with Filmora
Step 1. Launch Filmora
First, begin by downloading and installing Filmora on your computer device. Once installed, launch it and allow it to run. You can either create a new project or open an existing project to work on.
Step 2. Create a new project
Here, click on the “New Project” tab on the app’s welcome screen. The editor should load immediately. Then proceed to register the product. Just hit on the “Register” tab.
Step 3. Import video
Check the upper left corner of your screen to see the “Import” tab. Click on it and choose the “Import Media Files” option. Next, navigate to the location of your computer’s local list to select the clip or video you want to edit. Then, hit the “Import” button to add the video to the timeline for editing.
Step 4. Edit video
Drag and drop the raw footage to Filmora’s timeline to begin editing. Here, you can trim, add other video clips, merge, and add effects as you wish. Likewise, you can add opening titles, subtitles, and end credits to your video. More so, this tool offers different templates to use. Just drag and drop the templates you wish to use to a specific location on the timeline.
Step 5. Preview your file
Last but not least, you can preview your files. Click on the “Play” tab to start previewing your video clips. The main essence of this part is to allow you to make the necessary changes to your clips if there is a need.
Step 6. Export and Share
With Filmora, you can export your file to various social media platforms. But first, go to the “Output window” and select the video file format to use. This software supports several output formats to apply to any platform and device. Just click on the “Format” tab and choose the file format to use. Then also change the resolution and other parameters like frame rate and channel of your video in the “Settings” section. Finally, share your video to your YouTube channel and get ready to add the video to the Google Slide presentation.
For Win 7 or later (64-bit)
For macOS 10.12 or later
Conclusion
● You now know how to put a YouTube video in Google Slides the simple way. You can search for your YouTube videos or directly use the URL link. Whatever the case, remember that it’s the quality of your video that carries more weight. Thanks to the availability of third-party apps that you can use to create and improve the quality of your videos.
● Filmora is at your service to create high-resolution videos that you can export in any format to your YouTube channel. The tool is intuitive, and it won’t matter whether you haven’t tried it before. It is a perfect choice for both professionals and first-time users.
Disabling YouTube Shorts for Good: A Simple Approach
How to Disable/Remove YouTube Shorts Permanently?

Shanoon Cox
Nov 07, 2023• Proven solutions
YouTube Shorts is undoubtedly one of the most trending features, just like TikTok, which has also followed it for many years and created a vast user base. Creating such a short duration video is quick, grabs attention, and gets spread like a fire.
But, do you know that inclusion of YouTube shorts replaces the explore option to make proper adjustments for YouTube Shorts under the application. Not only this, many users dislike getting disturbed by such a short duration video while searching for some beneficial, informative, or detailed information.
If any of such cases, attune with you, and you want to know how to disable YouTube Shorts or remove Shorts from the YouTube platform. Then, this is the right place.
In this article, you will learn the process of disabling YouTube Shorts or removing YouTube shorts permanently. Just remain stick with the guidelines, and soon you will become able to do the same with easy steps.
- Method 1: Three dots option
- Method 2: Settings menu of YouTube
- Method 3: Can go with YouTube browser
- Method 4: Factory reset
- Method 5: Link to downgrade the YouTube
- Method 6: Removing all update
- Method 7: Try YouTube Vanced
Easy Ways to Disable/Remove YouTube Shorts
Now, as you have reached this section, you should be curious, what are the steps or methods with the help of which you would be able to disable YouTube Shorts. Don’t worry. Here, we shall cover all the methods of removing shorts from YouTube in detail.
You can choose either of them as per your suitability or the one which best suits you. Some of these methods are pretty easy to follow, or you might need to follow some steps for some. But the main essence is, following any method will show how to remove shorts from YouTube. So, now go with the methods one by one and follow the guidelines to remove shorts from YouTube.
Method 1: Three dots option
One of the primary things you can do with any short videos is to click on the three dots next to each of such videos if you are not particularly willing to see something. Doing so will open the pop-up window, which will give you the option of “Not interested”. Click on this option. That’s it. Next time, such a video will not appear to you while surfing videos on YouTube.
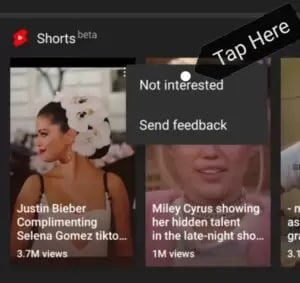
Here, no doubt the method is simple, but this method needs repetitiveness. As, whenever you see Shorts videos, you need to click on three dots to remove that.
Method 2: Settings menu of YouTube
At your YouTube homepage at the top end, you will see the profile icon. If you click on it, that will lead you towards the Settings menu of YouTube.
From there, you need to select “General”, which will show up some options. Here, click on the Shorts option to turn it off.
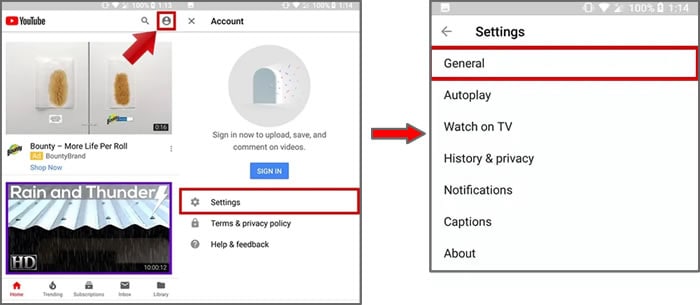
This way, by simply following and managing settings, you can easily disable YouTube shorts from the platform.
Now, restart your device to apply the removal process of YouTube shorts from there entirely. Thus, the next time you open the application, you will find that there exists no such YouTube shorts video as this option will disable YouTube Shorts.
Try Filmora to Create Funny yet Trendy YouTube Shorts!
As a YouTube fan, you can also create interesting video by yourself with Filmora YouTube Video Editor. You can add cool visual effects and popular emojis to decorate your video. Plus, there is a vast media library to add audio and filter! You are free to create popular YouTube Shorts and post it on YouTube or other social media directly.
Create YouTube Shorts Free Create YouTube Shorts Free Learn More >


Method 3: Can go with YouTube browser
Hey guys, there is one more trick. Whenever you want to access YouTube, instead of going through the application, try to open YouTube website either from your mobile or PC browser window. You would wonder why so and what difference it will make. The fact is that the Shorts tab has not yet been incorporated under the browser version of YouTube.
So friends, try this to avoid seeing YouTube Shorts videos either from phone or desktop. This is not only simple but also device-free. And even if you do not have a YouTube application, you can use this trick to solve your concern.
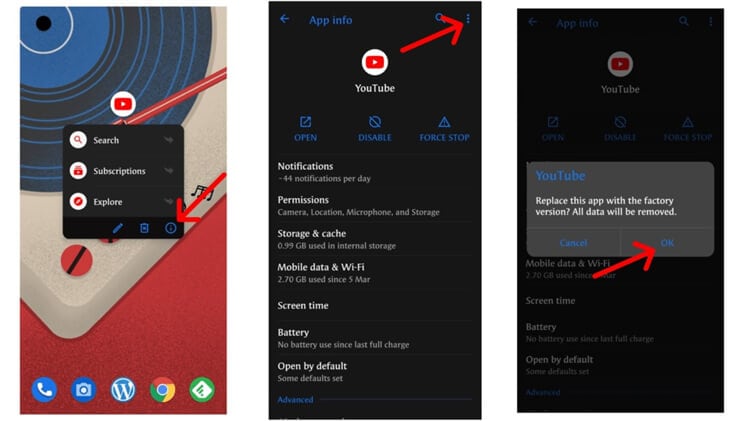
Method 4: Factory reset
If you disagree with the shorts video and want to get off of it entirely. This trick might help you. For this, visit the YouTube app on your mobile and press on it for some time. Doing so will lead you to the info section under the settings.
When you click on the Uninstall option, the YouTube version will get downgraded to the factory version. This is the version that is a pre-installed version of YouTube that comes with the device.
Also, if you have not updated your YouTube app, then don’t go with that. However, you will receive notifications many times that you should update your application. Just ignore it, especially if you are not willing to add the Shorts video option on your YouTube application.
Method 5: Link to downgrade the YouTube
Friends, for every problem, there exists some solution. And, if you are finding it difficult to factory reset the YouTube, you can download the downgraded version of YouTube. This is the version that does not contain the YouTube Shorts feature. Do like this:
- Visit the Link and download the downgraded version.
- Install by allowing unknown resources also.
- Then, disable the auto-update of the YouTube option also.
Note: While downloading and installing this version, you need to allow installation from unknown sources.
Filmora YouTube Video Editor
Get started easily with Filmora’s powerful performance, intuitive interface, and countless effects! Create YouTube Shorts with ease!
Make YouTube Shorts Make YouTube Shorts Make YouTube Shorts

Method 6: Removing all update
There exists one more simple trick to understand how to turn off YouTube Shorts. That is to remove all update options. How to do that, follow the below-mentioned steps you can do so.
On your smartphone, open the Settings > Apps or Manage Apps option > choose YouTube app> at the top right end, click on three dots there > click on Uninstall Updates. That will replace your YouTube app with that of the older version of YouTube.
Using this method, you can remove shorts easily from YouTube. And, it is not going to take much amount of time. So, go and follow the steps.
Method 7: Try YouTube Vanced
Wait, the list is not over yet. If none of the previous methods work, try YouTube Vanced, the advanced and premium version of YouTube to get rid of YouTube Shorts. Well, not only that, but YouTube Vanced also comes up with multiple services that you can enjoy along with it, such as disabling YouTube Shorts, blocking ads, stories, or any of the sponsored features.
If not sure how to go about it, then let’s have a look over the following steps that will guide you to get YouTube Vanced.
Step 1: Download YouTube Vanced
First, download the YouTube Vanced application from its website.
Step 2: Install and complete the setup process
After that, complete the installation process and follow the on-screen direction rightly to make it work effectively for you.
Note: If you are downloading from the website, not from the app store, then there might appear the warning. So ignore that and go with the downloading and installation process.
Step 3: Open application and visit settings
Once you have launched the application, under the settings, you need to go for the Vanced settings option> there opt for “Ad settings” > at the end of the page, switch on the Shorts shelf.
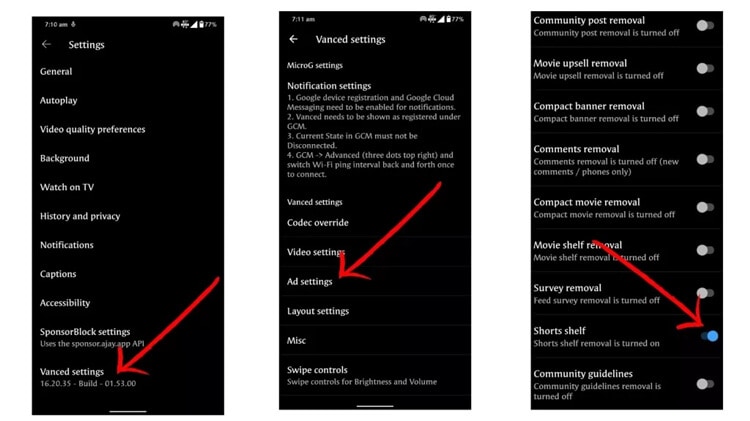
Doing so will disable the YouTube Shorts option from the Home screen.
Alternatively, remove the YouTube Shorts button also from the screen. Under the “Vanced settings” > Visit Layout settings > Switch on the Comments location option. That will further remove the Shorts button from the bottom end of the Home screen of the YouTube page.
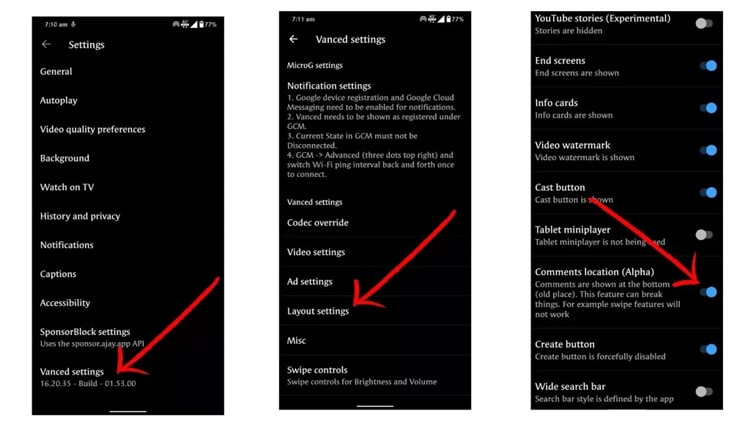
Voila, now you can say that you get rid of those shorts videos by removing shorts from YouTube using YouTube Vanced option.
Thus, following the methods mentioned above gives you multiple ways to turn off shorts on YouTube. I hope that now you will be able to use YouTube without any concern or interference of YouTube Shorts videos.
![]()
A cross-platform for making videos anywhere for all creators

Why your video editing isn’t good enough? How about some creative inspo?
- 100 Million+ Users
- 150+ Countries and Regions
- 4 Million+ Social Media Followers
- 5 Million+ Stock Media for Use
* Secure Download

Conclusion
YouTube has always been the favorite choice for many users to explain videos under the same platform just a few steps away. Somehow, the YouTube Shorts will not be a good choice for those dedicated users who always explore YouTube for detailed videos or information.
Thus, keeping that issue in mind, this article assisted with both the ways to turn off YouTube shorts or remove YouTube shorts with simple steps.
So, friends, let’s not wait for anymore. Scroll up the article and get a detailed steps-wise guide and get a good grab of the process. So that your concern will get resolved, and soon you will be able to access the platform with the last look.
Shanoon Cox
Shanoon Cox is a writer and a lover of all things video.
Follow @Shanoon Cox
Shanoon Cox
Nov 07, 2023• Proven solutions
YouTube Shorts is undoubtedly one of the most trending features, just like TikTok, which has also followed it for many years and created a vast user base. Creating such a short duration video is quick, grabs attention, and gets spread like a fire.
But, do you know that inclusion of YouTube shorts replaces the explore option to make proper adjustments for YouTube Shorts under the application. Not only this, many users dislike getting disturbed by such a short duration video while searching for some beneficial, informative, or detailed information.
If any of such cases, attune with you, and you want to know how to disable YouTube Shorts or remove Shorts from the YouTube platform. Then, this is the right place.
In this article, you will learn the process of disabling YouTube Shorts or removing YouTube shorts permanently. Just remain stick with the guidelines, and soon you will become able to do the same with easy steps.
- Method 1: Three dots option
- Method 2: Settings menu of YouTube
- Method 3: Can go with YouTube browser
- Method 4: Factory reset
- Method 5: Link to downgrade the YouTube
- Method 6: Removing all update
- Method 7: Try YouTube Vanced
Easy Ways to Disable/Remove YouTube Shorts
Now, as you have reached this section, you should be curious, what are the steps or methods with the help of which you would be able to disable YouTube Shorts. Don’t worry. Here, we shall cover all the methods of removing shorts from YouTube in detail.
You can choose either of them as per your suitability or the one which best suits you. Some of these methods are pretty easy to follow, or you might need to follow some steps for some. But the main essence is, following any method will show how to remove shorts from YouTube. So, now go with the methods one by one and follow the guidelines to remove shorts from YouTube.
Method 1: Three dots option
One of the primary things you can do with any short videos is to click on the three dots next to each of such videos if you are not particularly willing to see something. Doing so will open the pop-up window, which will give you the option of “Not interested”. Click on this option. That’s it. Next time, such a video will not appear to you while surfing videos on YouTube.
Here, no doubt the method is simple, but this method needs repetitiveness. As, whenever you see Shorts videos, you need to click on three dots to remove that.
Method 2: Settings menu of YouTube
At your YouTube homepage at the top end, you will see the profile icon. If you click on it, that will lead you towards the Settings menu of YouTube.
From there, you need to select “General”, which will show up some options. Here, click on the Shorts option to turn it off.
This way, by simply following and managing settings, you can easily disable YouTube shorts from the platform.
Now, restart your device to apply the removal process of YouTube shorts from there entirely. Thus, the next time you open the application, you will find that there exists no such YouTube shorts video as this option will disable YouTube Shorts.
Try Filmora to Create Funny yet Trendy YouTube Shorts!
As a YouTube fan, you can also create interesting video by yourself with Filmora YouTube Video Editor. You can add cool visual effects and popular emojis to decorate your video. Plus, there is a vast media library to add audio and filter! You are free to create popular YouTube Shorts and post it on YouTube or other social media directly.
Create YouTube Shorts Free Create YouTube Shorts Free Learn More >
Method 3: Can go with YouTube browser
Hey guys, there is one more trick. Whenever you want to access YouTube, instead of going through the application, try to open YouTube website either from your mobile or PC browser window. You would wonder why so and what difference it will make. The fact is that the Shorts tab has not yet been incorporated under the browser version of YouTube.
So friends, try this to avoid seeing YouTube Shorts videos either from phone or desktop. This is not only simple but also device-free. And even if you do not have a YouTube application, you can use this trick to solve your concern.
Method 4: Factory reset
If you disagree with the shorts video and want to get off of it entirely. This trick might help you. For this, visit the YouTube app on your mobile and press on it for some time. Doing so will lead you to the info section under the settings.
When you click on the Uninstall option, the YouTube version will get downgraded to the factory version. This is the version that is a pre-installed version of YouTube that comes with the device.
Also, if you have not updated your YouTube app, then don’t go with that. However, you will receive notifications many times that you should update your application. Just ignore it, especially if you are not willing to add the Shorts video option on your YouTube application.
Method 5: Link to downgrade the YouTube
Friends, for every problem, there exists some solution. And, if you are finding it difficult to factory reset the YouTube, you can download the downgraded version of YouTube. This is the version that does not contain the YouTube Shorts feature. Do like this:
- Visit the Link and download the downgraded version.
- Install by allowing unknown resources also.
- Then, disable the auto-update of the YouTube option also.
Note: While downloading and installing this version, you need to allow installation from unknown sources.
Filmora YouTube Video Editor
Get started easily with Filmora’s powerful performance, intuitive interface, and countless effects! Create YouTube Shorts with ease!
Make YouTube Shorts Make YouTube Shorts Make YouTube Shorts
Method 6: Removing all update
There exists one more simple trick to understand how to turn off YouTube Shorts. That is to remove all update options. How to do that, follow the below-mentioned steps you can do so.
On your smartphone, open the Settings > Apps or Manage Apps option > choose YouTube app> at the top right end, click on three dots there > click on Uninstall Updates. That will replace your YouTube app with that of the older version of YouTube.
Using this method, you can remove shorts easily from YouTube. And, it is not going to take much amount of time. So, go and follow the steps.
Method 7: Try YouTube Vanced
Wait, the list is not over yet. If none of the previous methods work, try YouTube Vanced, the advanced and premium version of YouTube to get rid of YouTube Shorts. Well, not only that, but YouTube Vanced also comes up with multiple services that you can enjoy along with it, such as disabling YouTube Shorts, blocking ads, stories, or any of the sponsored features.
If not sure how to go about it, then let’s have a look over the following steps that will guide you to get YouTube Vanced.
Step 1: Download YouTube Vanced
First, download the YouTube Vanced application from its website.
Step 2: Install and complete the setup process
After that, complete the installation process and follow the on-screen direction rightly to make it work effectively for you.
Note: If you are downloading from the website, not from the app store, then there might appear the warning. So ignore that and go with the downloading and installation process.
Step 3: Open application and visit settings
Once you have launched the application, under the settings, you need to go for the Vanced settings option> there opt for “Ad settings” > at the end of the page, switch on the Shorts shelf.
Doing so will disable the YouTube Shorts option from the Home screen.
Alternatively, remove the YouTube Shorts button also from the screen. Under the “Vanced settings” > Visit Layout settings > Switch on the Comments location option. That will further remove the Shorts button from the bottom end of the Home screen of the YouTube page.
Voila, now you can say that you get rid of those shorts videos by removing shorts from YouTube using YouTube Vanced option.
Thus, following the methods mentioned above gives you multiple ways to turn off shorts on YouTube. I hope that now you will be able to use YouTube without any concern or interference of YouTube Shorts videos.
![]()
A cross-platform for making videos anywhere for all creators
Why your video editing isn’t good enough? How about some creative inspo?
- 100 Million+ Users
- 150+ Countries and Regions
- 4 Million+ Social Media Followers
- 5 Million+ Stock Media for Use
* Secure Download
Conclusion
YouTube has always been the favorite choice for many users to explain videos under the same platform just a few steps away. Somehow, the YouTube Shorts will not be a good choice for those dedicated users who always explore YouTube for detailed videos or information.
Thus, keeping that issue in mind, this article assisted with both the ways to turn off YouTube shorts or remove YouTube shorts with simple steps.
So, friends, let’s not wait for anymore. Scroll up the article and get a detailed steps-wise guide and get a good grab of the process. So that your concern will get resolved, and soon you will be able to access the platform with the last look.
Shanoon Cox
Shanoon Cox is a writer and a lover of all things video.
Follow @Shanoon Cox
Also read:
- In 2024, Command the Stage of YouTube with Studio Skills
- Capturing Audiene with Spectacular Gadget Unboxing Vlogs for 2024
- YouTube’s Payment System A Monthly Breakdown
- In 2024, Elevate Your YouTube Shorts Top 10 Strategies for Uniqueness
- 2024 Approved Breaking the Internet Hashtag Wisdom for Short Films
- 2024 Approved Charting Financial Success The Tale of Ajey (CarryMinati) and YouTube
- Charting Your Course in YouTubing Dodge These Top 8 Common Missteps for 2024
- 2024 Approved Create Memorable Videos with the Right Thumbnail Font
- Elevate Thumbnails Fantasy Elements Added
- In 2024, Digital Dialogue Mastery Connecting with Viewers Flawlessly
- Antique Cinematography in the Digital Realm for 2024
- [Updated] Cultivating Productive Collaboration A Pathway to Effective Collab Videos
- In 2024, Crafting Eye-Catching Video Summaries 3 Neon Border Methods
- Leveraging YouTube's Features to Improve Visuals
- Cutting Edge Professional Guide to YouTube Editing for 2024
- In 2024, Conciseness in Content Editing Your YouTube Videos Smartly
- Unmatched Convert Experience Premier Online YTVideo Tools
- Insider Secrets to Properly Tag Your YouTube Videos
- In 2024, Enhance Engagement Mastering Template-Based Video Description Writing
- Maximize Engagement The Ultimate List of YouTube Growth Tactics
- [Updated] Deciphering YouTube’s Profit for A Mil of Viewers
- 2024 Approved Creating Unique Storytelling in Your Haul Videos
- Expand Your Online Realm Harnessing YouTube Insights Powerfully
- [New] Engaging Students The Power of YouTube in Education
- [New] Adding Clear Timestamps to Your YouTube Channel's Live Streams
- 2024 Approved Elevating Video Sharing From YouTube to Insta
- In 2024, Crafting Motivational Life Vlogs for Fan Engagement
- Unveiling Allure Comprehensive Beauty How-Tos on Youtube
- Explore More Than YouTube The Best 27 Video Sharing Services Reviewed
- Streamlining Earnings with Youtube Studio Techniques
- [New] Easy Ways to Make a Great Educational Video for YouTube
- [New] Blueprinting Engaging Content Layouts on YouTube
- [Updated] Detailed Walkthrough to Flawless YouTube Videos Using iMovie Software
- Simplifying Your Stream A Stepwise Approach to YouTube's Watch Later Feature
- [New] Evaluating Rapid Subscription's Impact on Video Engagement
- 2024 Approved Best 5 Video Editing Platforms That Don't Feature in YouToo
- In 2024, Discover the Joy of Animated Journeys YouTube's Best for Everyday
- Charting Success with YouTube Income Streams
- Leading Selection of 10 Free Video Subtitle Extractors
- 2024 Approved All You Need to Know About the YouTube Shorts Fund
- [New] 10 Spectacularly Free LUTs; Elevate with Exclusive Purchase Options
- 2024 Approved Personal Emblem Creation Fashioning an Exaggerated Self
- Undeleted lost videos from OnePlus
- [Updated] Symphony of Screens Adding Music to Online Chronicles
- [Updated] In 2024, Advanced Tech Roundup Nine Innovative Mic Recorders for Web ('23)
- [Updated] 2024 Approved SonicSoothsayer Listening Inspection Report
- In 2024, How to Transfer Music from Google Pixel Fold to iPod | Dr.fone
- Complete Guide to Hard Reset Your Tecno Pop 8 | Dr.fone
- Does Redmi K70 has native HEVC support?
- 2024 Approved Top 8 Dictation Software for Windows, Mac, and Online
- Will MOV files play on Moto G04 ?
- In 2024, Learn How To Lock Stolen Your iPhone XS Properly | Dr.fone
- [Updated] Facebook's Flash Video Frenzy for 2024
- How to Change Spotify Location After Moving to Another Country On Samsung Galaxy A34 5G | Dr.fone
- [New] Constructing Unique Instagram Story Panels for 2024
- Add Emojis to Videos on YouTube/Facebook/Snapchat Step by Step Guide for 2024
- [Updated] 2024 Approved Optimal Zoom Audio Enhancing Quality, Two-Fold Approach
- [New] How Can I Share YouTube Videos on Facebook for 2024
- In 2024, How to Transfer Data from Honor 100 Pro to Other Android Devices? | Dr.fone
- Failed to play MKV movies on Xiaomi
- [Updated] In 2024, Syncopated Stories in Reels Merging Sound & Vision
- Step-by-Step Process Disabling Video Sound in Latest MKV Format (MKV-2023)
- In 2024, Hacks to do pokemon go trainer battles For Realme GT 5 Pro | Dr.fone
- [New] In 2024, Crafted for Quality Converting IPV Files From Instagram to MP4
- Mastering Gopro Livestreams Connecting to Facebook & Periscope
- How to Unlock Realme Narzo 60 5G Phone without Google Account?
- How to retrieve erased messages from Nubia Z50S Pro
- Updated 2024 Approved Alternatives to PowerDirector Top Mobile Video Editing Software
- [New] The Ultimate Collection of TikTok Emojis – Find Your Favorite 7 + Hidden Gems
- In 2024, AI Voice Manipulation Techniques for Authentic and Natural Sound Replication
- [New] In 2024, The Essentials of Creating a Personalized Twitter Account
- 10 Cartoon Character Makers to Create Animated Characters for 2024
- New In 2024, Mastering GoPro Video Editing on Mac A Step-by-Step Guide
- [Updated] Logitech's 4K Pro Webcam A Complete Exploration
- Aspect Ratio Made Easy A Calculator Tutorial for Photographers
- In 2024, Thriving in the Social Media Jungle Facebook's Essentials
- How to Easily Hard reset my Vivo Y100i | Dr.fone
- 3 Easy Solutions to Hard Reset Vivo S18 Pro | Dr.fone
- Title: "[New] Effortless Media Incorporation YouTube to Slides"
- Author: Steven
- Created at : 2024-05-25 20:11:47
- Updated at : 2024-05-26 20:11:47
- Link: https://youtube-clips.techidaily.com/new-effortless-media-incorporation-youtube-to-slides/
- License: This work is licensed under CC BY-NC-SA 4.0.
