
!["[New] Dream Weavers The Marvel Interactive Sculptors"](https://www.lifewire.com/thmb/jbamhywtXiyGSlJ3P3Gh1VQ_dkA=/400x300/filters:no_upscale():max_bytes(150000):strip_icc()/FaceTime-Conference-Call-d68241b6f5914009a7eb2486fddab0e1.jpg)
"[New] Dream Weavers The Marvel Interactive Sculptors"
Dream Weavers: The Marvel Interactive Sculptors
Top 4 Marvel Intro Makers Online

Richard Bennett
Mar 27, 2024• Proven solutions
Are you a fan of Marvel’s Tv series? If yes, you must have watched the intro that Marvel includes at the starting of its every video, and you may be looking for a marvel intro maker for yourself. The intro has some cool sound effects with amazing animations. Different superheroes appear on the screen and then fade away. It also features some scenes from other tv series. Overall it is a power-packed intro that grabs the users’ attention, and it becomes difficult to take your eyes off the screen when this intro is played.
When watching this intro, you may get excited and want to make your intro if you are a true Marvel fan. But you might be thinking that how it is possible to blend so many elements and characters in a single video and make the smooth transitions so that everything seems to be going in a flow. The answer to your question is straightforward. You can either use Marlvel intro makers online to make it or use Filmora to make it according to our tutorial. Either way, we get you covered!
Top 4 Marvel Online Intro Makers:
This article will share the top 4 online marvel intro makers that you can use to create your own intros similar to Marvel’s intro easily. So, let’s get started with our main topic.
1. Introchamp.com
Price: $8.38 for 1080p version/ $6.98 for 720p version
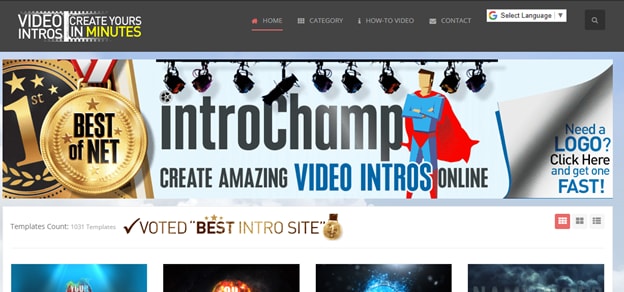
Intro champ is a website that allows you to create video intros in just a few minutes. It is one of the best online intro maker websites out there. If you want to make Marvel’s Intro video, then you can create it using this website. Just click the title to the website, and you will see the screen displayed in the above picture. You will see a search bar on the top right side of your screen. Type “Modern Marvel” in this search bar and hit the enter button. You will see a Marvel intro template that you can use to create your video.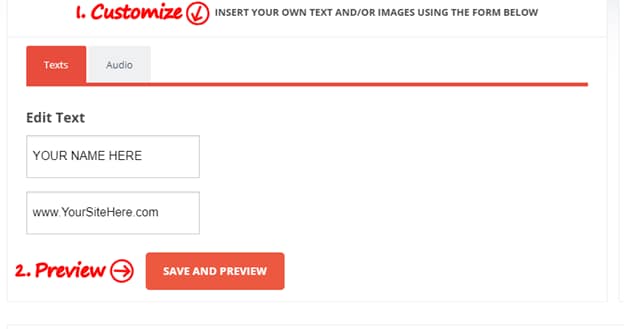
Creating your video is a straightforward process. You need to enter your desired text displayed in two different fields and click on the Save & Preview button. It allows you to try the intro video to have an idea how it will look like. There will be a watermark on the video. If you want to remove that watermark, you need to purchase this template. The 1080p version will cost you around $8.38, and the 780p version will cost around $6.98.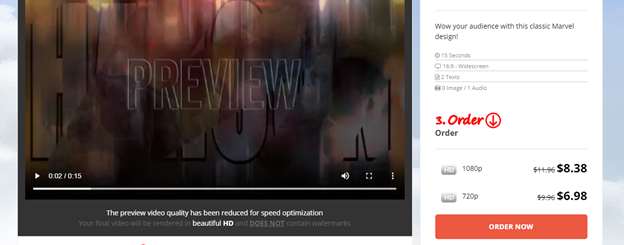
2. Videohive.com
Price: from $10 to $20
The third website that can help you to create online Marvel’s intro videos is Video Hive. It is a website where you can find stock images and stock videos. Just search Marvel Intro in the search bar of the website, and it will display different stock videos that you can use to create intros. 
Every stock video has a different price, and you may need to hire a video editor online to create your intro video using this template. It is a bit expensive option, but the results are more convincing at the same time.
3. Tubearsenal.com
Price: $13 for 1080p version/ $9 for 720p version
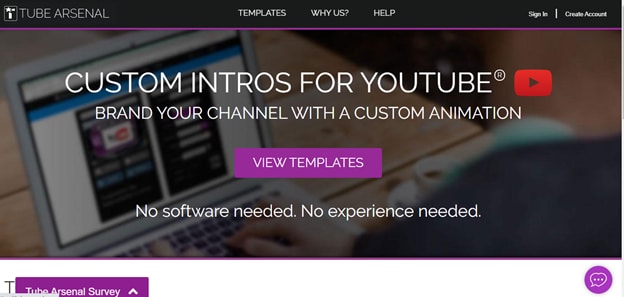
Tube Arsenal is also one of the best and premium intro makers online. It is effortless to use, and you don’t need to download any software or effects because everything here is online. You also don’t need to have any prior experience because it is easy to use platform. 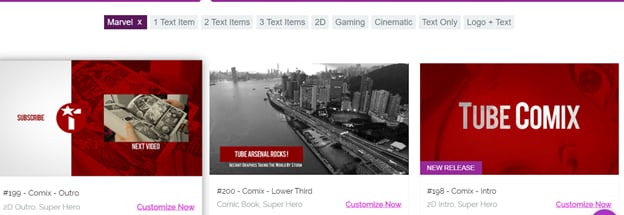
This website contains thousands of intro video templates that you can customize according to your videos’ needs and use. If you want to create Marvel’s intro video, then all you have to do is search “Marvel Intro” in the search bar and select “Comix Intro Template” from the results.
Click on the customize now button, and it will take you to a page where you will find plenty of customization options. You can add your desired text and choose the color of your text. You can also customize the background color and choose a custom music track played with your intro.
4. Filmora X
The fourth option that you have is to create Marvel’s intro video by using Filmora X. Filmora X is one of the latest and premium video editing software out there. You will develop your intro video manually on Filmora X by following a step-by-step procedure. Now you may think that it is not easy, but it is straightforward. You can include the elements that you want and exclude unwanted elements. Overall you can have an excellent experience by using this software.
Conclusion
Many intro maker programs and websites are available online. The websites are easier to use, and you can create your intros in just a few minutes, but they have some limitations. You cannot do much customization on those templates. However, if you use Filmora X, you have many options and can customize your intro how you want. We recommend you give it a try, and we assure you that you won’t regret your decision.


Richard Bennett
Richard Bennett is a writer and a lover of all things video.
Follow @Richard Bennett
Richard Bennett
Mar 27, 2024• Proven solutions
Are you a fan of Marvel’s Tv series? If yes, you must have watched the intro that Marvel includes at the starting of its every video, and you may be looking for a marvel intro maker for yourself. The intro has some cool sound effects with amazing animations. Different superheroes appear on the screen and then fade away. It also features some scenes from other tv series. Overall it is a power-packed intro that grabs the users’ attention, and it becomes difficult to take your eyes off the screen when this intro is played.
When watching this intro, you may get excited and want to make your intro if you are a true Marvel fan. But you might be thinking that how it is possible to blend so many elements and characters in a single video and make the smooth transitions so that everything seems to be going in a flow. The answer to your question is straightforward. You can either use Marlvel intro makers online to make it or use Filmora to make it according to our tutorial. Either way, we get you covered!
Top 4 Marvel Online Intro Makers:
This article will share the top 4 online marvel intro makers that you can use to create your own intros similar to Marvel’s intro easily. So, let’s get started with our main topic.
1. Introchamp.com
Price: $8.38 for 1080p version/ $6.98 for 720p version
Intro champ is a website that allows you to create video intros in just a few minutes. It is one of the best online intro maker websites out there. If you want to make Marvel’s Intro video, then you can create it using this website. Just click the title to the website, and you will see the screen displayed in the above picture. You will see a search bar on the top right side of your screen. Type “Modern Marvel” in this search bar and hit the enter button. You will see a Marvel intro template that you can use to create your video.
Creating your video is a straightforward process. You need to enter your desired text displayed in two different fields and click on the Save & Preview button. It allows you to try the intro video to have an idea how it will look like. There will be a watermark on the video. If you want to remove that watermark, you need to purchase this template. The 1080p version will cost you around $8.38, and the 780p version will cost around $6.98.
2. Videohive.com
Price: from $10 to $20
The third website that can help you to create online Marvel’s intro videos is Video Hive. It is a website where you can find stock images and stock videos. Just search Marvel Intro in the search bar of the website, and it will display different stock videos that you can use to create intros.
Every stock video has a different price, and you may need to hire a video editor online to create your intro video using this template. It is a bit expensive option, but the results are more convincing at the same time.
3. Tubearsenal.com
Price: $13 for 1080p version/ $9 for 720p version
Tube Arsenal is also one of the best and premium intro makers online. It is effortless to use, and you don’t need to download any software or effects because everything here is online. You also don’t need to have any prior experience because it is easy to use platform.
This website contains thousands of intro video templates that you can customize according to your videos’ needs and use. If you want to create Marvel’s intro video, then all you have to do is search “Marvel Intro” in the search bar and select “Comix Intro Template” from the results.
Click on the customize now button, and it will take you to a page where you will find plenty of customization options. You can add your desired text and choose the color of your text. You can also customize the background color and choose a custom music track played with your intro.
4. Filmora X
The fourth option that you have is to create Marvel’s intro video by using Filmora X. Filmora X is one of the latest and premium video editing software out there. You will develop your intro video manually on Filmora X by following a step-by-step procedure. Now you may think that it is not easy, but it is straightforward. You can include the elements that you want and exclude unwanted elements. Overall you can have an excellent experience by using this software.
Conclusion
Many intro maker programs and websites are available online. The websites are easier to use, and you can create your intros in just a few minutes, but they have some limitations. You cannot do much customization on those templates. However, if you use Filmora X, you have many options and can customize your intro how you want. We recommend you give it a try, and we assure you that you won’t regret your decision.
Richard Bennett
Richard Bennett is a writer and a lover of all things video.
Follow @Richard Bennett
Captivating Call-to-Action: Designing a Dynamic Subscribe Buttons with Filmora
How to Make Your YouTube Animated Subscribe Button Easily With Filmora
Richard Bennett
Mar 27, 2024• Proven solutions
The main goal of every content creator is to increase its audience to expand its reach and views. To do so, it’s essential to provide something unique and different to the viewer. Without providing them the content they are looking for, it is impossible to grow your channel and reach. Once your content is ready and you are getting many views, it is essential to make these potential viewers your permanent viewers. The animated subscribe button will help you achieve this goal. While your viewers are watching your videos, you must remind them about subscribing to your channel for receiving such incredible content in the future. Subscribe animation plays a vital role in converting your viewers into subscribers.
There are so many platforms on the internet from where you can get Youtube subscribe button animation free, and you can also purchase these subscribe png gifs. But creating your own animated subscribe button can make you stand out from the crowd and make your videos unique and exclusive. Because it enables you to design it the way you want according to your brand, so, let’s create your own subscribe animation using Wondershare Filmora .
Step-By-Step guide
Step 1: To get started,open Filmora X. On your upper left corner, click on the “Sample Colors,” select the Green color and drag it to Video Track into the timeline. We are using a Green background to easily remove it using the green screen feature in Filmora to use it in our future projects after exporting it, without creating it again. Adjust the duration of this track according to your requirement. In my case, I am trying to make an animated subscribe button of 5 seconds.
Step 2: Lock this track by clicking on the lock icon to work on subscribe animation without disturbing the background easily.
Step 3: Now it’s time to design the subscribe png gif. Go to the Sample colors again and drag the red color into the time above the green background.
Step 4: Double click on the red color in the timeline and adjust its size. Make it look like a subscribe button that is a rectangle and place it at the bottom center of the background. You can put it anywhere you want it to appear in your future videos.
Step 5: Now, let’s add Subscribe text into the button. Go to the Title and select any style that you like. “Basic 6” will work perfectly fine for this purpose. Drag and drop it into the timeline above all tracks.
Step 6: Double click on the Title on the timeline and edit it with “Subscribe” and place it under the red rectangle and click OK.
Step 7: We have put a cursor that can click on the animated subscribe button. You can use Google Search to find a transparent cursor. Make sure to save it in png format. Download it and import it into Filmora.
Step 8: Drag and drop the cursor into the timeline and place it above all the other three tracks to make it prominent. Adjust the size of the cursor place it on the Subscribe button where you want it to appear.
Step 9: Now, it’s time to animate the design using keyframes. First of all, let’s animate the red rectangle. Double click on the red color on the timeline. Go to the ‘Animation’ tab and then click ‘Customize.’ Move to the 1 second in the timeline and click ‘Add.’
Step 10: Now go back to the beginning in the timeline and adjust the scale to 0%. It will make the rectangle pop up when you play the clip.
Step 11: Text needs to be animated as well to match it with the rectangle. Double click on the text in the timeline and click ‘ADVANCED.’
Step 12: In this Advance text editor, go to the ‘Animation’ tab and select any animation that you like. On the timeline under the preview screen, adjusts the dark areas according to the time you set on the rectangle, which was 1 second. We want the text to appear on the screen in 1 second, like the rectangle. Also, adjust the ending time when you want the text to disappear again. We have set it on 4 seconds. Which means it will start to fade after 4 seconds.
Step 13: Now, to animate the mouse cursor, we will use the same process we used for a rectangle that is key framing. Double click on the cursor track on the timeline and move the time on your timeline to a point when you want the cursor to appear. Now add a key frame by clicking ‘Add’.
Step 14: Now jump back to a point in your timeline, when the cursor will start appearing from outside the screen. Move the cursor outside the screen from where you want it to start moving toward the subscribe animation.
Step 15: To animate the click of the cursor, move ahead a little bit into your timeline and scale down the cursor to around 70%. Move it a little further and scale it up to 100%.
Step 16: You can add the sound of mouse click to make it more realistic. You can find this sound anywhere on the internet. Download it and import it into Filmora. Now place it into the timeline where it can match the movement of the cursor.
Step 17: Now it’s time to make this subscribe animation button disappear. Move forward into the time to the end, at around 4 seconds. Double click on the red button in the timeline and add a key frame at its actual scale.
Step 18: After that, move further in the timeline to the end and make its scale 0. It will make it disappear.
Step 19: Do the same with the cursor. Double click on the cursor in the time and add a key frame at its actual position.
Step 20: Move ahead when you want it to disappear. Move the cursor out of the screen and click ‘OK’.
Step 21: Your Subscribe png gif is ready to be exported and used in your videos. Click on export and choose from various formats and options to choose from while exporting it.
You may also like: How to Get People to Subscribe Channel
Conclusion:Your own Animated Subscribe Button is ready to be used in your future videos and projects. This is a ready-to-use subscribe button that can be easily used using the green screen effect in Filmora. Just import the clip, remove the green screen, and you are good to go. You can also customize this Subscribe Animation using your channel and more. Keep experimenting with new things using Filmora.
Richard Bennett
Richard Bennett is a writer and a lover of all things video.
Follow @Richard Bennett
Richard Bennett
Mar 27, 2024• Proven solutions
The main goal of every content creator is to increase its audience to expand its reach and views. To do so, it’s essential to provide something unique and different to the viewer. Without providing them the content they are looking for, it is impossible to grow your channel and reach. Once your content is ready and you are getting many views, it is essential to make these potential viewers your permanent viewers. The animated subscribe button will help you achieve this goal. While your viewers are watching your videos, you must remind them about subscribing to your channel for receiving such incredible content in the future. Subscribe animation plays a vital role in converting your viewers into subscribers.
There are so many platforms on the internet from where you can get Youtube subscribe button animation free, and you can also purchase these subscribe png gifs. But creating your own animated subscribe button can make you stand out from the crowd and make your videos unique and exclusive. Because it enables you to design it the way you want according to your brand, so, let’s create your own subscribe animation using Wondershare Filmora .
Step-By-Step guide
Step 1: To get started,open Filmora X. On your upper left corner, click on the “Sample Colors,” select the Green color and drag it to Video Track into the timeline. We are using a Green background to easily remove it using the green screen feature in Filmora to use it in our future projects after exporting it, without creating it again. Adjust the duration of this track according to your requirement. In my case, I am trying to make an animated subscribe button of 5 seconds.
Step 2: Lock this track by clicking on the lock icon to work on subscribe animation without disturbing the background easily.
Step 3: Now it’s time to design the subscribe png gif. Go to the Sample colors again and drag the red color into the time above the green background.
Step 4: Double click on the red color in the timeline and adjust its size. Make it look like a subscribe button that is a rectangle and place it at the bottom center of the background. You can put it anywhere you want it to appear in your future videos.
Step 5: Now, let’s add Subscribe text into the button. Go to the Title and select any style that you like. “Basic 6” will work perfectly fine for this purpose. Drag and drop it into the timeline above all tracks.
Step 6: Double click on the Title on the timeline and edit it with “Subscribe” and place it under the red rectangle and click OK.
Step 7: We have put a cursor that can click on the animated subscribe button. You can use Google Search to find a transparent cursor. Make sure to save it in png format. Download it and import it into Filmora.
Step 8: Drag and drop the cursor into the timeline and place it above all the other three tracks to make it prominent. Adjust the size of the cursor place it on the Subscribe button where you want it to appear.
Step 9: Now, it’s time to animate the design using keyframes. First of all, let’s animate the red rectangle. Double click on the red color on the timeline. Go to the ‘Animation’ tab and then click ‘Customize.’ Move to the 1 second in the timeline and click ‘Add.’
Step 10: Now go back to the beginning in the timeline and adjust the scale to 0%. It will make the rectangle pop up when you play the clip.
Step 11: Text needs to be animated as well to match it with the rectangle. Double click on the text in the timeline and click ‘ADVANCED.’
Step 12: In this Advance text editor, go to the ‘Animation’ tab and select any animation that you like. On the timeline under the preview screen, adjusts the dark areas according to the time you set on the rectangle, which was 1 second. We want the text to appear on the screen in 1 second, like the rectangle. Also, adjust the ending time when you want the text to disappear again. We have set it on 4 seconds. Which means it will start to fade after 4 seconds.
Step 13: Now, to animate the mouse cursor, we will use the same process we used for a rectangle that is key framing. Double click on the cursor track on the timeline and move the time on your timeline to a point when you want the cursor to appear. Now add a key frame by clicking ‘Add’.
Step 14: Now jump back to a point in your timeline, when the cursor will start appearing from outside the screen. Move the cursor outside the screen from where you want it to start moving toward the subscribe animation.
Step 15: To animate the click of the cursor, move ahead a little bit into your timeline and scale down the cursor to around 70%. Move it a little further and scale it up to 100%.
Step 16: You can add the sound of mouse click to make it more realistic. You can find this sound anywhere on the internet. Download it and import it into Filmora. Now place it into the timeline where it can match the movement of the cursor.
Step 17: Now it’s time to make this subscribe animation button disappear. Move forward into the time to the end, at around 4 seconds. Double click on the red button in the timeline and add a key frame at its actual scale.
Step 18: After that, move further in the timeline to the end and make its scale 0. It will make it disappear.
Step 19: Do the same with the cursor. Double click on the cursor in the time and add a key frame at its actual position.
Step 20: Move ahead when you want it to disappear. Move the cursor out of the screen and click ‘OK’.
Step 21: Your Subscribe png gif is ready to be exported and used in your videos. Click on export and choose from various formats and options to choose from while exporting it.
You may also like: How to Get People to Subscribe Channel
Conclusion:Your own Animated Subscribe Button is ready to be used in your future videos and projects. This is a ready-to-use subscribe button that can be easily used using the green screen effect in Filmora. Just import the clip, remove the green screen, and you are good to go. You can also customize this Subscribe Animation using your channel and more. Keep experimenting with new things using Filmora.
Richard Bennett
Richard Bennett is a writer and a lover of all things video.
Follow @Richard Bennett
Also read:
- Brand Your Channel Innovative Banner Templates for Gamers
- YouTube to WebM The 10 Best YouTube to WebM Converters
- [Updated] Dream Weavers The Marvel Interactive Sculptors
- Professional Tips for Enhancing Your YouTube Videos with Captions
- Channel Identity Made Simple Discover the 10 Best Banner Maker Apps for 2024
- [Updated] 15 Must-Watch Anime Web Channels for Uplifting Days
- Will Real-Time Likes Elevate My Video Visibility?
- Mastering 4K Uploads Key Tips for YouTube Success
- [Updated] Binge on Christmas Classics Enjoy 9 Whole-Film Flicks No Charge
- In 2024, Dive Into Maker's Earnings Exploring YouTube Shorts Revenue Structure
- 2024 Approved How Do Beginners Make a Cool Video for YouTube on Mac
- The Year's Predictions Rendered in Infographics
- Dive Into YouTube TV Tips & Tricks for Optimal Viewing
- In 2024, Best Practices in Selecting YouTube Video Extractor Apps for Android
- Amplify Your Online Presence Top 5 Effective YouTube Strategies
- Cut, Color & Compile A Deep Dive Into YouTube Studio Video Editing for 2024
- [Updated] Comprehensive Strategies for Swiftly Clearing Feedback
- [New] Amplify Your Video's Impact Increasing View Count on YouTube Shorts
- In 2024, Boost Your Content Access Free Vocal SFX
- Achieve More Engagement on YouTube Learn the Best Thumbnail Size for 2024
- IPhone/Android AutoPlay Continuous YouTube Access
- 7 Top-Rated Free Mobile Apps for Video Downloads
- Cultivating Connection, Not Compulsion in Subscriptions for 2024
- Comedy Channel Guide Your Best 15 YouTube Sources
- Elite Channel Analyzer Top YouTube Positioning Tool
- 2024 Approved Cost-Effective Subscriber Growth - Hundreds at a Bargain Price
- [Updated] Clear Up Your YouTube Vision Issues
- [New] Elite Gamers' Capturing Solutions
- 2024 Approved Enhancing Engagement Through YouTube Advertising
- Remote Smile Engineer
- Recover your photos after Ace 2 Pro has been deleted.
- Trailblazing TikTok Profile Features to Become Iconic for 2024
- How do I reset my Samsung Galaxy XCover 6 Pro Tactical Edition Phone without technical knowledge? | Dr.fone
- Top 7 Devices to Power Your Metaverse Experience
- Updated Capture the Moment 10 Best Video to Image Converters for PC and Mac
- [Updated] In 2024, Unique Trajectories Plotting Your Course Amongst Top TikTok Creators
- Updated In 2024, Top 10 Free Video Translators to Mitigate Translation Risks
- [New] In 2024, Revoke Discord Integration (PC/Mobile)
- Updated In 2024, Lights, Camera, Action! A Kids Guide to Making Movies
- [Updated] Supercharging Instagram Videos on the Go (Mobile) for 2024
- New Navigating the Download of Auditory Broadcasts on Home Computers
- New 2024 Approved Audio Perfection A Step-by-Step Guide to Selecting the Ideal FLAC Converter
- In 2024, How to Unlock SIM Card on Apple iPhone 15 Plus online without jailbreak
- [Updated] Comprehensive Techniques to Master Telegram Web Interface
- Repair Video Tool - Repair all your damaged video files of Samsung Galaxy A15 4G
- Master Your Streams YouTube Buffer in Chrome/Safari
- [Updated] In 2024, The Complete Guide to Selecting & Raising Valheim Crops
- Title: "[New] Dream Weavers The Marvel Interactive Sculptors"
- Author: Steven
- Created at : 2024-05-25 20:10:36
- Updated at : 2024-05-26 20:10:36
- Link: https://youtube-clips.techidaily.com/new-dream-weavers-the-marvel-interactive-sculptors/
- License: This work is licensed under CC BY-NC-SA 4.0.
