![[New] Dominating Viewers' Spaces Channel Empire Rules](https://thmb.techidaily.com/a6017269d4c04c5e1e1b5dd34c08e1f92a0a41c1ec409bdbe7a0807e99cdc6f4.jpg)
"[New] Dominating Viewers' Spaces Channel Empire Rules"
Dominating Viewers’ Spaces: Channel Empire Rules
YouTube Creator Studio is a powerful tool for content creators. It allows you to manage and optimize YouTube channels for better performance. With YouTube studio monetization features, you can keep track of your revenues. The creator study also allows you to manage your videos and see how well they are performing. This article explores the monetization Youtube Studio in detail, including how to access and use it.
YouTube-Ready Video Editor A top choice for many creators looking to outperform their competitors on YouTube!
Free Download Free Download Learn More

Part 1. Introduction to YouTube Studio: Definition and Uses
Every creator is aware of YouTube Studio com monetization as a tool for managing YouTube. However, how much can you say about channel monetization YouTube Studio? Let’s have a look at what you need to know:
What is YouTube Studio?

YouTube Studio is a tool that allows creators and other users to manage their channels. Formerly known as YouTube Creator Studio, the tool helps you to edit and monitor the performance of your videos, You can also view and reply to comments, or even schedule content.
Uses of YouTube Studio
YouTube Studio is an essential tool for creators and brands. It helps them manage their presence on YouTube. Individuals can also grow their channels and track the progress they have made. Other people also use YouTube Studio as a hub to get a snapshot of their channel’s performance. It makes it easier to manage videos and offer opportunities for monetizing content through the YouTube Partner Program (YPP). The features that creators can access via the studio include:
- Manage the channel: YouTube Studio allows creators to customize their channel’s appearance, branding, description, and layout.
- Editing of videos: Options for editing videos in the Studio include details, end screens, thumbnails, uploading videos, subtitles, and adding or managing playlists.
- View your performance: Detailed insights are available about the performance of the videos, audience demographics, watch time, and more.
- YouTube Monetization: All the tools and settings for monetizing your videos and Shorts on YouTube are found on the Studio.
- Manage your comments: The comments section of the Studio allows you to view and reply to comments on your videos.
Part 2. Master Your YouTube Presence: Essential Steps to Dominate Creator Studio
Getting started with YouTube Creator Studio is simple. Log in to your YouTube, and click on the profile pic at the right corner of the page. Then select YouTube Studio from the dropdown menu.
Step-by-Step Guide for Using YouTube Creator Studio
Beginners may find it a bit tricky to navigate the YouTube Creator Studio. There are a lot of tools to explore, each with a unique function. Let’s break down the essentials to get you started.
- Step 1: Navigating the YouTube Studio
- Step 2: Exploring the Creator Dashboard
- Step 3: Manage Your Content
- Step 4: Monitoring Channel Performance
- Step 5: Review Your Studio Monetization Tab
Step 1: Navigating the YouTube Studio

To launch the YouTube Creator Studio, head over to studio.youtube.com and sign in. Then click on your profile pic and select YouTube Studio. On the left-hand side of the Studio screen, browse to navigate the features.
Step 2: Exploring the Creator Dashboard

The YouTube Creator Studio Dashboard provides all the handy information needed to create a growth strategy for your channel. You will see the analytics of your top videos and a summary of your views. You will also see your current subscribers watch time, and more:
- Review how your most recent video is performing
- Review personalized suggestions to grow your channel
- Check recent comments and respond appropriately
- Watch the latest updates from the YouTube team
- Look at important notifications to avoid copyright violations or monetization issues on time
- Explore the audio library to gain access to free soundtracks and music
Step 3: Manage Your Content

Click on the Content tab on the dashboard. Manage your content by editing or just reviewing the performance of each video. You can also create playlists linked to the videos to choose watch time.
Step 4: Monitoring Channel Performance

The YouTube Creator Studio Analytics provides a summary of your video metrics and reports. This will help you figure out what is working. The analytics also point out what needs to be improved to gain more views. Be sure to check views and watch time to get an accurate picture of the channel’s performance.
Step 5: Review Your Studio Monetization Tab

The monetization tab shows the monetization status of your channel. On the left side of the dashboard, click Earn to access this feature. After being accepted to the YPP, you can make money from advertising revenue, merch shelf, channel membership, and the fan-funded program. Before monetization, this page shows how far you are to meet the eligibility criteria.
Importance of Verifying the YouTube Channel
After uploading your videos to YouTube Creator Studio, you need to optimize each for monetization. This ensures that the algorithm works in your favor. It is also important to create an AdSense Account and link it to your channel. This will:
- Increase your level of credibility because a verified YouTube channel is seen as more trustworthy by viewers
- Protect you and your channel from impersonation by preventing other users from creating fake accounts under your name.
- Unlock additional features such as the ability to lie stream in HD and customer the channel layout.
Linking your AdSense to the Account is also a crucial step towards getting paid for your creation on YouTube. It ensures that your earnings get to you. After joining the YPP, you are allowed to change your linked AdSense account if you already have one. You can also monetize more than one channel using the same AdSense account, and keep track of your earnings.
Part 3. Create YouTube-Ready Videos with Wondershare Filmora
The success of your YouTube channel largely depends on the quality of the videos uploaded. You need video editing software that will make your creator studio attractive even before opening individual videos. Wondershare Filmora is a top choice for many creators looking to outperform their competitors on YouTube. Explore the range of possibilities with Filmora ranging from creative video effects to stunning text animations.
Free Download For Win 7 or later(64-bit)
Free Download For macOS 10.14 or later
Making YouTube-ready videos with Filmora is quick and easy. You need to have great footage to start with. Then, explore the editing features that will make the video stand out. Let’s have a look at the steps involved:
- Step 1: Launch Filmora
- Step 2: Create a New Project and Import Files
- Step 3: Organize Your Project Material
- Step 4: Place Files on the Timeline
- Step 5: Apply Visual Effects
- Step 6: Conduct the Color Correction Process
- Step 7: Export and Share
Step 1: Launch Filmora
Launch Filmora by double-clicking the desktop icon. On the welcome window, select the aspect ratio you want to use.

Step 2: Create a New Project and Import Files
After launching Filmora, click New Project on the welcome screen. Once the editor loads, import the media files from the options provided.

Step 3: Organize Your Project Material
Manage the files you will be using in the editing project. The My Album option allows you to organize the file using different criteria such as type or purpose.

Step 4: Place Files on the Timeline
Time to start editing your video. Place the video and audio files on the timeline while removing the redundant parts. Use the drag-and-drop feature to edit the clips, one at a time, cutting out unneeded footage to have a clear story.

Step 5: Apply Visual Effects
After removing the unwanted parts from the video clips, detach the audio and video files. Insert transitions between clips, add music, and use other visual effects on Filmora to make the video more exciting.

Step 6: Conduct the Color Correction Process
The effects icon gives you access to filters and overlays to make your video colors more vivid. Select the filters of choice, and drag and drop it to where you want to use on the timeline.

Step 7: Export and Share
Once you are satisfied with the video outcome, export it in MP4 format, ready for upload on YouTube. Save it in your local drive, and upload it to YouTube via the Creator Studio.

Conclusion
The YouTube Creator Studio allows you to manage your channel and content in a central location. You get access to all the essential features, including analytics and content editing. Also, manage the monetization of your videos and reply to comments. Good video editing software will play a crucial role in building your channel. We recommend exploring video editing features on Wondershare Filmora to make better videos for your channels. With most tasks now optimized, editing videos with Filmora is now easier and fun.
Free Download Free Download Learn More
Part 1. Introduction to YouTube Studio: Definition and Uses
Every creator is aware of YouTube Studio com monetization as a tool for managing YouTube. However, how much can you say about channel monetization YouTube Studio? Let’s have a look at what you need to know:
What is YouTube Studio?
YouTube Studio is a tool that allows creators and other users to manage their channels. Formerly known as YouTube Creator Studio, the tool helps you to edit and monitor the performance of your videos, You can also view and reply to comments, or even schedule content.
Uses of YouTube Studio
YouTube Studio is an essential tool for creators and brands. It helps them manage their presence on YouTube. Individuals can also grow their channels and track the progress they have made. Other people also use YouTube Studio as a hub to get a snapshot of their channel’s performance. It makes it easier to manage videos and offer opportunities for monetizing content through the YouTube Partner Program (YPP). The features that creators can access via the studio include:
- Manage the channel: YouTube Studio allows creators to customize their channel’s appearance, branding, description, and layout.
- Editing of videos: Options for editing videos in the Studio include details, end screens, thumbnails, uploading videos, subtitles, and adding or managing playlists.
- View your performance: Detailed insights are available about the performance of the videos, audience demographics, watch time, and more.
- YouTube Monetization: All the tools and settings for monetizing your videos and Shorts on YouTube are found on the Studio.
- Manage your comments: The comments section of the Studio allows you to view and reply to comments on your videos.
Part 2. Master Your YouTube Presence: Essential Steps to Dominate Creator Studio
Getting started with YouTube Creator Studio is simple. Log in to your YouTube, and click on the profile pic at the right corner of the page. Then select YouTube Studio from the dropdown menu.
Step-by-Step Guide for Using YouTube Creator Studio
Beginners may find it a bit tricky to navigate the YouTube Creator Studio. There are a lot of tools to explore, each with a unique function. Let’s break down the essentials to get you started.
- Step 1: Navigating the YouTube Studio
- Step 2: Exploring the Creator Dashboard
- Step 3: Manage Your Content
- Step 4: Monitoring Channel Performance
- Step 5: Review Your Studio Monetization Tab
Step 1: Navigating the YouTube Studio
To launch the YouTube Creator Studio, head over to studio.youtube.com and sign in. Then click on your profile pic and select YouTube Studio. On the left-hand side of the Studio screen, browse to navigate the features.
Step 2: Exploring the Creator Dashboard
The YouTube Creator Studio Dashboard provides all the handy information needed to create a growth strategy for your channel. You will see the analytics of your top videos and a summary of your views. You will also see your current subscribers watch time, and more:
- Review how your most recent video is performing
- Review personalized suggestions to grow your channel
- Check recent comments and respond appropriately
- Watch the latest updates from the YouTube team
- Look at important notifications to avoid copyright violations or monetization issues on time
- Explore the audio library to gain access to free soundtracks and music
Step 3: Manage Your Content
Click on the Content tab on the dashboard. Manage your content by editing or just reviewing the performance of each video. You can also create playlists linked to the videos to choose watch time.
Step 4: Monitoring Channel Performance
The YouTube Creator Studio Analytics provides a summary of your video metrics and reports. This will help you figure out what is working. The analytics also point out what needs to be improved to gain more views. Be sure to check views and watch time to get an accurate picture of the channel’s performance.
Step 5: Review Your Studio Monetization Tab
The monetization tab shows the monetization status of your channel. On the left side of the dashboard, click Earn to access this feature. After being accepted to the YPP, you can make money from advertising revenue, merch shelf, channel membership, and the fan-funded program. Before monetization, this page shows how far you are to meet the eligibility criteria.
Importance of Verifying the YouTube Channel
After uploading your videos to YouTube Creator Studio, you need to optimize each for monetization. This ensures that the algorithm works in your favor. It is also important to create an AdSense Account and link it to your channel. This will:
- Increase your level of credibility because a verified YouTube channel is seen as more trustworthy by viewers
- Protect you and your channel from impersonation by preventing other users from creating fake accounts under your name.
- Unlock additional features such as the ability to lie stream in HD and customer the channel layout.
Linking your AdSense to the Account is also a crucial step towards getting paid for your creation on YouTube. It ensures that your earnings get to you. After joining the YPP, you are allowed to change your linked AdSense account if you already have one. You can also monetize more than one channel using the same AdSense account, and keep track of your earnings.
Part 3. Create YouTube-Ready Videos with Wondershare Filmora
The success of your YouTube channel largely depends on the quality of the videos uploaded. You need video editing software that will make your creator studio attractive even before opening individual videos. Wondershare Filmora is a top choice for many creators looking to outperform their competitors on YouTube. Explore the range of possibilities with Filmora ranging from creative video effects to stunning text animations.
Free Download For Win 7 or later(64-bit)
Free Download For macOS 10.14 or later
Making YouTube-ready videos with Filmora is quick and easy. You need to have great footage to start with. Then, explore the editing features that will make the video stand out. Let’s have a look at the steps involved:
- Step 1: Launch Filmora
- Step 2: Create a New Project and Import Files
- Step 3: Organize Your Project Material
- Step 4: Place Files on the Timeline
- Step 5: Apply Visual Effects
- Step 6: Conduct the Color Correction Process
- Step 7: Export and Share
Step 1: Launch Filmora
Launch Filmora by double-clicking the desktop icon. On the welcome window, select the aspect ratio you want to use.
Step 2: Create a New Project and Import Files
After launching Filmora, click New Project on the welcome screen. Once the editor loads, import the media files from the options provided.
Step 3: Organize Your Project Material
Manage the files you will be using in the editing project. The My Album option allows you to organize the file using different criteria such as type or purpose.
Step 4: Place Files on the Timeline
Time to start editing your video. Place the video and audio files on the timeline while removing the redundant parts. Use the drag-and-drop feature to edit the clips, one at a time, cutting out unneeded footage to have a clear story.
Step 5: Apply Visual Effects
After removing the unwanted parts from the video clips, detach the audio and video files. Insert transitions between clips, add music, and use other visual effects on Filmora to make the video more exciting.
Step 6: Conduct the Color Correction Process
The effects icon gives you access to filters and overlays to make your video colors more vivid. Select the filters of choice, and drag and drop it to where you want to use on the timeline.
Step 7: Export and Share
Once you are satisfied with the video outcome, export it in MP4 format, ready for upload on YouTube. Save it in your local drive, and upload it to YouTube via the Creator Studio.
Conclusion
The YouTube Creator Studio allows you to manage your channel and content in a central location. You get access to all the essential features, including analytics and content editing. Also, manage the monetization of your videos and reply to comments. Good video editing software will play a crucial role in building your channel. We recommend exploring video editing features on Wondershare Filmora to make better videos for your channels. With most tasks now optimized, editing videos with Filmora is now easier and fun.
Transforming Ordinary Videos Into Viral Hits with Innovative Thumbnails
How to Make Video Thumbnails for YouTube

Richard Bennett
Oct 26, 2023• Proven solutions
The video thumbnails you use for YouTube are vital to getting views and subscribers. There are a lot of things that go into making people watch your videos, but your video thumbnail might be the most important factor.
Here are 5 easy tips for creating thumbnails that get views.
- Have a Consistent Layout
- Use Your Face
- Use Graphics/Emojis That is On Topic
- Make Your Text Huge
- Keep It Clutter-Free!
Contest now closed.
Edit Your Videos Before Creating Video Thumbnails


1. Have a Consistent Layout
Your thumbnails all must look like part of the same set. You want viewers to recognize your videos like yours, and they are more likely to do that if you build up a standard layout that they can start associating with you.
An example of a standard layout could be you in the middle of the screen wearing an expression that matches the theme of your video, with your title written underneath your face. Every individual thumbnail would still be different, but you and the text would always be in the same spot.
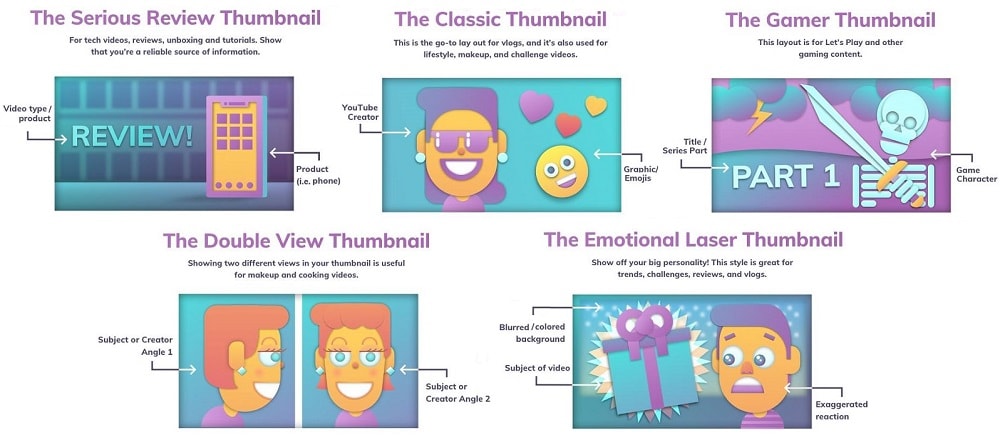
2. Use Your Face
People feel automatically connected and drawn into images that make eye contact. This makes thumbnails which feature faces more click-able than thumbnails which don’t, in most genres (i.e. if you make food videos then this may not apply – featuring the food might be more important than featuring your face). Check out more tips like this here .
Also, if somebody recognizes you in your thumbnail from a previous video of yours, that will go a long way towards making them click.
3. Use Graphics/Emojis that are On Topic
Anybody can take a screenshot of themselves in their video and use it as a thumbnail. To make your thumbnails look polished, consider using small images (like emojis or hearts) to stand out. This will add color and personality to your thumbnail.
Make sure the images you choose are relevant to the topic of your video.
4. Make Your Text Huge
If you use text in your thumbnail (you don’t have to) then it should be to add context. For example, if the main image is just you smiling then you might need some text to let viewers know the video is a makeup tutorial.
Thumbnails might look large while you’re putting them together in your image editor, but when they’re displayed on YouTube they’re a lot smaller. That goes double if a viewer is watching on their phone. So, make sure that any text you use is large enough that it can be read easily on small screens.
5. Keep it Clutter-Free
It’s great to add text and emojis to your thumbnails, but you do need to be careful not to add too much. You never want your thumbnails to look cluttered. Viewers should be able to glance at your thumbnails and know exactly what kind of video to expect – that’s difficult to do if there’s too much to process.
A good rule for text is to use only 1-3 words. That way they won’t clutter your screen, and you can make them large enough to read on small-screened devices.
For even more tips on making great YouTube thumbnails, click here .
Use these tips to make video thumbnails for YouTube, and tell us what kind of results you get!
Richard Bennett
Richard Bennett is a writer and a lover of all things video.
Follow @Richard Bennett
Richard Bennett
Oct 26, 2023• Proven solutions
The video thumbnails you use for YouTube are vital to getting views and subscribers. There are a lot of things that go into making people watch your videos, but your video thumbnail might be the most important factor.
Here are 5 easy tips for creating thumbnails that get views.
- Have a Consistent Layout
- Use Your Face
- Use Graphics/Emojis That is On Topic
- Make Your Text Huge
- Keep It Clutter-Free!
Contest now closed.
Edit Your Videos Before Creating Video Thumbnails
1. Have a Consistent Layout
Your thumbnails all must look like part of the same set. You want viewers to recognize your videos like yours, and they are more likely to do that if you build up a standard layout that they can start associating with you.
An example of a standard layout could be you in the middle of the screen wearing an expression that matches the theme of your video, with your title written underneath your face. Every individual thumbnail would still be different, but you and the text would always be in the same spot.
2. Use Your Face
People feel automatically connected and drawn into images that make eye contact. This makes thumbnails which feature faces more click-able than thumbnails which don’t, in most genres (i.e. if you make food videos then this may not apply – featuring the food might be more important than featuring your face). Check out more tips like this here .
Also, if somebody recognizes you in your thumbnail from a previous video of yours, that will go a long way towards making them click.
3. Use Graphics/Emojis that are On Topic
Anybody can take a screenshot of themselves in their video and use it as a thumbnail. To make your thumbnails look polished, consider using small images (like emojis or hearts) to stand out. This will add color and personality to your thumbnail.
Make sure the images you choose are relevant to the topic of your video.
4. Make Your Text Huge
If you use text in your thumbnail (you don’t have to) then it should be to add context. For example, if the main image is just you smiling then you might need some text to let viewers know the video is a makeup tutorial.
Thumbnails might look large while you’re putting them together in your image editor, but when they’re displayed on YouTube they’re a lot smaller. That goes double if a viewer is watching on their phone. So, make sure that any text you use is large enough that it can be read easily on small screens.
5. Keep it Clutter-Free
It’s great to add text and emojis to your thumbnails, but you do need to be careful not to add too much. You never want your thumbnails to look cluttered. Viewers should be able to glance at your thumbnails and know exactly what kind of video to expect – that’s difficult to do if there’s too much to process.
A good rule for text is to use only 1-3 words. That way they won’t clutter your screen, and you can make them large enough to read on small-screened devices.
For even more tips on making great YouTube thumbnails, click here .
Use these tips to make video thumbnails for YouTube, and tell us what kind of results you get!
Richard Bennett
Richard Bennett is a writer and a lover of all things video.
Follow @Richard Bennett
Also read:
- [New] Crafting YouTube Masterpieces with Powerful Hashtag Strategies
- [New] Cutting-Edge Tips Elevating Content with Tags
- 2024 Approved Choosing Streaming Giants Vimeo, YouTube, or DailyMotion?
- 2024 Approved Ensuring Precision The Art of Skype Call Documentation
- Become a Trending Sensation with These Effective YouTube SEO Strategies
- Complete guide for recovering contacts files on Itel A05s.
- Creative Camerawork Innovative Techniques for Video-Savvy YouTubers for 2024
- In 2024, Elevating Ad Effectiveness for YouTube
- In 2024, Essential Mobile Privacy The Best 7 AdBlocker Apps for Android
- In 2024, Untangling Box Mystery Ideas to Boost Joy
- Innovative App for Video Consumption Analysis
- Integrating Files on Two Windows PCs with AOEMi
- New PiP Like a Pro Advanced Techniques in Final Cut Pro
- Overcoming Frequent Game Interruptions: Your Ultimate Fix for a Stable Fortnite Experience
- Sierra Sovereign Dvd & Media Cutting Tools
- The Playlist Pivot New Order Strategies for YouTube
- Top-Rated Mac Software : Expert Picks and Reviews - ZDNet
- Turning Product Analysis Into Income via Video Platforms
- Unlock 6-Figure Videos Top Hashtag Trends
- Title: [New] Dominating Viewers' Spaces Channel Empire Rules
- Author: Steven
- Created at : 2024-12-11 17:36:23
- Updated at : 2024-12-16 19:54:50
- Link: https://youtube-clips.techidaily.com/new-dominating-viewers-spaces-channel-empire-rules/
- License: This work is licensed under CC BY-NC-SA 4.0.