
!["[New] Direct Capture Screen Record on PC/Mac + YouTube Upload"](https://www.lifewire.com/thmb/MD-H4Qz6P_9lnelH34Q5w394kTc=/400x300/filters:no_upscale():max_bytes(150000):strip_icc()/pathra-e4d704c32b464fae85640612f626dd22.jpg)
"[New] Direct Capture Screen Record on PC/Mac + YouTube Upload"
Direct Capture: Screen Record on PC/Mac + YouTube Upload
10 Record Screen and Upload to YouTube Tools [PC, Mac, Online]

Richard Bennett
Mar 27, 2024• Proven solutions
Recording the screen, including the audio, can help you introduce your gaming flow, show how to perform a task on the computer, or create a presentation. You can also upload the screen record to YouTube for free. There are several solutions if you want to record your screen and upload it to YouTube. You can record the screen with some screen recording software on your Mac or your Windows PC or with some online screen recording software or the screen recording feature built-in YouTube itself. In this article, we will show you how to to record screens and upload to YouTube on Windows and Mac with some screen recorders , some of which are free to use, or freemium, which are built in your computer. Check it out now.
- Part 1: Record Screen and Upload to YouTube Directly on PC
- Part 2: Record Screen and Upload to YouTube Online
- Part 3: Record Screen and Upload it to YouTube on Mac
Recommended YouTube Screen Recorders to Record Screen and Upload to YouTube Directly [Windows & Mac]
The following YouTube screen recording software can be used on both Windows and Mac computers. You can record the entire screen or a particular portion of the screen, record your own voiceover or add music to the recorded video and then upload it to YouTube directly.
Using Wondershare Filmora
Filmora is an easy-to-use yet powerful enough video editing software which features the Recording tools. Using Filmora, you can record the desktop screen , audio and webcam simultaneously. But compared with Filmora, the highest frame rates that Filmora can capture at 1 second is 60FPS.

Launch Wondershare Filmora and choose Full Feature mode to begin a project. Go to the Record tab and choose Record PC Screen. There are three types of screen recording to choose from – Target Window, Full Screen and Custom. You can also choose to record computer system audio or record from microphone. Click the icons to turn them off or on accordingly. Click Settings to see if there’s anything you need to adjust before recording.
 Download Mac Version ](https://tools.techidaily.com/wondershare/filmora/download/ )
The recorded footage will be loaded to the Media panel directly, you can then cut out imperfect frames, add some texts and titles, or apply transitions and filters to it. To upload the recorded screen video, click the Export in the main interface, and then switch to YouTube tab in the Export window.

Sign in your YouTube account and complete the video info accordingly and then click the Export button to upload the recorded video to YouTube directly.
If you are looking for more screen recorders which can run on Windows, Mac, Linux, Android, iOS or online for different purposes, you can check our picks of the best screen recorders for all platforms based on different purposes.
Part 1: How to Record Screen on Windows PC and Upload to YouTube Directly
1. Bandicam
To record screen using Bandicam, select “Screen Recording” and a green-edged rectangle window will appear. Adjust the rectangle window on the video then play the video.
Clicking the REC button will change the green-edged line of the rectangle window to red. Click the stop button to stop recording. To watch the recorded video, go to the “General” tab and click “Open.”
You can also upload your desired videos to YouTube from Bandicam by clicking the “Upload” button found under Bandicam’s “Output” tab.

2. Using Microsoft Expression Encoder 4
You can download Microsoft Expression Encoder 4 to record the screen of your device and upload it to YouTube. The software has a screen capture tool and encoder. Install the software as you would usually do. There’ll be 2 shortcuts in the start menu – Microsoft Expression Encoder 4 Screen Capture (used to capture the screen) and Microsoft Expression Encoder 4 (converts the screen into a video that can be uploaded to YouTube).
3. Using Ezvid
Ezvid can record screen and audio simultaneously. It can also capture the whole area of the screen, making it perfect for tutorial videos. Ezvid also has speech synthesis that translates text captions into artificial human language, so it can easily produce human sound with only a click of a button.
4. Using Smartpixel
Smartpixel is a screen recorder for Android and Windows. It has a user-friendly interface and different editing as well as recording functions. Smartpixel can export various video formats such as 3gp, MP4, wmv, avi and flv. It also allows you to upload videos to different online platforms like GoPlay and YouTube.
Part 2: How to Record Screen Online
1. Using YouTube
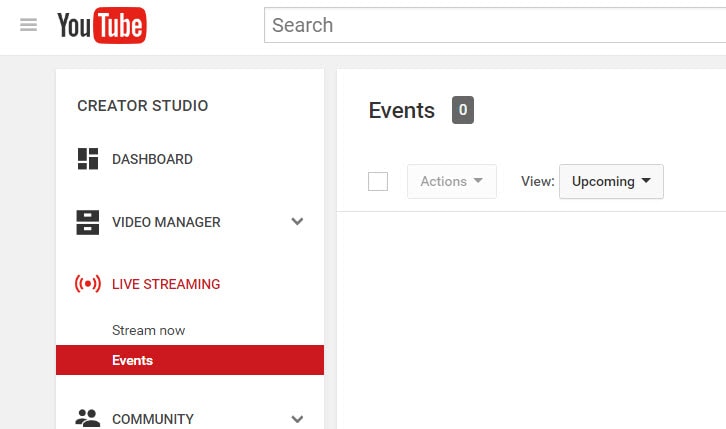
You can now also record desktop screen with the features in YouTube. To start recording the screen using YouTube, you just need to sign-in to the website using your Google Account. Click “Creator Studio”. Go to Live Streaming and choose “Events”. You’ll be directed to the “Create Event” page. Provide the title for your screencast video, set the video’s privacy to either Private or Unlisted.
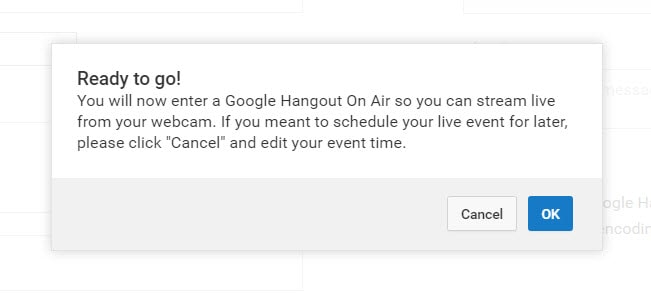
Click “Go Live Now” The Hangouts on Air page will open. Start the webcam from recording by clicking the camera icon. If you don’t want to record audio, you can just click the microphone icon.
Click “Screenshare” and choose a desktop window that you want to record for the screencast. Click “Start Screenshare” to share the screen then click the “Start Broadcast” button to begin recording the screen. When you’re done recording, just “Stop Broadcast” and go to the YouTube website. The new screencast video is stored in your YouTube video dashboard. You can share the video or download it to your Google Drive.
For more details, you can check How to record YouTube videos . If you’re looking for more online screen recorders for YouTube, you can check our picks of the 10 Best Free Online Screen Recorders .
2. Using FlexClip - Free Online Screen Recorder
FlexClip is a complete bundle of creativity. Why so? It is because it’s a web-based tool that helps you with image and video editing and post-production. It also offers a free online screen recording option.
FlexClip lets you record your webcam, screen, and audio with a simple click. Contrarily, you can also record simultaneous screens without a hitch! It can record almost anything that is being displayed on your computer screen. So be it gameplays, seminars, courses, presentations, or anything, you can always use this program to save your recording.
And once you’re done capturing the screen, FlexClip also allows you to edit your recording. You can add subtitles, highlights, overlays, and annotations to increase your video’s worth. So no wonder why FlexClip is one of the leading web-based software for free online screen capturing, especially if you want to make great YouTube videos.
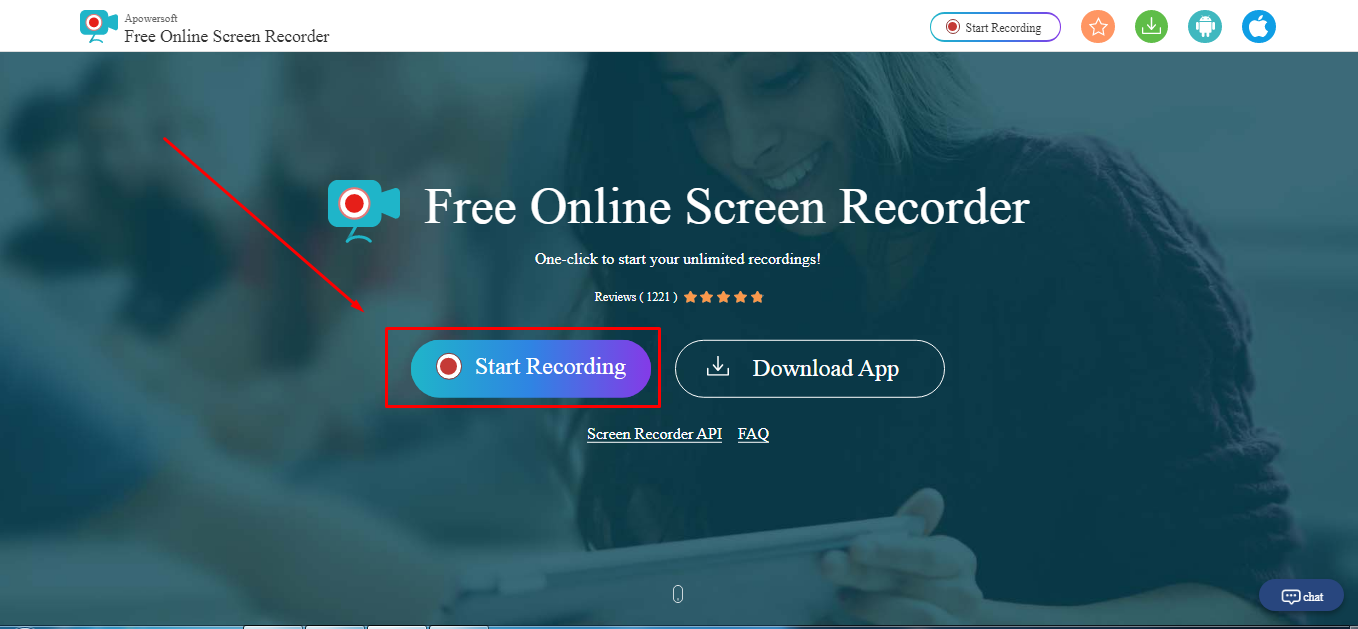
The recording process is easy. All you need to do is visit the website and click the “Start Recording” button.
Then, choose your layout to start recording the screen and audio. When you’re finished, just hit the “Stop” button to end recording to edit the video in FlexClip’s built-in video editor. Lastly, download the screencast to upload it to your YouTube channel.
3. Using Apowersoft - Online Screen Recorder (Free)
Apowersoft is a renowned company that creates digital products, including file compressors, watermark removers, and more. Since there’s a growing demand for screen recorders for YouTube, the Apowersoft creators have also launched a “Free Online Screen Recorder.” Yup! You’re reading the right name.
Apowersoft – Free Online Screen Recorder eases the screen recording process. While it’s an online tool, you can also download the app on your Mac or Windows OS.
It’s a free program with simple features, such as a screen and webcam recording with audio. So if your YouTube content doesn’t require overlays, subtitles, or other editing stuff, this software is ideal due to its simplicity.
You can click the “Start Recording” button to get started.
.
Then, select the screen you wish to record, and save the captured screen to your local disk or cloud so you can upload the videos later to your YouTube channel.
Part 3: How to Record Screen for YouTube with Free Screen Recorder on Mac
1. Using QuickTime Player
QuickTime Player can be used to record movies from your camera or the screen of your iPad, iPod touch or iPhone. It can also record your Mac’s screen or record audio from your microphone. To record the screen of your Pad, iPod touch or iPhone, you should use the movie-recording function. You can use it to record the screen for YouTube video, or you can also record the YouTube video and empower it with your creativity.
For more details of using QuickTime Player to record YouTube videos, check our guide: How to record videos with Quicktime.
2. Using Screen Flow
Screen Flow is our second pick for Mac. Although it’s paid software, you can still enjoy the blessings of this screen recorder through the trial version. It’s a very handy tool that allows Mac screen recording and all iOS devices, such as iPhones and iPad.
Okay! So what’s good about screen flow? Let’s uncover. Firstly, it’s an editor + screen recorder specifically made for YouTube. You can capture the screen and edit the footage before uploading it to your channel.
Secondly, this software allows you to record simultaneous screens and your webcam. Plus, you can also record your voice through its mic recording option.
Another great thing about Screen Flow is that it has numerous video filters and a customizable title library. It also permits you to save screen recordings on your Mac or directly share them to your YouTube channel, other social media accounts, websites, or cloud storage in a few clicks.
Here’s a video to help you get started with screen recording on your Mac using Screen Flow:
3. Using Vmaker
Vmaker is another authentic software to record screens for your YouTube videos. It’s a free program, but you can buy premium versions to unlock more features.
The tool is trusted by many software review websites, such as “crozdesk.” It is available on both Mac and Windows OS. However, it seems like this software performs well on Mac operating systems.
Vmaker allows you to record your screen, your favorite YouTube videos, and the audio – all together! You can record the entire Mac screen or a specific portion in HD quality. Moreover, the software allows you to pick resolutions up to 4K to record the media.
This program also offers editing features like adding subtitles, music, flip, blur, trim, and more to create an awesome video. All videos are saved to your cloud workspace once you finish recording. Then, you can share the recorded video screens on your YouTube.
The tool is ideal for making tutorials, courses, demos, and product review videos. All you need to do is download Vmaker on your Mac. Choose a webcam, screen, or both with audio for recording. Start recording in the highest quality. Edit your video and share it on your YouTube channel.
Conclusion
Above are some screen recorders that you can use to record YouTube videos or record the screen and webcam simultaneously to make a video and upload it it to YouTube. If you want to record a screen video and edit it further, you should try Wondershare Filmora video editor.
Download Mac Version ](https://tools.techidaily.com/wondershare/filmora/download/ )
FAQs
Q1. How do you record your screen on a Mac for YouTube?
There are some great tools for screen recording on Mac for YouTube. The most loved and enjoyed program is Filmora by Wondershare. It’s a professional tool for screen recording and video editing. Most importantly, it has a user-friendly interface and records your screen in high quality.
Another option is the Quick Time Player. This program also allows screen recording. Likewise, Screen Flow is also a great program for screen capturing for YouTube on Mac.
Q2. Can I screen-record and upload it to YouTube?
There are two ways to do it. First, you can download the free or paid screen recording software on your Windows or macOS. Second, you can look for online screen recorders like FlexClip or the built-in YouTube recorder and directly share the recorded video to your channel.
Some tools, like Apowersoft and Vmaker, save screen recordings to the cloud or local disk. And there’s no direct sharing of the recorded screens to your YouTube channel. So if you’re using such programs, you will need to sign in to your YouTube channel and upload the file from your computer hard drive.
Q3. How do I record my computer screen for 2022?
Some of the greatest video editing and screen recording tools like Filmora, Bandicam, and FlexClip allow you to record your computer screen. Depending on the software, you can directly share the video to your YouTube channel. Or, save the video on your computer and then upload it on your channel.
Richard Bennett
Richard Bennett is a writer and a lover of all things video.
Follow @Richard Bennett
Richard Bennett
Mar 27, 2024• Proven solutions
Recording the screen, including the audio, can help you introduce your gaming flow, show how to perform a task on the computer, or create a presentation. You can also upload the screen record to YouTube for free. There are several solutions if you want to record your screen and upload it to YouTube. You can record the screen with some screen recording software on your Mac or your Windows PC or with some online screen recording software or the screen recording feature built-in YouTube itself. In this article, we will show you how to to record screens and upload to YouTube on Windows and Mac with some screen recorders , some of which are free to use, or freemium, which are built in your computer. Check it out now.
- Part 1: Record Screen and Upload to YouTube Directly on PC
- Part 2: Record Screen and Upload to YouTube Online
- Part 3: Record Screen and Upload it to YouTube on Mac
Recommended YouTube Screen Recorders to Record Screen and Upload to YouTube Directly [Windows & Mac]
The following YouTube screen recording software can be used on both Windows and Mac computers. You can record the entire screen or a particular portion of the screen, record your own voiceover or add music to the recorded video and then upload it to YouTube directly.
Using Wondershare Filmora
Filmora is an easy-to-use yet powerful enough video editing software which features the Recording tools. Using Filmora, you can record the desktop screen , audio and webcam simultaneously. But compared with Filmora, the highest frame rates that Filmora can capture at 1 second is 60FPS.
Launch Wondershare Filmora and choose Full Feature mode to begin a project. Go to the Record tab and choose Record PC Screen. There are three types of screen recording to choose from – Target Window, Full Screen and Custom. You can also choose to record computer system audio or record from microphone. Click the icons to turn them off or on accordingly. Click Settings to see if there’s anything you need to adjust before recording.
Download Mac Version ](https://tools.techidaily.com/wondershare/filmora/download/ )
The recorded footage will be loaded to the Media panel directly, you can then cut out imperfect frames, add some texts and titles, or apply transitions and filters to it. To upload the recorded screen video, click the Export in the main interface, and then switch to YouTube tab in the Export window.
Sign in your YouTube account and complete the video info accordingly and then click the Export button to upload the recorded video to YouTube directly.
If you are looking for more screen recorders which can run on Windows, Mac, Linux, Android, iOS or online for different purposes, you can check our picks of the best screen recorders for all platforms based on different purposes.
Part 1: How to Record Screen on Windows PC and Upload to YouTube Directly
1. Bandicam
To record screen using Bandicam, select “Screen Recording” and a green-edged rectangle window will appear. Adjust the rectangle window on the video then play the video.
Clicking the REC button will change the green-edged line of the rectangle window to red. Click the stop button to stop recording. To watch the recorded video, go to the “General” tab and click “Open.”
You can also upload your desired videos to YouTube from Bandicam by clicking the “Upload” button found under Bandicam’s “Output” tab.
2. Using Microsoft Expression Encoder 4
You can download Microsoft Expression Encoder 4 to record the screen of your device and upload it to YouTube. The software has a screen capture tool and encoder. Install the software as you would usually do. There’ll be 2 shortcuts in the start menu – Microsoft Expression Encoder 4 Screen Capture (used to capture the screen) and Microsoft Expression Encoder 4 (converts the screen into a video that can be uploaded to YouTube).
3. Using Ezvid
Ezvid can record screen and audio simultaneously. It can also capture the whole area of the screen, making it perfect for tutorial videos. Ezvid also has speech synthesis that translates text captions into artificial human language, so it can easily produce human sound with only a click of a button.
4. Using Smartpixel
Smartpixel is a screen recorder for Android and Windows. It has a user-friendly interface and different editing as well as recording functions. Smartpixel can export various video formats such as 3gp, MP4, wmv, avi and flv. It also allows you to upload videos to different online platforms like GoPlay and YouTube.
Part 2: How to Record Screen Online
1. Using YouTube
You can now also record desktop screen with the features in YouTube. To start recording the screen using YouTube, you just need to sign-in to the website using your Google Account. Click “Creator Studio”. Go to Live Streaming and choose “Events”. You’ll be directed to the “Create Event” page. Provide the title for your screencast video, set the video’s privacy to either Private or Unlisted.
Click “Go Live Now” The Hangouts on Air page will open. Start the webcam from recording by clicking the camera icon. If you don’t want to record audio, you can just click the microphone icon.
Click “Screenshare” and choose a desktop window that you want to record for the screencast. Click “Start Screenshare” to share the screen then click the “Start Broadcast” button to begin recording the screen. When you’re done recording, just “Stop Broadcast” and go to the YouTube website. The new screencast video is stored in your YouTube video dashboard. You can share the video or download it to your Google Drive.
For more details, you can check How to record YouTube videos . If you’re looking for more online screen recorders for YouTube, you can check our picks of the 10 Best Free Online Screen Recorders .
2. Using FlexClip - Free Online Screen Recorder
FlexClip is a complete bundle of creativity. Why so? It is because it’s a web-based tool that helps you with image and video editing and post-production. It also offers a free online screen recording option.
FlexClip lets you record your webcam, screen, and audio with a simple click. Contrarily, you can also record simultaneous screens without a hitch! It can record almost anything that is being displayed on your computer screen. So be it gameplays, seminars, courses, presentations, or anything, you can always use this program to save your recording.
And once you’re done capturing the screen, FlexClip also allows you to edit your recording. You can add subtitles, highlights, overlays, and annotations to increase your video’s worth. So no wonder why FlexClip is one of the leading web-based software for free online screen capturing, especially if you want to make great YouTube videos.
The recording process is easy. All you need to do is visit the website and click the “Start Recording” button.
Then, choose your layout to start recording the screen and audio. When you’re finished, just hit the “Stop” button to end recording to edit the video in FlexClip’s built-in video editor. Lastly, download the screencast to upload it to your YouTube channel.
3. Using Apowersoft - Online Screen Recorder (Free)
Apowersoft is a renowned company that creates digital products, including file compressors, watermark removers, and more. Since there’s a growing demand for screen recorders for YouTube, the Apowersoft creators have also launched a “Free Online Screen Recorder.” Yup! You’re reading the right name.
Apowersoft – Free Online Screen Recorder eases the screen recording process. While it’s an online tool, you can also download the app on your Mac or Windows OS.
It’s a free program with simple features, such as a screen and webcam recording with audio. So if your YouTube content doesn’t require overlays, subtitles, or other editing stuff, this software is ideal due to its simplicity.
You can click the “Start Recording” button to get started.
.
Then, select the screen you wish to record, and save the captured screen to your local disk or cloud so you can upload the videos later to your YouTube channel.
Part 3: How to Record Screen for YouTube with Free Screen Recorder on Mac
1. Using QuickTime Player
QuickTime Player can be used to record movies from your camera or the screen of your iPad, iPod touch or iPhone. It can also record your Mac’s screen or record audio from your microphone. To record the screen of your Pad, iPod touch or iPhone, you should use the movie-recording function. You can use it to record the screen for YouTube video, or you can also record the YouTube video and empower it with your creativity.
For more details of using QuickTime Player to record YouTube videos, check our guide: How to record videos with Quicktime.
2. Using Screen Flow
Screen Flow is our second pick for Mac. Although it’s paid software, you can still enjoy the blessings of this screen recorder through the trial version. It’s a very handy tool that allows Mac screen recording and all iOS devices, such as iPhones and iPad.
Okay! So what’s good about screen flow? Let’s uncover. Firstly, it’s an editor + screen recorder specifically made for YouTube. You can capture the screen and edit the footage before uploading it to your channel.
Secondly, this software allows you to record simultaneous screens and your webcam. Plus, you can also record your voice through its mic recording option.
Another great thing about Screen Flow is that it has numerous video filters and a customizable title library. It also permits you to save screen recordings on your Mac or directly share them to your YouTube channel, other social media accounts, websites, or cloud storage in a few clicks.
Here’s a video to help you get started with screen recording on your Mac using Screen Flow:
3. Using Vmaker
Vmaker is another authentic software to record screens for your YouTube videos. It’s a free program, but you can buy premium versions to unlock more features.
The tool is trusted by many software review websites, such as “crozdesk.” It is available on both Mac and Windows OS. However, it seems like this software performs well on Mac operating systems.
Vmaker allows you to record your screen, your favorite YouTube videos, and the audio – all together! You can record the entire Mac screen or a specific portion in HD quality. Moreover, the software allows you to pick resolutions up to 4K to record the media.
This program also offers editing features like adding subtitles, music, flip, blur, trim, and more to create an awesome video. All videos are saved to your cloud workspace once you finish recording. Then, you can share the recorded video screens on your YouTube.
The tool is ideal for making tutorials, courses, demos, and product review videos. All you need to do is download Vmaker on your Mac. Choose a webcam, screen, or both with audio for recording. Start recording in the highest quality. Edit your video and share it on your YouTube channel.
Conclusion
Above are some screen recorders that you can use to record YouTube videos or record the screen and webcam simultaneously to make a video and upload it it to YouTube. If you want to record a screen video and edit it further, you should try Wondershare Filmora video editor.
Download Mac Version ](https://tools.techidaily.com/wondershare/filmora/download/ )
FAQs
Q1. How do you record your screen on a Mac for YouTube?
There are some great tools for screen recording on Mac for YouTube. The most loved and enjoyed program is Filmora by Wondershare. It’s a professional tool for screen recording and video editing. Most importantly, it has a user-friendly interface and records your screen in high quality.
Another option is the Quick Time Player. This program also allows screen recording. Likewise, Screen Flow is also a great program for screen capturing for YouTube on Mac.
Q2. Can I screen-record and upload it to YouTube?
There are two ways to do it. First, you can download the free or paid screen recording software on your Windows or macOS. Second, you can look for online screen recorders like FlexClip or the built-in YouTube recorder and directly share the recorded video to your channel.
Some tools, like Apowersoft and Vmaker, save screen recordings to the cloud or local disk. And there’s no direct sharing of the recorded screens to your YouTube channel. So if you’re using such programs, you will need to sign in to your YouTube channel and upload the file from your computer hard drive.
Q3. How do I record my computer screen for 2022?
Some of the greatest video editing and screen recording tools like Filmora, Bandicam, and FlexClip allow you to record your computer screen. Depending on the software, you can directly share the video to your YouTube channel. Or, save the video on your computer and then upload it on your channel.
Richard Bennett
Richard Bennett is a writer and a lover of all things video.
Follow @Richard Bennett
Finding Prominent Comment Spotlights
What Is the YouTube Highlighted Comment?

Liza Brown
Mar 27, 2024• Proven solutions
Did you just come across a comment tagged with Highlight on YouTube and wondering what it means? In our guide, you will find an answer to this, along with related queries like how YouTube highlighted comment works, the removal process, its benefits, and more.
If you own a YouTube channel or are starting one, even you can do this. Without further ado, let’s jump straight into the core of YouTube’s highlighted comments. We’ve categorized this article into a total of 8 parts for simple and better understanding.
- Part 1: What Does Highlighted Comment Mean On YouTube?
- Part 2: What Does Highlighted Comments Look Like on YouTube?
- Part 3: How to Make Comment Highlighted?
- Part 4: How to Highlighted Comments URL?
- Part 5: How to Reply to Highlighted Comments?
- Part 6: How to Remove Highlighted Comments?
- Part 7: Tips for Writing a Comment
- Part 8: Benefits of Highlighted Comments
Part 1: What Does The Highlighted Comment Mean On YouTube?
Before you get on with highlighting your comments, you must understand what it means exactly. You may follow comments on the videos posted by several YouTubers, but the highlighted ones are always making it to the top of the list.
Having said that, neither the content creator nor users or moderators choose to highlight YouTube comments to begin with. They are no rocket science, but only a tad bit more than what you know as a bookmarking feature.
Think of highlighted comments as a “tag”. You might notice this in the form of a ‘new activity YouTube notification’ link you receive on your registered email. Only you can see this tag when you click the notification and arrive at Youtube.com to either view or reply to a comment.
Highlighting comments (HC’s) are an automatic feature generated by YouTube. It draws the YouTuber’s & viewer’s attention to relevant activities. Don’t fail to notice that the highlight disappears once you are done interacting in the tagged comment thread. However, they are reloadable by tapping the comment timestamp.
For instance, you may want to check the following links. The 2 URLs lead you to the same video, but only one of them shows a highlighted comment.
- https://www.youtube.com/watch?v=XWhjJjhpmQA&lc=Ugya-89WYAlutJurKGh4AaABAg
- https://www.youtube.com/watch?v=XWhjJjhpmQA
Notice the name “lc” in the first URL- that stands for linked comment. YouTube might include this additional parameter. If a reply comment (HR) gets highlighted, the parent comment gets raised to the top.
Part 2: What Does The Highlighted Comment Look Like?
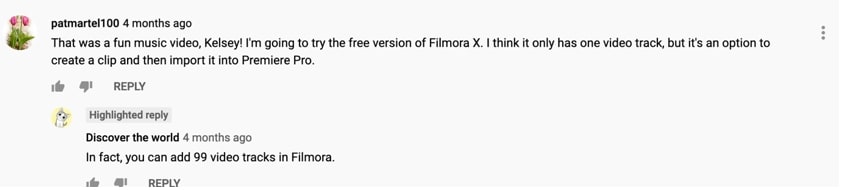
YouTube has been working on improving the navigation of the comment section for videos, and highlighted comments are one of them. These comments appear even above the pinned comments on a video. The label of a highlighted comment is displayed above the commentator’s name in a light grey shade.

YouTube labels comment replies as well and call it “Highlighted Reply.” You can see this tag above the replier’s name in the same color tone.
Part 3: How to Make My Comment Highlighted?
Now, making YouTube highlight your comment on a popular video is nothing less than an art. YouTube doesn’t make it easy for you. The advantage of getting your comment highlighted on YouTube is limitless.
Thus, anybody who wants to get their YouTube comment an HC tag has to follow a few simple steps, which we will discuss below in another section. Finding the correct or relevant video content that can benefit your channel from such a comment is an excellent place to start.
For example, if you are a YouTuber who deals in tech information, you need to look for a popular video or channel with a similar genre, in this case, technical knowledge. The more popular the channel is, the more is the chance of a viewer checking the comments on its videos. You will only benefit if you’re comment is highlighted on pages of Youtuber’s who are huge.
Part 4: How to Get the URL of Highlighted Comments?
The ways to acquire the URL or link for a highlighted comment are different for both parties- viewer and host.
Suppose you are a viewer who is going through the comments section of a video. If you want to get the highlighted URL for the comment, simply click on the timestamp (e.g., 2 weeks ago) beside the commentator’s username.
On the other hand, for a YouTuber, getting access to the comment URL is relatively straightforward. The host will get a notification on his or her registered email-id when a viewer publishes a comment on their posted video. You will find the link to the highlighted comment in the notification
Part 5: How to Reply to Highlighted Comments?
Replying to “highlighted comments” on your YouTube channel is pretty easy since this feature was developed, keeping the user’s convenience in mind. If you want to follow up or reply to such comments, you can do so from your email or YouTube Dashboard.
If you click the notification bell icon, whenever a viewer drops a new comment on one of your videos, YouTube will send you a notification via email. On opening the email, you will find a clickable “Reply” option. Or else, if you follow the comment section in the YouTube Dashboard, you can directly view or reply to highlighted comments from here as well.
Have you ever wondered why a highlighted comment always shows at the top of the comment list? Both the above options will lead you to the comment thread on YouTube. To help you find the new activity easily, it appears with the highlight tag on it. The purpose is to remind you that you are here for that specific comment.
Part 6: How to Remove Highlighted Comments?
Can you, as a video maker, remove highlighted comments on YouTube? The direct answer to this would be a ‘No.’ It is because based on how you have opened the specific video, YouTube does it automatically.
Alternatively, you can try out a few temporary solutions.
- You can edit the particular URL of the video where the highlighted tag is showing. Remove the red part of the URL (example given below) starting with “&”:
https://www.youtube.com/watch?v=XWhjJjhpmQA&lc=Ugya-89WYAlutJurKGh4AaABAg After removing the above parameter, reload the original video link (below):
https://www.youtube.com/watch?v=XWhjJjhpmQA
- Try logging out from your Google Account and browse YouTube (anonymously). Doing this will ensure that you no longer see any highlighted comments. However, at the same time, this will restrict you from interacting in any way with that video, let alone leaving a comment.
Part 7: Tips for Writing a Comment that will be Pinned as a Highlighted Comment?
Many frequently inquire on the internet about how they can improve the chances of getting their comment pinned, as highlighted on YouTube. The secret lies in how you write the statement. We’ve listed a few pro tips below that can help:
- First, go through all the posted comments under the video. It will help you identify what is missing. You can comment or write the missing point in comprehendible and straightforward words. Also, never forget to acknowledge the YouTuber’s talent.
- Remember, no one has the time to read long comments. So, when you know what you want to write, try to shorten your sentences. A short and crisp comment draws more attention.
- After you have framed your comment, make sure that it is grammatically correct. YouTube and Google hate grammatical errors.
- Do not hit the post option already. Before publishing it, you must cross-check that your comment has all the above points in place.
- Lastly, you have to wait after publishing on the video’s comment section. YouTube will highlight your comment if it passes according to the YouTube policy and if the search engine finds it unique.
Part 8: Are Highlighted Comments Beneficial?
Being a convenience feature, a highlighted comment on YouTube is 100% beneficial. That is especially true if you are looking for ways to optimize your channel.
YouTube is undeniably the second largest search engine on the web. Highlight comments can potentially increase the outreach of your content and, consequently, your brand presence.
As said earlier, these comments always show first on the comment section. Needless to say, many people who watch the videos also scroll down to the comments section to start a conversation or see what other viewers are saying about this video.
In the process, alongside the interaction, they also check out the channels or profiles of the commentators. Viewers often visit the pages of these channels, and if they happen to enjoy the video content, they will subscribe to the YouTuber’s channel. If your comment gets highlighted, your YouTube channel can be one of them.
Conclusion
YouTube can be an intimidating tool for marketing and more so for newcomers. Every YouTuber wishes that their channel performs better than the previous day. Even though the highlighted comment or highlighted reply feature doesn’t have any direct benefits, it can indeed help in optimizing your YouTube channel.
It can connect you with potential viewers and increase the number of people that visit your channel regularly. However, how many of them stay and hit the “Subscribe” button is a different story altogether and is wholly based on whether they like what you share through your videos.
In this article, we have shared facts on YouTube’s commonly seen highlighted comment feature. Yet, the term is a heavily misleading one, as far as viewers and Youtuber’s are concerned. We have also covered all other aspects and queries related to this term. Here’s hoping they clarify all your doubts.
Liza Brown
Liza Brown is a writer and a lover of all things video.
Follow @Liza Brown
Liza Brown
Mar 27, 2024• Proven solutions
Did you just come across a comment tagged with Highlight on YouTube and wondering what it means? In our guide, you will find an answer to this, along with related queries like how YouTube highlighted comment works, the removal process, its benefits, and more.
If you own a YouTube channel or are starting one, even you can do this. Without further ado, let’s jump straight into the core of YouTube’s highlighted comments. We’ve categorized this article into a total of 8 parts for simple and better understanding.
- Part 1: What Does Highlighted Comment Mean On YouTube?
- Part 2: What Does Highlighted Comments Look Like on YouTube?
- Part 3: How to Make Comment Highlighted?
- Part 4: How to Highlighted Comments URL?
- Part 5: How to Reply to Highlighted Comments?
- Part 6: How to Remove Highlighted Comments?
- Part 7: Tips for Writing a Comment
- Part 8: Benefits of Highlighted Comments
Part 1: What Does The Highlighted Comment Mean On YouTube?
Before you get on with highlighting your comments, you must understand what it means exactly. You may follow comments on the videos posted by several YouTubers, but the highlighted ones are always making it to the top of the list.
Having said that, neither the content creator nor users or moderators choose to highlight YouTube comments to begin with. They are no rocket science, but only a tad bit more than what you know as a bookmarking feature.
Think of highlighted comments as a “tag”. You might notice this in the form of a ‘new activity YouTube notification’ link you receive on your registered email. Only you can see this tag when you click the notification and arrive at Youtube.com to either view or reply to a comment.
Highlighting comments (HC’s) are an automatic feature generated by YouTube. It draws the YouTuber’s & viewer’s attention to relevant activities. Don’t fail to notice that the highlight disappears once you are done interacting in the tagged comment thread. However, they are reloadable by tapping the comment timestamp.
For instance, you may want to check the following links. The 2 URLs lead you to the same video, but only one of them shows a highlighted comment.
- https://www.youtube.com/watch?v=XWhjJjhpmQA&lc=Ugya-89WYAlutJurKGh4AaABAg
- https://www.youtube.com/watch?v=XWhjJjhpmQA
Notice the name “lc” in the first URL- that stands for linked comment. YouTube might include this additional parameter. If a reply comment (HR) gets highlighted, the parent comment gets raised to the top.
Part 2: What Does The Highlighted Comment Look Like?
YouTube has been working on improving the navigation of the comment section for videos, and highlighted comments are one of them. These comments appear even above the pinned comments on a video. The label of a highlighted comment is displayed above the commentator’s name in a light grey shade.
YouTube labels comment replies as well and call it “Highlighted Reply.” You can see this tag above the replier’s name in the same color tone.
Part 3: How to Make My Comment Highlighted?
Now, making YouTube highlight your comment on a popular video is nothing less than an art. YouTube doesn’t make it easy for you. The advantage of getting your comment highlighted on YouTube is limitless.
Thus, anybody who wants to get their YouTube comment an HC tag has to follow a few simple steps, which we will discuss below in another section. Finding the correct or relevant video content that can benefit your channel from such a comment is an excellent place to start.
For example, if you are a YouTuber who deals in tech information, you need to look for a popular video or channel with a similar genre, in this case, technical knowledge. The more popular the channel is, the more is the chance of a viewer checking the comments on its videos. You will only benefit if you’re comment is highlighted on pages of Youtuber’s who are huge.
Part 4: How to Get the URL of Highlighted Comments?
The ways to acquire the URL or link for a highlighted comment are different for both parties- viewer and host.
Suppose you are a viewer who is going through the comments section of a video. If you want to get the highlighted URL for the comment, simply click on the timestamp (e.g., 2 weeks ago) beside the commentator’s username.
On the other hand, for a YouTuber, getting access to the comment URL is relatively straightforward. The host will get a notification on his or her registered email-id when a viewer publishes a comment on their posted video. You will find the link to the highlighted comment in the notification
Part 5: How to Reply to Highlighted Comments?
Replying to “highlighted comments” on your YouTube channel is pretty easy since this feature was developed, keeping the user’s convenience in mind. If you want to follow up or reply to such comments, you can do so from your email or YouTube Dashboard.
If you click the notification bell icon, whenever a viewer drops a new comment on one of your videos, YouTube will send you a notification via email. On opening the email, you will find a clickable “Reply” option. Or else, if you follow the comment section in the YouTube Dashboard, you can directly view or reply to highlighted comments from here as well.
Have you ever wondered why a highlighted comment always shows at the top of the comment list? Both the above options will lead you to the comment thread on YouTube. To help you find the new activity easily, it appears with the highlight tag on it. The purpose is to remind you that you are here for that specific comment.
Part 6: How to Remove Highlighted Comments?
Can you, as a video maker, remove highlighted comments on YouTube? The direct answer to this would be a ‘No.’ It is because based on how you have opened the specific video, YouTube does it automatically.
Alternatively, you can try out a few temporary solutions.
- You can edit the particular URL of the video where the highlighted tag is showing. Remove the red part of the URL (example given below) starting with “&”:
https://www.youtube.com/watch?v=XWhjJjhpmQA&lc=Ugya-89WYAlutJurKGh4AaABAg After removing the above parameter, reload the original video link (below):
https://www.youtube.com/watch?v=XWhjJjhpmQA
- Try logging out from your Google Account and browse YouTube (anonymously). Doing this will ensure that you no longer see any highlighted comments. However, at the same time, this will restrict you from interacting in any way with that video, let alone leaving a comment.
Part 7: Tips for Writing a Comment that will be Pinned as a Highlighted Comment?
Many frequently inquire on the internet about how they can improve the chances of getting their comment pinned, as highlighted on YouTube. The secret lies in how you write the statement. We’ve listed a few pro tips below that can help:
- First, go through all the posted comments under the video. It will help you identify what is missing. You can comment or write the missing point in comprehendible and straightforward words. Also, never forget to acknowledge the YouTuber’s talent.
- Remember, no one has the time to read long comments. So, when you know what you want to write, try to shorten your sentences. A short and crisp comment draws more attention.
- After you have framed your comment, make sure that it is grammatically correct. YouTube and Google hate grammatical errors.
- Do not hit the post option already. Before publishing it, you must cross-check that your comment has all the above points in place.
- Lastly, you have to wait after publishing on the video’s comment section. YouTube will highlight your comment if it passes according to the YouTube policy and if the search engine finds it unique.
Part 8: Are Highlighted Comments Beneficial?
Being a convenience feature, a highlighted comment on YouTube is 100% beneficial. That is especially true if you are looking for ways to optimize your channel.
YouTube is undeniably the second largest search engine on the web. Highlight comments can potentially increase the outreach of your content and, consequently, your brand presence.
As said earlier, these comments always show first on the comment section. Needless to say, many people who watch the videos also scroll down to the comments section to start a conversation or see what other viewers are saying about this video.
In the process, alongside the interaction, they also check out the channels or profiles of the commentators. Viewers often visit the pages of these channels, and if they happen to enjoy the video content, they will subscribe to the YouTuber’s channel. If your comment gets highlighted, your YouTube channel can be one of them.
Conclusion
YouTube can be an intimidating tool for marketing and more so for newcomers. Every YouTuber wishes that their channel performs better than the previous day. Even though the highlighted comment or highlighted reply feature doesn’t have any direct benefits, it can indeed help in optimizing your YouTube channel.
It can connect you with potential viewers and increase the number of people that visit your channel regularly. However, how many of them stay and hit the “Subscribe” button is a different story altogether and is wholly based on whether they like what you share through your videos.
In this article, we have shared facts on YouTube’s commonly seen highlighted comment feature. Yet, the term is a heavily misleading one, as far as viewers and Youtuber’s are concerned. We have also covered all other aspects and queries related to this term. Here’s hoping they clarify all your doubts.
Liza Brown
Liza Brown is a writer and a lover of all things video.
Follow @Liza Brown
Also read:
- How to Make Outstanding YouTube Outro?
- In 2024, Audience Appeal The Ultimate Guide to YouTube Video Formats
- In 2024, Deep Dive Evolution of Virtual Performance Artists
- Cohesive Title Blueprint for Social & Mobile Platforms for 2024
- Dream Weavers The Marvel Interactive Sculptors for 2024
- Channel Success Story Optimal Themes and Ideas to Boost Content for 2024
- [Updated] Access Top Shorter Video Downloads for FREE Online
- A Comprehensive Overview of YouTube Standards for Content Creators
- Unveiling the Ideal 12 Vlogging Cameras with Seamless Screen Control
- Affordable Subscriber Boost Buy & Sell YouTube Views
- In 2024, Audiovisual Attraction 3 Approaches to Neon-Bordered YouTubes
- [New] 10 Premier Travel Blogs to Watch Online
- Epic Battle Royale Thumbnails, Done Fast
- YouTube Unearthing the Obscured Videotapes
- The Ultimate Guide to Reviving Your Stalled YouTube Channel
- YouTube Copyright Claims and How to Deal with a Strike?
- The VR Wave Crafting Engaging 360 Video Narratives for YouTube Audiences
- In 2024, Elite 6 Most Watched Shorter Video Repositories
- [New] A Peek Into the Heart of YouTube's Video Operations
- [Updated] Easy-Access Luxury - Free Access to Your Dreamset of 50 Banners
- Earnings Analysis YouTube Views vs Financial Gain for 2024
- 2024 Approved Essential Guide 9 Cost-Free Editing Tools for Creatives
- [New] Download YouTube Gallery Files Instantly
- Diving Into Mr. Beast's Cash Flow
- Humor Hub Catching the Best Comedy Channels Ever
- [New] Eco-Effective Ads Green Technology & CTA Enhancements
- In 2024, Crafting Effective, Affordable YouTube Intros with Templates
- In 2024, Combating Content ID Blocks on YouTube with Knowledge
- Creators Uniting for Marvel's Digital Future for 2024
- Master iPhone/iPad Video Posting to YouTube
- In 2024, Discover a World of Videos - The 27 Superior Platforms
- In 2024, Engaging Emojis Boost Your Video's Appeal Without Payments
- In 2024, Earning Through YouTube Partnerships
- [New] Captivating Call-to-Action Designing a Dynamic Subscribe Buttons with Filmora
- Content Creation & Currency Maximizing YouTube Wealth for 2024
- Converting YouTube Videos Into Engaging GIFs on Devices for 2024
- A Comprehensive Tutorial for Transforming Vids Into Dollars
- In 2024, Elevating Video Visibility Through Thumbnails
- Converting Spotify Playlist Content for YouTube Music Compatibility
- Mastering YouTube Google Meet Live Broadcast Steps
- In 2024, How to Unlock Samsung Galaxy S24 Ultra Phone Password Without Factory Reset?
- Crafting Cinematic Magic Essential Tips for Creating Stunning Slow-Motion Media on Instagram for 2024
- Master Your Image Transformation with Complete Facetune Guide
- [New] From Tweets to Tomes The Full Year in Video
- In 2024, The Math Behind It Calculating Pixel Aspect Ratio
- New Leading Effortless Womens Sound Modification Service Online
- In 2024, Flip the Script Crafting Unique and Shareable Memes on Social Platforms
- 2024 Approved 'QuickCapture' Vs 'Recordify' Comparative Recorder Analysis 2023
- [New] Ultimate Screen Capture Guide - Tunefab Pro
- How to Repair corrupt MP4 and AVI files of Realme Narzo 60 5G with Video Repair Utility on Windows?
- Making Marks Trendsetting on Social Media Platforms for 2024
- In 2024, Itel P55 ADB Format Tool for PC vs. Other Unlocking Tools Which One is the Best?
- Proven Strategies for Creating Superb IGTV Videos on Smartphones/DLSRs
- 10 Top Tools for Dynamic Image Background Alterations for 2024
- [Updated] 2024 Approved Conducting Collaborative Discussions in a Hassle-Free Manner via Skype Across Operating Systems
- [New] Cutting-Edge Methods for Capturing Your Playtime for 2024
- Latest way to get Shiny Meltan Box in Pokémon Go Mystery Box On Meizu 21 | Dr.fone
- How to Change Credit Card from Your iPhone 13 Pro Max Apple ID and Apple Pay
- How To Unlock Any Itel A70 Phone Password Using Emergency Call
- In 2024, Skyrocketing Performance Boosting RAM in Minecraft
- [Updated] Unleashing Creativity with Audacity Sound Capture on Your Mac for 2024
- Superior Smartphones That Dominate in Video Recording
- [New] Ultimate Guide to the Best High-Res Capture Software
- 2024 Approved Demystifying Screen Record Snapchat A Beginner's Handbook
- Title: "[New] Direct Capture Screen Record on PC/Mac + YouTube Upload"
- Author: Steven
- Created at : 2024-05-25 20:08:58
- Updated at : 2024-05-26 20:08:58
- Link: https://youtube-clips.techidaily.com/new-direct-capture-screen-record-on-pcmac-plus-youtube-upload/
- License: This work is licensed under CC BY-NC-SA 4.0.
