
!["[New] Digital Riches Transitioning YouTube Earnings to Currency"](https://www.lifewire.com/thmb/KLxIwz4EB-ugDE06kCw6C7FZbyw=/400x300/filters:no_upscale():max_bytes(150000):strip_icc()/GettyImages-1443630224-4e7adb2ce8df439fb47035a652dee4d7.jpg)
"[New] Digital Riches Transitioning YouTube Earnings to Currency"
Digital Riches: Transitioning YouTube Earnings to Currency
How To Get Paid on YouTube - From AdSense to your Bank Account

Richard Bennett
Oct 26, 2023• Proven solutions
YouTube is more than a video sharing social network; here’s how to get paid on YouTube. Having an active YouTube channel with decent monthly views can earn you income through advertising. If your channel is set up properly, Google can place ads over your YouTube videos and you can earn money based on how many people see or click on (depends on the ad) those ads while watching your videos.
- The Requirements for YouTube Monetization
- How to Enable Monetization for Your YouTube Channel
- Linking Your Bank Account to Your AdSense Account
- Receiving Payments
Many vloggers receive direct bank deposits of their ad-based revenues every month. In this article, we’ll show you how to monetize your YouTube Channel and how to receive payments to your bank account.
Making Your YouTube Videos Better with Filmora
If you want to earn more money with YouTube videos, your video should be stand out. To achieve that, you should use a powerful video editing software as well. Here, I recommend Wondershare Filmora video editor . As one of the most widely used video editing software among YouTubers, Filmora provides lots of templates and effects which allows you to edit faster and better.


Part 1: The Requirements for YouTube Monetization
Meeting the minimum requirement for YouTube monetization is probably the hardest part of this whole process. About a month ago, you had to have 10,000 lifetime views on your YouTube channel to qualify for monetization. However, earlier this year, Google changed their eligibility requirements and made them even tougher.
As of February 20, 2018, YouTube channels need to have accumulated 4000 hours of ‘watch time’ over the past 12 months and no less than 1000 subscribers to qualify for monetization. If you do not meet these requirements you cannot join the YouTube Partner Program and monetize your YouTube channel.
So, the first step to successful monetization on YouTube is to actually grow your channel. You need to create videos that will attract viewers and engage your audience. You also need to get people to subscribe because this is really what will grow your YouTube channel over time.
Part 2: How To Enable Monetization for Your YouTube Channel
Here’s the step-by-step process for monetizing your YouTube Channel, for those who are qualified.
- Log in to your YouTube account.
- Find your account icon in the top right corner. Click it to find the ‘Creator Studio’ button.
- Click the ‘Creator Studio’ button.
- Click the ‘Channel’ option in the left side menu.
- You’ll see a drop-down menu under ‘Channel’. Click on ‘Status and Features’. This is actually the first option on the menu. It should open by default once you click the ‘Channel’ button.
- Look through the ‘Status and Features’ page and click the ‘Enable’ button beside monetization.

- Clicking the ‘Enable’ button should lead you to another page where the guidelines for monetization are explained. Take the time to read through the guidelines and understand the dos and don’ts of YouTube monetization.
- Once you’ve looked through the guidelines, click the ‘Enable my account’ button to proceed. This will lead you to a page where you’ll be prompted to join the YouTube Partner Program.
- Read through the YouTube Partner Program terms, check the appropriate boxes, and click the ‘accept’ button.
- You’ll be prompted to link an AdSense account.
- Connect an existing AdSense account if you have one or create a new one.
- Once you’re done linking an AdSense account, you’ll be redirected to YouTube. There, select the type of ads you want to run under ‘Monetization Preferences’.
- Click the submit button and wait to find out if your account is approved for monetization.
According to YouTube, it can take up to a week for a decision to be reached on your application.
YouTube will not review your monetization application until you’ve met their eligibility criteria. Even then, your application may be declined if your videos do not follow the community guidelines (i.e. channels which simply repost content from other channels will not be monetized).
Not all videos can be monetized. While there are legal ways to create videos consisting of imagery and footage belonging to others, be aware that such videos are not always eligible for monetization. YouTube will only monetize videos that you own. So, posting videos which do not belong to you or which include copyrighted content can cause your monetization application to be declined.
Part 3: Linking Your Bank Account To Your AdSense Account
AdSense offers a variety of payment options including mailed checks and Western Union transfers. However, these options may not be available to you depending on where you’re based. AdSense does make payments through electronic wire transfer (EFT – Electronic funds transfer) to virtually every country in the world, and this is the preferred payment option for most people.
To have your earnings deposited directly into your account through EFT, you’ll need to link your bank account to your AdSense account.
Here’s a step-by-step guide for linking your bank account to your AdSense account.
- Log in to AdSense via: www.google.com/adsense/start
- Click the ‘Settings’ button in the left panel menu
- Under ‘Settings’, click ‘Payments’.
- On the ‘Payments’ page, click ‘Manage payment options’.
- Click ‘Add payment method’.
- Next, you’ll be prompted to add your bank account details. In general, you will be asked to provide the following:
- Name on the account / account holder’s name
- Bank account number
- Bank name
- Bank SWIFT code
- Depending on where you are based, additional information may be required.
- Ensure that the name on your AdSense account matches the name on the bank account you provide. To edit your AdSense name, click the ‘Manage settings’ button also on the Payments page.
Part 4: Receiving Payments
To get paid by AdSense, you need to reach the $100 threshold. You may wish to set a higher threshold but as a rule, earnings below the $100 will not be processed for payment (you will still receive the money, it will just keep adding up until it gets to $100 and then you’ll be paid).
Also, bear in mind that AdSense follows a monthly payment cycle. This means that a month’s earnings (assuming they meet the threshold requirement) will be paid next month. Usually, direct deposit payments will be processed between the 21st and 26th of every month. That said, it can take up to 10 days for electronic wire payments to be received.
In addition to reaching the payment threshold, be sure that you have no payment hold on your AdSense account. A payment hold can cause your earnings to be withheld even if it has reached the payment threshold.
To avoid a payment hold, be sure to provide the necessary tax information, verify your identity and your address, make sure the bank account linked to your AdSense is verified, and make sure you have not violated any of YouTube’s guidelines and community rules.
Conclusion
Depending on your vlogging skills and the nature of your content (some types of videos get more attention than others), it can take a while for you to be eligible for monetization. And even when you’ve successfully monetized your channel, getting enough views to reach the payment threshold can be tough.
Don’t let this discourage you from working towards earning income from your YouTube channel. Just focus on creating a YouTube channel people will want to watch. That’s how to get paid on YouTube - be sticking with your channel long enough for it to grow.
Richard Bennett
Richard Bennett is a writer and a lover of all things video.
Follow @Richard Bennett
Richard Bennett
Oct 26, 2023• Proven solutions
YouTube is more than a video sharing social network; here’s how to get paid on YouTube. Having an active YouTube channel with decent monthly views can earn you income through advertising. If your channel is set up properly, Google can place ads over your YouTube videos and you can earn money based on how many people see or click on (depends on the ad) those ads while watching your videos.
- The Requirements for YouTube Monetization
- How to Enable Monetization for Your YouTube Channel
- Linking Your Bank Account to Your AdSense Account
- Receiving Payments
Many vloggers receive direct bank deposits of their ad-based revenues every month. In this article, we’ll show you how to monetize your YouTube Channel and how to receive payments to your bank account.
Making Your YouTube Videos Better with Filmora
If you want to earn more money with YouTube videos, your video should be stand out. To achieve that, you should use a powerful video editing software as well. Here, I recommend Wondershare Filmora video editor . As one of the most widely used video editing software among YouTubers, Filmora provides lots of templates and effects which allows you to edit faster and better.
Part 1: The Requirements for YouTube Monetization
Meeting the minimum requirement for YouTube monetization is probably the hardest part of this whole process. About a month ago, you had to have 10,000 lifetime views on your YouTube channel to qualify for monetization. However, earlier this year, Google changed their eligibility requirements and made them even tougher.
As of February 20, 2018, YouTube channels need to have accumulated 4000 hours of ‘watch time’ over the past 12 months and no less than 1000 subscribers to qualify for monetization. If you do not meet these requirements you cannot join the YouTube Partner Program and monetize your YouTube channel.
So, the first step to successful monetization on YouTube is to actually grow your channel. You need to create videos that will attract viewers and engage your audience. You also need to get people to subscribe because this is really what will grow your YouTube channel over time.
Part 2: How To Enable Monetization for Your YouTube Channel
Here’s the step-by-step process for monetizing your YouTube Channel, for those who are qualified.
- Log in to your YouTube account.
- Find your account icon in the top right corner. Click it to find the ‘Creator Studio’ button.
- Click the ‘Creator Studio’ button.
- Click the ‘Channel’ option in the left side menu.
- You’ll see a drop-down menu under ‘Channel’. Click on ‘Status and Features’. This is actually the first option on the menu. It should open by default once you click the ‘Channel’ button.
- Look through the ‘Status and Features’ page and click the ‘Enable’ button beside monetization.
- Clicking the ‘Enable’ button should lead you to another page where the guidelines for monetization are explained. Take the time to read through the guidelines and understand the dos and don’ts of YouTube monetization.
- Once you’ve looked through the guidelines, click the ‘Enable my account’ button to proceed. This will lead you to a page where you’ll be prompted to join the YouTube Partner Program.
- Read through the YouTube Partner Program terms, check the appropriate boxes, and click the ‘accept’ button.
- You’ll be prompted to link an AdSense account.
- Connect an existing AdSense account if you have one or create a new one.
- Once you’re done linking an AdSense account, you’ll be redirected to YouTube. There, select the type of ads you want to run under ‘Monetization Preferences’.
- Click the submit button and wait to find out if your account is approved for monetization.
According to YouTube, it can take up to a week for a decision to be reached on your application.
YouTube will not review your monetization application until you’ve met their eligibility criteria. Even then, your application may be declined if your videos do not follow the community guidelines (i.e. channels which simply repost content from other channels will not be monetized).
Not all videos can be monetized. While there are legal ways to create videos consisting of imagery and footage belonging to others, be aware that such videos are not always eligible for monetization. YouTube will only monetize videos that you own. So, posting videos which do not belong to you or which include copyrighted content can cause your monetization application to be declined.
Part 3: Linking Your Bank Account To Your AdSense Account
AdSense offers a variety of payment options including mailed checks and Western Union transfers. However, these options may not be available to you depending on where you’re based. AdSense does make payments through electronic wire transfer (EFT – Electronic funds transfer) to virtually every country in the world, and this is the preferred payment option for most people.
To have your earnings deposited directly into your account through EFT, you’ll need to link your bank account to your AdSense account.
Here’s a step-by-step guide for linking your bank account to your AdSense account.
- Log in to AdSense via: www.google.com/adsense/start
- Click the ‘Settings’ button in the left panel menu
- Under ‘Settings’, click ‘Payments’.
- On the ‘Payments’ page, click ‘Manage payment options’.
- Click ‘Add payment method’.
- Next, you’ll be prompted to add your bank account details. In general, you will be asked to provide the following:
- Name on the account / account holder’s name
- Bank account number
- Bank name
- Bank SWIFT code
- Depending on where you are based, additional information may be required.
- Ensure that the name on your AdSense account matches the name on the bank account you provide. To edit your AdSense name, click the ‘Manage settings’ button also on the Payments page.
Part 4: Receiving Payments
To get paid by AdSense, you need to reach the $100 threshold. You may wish to set a higher threshold but as a rule, earnings below the $100 will not be processed for payment (you will still receive the money, it will just keep adding up until it gets to $100 and then you’ll be paid).
Also, bear in mind that AdSense follows a monthly payment cycle. This means that a month’s earnings (assuming they meet the threshold requirement) will be paid next month. Usually, direct deposit payments will be processed between the 21st and 26th of every month. That said, it can take up to 10 days for electronic wire payments to be received.
In addition to reaching the payment threshold, be sure that you have no payment hold on your AdSense account. A payment hold can cause your earnings to be withheld even if it has reached the payment threshold.
To avoid a payment hold, be sure to provide the necessary tax information, verify your identity and your address, make sure the bank account linked to your AdSense is verified, and make sure you have not violated any of YouTube’s guidelines and community rules.
Conclusion
Depending on your vlogging skills and the nature of your content (some types of videos get more attention than others), it can take a while for you to be eligible for monetization. And even when you’ve successfully monetized your channel, getting enough views to reach the payment threshold can be tough.
Don’t let this discourage you from working towards earning income from your YouTube channel. Just focus on creating a YouTube channel people will want to watch. That’s how to get paid on YouTube - be sticking with your channel long enough for it to grow.
Richard Bennett
Richard Bennett is a writer and a lover of all things video.
Follow @Richard Bennett
How to Elevate YouTube Rankings with Optimized Metadata
How to Optimize YouTube Tags/Title/Description for More Views
Richard Bennett
Mar 27, 2024• Proven solutions
Making awesome video content is just the first hurdle to overcome. Getting people to watch them is the next and a much bigger obstacle in your path. Just as a blogger must work hard to get people to read their blog, so a YouTuber needs to find ways to get more views on their videos.
For any piece of content on the internet, discoverability is key to exposure. After all, nobody will watch your video or read your blog if they can’t find it, right? A blogger would do this by lacing their content with SEO - search engine optimization. But how can a YouTuber do the same? The answer lies in something known as YouTube tags optimization. In this article, we will let you know how to add, edit and optimize YouTube tags easily for more views, and some tips on YouTube title and description.
Quick Jump Menu
- What are YouTube tags and why they are so important
- How to come up with YouTube tags and optimize them
- How to Tag YouTube and Add Title, Description
- How to Improve YouTube video Metadata: Tags, Title, Description
- Tips for Tagging YouTube and Writing Title, Description
Before we get started, I want to recommend the best video editing software for YouTubers - Wondershare Filmora , an easy to use while powerful video editor that allows you not only to cut, split, crop, resize, reverse your videos, but also offers you multiple video effects specially designed for Fashion, Beauty, Gaming, Travel, Education, etc. Check the video to know more fantastic features:
Download Mac Version ](https://tools.techidaily.com/wondershare/filmora/download/ )
Part 1: What are YouTube tags and why they are so important
YouTube tags are used when you upload a video on YouTube. You need to specify the type of video. In other words, you need to describe your video with keywords. But you might think about why you need to add these words. YouTube can’t figure out what my videos are about? Unfortunately, YouTube can’t though its algorithm is much more advanced than before.
You must know the competition between videos is furious since 500 hours of video per minute are uploaded on YouTube . In this case, it is important to let the YouTube algorithm know your video by adding related tags to have a higher ranking. So the better tags we choose, the higher chance to rank in the top 1, which means you will get more views!
Using YouTube meta tags wisely can broaden your reach and help new people discover your content. However, don’t be tempted to insert irrelevant tags just because you know they are high traffic. You will be found out and penalized as a result. Just as you did with your description, research your keywords, place the most important ones first and use as many as you can.
What are the three YouTube tag types?
YouTube has three different types of tags and each of them has a specific purpose. The tags are-
Specific – The specific tag types are keywords-oriented. These keywords specifically pertain to the content of your video. In this tag type, the particular video is highlighted with the keyword tags. Often while typing the keywords in your mind, YouTube suggests phrases and keywords according to the content of your video. You may apply the suggestions and also add more general or common versions of the same keywords.
Compound – The compound tags are usually using more than two words. Many a time it is seen that users prefer tagging the complete title of the video. If you are using your video title as the compound tag, ensure that you do not include the prepositions like or, as, and, etc. This is because YouTube allows just 500 characters in the title and ignore the prepositions. It is always advised to use all the 500 characters YouTube has allowed without wasting the characters on prepositions as it will automatically be ignored.
Generic – The generic tags are the ones that describe the entire video in one or two words. These tags are used in all the videos of yours. These tags are used across your channel for all the videos you post. It is important to have such general constant tags.
Part 2: How to add YouTube tags and optimize them
The more relevant tags you add, the better it is. The best part is YouTube doesn’t restrict the number of tags but adding all is not possible and adding something irrelevant doesn’t make sense. So, your YouTube video tags must be the smart ones for more views. Educated tagging is what is required.
1. Brand-Specific Tags Addition - Every business wants their brand name to show up in the search results on YouTube and Google. Self-referencing your video or tagging your brand name in a number of variations is a smart way of letting others know your brand.
2. Using YouTube Auto Suggest – Play with the search option on YouTube and check out the YouTube suggestions when you search. Try to recognize the common videos that pop up while searching for something important and relevant to yours. Try searching for random keywords according to your YouTube search experience.
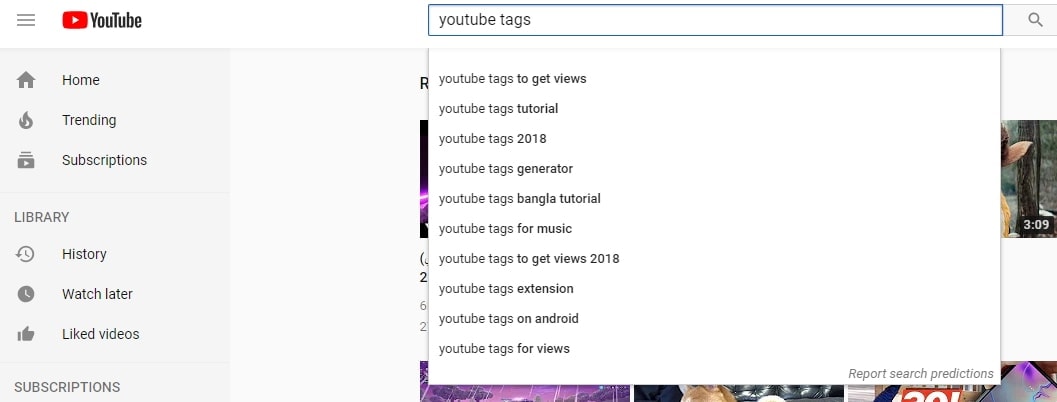
3. Use the YouTube Keyword Search Tool – Lastly, you may use the YouTube keyword suggestion tool. It helps you to extract the relevant keywords from the videos of your competitors and create suggestions according to the basic term provided by you.
4. Use Specific Tags - After using tools, you need to narrow down your tags specifically, like tags “learn 3D paper cutting”. The search volume may not be huge, but these kinds of tags can let YouTube know your video very well. Give it a try!
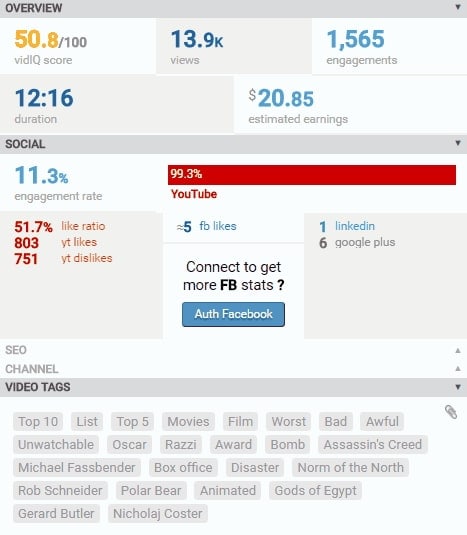
5. Check competitor’s Tags - When you check tags from other brands, it is not suggested to copy them all. What you need to do is find what you are missing and try to cover that area. However, only third-party tools can help you do that. In the market, VidIQ is highly used. It has a free version. Most of all data including tags can be found for higher views.
YouTube Tags Bonus Tips
Here you can learn some tips when optimizing tags. You can use singular and plural tags. Sometimes remember to add some misspelling tags because users tend to mistype some words, so it’s better to cover this kind of tag. You can get more information on misspelled words . More tips are listed below.
- Build on what you learned in your keyword research and use high traffic keywords as tags
- Use as many tags as possible, but without being spammy
- Build related playlists using particular tags
- Be generic; ‘big’, ‘funny’ and ‘sweet’ are fine, but ‘luscious’, ‘delightful’ and ‘splendid’ don’t make the best tags
- Put the most important tags first
- Mix single word tags with ‘long tail’ tags, e.g. ‘how to’
Part 3: How to Tag YouTube and Add Title, Description
For a New Video
- Step 1. The first thing you need to do is to sign in to your YouTube account .
- Step 2. Then click the Upload button that’s found on the top right corner of the window.

- Step 3. Then select the video that you want to upload. You will be asked to add a title, description, and tags.
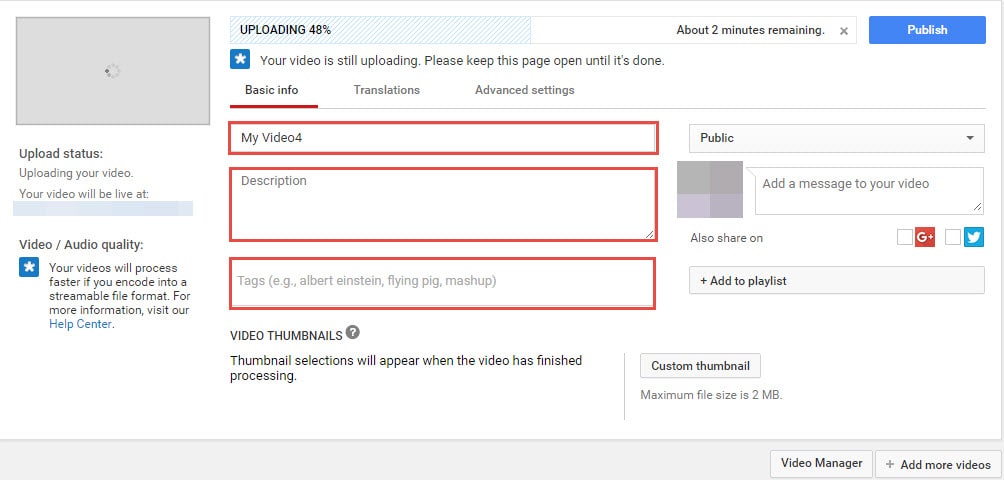
- Step 4. After uploading, you can still edit the YouTube title, description, and tags.
For a Published Video
There are times when you want to change the title, description or tag of an already published video. The good news is that YouTube allows you to re-edit them whenever you want to.
- Step 1. Log into your YouTube account
- Step 2. Click the account name found at the top right-hand corner of the screen. Then you will have a dropdown menu. Select Video Manager to show a list of your uploaded videos.

- Step 3. Click the Edit button that’s found right next to the video that you want to modify. In the Video Information, you can now change the title, description or any of the tags. Click on the Save Changes button when you are done.
Part 4: How to Improve YouTube Video Title and Description
Metadata on YouTube is where both the viewers and the platform itself can find out what your video is all about. It helps people search for your video, helps YouTube to categorize it correctly and, when done well, can broaden the reach of your content. YouTube meta consists of three main parts: tags, title and description. Here’s how you can use each of these three elements to create powerful metadata for your video:
1. Title
YouTube titles play a big part in the ranking factors for search. That means you’ve got to think about what the people most likely to want to see your video will type into the search bar, as well as the words that accurately describe your video.
For example, if you have a clip of your cat Fluffy climbing a tree, calling your video ‘Fluffy climbs a tree’ is not the best idea. Nobody knows who Fluffy is; it could be your rabbit, dog, daughter or feather duster for all the YouTube community knows, and nobody is going to be searching for it.
A better title would be ‘cat climbs a tree, but you could even improve on that. How about ‘funny cat climbs a tree’, which would capture all those people looking for funny cat videos. Or, even better, ‘funny Persian cat climbs a tree’, also capturing those people who adore Persian cats.
You can see how building awesome YouTube titles can happen organically like this, but it’s also worth doing your homework too. We have collected a handful of YouTube Keyword tools for you to improve your YouTube meta, so check out the suggestions and work forwards from there.
Best practices
- Research your keywords and include high traffic keywords at the start of the title
- Keep titles under 70 characters
- Branding, episode number, and other non-essential info should be at the end of the title
- Review your YouTube titles from time to time and update with new keywords as search trends change
- Avoid clickbait titles or misleading titles as this will affect your view time and subsequently your ranking in search
2. Description
Your description is a much longer piece of YouTube meta, so you can really go to town with your YouTube keywords here. You’ve got up to 5,000 characters to fill in, and we strongly advise that you aim to use every single one. This really is a golden opportunity, not only to get people motivated to watch all of your video, but also to be indexed correctly through well researched YouTube keywords.
You may have noticed that, on the search page itself, only a small part of the description actually shows up; 120 characters of it to be precise. This doesn’t affect indexing, but it does mean you have to plan your YouTube description carefully to really hook people into clicking through from just the first sentence or two.
Best practices
- Make the first sentence or two compelling and captivating to get people to click
- Research the best YouTube keywords to use to ensure your video is correctly indexed
- At the end of your YouTube description, include a call to action to direct viewers on what to do next (subscribe, click through to the website, look at a product, watch more videos, etc.)
- If your video is long, consider placing time codes in your description to help users jump to their areas of interest
- Add links to products showcased, your social channels, or website as you wish
- Don’t forget to credit any music you’ve used here
Part 5: Tips for Tagging YouTube and Writing Title, Description
So, now we’ve got the basics down, let’s move on to some top tips for getting your metadata just right:
- 1. Do not spam
Irrelevant keywords will not do you any favors in the long run. Using a popular search term such as ‘funny cat’ when actually it’s a video of you unboxing your product will simply irritate your viewers. You’ll get more views, but for shorter durations, and that will hurt not only your ranking but also your reputation. The people you want to draw in with your YouTube meta should be those who are genuinely interested in your videos, as these are the people who will share, comment and interact with you.
- 2. Don’t put tags in the description
YouTube has given you a place to put your tags, and that’s not in the description area of your meta. Placing tags in the description area is known as tag stuffing and can lead to videos being removed or penalized.
- 3. Update regularly
YouTube meta is not a static thing. Trends change, search statistics fluctuate, and the needs of your viewers alter as time goes on. For this reason, you should look to update your meta from time to time, at least once every six months or so. Re-research your keywords and optimize for today’s trending search terms.
You May Also Like: YouTube SEO Complete Guide
Conclusion
Take some time to perfect your meta on YouTube and see how many more views it helps you get. Let us know if you have any other tips for developing powerful metadata, and how optimizing your meta has worked for you!
Download Mac Version ](https://tools.techidaily.com/wondershare/filmora/download/ )
Richard Bennett
Richard Bennett is a writer and a lover of all things video.
Follow @Richard Bennett
Richard Bennett
Mar 27, 2024• Proven solutions
Making awesome video content is just the first hurdle to overcome. Getting people to watch them is the next and a much bigger obstacle in your path. Just as a blogger must work hard to get people to read their blog, so a YouTuber needs to find ways to get more views on their videos.
For any piece of content on the internet, discoverability is key to exposure. After all, nobody will watch your video or read your blog if they can’t find it, right? A blogger would do this by lacing their content with SEO - search engine optimization. But how can a YouTuber do the same? The answer lies in something known as YouTube tags optimization. In this article, we will let you know how to add, edit and optimize YouTube tags easily for more views, and some tips on YouTube title and description.
Quick Jump Menu
- What are YouTube tags and why they are so important
- How to come up with YouTube tags and optimize them
- How to Tag YouTube and Add Title, Description
- How to Improve YouTube video Metadata: Tags, Title, Description
- Tips for Tagging YouTube and Writing Title, Description
Before we get started, I want to recommend the best video editing software for YouTubers - Wondershare Filmora , an easy to use while powerful video editor that allows you not only to cut, split, crop, resize, reverse your videos, but also offers you multiple video effects specially designed for Fashion, Beauty, Gaming, Travel, Education, etc. Check the video to know more fantastic features:
Download Mac Version ](https://tools.techidaily.com/wondershare/filmora/download/ )
Part 1: What are YouTube tags and why they are so important
YouTube tags are used when you upload a video on YouTube. You need to specify the type of video. In other words, you need to describe your video with keywords. But you might think about why you need to add these words. YouTube can’t figure out what my videos are about? Unfortunately, YouTube can’t though its algorithm is much more advanced than before.
You must know the competition between videos is furious since 500 hours of video per minute are uploaded on YouTube . In this case, it is important to let the YouTube algorithm know your video by adding related tags to have a higher ranking. So the better tags we choose, the higher chance to rank in the top 1, which means you will get more views!
Using YouTube meta tags wisely can broaden your reach and help new people discover your content. However, don’t be tempted to insert irrelevant tags just because you know they are high traffic. You will be found out and penalized as a result. Just as you did with your description, research your keywords, place the most important ones first and use as many as you can.
What are the three YouTube tag types?
YouTube has three different types of tags and each of them has a specific purpose. The tags are-
Specific – The specific tag types are keywords-oriented. These keywords specifically pertain to the content of your video. In this tag type, the particular video is highlighted with the keyword tags. Often while typing the keywords in your mind, YouTube suggests phrases and keywords according to the content of your video. You may apply the suggestions and also add more general or common versions of the same keywords.
Compound – The compound tags are usually using more than two words. Many a time it is seen that users prefer tagging the complete title of the video. If you are using your video title as the compound tag, ensure that you do not include the prepositions like or, as, and, etc. This is because YouTube allows just 500 characters in the title and ignore the prepositions. It is always advised to use all the 500 characters YouTube has allowed without wasting the characters on prepositions as it will automatically be ignored.
Generic – The generic tags are the ones that describe the entire video in one or two words. These tags are used in all the videos of yours. These tags are used across your channel for all the videos you post. It is important to have such general constant tags.
Part 2: How to add YouTube tags and optimize them
The more relevant tags you add, the better it is. The best part is YouTube doesn’t restrict the number of tags but adding all is not possible and adding something irrelevant doesn’t make sense. So, your YouTube video tags must be the smart ones for more views. Educated tagging is what is required.
1. Brand-Specific Tags Addition - Every business wants their brand name to show up in the search results on YouTube and Google. Self-referencing your video or tagging your brand name in a number of variations is a smart way of letting others know your brand.
2. Using YouTube Auto Suggest – Play with the search option on YouTube and check out the YouTube suggestions when you search. Try to recognize the common videos that pop up while searching for something important and relevant to yours. Try searching for random keywords according to your YouTube search experience.
3. Use the YouTube Keyword Search Tool – Lastly, you may use the YouTube keyword suggestion tool. It helps you to extract the relevant keywords from the videos of your competitors and create suggestions according to the basic term provided by you.
4. Use Specific Tags - After using tools, you need to narrow down your tags specifically, like tags “learn 3D paper cutting”. The search volume may not be huge, but these kinds of tags can let YouTube know your video very well. Give it a try!
5. Check competitor’s Tags - When you check tags from other brands, it is not suggested to copy them all. What you need to do is find what you are missing and try to cover that area. However, only third-party tools can help you do that. In the market, VidIQ is highly used. It has a free version. Most of all data including tags can be found for higher views.
YouTube Tags Bonus Tips
Here you can learn some tips when optimizing tags. You can use singular and plural tags. Sometimes remember to add some misspelling tags because users tend to mistype some words, so it’s better to cover this kind of tag. You can get more information on misspelled words . More tips are listed below.
- Build on what you learned in your keyword research and use high traffic keywords as tags
- Use as many tags as possible, but without being spammy
- Build related playlists using particular tags
- Be generic; ‘big’, ‘funny’ and ‘sweet’ are fine, but ‘luscious’, ‘delightful’ and ‘splendid’ don’t make the best tags
- Put the most important tags first
- Mix single word tags with ‘long tail’ tags, e.g. ‘how to’
Part 3: How to Tag YouTube and Add Title, Description
For a New Video
- Step 1. The first thing you need to do is to sign in to your YouTube account .
- Step 2. Then click the Upload button that’s found on the top right corner of the window.
- Step 3. Then select the video that you want to upload. You will be asked to add a title, description, and tags.
- Step 4. After uploading, you can still edit the YouTube title, description, and tags.
For a Published Video
There are times when you want to change the title, description or tag of an already published video. The good news is that YouTube allows you to re-edit them whenever you want to.
- Step 1. Log into your YouTube account
- Step 2. Click the account name found at the top right-hand corner of the screen. Then you will have a dropdown menu. Select Video Manager to show a list of your uploaded videos.
- Step 3. Click the Edit button that’s found right next to the video that you want to modify. In the Video Information, you can now change the title, description or any of the tags. Click on the Save Changes button when you are done.
Part 4: How to Improve YouTube Video Title and Description
Metadata on YouTube is where both the viewers and the platform itself can find out what your video is all about. It helps people search for your video, helps YouTube to categorize it correctly and, when done well, can broaden the reach of your content. YouTube meta consists of three main parts: tags, title and description. Here’s how you can use each of these three elements to create powerful metadata for your video:
1. Title
YouTube titles play a big part in the ranking factors for search. That means you’ve got to think about what the people most likely to want to see your video will type into the search bar, as well as the words that accurately describe your video.
For example, if you have a clip of your cat Fluffy climbing a tree, calling your video ‘Fluffy climbs a tree’ is not the best idea. Nobody knows who Fluffy is; it could be your rabbit, dog, daughter or feather duster for all the YouTube community knows, and nobody is going to be searching for it.
A better title would be ‘cat climbs a tree, but you could even improve on that. How about ‘funny cat climbs a tree’, which would capture all those people looking for funny cat videos. Or, even better, ‘funny Persian cat climbs a tree’, also capturing those people who adore Persian cats.
You can see how building awesome YouTube titles can happen organically like this, but it’s also worth doing your homework too. We have collected a handful of YouTube Keyword tools for you to improve your YouTube meta, so check out the suggestions and work forwards from there.
Best practices
- Research your keywords and include high traffic keywords at the start of the title
- Keep titles under 70 characters
- Branding, episode number, and other non-essential info should be at the end of the title
- Review your YouTube titles from time to time and update with new keywords as search trends change
- Avoid clickbait titles or misleading titles as this will affect your view time and subsequently your ranking in search
2. Description
Your description is a much longer piece of YouTube meta, so you can really go to town with your YouTube keywords here. You’ve got up to 5,000 characters to fill in, and we strongly advise that you aim to use every single one. This really is a golden opportunity, not only to get people motivated to watch all of your video, but also to be indexed correctly through well researched YouTube keywords.
You may have noticed that, on the search page itself, only a small part of the description actually shows up; 120 characters of it to be precise. This doesn’t affect indexing, but it does mean you have to plan your YouTube description carefully to really hook people into clicking through from just the first sentence or two.
Best practices
- Make the first sentence or two compelling and captivating to get people to click
- Research the best YouTube keywords to use to ensure your video is correctly indexed
- At the end of your YouTube description, include a call to action to direct viewers on what to do next (subscribe, click through to the website, look at a product, watch more videos, etc.)
- If your video is long, consider placing time codes in your description to help users jump to their areas of interest
- Add links to products showcased, your social channels, or website as you wish
- Don’t forget to credit any music you’ve used here
Part 5: Tips for Tagging YouTube and Writing Title, Description
So, now we’ve got the basics down, let’s move on to some top tips for getting your metadata just right:
- 1. Do not spam
Irrelevant keywords will not do you any favors in the long run. Using a popular search term such as ‘funny cat’ when actually it’s a video of you unboxing your product will simply irritate your viewers. You’ll get more views, but for shorter durations, and that will hurt not only your ranking but also your reputation. The people you want to draw in with your YouTube meta should be those who are genuinely interested in your videos, as these are the people who will share, comment and interact with you.
- 2. Don’t put tags in the description
YouTube has given you a place to put your tags, and that’s not in the description area of your meta. Placing tags in the description area is known as tag stuffing and can lead to videos being removed or penalized.
- 3. Update regularly
YouTube meta is not a static thing. Trends change, search statistics fluctuate, and the needs of your viewers alter as time goes on. For this reason, you should look to update your meta from time to time, at least once every six months or so. Re-research your keywords and optimize for today’s trending search terms.
You May Also Like: YouTube SEO Complete Guide
Conclusion
Take some time to perfect your meta on YouTube and see how many more views it helps you get. Let us know if you have any other tips for developing powerful metadata, and how optimizing your meta has worked for you!
Download Mac Version ](https://tools.techidaily.com/wondershare/filmora/download/ )
Richard Bennett
Richard Bennett is a writer and a lover of all things video.
Follow @Richard Bennett
Also read:
- [Updated] Audio Upheavals Top Rhythmic Disruptors for Devices
- Ideal History Streams The 10 Premier Channels for Students' Study
- Giggle Genesis Conceptualizing 7 Funny YouTube Sessions
- Daily Dollars and Cents Average Income From YouTube's AdSense Per Thousand Viewer Hours for 2024
- Visionary Video Planning Using the Power of Google Trends
- 2024 Approved Delving Into the World of Mukbang Videos
- [Updated] Crafting Success in YouTube's Creator Hub
- 2024 Approved Collect Premium Audio for Video Editors
- [Updated] Essential Tools for Android & iOS Users Seeking Playlist Extractors
- Designing Custom YouTube Music Sequences
- [New] Defending Your Videos Against YouTube Copyright Strikes
- SheGames Legends YouTube's Number One Ten
- [Updated] Designing a Simple YouTube Subscriber Shortcut
- Top Free Audio Samples for YouTube Creators
- How to Turn YouTube Shorts Into a Money Machine Key Requirements & Income Potential
- YouTube Rankings Secrets Enhancing Video Visibility
- A Compreayer's Guide to Monetizing Videos Critical View Figures for 2024
- [New] Discover How to Design Dynamic YouTube Music Playlists
- Creating Compelling Content with Powerful YouTube Titles for 2024
- Best ASMR Microphones
- [New] Audiovisual Excellence YouTube Videos in Premiere Pro
- In 2024, Discovering Digital Dominance Which Is Superior, YouTubes Shorts or TikToks?
- Top 10 Video Capture Tools for Blogging Platforms
- In 2024, Affordable Acoustic Amps and Mics for Video Voyagers
- Decoding Shorts Into Professional-Grade MP4 Videos for 2024
- In 2024, Daily Dosage of Serenity Top Yoga Channels for Life
- The Connoisseur's Guide to YouTube Music Orchestration
- [Updated] Accelerate Thumbnail Designs for Professional Valorant Portraits
- [Updated] Bringing in the Crowd The Top Ten Reasons and Fixes to Boost YouTube Views
- Android Melody Manual Best Free YouTube Downloader Tools
- Dispelling Dark Pixels YouTube Solution Guide for 2024
- Creating Impactful Outros Top 6 FREE Tools
- Crafting an Engaging Online Presence The Complete Guide to YouTube Submissions
- Discover Powerful Tagging Tactics A Guide to Amplifying FreeGame Content
- How to Screen Mirroring Oppo A56s 5G? | Dr.fone
- Updated 2024 Approved Quick Solved How to Add Subtitles to a Video on iPhones
- Updated 15 Must-Have Tech Gadgets and Digital Platforms to Transform Your Videos With Impactful Music Integration A Side-by-Side Analysis for 2024
- New In 2024, Deleting White Background in Photoshop Is Hard? No
- [Updated] In 2024, Unleash Viral Potential Top 50+ Trending TikTok HashTags
- [New] 2024 Approved Bandicam in Focus The Updated Guide Users
- Play MKV movies on Galaxy S23, is it possible?
- Strategies for Apps That Wont Download From Play Store On Google Pixel Fold | Dr.fone
- [Updated] 2024 Approved The Top 10 Must-Have Disco Upgrades for Seamless Use
- In 2024, Social Sightings Exploring the Most Engaged Twitters
- [Updated] Enhance Gameplay Memories Win10 Recording Methods for 2024
- How to bypass Yuva 2’s lock screen pattern, PIN or password
- [Updated] Streamline Your Workflow with HP Screen Recordings
- Updated Easily Implemented Phonetic Adjustment Features Exploration of Functions, Regulations, and Diverse Methods
- In 2024, Syncing Tunes with Video Posts on Facebook
- Best Mobile and Desktop Video Player for 2024
- Updated What Is AI Pixel Art Generator, In 2024
- [New] Breakthrough Tactics for Capturing Virtual Conferences for 2024
- Everything You Need to Know about Lock Screen Settings on your Motorola Edge 40
- In 2024, Digital Dialogue Diaries The Full-Year Tweets Summary
- Flavor of Fun Explore the 10 Top Themes at BetterDiscord for 2024
- From First Click to Final Cut Elevating PS4 Recording Techniques for 2024
- New The Science of Thumbnails YouTube Image Size, Format, and Conversion Hacks
- Proven Ways to Fix There Was A Problem Parsing the Package on Nokia 130 Music | Dr.fone
- New Mac Video Editing Made Easy Top Software Solutions for 2024
- [New] Fixing Full Screen in Obs Journey for 2024
- Title: "[New] Digital Riches Transitioning YouTube Earnings to Currency"
- Author: Steven
- Created at : 2024-05-25 20:08:55
- Updated at : 2024-05-26 20:08:55
- Link: https://youtube-clips.techidaily.com/new-digital-riches-transitioning-youtube-earnings-to-currency/
- License: This work is licensed under CC BY-NC-SA 4.0.
