![[New] Crafting Content Masterpieces with These Essential YouTube Tips](https://thmb.techidaily.com/f00def1c04cb418f21da5c60f199b078da943127e970aa7acf9eb30479f71c91.jpg)
[New] Crafting Content Masterpieces with These Essential YouTube Tips
Crafting Content Masterpieces with These Essential YouTube Tips
YouTube Video Editing Tips for Beginner Editors

Marion Dubois
Oct 26, 2023• Proven solutions
Creating good-quality videos regularly can be difficult, especially when you are a beginner. The most crucial part of making a video is editing. This is the part where you have to look at every intricate detail. This is the part where you remove unwanted footage and place useful shots in their position. Every creator has their editing style by which they put their mark on their videos.
Editing can be a long and tedious process. It takes time, patience, and an immense amount of creativity to create a video good enough to impress the viewers. Here are few tips that will make your editing process easier and cut your editing time in half.
Top 10 Video Editing Tips for YouTube Beginners
The following will not tell you how to edit your YouTube videos, but will surely make editing a little more convenient.
1. Choose a Good Video Editor
One of the first things you have to do is make sure that you have chosen a video editor that is best for you.
Using either too complicated or too basic a video editor can only create problems for you. An advanced video editor may create very high-end, professional videos, but it will take months just to get the hang of the software. Whereas a free basic video editor may not give as many options as you’d need to edit your videos properly.
2. Use Fast Computers
Being a video creator, you’ll have to store numerous huge files on your computer. To improve your current PC, you can invest in an SSD, which is a lot faster than the traditional hard disk.
SSD will not only improve your export, loading, and rendering time but it will allow you to access files and editing software much faster. Another improvement you can make to make your editing process faster is to increase the RAM of your computer (it should be at least 8 GB). Also, make sure to get the recommended video card and processor for your video editor.
3. Invest Your Time in Video Editing Tutorials
You can watch video editing tutorials to learn and perfect the art of video editing. You can easily find free tutorials online, visiting websites like Skillshare and Red Giant tutorials to access free video editing tutorials. Search for tutorials that are specific to the editing software you use. You can also search for tutorials that will help improve your content.
4. Use Keyboard Shortcuts
Learn the keyboard shortcuts for various functions in the software, especially the ones that are usually repeated throughout the process like undo, redo, delete, etc.
You can also invest in an Editing keyboard, they are software specific and already have keyboard shortcut icons in them.
5. Add Good Music
Another important tip to keep your audience all ears is to add good music to your videos. Whether it is background music or a soundtrack in between shots, it has to pair well with your video.
If you are on a budget and don’t want to spend money on music, there are royalty-free options available. But, know that good music only comes at a price.
6. Add Text, Titles, and Graphics
You can choose from a wide variety of text and titles. You’ll also have tools to enhance the graphics of your video. When you have so many options, choosing the right one can be difficult. It is better to keep the font of the text simple.
You can also use video editors to add flashy motion graphics to your videos. You can either create your graphics by hand or you can also choose from a variety of ready-made graphics templates.
7. Don’t Forget to Color Correction
Not color correcting your videos may render them looking dull and lifeless. Color is one of the major elements that play a crucial part in setting the mood of your video. Depending upon the type of content you’re portraying in the video, you can use a color scheme to highlight specific aspects or to evoke certain emotions in the audience.
Color correction is used to make your video appear consistent throughout the scenes. Whereas color grading is used to make videos stand out. Both are essential to differentiate certain scenes from others.
8. Learn Important Terms
Learn the terms commonly used in video editing. It will help you become proficient with the software and the process of editing. Some common terms used in the editing sphere are:
- Cutaways
- Jump Cuts
- Match Cuts/Match-Action Montage
- J and L Cuts
- Cutting on Action
9. Store Your Video Files on an External Drive
Storing your huge video files on an external drive will free up a lot of space on your computer. This will help speed up your device so you don’t have to worry about slow rendering.
10. Make Copies of Your Files
Always make more than two copies of your files. You can use the 321 rule. The rule is to make 3 copies of your files, store them in two different places, where one place should be physically separate from the other.
The Best YouTube Video Editing Software for Beginners
There are many video editing software available in the video editing market, but Wondershare Filmora is the best video editor for beginners and professionals alike. It has a beginner-friendly interface, contains advanced editing tools, and is available at a reasonable price.


Here is a list of few features offered by Wondershare Filmora.
1. AI Portrait
It helps make your videos vibrant and colorful
2. Visual and Audio Effects
Visual and audio effects can be added to improve the image and sound quality of the video
3. Audio Ducking
You can layer one sound on top of the other.
4. Cool Texts
You can add cool texts and titles from the library.
5. Screen Recording
You can record the screen activity of your device.
Final Word
As a beginner, the time and effort required to make a good video can be reduced to half if you follow a few simple tricks that professionals use daily. It’s all about working smart and not hard. You can save time by learning the editing term and keyboard shortcuts. You can save your files in an external drive to save storage and make backup in case of any mishaps. Remember to color grade, add cool texts and good music to make your videos distinct.
Marion Dubois
Marion Dubois is a writer and a lover of all things video.
Follow @Marion Dubois
Marion Dubois
Oct 26, 2023• Proven solutions
Creating good-quality videos regularly can be difficult, especially when you are a beginner. The most crucial part of making a video is editing. This is the part where you have to look at every intricate detail. This is the part where you remove unwanted footage and place useful shots in their position. Every creator has their editing style by which they put their mark on their videos.
Editing can be a long and tedious process. It takes time, patience, and an immense amount of creativity to create a video good enough to impress the viewers. Here are few tips that will make your editing process easier and cut your editing time in half.
Top 10 Video Editing Tips for YouTube Beginners
The following will not tell you how to edit your YouTube videos, but will surely make editing a little more convenient.
1. Choose a Good Video Editor
One of the first things you have to do is make sure that you have chosen a video editor that is best for you.
Using either too complicated or too basic a video editor can only create problems for you. An advanced video editor may create very high-end, professional videos, but it will take months just to get the hang of the software. Whereas a free basic video editor may not give as many options as you’d need to edit your videos properly.
2. Use Fast Computers
Being a video creator, you’ll have to store numerous huge files on your computer. To improve your current PC, you can invest in an SSD, which is a lot faster than the traditional hard disk.
SSD will not only improve your export, loading, and rendering time but it will allow you to access files and editing software much faster. Another improvement you can make to make your editing process faster is to increase the RAM of your computer (it should be at least 8 GB). Also, make sure to get the recommended video card and processor for your video editor.
3. Invest Your Time in Video Editing Tutorials
You can watch video editing tutorials to learn and perfect the art of video editing. You can easily find free tutorials online, visiting websites like Skillshare and Red Giant tutorials to access free video editing tutorials. Search for tutorials that are specific to the editing software you use. You can also search for tutorials that will help improve your content.
4. Use Keyboard Shortcuts
Learn the keyboard shortcuts for various functions in the software, especially the ones that are usually repeated throughout the process like undo, redo, delete, etc.
You can also invest in an Editing keyboard, they are software specific and already have keyboard shortcut icons in them.
5. Add Good Music
Another important tip to keep your audience all ears is to add good music to your videos. Whether it is background music or a soundtrack in between shots, it has to pair well with your video.
If you are on a budget and don’t want to spend money on music, there are royalty-free options available. But, know that good music only comes at a price.
6. Add Text, Titles, and Graphics
You can choose from a wide variety of text and titles. You’ll also have tools to enhance the graphics of your video. When you have so many options, choosing the right one can be difficult. It is better to keep the font of the text simple.
You can also use video editors to add flashy motion graphics to your videos. You can either create your graphics by hand or you can also choose from a variety of ready-made graphics templates.
7. Don’t Forget to Color Correction
Not color correcting your videos may render them looking dull and lifeless. Color is one of the major elements that play a crucial part in setting the mood of your video. Depending upon the type of content you’re portraying in the video, you can use a color scheme to highlight specific aspects or to evoke certain emotions in the audience.
Color correction is used to make your video appear consistent throughout the scenes. Whereas color grading is used to make videos stand out. Both are essential to differentiate certain scenes from others.
8. Learn Important Terms
Learn the terms commonly used in video editing. It will help you become proficient with the software and the process of editing. Some common terms used in the editing sphere are:
- Cutaways
- Jump Cuts
- Match Cuts/Match-Action Montage
- J and L Cuts
- Cutting on Action
9. Store Your Video Files on an External Drive
Storing your huge video files on an external drive will free up a lot of space on your computer. This will help speed up your device so you don’t have to worry about slow rendering.
10. Make Copies of Your Files
Always make more than two copies of your files. You can use the 321 rule. The rule is to make 3 copies of your files, store them in two different places, where one place should be physically separate from the other.
The Best YouTube Video Editing Software for Beginners
There are many video editing software available in the video editing market, but Wondershare Filmora is the best video editor for beginners and professionals alike. It has a beginner-friendly interface, contains advanced editing tools, and is available at a reasonable price.
Here is a list of few features offered by Wondershare Filmora.
1. AI Portrait
It helps make your videos vibrant and colorful
2. Visual and Audio Effects
Visual and audio effects can be added to improve the image and sound quality of the video
3. Audio Ducking
You can layer one sound on top of the other.
4. Cool Texts
You can add cool texts and titles from the library.
5. Screen Recording
You can record the screen activity of your device.
Final Word
As a beginner, the time and effort required to make a good video can be reduced to half if you follow a few simple tricks that professionals use daily. It’s all about working smart and not hard. You can save time by learning the editing term and keyboard shortcuts. You can save your files in an external drive to save storage and make backup in case of any mishaps. Remember to color grade, add cool texts and good music to make your videos distinct.
Marion Dubois
Marion Dubois is a writer and a lover of all things video.
Follow @Marion Dubois
Unveiling Video Capabilities: DSLR or Mirrorless?
Mirrorless vs. DSLR Cameras: Which is Better for Videos?

Richard Bennett
Oct 26, 2023• Proven solutions
If you’re looking to shoot your videos with interchangeable lenses, your camera set up will either have to have a mirrorless camera body or a DSLR camera body. In this post, I’ll be comparing the two camera body types for recording video.
- Part 1: What is a DSLR Camera?
- Part 2: What is a Mirrorless Camera?
- Part 3: Mirrorless vs. DSLR - a Complete Comparison
- Part 4: Mirrorless vs. DSLR - Which One is Better for Video?
What is a DSLR Camera?
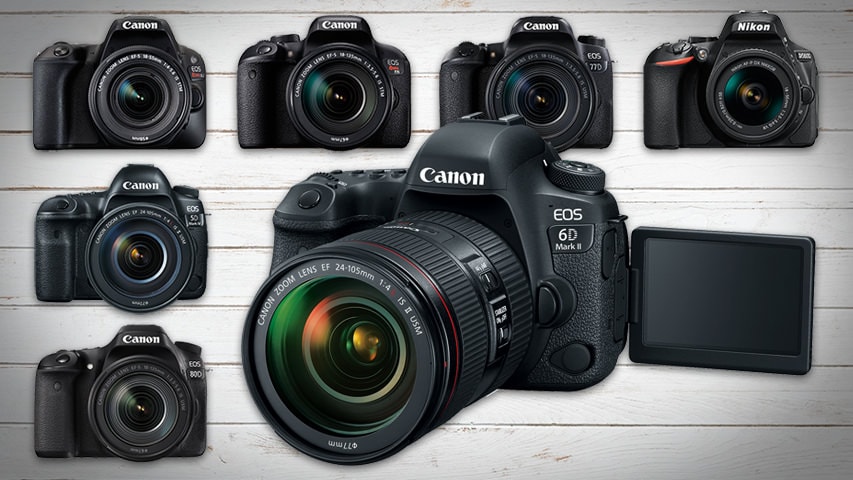
DSLR cameras are digital single-lens reflex cameras. Like 35mm film cameras of the past, DSLR cameras are built with an angled mirror inside its camera body. This mirror allows you to look into your camera’s optical viewfinder and see exactly what your camera sees.
The mirror inside a DSLR camera flips up out of the way when you open the shutter to allow light to reach the camera’s image sensor.
Check out our list of the 7 Best DSLR Cameras For Vlogging .
What is a Mirrorless Camera?
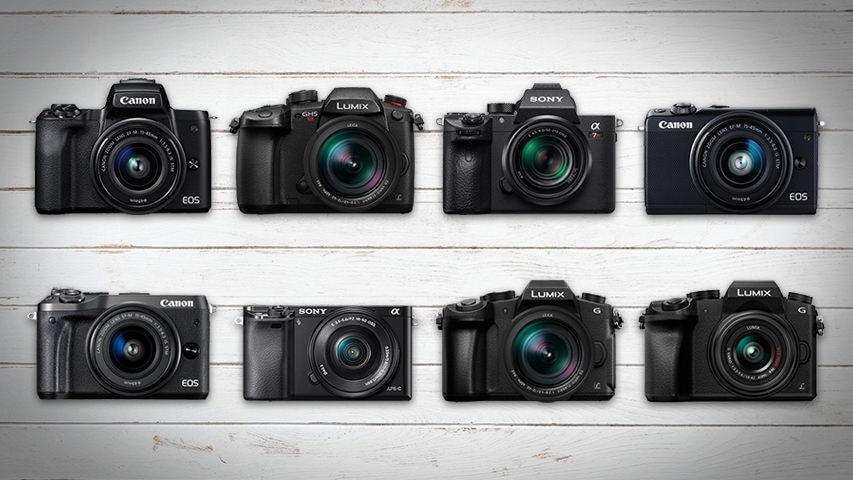
Mirrorless cameras are interchangeable lens cameras without a mirror inside the camera body. With nothing to reflect your image, you won’t find any optical viewfinder to look through to see exactly what your camera sees.
Light passes through the lens of a mirrorless camera and lands directly onto the camera’s sensor.
Check out our list of the 8 Best Mirrorless Cameras For Vlogging .
Mirrorless vs. DSLR - a Complete Comparison
Size and Weight
DSLR cameras are larger and heavier than mirrorless cameras because there are more parts that go into their camera bodies. DSLR cameras require enough space inside for an angled mirror to flip up out of the way.
If your video shooting style is more on-the-go, like that of a daily vlogger or travel vlogger, the smaller size and lighter weight of a mirrorless camera may be more suitable for you.
Previewing Images
When you’re using a DSLR camera, your optical viewfinder will show you exactly what your camera sees as opposed to a digital preview of what your image sensor picks up. No matter how bright or dark your scene actually is, through the optical viewfinder, you’ll be able to clearly see what your camera sees with the power of your eye.
Mirrorless cameras, on the other hand, display on your camera’s screen or electronic viewfinder a digital preview of what your camera is looking at. You will notice a lag, especially in low light, between actions that are taking place in front of the camera and the same actions being displayed in your live preview.
Lenses and Accessories
Having been around much longer, there are plenty more options for lenses and accessories when it comes to shooting with DSLR cameras. You can choose from all kinds of different quality levels and price ranges.
Video Resolution
4K video recording is more readily available in mirrorless cameras than DSLR cameras. At a much more affordable budget, you can get your hands on a 4K mirrorless camera. If you want to shoot 4K video on a DSLR camera, though, you will have to pay for some of the most expensive DSLR cameras on the market.
Image Stabilization
Up until quite recently, you needed to get the right lens with built-in optical image stabilization if you wanted to shoot stabilized photos and videos with an interchangeable lens camera. Image stabilization had not been readily available in the bodies of these cameras.
In recent years, however, mirrorless cameras have been much more active in their development of camera bodies equipped with shifting image sensors. Your shots can be even more stabilized when the optical image stabilization of your lens is combined with your camera’s in-body sensor-shift image stabilization.
Battery Life
When it comes to shooting video, DSLR cameras and mirrorless cameras consume about the same amount of power. It’s still safe to say, though, that DSLR cameras, for the most part, have better battery life than mirrorless cameras because their bigger batteries are packed with more power.
Mirrorless vs. DSLR - Which One is Better for Video?
In my opinion, when it comes to filming a video, mirrorless cameras are the way to go. In such a short time, mirrorless cameras have made huge leaps in their capabilities. It won’t be long before the ultimate vlogging camera comes out on the mirrorless market.
In the end, if you need to edit videos futhermore, try Filmora video editor . It’s a video editor which has significantly improved overall performance, making the product faster, and more powerful, and taking the user editing experience to a new level.
It is perfect for helping beginners, and intermediate users create stylish videos by providing an intuitive user interface and built-in effects.
![]()
Richard Bennett
Richard Bennett is a writer and a lover of all things video.
Follow @Richard Bennett
Richard Bennett
Oct 26, 2023• Proven solutions
If you’re looking to shoot your videos with interchangeable lenses, your camera set up will either have to have a mirrorless camera body or a DSLR camera body. In this post, I’ll be comparing the two camera body types for recording video.
- Part 1: What is a DSLR Camera?
- Part 2: What is a Mirrorless Camera?
- Part 3: Mirrorless vs. DSLR - a Complete Comparison
- Part 4: Mirrorless vs. DSLR - Which One is Better for Video?
What is a DSLR Camera?
DSLR cameras are digital single-lens reflex cameras. Like 35mm film cameras of the past, DSLR cameras are built with an angled mirror inside its camera body. This mirror allows you to look into your camera’s optical viewfinder and see exactly what your camera sees.
The mirror inside a DSLR camera flips up out of the way when you open the shutter to allow light to reach the camera’s image sensor.
Check out our list of the 7 Best DSLR Cameras For Vlogging .
What is a Mirrorless Camera?
Mirrorless cameras are interchangeable lens cameras without a mirror inside the camera body. With nothing to reflect your image, you won’t find any optical viewfinder to look through to see exactly what your camera sees.
Light passes through the lens of a mirrorless camera and lands directly onto the camera’s sensor.
Check out our list of the 8 Best Mirrorless Cameras For Vlogging .
Mirrorless vs. DSLR - a Complete Comparison
Size and Weight
DSLR cameras are larger and heavier than mirrorless cameras because there are more parts that go into their camera bodies. DSLR cameras require enough space inside for an angled mirror to flip up out of the way.
If your video shooting style is more on-the-go, like that of a daily vlogger or travel vlogger, the smaller size and lighter weight of a mirrorless camera may be more suitable for you.
Previewing Images
When you’re using a DSLR camera, your optical viewfinder will show you exactly what your camera sees as opposed to a digital preview of what your image sensor picks up. No matter how bright or dark your scene actually is, through the optical viewfinder, you’ll be able to clearly see what your camera sees with the power of your eye.
Mirrorless cameras, on the other hand, display on your camera’s screen or electronic viewfinder a digital preview of what your camera is looking at. You will notice a lag, especially in low light, between actions that are taking place in front of the camera and the same actions being displayed in your live preview.
Lenses and Accessories
Having been around much longer, there are plenty more options for lenses and accessories when it comes to shooting with DSLR cameras. You can choose from all kinds of different quality levels and price ranges.
Video Resolution
4K video recording is more readily available in mirrorless cameras than DSLR cameras. At a much more affordable budget, you can get your hands on a 4K mirrorless camera. If you want to shoot 4K video on a DSLR camera, though, you will have to pay for some of the most expensive DSLR cameras on the market.
Image Stabilization
Up until quite recently, you needed to get the right lens with built-in optical image stabilization if you wanted to shoot stabilized photos and videos with an interchangeable lens camera. Image stabilization had not been readily available in the bodies of these cameras.
In recent years, however, mirrorless cameras have been much more active in their development of camera bodies equipped with shifting image sensors. Your shots can be even more stabilized when the optical image stabilization of your lens is combined with your camera’s in-body sensor-shift image stabilization.
Battery Life
When it comes to shooting video, DSLR cameras and mirrorless cameras consume about the same amount of power. It’s still safe to say, though, that DSLR cameras, for the most part, have better battery life than mirrorless cameras because their bigger batteries are packed with more power.
Mirrorless vs. DSLR - Which One is Better for Video?
In my opinion, when it comes to filming a video, mirrorless cameras are the way to go. In such a short time, mirrorless cameras have made huge leaps in their capabilities. It won’t be long before the ultimate vlogging camera comes out on the mirrorless market.
In the end, if you need to edit videos futhermore, try Filmora video editor . It’s a video editor which has significantly improved overall performance, making the product faster, and more powerful, and taking the user editing experience to a new level.
It is perfect for helping beginners, and intermediate users create stylish videos by providing an intuitive user interface and built-in effects.
![]()
Richard Bennett
Richard Bennett is a writer and a lover of all things video.
Follow @Richard Bennett
Also read:
- [New] Create a YouTube Music Playlist on Web and Mobile - A Detailed Guidance
- [New] Engaging Viewers on YouTube Gaming Livestreams
- [Updated] 2024 Approved The Essential Guide to Early Success on YouTube Steer Clear of These Top 8 Pitfalls
- [Updated] A Year in the Market Top 15 Finance Videos
- [Updated] Cut the Boring, Watch These 15 Hilarious YouTube Bites
- [Updated] Mastering Image Upload YouTube Guide
- 2024 Approved Animator’s Playground Building Your Own Visual Treats
- 2024 Approved Channel Identity Constructing Memorable Templates for Gamers
- 2024 Approved Discovering 2023'S Cinematic Hidden Gems
- Full Guide to Hard Reset Your Poco C50 | Dr.fone
- Get a Taste of Victory: Free Soccer Management on Windows
- How to Screen Mirroring Samsung Galaxy M34 5G? | Dr.fone
- Philosophical Underpinnings and Societal Impacts of Comparing the Internet with a Public Library Model
- ProArt PA 329Q Review The Ultimate 4K Workstation Display for 2024
- Step-by-Step Guide: Adding Libdvdcss Support with HandBrake in macOS & Windows 10 for DVD Extraction
- Understanding the AV1 Standard: Comparing Benefits & Drawbacks with HEVC & VVC
- YouTube Recommended Videos - Block the Videos
- Title: [New] Crafting Content Masterpieces with These Essential YouTube Tips
- Author: Steven
- Created at : 2024-12-13 16:33:03
- Updated at : 2024-12-16 18:11:34
- Link: https://youtube-clips.techidaily.com/new-crafting-content-masterpieces-with-these-essential-youtube-tips/
- License: This work is licensed under CC BY-NC-SA 4.0.