
!["[New] Content Distribution Excellence Vimeo vs YouTube"](https://www.lifewire.com/thmb/2XDVyL2caIKeRAo1samzvy7xQM8=/400x300/filters:no_upscale():max_bytes(150000):strip_icc()/female-traveller-texting-at-airport-check-in-desk-142309131-5a0b352813f1290037c17caf.jpg)
"[New] Content Distribution Excellence Vimeo vs YouTube"
Content Distribution Excellence: Vimeo vs YouTube
Vimeo vs YouTube: Which is Better?

Ollie Mattison
Mar 27, 2024• Proven solutions
Lots of people nowadays use videos to share with people all around the world. Two of the main platforms are YouTube and Vimeo. This article tells you the difference between both so that you can decide which the best platform is for you. Whether you are a marketer, video producer or gamer you will find the information useful to find your target audience easily.
Also read:
Vimeo Basic, Vimeo Plus or Vimeo Pro: Which is Right for You?
Please watch the video below for more information:
Detailed View of YouTube and Vimeo
1 Communities
YouTube: When it comes to users YouTube comes out on top with over a billion views each and every month. You are able to interact with your viewers by using the comments and people are able to follow you so that they are notified of new videos and comments. As there is already a huge following on YouTube it’s easy to get a good following if you have great content. It’s harder to control public content which is a downside to using YouTube and there is very little customer support. With the comments being moderated rarely it can cause a distraction from your video. Businesses tend to internally block YouTube video’s which means you won’t get the viewings from people on their lunch breaks.

Vimeo: With higher quality content and no advertisements video owners can quickly build a valid following and gain comments from people that are contributing high value information. You have more detailed analytics which makes it easier to see where you are going wrong should you not have the following you want and you are able to use your own domain. With Google owning YouTube you are unlikely to get the same exposure you would, however the followers tend to be valid giving you a real idea of where you are going right or wrong. Because of the higher quality followers you are less likely to get negative or abusive comments when you use Vimeo, however it is a paid subscription with each tier giving you more space to upload.
2 Membership
YouTube: YouTube on the other hand is free for all to use because the main focus is getting their equity through advertisements. There is however the option to take out a subscription which is known as YouTube Red. This lets you watch as many video’s as you want without having to view the ads and also gets you the ability to download so you don’t have to go online to view your favourite videos, a music app and original programming facilities.
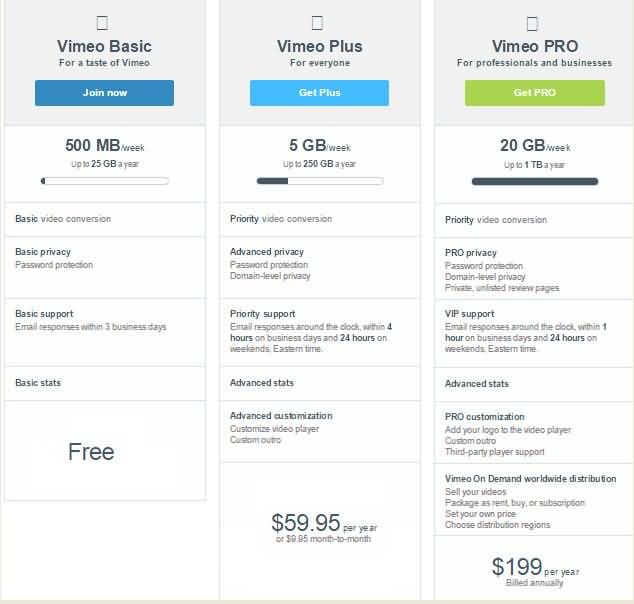
Vimeo: There are 4 different membership options with Vimeo allowing you to tailor it to your needs; there is the basic, plus, pro and business. The higher the cost, the greater level of support and storage capacity you will get. There is a free membership available but you will only be able to use up to 500MB each week.
3 Advertising
YouTube: What makes YouTube free is the fact they get their money from the advertisements they put not only on their sites but before video’s that people have to watch a set amount of seconds for before they can view their video of choice. This is great news if you are a marketer as it will allow you to reach out to viewers on video’s that are relevant to your brand/product/service, however for those that are viewing the sheer amount of ads can be off-putting.

Vimeo: As a paid subscription service and even the limited free package, you won’t have to view or show viewers ads, which means that your videos are more likely to be seen in their entirety not abandoned due to advertisements.
4 Updating video
YouTube: If you upload videos to YouTube you do not have the same benefits as the only way to amend a video is to take it down, delete it and re-upload a new one. This unfortunately takes with it any statistics such as views that you have gained. If you do choose YouTube for your videos then do make sure you check everything vigorously before you upload it as there’s no way to change it.
Vimeo: Occasionally an uploaded video may need some changes made. This could be due to changes to the offer you have or you have noticed something else that needs amending. With Vimeo if you need to update a video you can do so without losing the statistics it has already gained, which is great news if you notice an error later down the line or need to add or take something away.
Conclusion
When it comes down to making the final decision between using YouTube or Vimeo you will need to look at the type of audience you want to attract. With Vimeo you are more likely to attract creators and film makers, whereas with YouTube you will have a bigger audience to target which gives you a better chance of a higher rank on search engines.
Ollie Mattison
Ollie Mattison is a writer and a lover of all things video.
Follow @Ollie Mattison
Ollie Mattison
Mar 27, 2024• Proven solutions
Lots of people nowadays use videos to share with people all around the world. Two of the main platforms are YouTube and Vimeo. This article tells you the difference between both so that you can decide which the best platform is for you. Whether you are a marketer, video producer or gamer you will find the information useful to find your target audience easily.
Also read:
Vimeo Basic, Vimeo Plus or Vimeo Pro: Which is Right for You?
Please watch the video below for more information:
Detailed View of YouTube and Vimeo
1 Communities
YouTube: When it comes to users YouTube comes out on top with over a billion views each and every month. You are able to interact with your viewers by using the comments and people are able to follow you so that they are notified of new videos and comments. As there is already a huge following on YouTube it’s easy to get a good following if you have great content. It’s harder to control public content which is a downside to using YouTube and there is very little customer support. With the comments being moderated rarely it can cause a distraction from your video. Businesses tend to internally block YouTube video’s which means you won’t get the viewings from people on their lunch breaks.
Vimeo: With higher quality content and no advertisements video owners can quickly build a valid following and gain comments from people that are contributing high value information. You have more detailed analytics which makes it easier to see where you are going wrong should you not have the following you want and you are able to use your own domain. With Google owning YouTube you are unlikely to get the same exposure you would, however the followers tend to be valid giving you a real idea of where you are going right or wrong. Because of the higher quality followers you are less likely to get negative or abusive comments when you use Vimeo, however it is a paid subscription with each tier giving you more space to upload.
2 Membership
YouTube: YouTube on the other hand is free for all to use because the main focus is getting their equity through advertisements. There is however the option to take out a subscription which is known as YouTube Red. This lets you watch as many video’s as you want without having to view the ads and also gets you the ability to download so you don’t have to go online to view your favourite videos, a music app and original programming facilities.
Vimeo: There are 4 different membership options with Vimeo allowing you to tailor it to your needs; there is the basic, plus, pro and business. The higher the cost, the greater level of support and storage capacity you will get. There is a free membership available but you will only be able to use up to 500MB each week.
3 Advertising
YouTube: What makes YouTube free is the fact they get their money from the advertisements they put not only on their sites but before video’s that people have to watch a set amount of seconds for before they can view their video of choice. This is great news if you are a marketer as it will allow you to reach out to viewers on video’s that are relevant to your brand/product/service, however for those that are viewing the sheer amount of ads can be off-putting.
Vimeo: As a paid subscription service and even the limited free package, you won’t have to view or show viewers ads, which means that your videos are more likely to be seen in their entirety not abandoned due to advertisements.
4 Updating video
YouTube: If you upload videos to YouTube you do not have the same benefits as the only way to amend a video is to take it down, delete it and re-upload a new one. This unfortunately takes with it any statistics such as views that you have gained. If you do choose YouTube for your videos then do make sure you check everything vigorously before you upload it as there’s no way to change it.
Vimeo: Occasionally an uploaded video may need some changes made. This could be due to changes to the offer you have or you have noticed something else that needs amending. With Vimeo if you need to update a video you can do so without losing the statistics it has already gained, which is great news if you notice an error later down the line or need to add or take something away.
Conclusion
When it comes down to making the final decision between using YouTube or Vimeo you will need to look at the type of audience you want to attract. With Vimeo you are more likely to attract creators and film makers, whereas with YouTube you will have a bigger audience to target which gives you a better chance of a higher rank on search engines.
Ollie Mattison
Ollie Mattison is a writer and a lover of all things video.
Follow @Ollie Mattison
Mastering YT Video Tweaks with Windows Movie Maker
How to Edit YouTube videos in Windows Movie Maker

Richard Bennett
Mar 27, 2024• Proven solutions
We all know YouTube is an important platform for sharing and watching videos. Are you a YouTuber looking for how to edit YouTube video with the best YouTube movie maker? You have come the right place if you wonder how to edit a video for YouTube on Windows. While, if you have free Windows Movie Maker already installed on your computer, you can edit YouTube videos in Windows Movie Maker and then upload to YouTube directly. In this article, I will show you all the information you need to know about how to edit a video for YouTube in Windows Movie Maker with step by step.
You may also like : The Ultimate Guide to YouTube Video Editing Tools
In case that you do not have free Windows Movie Maker in your computer, you may need to download it from other website since Microsoft has removed the downloading link after January 2017. Please pay attention when downloading the Movie Maker application from website and never download it from untrusted website.
A better way to edit YouTube Videos - Wondershare Filmora supports many formats including MP4, MOV, MKV, and FLV, which means that you will not need to convert the files before and after editing. Like Windows Movie Maker, Wondershare Filmora is easy to use but comes with many more features that allow for professional-grade videos. One of these features is the animated text. There are also built-in presets that you can use to quickly edit your videos. There is also the option to directly upload a video to YouTube from Filmora, so no time is wasted waiting for a video to process.
 Download Mac Version ](https://tools.techidaily.com/wondershare/filmora/download/ )
It is hard to list all the information of how to use Filmora to edit YouTube videos here, but we have composed an article about how to edit videos, you can check How to Edit Video in Filmora: Beginners’ Guide .
Windows Movie Maker YouTube: How to Edit YouTube Videos?
Before editing the video in Windows Movie Maker , you have to make sure that the video format is supported by free Windows Movie Maker. As you may know that Window Movie Maker only accept the following file formats at importing: .WMV/.ASF, .MPG (MPEG-1), .AVI (DV-AVI), .WMA, .WAV, and .MP3. Importing formats such as MP4/3GP, FLV and MOV, are also supported you are running Windows 7 or later and you have installed the necessary codec as well.
If your videos are not supported at importing in Windows Movie Maker, you may need to converter it first or choose a video editor like Filmora video editor which supports the almost all popular formats.
Step 1: Import Video Files Into Windows Movie Maker

To import video or photo into Windows Movie Maker, you can click on the button Add Videos or Photos located at the top of the program. A file window will open, and you can select the videos from any area of your computer. Once you have the files selected, click OK to import the files to the storyboard in the right hand panel.
You can also choose to record a webcam on your windows 10 or windows 7 computer and use it as the material.

Step 2: Trim/Cut/Split/Combine videos in Windows Movie Maker
Preview the video clips in the preview box. You can always use the Previous Frame or Next Frame to preview video frame by frame. When editing a video for YouTube, you may need to trim to remove unwanted parts from the video , combine several clips into a new one or split the video into several smaller parts .
To remove any parts of the video that you do not want in the final version of the video, locate the start frame that you want to remove in the storyboard, and then click the Split button to get the starting point of the split segment, and then locate the end frame that you want to remove and click Split again. Right-click the split video clip you want to remove and select Remove from the context menu. This can be done as many times as you want.

Step 3: Apply Transitions and Visual Effects to YouTube Video
Once you have all the clips that you want in your video, you can then add transitions to the video. At the top of Windows Movie Maker, there is a button that says Animations. This will open a menu that has different options. You need to select the clip, and add the transition that you want. The program does the rest of the work. You can see how it looks by clicking play.

Applying visual effects, overlays and filters work in the same way, but you click on Visual Effects, which is located at the top of the window. You can apply effects to any clip as along as the clip is selected first.
Step 4: Edit/Mute Audio in Video or Add New Audio Sound
If you are planning on adding music to your video, you should think about muting the audio in video or decrease the audio volume in Video. Double click the video clip to enter the Edit panel, and then then click on Video Volume button. You can then mute the audio by drag the volume slider to the left end. Of course, you can adjust the video audio volume per your need. This will affect the all the sounds on that video clip. If you want to mute all the clips, you need to select all the clips, or you will end up with one clip with no sound, and the rest of the clips having sound.

Once the sound has been adjusted on the clips, you can add new audio sound to the video. You can record narrations for your YouTube video in Windows Movie Maker by clicking Record narration button in Home tab and add music to video by clicking Add music button and select the music to import it. You can add music from your computer or find new music sound from AudioMicro, Vimeo or Free Music Archive online.

After importing the new audio file for your YouTube video, you can now adjust the music volume. In the Music Tools tab, there is an Option tab, you can control the volume and other options about the music.

Step 5: Add Title and Text to Video for YouTube
Windows Movie Maker allows you to add different types of text freely. You will see 3 buttons that allow different types of text to video: stationary title, captions and rolling credits. Click on Title, you can add text before the video begins; select Caption, you will write text to the video frames; and click Credits will add end credits to the end of the video.

After selecting the type of text you want, you can enter your text and edit the text effects. You can change the text duration and apply text visual effects, and change the text outline size and more.

Check the detailed information of How to Add Text in Windows Movie Maker .
Step 6: Save and Publish
Once all the edits are done, you can save the video by clicking on File then clicking on Publish Movie. You will need to select where you want to save the file and the file type. Since we are editing videos for YouTube, choose YouTube to upload the edited video to YouTube. You can also save the video in computer with different formats, resolution or burn to DVD. Windows Movie Maker also allows you to save the Video for Email or for mobile devices.

Conclusion
That’s it. That’s how you can edit your YouTube video with Windows Movie Maker. It is a great YouTube video editor to make video with various features. However, you may consider other YouTube movie maker as it won’t updated. Why not try Filmora. It is one of the best movie editor for YouTube. Download it now to have a try!
Download Mac Version ](https://tools.techidaily.com/wondershare/filmora/download/ )
Richard Bennett
Richard Bennett is a writer and a lover of all things video.
Follow @Richard Bennett
Richard Bennett
Mar 27, 2024• Proven solutions
We all know YouTube is an important platform for sharing and watching videos. Are you a YouTuber looking for how to edit YouTube video with the best YouTube movie maker? You have come the right place if you wonder how to edit a video for YouTube on Windows. While, if you have free Windows Movie Maker already installed on your computer, you can edit YouTube videos in Windows Movie Maker and then upload to YouTube directly. In this article, I will show you all the information you need to know about how to edit a video for YouTube in Windows Movie Maker with step by step.
You may also like : The Ultimate Guide to YouTube Video Editing Tools
In case that you do not have free Windows Movie Maker in your computer, you may need to download it from other website since Microsoft has removed the downloading link after January 2017. Please pay attention when downloading the Movie Maker application from website and never download it from untrusted website.
A better way to edit YouTube Videos - Wondershare Filmora supports many formats including MP4, MOV, MKV, and FLV, which means that you will not need to convert the files before and after editing. Like Windows Movie Maker, Wondershare Filmora is easy to use but comes with many more features that allow for professional-grade videos. One of these features is the animated text. There are also built-in presets that you can use to quickly edit your videos. There is also the option to directly upload a video to YouTube from Filmora, so no time is wasted waiting for a video to process.
Download Mac Version ](https://tools.techidaily.com/wondershare/filmora/download/ )
It is hard to list all the information of how to use Filmora to edit YouTube videos here, but we have composed an article about how to edit videos, you can check How to Edit Video in Filmora: Beginners’ Guide .
Windows Movie Maker YouTube: How to Edit YouTube Videos?
Before editing the video in Windows Movie Maker , you have to make sure that the video format is supported by free Windows Movie Maker. As you may know that Window Movie Maker only accept the following file formats at importing: .WMV/.ASF, .MPG (MPEG-1), .AVI (DV-AVI), .WMA, .WAV, and .MP3. Importing formats such as MP4/3GP, FLV and MOV, are also supported you are running Windows 7 or later and you have installed the necessary codec as well.
If your videos are not supported at importing in Windows Movie Maker, you may need to converter it first or choose a video editor like Filmora video editor which supports the almost all popular formats.
Step 1: Import Video Files Into Windows Movie Maker
To import video or photo into Windows Movie Maker, you can click on the button Add Videos or Photos located at the top of the program. A file window will open, and you can select the videos from any area of your computer. Once you have the files selected, click OK to import the files to the storyboard in the right hand panel.
You can also choose to record a webcam on your windows 10 or windows 7 computer and use it as the material.
Step 2: Trim/Cut/Split/Combine videos in Windows Movie Maker
Preview the video clips in the preview box. You can always use the Previous Frame or Next Frame to preview video frame by frame. When editing a video for YouTube, you may need to trim to remove unwanted parts from the video , combine several clips into a new one or split the video into several smaller parts .
To remove any parts of the video that you do not want in the final version of the video, locate the start frame that you want to remove in the storyboard, and then click the Split button to get the starting point of the split segment, and then locate the end frame that you want to remove and click Split again. Right-click the split video clip you want to remove and select Remove from the context menu. This can be done as many times as you want.
Step 3: Apply Transitions and Visual Effects to YouTube Video
Once you have all the clips that you want in your video, you can then add transitions to the video. At the top of Windows Movie Maker, there is a button that says Animations. This will open a menu that has different options. You need to select the clip, and add the transition that you want. The program does the rest of the work. You can see how it looks by clicking play.
Applying visual effects, overlays and filters work in the same way, but you click on Visual Effects, which is located at the top of the window. You can apply effects to any clip as along as the clip is selected first.
Step 4: Edit/Mute Audio in Video or Add New Audio Sound
If you are planning on adding music to your video, you should think about muting the audio in video or decrease the audio volume in Video. Double click the video clip to enter the Edit panel, and then then click on Video Volume button. You can then mute the audio by drag the volume slider to the left end. Of course, you can adjust the video audio volume per your need. This will affect the all the sounds on that video clip. If you want to mute all the clips, you need to select all the clips, or you will end up with one clip with no sound, and the rest of the clips having sound.
Once the sound has been adjusted on the clips, you can add new audio sound to the video. You can record narrations for your YouTube video in Windows Movie Maker by clicking Record narration button in Home tab and add music to video by clicking Add music button and select the music to import it. You can add music from your computer or find new music sound from AudioMicro, Vimeo or Free Music Archive online.
After importing the new audio file for your YouTube video, you can now adjust the music volume. In the Music Tools tab, there is an Option tab, you can control the volume and other options about the music.
Step 5: Add Title and Text to Video for YouTube
Windows Movie Maker allows you to add different types of text freely. You will see 3 buttons that allow different types of text to video: stationary title, captions and rolling credits. Click on Title, you can add text before the video begins; select Caption, you will write text to the video frames; and click Credits will add end credits to the end of the video.
After selecting the type of text you want, you can enter your text and edit the text effects. You can change the text duration and apply text visual effects, and change the text outline size and more.
Check the detailed information of How to Add Text in Windows Movie Maker .
Step 6: Save and Publish
Once all the edits are done, you can save the video by clicking on File then clicking on Publish Movie. You will need to select where you want to save the file and the file type. Since we are editing videos for YouTube, choose YouTube to upload the edited video to YouTube. You can also save the video in computer with different formats, resolution or burn to DVD. Windows Movie Maker also allows you to save the Video for Email or for mobile devices.
Conclusion
That’s it. That’s how you can edit your YouTube video with Windows Movie Maker. It is a great YouTube video editor to make video with various features. However, you may consider other YouTube movie maker as it won’t updated. Why not try Filmora. It is one of the best movie editor for YouTube. Download it now to have a try!
Download Mac Version ](https://tools.techidaily.com/wondershare/filmora/download/ )
Richard Bennett
Richard Bennett is a writer and a lover of all things video.
Follow @Richard Bennett
Also read:
- [Updated] Achieve Financial Success with YouTube Ad Profit Techniques
- Uncover the Top 7 Android Alternatives for Ad-Free Browsing
- Direct Conversion of Spotify Music 5 Tools for YouTube Streaming
- In 2024, Effortless Repetition Replay Your YouTube Videos via TV Connection
- [New] 8 Tips on How to Vlog Confidently Like Popular YouTubers
- In 2024, Boost Engagement Advanced YouTube Tag Strategies Revealed
- YouTube Video Magic Advanced Editing with Premiere Pro
- 2024 Approved Elevate Streams Using YouTube's AV1 Settings
- Discovering How YouTube Runs Its Creator Workshop for 2024
- Quick & Detailed Guide to iPhone/iPad for YouTube Video Uploading
- Channel Growth Hacks – The Ultimate List of 5 YouTube Strategies
- Creating Simple Videos Top 10 YouTube Projects Anyone Can Do
- Learn How to Add YouTube Video to Google Slides for 2024
- Crafting Easy YouTube Animation Subscribe Bars in Filmora for 2024
- [New] Erase Unwanted Boards From Old YouTube Videos for Clearer Viewing
- Perfecting Proportions Understanding YouTube Video Sizes
- [Updated] Designing a Personalized YouTube Subscribe Link
- The Ultimate Collection of Top ASMR Microphones
- 2024 Approved Cutting Edge Techniques YouTube Trailers Through Filmora's Lens
- Downloading the Latest Hits Top YouTube Playlist Savers for PC for 2024
- 2024 Approved Enhancing YouTube Videos with Professional Techniques Using WMM
- Engaging YouTube Summaries with Tailored Templates for 2024
- Business Mastery Through YouTube's Top Ten Channels for 2024
- [Updated] Essential Strategies for Professional-Grade Video Editing
- Compreran Yoga Moves? Check Out Top 10 YouTube Channels for 2024
- Speedy Tutorial Crafting YouTube Image Thumbnails From Scratch
- Unleash Your SEO Potential Explore the Most Effective 7 Free Video Tags Extractors
- Transform Your Video Calls Google Meet on YouTube Guide
- In 2024, Avoiding Pitfalls Understanding YouTube Standards
- [Updated] Essentials Checklist - What You Must Know Before Sharing 4K Videos on Youtube
- Captivating Viewers with Youtube's Visual Polishing
- [Updated] Achieve Professional Aesthetics Embedding Watermarks & Branding in Videos
- In 2024, Customizing Your Watch The Art of Altering YouTube Video Pace
- [Updated] Creating Momentum in Life Coaching Video Series
- In 2024, Connecting YouTube & TikTok Your Ultimate Step-by-Step Walkthrough
- [New] Choosing Your Best GIF Creator A Comparative Analysis
- In 2024, Cut Costs, Enhance Visuals – Free Banners for Video Makers
- [Updated] Best Tales for YouTube Triumph Top 3 Strategies
- 2024 Approved Entering the VTuber Universe Beginning Stages & Possibilities?
- Transforming Mobile Devices Into Business & Personal Video Platforms
- Diving Deep Into Youtube Launching and Earning Your Way
- In 2024, Crafting Your Custom YouTube Subscriber URL
- Navigating the World of Content Delivery A Comprehensive Video Upload Guide for YouTube
- [New] Channel Upgrade Smartphone Techniques for Professional Videos
- Post Youtube Video on the Best Days to Get More View for 2024
- Building a Business From Blogs and Video Reviews for 2024
- Direct the Degrees Cutting-Edge YouTube Video Manipulation
- [Updated] Capturing Screens A Laptop's Webcam Journey
- Updated 2024 Approved Tidal Transformations Using Discords Clownfish Voice Filter for a Unique Skype Experience
- 2024 Approved IMovie Basics for New Users How to Seamlessly Add Sounds and Music
- [New] Unlock Potential Innovating with Effective Instagram Video Loops for 2024
- New Top 10 Free & Paid Tools for Converting Podcasts Into Written Format for 2024
- 2024 Approved Animation Mastery 8 Elite Software Options for Mac and Windows Users
- Updated Mastering Aspect Ratios in Final Cut Pro A Beginners Guide for 2024
- New 2024 Approved Expert Recommendations Leveraging Voxels Voice Manipulation Feature to Boost Your Discord Experience
- Updated In 2024, Find Out the Best Animated Text Video Tools and Learn How to Animate Text in a Video in Simple Steps. Discover the Best Fonts to Animate Text Along with the Text Animation Templates
- How to Retrieve deleted photos on Sony
- Here Are Some Reliable Ways to Get Pokemon Go Friend Codes For Apple iPhone X | Dr.fone
- In 2024, Superior Top Ten Nintendo Switch Combat Games (Max 156)
- [New] Unveiling Audible Tweets Within Social Media Videos
- [New] In 2024, Strategic Hashtag Usage for Enhanced Visibility on TikTok
- New 2024 Approved Takeaways From the Top OGG Converter
- Updated The Ultimate List Top Video Brightening Apps for Android and iOS for 2024
- 5 Solutions For Xiaomi Redmi K70 Unlock Without Password
- New The Soft-Spoken Symphony Candid Choirs and Soloists in Sadness for 2024
- Comparing Huawei P10 with Industry Standards of Smartphones
- [New] Inside Secrets Everything About Discord Stickers for 2024
- 2024 Approved Locating Videogame SFX Archives Online
- Ways to trade pokemon go from far away On Sony Xperia 1 V? | Dr.fone
- Elevate Content Impact Exclusive Access to the Best 20 TikTok Caption Hacks for 2024
- New Free 3D Animation Software Is Not Easy to Find. Some Makers Are Even Free and Simple. If You Want to Know Which Are the 8 Best 3D Animation Software, Check It Out for 2024
- [Updated] 2024 Approved FreezeFrame Stop & Screen Retain Guide
- Updated Windows Movie Maker Free Download The Ultimate User Guide for 2024
- Updated Streamline Your Workflow Best Low-Resource Video Editors
- Title: "[New] Content Distribution Excellence Vimeo vs YouTube"
- Author: Steven
- Created at : 2024-05-25 20:05:17
- Updated at : 2024-05-26 20:05:17
- Link: https://youtube-clips.techidaily.com/new-content-distribution-excellence-vimeo-vs-youtube/
- License: This work is licensed under CC BY-NC-SA 4.0.
