![[New] Building a Successful Online Presence WireCast Streaming to Youtube](https://thmb.techidaily.com/51abaf027a31735325c9f76686dddc367d5ab57a5b37d142ebd628755c0e5ec6.jpg)
"[New] Building a Successful Online Presence WireCast Streaming to Youtube"
Building a Successful Online Presence: WireCast Streaming to Youtube
How to live stream to youtube with wirecast?

Richard Bennett
Mar 27, 2024• Proven solutions
Are you trying to use wirecast to stream to youtube? You are in the right place, here is our step by step guide to go live on youtube with wirecast.
Step 1: First of all you need to login to your YouTube Creator Studio and then select Live Streaming option from available options on your screen.
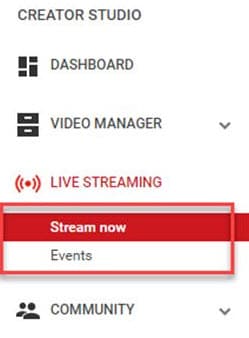
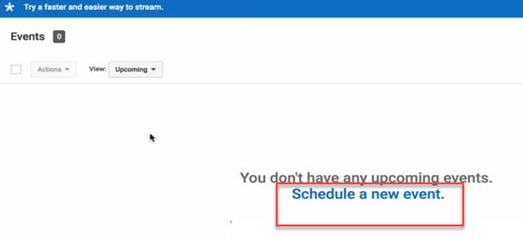
Step 2: Once you enter into the live streaming option then your application will ask you to schedule a new event; follow this option.
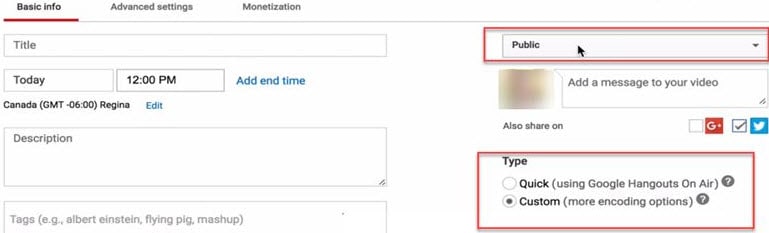
Step 3: Now you need to enter few basic details about your video that you are going to live stream. Do not forget to choose custom option under the Type category available on bottom right side of screen.
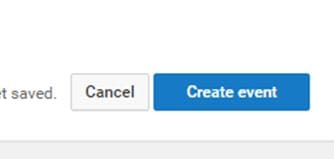
Step 4: It is time to hit the create event option.
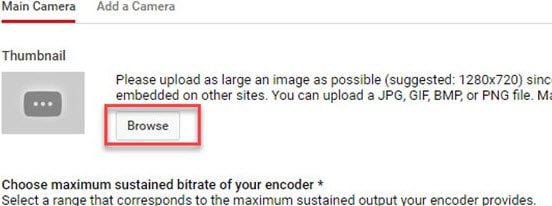
Step 5: Your system will now take you to the camera settings; here you need to enter your thumbnail. It can be done directly by using browse option.
Step 6: Now you need to select ‘basic ingestion’ option and secondly select ‘other encoders’ option from second set of information.

Step 7: Once you have completed above settings then you need to save all the changes and then move to the live control room on your screen.
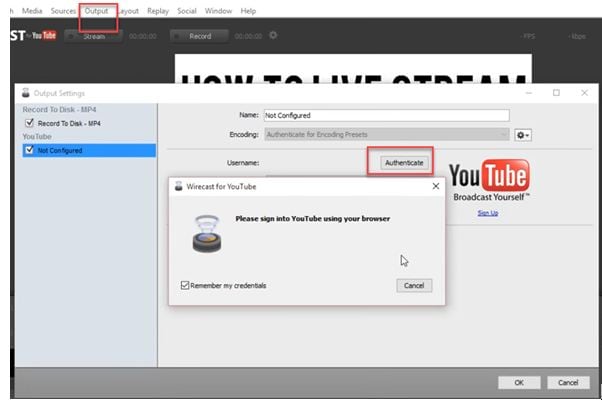
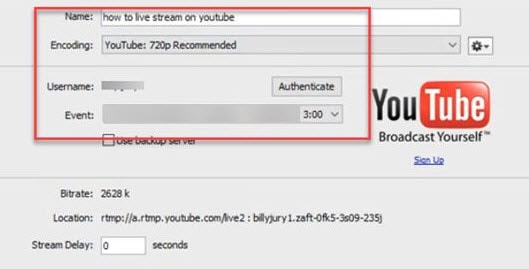
Step 8: Open the wirecast software tool on your device and then simply move to the output settings. Hit the authenticate option, it will soon ask you to enter the YouTube login detail.
Step 9: As soon as you sign in with your account using browser, then your settings will be ready on screen. Simply hit Ok.
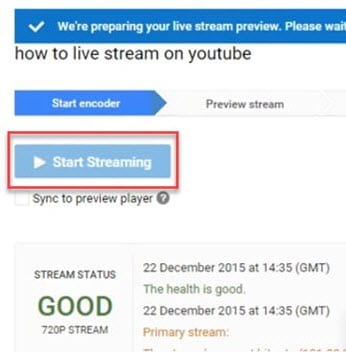
Step 10: It is time to make your video source or content ready for streaming. You need to hit on the stream button that is available on top portion of screen.

Step 11: Now simply move to the YouTube event page and start streaming your content.
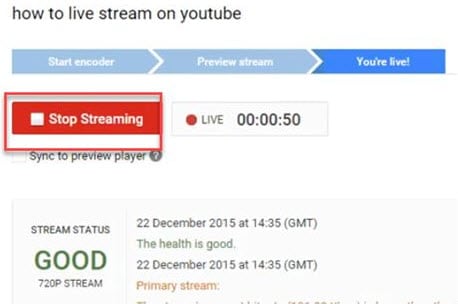
Step 12: Once you content for streaming is finished then click the stop streaming button that appears in red color on screen. You will also get information about duration of your video that is going live.
Step 13: When your streaming process ends then video will be saved to video manager. You can view it easily at later stage.
Richard Bennett
Richard Bennett is a writer and a lover of all things video.
Follow @Richard Bennett
Richard Bennett
Mar 27, 2024• Proven solutions
Are you trying to use wirecast to stream to youtube? You are in the right place, here is our step by step guide to go live on youtube with wirecast.
Step 1: First of all you need to login to your YouTube Creator Studio and then select Live Streaming option from available options on your screen.
Step 2: Once you enter into the live streaming option then your application will ask you to schedule a new event; follow this option.
Step 3: Now you need to enter few basic details about your video that you are going to live stream. Do not forget to choose custom option under the Type category available on bottom right side of screen.
Step 4: It is time to hit the create event option.
Step 5: Your system will now take you to the camera settings; here you need to enter your thumbnail. It can be done directly by using browse option.
Step 6: Now you need to select ‘basic ingestion’ option and secondly select ‘other encoders’ option from second set of information.
Step 7: Once you have completed above settings then you need to save all the changes and then move to the live control room on your screen.
Step 8: Open the wirecast software tool on your device and then simply move to the output settings. Hit the authenticate option, it will soon ask you to enter the YouTube login detail.
Step 9: As soon as you sign in with your account using browser, then your settings will be ready on screen. Simply hit Ok.
Step 10: It is time to make your video source or content ready for streaming. You need to hit on the stream button that is available on top portion of screen.
Step 11: Now simply move to the YouTube event page and start streaming your content.
Step 12: Once you content for streaming is finished then click the stop streaming button that appears in red color on screen. You will also get information about duration of your video that is going live.
Step 13: When your streaming process ends then video will be saved to video manager. You can view it easily at later stage.
Richard Bennett
Richard Bennett is a writer and a lover of all things video.
Follow @Richard Bennett
A Compreehensive Guide to YouTube Thumbnail Creation (Mac)
How to Make a YouTube Thumbnail On Mac

Shanoon Cox
Oct 26, 2023• Proven solutions
As a Youtuber, the first thing you would want is to achieve is a high number of views on your videos. One of the most crucial factors that determine whether the video will be a success or not is the thumbnail.
You need to design an attractive youtube custom thumbnail as it can up your game and get you significantly more views. this calls for you to exercise your artistic skills to the best, to be able to create thumbnails that make it almost irresistible for the viewers to scroll down without watching the video.
However, if you are wondering how that can be achieved then fret no longer for this article will explain the simple process of creating youtube thumbnails easily. All you need is a capable thumbnail maker like FilmoraX that can do it all for you in one automagical flourish!

What is a Youtube Thumbnail?
A youtube thumbnail is a smaller version of the video, a snapshot that you choose as a preview of your video. A Thumbnail is extremely important because it is essentially the outer packaging of your video; its front cover.
Much like the cover of a book, a thumbnail has to be attractive so that it can tempt your potential viewers to stop and watch your video while they are scrolling on youtube.
thumbnails are a significant factor in determining the number of views a Youtuber gets on his videos.
If you don’t create a thumbnail then youtube will generate one by itself which may not be so enticing for viewers. The purpose of the thumbnail is to make your videos stand out among the rest so you need to pay attention to it!
How to make Youtube Thumbnails on Mac
You can easily create interesting thumbnails for youtube videos using a thumbnail maker likeFilmoraX . Here is a step by step guide:
1. Preview the video and choose the still snapshot
The first step in creating a thumbnail is to import the final video into the FilmoraX editor on your MacBook.

Then, use the thumbnail editor to play your video and choose the snapshot that you want to be appearing as your thumbnail.
You can easily choose the frame from the video or use the preview frame button to view the frames one by one!

2. Add text, shape, and image overlays
Once you’ve chosen the frame for the thumbnail, the next step would be to add text to it to catch the attention of the audience. You can also adjust the thumbnail size as per your requirement, however, the ideal size would be 1280x720 pixels with a minimum width of 640 pixels.

3. Add effects
FilmoraX has a wide range of effects that you can apply to your videos or pictures to make them look more attractive.

4. Save the thumbnail
After you are done with all the editing, the final step would be to save the youtube thumbnail by hitting the save button.
Once you save you’ll see how your thumbnail will feature on different platforms like Facebook, Youtube, and Twitter.
So, using this thumbnail maker you can easily create custom thumbnails for your videos!
Conclusion
Hopefully, the above-mentioned steps have given you enough insight and clarity on making creative and good youtube thumbnails. Using FilmoraX will further simplify the process for you with its amazing tools and features!


Shanoon Cox
Shanoon Cox is a writer and a lover of all things video.
Follow @Shanoon Cox
Shanoon Cox
Oct 26, 2023• Proven solutions
As a Youtuber, the first thing you would want is to achieve is a high number of views on your videos. One of the most crucial factors that determine whether the video will be a success or not is the thumbnail.
You need to design an attractive youtube custom thumbnail as it can up your game and get you significantly more views. this calls for you to exercise your artistic skills to the best, to be able to create thumbnails that make it almost irresistible for the viewers to scroll down without watching the video.
However, if you are wondering how that can be achieved then fret no longer for this article will explain the simple process of creating youtube thumbnails easily. All you need is a capable thumbnail maker like FilmoraX that can do it all for you in one automagical flourish!
What is a Youtube Thumbnail?
A youtube thumbnail is a smaller version of the video, a snapshot that you choose as a preview of your video. A Thumbnail is extremely important because it is essentially the outer packaging of your video; its front cover.
Much like the cover of a book, a thumbnail has to be attractive so that it can tempt your potential viewers to stop and watch your video while they are scrolling on youtube.
thumbnails are a significant factor in determining the number of views a Youtuber gets on his videos.
If you don’t create a thumbnail then youtube will generate one by itself which may not be so enticing for viewers. The purpose of the thumbnail is to make your videos stand out among the rest so you need to pay attention to it!
How to make Youtube Thumbnails on Mac
You can easily create interesting thumbnails for youtube videos using a thumbnail maker likeFilmoraX . Here is a step by step guide:
1. Preview the video and choose the still snapshot
The first step in creating a thumbnail is to import the final video into the FilmoraX editor on your MacBook.
Then, use the thumbnail editor to play your video and choose the snapshot that you want to be appearing as your thumbnail.
You can easily choose the frame from the video or use the preview frame button to view the frames one by one!
2. Add text, shape, and image overlays
Once you’ve chosen the frame for the thumbnail, the next step would be to add text to it to catch the attention of the audience. You can also adjust the thumbnail size as per your requirement, however, the ideal size would be 1280x720 pixels with a minimum width of 640 pixels.
3. Add effects
FilmoraX has a wide range of effects that you can apply to your videos or pictures to make them look more attractive.
4. Save the thumbnail
After you are done with all the editing, the final step would be to save the youtube thumbnail by hitting the save button.
Once you save you’ll see how your thumbnail will feature on different platforms like Facebook, Youtube, and Twitter.
So, using this thumbnail maker you can easily create custom thumbnails for your videos!
Conclusion
Hopefully, the above-mentioned steps have given you enough insight and clarity on making creative and good youtube thumbnails. Using FilmoraX will further simplify the process for you with its amazing tools and features!
Shanoon Cox
Shanoon Cox is a writer and a lover of all things video.
Follow @Shanoon Cox
Also read:
- [New] 2024 Approved Captivating Snaps with Snapchat’s Colorful Cartoon Lens
- [New] Short Film Script Example
- [Updated] In 2024, Maximizing Android Video Brilliance Simple Steps
- 2024 Approved Deciphering the Language of YouTube Live Images
- 2024 Approved Enjoy Endless Creativity Discover the Best in Cheap, Online Video Downloading
- A Deep Dive Into YouTube’ Writers' Workshop Space for 2024
- A Stepwise Approach to YouTube Caption Addition
- Amplifying Impact YouTube Visibility Techniques
- Audiences on the Move Tracker Apps for 2024
- Easy Steps to Successfully Run Handbrake on Windows 10 or 11
- Effective Steps for Purging Browser Cache on Popular Internet Explorers
- Generating Funny Images Through Adobe for 2024
- Step-by-Step Fix for 'EntryPointMissing' Error on Your Windows PC
- Trouble with Netflix? Try These 19 Handy Solutions Specifically for Your LG Smart TV
- Title: [New] Building a Successful Online Presence WireCast Streaming to Youtube
- Author: Steven
- Created at : 2024-12-19 16:02:05
- Updated at : 2024-12-25 16:02:51
- Link: https://youtube-clips.techidaily.com/new-building-a-successful-online-presence-wirecast-streaming-to-youtube/
- License: This work is licensed under CC BY-NC-SA 4.0.