![[New] Building a Strong Online Presence with Attractive Video Thumbnails](https://thmb.techidaily.com/2b5408cdd9aa5a17f9e7b91e863fefaf73cf6e1aca47c82b58449d867a0d4a44.jpg)
[New] Building a Strong Online Presence with Attractive Video Thumbnails
Building a Strong Online Presence with Attractive Video Thumbnails
How to Make Video Thumbnails for YouTube

Richard Bennett
Oct 26, 2023• Proven solutions
The video thumbnails you use for YouTube are vital to getting views and subscribers. There are a lot of things that go into making people watch your videos, but your video thumbnail might be the most important factor.
Here are 5 easy tips for creating thumbnails that get views.
- Have a Consistent Layout
- Use Your Face
- Use Graphics/Emojis That is On Topic
- Make Your Text Huge
- Keep It Clutter-Free!
Contest now closed.
Edit Your Videos Before Creating Video Thumbnails


1. Have a Consistent Layout
Your thumbnails all must look like part of the same set. You want viewers to recognize your videos like yours, and they are more likely to do that if you build up a standard layout that they can start associating with you.
An example of a standard layout could be you in the middle of the screen wearing an expression that matches the theme of your video, with your title written underneath your face. Every individual thumbnail would still be different, but you and the text would always be in the same spot.
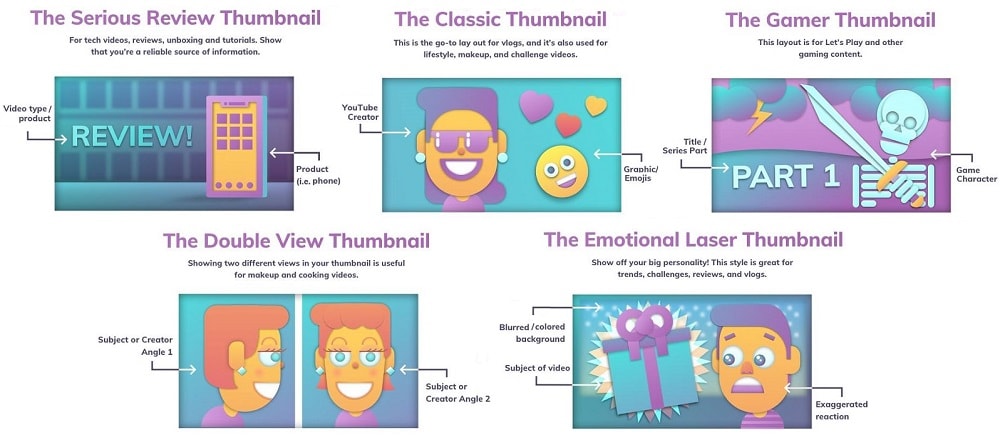
2. Use Your Face
People feel automatically connected and drawn into images that make eye contact. This makes thumbnails which feature faces more click-able than thumbnails which don’t, in most genres (i.e. if you make food videos then this may not apply – featuring the food might be more important than featuring your face). Check out more tips like this here .
Also, if somebody recognizes you in your thumbnail from a previous video of yours, that will go a long way towards making them click.
3. Use Graphics/Emojis that are On Topic
Anybody can take a screenshot of themselves in their video and use it as a thumbnail. To make your thumbnails look polished, consider using small images (like emojis or hearts) to stand out. This will add color and personality to your thumbnail.
Make sure the images you choose are relevant to the topic of your video.
4. Make Your Text Huge
If you use text in your thumbnail (you don’t have to) then it should be to add context. For example, if the main image is just you smiling then you might need some text to let viewers know the video is a makeup tutorial.
Thumbnails might look large while you’re putting them together in your image editor, but when they’re displayed on YouTube they’re a lot smaller. That goes double if a viewer is watching on their phone. So, make sure that any text you use is large enough that it can be read easily on small screens.
5. Keep it Clutter-Free
It’s great to add text and emojis to your thumbnails, but you do need to be careful not to add too much. You never want your thumbnails to look cluttered. Viewers should be able to glance at your thumbnails and know exactly what kind of video to expect – that’s difficult to do if there’s too much to process.
A good rule for text is to use only 1-3 words. That way they won’t clutter your screen, and you can make them large enough to read on small-screened devices.
For even more tips on making great YouTube thumbnails, click here .
Use these tips to make video thumbnails for YouTube, and tell us what kind of results you get!
Richard Bennett
Richard Bennett is a writer and a lover of all things video.
Follow @Richard Bennett
Richard Bennett
Oct 26, 2023• Proven solutions
The video thumbnails you use for YouTube are vital to getting views and subscribers. There are a lot of things that go into making people watch your videos, but your video thumbnail might be the most important factor.
Here are 5 easy tips for creating thumbnails that get views.
- Have a Consistent Layout
- Use Your Face
- Use Graphics/Emojis That is On Topic
- Make Your Text Huge
- Keep It Clutter-Free!
Contest now closed.
Edit Your Videos Before Creating Video Thumbnails
1. Have a Consistent Layout
Your thumbnails all must look like part of the same set. You want viewers to recognize your videos like yours, and they are more likely to do that if you build up a standard layout that they can start associating with you.
An example of a standard layout could be you in the middle of the screen wearing an expression that matches the theme of your video, with your title written underneath your face. Every individual thumbnail would still be different, but you and the text would always be in the same spot.
2. Use Your Face
People feel automatically connected and drawn into images that make eye contact. This makes thumbnails which feature faces more click-able than thumbnails which don’t, in most genres (i.e. if you make food videos then this may not apply – featuring the food might be more important than featuring your face). Check out more tips like this here .
Also, if somebody recognizes you in your thumbnail from a previous video of yours, that will go a long way towards making them click.
3. Use Graphics/Emojis that are On Topic
Anybody can take a screenshot of themselves in their video and use it as a thumbnail. To make your thumbnails look polished, consider using small images (like emojis or hearts) to stand out. This will add color and personality to your thumbnail.
Make sure the images you choose are relevant to the topic of your video.
4. Make Your Text Huge
If you use text in your thumbnail (you don’t have to) then it should be to add context. For example, if the main image is just you smiling then you might need some text to let viewers know the video is a makeup tutorial.
Thumbnails might look large while you’re putting them together in your image editor, but when they’re displayed on YouTube they’re a lot smaller. That goes double if a viewer is watching on their phone. So, make sure that any text you use is large enough that it can be read easily on small screens.
5. Keep it Clutter-Free
It’s great to add text and emojis to your thumbnails, but you do need to be careful not to add too much. You never want your thumbnails to look cluttered. Viewers should be able to glance at your thumbnails and know exactly what kind of video to expect – that’s difficult to do if there’s too much to process.
A good rule for text is to use only 1-3 words. That way they won’t clutter your screen, and you can make them large enough to read on small-screened devices.
For even more tips on making great YouTube thumbnails, click here .
Use these tips to make video thumbnails for YouTube, and tell us what kind of results you get!
Richard Bennett
Richard Bennett is a writer and a lover of all things video.
Follow @Richard Bennett
Breaking Into Livestrances: A Gamers’ Guide to YouTube Success
How to Live Stream on YouTube Gaming?
Richard Bennett
Mar 27, 2024• Proven solutions
1. Live Stream on YouTube Gaming with OBS
You need to follow these simple Step s to use OBS for YouTube Live Streaming:
**Step 1:**First of all you need to login to your YouTube account. You might be aware of the fact that same YouTube account is used for YouTube gaming needs.
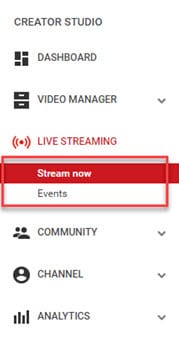
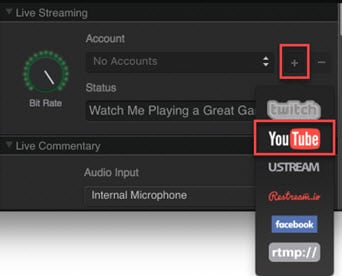
**Step 2:**Once entered inside your account then you need to visit the Go live streaming options and then from drop down menu simply choose Stream Now option.
**Step 3:**It is time to fill the details on screen; put impressive words for your live stream description so that it can grab attention of more viewers. Then select category as ‘Gaming’.

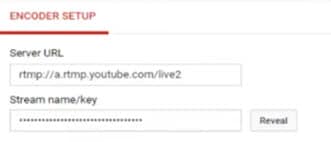
**Step 4:**Now you need to copy the stream key.
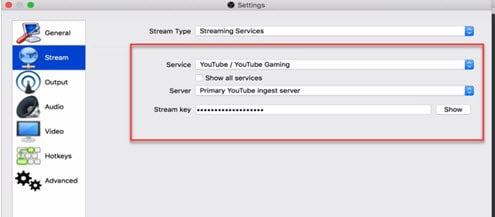
**Step 5:**Now open your OBS tool and then select YouTube as your active game streaming service. Users here need to paste that copied streaming key of Step 5 into the space provided on OBS settings page.
**Step 6:**It is time to make your desktop a video source.
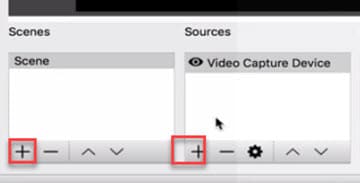
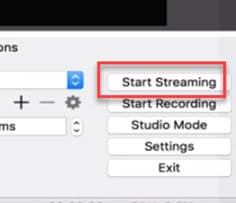
**Step 7:**Once all these settings are completed then you need to hit the start streaming option.
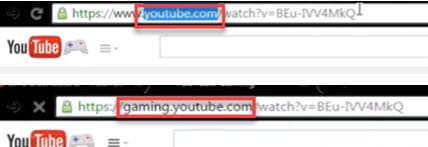
**Step 8:**The service may take few seconds to bring your live on YouTube and after this small duration you will be connected to your channel with your streamed content. Then change your url from youtube.com to gaming.youtube.com
**Step 9:**You are all set to be live on your YouTube gaming profile.
2. Live Stream on YouTube with Elgato Game Capture HD
A: Basic Settings for Elgato Game Capture HD
The Step s below will help you to get ready for streaming with all basic settings that are required by Elgato Game Capture HD tool.
**Step 1:**First of all, you need to open your browser, search for Elgato Game Capture HD software on its official website and then download it for your system. Get it installed.
**Step 2:**Once installation process is complete then launch your software.
**Step 3:**Now you need to hit the add button on screen and select YouTube from drop down menu.
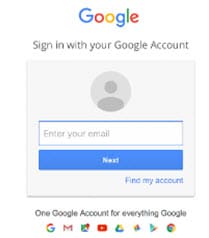
Step 4: It is time to sign in with your Google Account.
**Step 5:**After sign up process, allow the Elgato Game Capture tool to make connection with your YouTube account.

**Step 6:**Soon you will be able to access you account from Elgato platform.

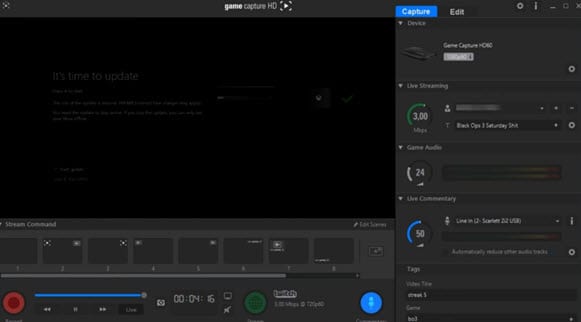
**Step 7:**It is time to make adjustments for streaming settings.
B: Test your Bandwidth and make adjustments for Stream settings
It is essential to check speed of your internet connection during live streaming because if it goes slow then your content will become annoying to viewers and it will decay the reputation of your channel. So prefer to use following Step s to complete the basic settings and to test your internet connection.
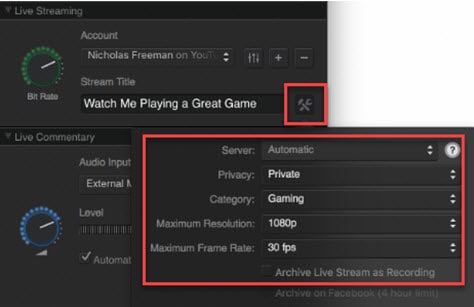
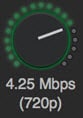
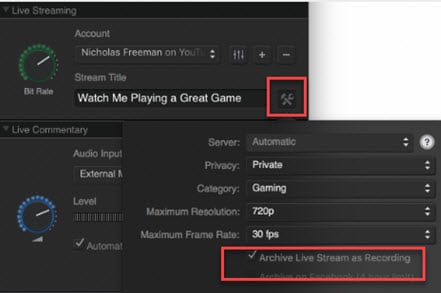
**Step 1:**Open your browser and then visit the speedtest.net platform. You can also use other similar kind of websites to ensure the speed of your internet. Note that you will find a Bit Rate dial in the live streaming section, here you can make adjustments for bit rates to bring it to desired level.
**Step 2:**It is also possible to make customized settings for frame rate and resolution as per need of your stream content.
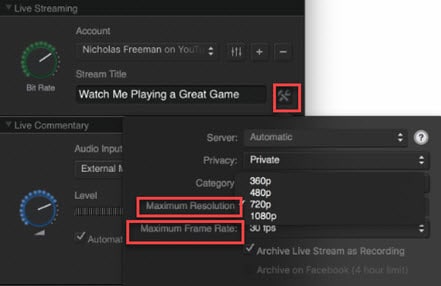
**Step 3:**One can also prefer to archive his streaming.
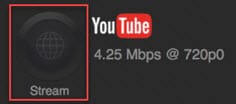
**Step 4:**As soon as you have completed all above settings then you need to hit the stream button on screen.
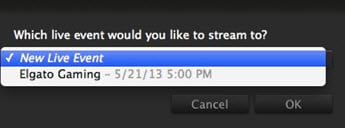
**Step 5:**Soon your software will ask you to select the event that you want to stream, choose your desired event and then press Ok. Soon you will be live on YouTube.
Richard Bennett
Richard Bennett is a writer and a lover of all things video.
Follow @Richard Bennett
Richard Bennett
Mar 27, 2024• Proven solutions
1. Live Stream on YouTube Gaming with OBS
You need to follow these simple Step s to use OBS for YouTube Live Streaming:
**Step 1:**First of all you need to login to your YouTube account. You might be aware of the fact that same YouTube account is used for YouTube gaming needs.
**Step 2:**Once entered inside your account then you need to visit the Go live streaming options and then from drop down menu simply choose Stream Now option.
**Step 3:**It is time to fill the details on screen; put impressive words for your live stream description so that it can grab attention of more viewers. Then select category as ‘Gaming’.
**Step 4:**Now you need to copy the stream key.
**Step 5:**Now open your OBS tool and then select YouTube as your active game streaming service. Users here need to paste that copied streaming key of Step 5 into the space provided on OBS settings page.
**Step 6:**It is time to make your desktop a video source.
**Step 7:**Once all these settings are completed then you need to hit the start streaming option.
**Step 8:**The service may take few seconds to bring your live on YouTube and after this small duration you will be connected to your channel with your streamed content. Then change your url from youtube.com to gaming.youtube.com
**Step 9:**You are all set to be live on your YouTube gaming profile.
2. Live Stream on YouTube with Elgato Game Capture HD
A: Basic Settings for Elgato Game Capture HD
The Step s below will help you to get ready for streaming with all basic settings that are required by Elgato Game Capture HD tool.
**Step 1:**First of all, you need to open your browser, search for Elgato Game Capture HD software on its official website and then download it for your system. Get it installed.
**Step 2:**Once installation process is complete then launch your software.
**Step 3:**Now you need to hit the add button on screen and select YouTube from drop down menu.
Step 4: It is time to sign in with your Google Account.
**Step 5:**After sign up process, allow the Elgato Game Capture tool to make connection with your YouTube account.
**Step 6:**Soon you will be able to access you account from Elgato platform.
**Step 7:**It is time to make adjustments for streaming settings.
B: Test your Bandwidth and make adjustments for Stream settings
It is essential to check speed of your internet connection during live streaming because if it goes slow then your content will become annoying to viewers and it will decay the reputation of your channel. So prefer to use following Step s to complete the basic settings and to test your internet connection.
**Step 1:**Open your browser and then visit the speedtest.net platform. You can also use other similar kind of websites to ensure the speed of your internet. Note that you will find a Bit Rate dial in the live streaming section, here you can make adjustments for bit rates to bring it to desired level.
**Step 2:**It is also possible to make customized settings for frame rate and resolution as per need of your stream content.
**Step 3:**One can also prefer to archive his streaming.
**Step 4:**As soon as you have completed all above settings then you need to hit the stream button on screen.
**Step 5:**Soon your software will ask you to select the event that you want to stream, choose your desired event and then press Ok. Soon you will be live on YouTube.
Richard Bennett
Richard Bennett is a writer and a lover of all things video.
Follow @Richard Bennett
Also read:
- [New] Social Media Savvy How to Successfully Post Videos on FB for 2024
- 2024 Approved Chuckles Galore Navigate the Best 15 Comedic YouTube Crews
- 2024 Approved Diverse Vlogging Content Suggestions
- 2024 Approved Effortless Downloads at Zero Cost Find the Top 20 Tools for YouTube Sound Ripping
- 2024 Approved Lush Looks and Flawless Filters Building Your Vlog Empire
- 7 Reasons to Question Generative AI Use in Chats
- Android's Best YouTube Video Downloaders Reviewed for 2024
- Best 3 Software to Transfer Files to/from Your Vivo V29e via a USB Cable | Dr.fone
- Charting the Course of YouTube Success Through Social Blade Analysis for 2024
- Constructing an Inviting Subscribe Link for YouTube Enthusiasts
- Create Captivating YT Thumbnails Fast
- Creating High-Impact Short Waterway Previews
- DIY Repair Techniques for Dealing with a Missing Comctl32.dll File
- In 2024, Permitted Practices for Saving YouTube Videos
- Is your Oppo A78 5G working too slow? Heres how you can hard reset it | Dr.fone
- Laravel-Powered VueSoft UI: Advanced Dashboard Solutions by Creative Tim and Updivision
- Step-by-Step Guide to Fix a Stuck Windows 11 Installation Process
- Title: [New] Building a Strong Online Presence with Attractive Video Thumbnails
- Author: Steven
- Created at : 2024-12-19 16:04:50
- Updated at : 2024-12-25 16:00:12
- Link: https://youtube-clips.techidaily.com/new-building-a-strong-online-presence-with-attractive-video-thumbnails/
- License: This work is licensed under CC BY-NC-SA 4.0.