
!["[New] Boost Engagement Adding Dynamic Backgrounds to Your Thumbnails"](https://www.lifewire.com/thmb/8soRgdNYSpjhrbUPLjYCDEKZVSs=/400x300/filters:no_upscale():max_bytes(150000):strip_icc()/nordwood-themes-q8U1YgBaRQk-unsplash-7fd170adeba1423bae09282ffbe74df4.jpg)
"[New] Boost Engagement Adding Dynamic Backgrounds to Your Thumbnails"
Boost Engagement: Adding Dynamic Backgrounds to Your Thumbnails
YouTube is a platform where you can make money from videos. But in order to earn, your videos should get lots of views. The thing is that YouTube is a competitive space. So many others are trying to do the same. Thus, you’ll be competing for viewers’ time and attention. How can you win that battle? One way is to add eye-catching YouTube thumbnail backgrounds.
The video thumbnail will leave an impression on viewers looking for something to watch. So ensuring it is high-quality is crucial. In this article, you’ll learn where to find amazing thumbnail backgrounds and how to add them to your thumbnails.

Why Change YouTube Thumbnail Background?
When people are searching for something to watch on YouTube, they’ll look at two (2) things:
- They’ll check the title to see how relevant it is to what they’re looking for.
- Two, they’ll check the video thumbnail.
Thumbnail helps them determine off the bat if the video is high quality or not. A poor thumbnail will push them away, while a good one will encourage them to click.
That said, YouTubers should ensure their thumbnails are on point. Your thumbnails should be visually striking. One way to achieve that is by changing the thumbnail background. It allows you to remove unnecessary objects from the image. Additionally, it lets you improve the aesthetic of the thumbnail.
Now the question is: how do you change a YouTube thumbnail background?
Where To Find a New YouTube Thumbnail Background?
Thanks to the resource sites on the Internet, you can always find kickass backgrounds to create an attractive YouTube Thumbnail. Here, we recommend five (5) powerful apps/websites to help you easily find ideal thumbnail backgrounds.
1. Search for Numerous YouTube Thumbnail Backgrounds in Filmora
Pros
- Get access to YouTube Thumbnail Backgrounds within the video editing tool.
- Provides you with millions of stock images to choose from.
- The collection of stock media is constantly updated, giving you more and more options for your thumbnail background.
Cons
- The software itself is not totally free.

Wondershare Filmora is one of the leading video editors in the world. And it does not stop at enabling you to make amazing videos. Filmora also helps you make that video succeed. It provides you with over 4 million stock media! That includes gorgeous photos that you can use as YouTube thumbnail backgrounds.
The best thing is that you can access those images within the video editor. Meaning there’s a streamlined workflow that makes things more convenient.
Where Do the Photos Come From? Wondershare Filmora takes images from the websites Pexels, GIPHY, Pixabay, and Unsplash. Besides those, Filmora also has its own stock media library - Filmstock.
Filmstock was previously known as Filmora Store. It is the effect store for Filmora version 9.1.0 and above. From there, you can find stock media, including videos, images that you can use for your thumbnails, and royalty-free music and sound effects. You can download these resources to turn your videos into art.
2. Use Freepik To Find YouTube Thumbnail Background Images
Pros
- With over 22 million stock media resources, it offers a significant amount of photos, vectors, and graphic resources.
- The website is well-designed and void of pop-ups, making it very easy to search for specific photos.
Cons
- The free version has lots of limitations.
- The premium version is expensive.
- Download times can sometimes be slow.

Freepik is one of the largest image bank websites. It has over 22 million stock media that you can choose from to be your YouTube thumbnail backgrounds. And that collection grows further every day. Therefore, it’s highly likely to have the image you are looking for.
Not just that. Freepik has a special section containing only YouTube thumbnail backgrounds. That expedites your search. Then, you can use the filters to show only the thumbnail background designs that match your vision.
3. Find YouTube Thumbnail Background on Shutterstock for Free
Pros
- One of the largest libraries of stock photos.
- Gives a 30-day free trial that lets you make 10 downloads totally free of charge.
- Includes free images.
Cons
- The free trial lasts only 30 days. It becomes very expensive after that has expired.

Shutterstock is probably the biggest website that offers stock images. It’s so popular Shutterstock is what many people first think of when they need to find stock images.
Shutterstock has been around since 2003. As such, its collection consists of over 200 million stock photos. From that many resources, you’ll surely be able to find something to use for your YouTube thumbnail background. Even after the free trial expires, you can find some free photos from the website.
4. Download Thumbnail Background Images for YouTube in Vecteezy
Pros
- Millions of free resources.
- Cheaper than alternatives.
Cons
- The free version does not give you full commercial rights and requires you to add attribution.
- The free version allows you to download only 10 files a day.

Vecteezy allows you to download stock images for free. However, if you are serious about your YouTubing career, you must upgrade to Pro for full commercial rights. The good thing is that Vecteezy is very affordable. It costs only $7 per month! And that already gives you unlimited downloads.
Now the question is, does it have YouTube thumbnail backgrounds? Yes, it does! Whether you prefer vectors or images, Vecteezy has you covered.
5. Attractive Backgrounds for YouTube Thumbnail – NegativeSpace
Pros
- Photos downloaded from the website are free to use
- NegativeSpace encourages attribution, though, to thank the photographer that took the photo.
Cons
- The collection includes mostly photographs with just a few vectors here and there.
- The website can sometimes be slow to load.

NegativeSpace is the perfect place to get your YouTube thumbnail background if you are on a tight budget. It allows you not only to download the photos but also to use them commercially! And the photos are high-quality too, and they’re meant to be used as backgrounds.
Please note, however, that if you’re looking for vector illustrations, you’d better be on another site. NegativeSpace is built by a community of photographers. So, most of the resources you can download from this website are photos captured by a camera.
How To Change YouTube Thumbnail Background?
Suppose you have downloaded a high-quality image that will work great as a thumbnail background for your YouTube video. What shall you do next? Of course, the next step is to make the actual thumbnail.
Choosing the background image from Filmora is great because it saves you lots of time and resources. The program allows you to select from millions of high-quality options. After selecting, you can use Filmora’s native features to edit the thumbnail. You can even resize the thumbnail background to 1280x720 - YouTube’s suggested thumbnail size.
It is more convenient than you may initially think. Yes, it saves you time and effort because you don’t have to switch to another program to edit the thumbnail. But it also makes the workload easier for your computer. Opening another program will eat more RAM and will slow down the computer.
Filmora’s tools for editing the video thumbnail aren’t too shabby, either. Suppose you have a great image with the main subject where exactly you want it to be. However, you want to change the background to make the subject stand out more. You can use Wondershare Filmora’s AI Portrait feature to easily change it.
Free Download For Win 7 or later(64-bit)
Free Download For macOS 10.14 or later
What is Filmora’s AI Portrait Feature?
Wondershare Filmora’s AI Portrait feature allows you to quickly remove and change the background of an image.
Normally, you would need a green screen or chroma key to do that. Another method is to manually erase the background using an eraser. The AI Portrait feature has an effect called “human segmentation.” It separates the humans in an image from the background. Then, you can delete or change the background with the thumbnail background that you have downloaded. It’s really convenient!
Here is a guide on changing a YouTube thumbnail background using Wondershare Filmora.
1. Put the Thumbnail image in the timeline.

2. Select the thumbnail image. Click “Tools” > “Video” > “AI Portrait.”

3. The AI Portrait tool will remove the background automatically. Click “OK.”

4. Click “Stock Media” > “Photos.” Search for a background image that you like. Download the photo.

5. Drag the new background to the track below your thumbnail image.

6. Select your thumbnail image to adjust its size and position.

7. Click the camera icon to take a snapshot of the still frame you want to use as the YouTube video thumbnail.

8. Select the format and storage path.

9. Find the icon of the snapshot in the Media tab. Right-click and select “Reveal In Explorer” to open your local folder to find the new thumbnail.

The Bottom Line
Your YouTube video thumbnail is almost as important as the video content itself. So you must not neglect it. Ensuring it is high-quality is important. One big step in doing that is selecting a great thumbnail background image. You can find these in many places.
The video editor Wondershare Filmora even allows you to browse for some within the program! Furthermore, Filmora provides you with tools to edit the thumbnail. In turn, it streamlines the whole process. Give it a try to start creating video thumbnails that will make YouTube users click on your video easily.
Wondershare Filmora is one of the leading video editors in the world. And it does not stop at enabling you to make amazing videos. Filmora also helps you make that video succeed. It provides you with over 4 million stock media! That includes gorgeous photos that you can use as YouTube thumbnail backgrounds.
The best thing is that you can access those images within the video editor. Meaning there’s a streamlined workflow that makes things more convenient.
Where Do the Photos Come From? Wondershare Filmora takes images from the websites Pexels, GIPHY, Pixabay, and Unsplash. Besides those, Filmora also has its own stock media library - Filmstock.
Filmstock was previously known as Filmora Store. It is the effect store for Filmora version 9.1.0 and above. From there, you can find stock media, including videos, images that you can use for your thumbnails, and royalty-free music and sound effects. You can download these resources to turn your videos into art.
2. Use Freepik To Find YouTube Thumbnail Background Images
Pros
- With over 22 million stock media resources, it offers a significant amount of photos, vectors, and graphic resources.
- The website is well-designed and void of pop-ups, making it very easy to search for specific photos.
Cons
- The free version has lots of limitations.
- The premium version is expensive.
- Download times can sometimes be slow.
Freepik is one of the largest image bank websites. It has over 22 million stock media that you can choose from to be your YouTube thumbnail backgrounds. And that collection grows further every day. Therefore, it’s highly likely to have the image you are looking for.
Not just that. Freepik has a special section containing only YouTube thumbnail backgrounds. That expedites your search. Then, you can use the filters to show only the thumbnail background designs that match your vision.
3. Find YouTube Thumbnail Background on Shutterstock for Free
Pros
- One of the largest libraries of stock photos.
- Gives a 30-day free trial that lets you make 10 downloads totally free of charge.
- Includes free images.
Cons
- The free trial lasts only 30 days. It becomes very expensive after that has expired.
Shutterstock is probably the biggest website that offers stock images. It’s so popular Shutterstock is what many people first think of when they need to find stock images.
Shutterstock has been around since 2003. As such, its collection consists of over 200 million stock photos. From that many resources, you’ll surely be able to find something to use for your YouTube thumbnail background. Even after the free trial expires, you can find some free photos from the website.
4. Download Thumbnail Background Images for YouTube in Vecteezy
Pros
- Millions of free resources.
- Cheaper than alternatives.
Cons
- The free version does not give you full commercial rights and requires you to add attribution.
- The free version allows you to download only 10 files a day.
Vecteezy allows you to download stock images for free. However, if you are serious about your YouTubing career, you must upgrade to Pro for full commercial rights. The good thing is that Vecteezy is very affordable. It costs only $7 per month! And that already gives you unlimited downloads.
Now the question is, does it have YouTube thumbnail backgrounds? Yes, it does! Whether you prefer vectors or images, Vecteezy has you covered.
5. Attractive Backgrounds for YouTube Thumbnail – NegativeSpace
Pros
- Photos downloaded from the website are free to use
- NegativeSpace encourages attribution, though, to thank the photographer that took the photo.
Cons
- The collection includes mostly photographs with just a few vectors here and there.
- The website can sometimes be slow to load.
NegativeSpace is the perfect place to get your YouTube thumbnail background if you are on a tight budget. It allows you not only to download the photos but also to use them commercially! And the photos are high-quality too, and they’re meant to be used as backgrounds.
Please note, however, that if you’re looking for vector illustrations, you’d better be on another site. NegativeSpace is built by a community of photographers. So, most of the resources you can download from this website are photos captured by a camera.
How To Change YouTube Thumbnail Background?
Suppose you have downloaded a high-quality image that will work great as a thumbnail background for your YouTube video. What shall you do next? Of course, the next step is to make the actual thumbnail.
Choosing the background image from Filmora is great because it saves you lots of time and resources. The program allows you to select from millions of high-quality options. After selecting, you can use Filmora’s native features to edit the thumbnail. You can even resize the thumbnail background to 1280x720 - YouTube’s suggested thumbnail size.
It is more convenient than you may initially think. Yes, it saves you time and effort because you don’t have to switch to another program to edit the thumbnail. But it also makes the workload easier for your computer. Opening another program will eat more RAM and will slow down the computer.
Filmora’s tools for editing the video thumbnail aren’t too shabby, either. Suppose you have a great image with the main subject where exactly you want it to be. However, you want to change the background to make the subject stand out more. You can use Wondershare Filmora’s AI Portrait feature to easily change it.
Free Download For Win 7 or later(64-bit)
Free Download For macOS 10.14 or later
What is Filmora’s AI Portrait Feature?
Wondershare Filmora’s AI Portrait feature allows you to quickly remove and change the background of an image.
Normally, you would need a green screen or chroma key to do that. Another method is to manually erase the background using an eraser. The AI Portrait feature has an effect called “human segmentation.” It separates the humans in an image from the background. Then, you can delete or change the background with the thumbnail background that you have downloaded. It’s really convenient!
Here is a guide on changing a YouTube thumbnail background using Wondershare Filmora.
1. Put the Thumbnail image in the timeline.
2. Select the thumbnail image. Click “Tools” > “Video” > “AI Portrait.”
3. The AI Portrait tool will remove the background automatically. Click “OK.”
4. Click “Stock Media” > “Photos.” Search for a background image that you like. Download the photo.
5. Drag the new background to the track below your thumbnail image.
6. Select your thumbnail image to adjust its size and position.
7. Click the camera icon to take a snapshot of the still frame you want to use as the YouTube video thumbnail.
8. Select the format and storage path.
9. Find the icon of the snapshot in the Media tab. Right-click and select “Reveal In Explorer” to open your local folder to find the new thumbnail.
The Bottom Line
Your YouTube video thumbnail is almost as important as the video content itself. So you must not neglect it. Ensuring it is high-quality is important. One big step in doing that is selecting a great thumbnail background image. You can find these in many places.
The video editor Wondershare Filmora even allows you to browse for some within the program! Furthermore, Filmora provides you with tools to edit the thumbnail. In turn, it streamlines the whole process. Give it a try to start creating video thumbnails that will make YouTube users click on your video easily.
Innovating with Structured Content on YouTube
How to structure YouTube videos

Richard Bennett
Mar 27, 2024• Proven solutions
Creating a YouTube channel and uploading video content is only one part of the key to your success. With so much competition on the platform, it’s crucial that you stand out from the crowd with efficient, professional videos that are a pleasure to watch.
Without some planning and structure in mind before you begin filming, it’s all too easy to get a bit lost and start to ramble or fumble your words. Video’s filled with ‘umm’ and ‘err’ are neither pleasant to watch nor engaging.
If you’re serious about making a great YouTube channel and developing a loyal fan base, you’re going to need a workable structure for every video to help you stay on track. Here’s what you need to know:
Quick Jump Menu
- Why is structuring your video important?
- How should you structure YouTube Video Content?
- Ready to go out and make amazing videos?
Why is structuring your video important?
The structure of your video can make all the difference between a successful YouTube channel and a big waste of time. Your objective is to get people watching more and watching all the way to the end. A great structure can:
- Build interest and engagement: By keeping something in reserve and naturally building interest as you go along, people will be compelled to watch longer and interact more with your channel.
- Helps you rank higher: Longer and higher numbers of views will demonstrate your position as an authority well. The YouTube algorithm uses these metrics as part of their ranking factor, so the more and longer views you get, the higher you’ll rank in search.
- Builds consistency and familiarity: If all your videos follow a typical structure, your fans will come to be familiar with your format. They’ll know what to expect from your content and will watch more regularly as a result.
So, now you understand why structure is so important to your channel, let’s take a look at ways in which you can create an amazing structure for every video you produce.
How should you structure YouTube video content?
There are some key elements of a YouTube video’s structure which can make it more natural, more engaging and more fun to watch. When you’re planning your structure, you should follow a logical timeline to take the viewer from start to finish easily, and to ensure you get the actions you want at the end.
Intro
People love to be told what’s about to happen, and an intro can be a crucial step in ensuring they are going to continue watching your content. By explaining clearly what they are about to see, why it’s important to them and what problems you’re aiming to solve, you’ll keep them hooked and prevent them from browsing away to the next search result.
An introduction doesn’t need to be long or particularly involved. Remember, you don’t want to give away all your information here, as what you want is to encourage them to watch until the end. Something like “I’m going to show you … which will help you to …” is fine.
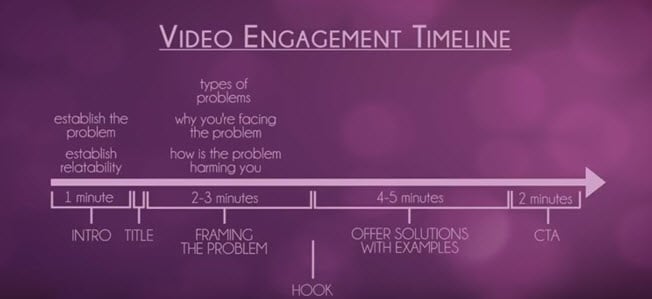
Your idea and purpose need to be conveyed fast and effectively if you’re keen to get their interest. Most viewers will decide within the first three to five seconds of a video if they want to invest their time in watching, so it’s crucial you capture their interest and engage them fast to stop them drifting away.
Main content
Once you’ve introduced your video, it’s time to start working through your content. This should be done by:
- Framing the problem
What are the types of problems that your viewers will have encountered which your video can solve? How is the problem affecting you and your viewers? Take around two to three minutes to describe the problems that you hope your video will solve, and work on being empathetic so people can relate to you and the issue you’re discussing.
- Offer solutions with examples
Move on to your solution to the problem. How did you find this solution? Is it easy to implement? Take around four to five minutes to address your solution and give examples of how it works in practice.
Now you’ve addressed the issue that your video content will solve, you’re almost ready to ask them to take the next step. Almost. There’s one more key element in your structure that you need to remember to include.
Hook
The hook can be placed anywhere in your content, although it’s most successful when placed either in the introduction or while you are framing the problem. The hook is a tidbit that aims to encourage a full viewing of your video, so don’t give away your solutions but do give them a reason to carry on watching.
If there’s a particular point where you think they might become bored or distracted, this is a great time to insert your hook. Come up with a powerful hook, for instance ‘with my solution I managed to go from ten views to two hundred in an hour’ or ‘when you hear this solution you’ll understand how I tripled my profits overnight’. Give them a reason to want to stay to the end.
Outro
Your outro shouldn’t just be about signing off in your unique way with some lovely music and visuals. This is the point at which you can ask something back from your audience, whatever that may be. We call this a ‘call to action’, and it could eb something as simple as subscribing through to something more involved like visiting your website.
Think about what you want from your audience; what should they do next? Remember to ask via a strong call to action, otherwise you’ve simply given them some free advice with very little in the way of a return for you.
Script or no script?
Many YouTubers shy away from using any sort of script, feeling that this will make them less relatable and natural. Choosing whether or not to script is entirely up to you; some people feel more comfortable with a script to hand, whereas others prefer to just wing it as they go.
If you don’t feel a script would work for you, do consider having a very rough outline of your structure and the points you want to make readily available while filming. It will help you regain control if you do happen to lose your place and will ensure you get all the information across that you’d planned to.
If you do think a full script would work better for you, make sure you are able to come across as naturally as possible while reading it. Write your script the same way you speak and run through a few times so you’re not squinting at words while you’re on camera. If you regularly wander off script, this could be a sign that a freer flowing style is more your thing.
Read More to Get : How to Loop a YouTube Video >>
Ready to go out and make amazing videos?
Having a structure to your videos might seem a little unnatural at first, but there’s plenty of evidence to show that people who take the time to plan their content get far better results than those who just improvise. If you’re unsure of the best structure for your content, watch videos made by others in your niche to see how they organize theirs.
That’s not to say you have to copy the leaders to be a success; indeed, you’ll be far more successful on YouTube if you continue to be unique. But there’s always room to learn from the best and to take inspiration from those who’ve been getting the very best results.
Richard Bennett
Richard Bennett is a writer and a lover of all things video.
Follow @Richard Bennett
Richard Bennett
Mar 27, 2024• Proven solutions
Creating a YouTube channel and uploading video content is only one part of the key to your success. With so much competition on the platform, it’s crucial that you stand out from the crowd with efficient, professional videos that are a pleasure to watch.
Without some planning and structure in mind before you begin filming, it’s all too easy to get a bit lost and start to ramble or fumble your words. Video’s filled with ‘umm’ and ‘err’ are neither pleasant to watch nor engaging.
If you’re serious about making a great YouTube channel and developing a loyal fan base, you’re going to need a workable structure for every video to help you stay on track. Here’s what you need to know:
Quick Jump Menu
- Why is structuring your video important?
- How should you structure YouTube Video Content?
- Ready to go out and make amazing videos?
Why is structuring your video important?
The structure of your video can make all the difference between a successful YouTube channel and a big waste of time. Your objective is to get people watching more and watching all the way to the end. A great structure can:
- Build interest and engagement: By keeping something in reserve and naturally building interest as you go along, people will be compelled to watch longer and interact more with your channel.
- Helps you rank higher: Longer and higher numbers of views will demonstrate your position as an authority well. The YouTube algorithm uses these metrics as part of their ranking factor, so the more and longer views you get, the higher you’ll rank in search.
- Builds consistency and familiarity: If all your videos follow a typical structure, your fans will come to be familiar with your format. They’ll know what to expect from your content and will watch more regularly as a result.
So, now you understand why structure is so important to your channel, let’s take a look at ways in which you can create an amazing structure for every video you produce.
How should you structure YouTube video content?
There are some key elements of a YouTube video’s structure which can make it more natural, more engaging and more fun to watch. When you’re planning your structure, you should follow a logical timeline to take the viewer from start to finish easily, and to ensure you get the actions you want at the end.
Intro
People love to be told what’s about to happen, and an intro can be a crucial step in ensuring they are going to continue watching your content. By explaining clearly what they are about to see, why it’s important to them and what problems you’re aiming to solve, you’ll keep them hooked and prevent them from browsing away to the next search result.
An introduction doesn’t need to be long or particularly involved. Remember, you don’t want to give away all your information here, as what you want is to encourage them to watch until the end. Something like “I’m going to show you … which will help you to …” is fine.
Your idea and purpose need to be conveyed fast and effectively if you’re keen to get their interest. Most viewers will decide within the first three to five seconds of a video if they want to invest their time in watching, so it’s crucial you capture their interest and engage them fast to stop them drifting away.
Main content
Once you’ve introduced your video, it’s time to start working through your content. This should be done by:
- Framing the problem
What are the types of problems that your viewers will have encountered which your video can solve? How is the problem affecting you and your viewers? Take around two to three minutes to describe the problems that you hope your video will solve, and work on being empathetic so people can relate to you and the issue you’re discussing.
- Offer solutions with examples
Move on to your solution to the problem. How did you find this solution? Is it easy to implement? Take around four to five minutes to address your solution and give examples of how it works in practice.
Now you’ve addressed the issue that your video content will solve, you’re almost ready to ask them to take the next step. Almost. There’s one more key element in your structure that you need to remember to include.
Hook
The hook can be placed anywhere in your content, although it’s most successful when placed either in the introduction or while you are framing the problem. The hook is a tidbit that aims to encourage a full viewing of your video, so don’t give away your solutions but do give them a reason to carry on watching.
If there’s a particular point where you think they might become bored or distracted, this is a great time to insert your hook. Come up with a powerful hook, for instance ‘with my solution I managed to go from ten views to two hundred in an hour’ or ‘when you hear this solution you’ll understand how I tripled my profits overnight’. Give them a reason to want to stay to the end.
Outro
Your outro shouldn’t just be about signing off in your unique way with some lovely music and visuals. This is the point at which you can ask something back from your audience, whatever that may be. We call this a ‘call to action’, and it could eb something as simple as subscribing through to something more involved like visiting your website.
Think about what you want from your audience; what should they do next? Remember to ask via a strong call to action, otherwise you’ve simply given them some free advice with very little in the way of a return for you.
Script or no script?
Many YouTubers shy away from using any sort of script, feeling that this will make them less relatable and natural. Choosing whether or not to script is entirely up to you; some people feel more comfortable with a script to hand, whereas others prefer to just wing it as they go.
If you don’t feel a script would work for you, do consider having a very rough outline of your structure and the points you want to make readily available while filming. It will help you regain control if you do happen to lose your place and will ensure you get all the information across that you’d planned to.
If you do think a full script would work better for you, make sure you are able to come across as naturally as possible while reading it. Write your script the same way you speak and run through a few times so you’re not squinting at words while you’re on camera. If you regularly wander off script, this could be a sign that a freer flowing style is more your thing.
Read More to Get : How to Loop a YouTube Video >>
Ready to go out and make amazing videos?
Having a structure to your videos might seem a little unnatural at first, but there’s plenty of evidence to show that people who take the time to plan their content get far better results than those who just improvise. If you’re unsure of the best structure for your content, watch videos made by others in your niche to see how they organize theirs.
That’s not to say you have to copy the leaders to be a success; indeed, you’ll be far more successful on YouTube if you continue to be unique. But there’s always room to learn from the best and to take inspiration from those who’ve been getting the very best results.
Richard Bennett
Richard Bennett is a writer and a lover of all things video.
Follow @Richard Bennett
Also read:
- The Insider's Guide to YouTube Success
- [New] Breaking Down the Elements of a YouTube Shorts Template
- [Updated] Best Audio Modification Methods for YouTube Stars
- [Updated] Essential MP4 Software Elevate Your Mac Productions
- 2024 Approved 15 Online Audio Haven Sites for Video Content Makers
- Discovering All in YouTube Shorts Guide for 2024
- The Ultimate Framework for Captivating Streams on YouTube
- [New] Ensuring Authenticity as You Aspire for One Million Video Watches
- [Updated] Decoding the Language of ASMR Videos
- FREE Best YouTube Video Editor Apps for Android for 2024
- [Updated] Elevate Play Button Visuals Vivid Neon Lines Added
- How-To Manual for Crafting YouTube Playlists
- Skyrocket Your YouTube Speed with Effective Render Techniques
- Cut Down, Catch More The Best URL Reducers for YouTube for 2024
- Broadcast Your Music MP3 Conversion and Upload on YouTube
- In 2024, Epic Editing Illusions YouTube Edition
- [Updated] Capture Your Best Side Tips for Effective Talking-Head Shots
- [New] Enhancing Your YouTube Reach with FameBit Ad Sponsorships
- Amplify Your Video's Value Anywhere on Multiple Devices
- In 2024, Directed Camera Roll Efficient Sync with Snapchat Features
- Is pgsharp legal when you are playing pokemon On Xiaomi Redmi Note 12 Pro 4G? | Dr.fone
- How To Fix OEM Unlock Missing on Tecno Camon 20?
- Easy Guide to Poco F5 Pro 5G FRP Bypass With Best Methods
- [New] Epic Eats TikTok’s Culinary Stars
- How to Unlock SIM Card on Tecno online without jailbreak
- [New] Lightning-Fast Method to Claim TikTok Treasures for 2024
- [Updated] In 2024, Igniting Instagram Interest Maximizing Content Reach and Interactions
- 2024 Approved Best Empathic 3DS Players Android Edition
- Updated In 2024, The Best Virtualdub Replacements for Video Editing
- [Updated] Fundamentals Setting Up Messenger Rooms
- 2024 Approved Compose Cover Videos for Friends' Facebooks
- In 2024, Turning Off Two Factor Authentication From Apple iPhone 8 Plus? 5 Tips You Must Know
- In 2024, Solutions to Spy on Meizu 21 with and without jailbreak | Dr.fone
- In 2024, Delete Gmail Account With/Without Password On Vivo Y200e 5G
- Updated In 2024, Get Pro-Level Smoothness Best Video Stabilizer Apps for Mobile Phones
- Title: "[New] Boost Engagement Adding Dynamic Backgrounds to Your Thumbnails"
- Author: Steven
- Created at : 2024-05-25 20:01:21
- Updated at : 2024-05-26 20:01:21
- Link: https://youtube-clips.techidaily.com/new-boost-engagement-adding-dynamic-backgrounds-to-your-thumbnails/
- License: This work is licensed under CC BY-NC-SA 4.0.
