
![[New] Best Practices in YT Thumbnail Sizing](https://www.lifewire.com/thmb/a-DaUZrHPc89svfPN18p7fZjBtc=/400x300/filters:no_upscale():max_bytes(150000):strip_icc()/GettyImages-107428999-5acb3c871d6404003c114d40.jpg)
[New] Best Practices in YT Thumbnail Sizing
Best Practices in YT Thumbnail Sizing
What’s the Best YouTube Thumbnail Size?

Richard Bennett
Dec 30, 2022• Proven solutions
Making better YouTube thumbnails will help you get more views, and knowing the best YouTube thumbnail size is part of that. There are millions of videos on YouTube, so if you want the audience to click on yours, then you need to make a great first impression.
- What’s the ideal YouTube thumbnail Size and Dimension?
- Tips for Perfect Thumbnails
- Making Better Thumbnails for YouTube
1. What’s the ideal YouTube thumbnail Size and Dimension?
An essential thing that every YouTube video developer needs to know is about the selection of the right side of the thumbnail for any video. As per the guidelines circulated by Google itself, the most appropriate size for the thumbnail image is 1280x720 pixels, where the recommended minimal pixel width is 640 pixels. Generally, the 16:9 ratio is considered as an ideal choice for Most of YouTube previews and players.
Here is one interesting thing that you need to know; the thumbnail of videos appears smaller during searches, but it naturally grows to the full size of a video during suggestions. Now the fact is that upscaling of images often loses the quality of content, whereas it is much easier to downscale larger images into smaller ones. Hence, the best idea is to use large size images so that this search and suggestion based scaling needs can be well accomplished.
You May Also Like:
Top 12 Best Free YouTube Thumbnail Makers >>
How to Download YouTube Thumbnail in 3 Ways [Online/Win/Mac] >>
2. Tips for Perfect Thumbnails
So, if you are ready to add thumbnails to your videos, then it is time to learn a few essential tips to do this task with improved impact. You need to ignore the blurry details and boost the eye-catching ones. Here are a few essential tips for developing the best videos with an impressive selection of thumbnail images:
YouTube’s Default Thumbnails
When you upload your video on YouTube, the platform itself gives you suggestions about thumbnails, and they are directly picked up from your own video. Although the idea is good and original, these thumbnails use to be of low quality with blur details. Hope! You don’t want to lose your audience with this bad selection.
Custom Thumbnails
This is probably the best choice for your customized videos, and the interesting thing is that here you can control everything manually with lots of useful effects.
First of all, you need to open your video on YouTube and then scrub a useful still from your video that you wish to use as a thumbnail.
Now, you need to take a screenshot of this particular instance of your video file. The best part is that most of the operating systems allow users to enjoy several shortcuts to complete this task. For example:
Mac users need to press Command+Shift+4 and then simply highlight the area that you want to include in your screenshot with the help of a frame. The system will automatically save your selected area to your desktop in the form of an image.
Window users are advised to access Windows Key with Print Screen option to get their desired screenshot.
Once you are ready with your video specific still image, then simply get it uploaded on YouTube using the edit video page.
3. Making Better Thumbnails for YouTube
The best part is to access some photo editing software tool to edit your image the way you like. You can use an advanced tool like Photoshop or a free online tool like Canva.
- Focus on Size:
It is always advised to create thumbnail images with standard video file size; the most commonly used standard size range is 1980x1080 or 1280x720. Images having a size smaller than this range may often appear blurry.
- Add Text:
The best idea is to use text-based editing for your thumbnail images and preferably add the title of your video to this image. It will naturally attract more viewers.
- Borders matter:
Professionals recommend adding borders around thumbnail images but do not try to make it too thick rather, try to make it noticeable with fine details.
- Background editing:
Most of the expert video thumbnail developers prefer to change the impact of thumbnail background by simply replacing the background color with solid colors. It will definitely attract more viewers and will bring major attention to the major subject.
- Test it before uploading:
Before uploading your customized thumbnail to your YouTube channel, prefer to check its final view. Zoom in to check the appearance of the thumbnail image on the larger screen, and it should also look fine when sized down.
Now that you know the best YouTube thumbnail size and how to design better thumbnails, do you think you’ll revisit the thumbnails of your existing YouTube videos?
If you want to find a video editing solution that empowers your imagination and creativity yet takes less effort, please try this robust and user-friendly video editing software Wondershare Filmora. It provides special effects, stock photo & video, sound library, etc., which will definitely enhance your productivity and helps to make money by making videos much accessible.


Richard Bennett
Richard Bennett is a writer and a lover of all things video.
Follow @Richard Bennett
Richard Bennett
Dec 30, 2022• Proven solutions
Making better YouTube thumbnails will help you get more views, and knowing the best YouTube thumbnail size is part of that. There are millions of videos on YouTube, so if you want the audience to click on yours, then you need to make a great first impression.
- What’s the ideal YouTube thumbnail Size and Dimension?
- Tips for Perfect Thumbnails
- Making Better Thumbnails for YouTube
1. What’s the ideal YouTube thumbnail Size and Dimension?
An essential thing that every YouTube video developer needs to know is about the selection of the right side of the thumbnail for any video. As per the guidelines circulated by Google itself, the most appropriate size for the thumbnail image is 1280x720 pixels, where the recommended minimal pixel width is 640 pixels. Generally, the 16:9 ratio is considered as an ideal choice for Most of YouTube previews and players.
Here is one interesting thing that you need to know; the thumbnail of videos appears smaller during searches, but it naturally grows to the full size of a video during suggestions. Now the fact is that upscaling of images often loses the quality of content, whereas it is much easier to downscale larger images into smaller ones. Hence, the best idea is to use large size images so that this search and suggestion based scaling needs can be well accomplished.
You May Also Like:
Top 12 Best Free YouTube Thumbnail Makers >>
How to Download YouTube Thumbnail in 3 Ways [Online/Win/Mac] >>
2. Tips for Perfect Thumbnails
So, if you are ready to add thumbnails to your videos, then it is time to learn a few essential tips to do this task with improved impact. You need to ignore the blurry details and boost the eye-catching ones. Here are a few essential tips for developing the best videos with an impressive selection of thumbnail images:
YouTube’s Default Thumbnails
When you upload your video on YouTube, the platform itself gives you suggestions about thumbnails, and they are directly picked up from your own video. Although the idea is good and original, these thumbnails use to be of low quality with blur details. Hope! You don’t want to lose your audience with this bad selection.
Custom Thumbnails
This is probably the best choice for your customized videos, and the interesting thing is that here you can control everything manually with lots of useful effects.
First of all, you need to open your video on YouTube and then scrub a useful still from your video that you wish to use as a thumbnail.
Now, you need to take a screenshot of this particular instance of your video file. The best part is that most of the operating systems allow users to enjoy several shortcuts to complete this task. For example:
Mac users need to press Command+Shift+4 and then simply highlight the area that you want to include in your screenshot with the help of a frame. The system will automatically save your selected area to your desktop in the form of an image.
Window users are advised to access Windows Key with Print Screen option to get their desired screenshot.
Once you are ready with your video specific still image, then simply get it uploaded on YouTube using the edit video page.
3. Making Better Thumbnails for YouTube
The best part is to access some photo editing software tool to edit your image the way you like. You can use an advanced tool like Photoshop or a free online tool like Canva.
- Focus on Size:
It is always advised to create thumbnail images with standard video file size; the most commonly used standard size range is 1980x1080 or 1280x720. Images having a size smaller than this range may often appear blurry.
- Add Text:
The best idea is to use text-based editing for your thumbnail images and preferably add the title of your video to this image. It will naturally attract more viewers.
- Borders matter:
Professionals recommend adding borders around thumbnail images but do not try to make it too thick rather, try to make it noticeable with fine details.
- Background editing:
Most of the expert video thumbnail developers prefer to change the impact of thumbnail background by simply replacing the background color with solid colors. It will definitely attract more viewers and will bring major attention to the major subject.
- Test it before uploading:
Before uploading your customized thumbnail to your YouTube channel, prefer to check its final view. Zoom in to check the appearance of the thumbnail image on the larger screen, and it should also look fine when sized down.
Now that you know the best YouTube thumbnail size and how to design better thumbnails, do you think you’ll revisit the thumbnails of your existing YouTube videos?
If you want to find a video editing solution that empowers your imagination and creativity yet takes less effort, please try this robust and user-friendly video editing software Wondershare Filmora. It provides special effects, stock photo & video, sound library, etc., which will definitely enhance your productivity and helps to make money by making videos much accessible.
Richard Bennett
Richard Bennett is a writer and a lover of all things video.
Follow @Richard Bennett
Finding YT Comments: Tips for Desktop, iPhone, Android Users
How to Find Your Comments on YouTube?
Richard Bennett
Mar 27, 2024• Proven solutions
Have you ever felt worried about any YouTube comment that you published long ago, and later you realized that it was a mistake? Or, do you want to know what comments did you post and when? If so, YouTube offers a simple way of finding your past remarks, and making any changes to them if need be.
That said, the following sections teach you how to find your YouTube comments on a desktop or laptop computer, and also on a mobile device if you are a gadget freak.
- Part 1: How to Find Comments You’ve Posted on YouTube?
- Part 2: How to Find All YouTube Comments Your Channel Has Received?
- Part 3: How to Find Someone’s YouTube Comments by User Name?
- Part 4: How to Edit and Reply to YouTube Comments?
- Part 5: How to Moderate YouTube Comments?
- Part 6: Tips for Writing Good YouTube Comments
Part 1: How to Find All the Comments You’ve Posted on YouTube?
YouTube allows you to post comments on any video only if you are signed in to your Google account while browsing the streaming platform. Because of this, the portal is able to keep a record of your activities, thus enabling you to track all your comments, and take necessary action such as deleting or modifying them as required.
You can learn how to find all the comments you have posted on YouTube while using your preferred device by following the instructions given below:
1. Find Your YouTube Comments on a Desktop or Laptop Computer
Step 1: Sign In to Your YouTube Account
Launch your favorite web browser, go to the YouTube page, click SIGN IN from the top-right corner, and follow the on-screen instructions to enter your credentials and sign in to your Google/YouTube account.
Step 2: Get to the History Page
Click the Menu button from the top-left corner of the page, and then click History from the categories available in the navigation bar in the left.

Step 3: Access/View Your Past Comments
Click Comments from the right of the History page to view all the comments that you have posted earlier.

2. Find Your YouTube Comments on an iPhone
Unfortunately, at the time of this writing, the YouTube app for iOS doesn’t have the feature to view your comments history. However, there is a workaround where you can use a web browser on your smartphone to get this done. The process that is given below explains how to view your past YouTube comments on an iPhone:
Step 1: Sign In to Your YouTube Account on an Internet Browser
Launch your favorite web browser on your iPhone (Safari, the default one, is used here for illustration), go to https://m.youtube.com , tap the profile icon from the top-right corner, tap Sign in from the menu that appears, and follow the on-screen instructions to use your Google account credentials to sign in to YouTube.
Step 2: Access the Desktop Version of YouTube
Tap the More Options icon from the top-left corner of the browser, and then tap Request Desktop Website from the menu that appears to access the desktop version of YouTube on your iPhone.

Step 3: View Your Past YouTube Comments
Tap the Menu icon from the top-left corner of the YouTube page, and tap History from the menu that appears. On the History page, tap Comments from the right pane to view/access your YouTube comments that you posted in the past.

3. Find Your YouTube Comments on an Android Smartphone
As it is with iOS, the YouTube app for Android doesn’t allow you to view your comments history either. However, the workaround of using a web browser works pretty well on Android smartphones too, but with a few tweaks. The process of doing so is given below:
Step 1: Use a Web Browser to Sign In to Your YouTube Account
Launch Google Chrome on your Android smartphone (you can use any other web browser of your choice), and go to https://m.youtube.com . Notice how the interface automatically changes to the desktop version. Note: If the desktop version of the website isn’t visible, you can tap the More button (with three vertical dots) from the top-right corner of the browser, and check the Desktop site box.
Next, tap SIGN IN from the top-right corner of the YouTube page, enter your Google account credentials in the box available on the Sign in screen, enter your password when prompted, and sign in to your YouTube account.
Step 2: Choose a Web Browser (for Confirmation)
When the confirmation box pops up at the bottom, choose your preferred web browser, and tap the frequency of its usage for accessing YouTube. For instance, choose Chrome and Just once to use Google Chrome to access YouTube only for this session.
Step 3: View/Access Your Past YouTube Comments
Once you are signed in to your account, tap the Menu icon from the top-left corner of the YouTube page, and tap History from the menu that appears. When the History page opens up, tap Comments from the right pane to view and/or access your past YouTube comments.
Part 2: How to Find All YouTube Comments Your Channel Has Received?
If you own a YouTube channel and have posted several videos there, it is likely that you also have received a decent number of comments. Usually, these remarks are pretty helpful as they tell you how to improve your production quality, and what your audience prefers to watch in the future. Therefore, it is imperative to learn how to find all the comments that your YouTube channel has received, and the process given below explains exactly that:
1. Find Your Channel’s YouTube Comments on a Desktop or Laptop Computer
You can use your favorite web browser on a PC to easily find all the comments that the videos on your YouTube channel have received as long as you are signed in to your Google account. The step-by-step instructions on how this can be done are given below:
Step 1: Go to the Your videos Page
Open your favorite Internet browser, go to https://www.youtube.com , and sign in to your YouTube account as explained in the previous sections. Next, click the Menu icon from the top-left corner of the YouTube homepage, and click Your videos from the menu that appears.

Step 2: View the Comments
Make sure that the Uploads tab is selected on the Channel content window, and check the number under the Comments column of each video to see how many comments that particular film has received. You can click the number for any video to view its comments.

Step 3: Hide or Hold a Comment for Approval
Click the More icon from the right of the comment you want to moderate, and click Hide user from channel or Always approve comments from this user to hide the comments from the selected user or keep their comments on hold until you review and approve them respectively.

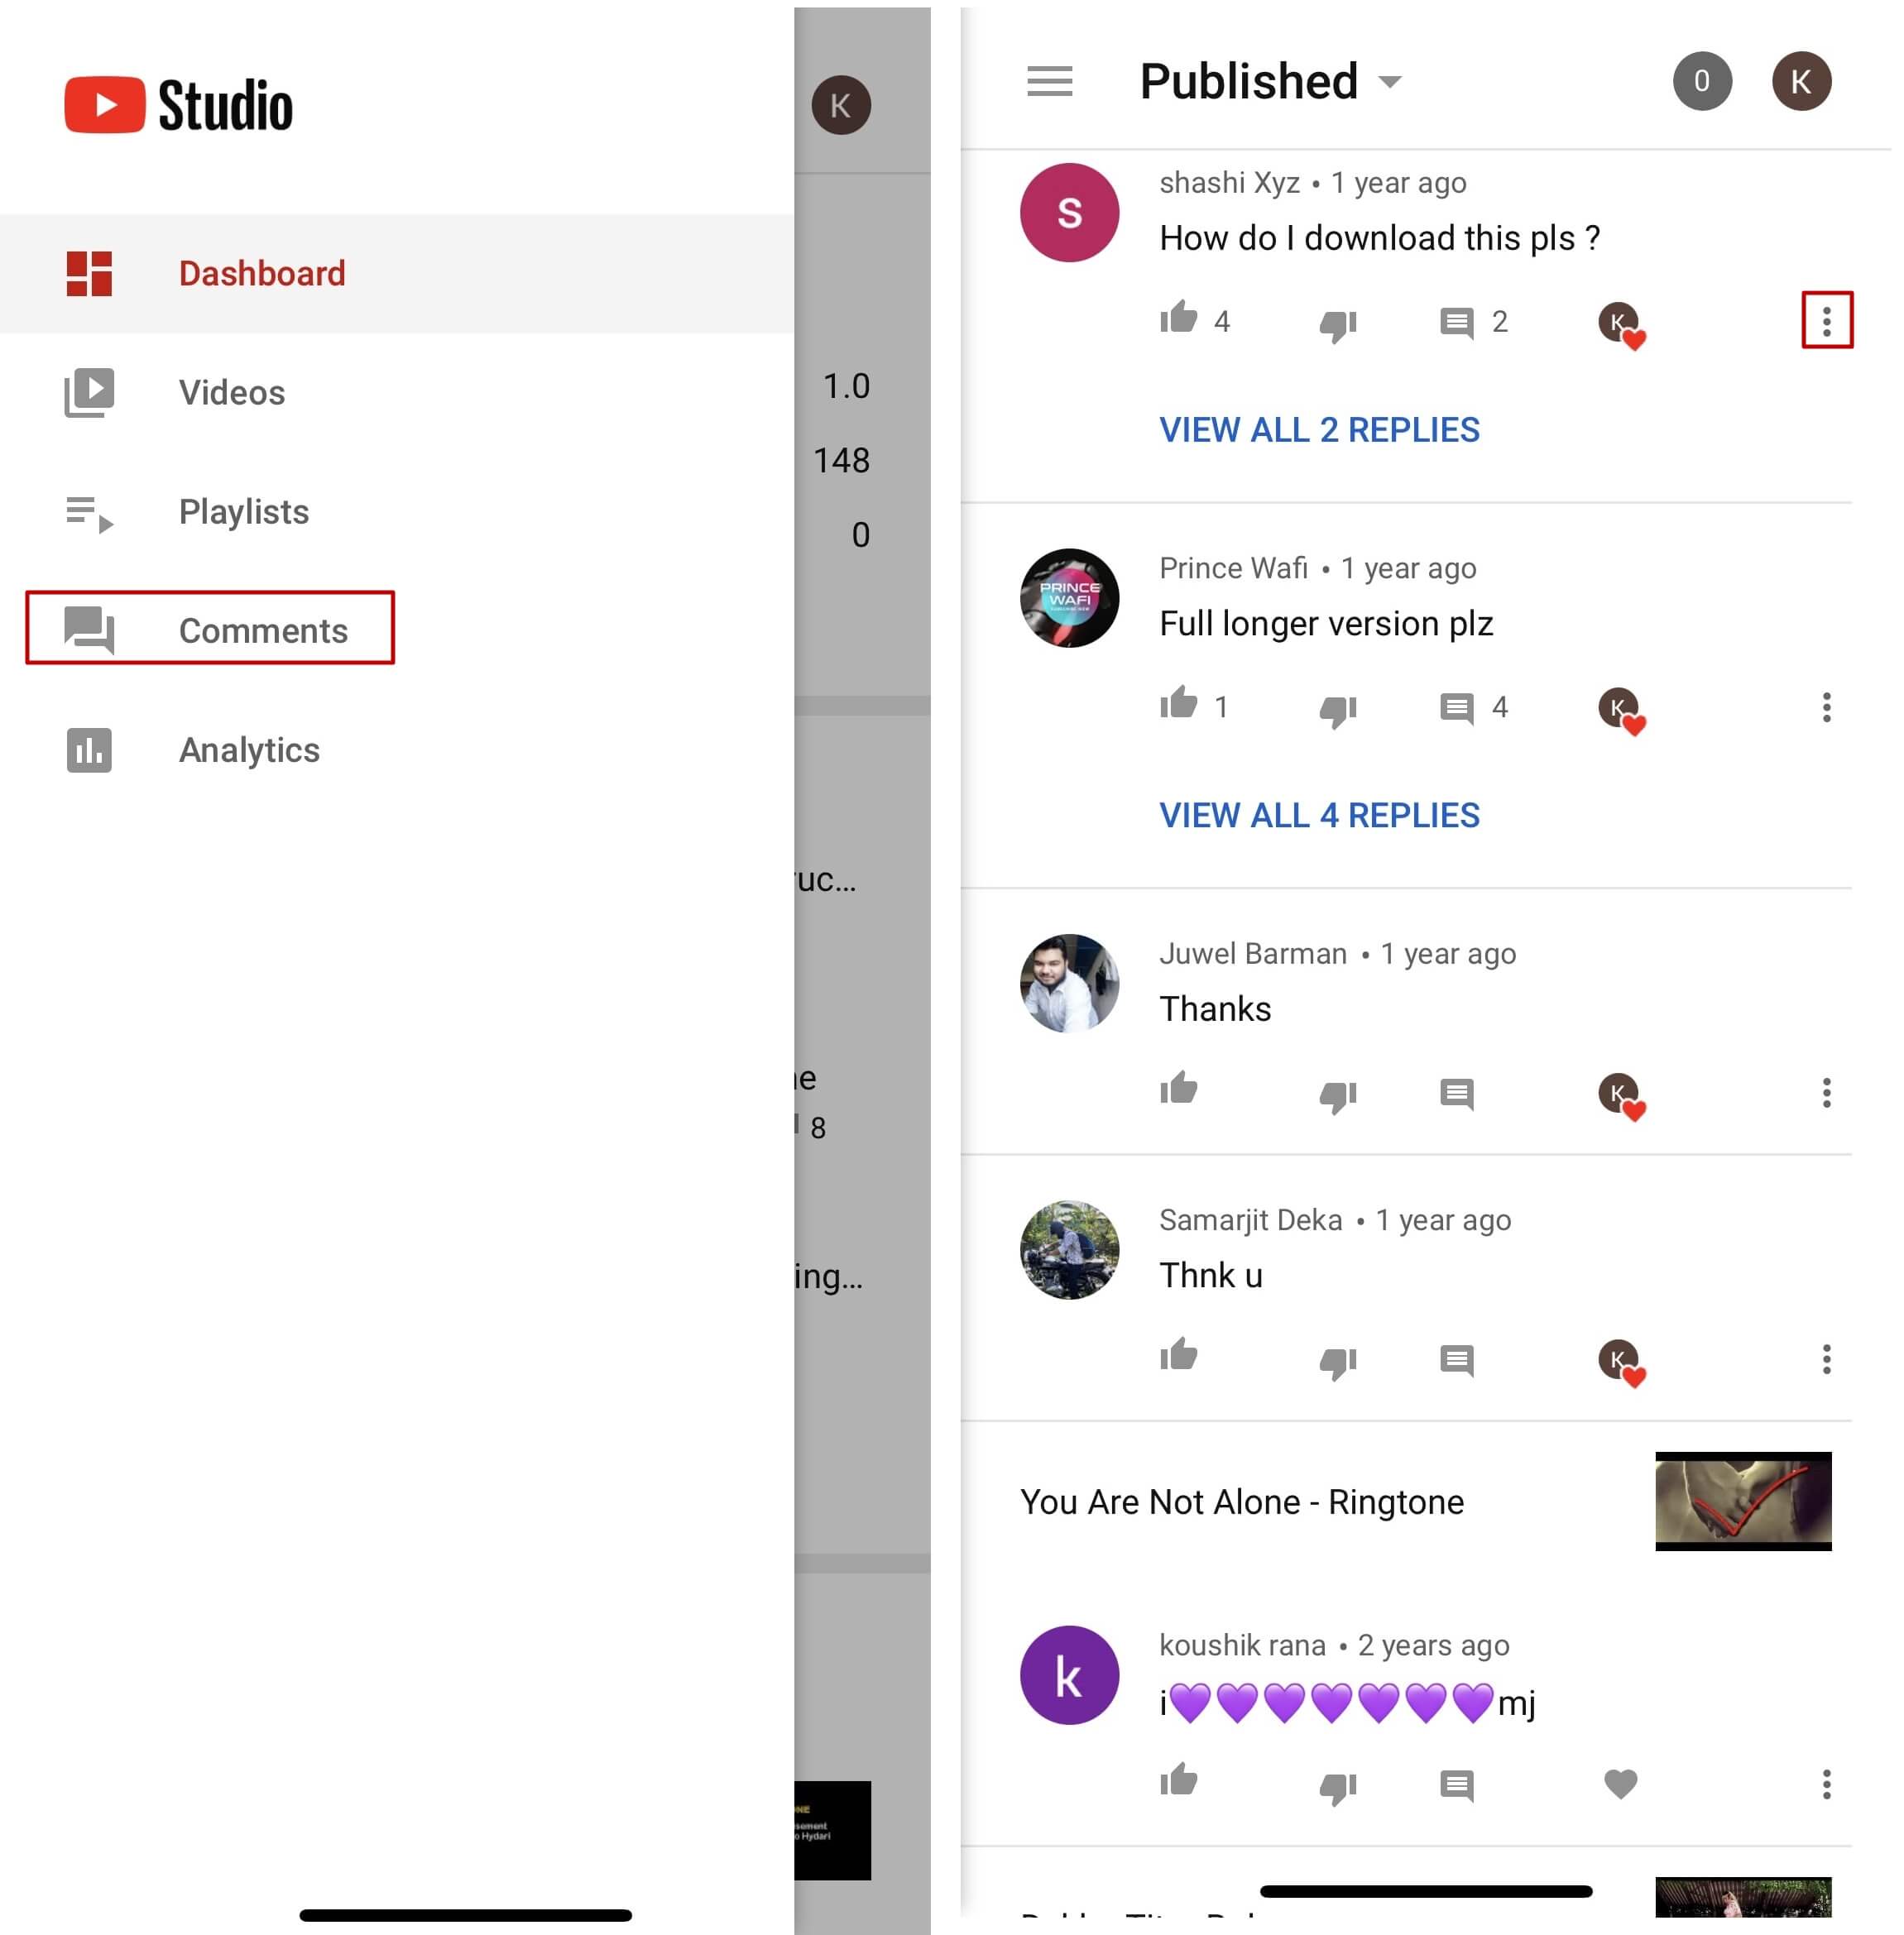
Note: To view all comments received on your YouTube channel, go to the Comments tab under YouTube Studio, and you will find all Channel comments & mentions.
2. Find Your Channel’s YouTube Comments on a Mobile App
This process is comparatively simpler than the previous one as all that you need to do is download the YT Studio app, and access a central location where all the comments for all the videos can be viewed. The process is given below:
Step 1: Obtain a Mobile App
Go to App Store or Google Play Store, and search and download the YT Studio app on your iPhone or Android smartphone (iPhone X is used here for illustration).
Step 2: View/Access All the Comments
Launch the YT Studio app, and sign in to your YouTube account. Tap the Menu icon from the top-left corner of the interface, and tap Comments from the menu to view all the published comments for all the videos that you have received on your YouTube channel.
Step 3: Hide Users and View Held Comments
Tap the More button from the right of an inappropriate comment, and tap Hide user from channel from the menu that comes up. In addition, you can tap the More button next to Published from the top, and tap Held for review from the box that pops up to view the comments that are waiting for your approval.
Note: Unfortunately, you cannot hold the comments for approval using the YT Studio app. As a workaround, you can follow the procedure given earlier to access the desktop version of YouTube on your smartphone, and then use the method explained in the previous section to get this done. However, it is recommended that you do all such sensitive tasks on a laptop or desktop computer to avoid any errors.
Part 3: Find Someone’s YouTube Comments by User Name
If any of your YouTube videos has thousands of comments and you need to find a particular one from a specific user, checking each remark manually would be an extremely time-consuming and tedious task. Therefore, it is a good idea to let an efficient application do the job for you.
One program, a Google Chrome extension called YCS – YouTube Comment Search to be precise, can help you with this. All you are required to do is, install the extension, go to the video, and search the comment by the name of the user. The step-by-step instructions on how this can be done are given below:
Step 1: Install YCS – YouTube Comment Search
Launch Google Chrome on your desktop or laptop computer, search for YCS – YouTube Comment Search, click Add to Chrome, and click Add extension on the notification box that pops up to install the YCS – YouTube Comment Search extension on your instance of Google Chrome.
Step 2: Load All Comments
Go to your or any other’s YouTube video, and click Load All from the top-right corner of the YouTube Comment Search panel that is present under the description box to allow YCS to scan all the comments the video has received.

Step 3: Search Comments from a Particular User
Choose Comments from the search type drop-down list, enter the name of the user in question in the Search box, and click Search to fetch all their comments on the video.

Part 4: How to Edit and Reply to YouTube Comments?
Editing an existing YouTube comment that you have posted earlier, or replying to the one published by someone else is simple. The process is given below:
Step 1: Edit an Existing Comment
Use any of the methods explained above to locate your YouTube comment that you want to edit. Next, click the More icon from the right of the comment, click Edit from the menu, make the required changes to the text, and click SAVE.
Step 2: Reply to a Comment
Locate the comment that you want to reply to, click REPLY from under the comment, type your text in the available field, and click REPLY.

Part 5: How to Moderate YouTube Comments?
If you publish videos on YouTube that may put some impact on people’s lifestyle, you are likely to face criticism quite often. Therefore, you might want to moderate all your comments before they become visible to the audience so as not to spread negativity among the mass. Fortunately, YouTube helps you get this done easily, and the instructions that teach you the process are given below:
Step 1: Get to Your Channel’s Settings Box
Sign in to your YouTube account, click the Menu icon from the top-left corner of the homepage, and click Your videos from the menu that appears.
From the bottom of the navigation bar on the left of the YouTube Studio page, click Settings to open the channel’s Settings box.
Step 2: Moderate YouTube Comments
Go to the Community category from the left pane, and go to the Defaults tab from the right. Next, choose Hide all comments for review from the Comments on your new videos drop-down list, and click SAVE from the bottom-right corner of the box to moderate all YouTube comments that your new videos receive from this point onward.

Part 6: Tips for Writing Good YouTube Comments
While posting a comment on a YouTube video, it is imperative to keep a few things in mind. Some important tips that might come in handy in this regard are suggested below:
- Make your comment as relevant to the video as you possibly can
- Avoid using harsh language or slangs to maintain decency
- Be genuine while leaving feedback. However, make sure to choose polite words while typing a comment
- In case you want to add some suggestions, make sure to be humble
- Ignore the replies with inappropriate content
FAQs About YouTube Comments
Q1) Why can’t I see the comments I posted?
A: If you cannot see your comments, this could be because the owner or moderator has configured the channel or the video to hold all the comments for review before they are visible on YouTube.
In such a case, you are advised to wait for the authorized person to approve your remark before it is published. Another possibility is that the moderator/owner has added you to the ‘hidden users’ list due to some reason. Even in this case, your comment won’t be visible until you are removed from that list.
Q2) I have enabled ‘Notify me’ about comments and other activity on my channel or videos, but can’t see the comments on my video. Why?
A: You won’t be able to view the unpublished comments or those from the users you have added to the ‘hidden’ list. To fix this problem, you may want to disable moderation from your channel or the videos, and also unhide the users. The processes of both these configurations are explained in detail in the above sections.
Richard Bennett
Richard Bennett is a writer and a lover of all things video.
Follow @Richard Bennett
Richard Bennett
Mar 27, 2024• Proven solutions
Have you ever felt worried about any YouTube comment that you published long ago, and later you realized that it was a mistake? Or, do you want to know what comments did you post and when? If so, YouTube offers a simple way of finding your past remarks, and making any changes to them if need be.
That said, the following sections teach you how to find your YouTube comments on a desktop or laptop computer, and also on a mobile device if you are a gadget freak.
- Part 1: How to Find Comments You’ve Posted on YouTube?
- Part 2: How to Find All YouTube Comments Your Channel Has Received?
- Part 3: How to Find Someone’s YouTube Comments by User Name?
- Part 4: How to Edit and Reply to YouTube Comments?
- Part 5: How to Moderate YouTube Comments?
- Part 6: Tips for Writing Good YouTube Comments
Part 1: How to Find All the Comments You’ve Posted on YouTube?
YouTube allows you to post comments on any video only if you are signed in to your Google account while browsing the streaming platform. Because of this, the portal is able to keep a record of your activities, thus enabling you to track all your comments, and take necessary action such as deleting or modifying them as required.
You can learn how to find all the comments you have posted on YouTube while using your preferred device by following the instructions given below:
1. Find Your YouTube Comments on a Desktop or Laptop Computer
Step 1: Sign In to Your YouTube Account
Launch your favorite web browser, go to the YouTube page, click SIGN IN from the top-right corner, and follow the on-screen instructions to enter your credentials and sign in to your Google/YouTube account.
Step 2: Get to the History Page
Click the Menu button from the top-left corner of the page, and then click History from the categories available in the navigation bar in the left.
Step 3: Access/View Your Past Comments
Click Comments from the right of the History page to view all the comments that you have posted earlier.
2. Find Your YouTube Comments on an iPhone
Unfortunately, at the time of this writing, the YouTube app for iOS doesn’t have the feature to view your comments history. However, there is a workaround where you can use a web browser on your smartphone to get this done. The process that is given below explains how to view your past YouTube comments on an iPhone:
Step 1: Sign In to Your YouTube Account on an Internet Browser
Launch your favorite web browser on your iPhone (Safari, the default one, is used here for illustration), go to https://m.youtube.com , tap the profile icon from the top-right corner, tap Sign in from the menu that appears, and follow the on-screen instructions to use your Google account credentials to sign in to YouTube.
Step 2: Access the Desktop Version of YouTube
Tap the More Options icon from the top-left corner of the browser, and then tap Request Desktop Website from the menu that appears to access the desktop version of YouTube on your iPhone.
Step 3: View Your Past YouTube Comments
Tap the Menu icon from the top-left corner of the YouTube page, and tap History from the menu that appears. On the History page, tap Comments from the right pane to view/access your YouTube comments that you posted in the past.
3. Find Your YouTube Comments on an Android Smartphone
As it is with iOS, the YouTube app for Android doesn’t allow you to view your comments history either. However, the workaround of using a web browser works pretty well on Android smartphones too, but with a few tweaks. The process of doing so is given below:
Step 1: Use a Web Browser to Sign In to Your YouTube Account
Launch Google Chrome on your Android smartphone (you can use any other web browser of your choice), and go to https://m.youtube.com . Notice how the interface automatically changes to the desktop version. Note: If the desktop version of the website isn’t visible, you can tap the More button (with three vertical dots) from the top-right corner of the browser, and check the Desktop site box.
Next, tap SIGN IN from the top-right corner of the YouTube page, enter your Google account credentials in the box available on the Sign in screen, enter your password when prompted, and sign in to your YouTube account.
Step 2: Choose a Web Browser (for Confirmation)
When the confirmation box pops up at the bottom, choose your preferred web browser, and tap the frequency of its usage for accessing YouTube. For instance, choose Chrome and Just once to use Google Chrome to access YouTube only for this session.
Step 3: View/Access Your Past YouTube Comments
Once you are signed in to your account, tap the Menu icon from the top-left corner of the YouTube page, and tap History from the menu that appears. When the History page opens up, tap Comments from the right pane to view and/or access your past YouTube comments.
Part 2: How to Find All YouTube Comments Your Channel Has Received?
If you own a YouTube channel and have posted several videos there, it is likely that you also have received a decent number of comments. Usually, these remarks are pretty helpful as they tell you how to improve your production quality, and what your audience prefers to watch in the future. Therefore, it is imperative to learn how to find all the comments that your YouTube channel has received, and the process given below explains exactly that:
1. Find Your Channel’s YouTube Comments on a Desktop or Laptop Computer
You can use your favorite web browser on a PC to easily find all the comments that the videos on your YouTube channel have received as long as you are signed in to your Google account. The step-by-step instructions on how this can be done are given below:
Step 1: Go to the Your videos Page
Open your favorite Internet browser, go to https://www.youtube.com , and sign in to your YouTube account as explained in the previous sections. Next, click the Menu icon from the top-left corner of the YouTube homepage, and click Your videos from the menu that appears.
Step 2: View the Comments
Make sure that the Uploads tab is selected on the Channel content window, and check the number under the Comments column of each video to see how many comments that particular film has received. You can click the number for any video to view its comments.
Step 3: Hide or Hold a Comment for Approval
Click the More icon from the right of the comment you want to moderate, and click Hide user from channel or Always approve comments from this user to hide the comments from the selected user or keep their comments on hold until you review and approve them respectively.
Note: To view all comments received on your YouTube channel, go to the Comments tab under YouTube Studio, and you will find all Channel comments & mentions.
2. Find Your Channel’s YouTube Comments on a Mobile App
This process is comparatively simpler than the previous one as all that you need to do is download the YT Studio app, and access a central location where all the comments for all the videos can be viewed. The process is given below:
Step 1: Obtain a Mobile App
Go to App Store or Google Play Store, and search and download the YT Studio app on your iPhone or Android smartphone (iPhone X is used here for illustration).
Step 2: View/Access All the Comments
Launch the YT Studio app, and sign in to your YouTube account. Tap the Menu icon from the top-left corner of the interface, and tap Comments from the menu to view all the published comments for all the videos that you have received on your YouTube channel.
Step 3: Hide Users and View Held Comments
Tap the More button from the right of an inappropriate comment, and tap Hide user from channel from the menu that comes up. In addition, you can tap the More button next to Published from the top, and tap Held for review from the box that pops up to view the comments that are waiting for your approval.
Note: Unfortunately, you cannot hold the comments for approval using the YT Studio app. As a workaround, you can follow the procedure given earlier to access the desktop version of YouTube on your smartphone, and then use the method explained in the previous section to get this done. However, it is recommended that you do all such sensitive tasks on a laptop or desktop computer to avoid any errors.
Part 3: Find Someone’s YouTube Comments by User Name
If any of your YouTube videos has thousands of comments and you need to find a particular one from a specific user, checking each remark manually would be an extremely time-consuming and tedious task. Therefore, it is a good idea to let an efficient application do the job for you.
One program, a Google Chrome extension called YCS – YouTube Comment Search to be precise, can help you with this. All you are required to do is, install the extension, go to the video, and search the comment by the name of the user. The step-by-step instructions on how this can be done are given below:
Step 1: Install YCS – YouTube Comment Search
Launch Google Chrome on your desktop or laptop computer, search for YCS – YouTube Comment Search, click Add to Chrome, and click Add extension on the notification box that pops up to install the YCS – YouTube Comment Search extension on your instance of Google Chrome.
Step 2: Load All Comments
Go to your or any other’s YouTube video, and click Load All from the top-right corner of the YouTube Comment Search panel that is present under the description box to allow YCS to scan all the comments the video has received.
Step 3: Search Comments from a Particular User
Choose Comments from the search type drop-down list, enter the name of the user in question in the Search box, and click Search to fetch all their comments on the video.
Part 4: How to Edit and Reply to YouTube Comments?
Editing an existing YouTube comment that you have posted earlier, or replying to the one published by someone else is simple. The process is given below:
Step 1: Edit an Existing Comment
Use any of the methods explained above to locate your YouTube comment that you want to edit. Next, click the More icon from the right of the comment, click Edit from the menu, make the required changes to the text, and click SAVE.
Step 2: Reply to a Comment
Locate the comment that you want to reply to, click REPLY from under the comment, type your text in the available field, and click REPLY.
Part 5: How to Moderate YouTube Comments?
If you publish videos on YouTube that may put some impact on people’s lifestyle, you are likely to face criticism quite often. Therefore, you might want to moderate all your comments before they become visible to the audience so as not to spread negativity among the mass. Fortunately, YouTube helps you get this done easily, and the instructions that teach you the process are given below:
Step 1: Get to Your Channel’s Settings Box
Sign in to your YouTube account, click the Menu icon from the top-left corner of the homepage, and click Your videos from the menu that appears.
From the bottom of the navigation bar on the left of the YouTube Studio page, click Settings to open the channel’s Settings box.
Step 2: Moderate YouTube Comments
Go to the Community category from the left pane, and go to the Defaults tab from the right. Next, choose Hide all comments for review from the Comments on your new videos drop-down list, and click SAVE from the bottom-right corner of the box to moderate all YouTube comments that your new videos receive from this point onward.
Part 6: Tips for Writing Good YouTube Comments
While posting a comment on a YouTube video, it is imperative to keep a few things in mind. Some important tips that might come in handy in this regard are suggested below:
- Make your comment as relevant to the video as you possibly can
- Avoid using harsh language or slangs to maintain decency
- Be genuine while leaving feedback. However, make sure to choose polite words while typing a comment
- In case you want to add some suggestions, make sure to be humble
- Ignore the replies with inappropriate content
FAQs About YouTube Comments
Q1) Why can’t I see the comments I posted?
A: If you cannot see your comments, this could be because the owner or moderator has configured the channel or the video to hold all the comments for review before they are visible on YouTube.
In such a case, you are advised to wait for the authorized person to approve your remark before it is published. Another possibility is that the moderator/owner has added you to the ‘hidden users’ list due to some reason. Even in this case, your comment won’t be visible until you are removed from that list.
Q2) I have enabled ‘Notify me’ about comments and other activity on my channel or videos, but can’t see the comments on my video. Why?
A: You won’t be able to view the unpublished comments or those from the users you have added to the ‘hidden’ list. To fix this problem, you may want to disable moderation from your channel or the videos, and also unhide the users. The processes of both these configurations are explained in detail in the above sections.
Richard Bennett
Richard Bennett is a writer and a lover of all things video.
Follow @Richard Bennett
Also read:
- 2024 Approved 10 User-Friendly Free Tools to Create Professional Video Thumbnails
- 2024 Approved Bite-Sized Broadcasting Maintaining Quality in Quick Posts
- Earning Insights Average AdSense Earning for Every 1,000 YouTube Views for 2024
- 2024 Approved Amplify Watcher Count Simplified Tactics Exposed
- 17 Best Lights and Lighting Equipment for YouTube for 2024
- 2024 Approved Breaking Personal Barriers in YT Content Creation
- [Updated] Channel Conversion Secrets YT Vs IGTV
- Best Practices in YouTube Keyword Selection
- Science Sphere's Pinnacle Channels Top 15 YT Lists
- Talking Head Techniques DIY Filming Made Simple
- From Editing to Sharing Using Premiere with YouTube
- [Updated] Elevate Your YouTube Presence with These 8 Free Courses
- The Blueprint for Building an Iconic Online Identity on YouTube
- Final Flourishes Crafting Memorable Video Closures
- Maximize Your Videos A Curated List of Top FLV-to-YouTube Apps
- Unlock 50 Exclusive YouTube Banner Free Gifts!
- The Income Impact of Sharing on YouTube Shorts
- [New] Calculating Monetary Gain for a Milion of YouTube Watchers
- [New] Crafting Engaging YouTube Videos Using FinalCut Pro Expertise
- Designing Efficient Auto-Subscribe Web Addresses for 2024
- Cash Flow Strategies Enrolling in YouTube's 2024 Membership Plan
- [New] Affordable Acoustic Amps and Mics for Video Voyagers
- A Comprehensive List of Top Video-Making Software (iPhone, Android)
- Optimize Video Audio Discovering Affordable WAV Extraction Methods
- The Newcomer's Roadmap Thriving on YouTube and Your Wallet
- [New] Beyond Tubes The Ultimate Video Share Sites
- Strategies for Video Discovery Boosting Viewership Cost-Free
- Complete Guide to Aspect Ratios About YouTube Videos/Shorts/Ads for 2024
- Finding Your Voice on YouTube A Guide to Selective Audiences
- [New] Creating a Singular Stream From Diverse YouTube Videos
- Probing Into YouTube's Decision-Making for Prominent Remarks
- 2024 Approved Decoding the Earnings Algorithm of TSeries Online Channel
- Unleash Potential Deciding Between Studio and Beta Version
- 2024 Approved Essential Selection The Greatest Free Editing Software
- Elevate Well-Being The Leading Online Yoga Vids for 2024
- Updated Virtualdub The Good, the Bad, and the Best Alternatives for You
- How To Transfer Data From Apple iPhone 8 To Other iPhone 12 Pro Max devices? | Dr.fone
- Grasping the Greener Side of Valheim Top Seeds List
- In 2024, 7 Ways to Unlock a Locked Vivo Y78+ Phone
- In 2024, 3 Effective Ways to Bypass Activation Lock from iPhone 11 Pro Max
- Best Pokemons for PVP Matches in Pokemon Go For Honor X50 | Dr.fone
- [Updated] Review and Compare StreamLabs & Embedding Platforms
- How to Bypass Google FRP Lock on Xiaomi Redmi Note 12T Pro Devices
- New Merge MPEG Videos for Free Top 5 Programs
- How To Transfer WhatsApp From Apple iPhone 8 to other iPhone 12 Pro Max devices? | Dr.fone
- [Updated] Broadcasting Vimeo Content Efficiently for 2024
- 2024 Approved Top-Rated Stop Motion Software for Windows and macOS This Year
- In 2024, Complete Tutorial to Use GPS Joystick to Fake GPS Location On Xiaomi Civi 3 Disney 100th Anniversary Edition | Dr.fone
- In 2024, How to Transfer Apple iPhone 14 Pro Data to iPhone 12 A Complete Guide | Dr.fone
- In 2024, How Can I Unlock My iPhone 15 After Forgetting my PIN Code? | Dr.fone
- The way to get back lost messages from Y200
- The Ultimate Guide to iPad Video Editing Top 5 Editors for 2024
- Discovering Your Own Original Tagline in the Realm of TikTok for 2024
- In 2024, How to Transfer Data from Tecno Spark 20C to Samsung Phone | Dr.fone
- Tips and Tricks for Setting Up your Xiaomi Redmi K70E Phone Pattern Lock
- 2024 Approved Best GIF Croppers How to Crop an Animated GIF
- How to Unlock iCloud Activation Lock and iCloud Account On Apple iPhone 15 Plus?
- Sorbet Snapshot Guide A Thorough Examination of Screen Recorder for 2024
- My Videos Arent Playing on Tecno Camon 20 Premier 5G – What Can I Do? | Dr.fone
- In 2024, Simple and Effective Ways to Change Your Country on YouTube App Of your Realme Narzo N53 | Dr.fone
- Bridge Between Platforms Sharing Facebook Videos on WhatsApp
- ChromeSnap Tracker OS Level Recording
- Title: [New] Best Practices in YT Thumbnail Sizing
- Author: Steven
- Created at : 2024-05-25 20:00:51
- Updated at : 2024-05-26 20:00:51
- Link: https://youtube-clips.techidaily.com/new-best-practices-in-yt-thumbnail-sizing/
- License: This work is licensed under CC BY-NC-SA 4.0.
