
![[New] Android's Best YouTube Video Downloaders Reviewed](https://www.lifewire.com/thmb/AEsXzHaxic-Kctx5LPnCrnuznAc=/400x300/filters:no_upscale():max_bytes(150000):strip_icc()/GettyImages-951122364-5bb18ecb46e0fb0026e9b92b.jpg)
[New] Android's Best YouTube Video Downloaders Reviewed
Android’s Best YouTube Video Downloaders Reviewed
9 Powerful YouTube Video Downloader for Android

Ollie Mattison
Mar 27, 2024• Proven solutions
Streaming online videos on YouTube has become a lifestyle for almost all of us now. But time and data usage are huge constraints. Isn’t it annoying when you find free Wi-Fi but lack a suitable video downloader or you have a downloader but no Wi-Fi access at the moment to stream the videos. You may already know how to download mp3 on Android , to solve your dilemma and let you download YouTube videos on your Android phone, we have collected the most popular YouTube video downloader for Android in this article.
Note: We resolutely oppose all forms of copyright-infringing downloads. This tutorial is only for downloading YouTube videos/audio materials from your own channel.
Part 1: Online Video Downloader App Only Supporting YouTube video
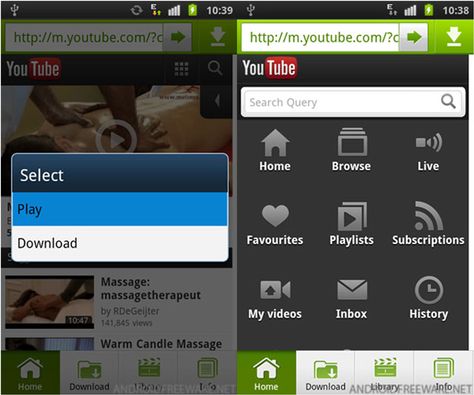
1. TubeMate
Using TubeMate, you can now save your favorite YouTube videos directly on your phone and cherish them anywhere offline. You can choose the quality of the video as this tool supports different resolutions. If you are a novice user this App is simple as one two three, you need to search the video on YouTube and tap the green arrow at the bottom of the screen to download it.

Pros:
- Multiple download options are available, along with the background download option to carry on with other routine work on your phone.
- It can download the video as well as audio.
- Videos can be converted to MP3 format.
Cons:
- It cannot download in 4K format.
- TubeMate doesn’t download the original YouTube video, but rather a video encoded video by YouTube. Hence, the video sometimes fails to play, and downloading a low-resolution video to save YouTube videos on Android might help.
![]()
A cross-platform for making videos anywhere for all creators

Why your video editing isn’t good enough? How about some creative inspo?
- 100 Million+ Users
- 150+ Countries and Regions
- 4 Million+ Social Media Followers
- 5 Million+ Stock Media for Use
* Secure Download

2. Dentex YouTube Downloader
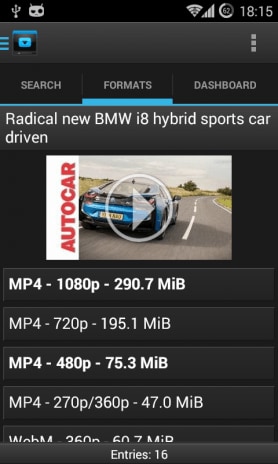
Dentex is a YouTube video downloader for Android that allows you to download YouTube videos within seconds. The interface is divided into 3 parts. In the first part, you can search the YouTube video and see the results, the second part shows the quality and format options, whereas the third part lists the previously downloaded videos.
Pros:
- You can change the format of any video even after downloading.
- You can extract audio files from the videos and later convert them to MP3 format.
- You can remote download through SSH.
Cons:
- An additional plug-in is required to change the format of the video.
- The app is not compatible with lower Android versions such as Gingerbread, Froyo and Éclair.
- The downloading process might sometimes stop, requiring you to resume the process.
3. InsTube Free Video & Music Downloader
InsTube Free Video & Music Downloader allows you to download YouTube videos at high speed supporting MP3, MP4, 3GP, as well as M4A formats. With this tool, downloading YouTube videos in HD, Full HD, or 4K is at your fingertips. You can download videos from more than 40 websites apart from YouTube and enjoy them offline.
Pros:
- It has an inbuilt locker to protect videos and keep them private.
- The hassle-free and neat interface allows easy operation.
- Faster downloading options across 40 plus websites and free YouTube video download is also possible.
Cons:
- Unwanted Ads popup on the screen forcing you to install updates.
- You see the clipboard identifier icon only for few seconds on the screen.
4. WonTube
With WonTube, you can stock and save YouTube videos on Android. Its high conversion speed saves your time. The simple interface of the App makes it user friendly. The App can merge videos and convert the result to any format is a very unique feature.
Pros:
- It supports AVI, WMV, MP4, MKV, FLV, 3GP, and MPG.
- It works well with poor internet connectivity compared to other video downloaders.
- It can convert videos into 20+ formats.
Cons:
- Even though multiple videos can be downloaded simultaneously, the same batch of videos can be converted only to one output format.
5. NewPipe
NewPipe analyses YouTube videos by itself to obtain the necessary information for downloading the videos. This downloader can thus work with phones that do not have Google Services installed in them. In addition, the app allows you to download audio and video with different formats and resolutions. NewPipe also keeps you updated about your favorite YouTube channels while you save YouTube videos on Android.
Pros:
- It is merely 2MB.
- It has a pop-up mode that is movable and resizable, using which you can watch the videos while carrying out other activities on your mobile.
- There are no Ads.
Cons:
- It doesn’t have a log in option, so you cannot view your history.
- It requires additional settings.
![]()

Best YouTube Video Editor for PC - Filmora
- Cut, Trim, Split and Deatch audio from YouTube videos
- Edit Videos with key frame, motion track, green screen ect.
- Built-in plentiful YouTube templates and effects
- Export to MP4, MOV, MKV, GIF and multiple formats
For Win 7 or later (64-bit)
For macOS 10.12 or later
 Secure Download


Part 2: YouTube Video Downloader App Supporting multiple video site
1. SnapTube
SnapTube is yet another amazing video and audio downloading app to download audio in MP3 format and video in MP4 format. The app is organized in itself, carrying a section of popular videos, most viewed videos and a daily recommendation section. The app also allows video downloading option from popular social media sites such as Instagram and Facebook.
Pros:
- It does not require an additional plug-in.
- It does not have malware and Ads.
Cons:
- YouTube multimedia download is restricted in India and China.
2. Videoder
Videoder is the app for you when you want to broaden your horizon and download videos from Facebook, Instagram, YouTube, Hotstar etc. in MP3 or MP4 format. It comes with an inbuilt feature to convert videos to MP3 format. You can personalize the app by using themes, setting cover art, and tag editor to organize your playlist in a visually attractive way.

Pros:
- Looking for HD quality viewing? You have 4K quality videos with Videoder.
- Multiple downloading is possible with a single tap.
- Downloading speed is accelerated by the number of network connections and utilizing it to the maximum.
Cons:
- Because of the numerous features, it may take time to learn all the functionalities.
- An audio encoding pop-up may sometimes appear asking to install a plug-in.
- It doesn’t support files other than MP3 and MP4 format.
3. KeepVid
KeepVid is a handy YouTube downloader that can download videos from YouTube and 27 other sites. It is a fantastic downloading tool that comes with a user-friendly interface and allows you to download videos from many sites, including YouTube, Vimeo, and Dailymotion. KeepVid also allows you to download multiple videos simultaneously with the option of selecting the quality of the videos.
Pros:
- The app does not have any size limit to the video.
- It does not have any Ads.
- It can download videos as good as 4K.
Cons:
- The only disadvantage is that you must download the app from the official site KeepVid.com.
Conclusion
In the end, we would like to say that as time passes by and with the tight schedules a YouTube video downloader on your phone frees you from your computer. For all those offline viewing needs of yours, the above-mentioned downloaders are excellent alternatives and help you save YouTube videos on Android.
Ollie Mattison
Ollie Mattison is a writer and a lover of all things video.
Follow @Ollie Mattison
Ollie Mattison
Mar 27, 2024• Proven solutions
Streaming online videos on YouTube has become a lifestyle for almost all of us now. But time and data usage are huge constraints. Isn’t it annoying when you find free Wi-Fi but lack a suitable video downloader or you have a downloader but no Wi-Fi access at the moment to stream the videos. You may already know how to download mp3 on Android , to solve your dilemma and let you download YouTube videos on your Android phone, we have collected the most popular YouTube video downloader for Android in this article.
Note: We resolutely oppose all forms of copyright-infringing downloads. This tutorial is only for downloading YouTube videos/audio materials from your own channel.
Part 1: Online Video Downloader App Only Supporting YouTube video
1. TubeMate
Using TubeMate, you can now save your favorite YouTube videos directly on your phone and cherish them anywhere offline. You can choose the quality of the video as this tool supports different resolutions. If you are a novice user this App is simple as one two three, you need to search the video on YouTube and tap the green arrow at the bottom of the screen to download it.
Pros:
- Multiple download options are available, along with the background download option to carry on with other routine work on your phone.
- It can download the video as well as audio.
- Videos can be converted to MP3 format.
Cons:
- It cannot download in 4K format.
- TubeMate doesn’t download the original YouTube video, but rather a video encoded video by YouTube. Hence, the video sometimes fails to play, and downloading a low-resolution video to save YouTube videos on Android might help.
![]()
A cross-platform for making videos anywhere for all creators
Why your video editing isn’t good enough? How about some creative inspo?
- 100 Million+ Users
- 150+ Countries and Regions
- 4 Million+ Social Media Followers
- 5 Million+ Stock Media for Use
* Secure Download
2. Dentex YouTube Downloader
Dentex is a YouTube video downloader for Android that allows you to download YouTube videos within seconds. The interface is divided into 3 parts. In the first part, you can search the YouTube video and see the results, the second part shows the quality and format options, whereas the third part lists the previously downloaded videos.
Pros:
- You can change the format of any video even after downloading.
- You can extract audio files from the videos and later convert them to MP3 format.
- You can remote download through SSH.
Cons:
- An additional plug-in is required to change the format of the video.
- The app is not compatible with lower Android versions such as Gingerbread, Froyo and Éclair.
- The downloading process might sometimes stop, requiring you to resume the process.
3. InsTube Free Video & Music Downloader
InsTube Free Video & Music Downloader allows you to download YouTube videos at high speed supporting MP3, MP4, 3GP, as well as M4A formats. With this tool, downloading YouTube videos in HD, Full HD, or 4K is at your fingertips. You can download videos from more than 40 websites apart from YouTube and enjoy them offline.
Pros:
- It has an inbuilt locker to protect videos and keep them private.
- The hassle-free and neat interface allows easy operation.
- Faster downloading options across 40 plus websites and free YouTube video download is also possible.
Cons:
- Unwanted Ads popup on the screen forcing you to install updates.
- You see the clipboard identifier icon only for few seconds on the screen.
4. WonTube
With WonTube, you can stock and save YouTube videos on Android. Its high conversion speed saves your time. The simple interface of the App makes it user friendly. The App can merge videos and convert the result to any format is a very unique feature.
Pros:
- It supports AVI, WMV, MP4, MKV, FLV, 3GP, and MPG.
- It works well with poor internet connectivity compared to other video downloaders.
- It can convert videos into 20+ formats.
Cons:
- Even though multiple videos can be downloaded simultaneously, the same batch of videos can be converted only to one output format.
5. NewPipe
NewPipe analyses YouTube videos by itself to obtain the necessary information for downloading the videos. This downloader can thus work with phones that do not have Google Services installed in them. In addition, the app allows you to download audio and video with different formats and resolutions. NewPipe also keeps you updated about your favorite YouTube channels while you save YouTube videos on Android.
Pros:
- It is merely 2MB.
- It has a pop-up mode that is movable and resizable, using which you can watch the videos while carrying out other activities on your mobile.
- There are no Ads.
Cons:
- It doesn’t have a log in option, so you cannot view your history.
- It requires additional settings.
![]()
Best YouTube Video Editor for PC - Filmora
- Cut, Trim, Split and Deatch audio from YouTube videos
- Edit Videos with key frame, motion track, green screen ect.
- Built-in plentiful YouTube templates and effects
- Export to MP4, MOV, MKV, GIF and multiple formats
For Win 7 or later (64-bit)
For macOS 10.12 or later
Secure Download
Part 2: YouTube Video Downloader App Supporting multiple video site
1. SnapTube
SnapTube is yet another amazing video and audio downloading app to download audio in MP3 format and video in MP4 format. The app is organized in itself, carrying a section of popular videos, most viewed videos and a daily recommendation section. The app also allows video downloading option from popular social media sites such as Instagram and Facebook.
Pros:
- It does not require an additional plug-in.
- It does not have malware and Ads.
Cons:
- YouTube multimedia download is restricted in India and China.
2. Videoder
Videoder is the app for you when you want to broaden your horizon and download videos from Facebook, Instagram, YouTube, Hotstar etc. in MP3 or MP4 format. It comes with an inbuilt feature to convert videos to MP3 format. You can personalize the app by using themes, setting cover art, and tag editor to organize your playlist in a visually attractive way.
Pros:
- Looking for HD quality viewing? You have 4K quality videos with Videoder.
- Multiple downloading is possible with a single tap.
- Downloading speed is accelerated by the number of network connections and utilizing it to the maximum.
Cons:
- Because of the numerous features, it may take time to learn all the functionalities.
- An audio encoding pop-up may sometimes appear asking to install a plug-in.
- It doesn’t support files other than MP3 and MP4 format.
3. KeepVid
KeepVid is a handy YouTube downloader that can download videos from YouTube and 27 other sites. It is a fantastic downloading tool that comes with a user-friendly interface and allows you to download videos from many sites, including YouTube, Vimeo, and Dailymotion. KeepVid also allows you to download multiple videos simultaneously with the option of selecting the quality of the videos.
Pros:
- The app does not have any size limit to the video.
- It does not have any Ads.
- It can download videos as good as 4K.
Cons:
- The only disadvantage is that you must download the app from the official site KeepVid.com.
Conclusion
In the end, we would like to say that as time passes by and with the tight schedules a YouTube video downloader on your phone frees you from your computer. For all those offline viewing needs of yours, the above-mentioned downloaders are excellent alternatives and help you save YouTube videos on Android.
Ollie Mattison
Ollie Mattison is a writer and a lover of all things video.
Follow @Ollie Mattison
Adding Subtitles: A Step-by-Step YouTube Video Approach
How to Add Text to YouTube Video Before or After Uploading

Richard Bennett
Mar 27, 2024• Proven solutions
A great way to emphasize something you say in your vlog is to have your words appear next to you as you say them . Adding text to YouTube videos can look really professional. You might put a title at the beginning of your video, use bullet points to help people keep track of your monologue, or to highlight an important point by writing it on your screen. When you use text in your videos there are a few things you need to keep in mind. In this article, I will share with you 2 ways to add text/subtitles/captions to YouTube videos, whether you need to add text to the video during editing and upload it to YouTube later, or you have uploaded the video to YouTube already and want to add some captions and subtitles to complement it.
- Part 1: Add text to video before uploading YouTube
- Part 2: Add Text to YouTube video after uploading
- Part 3: Top 3 YouTube Video Text Tips
How to Add Text to YouTube Video Before Uploading
Before uploading the video to YouTube, it is recommended to add text to the video first. You can add simple texts and captions to videos with the free video editing software. To add more text effects to the video, you can use Filmora, Sony Vegas Movie Studio and Adobe Premiere CC based on your video editing skills and needs. These software programs are great video editors, which can help you input text easily.
1. Use Filmora to Add text to Videos
There are plenty of Text effects built in Filmora, you can apply motions and animation to texts, titles, subtitles, end credits and openers as well. Each title preset will present different effects. You can add multiple text boxes and place the text to any position in need. Besides writing texts to video, you can select the target font, size and color and customize the text effect in detail as well. To add text to a video in Filmora is easy, just follow the steps below:

- Open up Filmora and drag a clip into your timeline. Then, go to Text/Credit.
- Find a style that you like and drag it into your timeline where you want your text to appear. Make sure your text is selected in your timeline and click the Advanced Text Editing icon, which looks like a pen and paper.
- Insert your own words and drag your text to where you want it on the screen. Adjust the size by dragging the blue squares which surround your text.
- To change the color of your text, go into the Customize menu. You will find it near the top left of your screen. While you are in Customize there will be a section called Fill. This is where you select the color of your text. You can even change the fill type to ‘gradient fill’ and have your text transition between two colors.
- All of Filmora’s text options are animated – they fade, move around the screen, or perform some other type of action as they appear and disappear. To change the animation of your text select Animation next to Customize. A selection of different animations will appear. Double click on the one you want to apply to your text.
 Download Mac Version ](https://tools.techidaily.com/wondershare/filmora/download/ )
Check the detailed steps of how to add text to video in Filmora.
2. Use Windows Movie Maker
As a simple video editing software, Windows Movie Maker also allows you to add text to videos. It provides 3 different options for you to add Title, Caption and Credits to the YouTube videos. You can follow the steps below to add text to the video in WMM.

- To start, launch the Windows Movie Maker.
- After, select import video to insert the video that you want to add text with.
- Select edit movie then click make credits or titles.
- Then add the text that you want to include.
For the step by step tutorial of adding text to YouTube video, check How to Add Text to Video with Windows Movie Maker . Besides adding text to video, you can use Windows Movie Maker to edit YouTube video further. Learn How to trim, cut, combine, split video and add transitions and upload video to YouTube in Windows Movie Maker?
3. Use Sony Vegas Movie Studio
Adding text to YouTube videos in Sony Vegas is not so complicated if you are new to this software. You can adjust the color, size, font and duration of the text effect and add fade in and fade out effects. Follow the steps below to add texts to video in Vegas:

- Launch Sony Vegas Movie Studio.
- Click the View Menu then select Media Generators.
- Choose the generator that you want to use.
- After, drag the generator you have chosen on the timeline.
- Then, the video event FX dialogue box will appear.
- Enter the text that you want and modify it by changing the font, size and style.
4. Use Adobe Premiere CC
For professionals who are looking for a professional way to adding text to video and also have a sufficient budget, Adobe Premiere CC is always recommended. You can check the video and the steps below to add text to video in Premiere:
- Click open or create a project.
- Click the file menu then choose new and title.
- After, the text window will appear then utilize the text tool to add text.
- You can also edit your text using the commands that are provided in the Title Menu.
- Save the text that you have made by clicking the file menu then choose Save As.
How to Add Text to video in YouTube after uploading
Sometimes, we have uploaded a video to YouTube and then want to add subtitles/cc to the video later. The good news is that YouTube is not only a site for videos but is also the place where you can edit your videos in an instant. As you have read, adding text and captions to the uploaded YouTube videos is just a breeze.
Of course, you can only add and edit texts and captions to the video under your YouTube account. Here are the steps on how you can add text to your videos with YouTube Video Editor after the video is uploaded.
- Go to youtube.com then sign in to your account. After sign in your YouTube account, click your avatar and select Creator Studio to enter the creator studio interface.
- Click the Video Manager tab and in Videos section you will see all your videos uploaded to YouTube. Select the video that you want to add captions to and then select Subtitles/CC after clicking Edit button.
- Add Captions/Subtitles

While YouTube may have already created the subtitles automatically for your video with its speech recognition technology. If it does, you will see something like Published: English (Automatic) to the right of your video. If the automatically generated subtitles is not correct, you can edit it to improve the accuracy. Select the line that needs modification to make the edits.
If there is no auto-subtitles, you can choose from 3 ways to add subtitles and closed captions to the video: Upload a file, Transcribe and auto-sync and create new subtitles or CC.

Upload a file: upload a text transcript or timed subtitles file.
Transcribe and auto-sync: Type or paste in a full transcript of the video and subtitle timings will be set automatically.
Create new subtitles or CC: Create subtitles and closed captions by typing them in as you watch the video.
If you already have a caption file which contains both text and time codes, just click Upload a file and upload the text to the video.
- Once everything is okay, you can change the name of the video and you can do it in the box beside Project.
Cons of Using YouTube Video Editor
When you make use of this editor, you cannot shorten the clips for music. Moreover, since it is an online editor, you need to refresh the page in order to do the changes. Aside from YouTube Video Editor, you can use Adobe Premier Pro, MAGIX Vegas Pro, OpenShot and Avidemux.
From 20th September 2017 users will no longer be able to use the complementary editing suite. Check the best YouTube video editor alternatives from this complete guide to find out more YouTube video editor alternatives if you want to add text to video with more features and customization.
Top 3 Tips for Adding Text to YouTube Videos
1. Leave Room
If you know you are going to add text to your video then make sure you leave room for it in your frame. Consider standing off to one side instead of directly in front of your camera. You do not want to have to choose between not using text, making your text really small, or placing it over your face.
While planning out your frame and leaving room for your text, consider what color you are going to make the words and whether it will stand out and look good against your background.
2. Bigger is Better
People should be able to read your text without putting in any extra effort, such as straining their eyes to make out small words. If it takes effort to read your text then a lot of people will just ignore it. Your text should be big enough that somebody watching your video on their smartphone screen – where everything is shrunk down – can read it easily.
It is easier to make your text larger when you stick to titles, keywords, and short sentences.
3. Do Not Overuse
Text is a great tool for making something stand out. However, if you try to use text to emphasize too much of what you say it will lose its effect. Text does not stand out anymore once viewers get too used to seeing it. Too much text can even get annoying and cause people to click away from your videos.
Try to use text to emphasize only the most important things you say.

Richard Bennett
Richard Bennett is a writer and a lover of all things video.
Follow @Richard Bennett
Richard Bennett
Mar 27, 2024• Proven solutions
A great way to emphasize something you say in your vlog is to have your words appear next to you as you say them . Adding text to YouTube videos can look really professional. You might put a title at the beginning of your video, use bullet points to help people keep track of your monologue, or to highlight an important point by writing it on your screen. When you use text in your videos there are a few things you need to keep in mind. In this article, I will share with you 2 ways to add text/subtitles/captions to YouTube videos, whether you need to add text to the video during editing and upload it to YouTube later, or you have uploaded the video to YouTube already and want to add some captions and subtitles to complement it.
- Part 1: Add text to video before uploading YouTube
- Part 2: Add Text to YouTube video after uploading
- Part 3: Top 3 YouTube Video Text Tips
How to Add Text to YouTube Video Before Uploading
Before uploading the video to YouTube, it is recommended to add text to the video first. You can add simple texts and captions to videos with the free video editing software. To add more text effects to the video, you can use Filmora, Sony Vegas Movie Studio and Adobe Premiere CC based on your video editing skills and needs. These software programs are great video editors, which can help you input text easily.
1. Use Filmora to Add text to Videos
There are plenty of Text effects built in Filmora, you can apply motions and animation to texts, titles, subtitles, end credits and openers as well. Each title preset will present different effects. You can add multiple text boxes and place the text to any position in need. Besides writing texts to video, you can select the target font, size and color and customize the text effect in detail as well. To add text to a video in Filmora is easy, just follow the steps below:
- Open up Filmora and drag a clip into your timeline. Then, go to Text/Credit.
- Find a style that you like and drag it into your timeline where you want your text to appear. Make sure your text is selected in your timeline and click the Advanced Text Editing icon, which looks like a pen and paper.
- Insert your own words and drag your text to where you want it on the screen. Adjust the size by dragging the blue squares which surround your text.
- To change the color of your text, go into the Customize menu. You will find it near the top left of your screen. While you are in Customize there will be a section called Fill. This is where you select the color of your text. You can even change the fill type to ‘gradient fill’ and have your text transition between two colors.
- All of Filmora’s text options are animated – they fade, move around the screen, or perform some other type of action as they appear and disappear. To change the animation of your text select Animation next to Customize. A selection of different animations will appear. Double click on the one you want to apply to your text.
Download Mac Version ](https://tools.techidaily.com/wondershare/filmora/download/ )
Check the detailed steps of how to add text to video in Filmora.
2. Use Windows Movie Maker
As a simple video editing software, Windows Movie Maker also allows you to add text to videos. It provides 3 different options for you to add Title, Caption and Credits to the YouTube videos. You can follow the steps below to add text to the video in WMM.
- To start, launch the Windows Movie Maker.
- After, select import video to insert the video that you want to add text with.
- Select edit movie then click make credits or titles.
- Then add the text that you want to include.
For the step by step tutorial of adding text to YouTube video, check How to Add Text to Video with Windows Movie Maker . Besides adding text to video, you can use Windows Movie Maker to edit YouTube video further. Learn How to trim, cut, combine, split video and add transitions and upload video to YouTube in Windows Movie Maker?
3. Use Sony Vegas Movie Studio
Adding text to YouTube videos in Sony Vegas is not so complicated if you are new to this software. You can adjust the color, size, font and duration of the text effect and add fade in and fade out effects. Follow the steps below to add texts to video in Vegas:
- Launch Sony Vegas Movie Studio.
- Click the View Menu then select Media Generators.
- Choose the generator that you want to use.
- After, drag the generator you have chosen on the timeline.
- Then, the video event FX dialogue box will appear.
- Enter the text that you want and modify it by changing the font, size and style.
4. Use Adobe Premiere CC
For professionals who are looking for a professional way to adding text to video and also have a sufficient budget, Adobe Premiere CC is always recommended. You can check the video and the steps below to add text to video in Premiere:
- Click open or create a project.
- Click the file menu then choose new and title.
- After, the text window will appear then utilize the text tool to add text.
- You can also edit your text using the commands that are provided in the Title Menu.
- Save the text that you have made by clicking the file menu then choose Save As.
How to Add Text to video in YouTube after uploading
Sometimes, we have uploaded a video to YouTube and then want to add subtitles/cc to the video later. The good news is that YouTube is not only a site for videos but is also the place where you can edit your videos in an instant. As you have read, adding text and captions to the uploaded YouTube videos is just a breeze.
Of course, you can only add and edit texts and captions to the video under your YouTube account. Here are the steps on how you can add text to your videos with YouTube Video Editor after the video is uploaded.
- Go to youtube.com then sign in to your account. After sign in your YouTube account, click your avatar and select Creator Studio to enter the creator studio interface.
- Click the Video Manager tab and in Videos section you will see all your videos uploaded to YouTube. Select the video that you want to add captions to and then select Subtitles/CC after clicking Edit button.
- Add Captions/Subtitles
While YouTube may have already created the subtitles automatically for your video with its speech recognition technology. If it does, you will see something like Published: English (Automatic) to the right of your video. If the automatically generated subtitles is not correct, you can edit it to improve the accuracy. Select the line that needs modification to make the edits.
If there is no auto-subtitles, you can choose from 3 ways to add subtitles and closed captions to the video: Upload a file, Transcribe and auto-sync and create new subtitles or CC.
Upload a file: upload a text transcript or timed subtitles file.
Transcribe and auto-sync: Type or paste in a full transcript of the video and subtitle timings will be set automatically.
Create new subtitles or CC: Create subtitles and closed captions by typing them in as you watch the video.
If you already have a caption file which contains both text and time codes, just click Upload a file and upload the text to the video.
- Once everything is okay, you can change the name of the video and you can do it in the box beside Project.
Cons of Using YouTube Video Editor
When you make use of this editor, you cannot shorten the clips for music. Moreover, since it is an online editor, you need to refresh the page in order to do the changes. Aside from YouTube Video Editor, you can use Adobe Premier Pro, MAGIX Vegas Pro, OpenShot and Avidemux.
From 20th September 2017 users will no longer be able to use the complementary editing suite. Check the best YouTube video editor alternatives from this complete guide to find out more YouTube video editor alternatives if you want to add text to video with more features and customization.
Top 3 Tips for Adding Text to YouTube Videos
1. Leave Room
If you know you are going to add text to your video then make sure you leave room for it in your frame. Consider standing off to one side instead of directly in front of your camera. You do not want to have to choose between not using text, making your text really small, or placing it over your face.
While planning out your frame and leaving room for your text, consider what color you are going to make the words and whether it will stand out and look good against your background.
2. Bigger is Better
People should be able to read your text without putting in any extra effort, such as straining their eyes to make out small words. If it takes effort to read your text then a lot of people will just ignore it. Your text should be big enough that somebody watching your video on their smartphone screen – where everything is shrunk down – can read it easily.
It is easier to make your text larger when you stick to titles, keywords, and short sentences.
3. Do Not Overuse
Text is a great tool for making something stand out. However, if you try to use text to emphasize too much of what you say it will lose its effect. Text does not stand out anymore once viewers get too used to seeing it. Too much text can even get annoying and cause people to click away from your videos.
Try to use text to emphasize only the most important things you say.
Richard Bennett
Richard Bennett is a writer and a lover of all things video.
Follow @Richard Bennett
Also read:
- [Updated] Becoming a Pro in Video Game Broadcasts
- [Updated] Ensuring Security in Converting YouTube Tracks to MP3 Format
- [New] Creating Hilarious Reactions Mastering YouTube Tricks (3 Methods)
- In 2024, Sites Like FameBit Where You Can Find YouTube Sponsorships
- 2024 Approved Essential YouTube Tagging Strategies for Optimal Visibility
- Elevate Your Content' Writability with These Best Fonts for 2024
- Recipe Rendezvous Top 30 Channels with a Taste for Success
- View Count Rewards on YouTube – Per Million?
- Finding the Perfect Phrases for Gamers' Videos
- Digital Dominance Display Top 10 by Followers
- [New] Essential Tips Creating Striking YouTube Video Previews
- A Step-by-Step Manual on Repetitive Watch Experiences in YT for 2024
- In 2024, Achieve Professional-Level YouTube Transcription Without Spending
- The New Wave of YouTube Branding Best Titles for Vloggers & Filmmakers (Keep It Under or at 156 Characters)
- How To Stream Google Meet to YouTube [Step-by-Step Guide]
- Creating Stunning YouTube Openings - Best Tools List
- [New] Designing Effective Video Previews for Channels
- In 2024, Elevate Your Channels - YouTube's Partner Program
- In 2024, Crafting Competitive Edge Assessing Personal and Marketplace Videos
- In 2024, Digital Divas Top Ten Gamers on YouTube
- Dial-Up Beats Easy Audio Posting to YouTubes for 2024
- Decoding YouTube’s Economic Strategy The Rise of Short Videos for 2024
- 2024 Approved Editing Essentials Your Go-To Guide for Beginner Vloggers
- Ace Your Online Presence YouTube's Studio Command Center for 2024
- Streaming Masterpieces Best Movie Directories on YT
- Essential Tips for YouTube Short Fixes
- Discovering the World's Most Popular Shorter Videos (FREE) for 2024
- [Updated] Capturing Moments with the Best 5 Photo & Video Apps for iPhones/Android
- 2024 Approved DIY YouTube Trailer Production via Filmora Software
- [Updated] Crystal Clear Capture Amping Up Your Home Studio Recordings
- Perfect Your Video's First Impression 20 Best Fonts
- Secure Approach Verifying Your YouTube Login Details
- Audience Engagement and Its Impact on YouTube Performance for 2024
- In 2024, Unlock iPhone XS Max Without Passcode Easily
- Remove Nokia Lock Screen without Password(Nokia )
- [Updated] ScreenRec Demystified A Comprehensible Guide for Laptops for 2024
- [Updated] 2024 Approved Unveiling the Secrets to a Flawless FB Live Session
- [Updated] 2024 Approved Top 5 Factors to Master When Using TikTok Web (Mac)
- Updated Top Mac Apps for Converting Audio Files to MP3 for 2024
- [New] In 2024, Instantly Display Pics on Platforms with This Guide
- In 2024, Best Text Plugins For After Effects
- You must know how to Share Your Winning Forex Trades With Friends and Family on Local Trade Copier™ Together
- In 2024, Perfecting the Art of Quiet Videography
- Is your Realme 11X 5G working too slow? Heres how you can hard reset it | Dr.fone
- [Updated] 2024 Approved Fabled Frontiers Top 10 Roguely Ventures
- Top 5 Best Lightweight Action Cameras For Backpacking Or Hiking
- New 2024 Approved How to Adjust Audio Volume in Videos 4 Ways
- 2024 Approved Create Video with Music for FREE
- Connected Platforms Sharing Videos Between Twitter & Tumblr
- Ultimate Guide to Catch the Regional-Located Pokemon For Vivo Y27s | Dr.fone
- [Updated] Exploring the Best Converters for TikTok Graphics
- [New] 15 Top-Rated Screen Capture Tools to Support Education for 2024
- [Updated] Instagram Visual Impact Strategic Planning for Viral Video Campaigns for 2024
- 2024 Approved Android's Best Free MP3 Extraction Tools
- How To Deal With the Honor 100 Screen Black But Still Works? | Dr.fone
- [Updated] In 2024, Navigating Instagram’s Backdrop Swap A Filmmaker's Guide
- 2024 Approved Comparing the Giants An In-Depth Guide to TikTok vs Snapchat's Functionality
- MacBook Video Editing Download and Set Up Videoleap in Minutes for 2024
- New Guide How To Check iCloud Activation Lock Status From Your iPhone XR
- [New] 2024 Approved Mastering FB Advertising with a Focus on Video Content
- How to Change Lock Screen Wallpaper on Google Pixel 8
- Title: [New] Android's Best YouTube Video Downloaders Reviewed
- Author: Steven
- Created at : 2024-05-25 19:59:14
- Updated at : 2024-05-26 19:59:14
- Link: https://youtube-clips.techidaily.com/new-androids-best-youtube-video-downloaders-reviewed/
- License: This work is licensed under CC BY-NC-SA 4.0.
