
!["[New] Amplify Your Video's Impact 7 Royalty-Free Sounds"](https://www.lifewire.com/thmb/SSy6NGHbIXSbfSEfGlhpi2qybtc=/400x300/filters:no_upscale():max_bytes(150000):strip_icc()/facebook-1602262_1920-5c36883246e0fb0001a7e779.jpg)
"[New] Amplify Your Video's Impact 7 Royalty-Free Sounds"
Amplify Your Video’s Impact: 7 Royalty-Free Sounds
7 Places to Find Royalty Free Sound Effects for YouTube Videos

Richard Bennett
Mar 27, 2024• Proven solutions
Sound effects can add a lot of excitement to your videos. Sometimes they are even used for comedic effect. For example, you might use a fake slap sound in a slapstick comedy sketch. Other times sound effects can be more subtle. You might want to add city noises to the background of your video to help set your scene, or a droning sound to build suspense. A lot of the most popular free sound effects are related to the genres of science fiction or action.
- Part 1: Three Types of Sound Effects
- Part 2: Royalty-Free Sound Effects for Your YouTube Videos
- Part 3: Free Sound Effects and Music in Filmora
Part 1: Three Types of Sound Effects
1. Without License
When you want to download sound effects for YouTube, the licensed ones cannot be used, but there are a few that do not hold a license and can be easily downloaded from the website. The quality might be poor to some extent, but you may use the sound effects without a license in any product or video.
2. Creative Commons License
The sound effects under the CC license need to be checked for their type. There are some vlog sound effects that can be used for personal projects free but not for commercial ones. There are a few sound effects that might just require attribution or credit to the creator and cannot be modified in any way.
3. Royalty-free license
You may download sound effects for YouTube by purchasing the licensed sound effects that a professional offers. When you purchase it, you will get high-quality sound, and you may use it on one or more projects, irrespective of personal or commercial types.
Where can you get free sound effects and edit audios at the same time? Just try Filmora for free!


Part 2: Royalty-Free Sound Effects for Your YouTube Videos
This article will introduce you to the six best sites to find royalty-free sound effects and explain their terms of use.
1.YouTube Audio Library – Free!
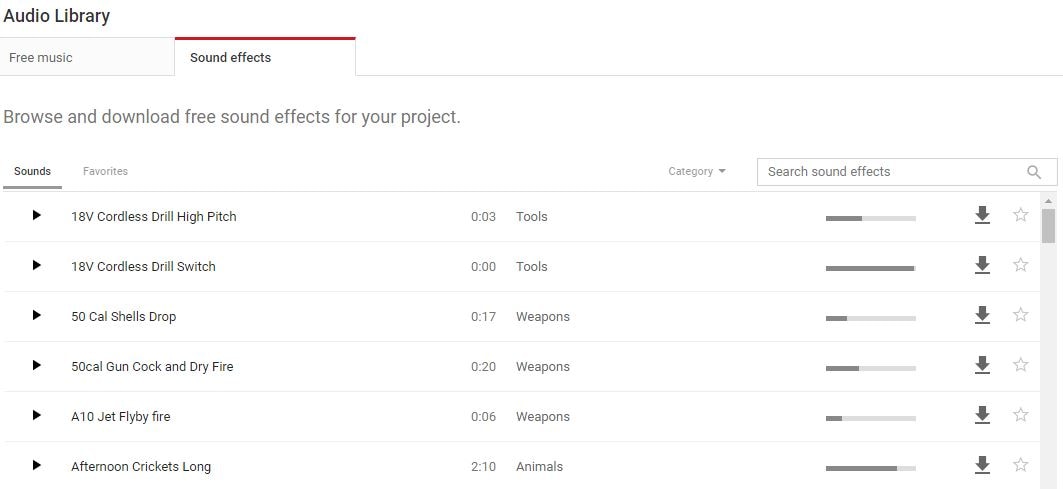
Besides royalty-free music, the YouTube Audio Library also has sound effects that you can download for free. The sound effects in YouTube’s library are organized into categories. You can select a category, i.e ‘sci-fi’, from the drop-down menu next to the search bar and browse through just the types of sounds you are interested in. You can also favorite sounds you like so you can find them again easily.
The sound effects you download from YouTube’s library can be used as many times as you like and in as many different projects. Monetizing your videos will not impact your ability to use these sound effects either. Some other sources of sound effects have different rules about monetizing or using sound effects in multiple projects.
2.Freesound – Free!
![]()
Freesound.org is a huge database of royalty-free sound effects and other audio files. All downloads are free, but there are conditions for using some of the sounds on Freesound. There are three different Creative Commons licenses uses on Freesound and which one applies to the sound effect you want depends on the user who posted it.
The three licenses used on Freesound are Zero, Attribution, and Attribution-Noncommercial.
Zero (cc0): you can do anything you want with these sound effects except claim that you created them. You can make money off of them and you do not have to credit the original creator.
Attribution (by): you should credit the creator of the sound. Usually, this means adding a ‘Sound effect by Username on Freesound’ line in the description of your video. So long as you credit the artists you can do anything with these sounds, even monetize the videos you use them in.
Attribution-Noncommercial (by –nc): you must credit the creators of these sound effects and you cannot make money off of them. This means that you cannot monetize a video in which you used these sound effects.
Freesound is a social site where you can talk to the creators of the sounds you want to download. If you are planning to monetize a video that uses an Attribution-Noncommercial sound effect you can always ask the artist for permission.
I’ve also found a YouTube video that explains the Creative Commons in detail. You can watch it below.
3.AudioJungle - $1 and Up

AudioJungle.net has a wide selection of royalty-free sound effects available for prices as low as $1. Sound effects costing more than $10 tend to either be longer or include whole sets of sounds. You can filter the sounds on AudioJungle by category, tags, and price while you browse.
There are two different licenses you can purchase on AudioJungle, SFX Single Use, and SFX Multi-Use. The prices displayed are all for the Single Use license. The Multi-Use license costs more.
The main difference between the two licenses on AudioJungle is how many projects you can use your sound effect in. If you purchase a sound under a Single-Use license you can only use it in one project. You can use it as many times as you want within that project, and you can even make money off of that project, but you cannot use it again in a second project unless you repurchase it. While it is more expensive, the Multi-Use license gives you unlimited use of your download.
If you decide to use sound effects from any of these sites then please make sure to read their more detailed legal information.
4.Free Sound Effects
The Free Sound Effects lets you access free as well as licensed sound effects. If you want to download sound effects for YouTube videos, the legally licensed soundtracks with high-quality effects can be selected from the Pro Sound Effects sections. These are royalty-free sound effects.
It requires a one-time fee and you get access to use the sound effects as many times you want for your projects. But, if you are not really serious and just creating videos out of fun, you may also try the free sound effects like animals, applause, cars, etc. to ensure good vlog sound effects that can give life to your vlog.
5.Soundsnap

Whether you wish to spice up your games videos or make the notification alerts hilarious, the Soundsnap app lets you download some of the most amazing sound effects. It is the best platform to search and also share the free vlog sound effects or loops legally. Soundsnap offers original sound effects created by the users and not the edited or mixed sounds that you find in usual commercial libraries. It features above 200,000 loops and sound effects created by expert and knowledgeable music producers and sound engineers.
6.PacDV Free Sound Effects
Now, you may create vlog sound effects from this royalty-free library of sounds produced by film students, multimedia developers, sound designers, music producers, etc. On the PacDV Free Sound Effects site, you can find free sound clips that have been used in a number of films, television programs, and videos.
You may definitely enjoy downloading sound effects for YouTube from this site completely free but cannot sell it or re-license it to anyone for your benefit. It must be used by you for your video only. The sound clips must not be put on site for download or link to other sound files.
Part 3: Get Free Sound Effects for YouTube Video in Filmora
If you’re using the Filmora video editor to produce YouTube videos, then you have a free sound effect library already. You can find them in the Audio library (shown below).

There are currently 25 different sound effects available, varying from animal, machine, people, sci-fi, and ambiance. After adding the sound effect to the timeline, you can change the speed to make the sound sounds fun.
Richard Bennett
Richard Bennett is a writer and a lover of all things video.
Follow @Richard Bennett
Richard Bennett
Mar 27, 2024• Proven solutions
Sound effects can add a lot of excitement to your videos. Sometimes they are even used for comedic effect. For example, you might use a fake slap sound in a slapstick comedy sketch. Other times sound effects can be more subtle. You might want to add city noises to the background of your video to help set your scene, or a droning sound to build suspense. A lot of the most popular free sound effects are related to the genres of science fiction or action.
- Part 1: Three Types of Sound Effects
- Part 2: Royalty-Free Sound Effects for Your YouTube Videos
- Part 3: Free Sound Effects and Music in Filmora
Part 1: Three Types of Sound Effects
1. Without License
When you want to download sound effects for YouTube, the licensed ones cannot be used, but there are a few that do not hold a license and can be easily downloaded from the website. The quality might be poor to some extent, but you may use the sound effects without a license in any product or video.
2. Creative Commons License
The sound effects under the CC license need to be checked for their type. There are some vlog sound effects that can be used for personal projects free but not for commercial ones. There are a few sound effects that might just require attribution or credit to the creator and cannot be modified in any way.
3. Royalty-free license
You may download sound effects for YouTube by purchasing the licensed sound effects that a professional offers. When you purchase it, you will get high-quality sound, and you may use it on one or more projects, irrespective of personal or commercial types.
Where can you get free sound effects and edit audios at the same time? Just try Filmora for free!
Part 2: Royalty-Free Sound Effects for Your YouTube Videos
This article will introduce you to the six best sites to find royalty-free sound effects and explain their terms of use.
1.YouTube Audio Library – Free!
Besides royalty-free music, the YouTube Audio Library also has sound effects that you can download for free. The sound effects in YouTube’s library are organized into categories. You can select a category, i.e ‘sci-fi’, from the drop-down menu next to the search bar and browse through just the types of sounds you are interested in. You can also favorite sounds you like so you can find them again easily.
The sound effects you download from YouTube’s library can be used as many times as you like and in as many different projects. Monetizing your videos will not impact your ability to use these sound effects either. Some other sources of sound effects have different rules about monetizing or using sound effects in multiple projects.
2.Freesound – Free!
![]()
Freesound.org is a huge database of royalty-free sound effects and other audio files. All downloads are free, but there are conditions for using some of the sounds on Freesound. There are three different Creative Commons licenses uses on Freesound and which one applies to the sound effect you want depends on the user who posted it.
The three licenses used on Freesound are Zero, Attribution, and Attribution-Noncommercial.
Zero (cc0): you can do anything you want with these sound effects except claim that you created them. You can make money off of them and you do not have to credit the original creator.
Attribution (by): you should credit the creator of the sound. Usually, this means adding a ‘Sound effect by Username on Freesound’ line in the description of your video. So long as you credit the artists you can do anything with these sounds, even monetize the videos you use them in.
Attribution-Noncommercial (by –nc): you must credit the creators of these sound effects and you cannot make money off of them. This means that you cannot monetize a video in which you used these sound effects.
Freesound is a social site where you can talk to the creators of the sounds you want to download. If you are planning to monetize a video that uses an Attribution-Noncommercial sound effect you can always ask the artist for permission.
I’ve also found a YouTube video that explains the Creative Commons in detail. You can watch it below.
3.AudioJungle - $1 and Up
AudioJungle.net has a wide selection of royalty-free sound effects available for prices as low as $1. Sound effects costing more than $10 tend to either be longer or include whole sets of sounds. You can filter the sounds on AudioJungle by category, tags, and price while you browse.
There are two different licenses you can purchase on AudioJungle, SFX Single Use, and SFX Multi-Use. The prices displayed are all for the Single Use license. The Multi-Use license costs more.
The main difference between the two licenses on AudioJungle is how many projects you can use your sound effect in. If you purchase a sound under a Single-Use license you can only use it in one project. You can use it as many times as you want within that project, and you can even make money off of that project, but you cannot use it again in a second project unless you repurchase it. While it is more expensive, the Multi-Use license gives you unlimited use of your download.
If you decide to use sound effects from any of these sites then please make sure to read their more detailed legal information.
4.Free Sound Effects
The Free Sound Effects lets you access free as well as licensed sound effects. If you want to download sound effects for YouTube videos, the legally licensed soundtracks with high-quality effects can be selected from the Pro Sound Effects sections. These are royalty-free sound effects.
It requires a one-time fee and you get access to use the sound effects as many times you want for your projects. But, if you are not really serious and just creating videos out of fun, you may also try the free sound effects like animals, applause, cars, etc. to ensure good vlog sound effects that can give life to your vlog.
5.Soundsnap
Whether you wish to spice up your games videos or make the notification alerts hilarious, the Soundsnap app lets you download some of the most amazing sound effects. It is the best platform to search and also share the free vlog sound effects or loops legally. Soundsnap offers original sound effects created by the users and not the edited or mixed sounds that you find in usual commercial libraries. It features above 200,000 loops and sound effects created by expert and knowledgeable music producers and sound engineers.
6.PacDV Free Sound Effects
Now, you may create vlog sound effects from this royalty-free library of sounds produced by film students, multimedia developers, sound designers, music producers, etc. On the PacDV Free Sound Effects site, you can find free sound clips that have been used in a number of films, television programs, and videos.
You may definitely enjoy downloading sound effects for YouTube from this site completely free but cannot sell it or re-license it to anyone for your benefit. It must be used by you for your video only. The sound clips must not be put on site for download or link to other sound files.
Part 3: Get Free Sound Effects for YouTube Video in Filmora
If you’re using the Filmora video editor to produce YouTube videos, then you have a free sound effect library already. You can find them in the Audio library (shown below).
There are currently 25 different sound effects available, varying from animal, machine, people, sci-fi, and ambiance. After adding the sound effect to the timeline, you can change the speed to make the sound sounds fun.
Richard Bennett
Richard Bennett is a writer and a lover of all things video.
Follow @Richard Bennett
Prime Your Vlogging Game: Top-Tier Mac MP4 Editors Reviewed
What is the Best MP4 Cutter for YouTubers On Mac?

Liza Brown
Oct 26, 2023• Proven solutions
Editing videos is a big part of YouTubers’ job including cutting MP4, customizing intros and outros, grading video colors, adding a multitude of effects, and many more. All YouTube celebrities use a diverse set of video editing features such as filters, transitions, custom titles and captions, and overlays.
These post-processing effects ensure that their videos don’t only look aesthetically pleasing but are more engaging and interactive to keep their viewers hooked from the beginning right till the end. This is exactly why cutting MP4 videos and editing have become monumentally significant for newcomers.
Having said that, most of the beginners and hobbyists either can’t afford or want to pay for professional video editing software for cutting MP4 such as Adobe Premiere or Final Cut Pro. In this time, FilmoraX will be a better choice to cut MP4 for Youtube
Before we further delve into the details of advanced video cutter functions, let’s first develop an understanding of the basics.
Section1. Basic Video Cutter Functions
Section2. Advanced Video Cutter Functions
Section 1. Basic Video Cutter Functions
These are the features of cutting MP4 videos that are used by almost all of the YouTuber to give their videos a more engaging look and contextualize them based on the content. For instance, almost all of the YouTubers use customized captions and titles to share information that is highly valuable for the viewers and enables them to develop a connection with the YouTuber.
Almost all of the YouTubers have customized intros and outros in their videos but some of the notable names include MKBHD, PewDiePie, and Smosh. In the process of cutting MP4 videos, they add these effects to create a brand for themselves.
One of the most basic functions of cutting MP4 or other videos intended for YouTube audiences is to add your intro and outro.
- Intro - It is a customized beginning where YouTubers usually add their channel name or its logo along with the title of the video. This helps them to develop a personal brand and add context to what their audience is about to see.
- Outro - It is the customized ending of the video where most content creators choose to add a call to action (CTA) encouraging them to engage with the channel or the video in some manner. For example, they may add an outro that asks the users to subscribe to the YouTube channel.

These are customized stickers, captions, and titles that enable YouTubers to add contextual information at any point in the video to add more value to their content during the process of cutting MP4 videos. For example, if a YouTuber is running a smartphone review channel, they can add rich stickers that contain specifications of the smartphone for those who are interested in particulars.
Including such information, while cutting MP4 also adds to the credibility of the content creator as they are perceived as more professional and dedicated to their job.

Steps to Perform Basic Video Cutter Effects on Filmora X
Here’s how you can add intros and outros to your YouTube videos using Wondershare Filmora X for cutting MP4 videos.
- Add intro background and select your favorite audio or sound effect
- Add your logo and/or text to the intro video
- Now add cool effects to improve the appearance of your intro
- Export your intro video and add it to shared media
You can also use Filmora templates for cutting MP4 videos to create your intro video for your YouTube content.
In Filmora, you will find a wide variety of templates for titles, openers, end credits, plain texts, callouts, and more for cutting MP4 and other video formats. You can use the premade template to add the desired text effect and then edit them according to your preferences. If you want to use these settings again, save the customized text effects as presets. It will save you a lot of time.
Section 2. Advanced Video Cutter Functions

These are the cutting MP4 effects that aren’t used by beginners but hobbyists and professional video content creators may use them to add production value and interactive dimension to their content.
- Green Screen - This effect allows YouTubers to add any type of live or static background while cutting MP4 videos adding production value to their video.
- Motion Tracking - This is a cinematic method that enables YouTubers to include digital visuals in live-action video. It ensures that everything including scale, position, relative motion, and orientation is accurate.
- Color Matching - If you are shooting your video with different cameras, every camera records the footage in its own color profile. Color matching is used to introduce color consistency throughout the video. Filmora X is perfectly capable of handling color matching while you are cutting MP4 and other videos.
Some of the channels and YouTubers that rely on advanced video cutting MP4 effects include Vlad and Niki, MKBHD, Dude Perfect, Canal KondZilla, Like Nastya Vlog, and Kids Diana Show.
Performing Advanced Cutting MP4 Video Effects on Filmora X
Step 1 - Set up and position the green screen and add adequate lighting.
Step 2 - Make sure that you don’t wear anything that’s green and start shooting.
Step 3 - Download green screen backgrounds from the website of your choice.
Step 4 - Import your green screen footage into Filmora X and adjust the settings according to your preferences.
Step 5 - Position the background-clip so it looks natural and then export the video in your required format (MP4).
Step 1 - Go to Behaviors in Control Panel and select the top clip. Then click on the “plus” button right next to Behaviors.
Step 2 - Here, select the motion track from the list and open the folder to select the footage you want to track.
Step 3 - This will automatically start motion analysis of the video clip and you’ll be notified with grey tracker points once the analysis is complete.
Step 4 - You can draw around the region that you want to follow the motion and it will be automatically applied to the object.
Step 5 - Preview the clip and adjust any settings if the result isn’t according to your liking.
Step 1 - Drag the video clip to your timeline and move the play head to the frame you want to color match.
Step 2 - Select the remaining video clips and apply color matching through the right-click or the toolbar. Select the frame as a reference and click on ‘Match’.
Step 3 - Now, using the slider, adjust the extent to which you want the color setting of other clips that need to be matched. See the result in the ‘comparison view’.
Final Word
Cutting MP4 or other videos for YouTube content creation is a major part of the process. You need to have reliable and versatile video editing software that can get the job done without any hassle. And while there are professional packages available, they cost way too much for the YouTubers who are just starting out or are just hobbyists. That’s where Filmora X can be an exceptional alternative offering a wide variety of features at a fraction of the cost.
You can tryFilmora X for free for cutting MP4 videos before you pay for the fully-featured software.
You May Also Like:How do Beginners Make a Cool Video for YouTube on Mac>>>
Liza Brown
Liza Brown is a writer and a lover of all things video.
Follow @Liza Brown
Liza Brown
Oct 26, 2023• Proven solutions
Editing videos is a big part of YouTubers’ job including cutting MP4, customizing intros and outros, grading video colors, adding a multitude of effects, and many more. All YouTube celebrities use a diverse set of video editing features such as filters, transitions, custom titles and captions, and overlays.
These post-processing effects ensure that their videos don’t only look aesthetically pleasing but are more engaging and interactive to keep their viewers hooked from the beginning right till the end. This is exactly why cutting MP4 videos and editing have become monumentally significant for newcomers.
Having said that, most of the beginners and hobbyists either can’t afford or want to pay for professional video editing software for cutting MP4 such as Adobe Premiere or Final Cut Pro. In this time, FilmoraX will be a better choice to cut MP4 for Youtube
Before we further delve into the details of advanced video cutter functions, let’s first develop an understanding of the basics.
Section1. Basic Video Cutter Functions
Section2. Advanced Video Cutter Functions
Section 1. Basic Video Cutter Functions
These are the features of cutting MP4 videos that are used by almost all of the YouTuber to give their videos a more engaging look and contextualize them based on the content. For instance, almost all of the YouTubers use customized captions and titles to share information that is highly valuable for the viewers and enables them to develop a connection with the YouTuber.
Almost all of the YouTubers have customized intros and outros in their videos but some of the notable names include MKBHD, PewDiePie, and Smosh. In the process of cutting MP4 videos, they add these effects to create a brand for themselves.
One of the most basic functions of cutting MP4 or other videos intended for YouTube audiences is to add your intro and outro.
- Intro - It is a customized beginning where YouTubers usually add their channel name or its logo along with the title of the video. This helps them to develop a personal brand and add context to what their audience is about to see.
- Outro - It is the customized ending of the video where most content creators choose to add a call to action (CTA) encouraging them to engage with the channel or the video in some manner. For example, they may add an outro that asks the users to subscribe to the YouTube channel.
These are customized stickers, captions, and titles that enable YouTubers to add contextual information at any point in the video to add more value to their content during the process of cutting MP4 videos. For example, if a YouTuber is running a smartphone review channel, they can add rich stickers that contain specifications of the smartphone for those who are interested in particulars.
Including such information, while cutting MP4 also adds to the credibility of the content creator as they are perceived as more professional and dedicated to their job.
Steps to Perform Basic Video Cutter Effects on Filmora X
Here’s how you can add intros and outros to your YouTube videos using Wondershare Filmora X for cutting MP4 videos.
- Add intro background and select your favorite audio or sound effect
- Add your logo and/or text to the intro video
- Now add cool effects to improve the appearance of your intro
- Export your intro video and add it to shared media
You can also use Filmora templates for cutting MP4 videos to create your intro video for your YouTube content.
In Filmora, you will find a wide variety of templates for titles, openers, end credits, plain texts, callouts, and more for cutting MP4 and other video formats. You can use the premade template to add the desired text effect and then edit them according to your preferences. If you want to use these settings again, save the customized text effects as presets. It will save you a lot of time.
Section 2. Advanced Video Cutter Functions
These are the cutting MP4 effects that aren’t used by beginners but hobbyists and professional video content creators may use them to add production value and interactive dimension to their content.
- Green Screen - This effect allows YouTubers to add any type of live or static background while cutting MP4 videos adding production value to their video.
- Motion Tracking - This is a cinematic method that enables YouTubers to include digital visuals in live-action video. It ensures that everything including scale, position, relative motion, and orientation is accurate.
- Color Matching - If you are shooting your video with different cameras, every camera records the footage in its own color profile. Color matching is used to introduce color consistency throughout the video. Filmora X is perfectly capable of handling color matching while you are cutting MP4 and other videos.
Some of the channels and YouTubers that rely on advanced video cutting MP4 effects include Vlad and Niki, MKBHD, Dude Perfect, Canal KondZilla, Like Nastya Vlog, and Kids Diana Show.
Performing Advanced Cutting MP4 Video Effects on Filmora X
Step 1 - Set up and position the green screen and add adequate lighting.
Step 2 - Make sure that you don’t wear anything that’s green and start shooting.
Step 3 - Download green screen backgrounds from the website of your choice.
Step 4 - Import your green screen footage into Filmora X and adjust the settings according to your preferences.
Step 5 - Position the background-clip so it looks natural and then export the video in your required format (MP4).
Step 1 - Go to Behaviors in Control Panel and select the top clip. Then click on the “plus” button right next to Behaviors.
Step 2 - Here, select the motion track from the list and open the folder to select the footage you want to track.
Step 3 - This will automatically start motion analysis of the video clip and you’ll be notified with grey tracker points once the analysis is complete.
Step 4 - You can draw around the region that you want to follow the motion and it will be automatically applied to the object.
Step 5 - Preview the clip and adjust any settings if the result isn’t according to your liking.
Step 1 - Drag the video clip to your timeline and move the play head to the frame you want to color match.
Step 2 - Select the remaining video clips and apply color matching through the right-click or the toolbar. Select the frame as a reference and click on ‘Match’.
Step 3 - Now, using the slider, adjust the extent to which you want the color setting of other clips that need to be matched. See the result in the ‘comparison view’.
Final Word
Cutting MP4 or other videos for YouTube content creation is a major part of the process. You need to have reliable and versatile video editing software that can get the job done without any hassle. And while there are professional packages available, they cost way too much for the YouTubers who are just starting out or are just hobbyists. That’s where Filmora X can be an exceptional alternative offering a wide variety of features at a fraction of the cost.
You can tryFilmora X for free for cutting MP4 videos before you pay for the fully-featured software.
You May Also Like:How do Beginners Make a Cool Video for YouTube on Mac>>>
Liza Brown
Liza Brown is a writer and a lover of all things video.
Follow @Liza Brown
Also read:
- Dissecting Digital Dynamics Comparative Channel Analysis
- [Updated] Daily Digital Dynasty Ranking the Top 10 YouTube Videos
- Premium Selection Top Free YouTube Transcript Apps
- [New] Dreamy Thumbnails Captivating Borders
- Best GIF Creation Tools Reviewed by Industry Vets
- The Best Value for Money 11 No-Cost Name Creation Tips
- 2024 Approved Best of Breed Top 10 YouTube Stations for Journalism
- [Updated] Cutting-Edge Techniques for iOS Users Uploading Videos to YouTube
- Hit the Floor with Optimal Posting Hours
- Soundtrack Synthesis Crafting the Perfect YouTube List
- 2024 Approved Digital Arena 100+ Titles for the True Gamer
- Editing Magic Transformative Strategies for YouTube Creators for 2024
- In 2024, Essential Selection The Greatest Free Editing Software
- In 2024, Deciphering the Complexity of Online Content Monetization
- [New] A Creator’s Guide to Understanding YouTube Policies
- 2024 Approved Can Subtle Strategies Trump Directly Buying Views for Content Creators?
- 2024 Approved Boost Length on YouTube Entry Filming
- [Updated] Discover the Best No-Cost Soundtracks for Video Production
- 10 Best Intro Maker Apps for iPhone and Android for 2024
- Discover the Visionaries Behind Video Content Six Intriguing YouTube Categorization Challenges for 2024
- Achieving Visual Excellence ASPECT RATIO Mastery on YOUTUBE for 2024
- 2024 Approved Direct Transition From YouTube to Instagram Reels
- In 2024, Amplify Video Impact Leading Trackers for YouTube Ranks
- In 2024, Ascending 8 Media Makers Dominating Viewership
- [New] Essential Tips for YouTube Short Fixes
- Earnings Escalation via YouTube Channel Initiatives
- [Updated] Completely Erase Your Connection with YouTube Shorts
- 2024 Approved Breakneck Buzzers YouTube's Hottest Topics Amassing Views Overnight by '24
- The Fastest to Reach a Billion Views on YouTube
- 2024 Approved Creating Emotional Connections with Your Audience Through Hauls
- [New] Essential Insights Mastering YouTube Keyword Strategies
- Top-Rank Watcher Decode YouTube Trending Patterns
- 2024 Approved A Glance at Your World Freeze and Save Windows
- [Updated] Resolve Chromebook's Video Issue for 2024
- [Updated] In 2024, Leveraging Likeability for Business Profits on FB
- Free Photo Editing Tricks Unveiling iPhone's Hidden Features
- [Updated] In 2024, Optimizing Livestream Videos on Twitch
- In 2024, How to Use Pokémon Emerald Master Ball Cheat On Nokia C02 | Dr.fone
- [Updated] In 2024, Comparing Cameras OBS vs Twitch Studio Edition
- New Elite Sound Silencers for Online Streaming Content (Windows/Mac 2024 Release)
- Bebop 2'S Avian Spectacle – A Compreran Analysis for 2024
- In 2024, How to Reset a Nubia Red Magic 8S Pro Phone that is Locked?
- New 2024 Approved 10 Essential Online Waveform Generators for Music Makers
- Updated Free Video Editing Gems Top Picks for Online Creators for 2024
- [Updated] Easy Steps to Rectify Non-Sending or Delayed Videos in Messenger Chats for 2024
- Ultimate Guide from Vivo X90S FRP Bypass
- Facebook Lives Demystified The Best Ways to Record a Stream
- In 2024, Easy Guide to Nokia G22 FRP Bypass With Best Methods
- In 2024, Top 5 Car Locator Apps for Samsung Galaxy F34 5G | Dr.fone
- [Updated] Capture & Replay The Ultimate Guide to Free Mac Screen Recording Apps for 2024
- [New] 2024 Approved Ultimate Ranking of 8 Swift Recorders
- All Must-Knows to Use Fake GPS GO Location Spoofer On Tecno Spark Go (2023) | Dr.fone
- Updated 2024 Approved Essential Adobe Premiere Keyboard Shortcuts to Boost Productivity
- New Strategies for Eliminating Reverb From Studio-Recorded Sounds for 2024
- Leaderboard The Four Premier Music Editors Tailored to macOS
- New 2024 Approved Linux Premiere Pro Alternatives Top 10 Video Editors You Need to Know
- [New] In 2024, Ingenious FP Designs Strategies for an Outstanding TikTok Profile
- Best Ways on How to Unlock/Bypass/Swipe/Remove Xiaomi Civi 3 Disney 100th Anniversary Edition Fingerprint Lock
- Exploring Leading TikTok GIF Conversion Apps Today
- Title: "[New] Amplify Your Video's Impact 7 Royalty-Free Sounds"
- Author: Steven
- Created at : 2024-05-25 19:59:01
- Updated at : 2024-05-26 19:59:01
- Link: https://youtube-clips.techidaily.com/new-amplify-your-videos-impact-7-royalty-free-sounds/
- License: This work is licensed under CC BY-NC-SA 4.0.
