
![[New] Adjust Privacy Settings for Secure Online Viewing](https://www.lifewire.com/thmb/hOsk21uKEV4CAznIWId7246CU9o=/400x300/filters:no_upscale():max_bytes(150000):strip_icc()/hands_free_02_for_web-e893b28d4c8243aabc27042e69133f38.jpg)
[New] Adjust Privacy Settings for Secure Online Viewing
Adjust Privacy Settings for Secure Online Viewing
How to Change the Privacy Setting on Your YouTube Videos

Richard Bennett
Mar 27, 2024• Proven solutions
Privacy settings on YouTube allow you to control who can see your videos. There are three settings — Public, unlisted, and private. This article will give you a brief introduction of what those three settings mean, and how to use them.
- Part1: Public VS Unlisted VS Private
- Part2: How to Change Privacy Settings
- Part2: Sharing Private Videos
Want to make your YouTube videos more beautiful within minutes? Here we recommend an easy-to-use video editing software for beginner for your reference - Wondershare Filmora .
 Download Mac Version ](https://tools.techidaily.com/wondershare/filmora/download/ )
Part 1: Public VS Unlisted VS Private
Let’s figure out some terms before runing into the how-to part.
Public Videos
These are videos that everyone can view. This is the majority of YouTube videos, and just about every one you’ve ever watched will have been public. You’ll want this if you want lots of people to watch your video.
Unlisted
Unlisted videos are ones that anybody can view so long as they have the link. The video won’t show up on search results or in “related” or “suggested” videos.
This is a great setting for sharing a video amongst small groups. You might have a rough edit you want to show a few people, or you might have a show reel that you only want certain people to see.
Private
Completely private videos cannot be watched by anyone who doesn’t have permission. You grant people permission by allowing their Google accounts to access the video. Nobody else can see the video, regardless of whether they have the link.
It won’t show up on searches, as related or suggested videos, or even when imbedded in other sites. This is the best setting for a video you need to share with only very specific people, if anyone. Below is a comparison table to know more about privacy settings .

Part 2: How to Change Privacy Settings
There are two ways to change the privacy settings: firstly, when you upload the video, and secondly through Creator Studio.
Method 1:
When you upload a video to YouTube you’ll see on the right hand side an option that says “privacy”. This is defaulted to “public”, but you can use the drop-down menu on the button to change the setting. This will apply your privacy setting the second the video finishes uploading and processing.

Method 2:
To change the privacy setting later, go to Creator Studio, then Video Manager. On the right-hand side you’ll see one of three icons: a world, a chain, and a lock. The world means “public”, the chain means “unlisted”, and the lock is for “private”.

To change the privacy, click the icon. You’ll be taken to the video’s info and settings page. Down below where you see the thumbnails you’ll see the selected privacy setting. Click this to open a drop down menu, and select your desired privacy level.
Part 3: Sharing Private Videos
If a video is set to “private’, you’ll have the option to share it with specific people. Below where it says “private” on the info and settings page you’ll see a button labeled “share”. Click this and type in the email addresses of the people you want to be able to watch the video. You’ll also have the option of notifying the people via email that you’ve shared the video with them.

Conclusion
And that’s all there is to it! Changing the privacy setting on YouTube videos is a simple, helpful tool to allow you to control the audience of you work. Enjoy!

Richard Bennett
Richard Bennett is a writer and a lover of all things video.
Follow @Richard Bennett
Richard Bennett
Mar 27, 2024• Proven solutions
Privacy settings on YouTube allow you to control who can see your videos. There are three settings — Public, unlisted, and private. This article will give you a brief introduction of what those three settings mean, and how to use them.
- Part1: Public VS Unlisted VS Private
- Part2: How to Change Privacy Settings
- Part2: Sharing Private Videos
Want to make your YouTube videos more beautiful within minutes? Here we recommend an easy-to-use video editing software for beginner for your reference - Wondershare Filmora .
Download Mac Version ](https://tools.techidaily.com/wondershare/filmora/download/ )
Part 1: Public VS Unlisted VS Private
Let’s figure out some terms before runing into the how-to part.
Public Videos
These are videos that everyone can view. This is the majority of YouTube videos, and just about every one you’ve ever watched will have been public. You’ll want this if you want lots of people to watch your video.
Unlisted
Unlisted videos are ones that anybody can view so long as they have the link. The video won’t show up on search results or in “related” or “suggested” videos.
This is a great setting for sharing a video amongst small groups. You might have a rough edit you want to show a few people, or you might have a show reel that you only want certain people to see.
Private
Completely private videos cannot be watched by anyone who doesn’t have permission. You grant people permission by allowing their Google accounts to access the video. Nobody else can see the video, regardless of whether they have the link.
It won’t show up on searches, as related or suggested videos, or even when imbedded in other sites. This is the best setting for a video you need to share with only very specific people, if anyone. Below is a comparison table to know more about privacy settings .
Part 2: How to Change Privacy Settings
There are two ways to change the privacy settings: firstly, when you upload the video, and secondly through Creator Studio.
Method 1:
When you upload a video to YouTube you’ll see on the right hand side an option that says “privacy”. This is defaulted to “public”, but you can use the drop-down menu on the button to change the setting. This will apply your privacy setting the second the video finishes uploading and processing.
Method 2:
To change the privacy setting later, go to Creator Studio, then Video Manager. On the right-hand side you’ll see one of three icons: a world, a chain, and a lock. The world means “public”, the chain means “unlisted”, and the lock is for “private”.
To change the privacy, click the icon. You’ll be taken to the video’s info and settings page. Down below where you see the thumbnails you’ll see the selected privacy setting. Click this to open a drop down menu, and select your desired privacy level.
Part 3: Sharing Private Videos
If a video is set to “private’, you’ll have the option to share it with specific people. Below where it says “private” on the info and settings page you’ll see a button labeled “share”. Click this and type in the email addresses of the people you want to be able to watch the video. You’ll also have the option of notifying the people via email that you’ve shared the video with them.
Conclusion
And that’s all there is to it! Changing the privacy setting on YouTube videos is a simple, helpful tool to allow you to control the audience of you work. Enjoy!
Richard Bennett
Richard Bennett is a writer and a lover of all things video.
Follow @Richard Bennett
Optimize Video Audio: Discovering Affordable WAV Extraction Methods
YouTube to WAV File: 4 Best Free Convert Solutions
Richard Bennett
Mar 27, 2024• Proven solutions
YouTube to WAV converter is a very common phenomenon. This is done by the users as they want to play the video on selected devices.
In this article, we will help you manage to convert YouTube to WAV file with ease.
You will Learn :
- What is WAV?
- How to Convert YouTube to WAV Format? (4 Options)
- Tips to Convert YouTube to WAV
- Beside WAV Other Popular Formats for YouTube Videos
What is WAV?
WAV, known as Wave Form Audio File Format and is fully supported by Windows, is a common format that was launched back in 1991, which supports most of the older devices as well.
For the users that want uncompressed and lossless quality prefer to use WAV format. It is extended from the RIFF format to the RF64 format.
How to Convert YouTube to WAV Format?
Some many ways and programs can be used as YouTube to WAV converter. All these programs are easy to use and definitive guides are also available online. Some of the best ways are mentioned below.
Option 1: Convert YouTube to WAV by Wondershare Filmora
Filmora is by far the best program that can be used to convert YouTube to WAV format. YouTube to WAV file conversion has never been as easy as it is with this program. The program is easy to use and allows the users to overcome the issues which other programs present.
Features of the Program
- It is one of the very few programs that come with split-screen functionality. It means that the video and audio can be played simultaneously on a single interface.
- The audio equalizer ensures that the tuning is done as per the requirements.
- There is an advanced functionality of text editing which allows the users to mention the text onto the converted video as well.
- The UI of the program is graphical and hence it is easy to use. The independent reviews have granted a score of 9.5 based on this functionality of the program.
- The part selection is available in the program. It means that multiple conversions can be done at the same time without losing quality.
How to Convert YouTube to WAV Using Filmora?
This YouTube WAV converter is easy to use. The best part is that it is compatible with major platforms i.e. Windows and Mac. The processes for both will be explained in detail so that you can understand the program better.
The Process to Convert YouTube to WAV:
Step 1: Download Filmora for Windows or Mac (depends on your operating system).
If you want to download the program for Windows then click below download icon:
For Mac version download click below icon:
Step 2: There are three ways to import media into the program.
Methond 1: Click File > Import Media. Choose the YouTube file that you want to convert to WAV format. If the file is on another device then you can get it from there as well.

Method 2: Click Import Media on the main interface and select the file from the window that pops up.
Method 3: You can also drag and drop the files onto the interface to make sure that they are imported.
Step 3: You now just need to export the video in the WAV format. Click the Export button and then go for the Local tab. The export formats that are currently supported by the program are WMV, MP4, AVI, MOV, F4V, MKV, TS, 3GP, MPEG-2, WEBM, GIF and MP3.

Step 4: You can then alter the settings within the settings tab. The bit rate is the main thing that defines the quality of the video. Once the settings are done press OK
Step 5: You can also export the video as per the device that you want to play it on.
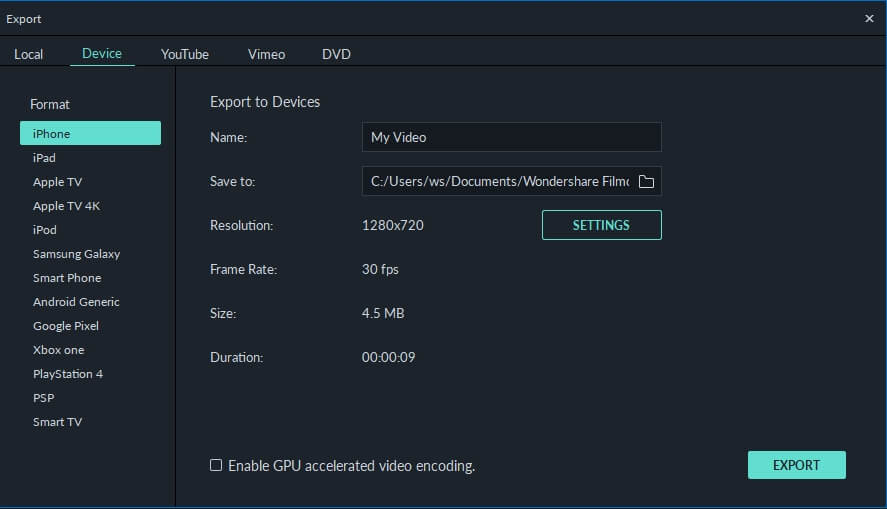
Step 6: You can also upload the video to social media platforms such as YouTube and Vimeo.
Step 7: You can also burn the converted format onto a DVD. Select the appropriate settings and press Export.
The process is explained as under. For video guides please visit Filmora 101 as it will get you the complete knowledge thoroughly.
You may also like: How to Convert YouTube to MP4 Safely? [Step by Step Guide] >>
Option 2: Other Way to Convert YouTube to WAV on Windows
5K Player is one of the best and the most used players that also work as YouTube to WAV conversion platform as well. The process is very easy to follow and is mentioned as under.
Step 1: Copy and paste the URL of the video on the desired location within the player. Click download and the process starts.

Step 2: Click “To Music” and select the WAV format from the drop-down that appears. You can also choose the bit rate, frame rate, and resolution. Once the conversion is completed you can save the file and the process ends here.
You may also like: >> How to to Convert WMV to MP4 Easily?
Option 3: Other Way to Convert YouTube to WAV on Mac
The Allavsoft is one of the best converters that can be used to convert YouTube to WAV on Mac. The process is simple and has been explained as under.
Step 1: Paste the URL of the YouTube video that you want to convert. You can also select the download quality and can access the file once the download has been completed.

Step 2: You can then select the format and once the conversion has been completed click the download button. The same has been depicted by numbers 2 and 3 in the picture below. WAV lossless quality should be selected from the dropdown to make sure that the work is done without any issue and problem.
Right format selection is important as the conversion is done instantly.
Option 4: YouTube to WAV Conversion Online
The process that you need to follow is explained as under.
Step 1: Visit https.//www.savethevideo.com/convert to access the converter.
Step 2: Paste the URL of the YouTube video that you want to convert and click the “Convert” button:

Step 3: Wait till the converter fetches the information.
Step 4: From the drop-down make sure that you select the WAV format.
Step 5: Click “Convert” once again and the process of conversion starts.
Step 6: The video then starts to download in the desired format.
Step 7: Click “Download” and save the file to the desired location. This concludes the process in full.
Tips to Convert YouTube to WAV
Below are some tips that would be useful for the users that want to convert YouTube to WAV format.
1. Always use the multipurpose software. It will allow you to download and convert the video at the same time-saving time.
2. Lossless quality is always to be selected while you are converting the format. It will make sure that the video is never compressed at all.
3. One of the best ways to convert the video is to disable the background noise. This will lead to awesome results.
4. Converting from YouTube to WAV also requires you to choose the software that is fast and reliable or else you will get the outcome which is not as per your requirements.
5. Free software programs can also get the malware to your system and therefore these are not recommended at all.
6. WAV is a format that is of high quality as the converters have loads of options so it is advised to use these carefully.
7. Make sure that the converters that are used are the ones that are highly rated and have a graphical user interface.
8. The YouTube to WAV downloader should be there on with the converter as it will make the process easy and you don’t need tons of software programs for a single purpose.
9. Always go for the program that supports the containers instead of just the format. If a program supports the containers then it is easy to convert a number of formats.
10. The conversion should be done with converters that do not cause any type of loss to enhance the quality as well.
Beside WAV Other Popular Formats for YouTube Videos
Many other video formats should be used to make sure that the best and the most advanced outcome is generated. Some of the most popular formats are as under.
- Audio Video Interleave Format, AVI
It is one of the oldest formats that are on the market. It was developed by Microsoft as a part of their video processing format for Windows. It was made publically available in 1992.
This one of the oldest formats is used universally. Many people consider it the standard to save videos. The AVI files are simple to use and are supported by almost every video player currently on the market.
It is easy to store as it takes less space than many other formats that are on the market. It will also let you transfer the files relatively faster due to the small size.
- Flash Video Format, FLV
The flash player by Adobe is one of the most common software programs on the system. This has made this video format one of the common ones on the market. The format can be played with ease as the supported plugins are there for other apps as well.
The flash content is supported by all browsers and therefore it is common to play these videos without any additional plugins. The best part of this format is the lossless quality that it provides to its users. Even if you compress these videos they remain HD as the quality remains the same.
- Apple QuickTime Movie, MOV
Among the Mac users, it is one of the most used formats. Developed by Apple it is a format that allows the users to overcome issues such as playback errors. The new version has also been launched which is known as QuickTime X.
The best part of this format is that it is available for Windows users as well. The files of the MOV format are usually of high quality. It is for the same that the size of such files is large as compared to other formats.
- Moving Pictures Expert Group 4, MP4
Introduced in 1998 it is a format that is used by the motion pictures association responsible for setting the standards. The format is widely used and is supported by various platforms as well as devices.
Even after the MP4 file is compressed it remains lossless and the quality remains the same. The HTML5 that has been launched currently also supports this format. It is compatible with almost all of the browsers that are on the market.
- 264
As the name suggests it is one of the best and the most used formats for HD videos. The compression remains lossless and even if the resolution is low the quality is maintained. The MP4 container is the one that is used to contain this format.
Most of the streaming devices, as well as the services, use this format while referring to HD video. The best part is that the format is widely accepted as industry standards for HD videos. Most of the users all over the world use this format to save their HD videos with ease.
- OGG
It is one of the most used video formats. It has been developed by the Xiph.org foundation to maintain the video as well as the audio quality on different platforms. The format is free and the documentation, as well as the configuration, can be downloaded by anyone.
- Advanced Systems Format, .ASF
If you want to stream videos then this is the format that is considered to be the best. It is still being used by the major popular streaming platforms of the world. The .ASF format is one of the best and it allows the users to overcome issues such as quality loss as well as streaming related issues.
You may also like: How to Post/Share a Video From YouTube on Instagram >>
Conclusion
If you require lossless compression then YouTube to WAV conversion is something that is required. Some many ways and means can be used to make sure that the idea is approached. The best way is to use Filmora as it is an easy and efficient operation.
The best way to get around the issue is to always use the service that is embedded with quality.
If you like this article then it is requested to comment and share it on social media. It will not only help others but will also let them have knowledgeable ideas.
Richard Bennett
Richard Bennett is a writer and a lover of all things video.
Follow @Richard Bennett
Richard Bennett
Mar 27, 2024• Proven solutions
YouTube to WAV converter is a very common phenomenon. This is done by the users as they want to play the video on selected devices.
In this article, we will help you manage to convert YouTube to WAV file with ease.
You will Learn :
- What is WAV?
- How to Convert YouTube to WAV Format? (4 Options)
- Tips to Convert YouTube to WAV
- Beside WAV Other Popular Formats for YouTube Videos
What is WAV?
WAV, known as Wave Form Audio File Format and is fully supported by Windows, is a common format that was launched back in 1991, which supports most of the older devices as well.
For the users that want uncompressed and lossless quality prefer to use WAV format. It is extended from the RIFF format to the RF64 format.
How to Convert YouTube to WAV Format?
Some many ways and programs can be used as YouTube to WAV converter. All these programs are easy to use and definitive guides are also available online. Some of the best ways are mentioned below.
Option 1: Convert YouTube to WAV by Wondershare Filmora
Filmora is by far the best program that can be used to convert YouTube to WAV format. YouTube to WAV file conversion has never been as easy as it is with this program. The program is easy to use and allows the users to overcome the issues which other programs present.
Features of the Program
- It is one of the very few programs that come with split-screen functionality. It means that the video and audio can be played simultaneously on a single interface.
- The audio equalizer ensures that the tuning is done as per the requirements.
- There is an advanced functionality of text editing which allows the users to mention the text onto the converted video as well.
- The UI of the program is graphical and hence it is easy to use. The independent reviews have granted a score of 9.5 based on this functionality of the program.
- The part selection is available in the program. It means that multiple conversions can be done at the same time without losing quality.
How to Convert YouTube to WAV Using Filmora?
This YouTube WAV converter is easy to use. The best part is that it is compatible with major platforms i.e. Windows and Mac. The processes for both will be explained in detail so that you can understand the program better.
The Process to Convert YouTube to WAV:
Step 1: Download Filmora for Windows or Mac (depends on your operating system).
If you want to download the program for Windows then click below download icon:
For Mac version download click below icon:
Step 2: There are three ways to import media into the program.
Methond 1: Click File > Import Media. Choose the YouTube file that you want to convert to WAV format. If the file is on another device then you can get it from there as well.
Method 2: Click Import Media on the main interface and select the file from the window that pops up.
Method 3: You can also drag and drop the files onto the interface to make sure that they are imported.
Step 3: You now just need to export the video in the WAV format. Click the Export button and then go for the Local tab. The export formats that are currently supported by the program are WMV, MP4, AVI, MOV, F4V, MKV, TS, 3GP, MPEG-2, WEBM, GIF and MP3.
Step 4: You can then alter the settings within the settings tab. The bit rate is the main thing that defines the quality of the video. Once the settings are done press OK
Step 5: You can also export the video as per the device that you want to play it on.
Step 6: You can also upload the video to social media platforms such as YouTube and Vimeo.
Step 7: You can also burn the converted format onto a DVD. Select the appropriate settings and press Export.
The process is explained as under. For video guides please visit Filmora 101 as it will get you the complete knowledge thoroughly.
You may also like: How to Convert YouTube to MP4 Safely? [Step by Step Guide] >>
Option 2: Other Way to Convert YouTube to WAV on Windows
5K Player is one of the best and the most used players that also work as YouTube to WAV conversion platform as well. The process is very easy to follow and is mentioned as under.
Step 1: Copy and paste the URL of the video on the desired location within the player. Click download and the process starts.
Step 2: Click “To Music” and select the WAV format from the drop-down that appears. You can also choose the bit rate, frame rate, and resolution. Once the conversion is completed you can save the file and the process ends here.
You may also like: >> How to to Convert WMV to MP4 Easily?
Option 3: Other Way to Convert YouTube to WAV on Mac
The Allavsoft is one of the best converters that can be used to convert YouTube to WAV on Mac. The process is simple and has been explained as under.
Step 1: Paste the URL of the YouTube video that you want to convert. You can also select the download quality and can access the file once the download has been completed.
Step 2: You can then select the format and once the conversion has been completed click the download button. The same has been depicted by numbers 2 and 3 in the picture below. WAV lossless quality should be selected from the dropdown to make sure that the work is done without any issue and problem.
Right format selection is important as the conversion is done instantly.
Option 4: YouTube to WAV Conversion Online
The process that you need to follow is explained as under.
Step 1: Visit https.//www.savethevideo.com/convert to access the converter.
Step 2: Paste the URL of the YouTube video that you want to convert and click the “Convert” button:
Step 3: Wait till the converter fetches the information.
Step 4: From the drop-down make sure that you select the WAV format.
Step 5: Click “Convert” once again and the process of conversion starts.
Step 6: The video then starts to download in the desired format.
Step 7: Click “Download” and save the file to the desired location. This concludes the process in full.
Tips to Convert YouTube to WAV
Below are some tips that would be useful for the users that want to convert YouTube to WAV format.
1. Always use the multipurpose software. It will allow you to download and convert the video at the same time-saving time.
2. Lossless quality is always to be selected while you are converting the format. It will make sure that the video is never compressed at all.
3. One of the best ways to convert the video is to disable the background noise. This will lead to awesome results.
4. Converting from YouTube to WAV also requires you to choose the software that is fast and reliable or else you will get the outcome which is not as per your requirements.
5. Free software programs can also get the malware to your system and therefore these are not recommended at all.
6. WAV is a format that is of high quality as the converters have loads of options so it is advised to use these carefully.
7. Make sure that the converters that are used are the ones that are highly rated and have a graphical user interface.
8. The YouTube to WAV downloader should be there on with the converter as it will make the process easy and you don’t need tons of software programs for a single purpose.
9. Always go for the program that supports the containers instead of just the format. If a program supports the containers then it is easy to convert a number of formats.
10. The conversion should be done with converters that do not cause any type of loss to enhance the quality as well.
Beside WAV Other Popular Formats for YouTube Videos
Many other video formats should be used to make sure that the best and the most advanced outcome is generated. Some of the most popular formats are as under.
- Audio Video Interleave Format, AVI
It is one of the oldest formats that are on the market. It was developed by Microsoft as a part of their video processing format for Windows. It was made publically available in 1992.
This one of the oldest formats is used universally. Many people consider it the standard to save videos. The AVI files are simple to use and are supported by almost every video player currently on the market.
It is easy to store as it takes less space than many other formats that are on the market. It will also let you transfer the files relatively faster due to the small size.
- Flash Video Format, FLV
The flash player by Adobe is one of the most common software programs on the system. This has made this video format one of the common ones on the market. The format can be played with ease as the supported plugins are there for other apps as well.
The flash content is supported by all browsers and therefore it is common to play these videos without any additional plugins. The best part of this format is the lossless quality that it provides to its users. Even if you compress these videos they remain HD as the quality remains the same.
- Apple QuickTime Movie, MOV
Among the Mac users, it is one of the most used formats. Developed by Apple it is a format that allows the users to overcome issues such as playback errors. The new version has also been launched which is known as QuickTime X.
The best part of this format is that it is available for Windows users as well. The files of the MOV format are usually of high quality. It is for the same that the size of such files is large as compared to other formats.
- Moving Pictures Expert Group 4, MP4
Introduced in 1998 it is a format that is used by the motion pictures association responsible for setting the standards. The format is widely used and is supported by various platforms as well as devices.
Even after the MP4 file is compressed it remains lossless and the quality remains the same. The HTML5 that has been launched currently also supports this format. It is compatible with almost all of the browsers that are on the market.
- 264
As the name suggests it is one of the best and the most used formats for HD videos. The compression remains lossless and even if the resolution is low the quality is maintained. The MP4 container is the one that is used to contain this format.
Most of the streaming devices, as well as the services, use this format while referring to HD video. The best part is that the format is widely accepted as industry standards for HD videos. Most of the users all over the world use this format to save their HD videos with ease.
- OGG
It is one of the most used video formats. It has been developed by the Xiph.org foundation to maintain the video as well as the audio quality on different platforms. The format is free and the documentation, as well as the configuration, can be downloaded by anyone.
- Advanced Systems Format, .ASF
If you want to stream videos then this is the format that is considered to be the best. It is still being used by the major popular streaming platforms of the world. The .ASF format is one of the best and it allows the users to overcome issues such as quality loss as well as streaming related issues.
You may also like: How to Post/Share a Video From YouTube on Instagram >>
Conclusion
If you require lossless compression then YouTube to WAV conversion is something that is required. Some many ways and means can be used to make sure that the idea is approached. The best way is to use Filmora as it is an easy and efficient operation.
The best way to get around the issue is to always use the service that is embedded with quality.
If you like this article then it is requested to comment and share it on social media. It will not only help others but will also let them have knowledgeable ideas.
Richard Bennett
Richard Bennett is a writer and a lover of all things video.
Follow @Richard Bennett
Also read:
- Unveiling the World of Virtual Performing Artists
- 2024 Approved Create Effective YouTube Advertisements on a Budget
- Youtubers Unleashed A Guide to Creating Memorable Music Reaction Vids
- In 2024, Efficient Guide Image Conversion to Professional YouTube Thumbnails
- Navigate to Sites Where You Can Procure Sponsorships on Youtube
- Avoiding Pitfalls in Sub4sub Key Lessons From a Seasoned Guide for 2024
- Striking a Balance in YouTube Thumbnail Sizing
- Boosting Audio Quality in Social Media Recordings
- 2024 Approved Co-Create Content to Maximize YouTube Follower Count
- Access Creative Banners for Video Makers at Zero Price
- In 2024, Amplify Audience on Both Platforms Youtube + Twitch Strategy
- [New] Effective Use of AdSense on YouTube to Boost Channel Income
- Crafting Compelling YouTube Narratives with Chapters and Subsections for 2024
- Blocking Unwanted Youtube Channels PC & Mobile Edition
- Visual Description Programmer
- Essential Sites for Fetching Video Intro Files for 2024
- Enduring Removal Protocol Say No to YouTube Shorts
- YouTube's Revenue Boost New 500 Subs Milestone
- 3 Efficient Methods for Saving YouTube's Standardized Images
- Adjusting YouTube's Viewership Limits for Content
- In 2024, Beginner's Guide Capturing YouTube Videos as Screencasts Without Payment
- [New] Elevate Your Channels Visibility Through Proven Methods
- [New] Dual Platform Dominance How to Captivate a Wider Audience via Youtube & Twitch Multistreaming
- Perfecting Video Segmentation for Enhanced Viewing Experience on YouTube
- [Updated] Elevate Your Content Game with These Powerful YouTube Shortcuts
- Reverse Video Magic Online Step-by-Step Guides
- How to Successfully Upload Elongated YouTube Clips
- 2024 Approved All You Need to Know About the YouTube Shorts Fund
- [New] 7 Best Zero-Cost Web-Based Film Makers
- [Updated] Enhancing Watchability Adding Time Stamps to YouTube Videos
- [New] Beginner's Ultimate List of Must-Have Video Tech
- 2024 Approved Audio-to-Text Converter for Videos
- Best Free Downloader Turn YouTube Audio Into Premium MP3s for 2024
- Building Your First Channel Essential Video Gear List
- Venturing Outside YouTube A Compreranal of Alternative Streaming Sites
- Peak Traffic Times for Stellar Video Performance
- Cross-Platform Comparison IPhone vs Android YouTube Viewing
- In 2024, A Professional's Playbook to Profitable YouTube Ventures
- In 2024, Adding Subtitles A Step-by-Step YouTube Video Approach
- In 2024, Demystifying Creative Commons and Its Legalities
- 2024 Approved Amplify Your Shorts' Impact with Bespoke Thumbnails
- 2024 Approved Access YouTube Beats Freshly Split With This Compelling List of 17 Crackers
- [New] Essential YouTube Rules for Content Creators
- Enigma of the Edgers Video Magic at Its Finest for 2024
- [New] Chart-Toppers Top 10 YouTube Personalities in Views
- Uncomplicated Online Music Conversion Top 6 Free iOS Apps for Video & Audio
- 2024 Approved Directed Focus YouTube's Easy Ways for Smoother Borders
- [Updated] DSLR or Mirrorless? The Ultimate Question for Videographers
- [Updated] Earning Estimates for YouTube Creators AdSense Pay-Out per 1,000 Viewers
- 2024 Approved Guidelines for Renaming Yourself in Online Meetings
- Updated Best 8 Light Video Editing Software for 2024
- In 2024, 4 Ways to Transfer Messages from Apple iPhone 15 to iPhone Including iPhone 15 | Dr.fone
- New 2024 Approved Hunt for Terrifying Acoustic Phenomena
- 2024 Approved Balancing Quality and Quantity in Podcasting
- Updated 2024 Approved Complete Guide of Top Video Language Translators
- Updated In 2024, From Jump Cuts to Smooth Moves 3 Final Cut Pro Transition Methods
- New Minitool Movie Maker A Detailed Review, User Guide, and Alternative Options
- [New] Securing Your Gaming Moments with Windows 11 for 2024
- In 2024, Removing Device From Apple ID For your Apple iPhone 7
- In 2024, How to Unlock Honor Magic 6 Phone without PIN
- Pixel Perfection Cutest/Scariest Filter Guide for TikToks
- [New] 2024 Approved Live Tune Streams on YouNow
- Best 10 Mock Location Apps Worth Trying On Nubia Red Magic 8S Pro | Dr.fone
- Updated Audio Absence Efficient Ways to Extract Silent Videos From iPhone Recordings
- [Updated] Expert Discord Video Capturing Software (Android/iOS)
- How to Rescue Lost Messages from Samsung Galaxy F34 5G
- In 2024, How to Change/Add Location Filters on Snapchat For your Samsung Galaxy S23 FE | Dr.fone
- Superior Plot Strategies Across Diverse Cinematic Fields
- [Updated] Android Without A Wire? Here's Your Free Games List!
- [Updated] 2024 Approved TikTok Moves Galore Top 20 Fun, Easy-To-Learn Grooves
- Updated The Ultimate Guide to Picking a Quick and Easy YouTube to MP4 Converter for 2024
- How To Update or Downgrade Apple iPhone 8 Without Data Loss? | Dr.fone
- Methods to Change GPS Location On Motorola Moto G24 | Dr.fone
- How to Send and Fake Live Location on Facebook Messenger Of your Honor 90 GT | Dr.fone
- Which is the Best Fake GPS Joystick App On Poco M6 Pro 5G? | Dr.fone
- 2024 Approved This Article Covers a Lot of Information About the Freeze-Frame Effect. It Includes Its Power, Its Usage in Films, and How to Create It in Your Videos Using Filmora. It Will Get You a Super Exciting Cinematic Effect
- 2024 Approved Cross-Platform Audio Transcription Turning Text Into MP3 Clips
- Vintage Video Enhancements An 80S Edition Hack List
- Title: [New] Adjust Privacy Settings for Secure Online Viewing
- Author: Steven
- Created at : 2024-05-25 19:58:33
- Updated at : 2024-05-26 19:58:33
- Link: https://youtube-clips.techidaily.com/new-adjust-privacy-settings-for-secure-online-viewing/
- License: This work is licensed under CC BY-NC-SA 4.0.
