
!["[New] A Novice's Navigational Guide on YouTube Channel Creation and Making Dough"](https://www.lifewire.com/thmb/ZcmxiC1dSbYycdBHzKQOeTES2Oc=/400x300/filters:no_upscale():max_bytes(150000):strip_icc()/001-be0b90f382934bec96a98506a6a0953e.jpg)
"[New] A Novice's Navigational Guide on YouTube Channel Creation and Making Dough"
A Novice’s Navigational Guide on YouTube: Channel Creation and Making Dough
Hello, I’m looking to start my journey as a YouTuber, but I do not know how the process works. Please, can you share with me how I can create a YouTube channel and make money from it? Kindly, help.
Starting a successful YouTube channel is very tricky. So, if you’re wondering how to create a YouTube channel and make money, worry less, we understand your struggle, and that is why we’ve created this YouTube beginners guide.
Regardless of whether you’re looking to start a tech YouTube channel, a money-making online YouTube channel, a lifestyle YouTube channel, or other topics, this guide will walk you through the simple process of how to create a YouTube channel and make money from it.
Part 1: Why choose YouTube to make money?
Boasting over 2 billion active users globally, YouTube remains the most used video-playing platform on the internet with all kinds of videos.
Today, many folks use YouTube as a means of generating income because it offers users more opportunities to reach a wide range of audiences, and the means of generating income via YouTube easily. As of when this article is written, research shows that an average YouTuber could earn up to $10,000 yearly.
Also, YouTube is a free marketing platform. So, if you have a website, you can add links to your website in the video description, thus enabling you to boost your website traffic via the platform. And it’ll allow you to advertise your product or services 100% free.
Part 2: 5-Step Formula to Start a YouTube Channel
Now you understand why you should choose YouTube to make money, the following steps will teach you how to create a YouTube channel within a few clicks. So, read on.
Step1 Create a google account
To get started, you need to create a google account. But if you already have a Google account you can skip this step.
Head to Google Account and click Create Account at the top right corner.

On the new screen, enter the necessary details and click Next.

Provide your phone number and other required details. Then, click Next.

On the new page, click I Agree to accept Google’s terms and conditions. Then finish the Google Account setup.

Step2 Create a YouTube account
Once you’ve successfully created a Google account, the next thing is to create your YouTube account. You just have to do the following to carry out the operation;
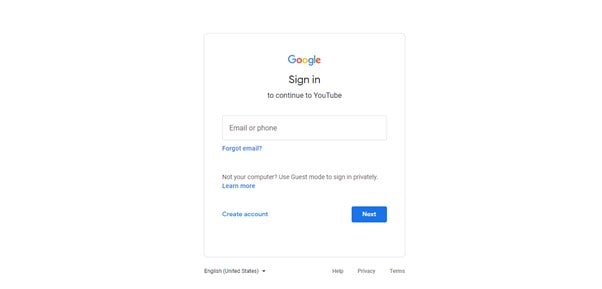
Open YouTube’s official website in your browser and click Sign in from the top right corner.

On the new page, sign in to the Google account that you want to use in creating your YouTube channel.
After you sign in to your Google account, you’ll be prompted back to the YouTube home interface. Click on your profile icon from the top right corner and select Create A Channel from the drop-down list.

Choose the Name you want to appear on your YouTube channel profile and upload a preferred Picture. Then, click Create Channel to proceed.

Step3 Customize your YouTube channel
After you’ve successfully created the channel, the next thing is to customize the channel as per requirement. Click Customise Channel from the left-hand side.

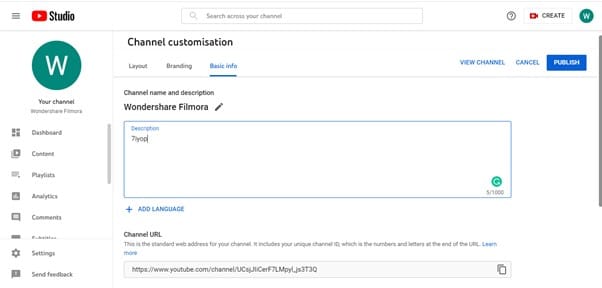
You’ll be prompted to the YouTube creator studio. There, you’ll find Layout, Branding, and Basic Info options displayed at the top of the page.
In the Layout section, you’ll be allowed to apply customization of how you want your YouTube channel homepage to look.

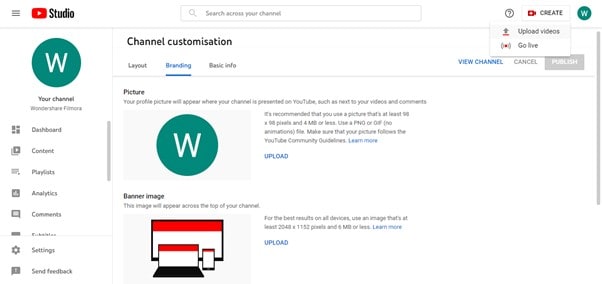
Under Branding, you can upload your brand logo as a profile photo, upload a banner image, and add the video watermark that you want to appear on all videos you upload on YouTube.

Under Basic Info, you’ll be able to enter a description for your YouTube channel, edit your channel URL, and do lots more. However, remember to always use the PUBLISH button to save customization.
Step4 Upload your first YouTube video
Now, it’s to upload your first YouTube video. To do so, navigate to the top-right corner of the page and click Create New. Select Upload Video.
If you have a video ready, click Select Files and upload the video you want to post.

Complete the required editing/settings after the video is uploaded.

Speaking of videos, you upload on YouTube, there are certain types of videos that can make you popular within a short time. Such YouTube video category includes;
- Singing
- Teaching
- Fashion Advice
- Cooking Tutorial
- Make-Up Tutorial
Step5 Make your YouTube channel discoverable
It’s time to start making your YouTube channel discoverable online. You need the subscribers, views, and all that a creator like you is worth having. However, to make this possible, you need to do the following;
Optimize Video Titles
Using Google-friendly titles for your videos is vital to allow them to rank well on Google search ranking. It should be catchy and compelling that users will be prompted to want to know what the video is about. Make sure it contains keywords too.

Optimize Video Description
Adding descriptions to your video is as important as the title. This will help search engines understand what your video is all about. So, make sure you add rich keywords to your video description and keep it concise.

Promote Your Channel on Other Social Media Platforms
You shouldn’t limit yourself to just creating videos and uploading them on YouTube. Make sure you always make it a priority to promote your YouTube videos on other platforms like Facebook, Twitter, or Instagram. This will help you give your existing fans a heads-up that you’re starting a YouTube channel.

Add Tags to your videos
When we say add tags to your videos, it does not mean you should add any tag to any video you upload on YouTube. Only add tags that’s relating to the theme of your video.
Tags will help YouTube understand the kind of video you’re uploading, and it’ll help you maintain the quality of not just your videos but your YouTube channel.

Use Keywords in Your Videos
Using rich keywords in your YouTube videos is a great way to increase the chances of your videos being seen online. Make sure you use the right keyword in the video title, as it’ll help guide viewers to your video when they search for similar words or phrases online.

Part 3: YouTube Must-Have Tools: What Are They?
Congratulations on creating your YouTube channel. But, before you get over-excited, there are essential tools you need as a YouTuber to help you stand out in the industry. These tools include the following;
1. Video Editor – Wondershare Filmora
As a YouTuber, regardless of your niche of expertise, you need an efficient video editing tool like Wondershare Filmora to create quality videos. Filmora is different from the regular video editor you find online, and it offers a plethora of video editing features that you can rely on to edit your videos and spice them up without requiring any kind of video editing knowledge.
See how you can use Filmora video editor on your YouTube videos;
Free Download For Win 7 or later(64-bit)
Free Download For macOS 10.14 or later
Step1 Go to the official website and install the Filmora video editing software on your computer. Then, launch the tool and import the video you want to edit using the Import button.

Drag-n-drop the video to the timeline.

Step2 Click Effects from the top of the screen. Select AI Portrait from the left-hand side and find a preferred AI Portrait effect. Then, click on it and drag-n-drop the effect to the Timeline.

Adjust the effect starting and ending point of where you want the AI Portrait effect to be displayed.
Step3 Again, adjust the AI Portrait effect settings by double-clicking on it, then, from the pop-up, apply the preferred settings.

Step4 You can also add a “Subscribe” watermark to your YouTube video. To do so, just click the >> icon next to Export at the top of the screen, then select Element.

Select the ‘Social Media Show Element 07’ Effects. Then, drag-n-drop it to the Timeline.

Step5 Lastly, preview the edited video, and if you’re okay with it, click Export from the top bar and select Burn DVD from the drop-down list.
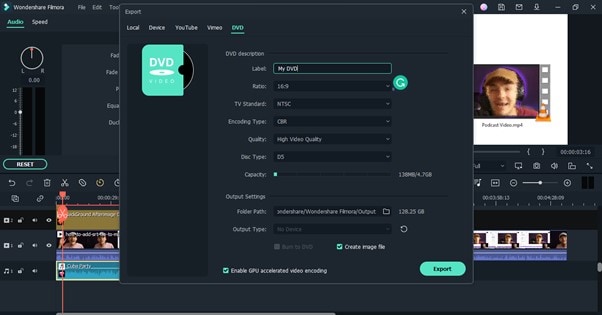
From the pop-up window that appears on your PC screen, select the Folder Path and give the video file a preferred name. Then, click Export to complete the operation.

2. Google Keyword Planner
The Google keyword planner is vital to help you do keyword research and see the trends of how a particular keyword is searched in a particular month, within a given year, or more. It’ll help you understand how people are searching for a particular keyword and what time of the year it usually has more searches from folks.
By using Google Keyword planner, you’ll put yourself ahead of your competitors by using the right keyword that you need for your SEO and PPC strategies at the right time. From search volume to trends, CPC, competition scores, and more, it’s crucial you have this tool at your fingertips. Besides, it’s 100% free to use.
3. YouTube Studio
YouTube Studio is a crucial analytic tool that can come in handy to help you improve your video as you grow your YouTube channel. It is like Google Analytics in a way. It’ll allow you to track the analytics of how people view your videos, comment on your video, and more. YouTube Studio is available for free. You can use it through the Android App, on your PC or online from YouTube itself.

4. VidIQ
Are you looking for a tool to grow your YouTube channel efficiently? Then VidIQ is the ideal tool for you. Yes, with VidIQ, you’ll get access to essential tools to grow your YouTube audience faster than you can think. It’s just a scorecard that offers you in-depth analytics of how your YouTube videos are performing compared to your competitors, thus allowing you to get helpful info on how you can get ahead of them and stand out in the industry.
With VidIQ, you’ll get access to a checklist that will highlight titles, descriptions, cards, end screens, closed captions, and lots more in your videos. And of all, it’ll suggest tags that you can use in your videos to get more traffic and improve SEO.

Part 4: Tips & Tricks to Make your YouTube Grow Faster
Stay Consistent
There’s no doubt that the key to succeeding in whatever you do is to stay consistent. It can be quite hard for anyone, especially newbies to keep up with different difficulties encountered in the pursuit to create a successful YouTube channel.
So, for you to achieve your dreams of being a popular YouTuber, you must keep up with the consistency of creating quality videos, promoting your videos, and doing the right thing that’s needed for your YouTube channel to stand out online.
Collaborate With Other YouTubers
Don’t be shy to reach out to your fellow YouTubers for collaboration. Yes, by collaborating with popular YouTubers, you get to enhance your online presence, thereby increasing your subscriber base and increasing your video views.
YouTube SEO Is Crucial
You might have heard of SEO (Search Engine Optimization) being crucial for websites to rank well, but the truth is it also applies to YouTube channels. YouTube SEO is a great way to optimize your YouTube channel and video to make it rank well on online search results.
It’s important you understand how YouTube SEO works and implement it in your YouTube channel, as it’ll increase your chances of more viewers visiting your channel and watching your videos.
Final Words
That’s all you need to know about creating a successful YouTube channel. If you fancy creating videos, the above tips will teach you how to create a YouTube channel and make money. Also, if you read the article to this point, we believe you’ve understood different ways you can make your YouTube channel stand out and enhance your chances of making more money on YouTube. Don’t hesitate to start your journey now!
Free Download For Win 7 or later(64-bit)
Free Download For macOS 10.14 or later
Part 1: Why choose YouTube to make money?
Boasting over 2 billion active users globally, YouTube remains the most used video-playing platform on the internet with all kinds of videos.
Today, many folks use YouTube as a means of generating income because it offers users more opportunities to reach a wide range of audiences, and the means of generating income via YouTube easily. As of when this article is written, research shows that an average YouTuber could earn up to $10,000 yearly.
Also, YouTube is a free marketing platform. So, if you have a website, you can add links to your website in the video description, thus enabling you to boost your website traffic via the platform. And it’ll allow you to advertise your product or services 100% free.
Part 2: 5-Step Formula to Start a YouTube Channel
Now you understand why you should choose YouTube to make money, the following steps will teach you how to create a YouTube channel within a few clicks. So, read on.
Step1 Create a google account
To get started, you need to create a google account. But if you already have a Google account you can skip this step.
Head to Google Account and click Create Account at the top right corner.
On the new screen, enter the necessary details and click Next.
Provide your phone number and other required details. Then, click Next.
On the new page, click I Agree to accept Google’s terms and conditions. Then finish the Google Account setup.
Step2 Create a YouTube account
Once you’ve successfully created a Google account, the next thing is to create your YouTube account. You just have to do the following to carry out the operation;
Open YouTube’s official website in your browser and click Sign in from the top right corner.
On the new page, sign in to the Google account that you want to use in creating your YouTube channel.
After you sign in to your Google account, you’ll be prompted back to the YouTube home interface. Click on your profile icon from the top right corner and select Create A Channel from the drop-down list.
Choose the Name you want to appear on your YouTube channel profile and upload a preferred Picture. Then, click Create Channel to proceed.
Step3 Customize your YouTube channel
After you’ve successfully created the channel, the next thing is to customize the channel as per requirement. Click Customise Channel from the left-hand side.
You’ll be prompted to the YouTube creator studio. There, you’ll find Layout, Branding, and Basic Info options displayed at the top of the page.
In the Layout section, you’ll be allowed to apply customization of how you want your YouTube channel homepage to look.
Under Branding, you can upload your brand logo as a profile photo, upload a banner image, and add the video watermark that you want to appear on all videos you upload on YouTube.
Under Basic Info, you’ll be able to enter a description for your YouTube channel, edit your channel URL, and do lots more. However, remember to always use the PUBLISH button to save customization.
Step4 Upload your first YouTube video
Now, it’s to upload your first YouTube video. To do so, navigate to the top-right corner of the page and click Create New. Select Upload Video.
If you have a video ready, click Select Files and upload the video you want to post.
Complete the required editing/settings after the video is uploaded.
Speaking of videos, you upload on YouTube, there are certain types of videos that can make you popular within a short time. Such YouTube video category includes;
- Singing
- Teaching
- Fashion Advice
- Cooking Tutorial
- Make-Up Tutorial
Step5 Make your YouTube channel discoverable
It’s time to start making your YouTube channel discoverable online. You need the subscribers, views, and all that a creator like you is worth having. However, to make this possible, you need to do the following;
Optimize Video Titles
Using Google-friendly titles for your videos is vital to allow them to rank well on Google search ranking. It should be catchy and compelling that users will be prompted to want to know what the video is about. Make sure it contains keywords too.
Optimize Video Description
Adding descriptions to your video is as important as the title. This will help search engines understand what your video is all about. So, make sure you add rich keywords to your video description and keep it concise.
Promote Your Channel on Other Social Media Platforms
You shouldn’t limit yourself to just creating videos and uploading them on YouTube. Make sure you always make it a priority to promote your YouTube videos on other platforms like Facebook, Twitter, or Instagram. This will help you give your existing fans a heads-up that you’re starting a YouTube channel.
Add Tags to your videos
When we say add tags to your videos, it does not mean you should add any tag to any video you upload on YouTube. Only add tags that’s relating to the theme of your video.
Tags will help YouTube understand the kind of video you’re uploading, and it’ll help you maintain the quality of not just your videos but your YouTube channel.
Use Keywords in Your Videos
Using rich keywords in your YouTube videos is a great way to increase the chances of your videos being seen online. Make sure you use the right keyword in the video title, as it’ll help guide viewers to your video when they search for similar words or phrases online.
Part 3: YouTube Must-Have Tools: What Are They?
Congratulations on creating your YouTube channel. But, before you get over-excited, there are essential tools you need as a YouTuber to help you stand out in the industry. These tools include the following;
1. Video Editor – Wondershare Filmora
As a YouTuber, regardless of your niche of expertise, you need an efficient video editing tool like Wondershare Filmora to create quality videos. Filmora is different from the regular video editor you find online, and it offers a plethora of video editing features that you can rely on to edit your videos and spice them up without requiring any kind of video editing knowledge.
See how you can use Filmora video editor on your YouTube videos;
Free Download For Win 7 or later(64-bit)
Free Download For macOS 10.14 or later
Step1 Go to the official website and install the Filmora video editing software on your computer. Then, launch the tool and import the video you want to edit using the Import button.
Drag-n-drop the video to the timeline.
Step2 Click Effects from the top of the screen. Select AI Portrait from the left-hand side and find a preferred AI Portrait effect. Then, click on it and drag-n-drop the effect to the Timeline.
Adjust the effect starting and ending point of where you want the AI Portrait effect to be displayed.
Step3 Again, adjust the AI Portrait effect settings by double-clicking on it, then, from the pop-up, apply the preferred settings.
Step4 You can also add a “Subscribe” watermark to your YouTube video. To do so, just click the >> icon next to Export at the top of the screen, then select Element.
Select the ‘Social Media Show Element 07’ Effects. Then, drag-n-drop it to the Timeline.
Step5 Lastly, preview the edited video, and if you’re okay with it, click Export from the top bar and select Burn DVD from the drop-down list.
From the pop-up window that appears on your PC screen, select the Folder Path and give the video file a preferred name. Then, click Export to complete the operation.
2. Google Keyword Planner
The Google keyword planner is vital to help you do keyword research and see the trends of how a particular keyword is searched in a particular month, within a given year, or more. It’ll help you understand how people are searching for a particular keyword and what time of the year it usually has more searches from folks.
By using Google Keyword planner, you’ll put yourself ahead of your competitors by using the right keyword that you need for your SEO and PPC strategies at the right time. From search volume to trends, CPC, competition scores, and more, it’s crucial you have this tool at your fingertips. Besides, it’s 100% free to use.
3. YouTube Studio
YouTube Studio is a crucial analytic tool that can come in handy to help you improve your video as you grow your YouTube channel. It is like Google Analytics in a way. It’ll allow you to track the analytics of how people view your videos, comment on your video, and more. YouTube Studio is available for free. You can use it through the Android App, on your PC or online from YouTube itself.
4. VidIQ
Are you looking for a tool to grow your YouTube channel efficiently? Then VidIQ is the ideal tool for you. Yes, with VidIQ, you’ll get access to essential tools to grow your YouTube audience faster than you can think. It’s just a scorecard that offers you in-depth analytics of how your YouTube videos are performing compared to your competitors, thus allowing you to get helpful info on how you can get ahead of them and stand out in the industry.
With VidIQ, you’ll get access to a checklist that will highlight titles, descriptions, cards, end screens, closed captions, and lots more in your videos. And of all, it’ll suggest tags that you can use in your videos to get more traffic and improve SEO.
Part 4: Tips & Tricks to Make your YouTube Grow Faster
Stay Consistent
There’s no doubt that the key to succeeding in whatever you do is to stay consistent. It can be quite hard for anyone, especially newbies to keep up with different difficulties encountered in the pursuit to create a successful YouTube channel.
So, for you to achieve your dreams of being a popular YouTuber, you must keep up with the consistency of creating quality videos, promoting your videos, and doing the right thing that’s needed for your YouTube channel to stand out online.
Collaborate With Other YouTubers
Don’t be shy to reach out to your fellow YouTubers for collaboration. Yes, by collaborating with popular YouTubers, you get to enhance your online presence, thereby increasing your subscriber base and increasing your video views.
YouTube SEO Is Crucial
You might have heard of SEO (Search Engine Optimization) being crucial for websites to rank well, but the truth is it also applies to YouTube channels. YouTube SEO is a great way to optimize your YouTube channel and video to make it rank well on online search results.
It’s important you understand how YouTube SEO works and implement it in your YouTube channel, as it’ll increase your chances of more viewers visiting your channel and watching your videos.
Final Words
That’s all you need to know about creating a successful YouTube channel. If you fancy creating videos, the above tips will teach you how to create a YouTube channel and make money. Also, if you read the article to this point, we believe you’ve understood different ways you can make your YouTube channel stand out and enhance your chances of making more money on YouTube. Don’t hesitate to start your journey now!
Free Download For Win 7 or later(64-bit)
Free Download For macOS 10.14 or later
Streamline Your iPhone/iPad Video Upload Process
Create High-Quality Video - Wondershare Filmora
An easy and powerful YouTube video editor
Numerous video and audio effects to choose from
Detailed tutorials provided by the official channel
Initially, iOS users had the option to load videos directly to YouTube via the tap-to-upload feature. However, this option is missing in the recent iOS devices versions. Therefore, many users search for possible ways to post a video on YouTube from iPhone. For this, you have to put some considerations into place before moving on. The video title length should not exceed 100 characters, while the description is maintained at 5,000 characters. Also, ensure the video length doesn’t exceed 15 minutes. Let’s roll out the best ways to upload your videos and make that big catch on subscribers.

In this article
01 [ How to upload a video to YouTube from iPhone or iPad](#Part 1)
02 [Why your phone doesn’t post videos to YouTube](#Part 2)
03 [Make your YouTube video better with Filmora](#Part 3)
How to upload a video to YouTube from iPhone or iPad
Are you ready to start on that big adventure and share your videos on YouTube? Follow these steps to learn how to upload a video to YouTube from your iPhone.
Method 1: Upload using the YouTube iOS app
Using the YouTube app is the simplest way to upload your YouTube videos. The YouTube app should be installed on your iOS device.
Step 1. Launch the YouTube app on your device, then sign in to your account. If you don’t have an account yet, you will need to “Sign up” for a new one before continuing the upload process.
Step 2. Click on the “+” icon found at the bottom of the screen.
Step 3. Then choose the “Upload a video” option from the populated list of options.
Step 4. Check out the pop-up that appears and “Allow access” to it.
Step 5. Edit your video to your preference by trimming or cropping as you desire. Then click on the “Next” option.

Step 6. Add “title and description” to your video. Remember, the title should contain less than 100 characters and the description no more than 500 characters.
Step 7. Then set the visibility mode as “Public” to enable you to share your video over the internet.
Step 8. Click on the “Upload” button to finally upload your video to YouTube.

Method 2: Upload using Photo App
The Photo App has a “Share” option that you can use to upload your videos to YouTube. Here is the guide.
Step 1. Go to your iOS device and tap on the “Photos” app.
Step 2. Then tap on the “Videos Folder” to locate the video you wish to upload to YouTube.

Step 3. Next, tap on the video that you want to upload.
Step 4. Then tap on the “Share” icon located at the bottom left of your iOS device screen.
Step 5. You’ll then access a “Share” menu from where you have various share options for your video.
Step 6. Choose the “YouTube” option to continue to share your video there. At this juncture, ensure you have logged in to your Google Account.

Step 7. You need to provide a “Title” and “Description” of your video. Then go to the “Privacy” Options and make your video “Public.”
Step 8. Finally, tap on the “Publish” tab found at the top-right corner of your screen to make your video viewable by the public.

Method 3: Upload video to YouTube using Safari
Safari is another alternative method to upload a video to YouTube.
Step 1. First, go to “youtube.com” on Safari and sign in.

Step 2. Then tap on the “account” icon at the top right side of the screen.
Step 3. Hit on the “Upload” icon and wait to be redirected to the YouTube Studio desktop site.
Step 4. Click on the “Select Files” option.
Step 5. Choose the video you wish to add to YouTube from the “Photo” library and tap on the “Add” button.

Step 6. Add your video’s “title and description” and hit the “Next” button.
Step 7. Tap on the “Next” button once more to go to the “Visibility” page.
Step 8. Select the “Public” option to upload your video to the public.
Why your phone doesn’t post videos to YouTube
Despite learning how to upload to YouTube from iPhone, you may be perplexed to realize that your phone refuses to post videos to YouTube. What could be the reason?
1) YouTube issues
In most cases, the problem doesn’t arise from your phone but from YouTube. This streaming app may also experience some hitches along the way. Remember that even if your phone sync with your YouTube account to upload videos from the “Camera Roll,” YouTube isn’t managed from the Camera Roll but the YouTube app directly. You can solve the issue by signing out of your YouTube account and signing back in.
2) Connection Strength
Some videos may appear quite large and cause a time-out during the upload process. Check your Wi-Fi or internet connection strength to determine if it needs a boost or wait until the streaming strength is strong for a quick upload. Test your internet speed by searching “internet test speed” on Google. Then click the “Run Speed Test” in the search box. A window will open and give you an estimate of the Mbps that your connection is operating at. If too low, switch to other alternatives.
3) Verify your YouTube account
Verifying your account will help you to enjoy YouTube’s full features. It’s then that you’ll manage to upload videos without any drawbacks. Also, that’s when you’ll manage to upload longer videos that go beyond the 15-minute duration.
4) Pay attention to the video size
There is a limit for videos to post to YouTube. If it is too large or long, the upload will cancel before completion.
5) Be patient
YouTube can save your partial upload for 24 hours. So, you can continue to upload from where you left. Learn to be patient as there could be a surge of user traffic, especially during evenings.
Make your YouTube video better with Filmora
Good video quality will make you go miles ahead of your marketing gig. You can use Filmora mobile application to make your videos look better before uploading them to YouTube. This intuitive video editing app has advanced features and several ways to compose creative videos.
- Stunning video effects that let you add animated text to video
- Easily record your voice-overs with its perfect sound effects
- Split functionality that allows you to slice your video footage into two or more separate video clips
- Playback your clips in reverse and adjust the speed for fast or slow motion
- Select the best aspect ratio for your video
- Advanced camera to create emoji selfies and other video beautification
- Directly share your videos to social media sites like YouTube and Facebook.
Check out the steps to edit your video with Filmora on your iOS device
Step 1. Download and install Filmora
For iOS devices, go to the “Apple Store” to download and install the app. Also, allow it to access your videos, camera, and pictures in the process.
Step 2. Import video
You may already have a video in your library that you wish to upload to YouTube. Nonetheless, you can shoot a video afresh to add. To shoot one, you need to settle on a topic before recording and downloading other images you may need. Ensure you watch what you are filming and use adequate lighting during the shooting process.
Next, begin to import your video file. Just open the application and select the “Create new video” option. Then choose the “Video” icon and select a folder that contains the video to be added. Hit the “Add” button from the bottom right corner.
Step 3. Edit video
Filmora has several editing features to make your video better. Use the “Edit tools” feature to turn your video into an impeccable piece. Easily add filters, adjust the speed, or create subtitles, among other functions. You can also split, trim, or delete the unwanted clip parts.
It is important to add a title and description to your video. Just use the “Titles” button to add the title. Other precepts that you can add include transitions, sound like voice-over,
Step 4. Export and share
You’ve just finished creating and editing your video. Click on the “Save” tab and let the application export your video. Then select the “Save to Camera Roll” option to save the video to your iPhone. Finally, you can upload and share the video directly to your YouTube account.
Conclusion
● However, it appears to be a difficult task; you must have found relief after going through these procedures. You don’t need prior knowledge on how to upload a video to YouTube from your iPhone. Several options are at your disposal. You can use the Safari, YouTube app, or the Photo app to upload your videos. The better part is that you can create top-notch videos with Filmora. This mobile video editing app has a lot to offer, ensuring quality content.
Initially, iOS users had the option to load videos directly to YouTube via the tap-to-upload feature. However, this option is missing in the recent iOS devices versions. Therefore, many users search for possible ways to post a video on YouTube from iPhone. For this, you have to put some considerations into place before moving on. The video title length should not exceed 100 characters, while the description is maintained at 5,000 characters. Also, ensure the video length doesn’t exceed 15 minutes. Let’s roll out the best ways to upload your videos and make that big catch on subscribers.
In this article
01 [ How to upload a video to YouTube from iPhone or iPad](#Part 1)
02 [Why your phone doesn’t post videos to YouTube](#Part 2)
03 [Make your YouTube video better with Filmora](#Part 3)
How to upload a video to YouTube from iPhone or iPad
Are you ready to start on that big adventure and share your videos on YouTube? Follow these steps to learn how to upload a video to YouTube from your iPhone.
Method 1: Upload using the YouTube iOS app
Using the YouTube app is the simplest way to upload your YouTube videos. The YouTube app should be installed on your iOS device.
Step 1. Launch the YouTube app on your device, then sign in to your account. If you don’t have an account yet, you will need to “Sign up” for a new one before continuing the upload process.
Step 2. Click on the “+” icon found at the bottom of the screen.
Step 3. Then choose the “Upload a video” option from the populated list of options.
Step 4. Check out the pop-up that appears and “Allow access” to it.
Step 5. Edit your video to your preference by trimming or cropping as you desire. Then click on the “Next” option.
Step 6. Add “title and description” to your video. Remember, the title should contain less than 100 characters and the description no more than 500 characters.
Step 7. Then set the visibility mode as “Public” to enable you to share your video over the internet.
Step 8. Click on the “Upload” button to finally upload your video to YouTube.
Method 2: Upload using Photo App
The Photo App has a “Share” option that you can use to upload your videos to YouTube. Here is the guide.
Step 1. Go to your iOS device and tap on the “Photos” app.
Step 2. Then tap on the “Videos Folder” to locate the video you wish to upload to YouTube.
Step 3. Next, tap on the video that you want to upload.
Step 4. Then tap on the “Share” icon located at the bottom left of your iOS device screen.
Step 5. You’ll then access a “Share” menu from where you have various share options for your video.
Step 6. Choose the “YouTube” option to continue to share your video there. At this juncture, ensure you have logged in to your Google Account.
Step 7. You need to provide a “Title” and “Description” of your video. Then go to the “Privacy” Options and make your video “Public.”
Step 8. Finally, tap on the “Publish” tab found at the top-right corner of your screen to make your video viewable by the public.
Method 3: Upload video to YouTube using Safari
Safari is another alternative method to upload a video to YouTube.
Step 1. First, go to “youtube.com” on Safari and sign in.
Step 2. Then tap on the “account” icon at the top right side of the screen.
Step 3. Hit on the “Upload” icon and wait to be redirected to the YouTube Studio desktop site.
Step 4. Click on the “Select Files” option.
Step 5. Choose the video you wish to add to YouTube from the “Photo” library and tap on the “Add” button.
Step 6. Add your video’s “title and description” and hit the “Next” button.
Step 7. Tap on the “Next” button once more to go to the “Visibility” page.
Step 8. Select the “Public” option to upload your video to the public.
Why your phone doesn’t post videos to YouTube
Despite learning how to upload to YouTube from iPhone, you may be perplexed to realize that your phone refuses to post videos to YouTube. What could be the reason?
1) YouTube issues
In most cases, the problem doesn’t arise from your phone but from YouTube. This streaming app may also experience some hitches along the way. Remember that even if your phone sync with your YouTube account to upload videos from the “Camera Roll,” YouTube isn’t managed from the Camera Roll but the YouTube app directly. You can solve the issue by signing out of your YouTube account and signing back in.
2) Connection Strength
Some videos may appear quite large and cause a time-out during the upload process. Check your Wi-Fi or internet connection strength to determine if it needs a boost or wait until the streaming strength is strong for a quick upload. Test your internet speed by searching “internet test speed” on Google. Then click the “Run Speed Test” in the search box. A window will open and give you an estimate of the Mbps that your connection is operating at. If too low, switch to other alternatives.
3) Verify your YouTube account
Verifying your account will help you to enjoy YouTube’s full features. It’s then that you’ll manage to upload videos without any drawbacks. Also, that’s when you’ll manage to upload longer videos that go beyond the 15-minute duration.
4) Pay attention to the video size
There is a limit for videos to post to YouTube. If it is too large or long, the upload will cancel before completion.
5) Be patient
YouTube can save your partial upload for 24 hours. So, you can continue to upload from where you left. Learn to be patient as there could be a surge of user traffic, especially during evenings.
Make your YouTube video better with Filmora
Good video quality will make you go miles ahead of your marketing gig. You can use Filmora mobile application to make your videos look better before uploading them to YouTube. This intuitive video editing app has advanced features and several ways to compose creative videos.
- Stunning video effects that let you add animated text to video
- Easily record your voice-overs with its perfect sound effects
- Split functionality that allows you to slice your video footage into two or more separate video clips
- Playback your clips in reverse and adjust the speed for fast or slow motion
- Select the best aspect ratio for your video
- Advanced camera to create emoji selfies and other video beautification
- Directly share your videos to social media sites like YouTube and Facebook.
Check out the steps to edit your video with Filmora on your iOS device
Step 1. Download and install Filmora
For iOS devices, go to the “Apple Store” to download and install the app. Also, allow it to access your videos, camera, and pictures in the process.
Step 2. Import video
You may already have a video in your library that you wish to upload to YouTube. Nonetheless, you can shoot a video afresh to add. To shoot one, you need to settle on a topic before recording and downloading other images you may need. Ensure you watch what you are filming and use adequate lighting during the shooting process.
Next, begin to import your video file. Just open the application and select the “Create new video” option. Then choose the “Video” icon and select a folder that contains the video to be added. Hit the “Add” button from the bottom right corner.
Step 3. Edit video
Filmora has several editing features to make your video better. Use the “Edit tools” feature to turn your video into an impeccable piece. Easily add filters, adjust the speed, or create subtitles, among other functions. You can also split, trim, or delete the unwanted clip parts.
It is important to add a title and description to your video. Just use the “Titles” button to add the title. Other precepts that you can add include transitions, sound like voice-over,
Step 4. Export and share
You’ve just finished creating and editing your video. Click on the “Save” tab and let the application export your video. Then select the “Save to Camera Roll” option to save the video to your iPhone. Finally, you can upload and share the video directly to your YouTube account.
Conclusion
● However, it appears to be a difficult task; you must have found relief after going through these procedures. You don’t need prior knowledge on how to upload a video to YouTube from your iPhone. Several options are at your disposal. You can use the Safari, YouTube app, or the Photo app to upload your videos. The better part is that you can create top-notch videos with Filmora. This mobile video editing app has a lot to offer, ensuring quality content.
Also read:
- The Ultimate Playbook for Captivating YouTube Audiences with Strategic Banners
- [Updated] Comprehensive Guide to YouTube's Subscription Advantages
- In 2024, Boost Video Performance with Key SEO Tools
- Create Professional Movies on YouTube Quickly
- Key Takeaways on YouTube TV An Overview of Its Advantages
- In 2024, Direct Download & Conversion Best YouTube to MP3 Software
- Fast-Track To 1,000 Subscribers in Youtube Landscape
- [New] Channeling Success Navigating the New YouTube Membership Model
- YouTube Earning Masterclass Taking Your Streaming Business to New Heights
- 2024 Approved Bridging Creativity & Engagement - Anime Subscribe Buttons with Filmora
- [Updated] Digital Film Composer
- [Updated] 2024 | How to Make a YouTube Intro Video?
- In 2024, Analyzing YouTube's Process for Selective Comment Showcasing
- [Updated] Accessing Global Hitters The #1-#6 Short Video Downloaders
- Saving YouTube Videos A Legal Overview
- Learn VFX for Free Mastering the Art of Background Substitution Through 4 Innovative Video Tutorials
- Your Guide to Making Millions on YouTube From Novice to Big Earnings
- Delightful Yuletide Cinema on YouTube Savor Nine Whole-Film Gems for 2024
- Key Factors in Understanding YouTube TV Experience
- Sustainable Traffic Growth Ethical Video Marketing Tips
- [Updated] Decoding Veiled Content on YouTube
- In 2024, Channel Finale 101 Insider Tricks for Successful Outros
- In 2024, Cultivate Inner Peace & Physical Strength with These Channels
- [New] Copyright Concerns with Recording YouTube Content
- [New] Streamlining Content Creation Using Siri in TikTok for 2024
- Complete Guide to Hard Reset Your Samsung Galaxy M14 5G | Dr.fone
- [Updated] 2024 Approved Epic Environments Discover the Hottest 10 Themes at BetterDiscord
- In 2024, The Most Useful Tips for Pokemon Go Ultra League On Apple iPhone SE (2020) | Dr.fone
- In 2024, Guide on How To Change Your Apple ID Email Address On Apple iPhone 12 Pro | Dr.fone
- Updated 2024 Approved Create Stunning Mac Slideshows A Beginners Guide to Ezvid
- Updated Step-by-Step Guide How to Translate TikTok Videos
- 2024 Approved Mastering Game Recording Steam Edition Techniques
- [Updated] In 2024, Exclusive Guide Top 5 Streamlined Recording Software
- In 2024, Easily Unlock Your Vivo X90S Device SIM
- [New] 2024 Approved Multi-User Android Calls The Top 8 Tools
- In 2024, Viral Visionaries Exploring 10 Wildest TikTok Gaming Scenes
- Edit and Organize Your MP4 Videos with These Tag Editors for 2024
- In 2024, Top 9 Motorola Moto G 5G (2023) Monitoring Apps for Parental Controls | Dr.fone
- Title: "[New] A Novice's Navigational Guide on YouTube Channel Creation and Making Dough"
- Author: Steven
- Created at : 2024-05-25 19:57:39
- Updated at : 2024-05-26 19:57:39
- Link: https://youtube-clips.techidaily.com/new-a-novices-navigational-guide-on-youtube-channel-creation-and-making-dough/
- License: This work is licensed under CC BY-NC-SA 4.0.
