
![[New] 10 Recording Tips for Recording Audio with High Quality](https://www.lifewire.com/thmb/ifWTsHLsL5LJcm41bwMfP8A6f4g=/400x300/filters:no_upscale():max_bytes(150000):strip_icc()/GettyImages-1129377245-31d2afce07c34729a07592c518bd5b25.jpg)
[New] 10 Recording Tips for Recording Audio with High Quality
Beyond the Basics: Advanced Techniques for Improved Recordings
10 Recording Tips for Recording Audio with High Quality

Richard Bennett
Oct 26, 2023• Proven solutions
Getting the best sound for your recording is not as simplistic as buying an expensive microphone. There are many different things you can do to record your audio more clearly. Here are 10 recording tips to record high-quality audio.
1. Silence everything you don’t want your microphone to record
2. Put your mobile phone in airplane mode
3. Minimize echo
4. Block wind from reaching your microphone
5. Upgrade your microphone
6. Adjust your levels
7. Start with a sound cue if you’re planning to do some syncing in post
8. Get close to the sound
9. ADR
10. Record Ambient Sound
Bonus Tip-Record Your Audio with Wondershare Filmora
Wondershare Filmora has great recording features that enable you to record screen , voiceover, and webcam. Just connect the recording device to your computer, and start the recording in Wondershare Filmora and you will get high-quality audio. And you can also easily pick a song from the royalty-free music library on Wondershare Filmora. These audio features on Filmora are rare and very simple to use, you only need to click a few times and your video will have a new sound and background song.


1. Silence everything you don’t want your microphone to record
When you’re recording audio, you have to be more aware of the subtle sounds that drone on in your background. These sounds may include humming from machines with fans, buzzing from lights, and jingling from your pet’s collar. Observe your recording space and find ways to silence everything that you don’t want in your audio recording.
2. Put your mobile phone in airplane mode
Although it may be quite obvious to turn your phone’s ring tone off when you’re recording, it may not be as obvious to put your phone in airplane mode. When phones receive calls or perform searches as part of their background processes, they emit signals that can get picked up by your recording system. Avoid ruining good takes with unwanted sounds of phone signals by putting your phones in airplane mode.
3. Minimize echo
If you are recording yourself talk or sing, make sure to set up your recording space in a way where the sound projected from your voice bounces minimally off the walls and back to your microphone. Bare walls and hardwood floors will cause a lot of bouncing. Make use of materials that will absorb your sound rather than bounce it, like a thick rug or a comforter. If you want your voice to echo, that’s something you should do in post-production.
4. Block wind from reaching your microphone
Although it might not sound so loud and distracting to the naked ear, wind sounds terribly loud through a microphone recording and can cause your audio to clip (distortion of waveform due to output of sound exceeding maximum capacity or 0 dB point). This includes the “wind” that comes out of your mouth when you pronounce words starting with the letter “p.” Use pop filters, windscreens, and deadcats to block wind from reaching your microphone.
5. Upgrade your microphone
As much as you try to control all the noise in your surroundings, your greatest recording limitation will come from the hardware that you use. Improve your recordings by plugging in an external microphone into your camera’s microphone jack or record audio completely separately with a professional microphone.
Need help with deciding on a microphone to buy? Check out our recommended list of microphones.
6. Adjust your levels
Before pressing the record button, see how loudly your microphone picks up the sound you wish to record. Adjust your levels (sensitivity of your microphone) until the sound sits in between -6 dBs and -12dBs. This range gives the source of your sound some room to get louder without the recorded audio getting clipped. When you first listen to audio recorded within this range, it may sound very quiet. No need to worry though because you can increase the volume later in editing.
7. Start with a sound cue if you’re planning to do some syncing in post
If you’re recording separate audio that you plan to sync to your video later in editing, start your recording with a short and loud sound cue like a clap or a high pitched “beep” tone. Later, when you’re editing, it’ll be much easier for you to find the section where your video and additional audio match.
8. Get close to the sound
Unless you’re aiming to record ambient sound, bring your microphone close to the source of sound you are wanting to record. The closer your microphone is to the source of sound, the lower your sensitivity setting can be on your microphone. As a result of lowering your levels, sounds you are not meaning to record will also sound fainter.
9. ADR
When you need to record a scene in a loud setting where you have very little control over the noise, record additional vocals later and replace the original vocals through a process called automated dialogue replacement.
10. Record Ambient Sound
Remember to record ambient sound or “room tone.” You can use these recordings to fill in the blanks if you run out of audio and also smooth out parts of your audio where you hear pops, clicks, and other unwanted noise.
Richard Bennett
Richard Bennett is a writer and a lover of all things video.
Follow @Richard Bennett
Richard Bennett
Oct 26, 2023• Proven solutions
Getting the best sound for your recording is not as simplistic as buying an expensive microphone. There are many different things you can do to record your audio more clearly. Here are 10 recording tips to record high-quality audio.
1. Silence everything you don’t want your microphone to record
2. Put your mobile phone in airplane mode
3. Minimize echo
4. Block wind from reaching your microphone
5. Upgrade your microphone
6. Adjust your levels
7. Start with a sound cue if you’re planning to do some syncing in post
8. Get close to the sound
9. ADR
10. Record Ambient Sound
Bonus Tip-Record Your Audio with Wondershare Filmora
Wondershare Filmora has great recording features that enable you to record screen , voiceover, and webcam. Just connect the recording device to your computer, and start the recording in Wondershare Filmora and you will get high-quality audio. And you can also easily pick a song from the royalty-free music library on Wondershare Filmora. These audio features on Filmora are rare and very simple to use, you only need to click a few times and your video will have a new sound and background song.
1. Silence everything you don’t want your microphone to record
When you’re recording audio, you have to be more aware of the subtle sounds that drone on in your background. These sounds may include humming from machines with fans, buzzing from lights, and jingling from your pet’s collar. Observe your recording space and find ways to silence everything that you don’t want in your audio recording.
2. Put your mobile phone in airplane mode
Although it may be quite obvious to turn your phone’s ring tone off when you’re recording, it may not be as obvious to put your phone in airplane mode. When phones receive calls or perform searches as part of their background processes, they emit signals that can get picked up by your recording system. Avoid ruining good takes with unwanted sounds of phone signals by putting your phones in airplane mode.
3. Minimize echo
If you are recording yourself talk or sing, make sure to set up your recording space in a way where the sound projected from your voice bounces minimally off the walls and back to your microphone. Bare walls and hardwood floors will cause a lot of bouncing. Make use of materials that will absorb your sound rather than bounce it, like a thick rug or a comforter. If you want your voice to echo, that’s something you should do in post-production.
4. Block wind from reaching your microphone
Although it might not sound so loud and distracting to the naked ear, wind sounds terribly loud through a microphone recording and can cause your audio to clip (distortion of waveform due to output of sound exceeding maximum capacity or 0 dB point). This includes the “wind” that comes out of your mouth when you pronounce words starting with the letter “p.” Use pop filters, windscreens, and deadcats to block wind from reaching your microphone.
5. Upgrade your microphone
As much as you try to control all the noise in your surroundings, your greatest recording limitation will come from the hardware that you use. Improve your recordings by plugging in an external microphone into your camera’s microphone jack or record audio completely separately with a professional microphone.
Need help with deciding on a microphone to buy? Check out our recommended list of microphones.
6. Adjust your levels
Before pressing the record button, see how loudly your microphone picks up the sound you wish to record. Adjust your levels (sensitivity of your microphone) until the sound sits in between -6 dBs and -12dBs. This range gives the source of your sound some room to get louder without the recorded audio getting clipped. When you first listen to audio recorded within this range, it may sound very quiet. No need to worry though because you can increase the volume later in editing.
7. Start with a sound cue if you’re planning to do some syncing in post
If you’re recording separate audio that you plan to sync to your video later in editing, start your recording with a short and loud sound cue like a clap or a high pitched “beep” tone. Later, when you’re editing, it’ll be much easier for you to find the section where your video and additional audio match.
8. Get close to the sound
Unless you’re aiming to record ambient sound, bring your microphone close to the source of sound you are wanting to record. The closer your microphone is to the source of sound, the lower your sensitivity setting can be on your microphone. As a result of lowering your levels, sounds you are not meaning to record will also sound fainter.
9. ADR
When you need to record a scene in a loud setting where you have very little control over the noise, record additional vocals later and replace the original vocals through a process called automated dialogue replacement.
10. Record Ambient Sound
Remember to record ambient sound or “room tone.” You can use these recordings to fill in the blanks if you run out of audio and also smooth out parts of your audio where you hear pops, clicks, and other unwanted noise.
Richard Bennett
Richard Bennett is a writer and a lover of all things video.
Follow @Richard Bennett
Top 5 GIF Making Software with the Highest Ratings
10 Best YouTube To GIF Makers: How to Create GIF from YouTube Video?
Richard Bennett
Mar 27, 2024• Proven solutions
GIF (Graphic Interchange Format) is an image file format supporting both uniform and animated images. Before, GIF was a basic 8-bit colored image until PNG image format was introduced as a more feasible alternative. Today, you can find them being used on all the trending social media applications like WhatsApp, Instagram, Snapchat, Twitter, Facebook, and various others.
The good thing here is that you can make GIFs from YouTube videos or any of your favorite videos for that matter which you think can help express your sentiments or ideas in an enhanced manner. There is a huge market available of apps and web software that can help create GIFs from YouTube without much trouble.
In this short guide ahead, we’ve brought for you the best YouTube to GIF maker available in the digital market. Let’s go GIF-ing!
Part 1: Best Online YouTube to GIFs Makers
Here is our curated list of the best 11 YouTube to GIF Maker that you can use to make GIF from YouTube video.
1. GIFS
Gifs.com is one the best GIF maker site that makes crafting GIFs from YouTube videos incredibly easy and quick with no time. If you’re looking for some straight and simple video to gif converter to help you convert YouTube videos into GIFs, this is the smoothest editor that will do the job and craft interesting gifs for your blogging platforms.
All you have to do is enter the URL of the video you want to convert into a GIF. At this point, the site accepts Instagram, YouTube, Facebook, and Vine links. In addition to that, there is also an option that allows users to upload from the desktop computer.
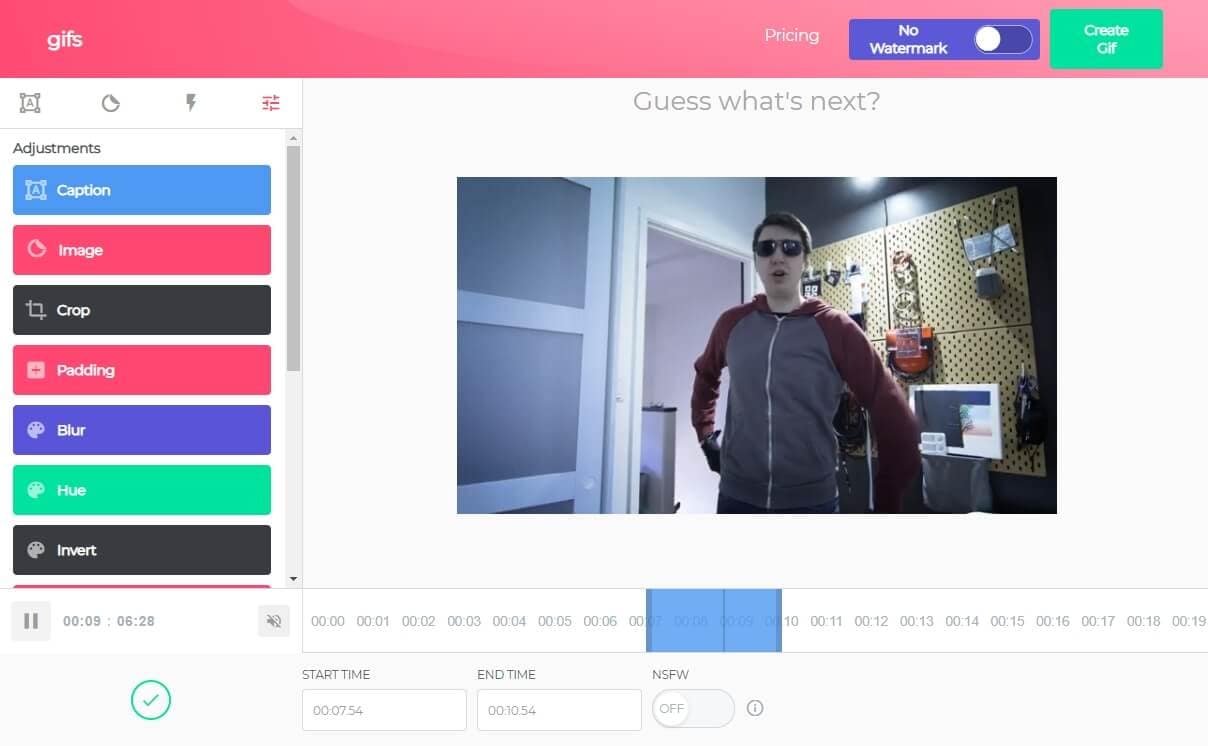
Once you’ve entered the YouTube video URL, it prompts a basic video editor wherein you select the frame and durations for your GIF. If you want to customize it further, you can add stickers, captions, and tools like blurring, cropping, and others.
Once you’re done exploring the filters and editing the GIF, you can directly share the URL on different platforms or just download it and store it on your device.
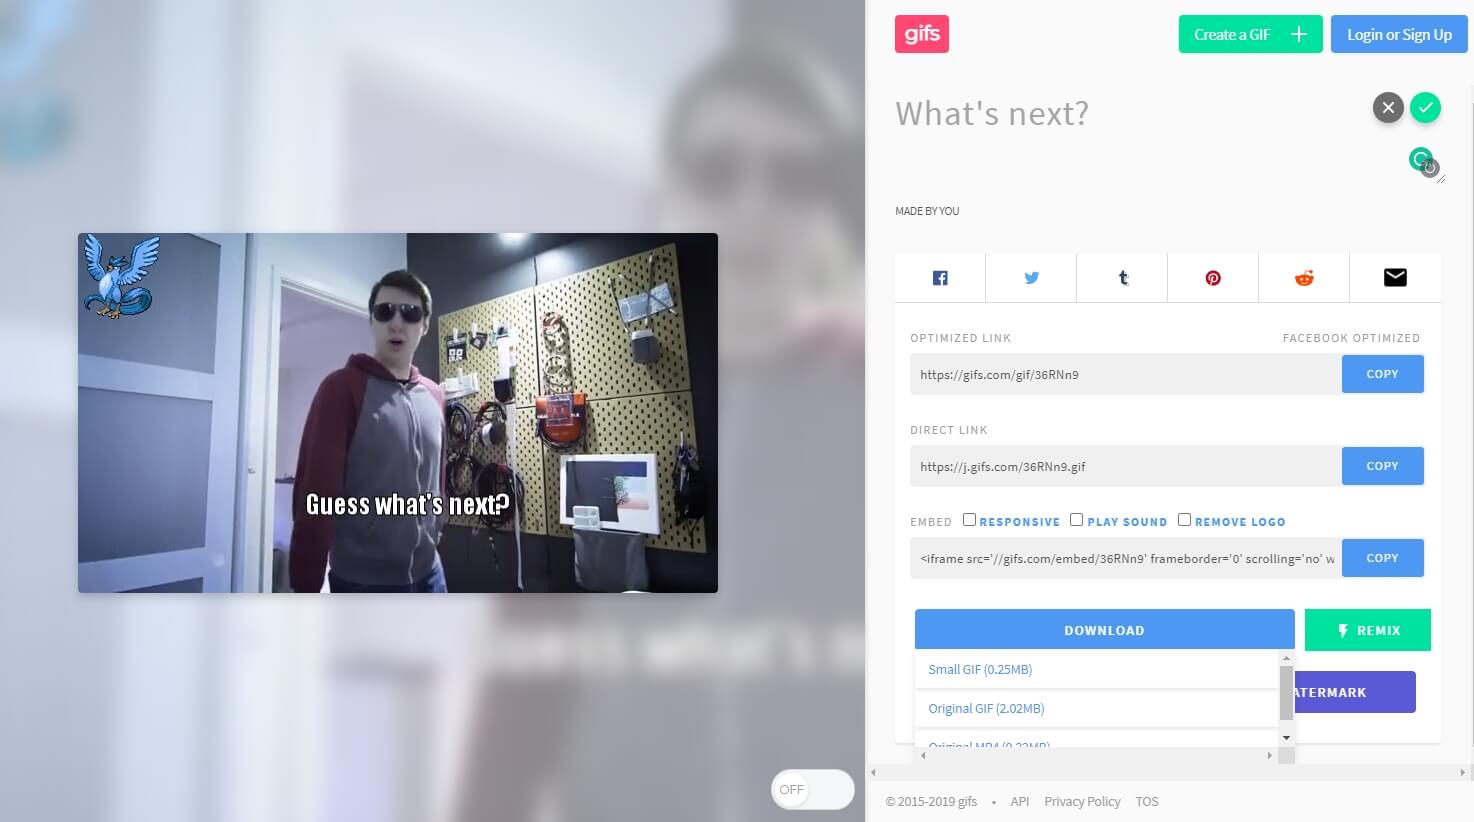
Note: If you want to remove the watermark and get full access to extra features, you may need to pay $1.99/month.
You can check the gif that I made from our YouTube video How to Edit Galaxy Effects with Green Screen | Wondershare FilmoraPro Tutorial on gifs.com here: https://gifs.com/gif/36RNn9 .
2. GIPHY
Giphy, as we all know, is the most used search engine for GIFs due to its limitless collection. Giphy here maintains its own GIF maker to create your customized GIFs effortlessly. The Giphy online GIF maker is quite simple and easy to use; it also has steadfast mobile applications for both Android and iOS devices.
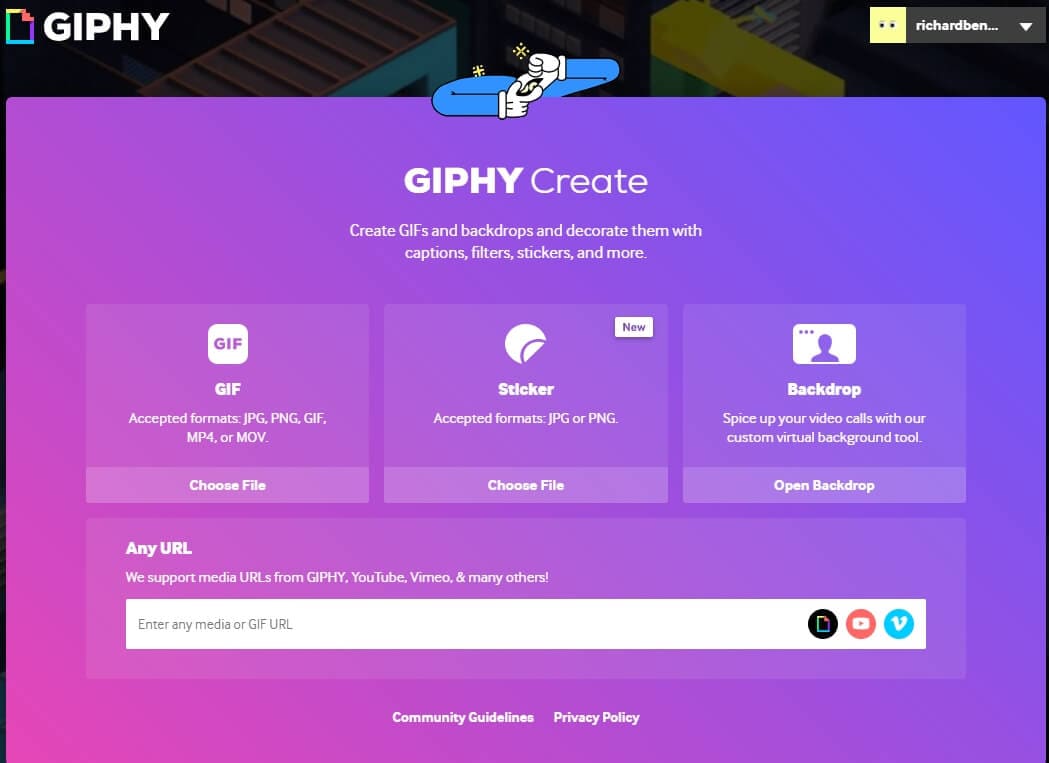
To begin converting YouTube videos into GIFs, click the Create button at the top and then you can either enter the URL or upload images/videos from local files. This GIF maker only accepts JPG, PNG, GIF, MP4, and MOV for people uploading images or videos.
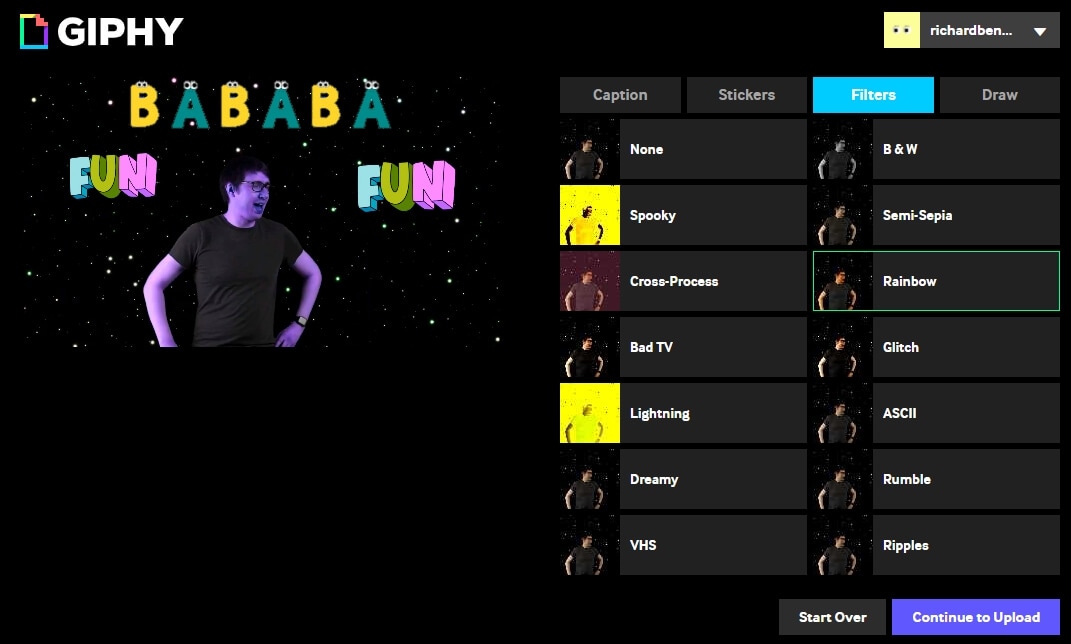
Then, trim the part from the video you want to convert into a GIF. Later, you can embellish your GIFs by adding filters, tags, text captions, and stickers to make them look eye-catching. If you’re looking for a clean and simple GIF maker, then Giphy GIF maker is the perfect choice for you.
Here is the gig that I made with Giphy: https://media.giphy.com/media/2Dtlp2MAXtoC0EyMsx/giphy.gif .
3. GIFit!
GIFit is a well-known online extension available on the Chrome Web Store for free that aids in making GIFs from YouTube videos. The GIFit extension has been recently updated to work with the new YouTube interface to help you craft Gifs smoothly. One thing to remember about GIFit is that with YouTube HTML5 mode only.
To use this Chrome extension, install it from the Chrome Web Store. Now, run the attachment and visit any video on YouTube that you would like to convert into GIF. Once decided, simply press on the GIFit icon in the YouTube toolbar. Then, edit according to your requirements and hit the red button with GIFit on it. After a few minutes, your GIF will be ready to be shared and saved. Currently, it offers convert YouTube to GIF feature only, so you can’t add stickers nor captions.
4. Make A GIF
Makeagif is an ideal online GIF maker for you that can convert videos into animated GIFs in no time. It allows you to create GIFs using local images, YouTube, Facebook, and Webcam. Makeagif even will enable you to develop new GIFs using the already existing ones.

The GIF maker also comes with a variety of free GIFs to download and add to your collection. Moreover, it allows you to edit existing GIFs by enhancing their quality, speed and adding filters to them. It offers functions that can enrich the standard of your GIFs.
To create GIFs using this, first, create your account on the site. Next, select the ‘YouTube to GIF’ option from the drop-down menu, among other alternatives. Then, enter the link to the YouTube video that you wish to transfigure into GIF, after which you can tailor-make the gifs by adjusting the configuration settings, such as adding captions and sticker. Once done, simply download and share your newly crafted GIF.
5. Imgur
Imgur might not be the best application to be included in the list. But it is definitely an amazing site where you can go looking for all kinds of images, Gifs, memes, or other digital stories. Imgur’s wide collection of visuals can never disappoint you, no matter what you’re searching for, from funny to sad, inspiring to aspiring, everything can be discovered in this treasure.

Now, this might not be the best YouTube to gif maker, but it does have the potential to provide you with great ideas for GIF-making. Besides, you can download all the interesting GIfs from here and save them for future reference.
6. GiFRun
Are you worried about searching for a gif converter with no prior experience in editing? Don’t worry; this GiFRun Maker is the simplest online service that requires minimum to zero skill for creating GIFs. GifRun is an easy enough site to navigate through and produce quality GIFs for your blogging sites.
To convert a YouTube video to GIF, simply enter the link. After that, it will prompt you to the editing page, where you can set the start/end time, duration, and resolution for your gif. You can preview your edit before finalizing it, making necessary changes, and then downloading it on your device.
7. Free Gif Maker Me
Free Gif maker is one of the straightforward and easily manageable GIF-making applications. It offers YouTube to gif, reverse gif, and gif effects tools to enhance your GIF quality and make it effortless to create your own GIFs.
To make GIF from YT Video on free Gif Maker, copy the video link in the input text field in the middle of your screen and then tap on ‘Load YouTube Video.’ Within seconds you will be redirected to the video preview and GIF editing page. Now, set the duration, start time, resolution, output, and other details. Then, click on the ‘Make A GIF’ option and save it on your device once ready.
8. Imgflip
Another website is known for creating and sharing visual content on different social media channels. Imgflip allows you to make customized animations from YouTube and other digital platforms. The site is completely safe to use and produces good-quality memes and GIFs quickly without incurring a dime.
Imgflip supports all the popular video formats such as AVI, MP4, 3GP, OGG, FLV, MOV, and various other video formats. To produce a high-quality GIF, make sure your video is at least 480P or higher. More so, the Imgflip supports GIF with audio features of all the videos with audio that can only be accessed using the Imgflip Pro at a minimum price of $9.95/ month.
9. GIF Maker
GIF Maker is a pretty basic application that everyone can navigate with or without any expertise in the tech department. Along with GIF maker, it also has other tools such as GIF resizer, GIF compressor, and GIF cropper, all specifically designed tools to help you create riveting GIFs ever!
GIF Maker provides two options; one video to gif and second Images to gif that you can use as per their need. One simply is to enter the YT video link/upload video to the upload box. Next, alter the animation, filter, speed, duration, and set start and endpoint in the editor. You can upload files in all the popular formats and upload up to 25Mb image files and 30 Mb for animated GIFs.
Another point to remember while using this GIF Maker, it only supports YT videos that have not been copy-righted by the creator.
Part 2: Best YouTube to GIF Maker on Windows and Mac: Wondershare UniConverter
It happens so that you stumble upon a video that runs the hippocampus of your brain rigid with ingenious abstractions about converting the video into GIF to delineate those ideas through digital content on your blogs.
Now, you will require the best-quality GIF maker that is easy to navigate without any complications. Despite the plethora of GIF makers being available at hand, it could be a strenuous task to search for the ideal GIF maker for yourself.
Presently, Wondershare UniConverter is one of the best and easy-to-use YouTube to GIF makers for you. It is the handiest tool to help you accomplish your conversion, customization, compressing, and revamping goals like a professional with its effective editing features. Wondershare offers many benefits, from converting files in hundred different formats to crafting your one GIF out of videos along with other fundamental editing attributes.
How to User UniConverter Video to GIF Maker?
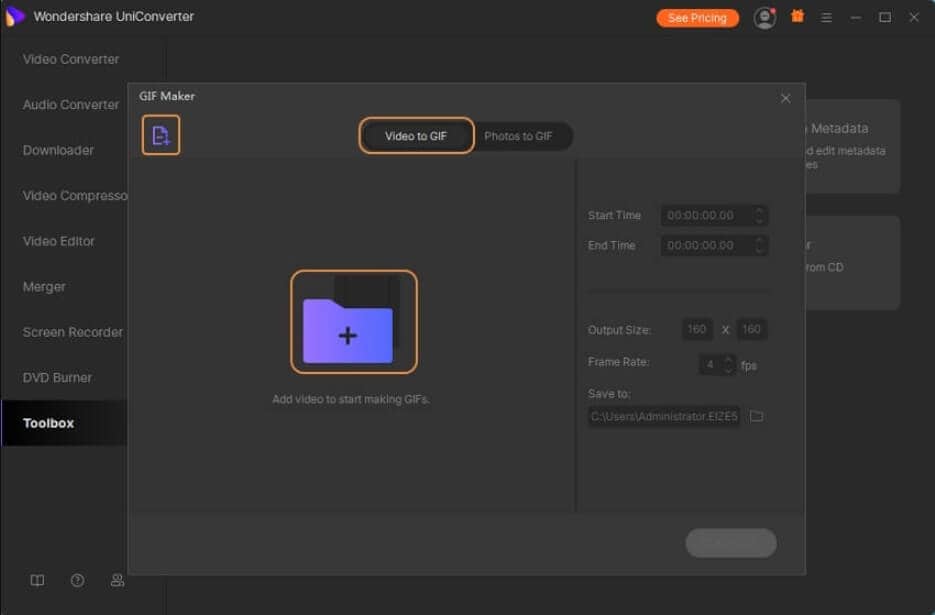
Step 1: Download and install the Wondershare Converter on your device. Now, run the app and launch the Wondershare GIF Maker by selecting the GIF Maker Icon on the toolbar.
Step 2: Click on the Video to GIF option before tapping on the Add File option to upload YT video for GIF conversion.
Step 3: Next, you can customize your uploaded video by setting the start and end time. In addition to that, you can enter the frame rate and output size according to your requirement.
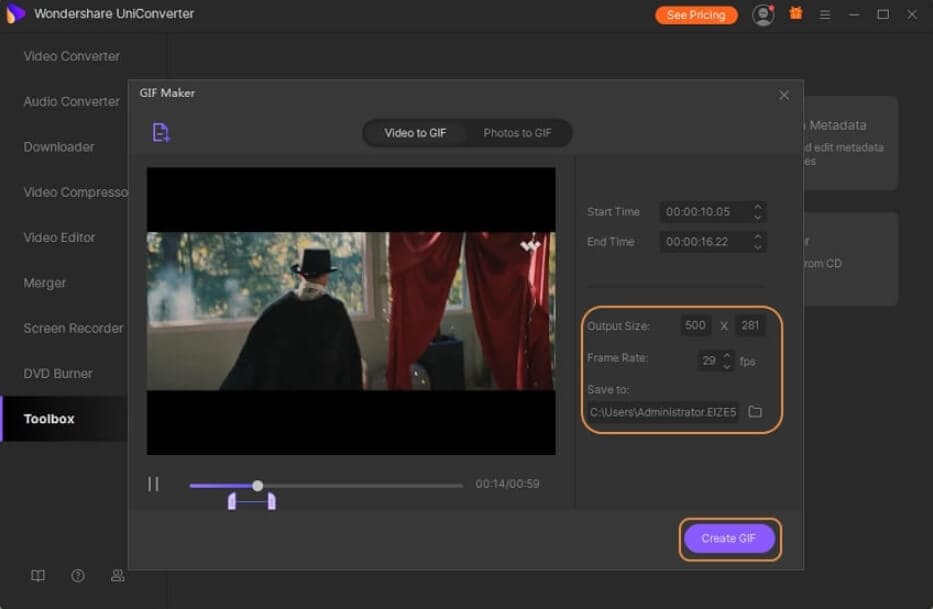
Step 4: Once finished with all the customization, convert the YouTube video into a GIF by tapping the Create GIF option.
Step 5: Ta-da! UniConverter will transform your YT video into a GIF within a minute or two. You can now export and share the GIF further.
That’s right, with five easy steps, you can convert all your favorite YouTube video into GIF with this YouTube to GIF maker.
Without any doubt, I can say that usage of GIFs during your regular texting and socialization can make your conversations more interesting. GIFs are the best shortcuts to express your mood, emotions, and humor without having to type much. No other digital medium provides an avenue that offers such proficiency in demonstrating your emotions, possibly the reason behind its escalating popularity.
With the help of this little guide, you can create gif from YouTube videos with a wave of your hand! I hope you’ve fun GIF-ing!
Richard Bennett
Richard Bennett is a writer and a lover of all things video.
Follow @Richard Bennett
Richard Bennett
Mar 27, 2024• Proven solutions
GIF (Graphic Interchange Format) is an image file format supporting both uniform and animated images. Before, GIF was a basic 8-bit colored image until PNG image format was introduced as a more feasible alternative. Today, you can find them being used on all the trending social media applications like WhatsApp, Instagram, Snapchat, Twitter, Facebook, and various others.
The good thing here is that you can make GIFs from YouTube videos or any of your favorite videos for that matter which you think can help express your sentiments or ideas in an enhanced manner. There is a huge market available of apps and web software that can help create GIFs from YouTube without much trouble.
In this short guide ahead, we’ve brought for you the best YouTube to GIF maker available in the digital market. Let’s go GIF-ing!
Part 1: Best Online YouTube to GIFs Makers
Here is our curated list of the best 11 YouTube to GIF Maker that you can use to make GIF from YouTube video.
1. GIFS
Gifs.com is one the best GIF maker site that makes crafting GIFs from YouTube videos incredibly easy and quick with no time. If you’re looking for some straight and simple video to gif converter to help you convert YouTube videos into GIFs, this is the smoothest editor that will do the job and craft interesting gifs for your blogging platforms.
All you have to do is enter the URL of the video you want to convert into a GIF. At this point, the site accepts Instagram, YouTube, Facebook, and Vine links. In addition to that, there is also an option that allows users to upload from the desktop computer.
Once you’ve entered the YouTube video URL, it prompts a basic video editor wherein you select the frame and durations for your GIF. If you want to customize it further, you can add stickers, captions, and tools like blurring, cropping, and others.
Once you’re done exploring the filters and editing the GIF, you can directly share the URL on different platforms or just download it and store it on your device.
Note: If you want to remove the watermark and get full access to extra features, you may need to pay $1.99/month.
You can check the gif that I made from our YouTube video How to Edit Galaxy Effects with Green Screen | Wondershare FilmoraPro Tutorial on gifs.com here: https://gifs.com/gif/36RNn9 .
2. GIPHY
Giphy, as we all know, is the most used search engine for GIFs due to its limitless collection. Giphy here maintains its own GIF maker to create your customized GIFs effortlessly. The Giphy online GIF maker is quite simple and easy to use; it also has steadfast mobile applications for both Android and iOS devices.
To begin converting YouTube videos into GIFs, click the Create button at the top and then you can either enter the URL or upload images/videos from local files. This GIF maker only accepts JPG, PNG, GIF, MP4, and MOV for people uploading images or videos.
Then, trim the part from the video you want to convert into a GIF. Later, you can embellish your GIFs by adding filters, tags, text captions, and stickers to make them look eye-catching. If you’re looking for a clean and simple GIF maker, then Giphy GIF maker is the perfect choice for you.
Here is the gig that I made with Giphy: https://media.giphy.com/media/2Dtlp2MAXtoC0EyMsx/giphy.gif .
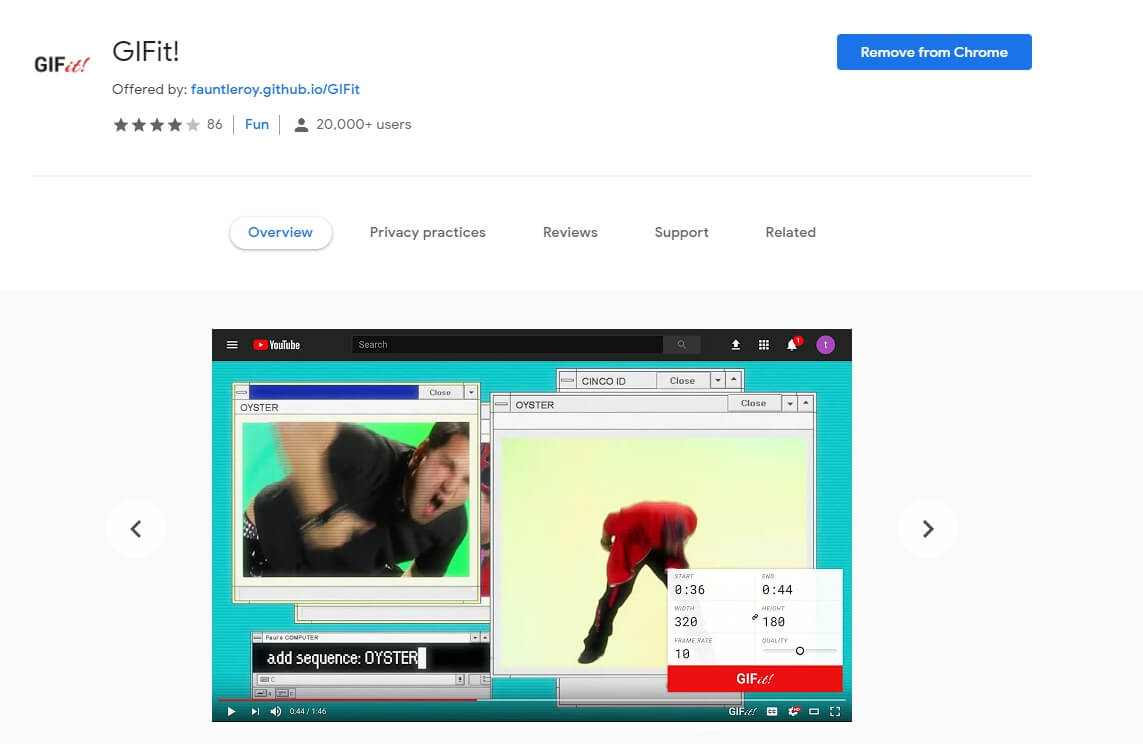
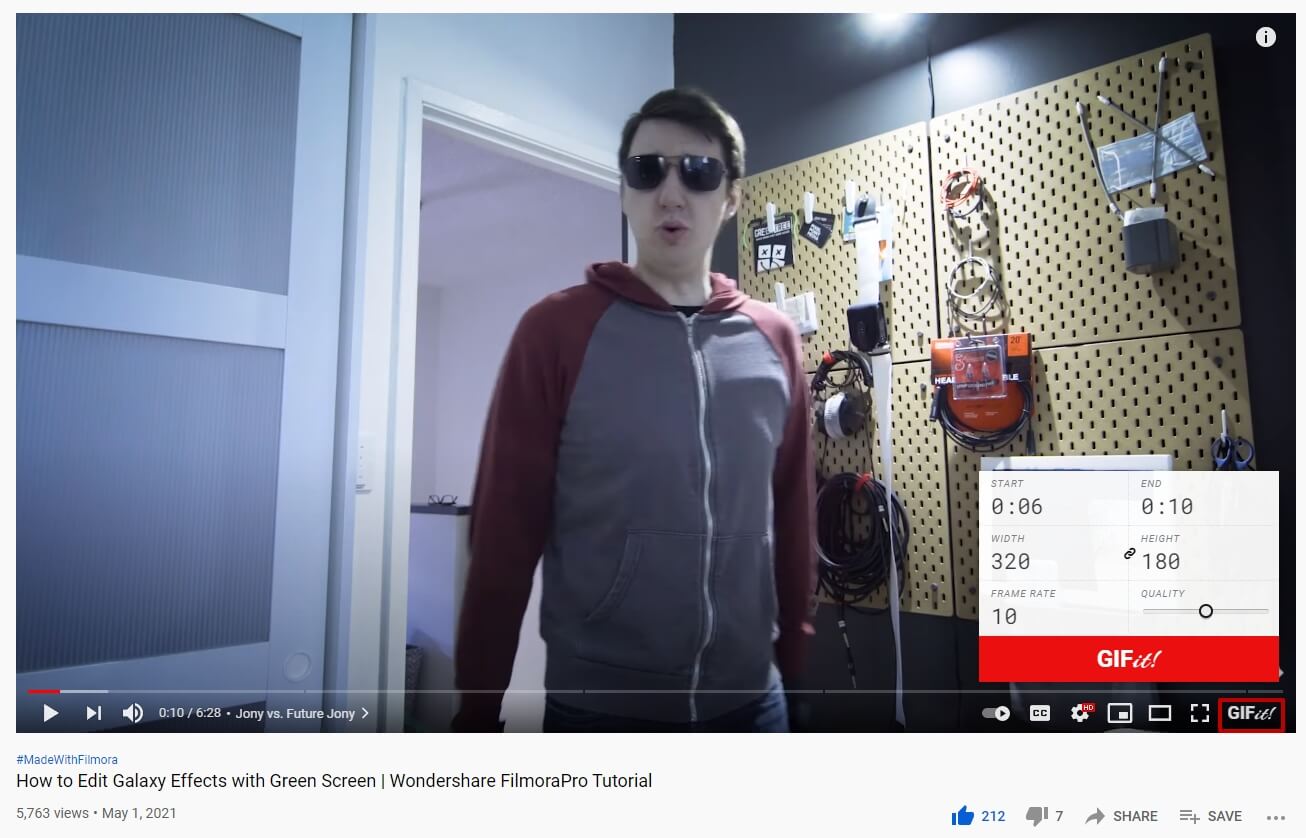
3. GIFit!
GIFit is a well-known online extension available on the Chrome Web Store for free that aids in making GIFs from YouTube videos. The GIFit extension has been recently updated to work with the new YouTube interface to help you craft Gifs smoothly. One thing to remember about GIFit is that with YouTube HTML5 mode only.
To use this Chrome extension, install it from the Chrome Web Store. Now, run the attachment and visit any video on YouTube that you would like to convert into GIF. Once decided, simply press on the GIFit icon in the YouTube toolbar. Then, edit according to your requirements and hit the red button with GIFit on it. After a few minutes, your GIF will be ready to be shared and saved. Currently, it offers convert YouTube to GIF feature only, so you can’t add stickers nor captions.
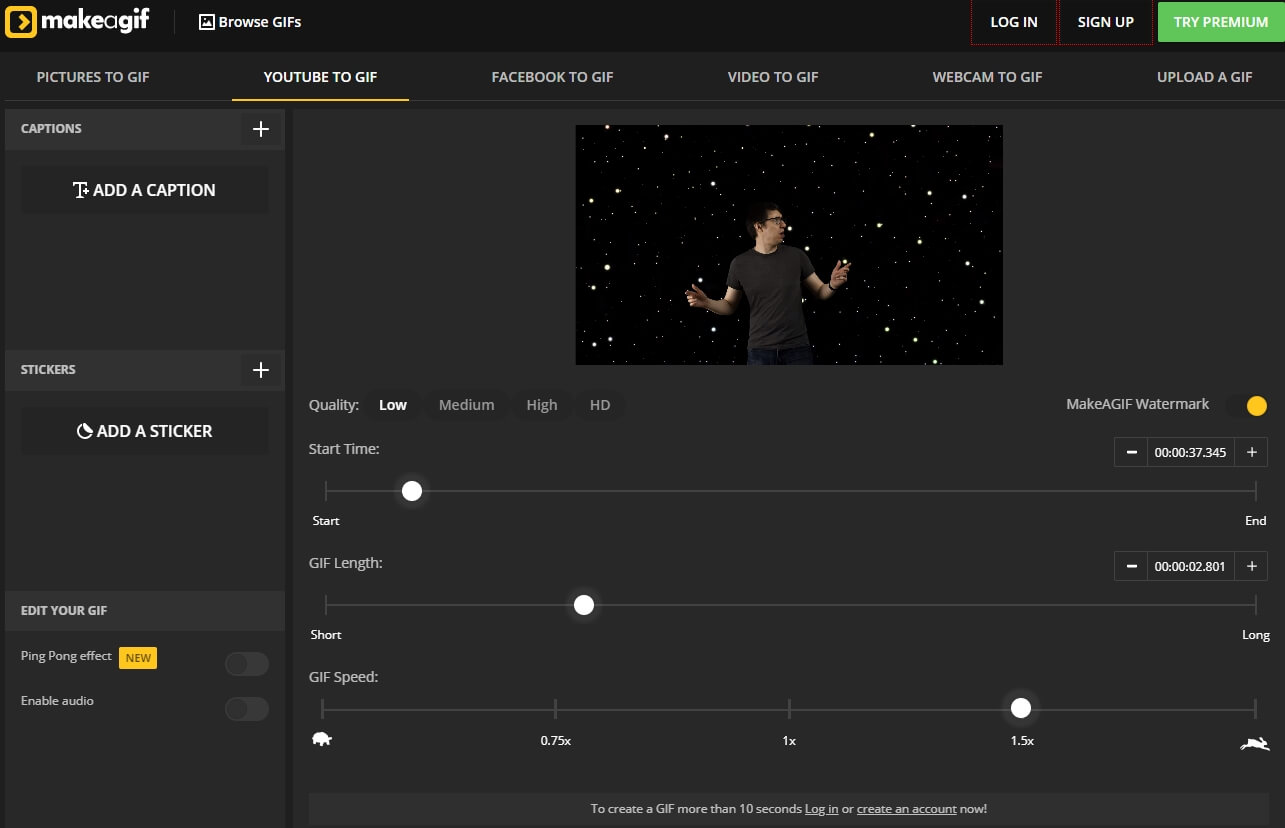
4. Make A GIF
Makeagif is an ideal online GIF maker for you that can convert videos into animated GIFs in no time. It allows you to create GIFs using local images, YouTube, Facebook, and Webcam. Makeagif even will enable you to develop new GIFs using the already existing ones.
The GIF maker also comes with a variety of free GIFs to download and add to your collection. Moreover, it allows you to edit existing GIFs by enhancing their quality, speed and adding filters to them. It offers functions that can enrich the standard of your GIFs.
To create GIFs using this, first, create your account on the site. Next, select the ‘YouTube to GIF’ option from the drop-down menu, among other alternatives. Then, enter the link to the YouTube video that you wish to transfigure into GIF, after which you can tailor-make the gifs by adjusting the configuration settings, such as adding captions and sticker. Once done, simply download and share your newly crafted GIF.
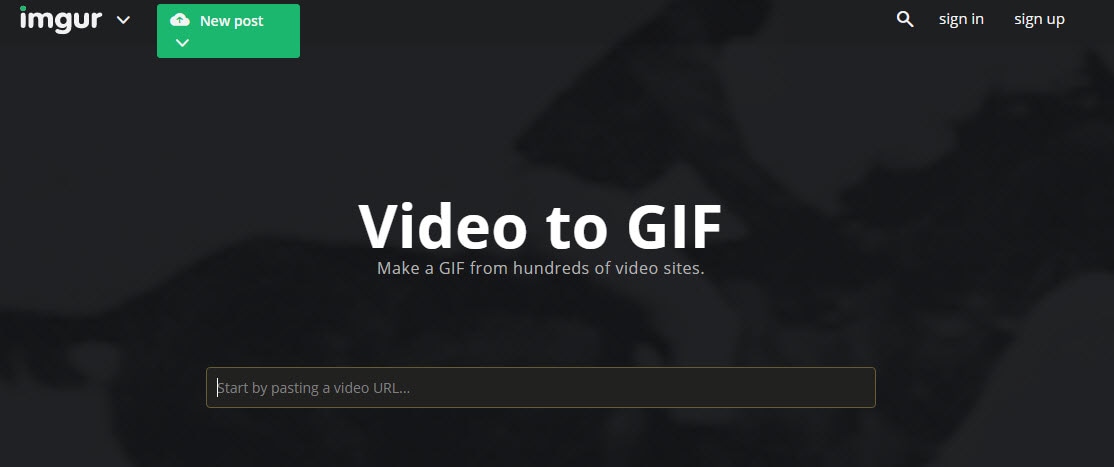
5. Imgur
Imgur might not be the best application to be included in the list. But it is definitely an amazing site where you can go looking for all kinds of images, Gifs, memes, or other digital stories. Imgur’s wide collection of visuals can never disappoint you, no matter what you’re searching for, from funny to sad, inspiring to aspiring, everything can be discovered in this treasure.
Now, this might not be the best YouTube to gif maker, but it does have the potential to provide you with great ideas for GIF-making. Besides, you can download all the interesting GIfs from here and save them for future reference.
6. GiFRun
Are you worried about searching for a gif converter with no prior experience in editing? Don’t worry; this GiFRun Maker is the simplest online service that requires minimum to zero skill for creating GIFs. GifRun is an easy enough site to navigate through and produce quality GIFs for your blogging sites.
To convert a YouTube video to GIF, simply enter the link. After that, it will prompt you to the editing page, where you can set the start/end time, duration, and resolution for your gif. You can preview your edit before finalizing it, making necessary changes, and then downloading it on your device.
7. Free Gif Maker Me
Free Gif maker is one of the straightforward and easily manageable GIF-making applications. It offers YouTube to gif, reverse gif, and gif effects tools to enhance your GIF quality and make it effortless to create your own GIFs.
To make GIF from YT Video on free Gif Maker, copy the video link in the input text field in the middle of your screen and then tap on ‘Load YouTube Video.’ Within seconds you will be redirected to the video preview and GIF editing page. Now, set the duration, start time, resolution, output, and other details. Then, click on the ‘Make A GIF’ option and save it on your device once ready.
8. Imgflip
Another website is known for creating and sharing visual content on different social media channels. Imgflip allows you to make customized animations from YouTube and other digital platforms. The site is completely safe to use and produces good-quality memes and GIFs quickly without incurring a dime.
Imgflip supports all the popular video formats such as AVI, MP4, 3GP, OGG, FLV, MOV, and various other video formats. To produce a high-quality GIF, make sure your video is at least 480P or higher. More so, the Imgflip supports GIF with audio features of all the videos with audio that can only be accessed using the Imgflip Pro at a minimum price of $9.95/ month.
9. GIF Maker
GIF Maker is a pretty basic application that everyone can navigate with or without any expertise in the tech department. Along with GIF maker, it also has other tools such as GIF resizer, GIF compressor, and GIF cropper, all specifically designed tools to help you create riveting GIFs ever!
GIF Maker provides two options; one video to gif and second Images to gif that you can use as per their need. One simply is to enter the YT video link/upload video to the upload box. Next, alter the animation, filter, speed, duration, and set start and endpoint in the editor. You can upload files in all the popular formats and upload up to 25Mb image files and 30 Mb for animated GIFs.
Another point to remember while using this GIF Maker, it only supports YT videos that have not been copy-righted by the creator.
Part 2: Best YouTube to GIF Maker on Windows and Mac: Wondershare UniConverter
It happens so that you stumble upon a video that runs the hippocampus of your brain rigid with ingenious abstractions about converting the video into GIF to delineate those ideas through digital content on your blogs.
Now, you will require the best-quality GIF maker that is easy to navigate without any complications. Despite the plethora of GIF makers being available at hand, it could be a strenuous task to search for the ideal GIF maker for yourself.
Presently, Wondershare UniConverter is one of the best and easy-to-use YouTube to GIF makers for you. It is the handiest tool to help you accomplish your conversion, customization, compressing, and revamping goals like a professional with its effective editing features. Wondershare offers many benefits, from converting files in hundred different formats to crafting your one GIF out of videos along with other fundamental editing attributes.
How to User UniConverter Video to GIF Maker?
Step 1: Download and install the Wondershare Converter on your device. Now, run the app and launch the Wondershare GIF Maker by selecting the GIF Maker Icon on the toolbar.
Step 2: Click on the Video to GIF option before tapping on the Add File option to upload YT video for GIF conversion.
Step 3: Next, you can customize your uploaded video by setting the start and end time. In addition to that, you can enter the frame rate and output size according to your requirement.
Step 4: Once finished with all the customization, convert the YouTube video into a GIF by tapping the Create GIF option.
Step 5: Ta-da! UniConverter will transform your YT video into a GIF within a minute or two. You can now export and share the GIF further.
That’s right, with five easy steps, you can convert all your favorite YouTube video into GIF with this YouTube to GIF maker.
Without any doubt, I can say that usage of GIFs during your regular texting and socialization can make your conversations more interesting. GIFs are the best shortcuts to express your mood, emotions, and humor without having to type much. No other digital medium provides an avenue that offers such proficiency in demonstrating your emotions, possibly the reason behind its escalating popularity.
With the help of this little guide, you can create gif from YouTube videos with a wave of your hand! I hope you’ve fun GIF-ing!
Richard Bennett
Richard Bennett is a writer and a lover of all things video.
Follow @Richard Bennett
Richard Bennett
Mar 27, 2024• Proven solutions
GIF (Graphic Interchange Format) is an image file format supporting both uniform and animated images. Before, GIF was a basic 8-bit colored image until PNG image format was introduced as a more feasible alternative. Today, you can find them being used on all the trending social media applications like WhatsApp, Instagram, Snapchat, Twitter, Facebook, and various others.
The good thing here is that you can make GIFs from YouTube videos or any of your favorite videos for that matter which you think can help express your sentiments or ideas in an enhanced manner. There is a huge market available of apps and web software that can help create GIFs from YouTube without much trouble.
In this short guide ahead, we’ve brought for you the best YouTube to GIF maker available in the digital market. Let’s go GIF-ing!
Part 1: Best Online YouTube to GIFs Makers
Here is our curated list of the best 11 YouTube to GIF Maker that you can use to make GIF from YouTube video.
1. GIFS
Gifs.com is one the best GIF maker site that makes crafting GIFs from YouTube videos incredibly easy and quick with no time. If you’re looking for some straight and simple video to gif converter to help you convert YouTube videos into GIFs, this is the smoothest editor that will do the job and craft interesting gifs for your blogging platforms.
All you have to do is enter the URL of the video you want to convert into a GIF. At this point, the site accepts Instagram, YouTube, Facebook, and Vine links. In addition to that, there is also an option that allows users to upload from the desktop computer.
Once you’ve entered the YouTube video URL, it prompts a basic video editor wherein you select the frame and durations for your GIF. If you want to customize it further, you can add stickers, captions, and tools like blurring, cropping, and others.
Once you’re done exploring the filters and editing the GIF, you can directly share the URL on different platforms or just download it and store it on your device.
Note: If you want to remove the watermark and get full access to extra features, you may need to pay $1.99/month.
You can check the gif that I made from our YouTube video How to Edit Galaxy Effects with Green Screen | Wondershare FilmoraPro Tutorial on gifs.com here: https://gifs.com/gif/36RNn9 .
2. GIPHY
Giphy, as we all know, is the most used search engine for GIFs due to its limitless collection. Giphy here maintains its own GIF maker to create your customized GIFs effortlessly. The Giphy online GIF maker is quite simple and easy to use; it also has steadfast mobile applications for both Android and iOS devices.
To begin converting YouTube videos into GIFs, click the Create button at the top and then you can either enter the URL or upload images/videos from local files. This GIF maker only accepts JPG, PNG, GIF, MP4, and MOV for people uploading images or videos.
Then, trim the part from the video you want to convert into a GIF. Later, you can embellish your GIFs by adding filters, tags, text captions, and stickers to make them look eye-catching. If you’re looking for a clean and simple GIF maker, then Giphy GIF maker is the perfect choice for you.
Here is the gig that I made with Giphy: https://media.giphy.com/media/2Dtlp2MAXtoC0EyMsx/giphy.gif .
3. GIFit!
GIFit is a well-known online extension available on the Chrome Web Store for free that aids in making GIFs from YouTube videos. The GIFit extension has been recently updated to work with the new YouTube interface to help you craft Gifs smoothly. One thing to remember about GIFit is that with YouTube HTML5 mode only.
To use this Chrome extension, install it from the Chrome Web Store. Now, run the attachment and visit any video on YouTube that you would like to convert into GIF. Once decided, simply press on the GIFit icon in the YouTube toolbar. Then, edit according to your requirements and hit the red button with GIFit on it. After a few minutes, your GIF will be ready to be shared and saved. Currently, it offers convert YouTube to GIF feature only, so you can’t add stickers nor captions.
4. Make A GIF
Makeagif is an ideal online GIF maker for you that can convert videos into animated GIFs in no time. It allows you to create GIFs using local images, YouTube, Facebook, and Webcam. Makeagif even will enable you to develop new GIFs using the already existing ones.
The GIF maker also comes with a variety of free GIFs to download and add to your collection. Moreover, it allows you to edit existing GIFs by enhancing their quality, speed and adding filters to them. It offers functions that can enrich the standard of your GIFs.
To create GIFs using this, first, create your account on the site. Next, select the ‘YouTube to GIF’ option from the drop-down menu, among other alternatives. Then, enter the link to the YouTube video that you wish to transfigure into GIF, after which you can tailor-make the gifs by adjusting the configuration settings, such as adding captions and sticker. Once done, simply download and share your newly crafted GIF.
5. Imgur
Imgur might not be the best application to be included in the list. But it is definitely an amazing site where you can go looking for all kinds of images, Gifs, memes, or other digital stories. Imgur’s wide collection of visuals can never disappoint you, no matter what you’re searching for, from funny to sad, inspiring to aspiring, everything can be discovered in this treasure.
Now, this might not be the best YouTube to gif maker, but it does have the potential to provide you with great ideas for GIF-making. Besides, you can download all the interesting GIfs from here and save them for future reference.
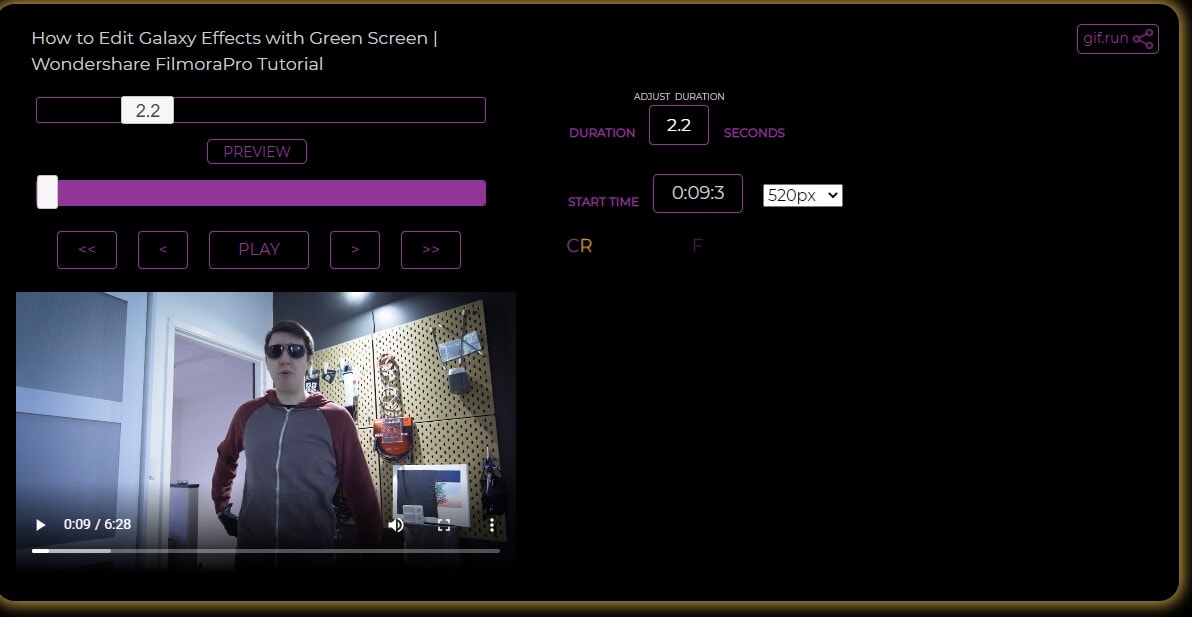
6. GiFRun
Are you worried about searching for a gif converter with no prior experience in editing? Don’t worry; this GiFRun Maker is the simplest online service that requires minimum to zero skill for creating GIFs. GifRun is an easy enough site to navigate through and produce quality GIFs for your blogging sites.
To convert a YouTube video to GIF, simply enter the link. After that, it will prompt you to the editing page, where you can set the start/end time, duration, and resolution for your gif. You can preview your edit before finalizing it, making necessary changes, and then downloading it on your device.
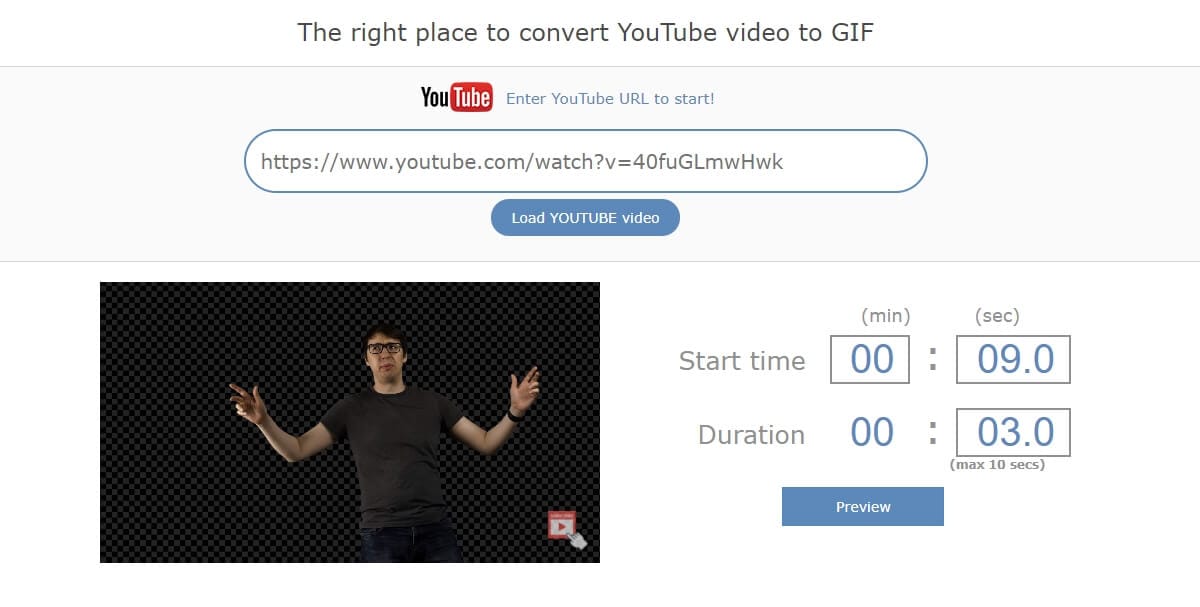
7. Free Gif Maker Me
Free Gif maker is one of the straightforward and easily manageable GIF-making applications. It offers YouTube to gif, reverse gif, and gif effects tools to enhance your GIF quality and make it effortless to create your own GIFs.
To make GIF from YT Video on free Gif Maker, copy the video link in the input text field in the middle of your screen and then tap on ‘Load YouTube Video.’ Within seconds you will be redirected to the video preview and GIF editing page. Now, set the duration, start time, resolution, output, and other details. Then, click on the ‘Make A GIF’ option and save it on your device once ready.
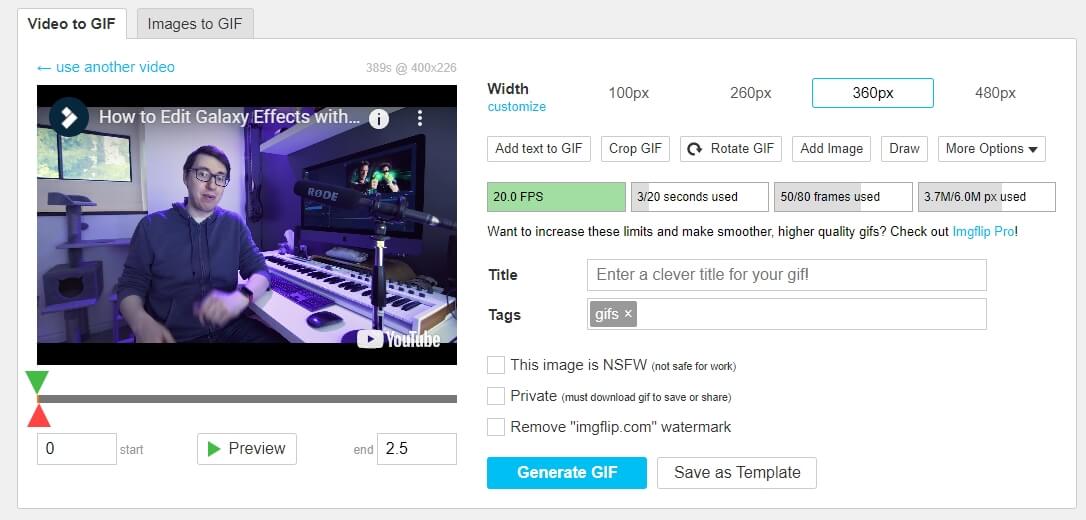
8. Imgflip
Another website is known for creating and sharing visual content on different social media channels. Imgflip allows you to make customized animations from YouTube and other digital platforms. The site is completely safe to use and produces good-quality memes and GIFs quickly without incurring a dime.
Imgflip supports all the popular video formats such as AVI, MP4, 3GP, OGG, FLV, MOV, and various other video formats. To produce a high-quality GIF, make sure your video is at least 480P or higher. More so, the Imgflip supports GIF with audio features of all the videos with audio that can only be accessed using the Imgflip Pro at a minimum price of $9.95/ month.
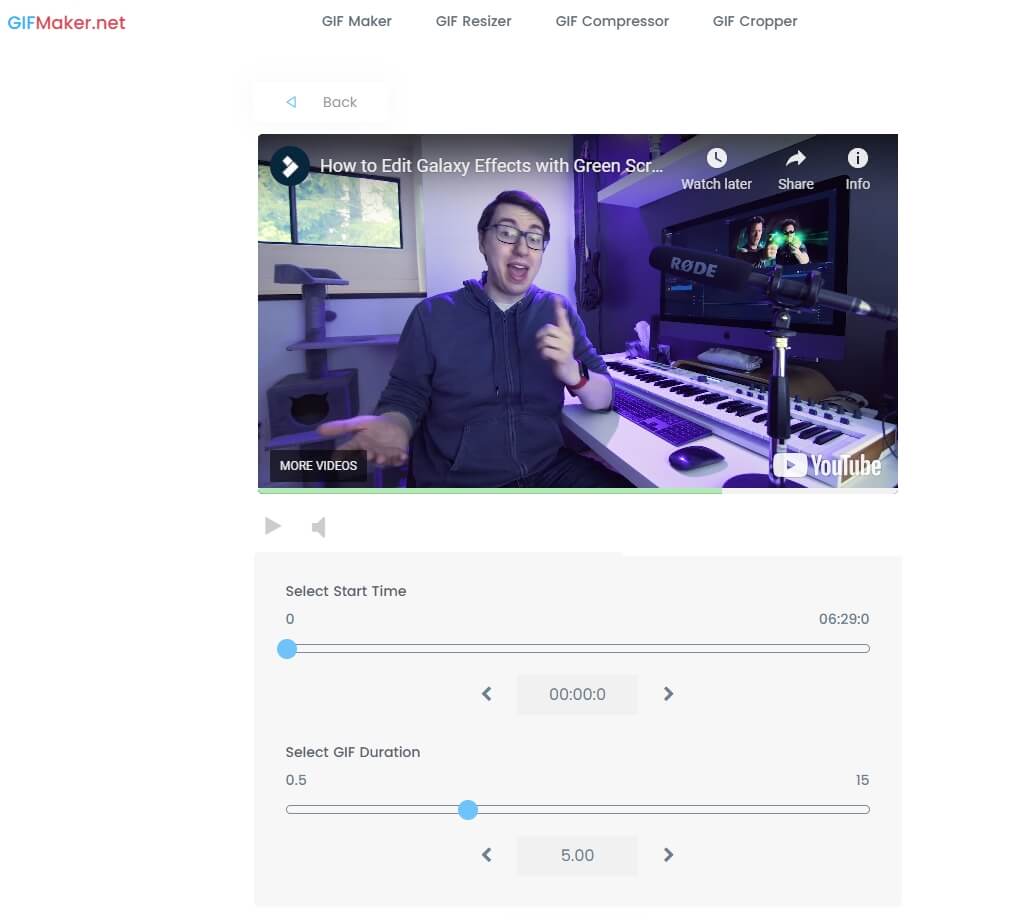
9. GIF Maker
GIF Maker is a pretty basic application that everyone can navigate with or without any expertise in the tech department. Along with GIF maker, it also has other tools such as GIF resizer, GIF compressor, and GIF cropper, all specifically designed tools to help you create riveting GIFs ever!
GIF Maker provides two options; one video to gif and second Images to gif that you can use as per their need. One simply is to enter the YT video link/upload video to the upload box. Next, alter the animation, filter, speed, duration, and set start and endpoint in the editor. You can upload files in all the popular formats and upload up to 25Mb image files and 30 Mb for animated GIFs.
Another point to remember while using this GIF Maker, it only supports YT videos that have not been copy-righted by the creator.
Part 2: Best YouTube to GIF Maker on Windows and Mac: Wondershare UniConverter
It happens so that you stumble upon a video that runs the hippocampus of your brain rigid with ingenious abstractions about converting the video into GIF to delineate those ideas through digital content on your blogs.
Now, you will require the best-quality GIF maker that is easy to navigate without any complications. Despite the plethora of GIF makers being available at hand, it could be a strenuous task to search for the ideal GIF maker for yourself.
Presently, Wondershare UniConverter is one of the best and easy-to-use YouTube to GIF makers for you. It is the handiest tool to help you accomplish your conversion, customization, compressing, and revamping goals like a professional with its effective editing features. Wondershare offers many benefits, from converting files in hundred different formats to crafting your one GIF out of videos along with other fundamental editing attributes.
How to User UniConverter Video to GIF Maker?
Step 1: Download and install the Wondershare Converter on your device. Now, run the app and launch the Wondershare GIF Maker by selecting the GIF Maker Icon on the toolbar.
Step 2: Click on the Video to GIF option before tapping on the Add File option to upload YT video for GIF conversion.
Step 3: Next, you can customize your uploaded video by setting the start and end time. In addition to that, you can enter the frame rate and output size according to your requirement.
Step 4: Once finished with all the customization, convert the YouTube video into a GIF by tapping the Create GIF option.
Step 5: Ta-da! UniConverter will transform your YT video into a GIF within a minute or two. You can now export and share the GIF further.
That’s right, with five easy steps, you can convert all your favorite YouTube video into GIF with this YouTube to GIF maker.
Without any doubt, I can say that usage of GIFs during your regular texting and socialization can make your conversations more interesting. GIFs are the best shortcuts to express your mood, emotions, and humor without having to type much. No other digital medium provides an avenue that offers such proficiency in demonstrating your emotions, possibly the reason behind its escalating popularity.
With the help of this little guide, you can create gif from YouTube videos with a wave of your hand! I hope you’ve fun GIF-ing!
Richard Bennett
Richard Bennett is a writer and a lover of all things video.
Follow @Richard Bennett
Also read:
- [Updated] Behind the Scenes Insider Knowledge for YouTube Video Production
- 2024 Approved Avoid Common Mistakes in YouTube Livestreaming with Best Webcams
- In 2024, Elevate Your FreeFire Gameplay on YouTube Channels
- How to Flip Your Video Collection in a Flash
- [Updated] Comedy Crusade YouTube's Hottest Laughter Leaders
- 2024 Approved Circumnavigating YouTube's Block List
- Integrating Playlist Videos From YouTube on Websites
- [New] Elevate Video Performance Following the Path of Stars
- Crafting YouTube Trailers A Filmora Guide
- [New] Bring Out the Vibes of Your Channel Top 10 Online Artists Unite
- In 2024, Aspect Ratio Insights for Engaging YouTube Thumbnails
- In 2024, Elevate Video Reach with Peak Watch Hours
- In 2024, Elevating Audio Rates on YouTube Dual Device Approach
- In 2024, Essential YouTube Tagging Strategies for Optimal Visibility
- 2024 Approved Crafting Captivating YouTube Presence The Ultimate Guide to Making Thumbnails on Phones
- Express Thumbnails for Epic Battle Royale
- [New] Channel Name Inspiration Strategies for Success
- Charting a Course to Success Understanding YouTube Income for 2024
- In 2024, How to Sign Out of Apple ID On iPhone XS Max without Password?
- 2024 Approved Unbiased Review How to Obtain Filmora Without Resorting to Piracy
- [New] In 2024, Twitch Sharing Techniques for Facebook Integration
- [Updated] How To Ensure No Loss of Frames During Recording
- Hard Reset Realme GT 5 in 3 Efficient Ways | Dr.fone
- Updated Best iPhone LUTs App to Use for 2024
- [New] Rapid Rise on Insta - Like Mastery + Video Impact
- [New] Master Online Engagement with Proficient Use of Snap in Teams
- How to Unlock Samsung Galaxy A34 5G Phone Password Without Factory Reset?
- [New] Syncing Social Media Post Videos on Twitter and Tumblr
- Steps to Fix Delayed or Failing Video Posts in Facebook's Chat App
- In 2024, Top 9 OnePlus 12 Monitoring Apps for Parental Controls | Dr.fone
- Updated 2024 Approved Minitool Movie Maker Vs. The Competition A Comprehensive Review
- Snicker Sphere Top-Grade, No-Charge Memes
- In 2024, Efficient TikTok-to-GIF Conversion with Top Tools Reviewed
- [New] In 2024, TikTok Copycat Techniques for Social Media Success
- [Updated] In 2024, Unseen Chronicles 5 Expertly Crafted Viewer Tools
- Title: [New] 10 Recording Tips for Recording Audio with High Quality
- Author: Steven
- Created at : 2024-05-25 19:56:26
- Updated at : 2024-05-26 19:56:26
- Link: https://youtube-clips.techidaily.com/new-10-recording-tips-for-recording-audio-with-high-quality/
- License: This work is licensed under CC BY-NC-SA 4.0.
