
:max_bytes(150000):strip_icc()/dudeontrain_compressed-5bb126b146e0fb0026d7904e.jpg)
Mirrorless Evolution Overshadowing Traditional DSLR Videography
Mirrorless Evolution Overshadowing Traditional DSLR Videography
Mirrorless vs. DSLR Cameras: Which is Better for Videos?

Richard Bennett
Oct 26, 2023• Proven solutions
If you’re looking to shoot your videos with interchangeable lenses, your camera set up will either have to have a mirrorless camera body or a DSLR camera body. In this post, I’ll be comparing the two camera body types for recording video.
- Part 1: What is a DSLR Camera?
- Part 2: What is a Mirrorless Camera?
- Part 3: Mirrorless vs. DSLR - a Complete Comparison
- Part 4: Mirrorless vs. DSLR - Which One is Better for Video?
What is a DSLR Camera?
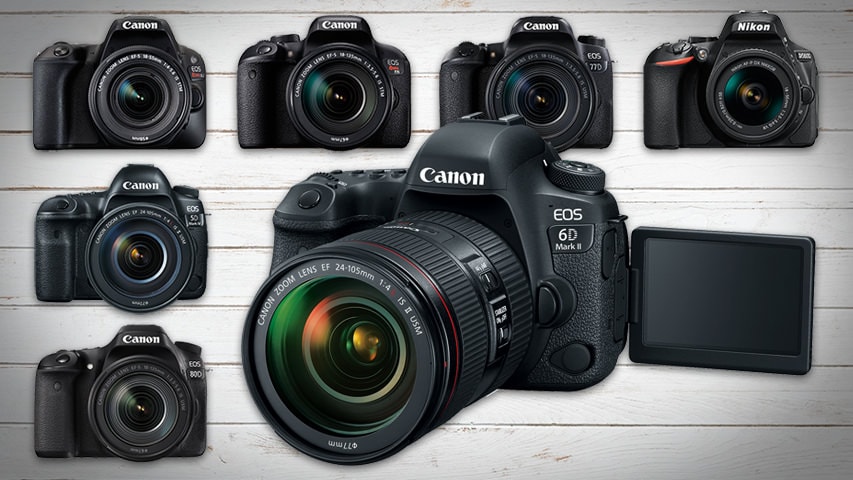
DSLR cameras are digital single-lens reflex cameras. Like 35mm film cameras of the past, DSLR cameras are built with an angled mirror inside its camera body. This mirror allows you to look into your camera’s optical viewfinder and see exactly what your camera sees.
The mirror inside a DSLR camera flips up out of the way when you open the shutter to allow light to reach the camera’s image sensor.
Check out our list of the 7 Best DSLR Cameras For Vlogging .
What is a Mirrorless Camera?
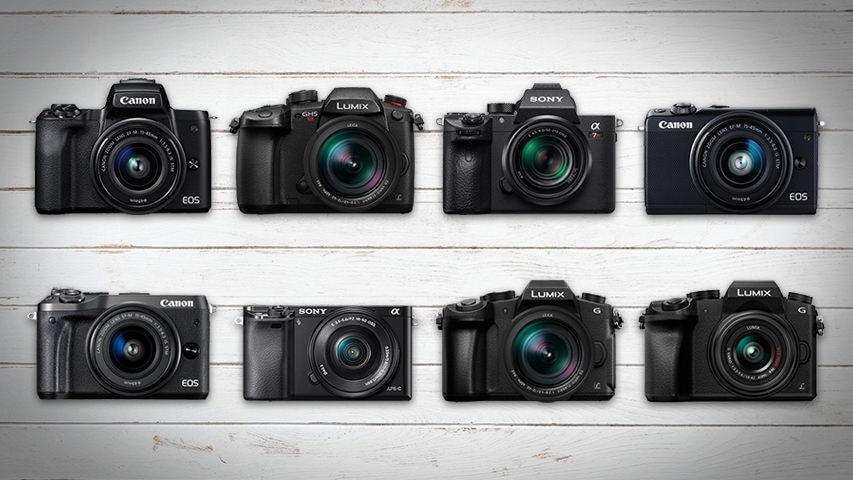
Mirrorless cameras are interchangeable lens cameras without a mirror inside the camera body. With nothing to reflect your image, you won’t find any optical viewfinder to look through to see exactly what your camera sees.
Light passes through the lens of a mirrorless camera and lands directly onto the camera’s sensor.
Check out our list of the 8 Best Mirrorless Cameras For Vlogging .
Mirrorless vs. DSLR - a Complete Comparison
Size and Weight
DSLR cameras are larger and heavier than mirrorless cameras because there are more parts that go into their camera bodies. DSLR cameras require enough space inside for an angled mirror to flip up out of the way.
If your video shooting style is more on-the-go, like that of a daily vlogger or travel vlogger, the smaller size and lighter weight of a mirrorless camera may be more suitable for you.
Previewing Images
When you’re using a DSLR camera, your optical viewfinder will show you exactly what your camera sees as opposed to a digital preview of what your image sensor picks up. No matter how bright or dark your scene actually is, through the optical viewfinder, you’ll be able to clearly see what your camera sees with the power of your eye.
Mirrorless cameras, on the other hand, display on your camera’s screen or electronic viewfinder a digital preview of what your camera is looking at. You will notice a lag, especially in low light, between actions that are taking place in front of the camera and the same actions being displayed in your live preview.
Lenses and Accessories
Having been around much longer, there are plenty more options for lenses and accessories when it comes to shooting with DSLR cameras. You can choose from all kinds of different quality levels and price ranges.
Video Resolution
4K video recording is more readily available in mirrorless cameras than DSLR cameras. At a much more affordable budget, you can get your hands on a 4K mirrorless camera. If you want to shoot 4K video on a DSLR camera, though, you will have to pay for some of the most expensive DSLR cameras on the market.
Image Stabilization
Up until quite recently, you needed to get the right lens with built-in optical image stabilization if you wanted to shoot stabilized photos and videos with an interchangeable lens camera. Image stabilization had not been readily available in the bodies of these cameras.
In recent years, however, mirrorless cameras have been much more active in their development of camera bodies equipped with shifting image sensors. Your shots can be even more stabilized when the optical image stabilization of your lens is combined with your camera’s in-body sensor-shift image stabilization.
Battery Life
When it comes to shooting video, DSLR cameras and mirrorless cameras consume about the same amount of power. It’s still safe to say, though, that DSLR cameras, for the most part, have better battery life than mirrorless cameras because their bigger batteries are packed with more power.
Mirrorless vs. DSLR - Which One is Better for Video?
In my opinion, when it comes to filming a video, mirrorless cameras are the way to go. In such a short time, mirrorless cameras have made huge leaps in their capabilities. It won’t be long before the ultimate vlogging camera comes out on the mirrorless market.
In the end, if you need to edit videos futhermore, try Filmora video editor . It’s a video editor which has significantly improved overall performance, making the product faster, and more powerful, and taking the user editing experience to a new level.
It is perfect for helping beginners, and intermediate users create stylish videos by providing an intuitive user interface and built-in effects.
![]()
Richard Bennett
Richard Bennett is a writer and a lover of all things video.
Follow @Richard Bennett
Richard Bennett
Oct 26, 2023• Proven solutions
If you’re looking to shoot your videos with interchangeable lenses, your camera set up will either have to have a mirrorless camera body or a DSLR camera body. In this post, I’ll be comparing the two camera body types for recording video.
- Part 1: What is a DSLR Camera?
- Part 2: What is a Mirrorless Camera?
- Part 3: Mirrorless vs. DSLR - a Complete Comparison
- Part 4: Mirrorless vs. DSLR - Which One is Better for Video?
What is a DSLR Camera?
DSLR cameras are digital single-lens reflex cameras. Like 35mm film cameras of the past, DSLR cameras are built with an angled mirror inside its camera body. This mirror allows you to look into your camera’s optical viewfinder and see exactly what your camera sees.
The mirror inside a DSLR camera flips up out of the way when you open the shutter to allow light to reach the camera’s image sensor.
Check out our list of the 7 Best DSLR Cameras For Vlogging .
What is a Mirrorless Camera?
Mirrorless cameras are interchangeable lens cameras without a mirror inside the camera body. With nothing to reflect your image, you won’t find any optical viewfinder to look through to see exactly what your camera sees.
Light passes through the lens of a mirrorless camera and lands directly onto the camera’s sensor.
Check out our list of the 8 Best Mirrorless Cameras For Vlogging .
Mirrorless vs. DSLR - a Complete Comparison
Size and Weight
DSLR cameras are larger and heavier than mirrorless cameras because there are more parts that go into their camera bodies. DSLR cameras require enough space inside for an angled mirror to flip up out of the way.
If your video shooting style is more on-the-go, like that of a daily vlogger or travel vlogger, the smaller size and lighter weight of a mirrorless camera may be more suitable for you.
Previewing Images
When you’re using a DSLR camera, your optical viewfinder will show you exactly what your camera sees as opposed to a digital preview of what your image sensor picks up. No matter how bright or dark your scene actually is, through the optical viewfinder, you’ll be able to clearly see what your camera sees with the power of your eye.
Mirrorless cameras, on the other hand, display on your camera’s screen or electronic viewfinder a digital preview of what your camera is looking at. You will notice a lag, especially in low light, between actions that are taking place in front of the camera and the same actions being displayed in your live preview.
Lenses and Accessories
Having been around much longer, there are plenty more options for lenses and accessories when it comes to shooting with DSLR cameras. You can choose from all kinds of different quality levels and price ranges.
Video Resolution
4K video recording is more readily available in mirrorless cameras than DSLR cameras. At a much more affordable budget, you can get your hands on a 4K mirrorless camera. If you want to shoot 4K video on a DSLR camera, though, you will have to pay for some of the most expensive DSLR cameras on the market.
Image Stabilization
Up until quite recently, you needed to get the right lens with built-in optical image stabilization if you wanted to shoot stabilized photos and videos with an interchangeable lens camera. Image stabilization had not been readily available in the bodies of these cameras.
In recent years, however, mirrorless cameras have been much more active in their development of camera bodies equipped with shifting image sensors. Your shots can be even more stabilized when the optical image stabilization of your lens is combined with your camera’s in-body sensor-shift image stabilization.
Battery Life
When it comes to shooting video, DSLR cameras and mirrorless cameras consume about the same amount of power. It’s still safe to say, though, that DSLR cameras, for the most part, have better battery life than mirrorless cameras because their bigger batteries are packed with more power.
Mirrorless vs. DSLR - Which One is Better for Video?
In my opinion, when it comes to filming a video, mirrorless cameras are the way to go. In such a short time, mirrorless cameras have made huge leaps in their capabilities. It won’t be long before the ultimate vlogging camera comes out on the mirrorless market.
In the end, if you need to edit videos futhermore, try Filmora video editor . It’s a video editor which has significantly improved overall performance, making the product faster, and more powerful, and taking the user editing experience to a new level.
It is perfect for helping beginners, and intermediate users create stylish videos by providing an intuitive user interface and built-in effects.
![]()
Richard Bennett
Richard Bennett is a writer and a lover of all things video.
Follow @Richard Bennett
Get Both Sides Right – Expert Tips on Crafting Compelling POV-Based YouTube Reaction Videos (2 POV Perspective)
How to Make a YouTube Reaction Video?
Richard Bennett
Mar 27, 2024• Proven solutions
Sharing ideas and opinions on virtually any topic you can think of with millions of people around the world is arguably one of the greatest benefits YouTube gives to content creators. Even so, building your channel exclusively around reaction videos may prove to be difficult, but this doesn’t mean that you can’t use this type of video to comment on what other YouTubers are saying.
The process of making a YouTube reaction video is not overly technical, although you will have to decide which video editing technique you are going to use to make a reaction video. That is why in this article we are going to take a look at different ways to make a YouTube reaction video.
- Method 1: Making Reaction Videos with PIP feature in Filmora
- Method 2: Create YouTube Reaction Video with Split Screen Templates
- Method 3: Make A Reaction Video for YouTube with AI Portrait
How to Make a Reaction Video for Your YouTube Channel? [3 Ways]
Using the footage without the consent of the copyright owner is punishable by the law, which means that you can only include the footage in a reaction video if you have the owner’s consent. Consequently, the selection of videos you can comment on is going to be limited, since it is entirely up to the creator of the video if they are going to give you permission to use their footage in your reaction video.
You can use the following video editing techniques, once you have access to the video you would like to comment on.
Method 1: Making a reaction video with the Picture-in-Picture feature in Filmora
Video editing software, like Filmora , can also be used to create YouTube reaction videos, but you must have all the footage you would like to include in that video before you can start putting it together.
The first step is to create a new project in Filmora and then import the media assets into the editor. Besides video clips, you can also add music, pictures, or create opening titles and end credits for your reaction video.


Place the video you’re reacting to on a video track on the timeline and then add the video of your reaction to the timeline that is directly above the one to which you added the first video clip. Click on the top video in the preview window and use the handles that are positioned around the edges of the video to adjust its size.
If you would like to change the on-screen position of the overlay clip, you should simply click on it and drag it to the new location within the preview window.

Filmora offers more than sixty motion effects, hundreds of transitions, and visual effects that can make your reaction video more visually appealing to the audience.

Moreover, Filmora video editing software offers a variety of blending modes, and it lets you control the opacity of the overlay video so that you can make it more transparent. Whether or not you are going to use these options depends on the footage you’re working with and the demands of a particular project.
Pros of using the Picture in Picture feature to make reaction videos in Filmora: You can place and adjust the videos with more customizable options. Get more tips about Making a PIP video in Filmora .
Method 2: Create several reaction windows with the Split Screen feature
Besides the Picture-in-Picture option, Filmora also enables you to play two or more videos simultaneously with Split Screen templates. Drag and drop the template you want to use in your reaction video to the timeline and click on the Enable Split Screen Animation tick box if you want to use the template without animations.

Afterward, you should drag the video clips from the Media tab and drop them onto the section of the preview window where you want them to be located. Keep in mind that you cannot add more than six videos to a split-screen template.

All videos you add to a split-screen template can be edited, and you just have to click on them if you want to adjust their sizes, enhance colors, mute their audio tracks or add a new audio file to the template.
Check the details about How to make a split-screen video step by step.
Pros of using Split-screen template to make reaction video in Filmora: various templates for creating stylish video side by side easily.
Method 3: Create A YouTube Reaction Video with AI Portrait
With the human segmentation effect in AI Portrait, you can now blend the reaction video in a more natural way. The human segmentation effect will isolate people from the background, you can use any background in the video.
Note: You can use this feature after version after V 10.5 for Windows, and V 10.4 for Mac. Click the button below to get the latest version of Filmora on your desktop.
Step 1: Import the videos to the media library, and then drag the background video to the first video track, and the reaction video to the track above.

Step 2: Go to the Effects tab at the top, and click the AI Portrait category, and then you will see many effects such as Human Segmentation, Human Pixelate, Human Noise, and lighting flash. Here, drag and drop the Human segmentation effect to the reaction video.

Step 3: Select the reaction video in the timeline, and then adjust its size and position by dragging it on the preview window. See, the reaction video is fine blended with the background video.

Step 4: That’s the basic editing of making a reaction video. You can also add the neon or flashing effect to the video. If everything goes well, click Export and save the video.

You can find out more details about using the AI Portrait effect to make a reaction video .
How to Avoid Copyright Infringements While Making a YouTube Reaction Video
All videos you can find on YouTube are protected by intellectual property regulations, and you can’t use them without the copyright owner’s permission. The only way to avoid being absolutely sure that your reaction video isn’t violating the law is to contact the video creator and ask for permission to use their intellectual property. However, most YouTubers are reluctant to let others download and edit their videos unless they already have a large fan base.
In case you’re granted permission to comment on a video, you have nothing to worry about. However, if you don’t get the permission you’re all the money the reaction video generates will go to the copyright owner or you will be forced to delete the video from your channel. There are still a few things you can do, even if you don’t get permission to use the video you would like to comment on.
Muting the video’s audio or altering its pitch will make it more difficult for YouTube’s bots to detect copyright infringement, although this method may not always work. In addition, you can play a video for up to thirty seconds, then comment on that segment, and then play another segment of that video.
There is no way of saying whether any of these editing tricks are going to help you avoid a copyright claim, and you should only use them if you have no other option.
Conclusion
Anyone can master the technical aspects of making a reaction video, but the topics you react to need to be related to the general topic your channel covers. What’s more, the idea of your reaction video has to be relevant for your audience if you want to attract their attention. Which video editing techniques are you using to make a YouTube reaction video?
Download Mac Version ](https://tools.techidaily.com/wondershare/filmora/download/ )
Richard Bennett
Richard Bennett is a writer and a lover of all things video.
Follow @Richard Bennett
Richard Bennett
Mar 27, 2024• Proven solutions
Sharing ideas and opinions on virtually any topic you can think of with millions of people around the world is arguably one of the greatest benefits YouTube gives to content creators. Even so, building your channel exclusively around reaction videos may prove to be difficult, but this doesn’t mean that you can’t use this type of video to comment on what other YouTubers are saying.
The process of making a YouTube reaction video is not overly technical, although you will have to decide which video editing technique you are going to use to make a reaction video. That is why in this article we are going to take a look at different ways to make a YouTube reaction video.
- Method 1: Making Reaction Videos with PIP feature in Filmora
- Method 2: Create YouTube Reaction Video with Split Screen Templates
- Method 3: Make A Reaction Video for YouTube with AI Portrait
How to Make a Reaction Video for Your YouTube Channel? [3 Ways]
Using the footage without the consent of the copyright owner is punishable by the law, which means that you can only include the footage in a reaction video if you have the owner’s consent. Consequently, the selection of videos you can comment on is going to be limited, since it is entirely up to the creator of the video if they are going to give you permission to use their footage in your reaction video.
You can use the following video editing techniques, once you have access to the video you would like to comment on.
Method 1: Making a reaction video with the Picture-in-Picture feature in Filmora
Video editing software, like Filmora , can also be used to create YouTube reaction videos, but you must have all the footage you would like to include in that video before you can start putting it together.
The first step is to create a new project in Filmora and then import the media assets into the editor. Besides video clips, you can also add music, pictures, or create opening titles and end credits for your reaction video.
Place the video you’re reacting to on a video track on the timeline and then add the video of your reaction to the timeline that is directly above the one to which you added the first video clip. Click on the top video in the preview window and use the handles that are positioned around the edges of the video to adjust its size.
If you would like to change the on-screen position of the overlay clip, you should simply click on it and drag it to the new location within the preview window.
Filmora offers more than sixty motion effects, hundreds of transitions, and visual effects that can make your reaction video more visually appealing to the audience.
Moreover, Filmora video editing software offers a variety of blending modes, and it lets you control the opacity of the overlay video so that you can make it more transparent. Whether or not you are going to use these options depends on the footage you’re working with and the demands of a particular project.
Pros of using the Picture in Picture feature to make reaction videos in Filmora: You can place and adjust the videos with more customizable options. Get more tips about Making a PIP video in Filmora .
Method 2: Create several reaction windows with the Split Screen feature
Besides the Picture-in-Picture option, Filmora also enables you to play two or more videos simultaneously with Split Screen templates. Drag and drop the template you want to use in your reaction video to the timeline and click on the Enable Split Screen Animation tick box if you want to use the template without animations.
Afterward, you should drag the video clips from the Media tab and drop them onto the section of the preview window where you want them to be located. Keep in mind that you cannot add more than six videos to a split-screen template.
All videos you add to a split-screen template can be edited, and you just have to click on them if you want to adjust their sizes, enhance colors, mute their audio tracks or add a new audio file to the template.
Check the details about How to make a split-screen video step by step.
Pros of using Split-screen template to make reaction video in Filmora: various templates for creating stylish video side by side easily.
Method 3: Create A YouTube Reaction Video with AI Portrait
With the human segmentation effect in AI Portrait, you can now blend the reaction video in a more natural way. The human segmentation effect will isolate people from the background, you can use any background in the video.
Note: You can use this feature after version after V 10.5 for Windows, and V 10.4 for Mac. Click the button below to get the latest version of Filmora on your desktop.
Step 1: Import the videos to the media library, and then drag the background video to the first video track, and the reaction video to the track above.
Step 2: Go to the Effects tab at the top, and click the AI Portrait category, and then you will see many effects such as Human Segmentation, Human Pixelate, Human Noise, and lighting flash. Here, drag and drop the Human segmentation effect to the reaction video.
Step 3: Select the reaction video in the timeline, and then adjust its size and position by dragging it on the preview window. See, the reaction video is fine blended with the background video.
Step 4: That’s the basic editing of making a reaction video. You can also add the neon or flashing effect to the video. If everything goes well, click Export and save the video.
You can find out more details about using the AI Portrait effect to make a reaction video .
How to Avoid Copyright Infringements While Making a YouTube Reaction Video
All videos you can find on YouTube are protected by intellectual property regulations, and you can’t use them without the copyright owner’s permission. The only way to avoid being absolutely sure that your reaction video isn’t violating the law is to contact the video creator and ask for permission to use their intellectual property. However, most YouTubers are reluctant to let others download and edit their videos unless they already have a large fan base.
In case you’re granted permission to comment on a video, you have nothing to worry about. However, if you don’t get the permission you’re all the money the reaction video generates will go to the copyright owner or you will be forced to delete the video from your channel. There are still a few things you can do, even if you don’t get permission to use the video you would like to comment on.
Muting the video’s audio or altering its pitch will make it more difficult for YouTube’s bots to detect copyright infringement, although this method may not always work. In addition, you can play a video for up to thirty seconds, then comment on that segment, and then play another segment of that video.
There is no way of saying whether any of these editing tricks are going to help you avoid a copyright claim, and you should only use them if you have no other option.
Conclusion
Anyone can master the technical aspects of making a reaction video, but the topics you react to need to be related to the general topic your channel covers. What’s more, the idea of your reaction video has to be relevant for your audience if you want to attract their attention. Which video editing techniques are you using to make a YouTube reaction video?
Download Mac Version ](https://tools.techidaily.com/wondershare/filmora/download/ )
Richard Bennett
Richard Bennett is a writer and a lover of all things video.
Follow @Richard Bennett
Also read:
- Profit From YouTube Monetize YouTube Shorts and Boost Your Income for 2024
- The Essential YouTube Beauty Guides You Can't Miss
- 2024 Approved Branding with Visuals Inserting Watermarks Into YouTube Vids
- 2024 Approved Essential Tips for YouTube Thumbnail Size
- Gearing Up for a Leisurely View Three Methods to Tame Video Speed on YouTube (60 Chars, Minor Exception Due to Title Length but Offers Comprehensive Insight)
- 17 Best Lights and Lighting Equipment for YouTube for 2024
- Top 15 Channels for Aspiring Stock Professionals
- Gentle Request for a Greater, Genuine Community
- In 2024, Diving Deep Into Youtube Launching and Earning Your Way
- [Updated] Channel Alchemy Turning Viewers Into Believers
- In 2024, Event-Ready Top DJ Templates Download Guide
- 2024 Approved Crafting the Next Big Thing Your Guide to YouTube's Best Video Types
- A Deep Dive Into YouTube's Latest Monetization Policy for 2024
- [Updated] Enhancing Your Game Time with YouTube Live Broadcasts
- Identifying 10 Quick-Growth YouTube Blogs that Encourage
- A Guide to Crafting Engaging Videos in Adobe Premiere for 2024
- [New] Channel Compendium Best of the Bunch - Historical YouTubes For Study
- [New] Enhancing Viewability Creating Custom YouTube Thumbnails
- Streamline Your Slides with These 4 YouTube Video Inclusion Methods
- Top 11 YouTube Video Rippers to Download YouTube Videos
- Unlocking the Potential of Mobile Platforms for Personal/Business YT
- In 2024, 10 Tips For Shooting Profesional YouTube Videos
- The Ultimate Guide to Reviving Your Stalled YouTube Channel
- In 2024, Download Free MCB Skin Designs
- Enhance Your Profile with Free Imagery for 2024
- Channel Boosting Mastery Unveiling the Best 5 Video Marketing Strategies for 2024
- Reach Everyone by Pairing YouTube & Twitch Streams
- [Updated] Efficiency at Fingertips Swiftly Upload Videos From iPhone/iPad to YouTube
- [New] Elite Influencer Economy Leaders
- How to Produce Compelling Haul Content on a Budget
- Ethical Approaches to Extract MP4 From YouTube
- Analyzing Online Video Discussions for 2024
- Top YouTube Concepts for Inspiring Viewers' Creativity
- [New] Elevate Streams Using YouTube's AV1 Settings
- 2024 Approved Enhance Engagement Top Tools and Tips for Properly Tagged Videos
- EditPrime Vision
- Crafting a Winning Edge Mastering Keywords in Digital Marketing
- In 2024, Breaking the Mold Unique Post-VidCon Events
- [Updated] 2024 Approved Anime-Inspired Filters & Overlays for Trendy TikTok Videos
- New In 2024, Turn Your Videos Into DVDs with These 3 Easy Methods
- Super Easy Ways To Deal with Samsung Galaxy S23 Unresponsive Screen | Dr.fone
- [New] 2024 Approved Stealthy Speakers' Sanctuary Discovering Quiet Voice Apps (Android/iOS)
- [New] 2024 Approved Beginner's Guide to Iphone Video Capture
- Why Your WhatsApp Live Location is Not Updating and How to Fix on your Oppo Find X6 Pro | Dr.fone
- A Perfect Guide To Remove or Disable Google Smart Lock On Itel P55 5G
- 5 Easy Ways to Change Location on YouTube TV On OnePlus Nord CE 3 Lite 5G | Dr.fone
- Easy Ways to Manage Your Itel P40 Location Settings | Dr.fone
- [New] Enhance Your Chat with Direct Spotify Streaming in Discord for 2024
- [Updated] 2024 Approved TikTok's Voyage to Twitter Success Stories
- 9 Best Phone Monitoring Apps for Oppo A1 5G | Dr.fone
- [New] 2024 Approved Precision Shot HD Video Tool
- In 2024, AddROM Bypass An Android Tool to Unlock FRP Lock Screen For your Lava Yuva 3
- 2024 Approved Top-Rated Video Editing Programs for Windows 10/11
- 2024 Approved Tailored Technology for Video Capture Excellence
- New 18 Best Tools and Services to Create Animated Videos for Your Business for 2024
- Master the Art of Audio Recording Top 8 Software Platforms to Achieve Professional Mixing and Mastering Results
- [New] In 2024, FB's Hot Five Most Captivating Vids
- How to Unlock Apple ID On your Apple iPhone 12 Pro Max without Security Questions?
- In 2024, Top 15 Apps To Hack WiFi Password On Nokia C32
- Title: Mirrorless Evolution Overshadowing Traditional DSLR Videography
- Author: Steven
- Created at : 2024-05-25 19:54:37
- Updated at : 2024-05-26 19:54:37
- Link: https://youtube-clips.techidaily.com/mirrorless-evolution-overshadowing-traditional-dslr-videography/
- License: This work is licensed under CC BY-NC-SA 4.0.
