
:max_bytes(150000):strip_icc()/Kaelena2-c3f8b50c11fb482b88ea4dbcad79e278.jpeg)
"Maximizing Mobile Profits Enabling YouTubers' Revenue"
Maximizing Mobile Profits: Enabling YouTubers’ Revenue
YouTube makes money easier and more accessible than ever in 2024. Create videos from the convenience of your mobile device and earn money from your passion. Your dreams can become a reality when you explore them. The goal of every YouTube creator is to monetize their channel. They can start side businesses, turn YouTube into a full-time job, or sell physical products. With today’s technology, the possibilities are endless!
This article is here to guide you on making money from your YouTube channel in 2024. You’ll discover steps and tips that can help boost your earnings. Whether you’re a pro or just starting out, monetizing your content can work for you. Get ready to increase your YouTube income potential as your journey on the platform is set to get even better.
YouTube Monetization Editor A cross-platform helps create attention-grabbing thumbnails and enhance your videos on YouTube easy!
Free Download Free Download Learn More

Part 1. What you need to know about YouTube Monetization
Rules and requirements for YouTube Monetization
YouTube Monetization means making money from YouTube content. For monetization, you need to join the YouTube Partner program and for this, you need to follow some requirements. In order to benefit from YPP fan funding, such as Super Chats and Super Thanks, here are the minimum requirements:
- A subscriber base of 500
- 90-day history of public uploads
- Within the last 90 days, public YouTube Shorts have been viewed 3 million times.
Video advertisements can make you money if you meet the following requirements:
- Subscribers of 1,000
- Watches by the public of 4,000 hours or views of 10 million YouTube Shorts in 90 days.
Promote your channel and create quality content to increase these numbers.

Join the YouTube Partner Program
In order to participate in the YouTube Partner Program, you must apply (YPP). YouTube is the top platform for content creators, offering them the chance to monetize their work.
Applications are reviewed by YouTube for at least one month before a decision is made. Due to YouTube’s actual specialists reviewing each application, it may take longer than a month.
To join the YPP, you must meet the following requirements:
- A minimum of 1,000 subscribers subscribe to your channel
- In the last 12 months, you’ve logged at least 4,000 public watch hours
- You live in an area that offers the YouTube Partner Program
- In terms of YouTube channel monetization policies, you follow them all
- Your YouTube channel must be secured with 2-Step Verification via your Google Account.
- Your YouTube channel is associated with an AdSense account
- The Community Guidelines strike on your channel is not active

Part 2. The Step-by-Step Guide for Monetizing Your YouTube Channel on Your Phone
YouTube Monetization Steps for Mobile
Following YPP’s requirements, you should follow these steps. Several steps must be followed in order to enable YouTube monetization using a mobile device:
A Quick Navigation
- Step 1 - Create an account on YouTube
- Step 2 - Get YouTube Studio access
- Step 3 -Monetize your site with Google Adsense
- Step 4 -Accept YouTube’s terms and conditions
- Step 5 -Creating ad formats
- Step 6 -Monetizing videos
- Step 7 -Content Promotion
- Step 8 -Analyze the results
- Step 9 -Ensure compliance
Step - 1 . Create an account on YouTube
Simply open YouTube on your mobile device, and sign in with your Google account right there on your device.
Step - 2 . Get YouTube Studio access
To access the YouTube Studio dashboard, click the icon of your channel or profile picture.

Step - 3 . Monetize your site with Google Adsense
To view YouTube Studio’s monetization options, click on the “Monetization” tab. The “Enable” option will appear if you meet the eligibility criteria. To receive your earnings, follow the instructions onscreen to set up Google AdSense.

Step - 4 . Accept YouTube’s terms and conditions
Read and accept YouTube’s terms and conditions for the Partner Program.
Step - 5 . Creating ad formats
In your videos, you can choose whether you want skippable or non-skippable advertisements.
Step - 6 . Monetizing videos
To enable or disable monetization on specific videos, select “Videos” from the YouTube Studio menu.
Step - 7 . Content Promotion
Continue producing high-quality content that engages viewers. It is crucial to create engaging content in order to increase ad revenue.
Step - 8 . Analyze the results
YouTube Studio lets you monitor channel performance, identify improvements, and monitor ad revenue.

Step - 9 . Ensure compliance
Keep in mind YouTube’s content policies if you want to maintain your monetization status.
Your YouTube channel may need some time to be approved for monetization. Engagement with your audience is the key to increasing viewership and revenue for your videos.
Part 3. Monetizing YouTube channels on mobile devices: Some Proven Ways
It is beneficial for creators to use YouTube AdSense, although it is not a reliable source of income. The advertising rates fluctuate, so making the same amount of money every year is hard. At last, here are some methods for monetizing YouTube:

Ads on YouTube
Monetizing a website has many methods, but this is the most basic and straightforward one. Various YouTube ad formats provide control over ad placement before or during a video.
Sponsorships that are paid
Sponsorship involves paying a content creator to use, demonstrate, or test a brand’s product in a video. It benefits both the sponsors and the viewers when brands sponsor creators.
Affiliates
Using affiliate programs is another way of monetizing your YouTube videos. With affiliate marketing, your audience is directed to a brand’s landing page or product by clicking an affiliate link. A commission is earned when the user purchases successfully. It is possible to earn extra income through affiliate programs. Offer discounts to your followers when you become an affiliate for a product you already use.
The merchandise
A similar tactic has already been discussed. Your fans can buy branded goods from a wide range of merchant platforms available today.
Premium YouTube subscriptions
Using YouTube Premium, users can watch videos ad-free and download videos. Fortunately, you can still earn money by uploading videos to this service. Video creators receive subscription revenue payments in the same manner as ad revenues. You earn money based on the number of times Premium members watch your videos.
Crowdfunding on YouTube
Creators can unlock this feature once they reach 500 subscribers and watch 3000 hours. Through three main avenues, they can directly monetize their audience:
- Fans can earn exclusive loyalty badges and watch private streams with channel memberships. Offering YouTube monetization options that can be customized.
- Live streams on YouTube can also be monetized through Super Chats. Viewers send creators “donations” or “tips” between $1 and $500 during live streams.
- The Super Thanks feature on YouTube lets viewers show appreciation for your content by buying digital goods.
Part 4. Wondershare Filmora’s Power: Elevating YouTube Content for Monetization
Keeping YouTube revenue high in 2024 means ensuring high-quality content. Introducing Wondershare Filmora, a tool that allows you to edit videos on your mobile device. You can use it to make your YouTube content stand out.
Creating attention-grabbing thumbnails and enhancing your videos is easy with Filmora. A package for trimming, adding music, overlaying text, and applying captivating effects to videos.
For your channel to succeed, you need to create eye-catching thumbnails. With Filmora, you can create thumbnails that pique interest and boost click-through rates.
You can elevate your content with Filmora whether you’re experienced or starting out. You can maximise your YouTube earnings in 2024 if your videos connect with your audience.
Free Download For Win 7 or later(64-bit)
Free Download For macOS 10.14 or later
Features for Editing Videos or Images for YouTube
1. AI Copywriting
Using the ChatGPT API, Filmora’s AI Copywriting feature generates scripts based on AI. Assists in the generation of text during the editing of videos. Automates YouTube title and description creation and simplifies the process.
2. Keyframing
The keyframing capabilities of Filmora enhance the quality and energy of your videos. Adding smooth animated effects to capture your audience’s attention.
3. AI Image
With Text to Image, you can use images directly in your video project in three resolutions. And explore limitless image styles, enhancing the visual appeal of your content.
4. Video Templates for All Your Needs
Start with Filmora’s built-in video templates, creating creative videos with ease. You can also save templates on the cloud. Streamline your video production process by sharing them with fellow creators.
Conclusion
You have now learned how to enable monetization on YouTube in mobile in 2024. From your mobile device, you can turn your passion into income. The possibilities are endless once you achieve monetization. No matter if you’re starting a side gig, launching a business, or going full-time on YouTube.
We have covered key steps for meeting YouTube’s requirements and monetizing videos. Following these steps and using the available strategies will assist you in achieving your goals. Making monetization easy with quality content is easy with Filmora’s above mentioned features. The road to success is open. Maximize your YouTube revenue potential today to make your YouTube journey truly rewarding.
Free Download Free Download Learn More
Part 1. What you need to know about YouTube Monetization
Rules and requirements for YouTube Monetization
YouTube Monetization means making money from YouTube content. For monetization, you need to join the YouTube Partner program and for this, you need to follow some requirements. In order to benefit from YPP fan funding, such as Super Chats and Super Thanks, here are the minimum requirements:
- A subscriber base of 500
- 90-day history of public uploads
- Within the last 90 days, public YouTube Shorts have been viewed 3 million times.
Video advertisements can make you money if you meet the following requirements:
- Subscribers of 1,000
- Watches by the public of 4,000 hours or views of 10 million YouTube Shorts in 90 days.
Promote your channel and create quality content to increase these numbers.
Join the YouTube Partner Program
In order to participate in the YouTube Partner Program, you must apply (YPP). YouTube is the top platform for content creators, offering them the chance to monetize their work.
Applications are reviewed by YouTube for at least one month before a decision is made. Due to YouTube’s actual specialists reviewing each application, it may take longer than a month.
To join the YPP, you must meet the following requirements:
- A minimum of 1,000 subscribers subscribe to your channel
- In the last 12 months, you’ve logged at least 4,000 public watch hours
- You live in an area that offers the YouTube Partner Program
- In terms of YouTube channel monetization policies, you follow them all
- Your YouTube channel must be secured with 2-Step Verification via your Google Account.
- Your YouTube channel is associated with an AdSense account
- The Community Guidelines strike on your channel is not active
Part 2. The Step-by-Step Guide for Monetizing Your YouTube Channel on Your Phone
YouTube Monetization Steps for Mobile
Following YPP’s requirements, you should follow these steps. Several steps must be followed in order to enable YouTube monetization using a mobile device:
A Quick Navigation
- Step 1 - Create an account on YouTube
- Step 2 - Get YouTube Studio access
- Step 3 -Monetize your site with Google Adsense
- Step 4 -Accept YouTube’s terms and conditions
- Step 5 -Creating ad formats
- Step 6 -Monetizing videos
- Step 7 -Content Promotion
- Step 8 -Analyze the results
- Step 9 -Ensure compliance
Step - 1 . Create an account on YouTube
Simply open YouTube on your mobile device, and sign in with your Google account right there on your device.
Step - 2 . Get YouTube Studio access
To access the YouTube Studio dashboard, click the icon of your channel or profile picture.
Step - 3 . Monetize your site with Google Adsense
To view YouTube Studio’s monetization options, click on the “Monetization” tab. The “Enable” option will appear if you meet the eligibility criteria. To receive your earnings, follow the instructions onscreen to set up Google AdSense.
Step - 4 . Accept YouTube’s terms and conditions
Read and accept YouTube’s terms and conditions for the Partner Program.
Step - 5 . Creating ad formats
In your videos, you can choose whether you want skippable or non-skippable advertisements.
Step - 6 . Monetizing videos
To enable or disable monetization on specific videos, select “Videos” from the YouTube Studio menu.
Step - 7 . Content Promotion
Continue producing high-quality content that engages viewers. It is crucial to create engaging content in order to increase ad revenue.
Step - 8 . Analyze the results
YouTube Studio lets you monitor channel performance, identify improvements, and monitor ad revenue.
Step - 9 . Ensure compliance
Keep in mind YouTube’s content policies if you want to maintain your monetization status.
Your YouTube channel may need some time to be approved for monetization. Engagement with your audience is the key to increasing viewership and revenue for your videos.
Part 3. Monetizing YouTube channels on mobile devices: Some Proven Ways
It is beneficial for creators to use YouTube AdSense, although it is not a reliable source of income. The advertising rates fluctuate, so making the same amount of money every year is hard. At last, here are some methods for monetizing YouTube:
Ads on YouTube
Monetizing a website has many methods, but this is the most basic and straightforward one. Various YouTube ad formats provide control over ad placement before or during a video.
Sponsorships that are paid
Sponsorship involves paying a content creator to use, demonstrate, or test a brand’s product in a video. It benefits both the sponsors and the viewers when brands sponsor creators.
Affiliates
Using affiliate programs is another way of monetizing your YouTube videos. With affiliate marketing, your audience is directed to a brand’s landing page or product by clicking an affiliate link. A commission is earned when the user purchases successfully. It is possible to earn extra income through affiliate programs. Offer discounts to your followers when you become an affiliate for a product you already use.
The merchandise
A similar tactic has already been discussed. Your fans can buy branded goods from a wide range of merchant platforms available today.
Premium YouTube subscriptions
Using YouTube Premium, users can watch videos ad-free and download videos. Fortunately, you can still earn money by uploading videos to this service. Video creators receive subscription revenue payments in the same manner as ad revenues. You earn money based on the number of times Premium members watch your videos.
Crowdfunding on YouTube
Creators can unlock this feature once they reach 500 subscribers and watch 3000 hours. Through three main avenues, they can directly monetize their audience:
- Fans can earn exclusive loyalty badges and watch private streams with channel memberships. Offering YouTube monetization options that can be customized.
- Live streams on YouTube can also be monetized through Super Chats. Viewers send creators “donations” or “tips” between $1 and $500 during live streams.
- The Super Thanks feature on YouTube lets viewers show appreciation for your content by buying digital goods.
Part 4. Wondershare Filmora’s Power: Elevating YouTube Content for Monetization
Keeping YouTube revenue high in 2024 means ensuring high-quality content. Introducing Wondershare Filmora, a tool that allows you to edit videos on your mobile device. You can use it to make your YouTube content stand out.
Creating attention-grabbing thumbnails and enhancing your videos is easy with Filmora. A package for trimming, adding music, overlaying text, and applying captivating effects to videos.
For your channel to succeed, you need to create eye-catching thumbnails. With Filmora, you can create thumbnails that pique interest and boost click-through rates.
You can elevate your content with Filmora whether you’re experienced or starting out. You can maximise your YouTube earnings in 2024 if your videos connect with your audience.
Free Download For Win 7 or later(64-bit)
Free Download For macOS 10.14 or later
Features for Editing Videos or Images for YouTube
1. AI Copywriting
Using the ChatGPT API, Filmora’s AI Copywriting feature generates scripts based on AI. Assists in the generation of text during the editing of videos. Automates YouTube title and description creation and simplifies the process.
2. Keyframing
The keyframing capabilities of Filmora enhance the quality and energy of your videos. Adding smooth animated effects to capture your audience’s attention.
3. AI Image
With Text to Image, you can use images directly in your video project in three resolutions. And explore limitless image styles, enhancing the visual appeal of your content.
4. Video Templates for All Your Needs
Start with Filmora’s built-in video templates, creating creative videos with ease. You can also save templates on the cloud. Streamline your video production process by sharing them with fellow creators.
Conclusion
You have now learned how to enable monetization on YouTube in mobile in 2024. From your mobile device, you can turn your passion into income. The possibilities are endless once you achieve monetization. No matter if you’re starting a side gig, launching a business, or going full-time on YouTube.
We have covered key steps for meeting YouTube’s requirements and monetizing videos. Following these steps and using the available strategies will assist you in achieving your goals. Making monetization easy with quality content is easy with Filmora’s above mentioned features. The road to success is open. Maximize your YouTube revenue potential today to make your YouTube journey truly rewarding.
Starting From Scratch: Video Gear Insights
Essential YouTube Equipment For Starting Your Channel - What Do You Really Need?

Richard Bennett
Oct 26, 2023• Proven solutions
Check out our most updated guide on this topic: YouTube Equipment Starter Guide For Beginners .
The first thing to make sure of before starting a YouTube channel is having all that you need to record and upload high-quality videos regularly. That doesn’t mean you have to take out a loan and spend thousands to purchase a brand new camera and all other gadgets that professional filmmakers use.
The smartest way to get started is to go through a list of necessary equipment for YouTube and check whether or not you already own some of it. Once your channel starts growing, you can then start thinking about whether you want to invest in upgraded equipment. Here is a quick overview of all items that you need to start entertaining your online audience and gaining subscribers to your YouTube channel:
- Your YouTube Camera
- Microphones and Audio
- Lighting Gear for YouTube
- Tripods and Camera Stands
- Smartphone Camera Gear
YouTube Cameras
The short version: Use whatever you already have, even if it’s your phone or webcam. It’s nice to have sharp, fine-tuned, 4K footage, but viewers will forgive lower visual quality if your content is good.
The long version: You will need a camera, but there are a lot of different devices you can use including DSLRs, point and shoots, webcams, and your smartphone.
Your choice of camera will have a tremendous impact on the visual quality of your content and might drive your decisions regarding other pieces of equipment. However, you shouldn’t feel obliged to work with a top-notch camera from day one, especially since cheaper options can produce great results if used the right way.
On one end of the spectrum, you have basic smartphone cameras and web cameras, which are easy to come by and simple to operate. These days, high-end phones come equipped with quite powerful cameras that are more than sufficient for the needs of the average YouTuber. Better webcams can also do the job, although high-performance webcam models can get pretty expensive too. It is probably wise to resist the urge to start broadcasting with the built-in camera in your laptop and at least get a webcam or use your phone, but your computer’s camera is still always an option. Not having a better camera should never stop you from making YouTube videos.
If you already have a DSLR camera then it’s a good idea to familiarize yourself with it. You have far more freedom to adjust the settings and achieve a professional look for your videos with a DSLR, but that does mean it’ll take some time to become an expert at using it. Ultra-high resolution is not required for YouTube, but it certainly won’t hurt to have additional sharpness and more detail in the scene. If you’re shopping for a DSLR, look for one with a flip screen that allows you to quickly check what your viewers see.
YouTube Microphone and Audio
The short version: Audio quality is extremely important. If you can buy either a new camera or an external microphone, but not both, it might be better to go for the microphone. Click here for advice on upping your audio quality without an external microphone.
The long version: Sound capturing is every bit as important for your success as your video feed. In fact, poor audio can be even more damaging to your subscriber count than grainy video, since people won’t spend their time listening to something they have to put effort into understanding.
Again, most YouTube video makers have a limited budget at their disposal, so professional microphones are mostly off the table. However, investing in a directional microphone (‘shotgun mic’) that can pick up your voice clearly and without background noise is certainly a smart move. Such microphones can be pointed towards you while you speak, and since most YouTubers sit still while doing their shows there won’t be too much need for in-session adjustments.
If you’re not ready to invest in a shotgun mic, you can also find very inexpensive (often under $20) LAV mics. These small microphones can be pinned to your shirt, which allows them to record very clear dialogue because they’re so close to your mouth.
Lights for YouTube
The short version: You need as much light as you can get. Lighting kits can be affordable on Amazon, but you can also achieve a great look using daylight/windows and ‘daylight’ lightbulbs.
The long version: If you’ve ever tried to make a video indoors, you already know that it’s necessary to have additional light. Often just filming with the normal lights in a room will cause your footage to look dark and grainy, and possibly be tinted orange. To overcome these problems you need to increase the amount of light you have available.
Sometimes, it is enough to film near windows and/or bring more household lamps into your filming area. For any household lamps or lighting fixtures you use, make sure to put in white or ‘daylight’ lightbulbs instead of using the orange/tungsten bulbs that you might have for everyday use (this is how you avoid tinting things orange).
If you have the budget available to get some lighting equipment, you can find softbox lights or LED panel lights available fairly inexpensively online. Softbox lights are great because they provide even, diffused, light.
Another useful piece of lighting equipment to have is a reflector. A reflector is usually a piece of white, silver, or gold fabric stretched over a frame. You can use it to bounce light from one light source back towards yourself (this is a great way to fill shadows cast by your main light). Reflectors tend to be inexpensive, but you can also use white cardboard or tinfoil in place of purchasing a reflector.
Tripods and Camera Stands
The short version: You need something to hold your camera. If you mostly film in your own home that can be a desk or a stack of books, but if you make a lot of videos while you’re on the go you probably need a tripod or gimbal. Heavier cameras need heavier tripods.
The long version: While handheld cameras can deliver solid results for vloggers and casual streamers, viewers do expect reasonably stable footage. For many types of videos, the camera needs to be completely still and flatly positioned on a horizontal plane. Tripods and camera stands can cost very little, so it’s a good idea to look into getting some kind of stabilizer.
When you are choosing a tripod, pay attention to how much it weighs. If the camera that needs to be mounted on it is very heavy (like some DSLR models), you want to ensure that the structure itself weighs enough not to be easily tipped over. Too thin tripods can put your camera at risk, and that’s the last thing you want. Smaller cameras such as GoPros are more flexible in this regard and can be placed on a wider range of tripods.
Even if you are using a phone or a webcam to record YouTube videos, you should consider mounting the device on a stable stand. It is possible to find mini tripods ideal for smartphones for as little as $10. These tripods are small enough to carry in your pocket, so you will be prepared to start making a video no matter where your adventures take you. If you are using a web camera, you should attach it to the stand so that it won’t move accidentally after you touch the surface it is placed on.
Smartphone Camera Gear
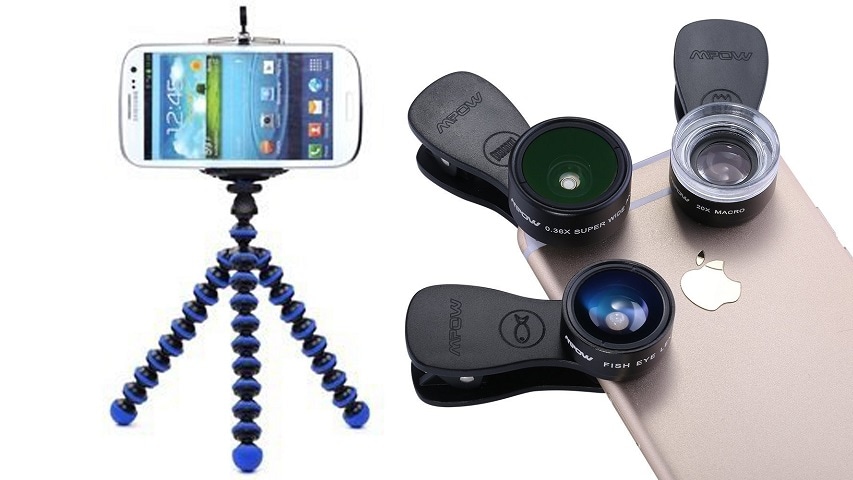
The short version: There’s a lot of gear out there designed with smartphone photos and videos in mind, including clip-on lenses, tripod mounts, phone-mounted LED lights, and inexpensive microphones that plug into the audio jack.
The long version: Recording your videos with a mobile phone can be a good decision. It all depends on the phone you have and the range of add-ons and apps that you complement it with. Almost every high-end model released in the past five years can shoot videos in 1080p or higher. Some can even produce 4K footage. If you perfect your smartphone filming technique, your YouTube videos could look as if they were made with pro equipment.
On the flip side, smartphone cameras typically perform poorly in low light. It is possible to download an app that lets you play around with settings to overcome this, but a phone-mounted LED light is probably a better solution. An external microphone might also be a necessity, but there are some good (inexpensive) options that can simply be plugged in through the headphone jack.
Another common downside of smartphone cameras is that most of them use digital zoom, which is vastly inferior to optical zoom. If you intend to shoot anything that’s further away than a few feet, you need a clip-on lens that goes on top of the built-in camera. This inexpensive device will give you a lot of freedom to work in space, and allow you to make spectacular shots even without high-end YouTube equipment.
Equipment with Easy-to-Use Video Editor


Richard Bennett
Richard Bennett is a writer and a lover of all things video.
Follow @Richard Bennett
Richard Bennett
Oct 26, 2023• Proven solutions
Check out our most updated guide on this topic: YouTube Equipment Starter Guide For Beginners .
The first thing to make sure of before starting a YouTube channel is having all that you need to record and upload high-quality videos regularly. That doesn’t mean you have to take out a loan and spend thousands to purchase a brand new camera and all other gadgets that professional filmmakers use.
The smartest way to get started is to go through a list of necessary equipment for YouTube and check whether or not you already own some of it. Once your channel starts growing, you can then start thinking about whether you want to invest in upgraded equipment. Here is a quick overview of all items that you need to start entertaining your online audience and gaining subscribers to your YouTube channel:
- Your YouTube Camera
- Microphones and Audio
- Lighting Gear for YouTube
- Tripods and Camera Stands
- Smartphone Camera Gear
YouTube Cameras
The short version: Use whatever you already have, even if it’s your phone or webcam. It’s nice to have sharp, fine-tuned, 4K footage, but viewers will forgive lower visual quality if your content is good.
The long version: You will need a camera, but there are a lot of different devices you can use including DSLRs, point and shoots, webcams, and your smartphone.
Your choice of camera will have a tremendous impact on the visual quality of your content and might drive your decisions regarding other pieces of equipment. However, you shouldn’t feel obliged to work with a top-notch camera from day one, especially since cheaper options can produce great results if used the right way.
On one end of the spectrum, you have basic smartphone cameras and web cameras, which are easy to come by and simple to operate. These days, high-end phones come equipped with quite powerful cameras that are more than sufficient for the needs of the average YouTuber. Better webcams can also do the job, although high-performance webcam models can get pretty expensive too. It is probably wise to resist the urge to start broadcasting with the built-in camera in your laptop and at least get a webcam or use your phone, but your computer’s camera is still always an option. Not having a better camera should never stop you from making YouTube videos.
If you already have a DSLR camera then it’s a good idea to familiarize yourself with it. You have far more freedom to adjust the settings and achieve a professional look for your videos with a DSLR, but that does mean it’ll take some time to become an expert at using it. Ultra-high resolution is not required for YouTube, but it certainly won’t hurt to have additional sharpness and more detail in the scene. If you’re shopping for a DSLR, look for one with a flip screen that allows you to quickly check what your viewers see.
YouTube Microphone and Audio
The short version: Audio quality is extremely important. If you can buy either a new camera or an external microphone, but not both, it might be better to go for the microphone. Click here for advice on upping your audio quality without an external microphone.
The long version: Sound capturing is every bit as important for your success as your video feed. In fact, poor audio can be even more damaging to your subscriber count than grainy video, since people won’t spend their time listening to something they have to put effort into understanding.
Again, most YouTube video makers have a limited budget at their disposal, so professional microphones are mostly off the table. However, investing in a directional microphone (‘shotgun mic’) that can pick up your voice clearly and without background noise is certainly a smart move. Such microphones can be pointed towards you while you speak, and since most YouTubers sit still while doing their shows there won’t be too much need for in-session adjustments.
If you’re not ready to invest in a shotgun mic, you can also find very inexpensive (often under $20) LAV mics. These small microphones can be pinned to your shirt, which allows them to record very clear dialogue because they’re so close to your mouth.
Lights for YouTube
The short version: You need as much light as you can get. Lighting kits can be affordable on Amazon, but you can also achieve a great look using daylight/windows and ‘daylight’ lightbulbs.
The long version: If you’ve ever tried to make a video indoors, you already know that it’s necessary to have additional light. Often just filming with the normal lights in a room will cause your footage to look dark and grainy, and possibly be tinted orange. To overcome these problems you need to increase the amount of light you have available.
Sometimes, it is enough to film near windows and/or bring more household lamps into your filming area. For any household lamps or lighting fixtures you use, make sure to put in white or ‘daylight’ lightbulbs instead of using the orange/tungsten bulbs that you might have for everyday use (this is how you avoid tinting things orange).
If you have the budget available to get some lighting equipment, you can find softbox lights or LED panel lights available fairly inexpensively online. Softbox lights are great because they provide even, diffused, light.
Another useful piece of lighting equipment to have is a reflector. A reflector is usually a piece of white, silver, or gold fabric stretched over a frame. You can use it to bounce light from one light source back towards yourself (this is a great way to fill shadows cast by your main light). Reflectors tend to be inexpensive, but you can also use white cardboard or tinfoil in place of purchasing a reflector.
Tripods and Camera Stands
The short version: You need something to hold your camera. If you mostly film in your own home that can be a desk or a stack of books, but if you make a lot of videos while you’re on the go you probably need a tripod or gimbal. Heavier cameras need heavier tripods.
The long version: While handheld cameras can deliver solid results for vloggers and casual streamers, viewers do expect reasonably stable footage. For many types of videos, the camera needs to be completely still and flatly positioned on a horizontal plane. Tripods and camera stands can cost very little, so it’s a good idea to look into getting some kind of stabilizer.
When you are choosing a tripod, pay attention to how much it weighs. If the camera that needs to be mounted on it is very heavy (like some DSLR models), you want to ensure that the structure itself weighs enough not to be easily tipped over. Too thin tripods can put your camera at risk, and that’s the last thing you want. Smaller cameras such as GoPros are more flexible in this regard and can be placed on a wider range of tripods.
Even if you are using a phone or a webcam to record YouTube videos, you should consider mounting the device on a stable stand. It is possible to find mini tripods ideal for smartphones for as little as $10. These tripods are small enough to carry in your pocket, so you will be prepared to start making a video no matter where your adventures take you. If you are using a web camera, you should attach it to the stand so that it won’t move accidentally after you touch the surface it is placed on.
Smartphone Camera Gear
The short version: There’s a lot of gear out there designed with smartphone photos and videos in mind, including clip-on lenses, tripod mounts, phone-mounted LED lights, and inexpensive microphones that plug into the audio jack.
The long version: Recording your videos with a mobile phone can be a good decision. It all depends on the phone you have and the range of add-ons and apps that you complement it with. Almost every high-end model released in the past five years can shoot videos in 1080p or higher. Some can even produce 4K footage. If you perfect your smartphone filming technique, your YouTube videos could look as if they were made with pro equipment.
On the flip side, smartphone cameras typically perform poorly in low light. It is possible to download an app that lets you play around with settings to overcome this, but a phone-mounted LED light is probably a better solution. An external microphone might also be a necessity, but there are some good (inexpensive) options that can simply be plugged in through the headphone jack.
Another common downside of smartphone cameras is that most of them use digital zoom, which is vastly inferior to optical zoom. If you intend to shoot anything that’s further away than a few feet, you need a clip-on lens that goes on top of the built-in camera. This inexpensive device will give you a lot of freedom to work in space, and allow you to make spectacular shots even without high-end YouTube equipment.
Equipment with Easy-to-Use Video Editor
Richard Bennett
Richard Bennett is a writer and a lover of all things video.
Follow @Richard Bennett
Also read:
- Elevate Your Videography - 7 Free Sound Effects Collection for 2024
- Hacks Create YouTube Shorts Thumbnails That Stand Out Quickly
- The Tug-of-War Youtube Licensing Versus CC Principles
- Mobile Mastery YouTube Video Thumbnails Made Easy
- Command the Stage of YouTube with Studio Skills for 2024
- 2024 Approved Branding with Visuals Inserting Watermarks Into YouTube Vids
- Gain Momentum with These Strategies for Trending YouTubers
- The Insider's Guide to YouTube Success
- Guide to Simplified GS-YT CTA Implementation
- Building Direct URLs for YouTube Channel Subscribers for 2024
- Steps to Remove Unseen Portions in Streamed YouTube Videos
- In 2024, A Step-by-Step Guide to Forming Effective YouTube Partner Relationships
- 2024 Approved Charisma in Characters Two Ways to Enliven Text
- [Updated] Break Down Top 7 Video Streaming Tools that Revolutionize YouTube Broadcasts (iPhones/Android)
- Streamline Sound Transfer Top 10 YouTube Audio Converters
- From Obscurity to Stardom Trendsetting Tactics for Videos
- In 2024, A Child’s Fortune The Wealthy World of YouTube’s Youngest Star
- Clearing Process for YouTube's Pending Video List
- Sprucing Up Video Thumbnails with Captivating BGs
- Mastering 4K Uploads Key Tips for YouTube Success
- [New] Bypass Software for YouTube Downloads
- [New] Creating Viral Haul Videos A Comprehensible Guide
- Channel Success Metrics Subscriber & Play Buttons
- [New] Digital Download King Comprerante Video Acquisition Guide
- [New] A Complete Guide to YouTube's Live Image Lore
- Debating Platform Preferences IGTV Versus YouTube Video Sharing
- [New] Charting the Course to Digital Stardom Launch Your Chanel Today
- Best Alternative to YouTube IOS & Android's 10 Leading Video Sites
- In 2024, Can YouTube Sub4Sub Really Enhance Viewing Experience?
- [Updated] Creating a Custom URL for YouTube Autosub
- In 2024, Elite Equipment Showcasing Gameplay Innovations
- Choreographing Climactic Crescendos for 2024
- Top 5 Snug Scenarios for Your Snowy Youtube Sessions
- The Small Screen, Big Impact Effortless Business/Personal YouTube Channel Setup
- The Art of Antiquated Visuals for Modern Audienciplines
- Exploring YouTube's Financial Blueprint for Short-Form Video Success
- Cutting-Edge Techniques for Channel Management on YT Hub for 2024
- Embarking on a Virtual Odyssey Through YT Stories
- [Updated] Crafting Kingdom The Path to YouTube Mastery
- Masters Designing Virtual Marvel Realms
- [New] Best Free YouTube Intro Makers to Create Awesome Intros
- [Updated] Amplifying Your Content Free Techniques to Boost YouTube Views
- Comprehensive iTunes Update Upload YouTube Videos Guide for 2024
- [New] Comparing YouTube and Dailymotion Notable Contrasts
- Best 7 High-Motion DSLRs for Dynamic Live Content Creation
- The Pathway to Discover Your YouTube Supporters
- [Updated] Daily Dharma The Best Yoga Channels for Self-Growth
- From Raw Feedback A Critical Review of Top Video Editors for YouTube
- [New] Elite Listings Easy Purchases of Startup YouTube Revenue Streams
- Distinctive Digital Monikers for Video Creators for 2024
- Troubleshooting Guide How to Fix an Unresponsive ZTE Blade A73 5G Screen | Dr.fone
- Updated Finding the Perfect YouTube MP3 Converter A Beginners Guide
- 2024 Approved Free Windows Movie Maker Download A Step-by-Step Tutorial
- New In 2024, Looking for the Best Websites for 3D Text PNG? Weve Covered You with Our Top 8 Picks for Your Upcoming Work
- 3uTools Virtual Location Not Working On Poco M6 5G? Fix Now | Dr.fone
- [Updated] 2024 Approved Mastering OBS Studio Key Editing Tactics Unveiled
- Top 7 Skype Hacker to Hack Any Skype Account On your Honor X9a | Dr.fone
- How to recover old call logs from your G54 5G?
- [New] In 2024, Ascend the TikTok Charts Strategies for Revenue Generation
- New In 2024, The Ultimate FCPX Freebie List 10 Plugins You Cant Miss
- [New] In 2024, Leading 10 Innovative TikTok Filters For Creators
- [New] 2024 Approved Transform Your Playtime Mastering PS4 Live Recordings with OBS
- Action Camera Showdown Who Wins with GoPro Hero5 Black & Yi's 4K Update
- Fixing Foneazy MockGo Not Working On Itel A05s | Dr.fone
- Lock Your Vivo Phone in Style The Top 5 Gesture Lock Screen Apps
- [New] Save the Day Guide to Downloading and Converting Vimeo Videos (MP4)
- [New] Mastering Social Media Tweeting Videos to Facebook for 2024
- 4 Ways to Unlock iPhone SE (2022) to Use USB Accessories Without Passcode | Dr.fone
- In 2024, Pokemon Go No GPS Signal? Heres Every Possible Solution On Vivo S17 Pro | Dr.fone
- Expert Tripods for YouTube Creators' Filming Needs
- New Inject Humor Into Your Calls Discover the Top 5 Funny Voice Alterations for Laughter-Filled Conversations for 2024
- Obtaining High-Quality Photos Without Restrictions
- New 2024 Approved Sound Innovators Choice The Best FREE Audio Mixer Platforms Ranked!
- Preparation to Beat Giovani in Pokemon Go For Xiaomi Redmi A2+ | Dr.fone
- In 2024, How to Transfer Data from Infinix Hot 40 Pro to Any iOS Devices | Dr.fone
- [New] 2024 Approved Step-by-Step Screen Recording for Snapchat Stories on Mobile
- 2 Ways to Transfer Text Messages from Honor X50i to iPhone 15/14/13/12/11/X/8/ | Dr.fone
- 2024 Approved Unveiling the Secrets to Efficient Recording
- In 2024, 9 Best Free Android Monitoring Apps to Monitor Phone Remotely For your Vivo Y78+ (T1) Edition | Dr.fone
- In 2024, How to Watch Hulu Outside US On Apple iPhone SE (2020) | Dr.fone
- Mastering the Art of Profile Age Precision on TikTok
- New From Voice to Print Effective Speech-to-Text Strategies
- Unlocking the Best Free Screen Recorders on Windows 10
- 2024 Approved Mastering Video Capturing Step-by-Step Manual
- 2024 Approved Best Free LUTs To Use in Shotcut
- 2024 Approved Top Picks The Most Advanced MP3 Tags Organizers for Mac Users
- [New] In 2024, Warriors' Epic Valhalla's Endgame
- Instagram Video Time Warp Techniques
- [Updated] In 2024, Unlocking the Power of Google Meet with Your Tech
- 2024 Approved Best-in-Class MKV Player for PC Users
- 8 Solutions to Fix Find My Friends Location Not Available On Itel S23 | Dr.fone
- What To Do if Your Samsung Galaxy F15 5G Auto Does Not Work | Dr.fone
- Unveiling DiscoNitro Access and Acquisition Explained for 2024
- Cutting Edge Tech for Professional Video Shows
- Title: "Maximizing Mobile Profits Enabling YouTubers' Revenue"
- Author: Steven
- Created at : 2024-05-25 19:54:03
- Updated at : 2024-05-26 19:54:03
- Link: https://youtube-clips.techidaily.com/maximizing-mobile-profits-enabling-youtubers-revenue/
- License: This work is licensed under CC BY-NC-SA 4.0.
