
:max_bytes(150000):strip_icc()/victor-carvalho-DuK8VqdVsMg-unsplash-de3e8df0517b4524a5bb76fb0dc2156e.jpg)
"Maximizing Engagement 10 Tips for Stellar YT Shorts Content"
Maximizing Engagement: 10 Tips for Stellar YT Shorts Content
10 Expert Suggestions to Make Your YT Shorts Stand Out

Shanoon Cox
Oct 26, 2023• Proven solutions
To make it easier for its audience to find crisp and entertaining content, YouTube has recently come up with a dedicated “Shorts” feature.
Ideally, any YouTube user can find the Shorts option on the app to watch interesting videos of 60 seconds or less. Though, it might take a lot of effort to make your YouTube Shorts videos appealing.
If you also want to go viral, then get to know about these YouTube Shorts tips that every content creator should follow.
YouTube Shorts Feature and Shorts Fund: Things to Know
Before we make you familiar with all kinds of YouTube Shorts tips and tricks, let’s cover some basics. Ideally, YouTube has recently come up with the Shorts feature to focus on short-length videos (and to rival Instagram Reels and TikTok).
You can now find the Shorts icon at the bottom panel on the YouTube app. Using it, you can watch or record short videos on YouTube easily. These are short-form clips of 60 seconds or less that you can create via the Shorts interface of the YouTube app.
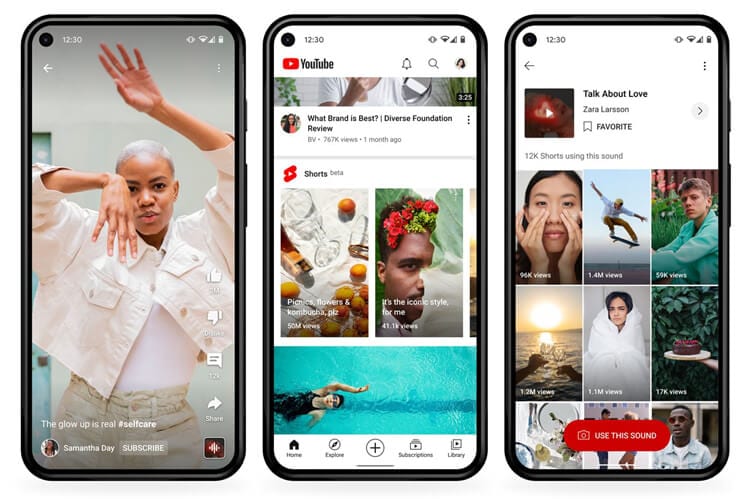
The interface would let you record multiple videos at different intervals and add sound to your clips as well. Later, you can post these short clips on your channel to get more views on YouTube.
YouTube Shorts Fund
YouTube Shorts already hosts a massive number of more than 6 billion daily views as of now. To promote it, Google has come up with a YouTube Shorts Fund of $100M that would be rewarded to various content creators each month.
That is, a “Shorts Bonus” would be added to the account of content creators to appreciate their viral content.
Top 10 Tips for YouTube Shorts That You Must Follow
Now when we have covered all the basics, let’s get to know about some effective YouTube Shorts tricks that would help you come up with interesting content and get more audience for it.
Tip 1: Learn How to Shoot YouTube Shorts
Before you start posting videos on YouTube Shorts, you should know how the feature works. Ideally, you can find a dedicated option for Shorts from the bottom panel on the updated YouTube app. From here, you can watch Shorts or simply choose to create them as well.
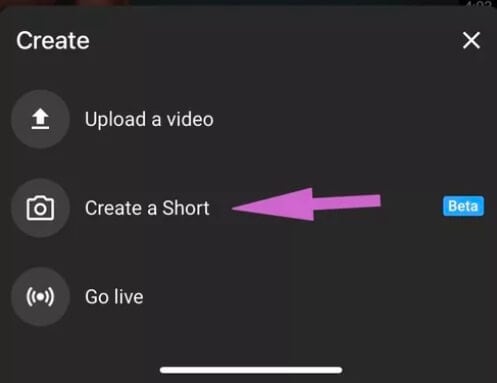
You can give YouTube access to your smartphone camera before you start recording. To record anything, you can just tap and hold the red button (the recording icon) on the interface.
As you would release it, the recording would be stopped. In this way, you can seamlessly move from one scene to another without worrying about editing in post-production.
Tip 2: Stick to a Selective Niche
To have a consistent growth of audience on YouTube shorts, you should stick to a specific niche. If you search on YouTube, you can find short videos related to funny, inspirational, fitness, romantic, and all kinds of niches.
Most of the prominent content creators already apply these YouTube Shorts tips in which they first identify their target audience. Based on that, you can work on the type of content that you want to create and share to attain consistent growth on YouTube.
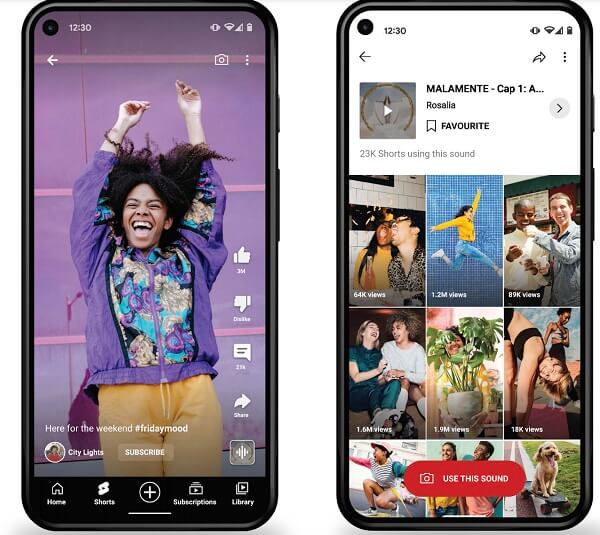
Tip 3: Add Appropriate Background Music to Your Short Videos
One of the best things about YouTube Shorts is that it lets us add a snippet of the music in the background, according to our content. Therefore, you must implement these tips for YouTube Shorts to make the most of this free feature of the app.
After recording your videos, you can tap on the “Sound” or the “Add Music” feature from the interface.
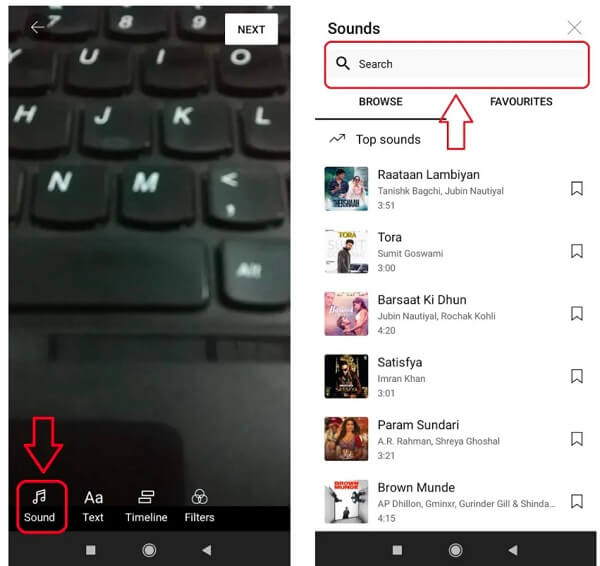
Now, YouTube will automatically load all kinds of trending music that you can use for free. If you want, you can enter the name of any song on the search option of YouTube shorts.
As you would select a track, it will automatically be loaded as the background music for your video. Though, you can also select a specific segment of the track and clip it accordingly to place it on your videos the way you like.
Tip 4: Insert Captions and Text Effects on Your Shorts
Apart from music, you can also add all kinds of text effects to make your YouTube Shorts videos appealing. After you have recorded a video, you can just tap on the text option from the bottom/side panel of the app.
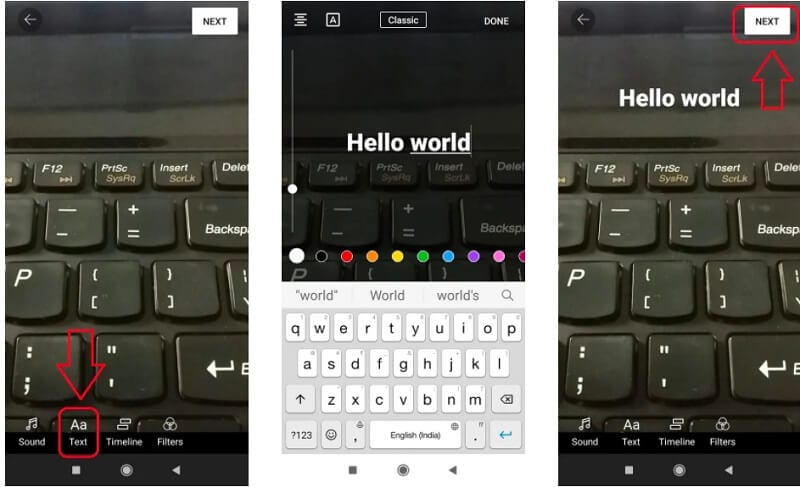
You can now type anything and place it on the video to make it more interesting. If you want, you can also implement these YouTube Shorts tips to add subtitles or pre/post video captions without any hassle.
Tip 5: Adjust the Playback Speed of YouTube Shorts
Since a lot of content creators are coming up with YouTube Shorts, you would have to walk an extra mile to make them more appealing. In these YouTube Shorts tricks, I would recommend adjusting the playback speed of the video.
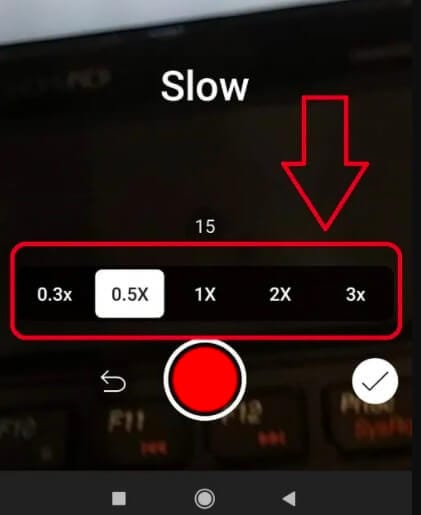
After recording the video, you can tap on the speed icon from the bottom/side panel. Here, you can make your videos play in slow motion or fast forward (in a range of 0.3x to 3x). This will add seamless speed control features to your videos without any technical issues.
Tip 6: Consider the Overall Length of Your Shorts Video
Even though the maximum length of the YouTube Shorts videos is 60 seconds, you don’t have to make it so long. If you look at most of the popular videos on YouTube Shorts, then you will find that they are of less than 30 seconds in length.
Remember, your goal is to come up with crisp and interesting content via YouTube Shorts. To implement these YouTube Shorts tips, you can consider the ideal length of 30-45 seconds and only have essential content in your videos.
Tip 7: Use the Timer Feature to Shoot Your Videos Correctly
A lot of people make the rookie mistake of shooting their videos for too long in Shorts. Therefore, if you want to implement these YouTube Shorts tips and tricks, then consider using the timer feature of the app.

Before shooting the video, you can tap on the timer button from the bottom and set up a preferred duration for it (like 10 or 15 seconds). In this way, you can be sure that you won’t go overboard and keep your videos short automatically.
Tip 8: Set a Preferred Target Audience for YouTube Shorts
Great! Now when you have recorded and edited your video by applying these tips for YouTube Shorts, you are ready to post them. While posting your videos, you would be asked whether the video is targeted at kids or not. If the video is made for kids, then you should select the relevant prompt, as YouTube would improve the overall visibility of your videos in this case.
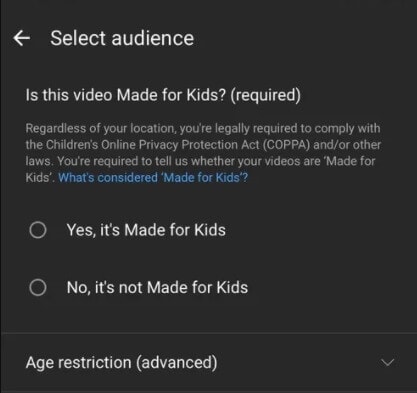
Though, if your videos are targeted at adults, then you should go with the second option instead. This would help you reach out to your target audience on YouTube easily.
Tip 9: Post Your YouTube Shorts the Right Way
Apart from setting the audience preferences of your YouTube Shorts videos, you should also take care of a couple of other things. For instance, you can consider making the visibility of your final video “Public” so that anyone on YouTube can watch it.
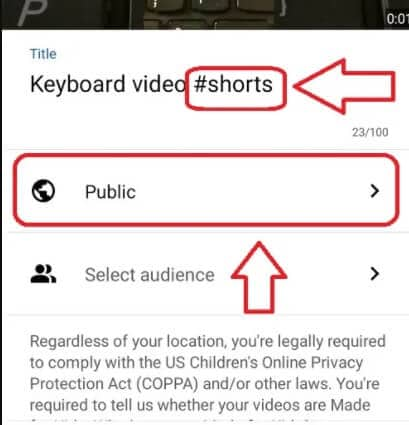
Besides that, it is also recommended to have the keyword “#Shorts” in the title of the video. You can also make the title of the video attractive and can even add a short description that would make your audience click on your YouTube video for sure.
Tip 10: Promote Your YouTube Shorts Video on Other Places
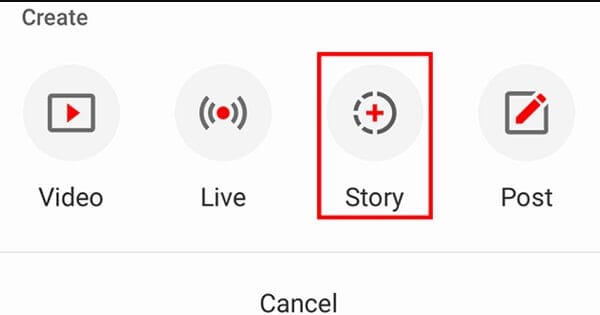
Lastly, posting the YouTube Shorts video is not enough, as you should also promote it to get more views. One of the best YouTube Shorts tips for promotion would be posting the snippet of the video as your Stories on YouTube.
You can also post your YouTube Shorts on other popular social media platforms like Facebook, Twitter, Reddit, WhatsApp, Instagram, etc. by sharing their link. In this way, you can easily redirect your audience from other platforms and increase the visibility of your video.
Bonus Tip: Use a Professional Editor for Your YouTube Shorts Videos
As you can see after going through these YouTube Shorts tricks that the native tool of the app has limited editing options. Therefore, if you want to come up with better videos, then consider using a professional tool like Wondershare Filmora.


The desktop video editing tool has hundreds of filters, transitions, captions, stickers, and other effects to elevate the overall visual appeal of your videos. You can also access numerous AI-integrated features in Filmora and can directly export your videos in YouTube-compatible formats.
Conclusion
That’s a wrap, everyone! I’m sure that after following these expert YouTube Shorts tips and tricks, you can make the most of this newly added YouTube feature. You can consider following the above-listed YouTube Shorts tips to record your videos and make them interesting by adding sound and caption effects.
Though, if you want to make your videos even more appealing, then consider using a reliable and smart video editor like Wondershare Filmora.
Shanoon Cox
Shanoon Cox is a writer and a lover of all things video.
Follow @Shanoon Cox
Shanoon Cox
Oct 26, 2023• Proven solutions
To make it easier for its audience to find crisp and entertaining content, YouTube has recently come up with a dedicated “Shorts” feature.
Ideally, any YouTube user can find the Shorts option on the app to watch interesting videos of 60 seconds or less. Though, it might take a lot of effort to make your YouTube Shorts videos appealing.
If you also want to go viral, then get to know about these YouTube Shorts tips that every content creator should follow.
YouTube Shorts Feature and Shorts Fund: Things to Know
Before we make you familiar with all kinds of YouTube Shorts tips and tricks, let’s cover some basics. Ideally, YouTube has recently come up with the Shorts feature to focus on short-length videos (and to rival Instagram Reels and TikTok).
You can now find the Shorts icon at the bottom panel on the YouTube app. Using it, you can watch or record short videos on YouTube easily. These are short-form clips of 60 seconds or less that you can create via the Shorts interface of the YouTube app.
The interface would let you record multiple videos at different intervals and add sound to your clips as well. Later, you can post these short clips on your channel to get more views on YouTube.
YouTube Shorts Fund
YouTube Shorts already hosts a massive number of more than 6 billion daily views as of now. To promote it, Google has come up with a YouTube Shorts Fund of $100M that would be rewarded to various content creators each month.
That is, a “Shorts Bonus” would be added to the account of content creators to appreciate their viral content.
Top 10 Tips for YouTube Shorts That You Must Follow
Now when we have covered all the basics, let’s get to know about some effective YouTube Shorts tricks that would help you come up with interesting content and get more audience for it.
Tip 1: Learn How to Shoot YouTube Shorts
Before you start posting videos on YouTube Shorts, you should know how the feature works. Ideally, you can find a dedicated option for Shorts from the bottom panel on the updated YouTube app. From here, you can watch Shorts or simply choose to create them as well.
You can give YouTube access to your smartphone camera before you start recording. To record anything, you can just tap and hold the red button (the recording icon) on the interface.
As you would release it, the recording would be stopped. In this way, you can seamlessly move from one scene to another without worrying about editing in post-production.
Tip 2: Stick to a Selective Niche
To have a consistent growth of audience on YouTube shorts, you should stick to a specific niche. If you search on YouTube, you can find short videos related to funny, inspirational, fitness, romantic, and all kinds of niches.
Most of the prominent content creators already apply these YouTube Shorts tips in which they first identify their target audience. Based on that, you can work on the type of content that you want to create and share to attain consistent growth on YouTube.
Tip 3: Add Appropriate Background Music to Your Short Videos
One of the best things about YouTube Shorts is that it lets us add a snippet of the music in the background, according to our content. Therefore, you must implement these tips for YouTube Shorts to make the most of this free feature of the app.
After recording your videos, you can tap on the “Sound” or the “Add Music” feature from the interface.
Now, YouTube will automatically load all kinds of trending music that you can use for free. If you want, you can enter the name of any song on the search option of YouTube shorts.
As you would select a track, it will automatically be loaded as the background music for your video. Though, you can also select a specific segment of the track and clip it accordingly to place it on your videos the way you like.
Tip 4: Insert Captions and Text Effects on Your Shorts
Apart from music, you can also add all kinds of text effects to make your YouTube Shorts videos appealing. After you have recorded a video, you can just tap on the text option from the bottom/side panel of the app.
You can now type anything and place it on the video to make it more interesting. If you want, you can also implement these YouTube Shorts tips to add subtitles or pre/post video captions without any hassle.
Tip 5: Adjust the Playback Speed of YouTube Shorts
Since a lot of content creators are coming up with YouTube Shorts, you would have to walk an extra mile to make them more appealing. In these YouTube Shorts tricks, I would recommend adjusting the playback speed of the video.
After recording the video, you can tap on the speed icon from the bottom/side panel. Here, you can make your videos play in slow motion or fast forward (in a range of 0.3x to 3x). This will add seamless speed control features to your videos without any technical issues.
Tip 6: Consider the Overall Length of Your Shorts Video
Even though the maximum length of the YouTube Shorts videos is 60 seconds, you don’t have to make it so long. If you look at most of the popular videos on YouTube Shorts, then you will find that they are of less than 30 seconds in length.
Remember, your goal is to come up with crisp and interesting content via YouTube Shorts. To implement these YouTube Shorts tips, you can consider the ideal length of 30-45 seconds and only have essential content in your videos.
Tip 7: Use the Timer Feature to Shoot Your Videos Correctly
A lot of people make the rookie mistake of shooting their videos for too long in Shorts. Therefore, if you want to implement these YouTube Shorts tips and tricks, then consider using the timer feature of the app.
Before shooting the video, you can tap on the timer button from the bottom and set up a preferred duration for it (like 10 or 15 seconds). In this way, you can be sure that you won’t go overboard and keep your videos short automatically.
Tip 8: Set a Preferred Target Audience for YouTube Shorts
Great! Now when you have recorded and edited your video by applying these tips for YouTube Shorts, you are ready to post them. While posting your videos, you would be asked whether the video is targeted at kids or not. If the video is made for kids, then you should select the relevant prompt, as YouTube would improve the overall visibility of your videos in this case.
Though, if your videos are targeted at adults, then you should go with the second option instead. This would help you reach out to your target audience on YouTube easily.
Tip 9: Post Your YouTube Shorts the Right Way
Apart from setting the audience preferences of your YouTube Shorts videos, you should also take care of a couple of other things. For instance, you can consider making the visibility of your final video “Public” so that anyone on YouTube can watch it.
Besides that, it is also recommended to have the keyword “#Shorts” in the title of the video. You can also make the title of the video attractive and can even add a short description that would make your audience click on your YouTube video for sure.
Tip 10: Promote Your YouTube Shorts Video on Other Places
Lastly, posting the YouTube Shorts video is not enough, as you should also promote it to get more views. One of the best YouTube Shorts tips for promotion would be posting the snippet of the video as your Stories on YouTube.
You can also post your YouTube Shorts on other popular social media platforms like Facebook, Twitter, Reddit, WhatsApp, Instagram, etc. by sharing their link. In this way, you can easily redirect your audience from other platforms and increase the visibility of your video.
Bonus Tip: Use a Professional Editor for Your YouTube Shorts Videos
As you can see after going through these YouTube Shorts tricks that the native tool of the app has limited editing options. Therefore, if you want to come up with better videos, then consider using a professional tool like Wondershare Filmora.
The desktop video editing tool has hundreds of filters, transitions, captions, stickers, and other effects to elevate the overall visual appeal of your videos. You can also access numerous AI-integrated features in Filmora and can directly export your videos in YouTube-compatible formats.
Conclusion
That’s a wrap, everyone! I’m sure that after following these expert YouTube Shorts tips and tricks, you can make the most of this newly added YouTube feature. You can consider following the above-listed YouTube Shorts tips to record your videos and make them interesting by adding sound and caption effects.
Though, if you want to make your videos even more appealing, then consider using a reliable and smart video editor like Wondershare Filmora.
Shanoon Cox
Shanoon Cox is a writer and a lover of all things video.
Follow @Shanoon Cox
DIY Guide: Screen Capture & Sound From YouTube
How to Record Audio from YouTube

Max Wales
Mar 27, 2024• Proven solutions
It happens several times when we are watching some videos on YouTube and the background music of the videos appeal us the most. We go online and start searching for that unknown but heart touching song. Unfortunately, the song is not available online. But it doesn’t mean that you cannot add that song to your playlist. The great news is that there are so many advanced audio recording software tools that allow users to record audios directly from YouTube videos.
Sometimes, we are interested to play our favorite music during a long hour journey, but the missing internet connectivity does not allow us to stream it online. In such a situation also, you can get your free music easily on your iPad, iPhone, or any handheld device and it can be later burnt into CD as well. Now you might be interested to know how all this can happen without the “Record Audio” button on YouTube. Don’t worry! Below we have highlighted three simple methods to do this task:
- Method 1: Capture Audio from YouTube with Online YouTube2MP3 Converter
- Method 2: Recording YouTube Audio with Audacity
- Method 3: Recording Sound with Streaming Audio Recorder
- Method 4: Record Audio with Filmora
Note: We resolutely oppose all forms of copyright-infringing downloads. This tutorial is only for downloading YouTube videos/audio materials from your own channel.
![]()

The All-in-One Screen Recorder & Video Editor
- Record desktop screen , voiceover, and webcam simultaneously
- Edit recorded clips quickly with a wide range of professional tools
- Built-in plentiful templates and effects
- Export to MP4, MOV, MKV, GIF and multiple formats
For Win 7 or later (64-bit)
For macOS 10.12 or later
 Secure Download
Method 1: Capture Audio from YouTube with Online YouTube2MP3 Converter
The simplest technique to record audio from YouTube videos is to use a trustworthy online application that can perform the conversion from video to MP3 file . In this article, I am going to show you how to capture audio from YouTube with the assist of a free online convert tool named YouTube to MP3. To do this, simply follow these simple steps:

- Visit the YouTube video page and copy the URL of the video whose audio you want to get in form of an MP3
- Go to the internet and open the online YouTube to MP3 converter tool.
- Paste your video URL in the text field available at the top of the website page.
- Choose your output file format as mp3.
- Hit the Convert conversion button.
- When the conversion is done, you will get a download button on the screen. Hit the Download button and soon your file will be saved to your device.
If you think using YouTube to MP3 Converter to capture audio from YouTube meets your needs, you can visit this online converter: youtubetomp3music.com . While, if you find need a better solution, then keep reading.
Method 2: Recording Sound from YouTube with Audacity
In case if you are interested to record yourself or want to capture just a small portion of the video’s sound, it is good to start with the Audacity program. Following simple steps will assist you to complete your recording process with this handy tool:
- First, download the Audacity program on your system. Note that it is available for free, so anyone can get it easily from the internet.
- Run the setup to begin the installation process and follow on-screen guidelines to finish the process.
- Open Audacity software on your system and from the top menu bar hit the Edit option and then go to Preferences.

- In the Device section of Preferences window, switch to the Recording section.
- Choose Stereo Mix option. In case if it is disabled by default, you may need to enable it first. To do this, go to the control panel of your computer, go to Hardware and Sound section and then switch to Sound section. Now go to Recording tab and right click with the mouse on the blank space of the screen. From the drop-down menu choose Show Disabled Devices option. You will find Stereo Mix Device option on the screen; right click on this device and hit Enable option.

- Hit Ok to save the new sound settings. After these settings, you will have to open the Audacity program again to work with Stereo Mix option.
- It is time to open your YouTube video and hit the record button. Make sure the connection is fast enough to play video without any interruption, otherwise keep it loaded in advance. Play the video and when done, hit the stop button on Audacity program.
- This file can be exported and saved to a device with the MP3 file format.
Method 3: Recording Sound with Streaming Audio Recorder
The third choice for recording YouTube audios is using Streaming Audio Recorder . The great news is that this software cannot only record audios for you rather at the same time it is loaded with advanced editor tool that allows easy cutting and splicing of sounds for the creation of customized videos. With Streaming Audio Recorder, you can also convert your videos into various file formats.
You will be happy to hear that this recorder is not just dedicated to YouTube platform only rather it can also work perfectly with Grooveshark, Jango, and Spotify. Below are few simple steps that you can use to complete the audio recording task with Streaming Audio Recorder:

- Go to the internet and download Streaming Audio Recorder. Install and open the program.
- Hit gear icon on the main interface and then move to settings. Set source of the audio input as System Sound.
- Start playing your desired YouTube video and on recorder, hit the record button instantly.
- As soon as the recording task is complete, hit the Stop button and your recorded audio will be soon saved to the targeted folder.
Recommended: Record Audio and Save to MP3 Format with Wondershare Filmora
You can also use Filmora to record your YouTube audio and then save the recorded audio or the video to MP3 format at exporting and then you can listen to the recorded audio and music even when there is no network connection.
With these advanced tools, the audio recording task becomes quite simple and easy. Even beginners can handle with without any trouble. If you are interested to capture your favorite tracks from online videos, it is right time to choose any of the above suitable methods and start recording your audio.
You can change the voice in audio , or add fade in and fade out effects, or edit the recorded audio file with more tools. The recorded media files can be further customized as well as shared on other social media platforms. It is a great idea for today’s creative young generation. These handy tools can make your audio recording task quite easier and resultant files can be saved in a variety of file formats for further sharing.
If you want to edit the record audio further, like adjust the audio pitch, remove background noise, mix the audio balance, equalize the audio, you can also try Filmora. It allows you to record the audio, webcam and desktop screen automatically . And it works on 64-bit Windows7/8/10, and Mac OS X 10.11 El Capitan and late.
Max Wales
Max Wales is a writer and a lover of all things video.
Follow @Max Wales
Max Wales
Mar 27, 2024• Proven solutions
It happens several times when we are watching some videos on YouTube and the background music of the videos appeal us the most. We go online and start searching for that unknown but heart touching song. Unfortunately, the song is not available online. But it doesn’t mean that you cannot add that song to your playlist. The great news is that there are so many advanced audio recording software tools that allow users to record audios directly from YouTube videos.
Sometimes, we are interested to play our favorite music during a long hour journey, but the missing internet connectivity does not allow us to stream it online. In such a situation also, you can get your free music easily on your iPad, iPhone, or any handheld device and it can be later burnt into CD as well. Now you might be interested to know how all this can happen without the “Record Audio” button on YouTube. Don’t worry! Below we have highlighted three simple methods to do this task:
- Method 1: Capture Audio from YouTube with Online YouTube2MP3 Converter
- Method 2: Recording YouTube Audio with Audacity
- Method 3: Recording Sound with Streaming Audio Recorder
- Method 4: Record Audio with Filmora
Note: We resolutely oppose all forms of copyright-infringing downloads. This tutorial is only for downloading YouTube videos/audio materials from your own channel.
![]()
The All-in-One Screen Recorder & Video Editor
- Record desktop screen , voiceover, and webcam simultaneously
- Edit recorded clips quickly with a wide range of professional tools
- Built-in plentiful templates and effects
- Export to MP4, MOV, MKV, GIF and multiple formats
For Win 7 or later (64-bit)
For macOS 10.12 or later
Secure Download
Method 1: Capture Audio from YouTube with Online YouTube2MP3 Converter
The simplest technique to record audio from YouTube videos is to use a trustworthy online application that can perform the conversion from video to MP3 file . In this article, I am going to show you how to capture audio from YouTube with the assist of a free online convert tool named YouTube to MP3. To do this, simply follow these simple steps:
- Visit the YouTube video page and copy the URL of the video whose audio you want to get in form of an MP3
- Go to the internet and open the online YouTube to MP3 converter tool.
- Paste your video URL in the text field available at the top of the website page.
- Choose your output file format as mp3.
- Hit the Convert conversion button.
- When the conversion is done, you will get a download button on the screen. Hit the Download button and soon your file will be saved to your device.
If you think using YouTube to MP3 Converter to capture audio from YouTube meets your needs, you can visit this online converter: youtubetomp3music.com . While, if you find need a better solution, then keep reading.
Method 2: Recording Sound from YouTube with Audacity
In case if you are interested to record yourself or want to capture just a small portion of the video’s sound, it is good to start with the Audacity program. Following simple steps will assist you to complete your recording process with this handy tool:
- First, download the Audacity program on your system. Note that it is available for free, so anyone can get it easily from the internet.
- Run the setup to begin the installation process and follow on-screen guidelines to finish the process.
- Open Audacity software on your system and from the top menu bar hit the Edit option and then go to Preferences.
- In the Device section of Preferences window, switch to the Recording section.
- Choose Stereo Mix option. In case if it is disabled by default, you may need to enable it first. To do this, go to the control panel of your computer, go to Hardware and Sound section and then switch to Sound section. Now go to Recording tab and right click with the mouse on the blank space of the screen. From the drop-down menu choose Show Disabled Devices option. You will find Stereo Mix Device option on the screen; right click on this device and hit Enable option.
- Hit Ok to save the new sound settings. After these settings, you will have to open the Audacity program again to work with Stereo Mix option.
- It is time to open your YouTube video and hit the record button. Make sure the connection is fast enough to play video without any interruption, otherwise keep it loaded in advance. Play the video and when done, hit the stop button on Audacity program.
- This file can be exported and saved to a device with the MP3 file format.
Method 3: Recording Sound with Streaming Audio Recorder
The third choice for recording YouTube audios is using Streaming Audio Recorder . The great news is that this software cannot only record audios for you rather at the same time it is loaded with advanced editor tool that allows easy cutting and splicing of sounds for the creation of customized videos. With Streaming Audio Recorder, you can also convert your videos into various file formats.
You will be happy to hear that this recorder is not just dedicated to YouTube platform only rather it can also work perfectly with Grooveshark, Jango, and Spotify. Below are few simple steps that you can use to complete the audio recording task with Streaming Audio Recorder:
- Go to the internet and download Streaming Audio Recorder. Install and open the program.
- Hit gear icon on the main interface and then move to settings. Set source of the audio input as System Sound.
- Start playing your desired YouTube video and on recorder, hit the record button instantly.
- As soon as the recording task is complete, hit the Stop button and your recorded audio will be soon saved to the targeted folder.
Recommended: Record Audio and Save to MP3 Format with Wondershare Filmora
You can also use Filmora to record your YouTube audio and then save the recorded audio or the video to MP3 format at exporting and then you can listen to the recorded audio and music even when there is no network connection.
With these advanced tools, the audio recording task becomes quite simple and easy. Even beginners can handle with without any trouble. If you are interested to capture your favorite tracks from online videos, it is right time to choose any of the above suitable methods and start recording your audio.
You can change the voice in audio , or add fade in and fade out effects, or edit the recorded audio file with more tools. The recorded media files can be further customized as well as shared on other social media platforms. It is a great idea for today’s creative young generation. These handy tools can make your audio recording task quite easier and resultant files can be saved in a variety of file formats for further sharing.
If you want to edit the record audio further, like adjust the audio pitch, remove background noise, mix the audio balance, equalize the audio, you can also try Filmora. It allows you to record the audio, webcam and desktop screen automatically . And it works on 64-bit Windows7/8/10, and Mac OS X 10.11 El Capitan and late.
Max Wales
Max Wales is a writer and a lover of all things video.
Follow @Max Wales
Also read:
- [Updated] Achieving Success in Your YouTube Endeavours A Step-by-Step Blueprint
- [Updated] Best Practices for YouTube Video Marketing
- 2024 Approved Download YouTube Tunes with These 10+ No-Cost Audio Crackers
- Building Successful YouTube Collaborations Step by Step
- [New] 1K Fans on YT Your Strategic Playbook for Success
- Channel Hunt Best Historical YouTubes That Every Student Should Watch
- 2024 Approved Academic Journey Across Time Top 10 History YouTubers
- 2024 Approved Earnings Expedition Navigating Your Way to Wealth with YouTube Mobile Content
- 2024 Approved Digital Arena 100+ Titles for the True Gamer
- Explore 11 Budget-Friendly Title Generators for YT
- From Script to Screen Methods of Inserting Dialogue Into Online Videos
- 2024 Approved Discover the Best 3 Platforms for Video Consumption (Post-YouTube)
- Break Free From Linearity Mastering Jump Cut Transitions
- [Updated] Ascend in the YouTube Arena Through Creative Studio Mastery
- 2024 Approved Effortless Spotify-to-YouTube Playlist Conversion 5 Must-Have Apps
- [New] Angular Adjustments on YouTube Videos - The Ultimate 2023 Guide
- Effortless Video Submission From iPhone/iPad for YouTubers for 2024
- Top 7 Best Fmovie Alternatieves
- In 2024, 10 Power Players YouTube's Ladies in Gaming
- Enlightenment Streams Foremost Ed Resources Online
- Enhance and Clean Up YouTube Footage Borderless Tutorial for 2024
- Accurate Chart Watcher Master Your Video Rankings for 2024
- [New] Enhance Youtubes' Conversations with Emojis
- Does Immediate Subscribing Affect Content Recommendations?
- Behind the Scenes of Online Content Monetization
- [Updated] Captivating Audiences with Cross-Platform Multistreaming on Youtube and Twitch
- [Updated] Deep Dive The Economy and Impact of Online Stars
- The Most Essential 5 Earbuds for Gaming
- Streaming Success Starts Here Your Channel Gear Guide
- In 2024, Easy Steps to Extract and Save Your YouTube Watch Lists
- [Updated] Enhancing Visual Appeal YouTube Images in Presentations
- In 2024, Boosting Income with Effective Youtube Short Strategies
- Wow-Tastic Editing YouTube Edition of Greatest Magic Tricks!
- Conquer Profits On-the-Go YouTube Studio Monetization Explained for 2024
- In 2024, Enhancing Content Strategy with Targeted Tagging
- [Updated] 7 Comedy YouTube Video Ideas That Only Funny People Are Allowed to Try
- 2024 Approved Directing Fundamentals A Comprehensive Online Course by YouTube Experts
- Diverse Vlogging Content Suggestions
- [New] Digital Dream Teams 8 YouTube's Growth Phenoms
- In 2024, Best Practices in YouTube Keyword Selection
- Uploading Made Simple The Essential Guide for iOS Devices and YouTube
- Instagram Story Hacks Your Path to Prominence
- In 2024, Fake Android Location without Rooting For Your OnePlus 12R | Dr.fone
- Stepwise Guide to Optimal Zoom Audio Recording
- [New] 2024 Approved Bravest Battles & Bold Journeys – Top 10 Adventure Games
- Updated In 2024, Essential Tips for Shooting Talking Head Videos
- Tutorial to Change Nokia C110 IMEI without Root A Comprehensive Guide
- [New] Mastering Massive IGTV Audience Engagement Essential Steps
- [Updated] 10 Webcam Covers That Keep You Safe Online for 2024
- New 11 Exceptional Free Music Recording Programs for Beginners and Pros
- Simplified Approach to Decoding Facebook Statistics for 2024
- In 2024, Mastering Quick Profile Retrieval on Facebook
- New Cartoon Video Creation Made Easy Top 10 Online and PC Options for 2024
- Looking For A Location Changer On Samsung Galaxy S23 Tactical Edition? Look No Further | Dr.fone
- Updated The Editors Path to Perfection Techniques for Removing Ambient Noise From Your Project
- Updated In 2024, HarmonySoft Masterclass Exploring the Intricacies of AVS Editing Features, Customer Testimonials & Similar Products
- Reaping the Benefits of HDR for Professional Videoists
- [Updated] In 2024, Downloading Facebook GIFs PC, Android & iOS Guide
- In 2024, Did Your iPhone 11 Passcode Change Itself? Unlock It Now
- 2024 Approved Top 5 Online Video Converter for Instagram
- How to share/fake gps on Uber for Poco C55 | Dr.fone
- In 2024, How Can Motorola Edge 40 NeoMirror Share to PC? | Dr.fone
- [New] Top 8 Free Video Calling Applications Recommended for Businesses
- In 2024, Guide to Mirror Your Nokia G310 to Other Android devices | Dr.fone
- [New] The Complete Playbook for Instagram Revenue Generation for 2024
- [New] Midgard Alliance The Ragnarök Saga Begins
- In 2024, The Easy Way to Remove an Apple ID from Your MacBook For your Apple iPhone 12 mini
- Mastering the Art of Screen Sharing in Zoom
- In 2024, How to Animate Image on Scroll
- New The Quiet Zone Mastering the Craft of Muting Unwanted Web-Based Sounds
- [Updated] Unlocking Network Growth Share IGTV Videos & FB for 2024
- New How to Create Glowing Edge Effect in TikTok Dancing Video
- Title: "Maximizing Engagement 10 Tips for Stellar YT Shorts Content"
- Author: Steven
- Created at : 2024-05-25 19:53:53
- Updated at : 2024-05-26 19:53:53
- Link: https://youtube-clips.techidaily.com/maximizing-engagement-10-tips-for-stellar-yt-shorts-content/
- License: This work is licensed under CC BY-NC-SA 4.0.
