
:max_bytes(150000):strip_icc()/how-to-set-up-and-use-the-nintendo-online-family-plan-featured-3b6c415d14f34e37a972e3800dc94c7d.jpg)
Mastery in Making Compelling YouTube Videos for Brands
Mastery in Making Compelling YouTube Videos for Brands
While there are a lot of ways you could advertise your business online, YouTube video ads are quickly becoming the most popular advertising solution. This is because more and more people choose to watch videos than any other form of video.
But to make sure that you are putting your best foot forward when it comes to video ads, you need to invest in a YouTube ad creator that is easy to use and effective. Here, we will be looking at the best YouTube video creators that you can use.
Why Use YouTube Video Ads
Before we look at some of the tools you can use to create YouTube video ads, it is important to mention some of the reasons why you may want to choose YouTube ads over other solutions. YouTube ads when compared to PPC are relatively cheaper and you also choose how much you are willing to pay when a user clicks on the ads. This makes it unlikely that you could spend more than you intended to.
YouTube ads are also more targeted than any other form of advertising. You have a lot of options when choosing who you want to target including metrics such as demographics, topics, similar audiences, customer matches, life events, and more.
Since the ad is a video, it generates far more engagement than a text ad on any other platform. Even though it is an ad, the video is still a great way for your brand to connect with potential audiences.
Types of Video Ads for YouTube
The following are the different types of YouTube ads that you can create;
**Video Discovery
Video discover ads appear on the search page results and are usually composed of a thumbnail image and a few lines of text. They also have a very recognizable “Ad” in the box to let all users know that this is sponsored content.
**In-Stream Ads
In-stream video ads can be skippable or non-skippable. Skippable in-stream video ads will often play for a minimum of 5 seconds before allowing the user to skip to the video content. Non-skippable in-stream video ads do not have the “skip” button and the user has to watch the video to the end.
**Pre-roll Ads
A pre-roll ad is just an in-stream ad that is not skippable. It doesn’t give the user the option of skipping the app and they have to watch the entire ad before they can watch the video. The pre-roll video ad is usually 15 to 60 seconds long.
**Bumper Ads
Bumper ads are tiny non-skippable 6-second ads that will play right before the video content loads. They can be an ideal way to promote an event or a new brand. Since they are only 6 seconds long, they can be very easy to make.
Best YouTube Ad Creators
The following are the best YouTube ad creators that you can use to make your YouTube video ad;
Filmora
Best For: All Types of YouTube Video ads
Price: Free Trial Available with plans starting from $54.99 a year.
Rating: 4.8/5
Wondershare Filmora is one of the best video creation software in the market and therefore can be very useful when creating YouTube video ads of any kind. It has powerful features that can benefit both beginner and professional users, allowing users to create stunning videos of any length.
For Win 7 or later (64-bit)
For macOS 10.12 or later
It comes with a library of more than 300 templates, filters, overlays, and numerous other effects that you can use to create your video. You can even add audio and music to the video to make your ad stand out more.
Animoto
Best For: All Types of YouTube Video Ads
Price: A free plan is available with paid plans starting from $15 a month
User Rating: 4.3/5

Animoto is another great solution that you can use to create YouTube ads of all kinds and publish them directly on the video-sharing platform. It has a very simple drag-and-drop operation that can allow you to create your YouTube video ad in just a few minutes.
It offers you a lot of resources that you can use to create the video including a huge library of up to one million photos and video clips as well as licensed audio tracks that you can use freely. This is on top of the numerous effects that you can use to make your video ad stand out more.
Promo.com
Best For: All Types of YouTube Video Ads
Price: Free plan is available with paid plans starting at $39 a month
User Rating: 4.4/5

Promo.com is another great solution that you can use to create YouTube video ads to give your brand the upper hand. It simplifies the video creation process by providing you with pre-made templates that you can add elements to create the video. You also get a library of music, photos, and video clips that you can choose to add to the video.
It also allows you to publish the video directly on social media apps. Since it doesn’t limit the size of the video that you can create, it is also an ideal solution for creating other types of videos.
Biteable
Best For: All Types of YouTube Ads
Price: Free Plan is available with paid plans starting at $19 a month
User Rating: 4.3/5

Biteable is also a great choice when you want to create YouTube ad videos. It is a professional solution that gives you a lot of options when it comes to video creation with a rich resource of over 1.8 million photos, clips, and pre-made animations to choose from.
The videos that you create with Biteable are of very high resolution and you have unlimited exports so you can use the same video over and over again. It also doesn’t limit the size or length of the video that you can create making it an ideal solution to create all types of videos.
InVideo
Best For: All Types of YouTube Ads
Price: Free plan is available with paid plans from $10 a month
User Rating: 4.7/5

This is an online solution that is very easy to use and that creates stunning videos. The interface allows you to upload your images, video clips, and audio and then use one of the many templates to create the video. The templates are also customizable, giving you additional options to customize your video in many ways.
InVideo allows you to upload the video that you create directly to social media platforms. It also has a very large library of resources that you can use to create the video including more than 3000 professionally made templates and more than a million premium photos and videos to choose from.
Adobe Spark
Best For: All Types of YouTube Ad Videos
Price: Free Plan available with paid plans starting at $9.99 a month
User Rating: 4.5/5

If you are looking for a solution that will allow you to make unique and very high-quality video ads, then Adobe Spark is a great choice. It has a ton of resources that you can use to make your video ad stand out including multiple themes, layouts, storyboards, and unique fonts.
You also have access to thousands of free images to spice up your creation and exclusive templates that you will not find anywhere else. But like most Adobe software, it can be hard to get started with Adobe Spark, especially for beginner users.
Animaker
Best For: All Types of YouTube Ad videos
Price: It doesn’t offer a free plan. Paid plans start at $10 per month.
User Rating: 4.6/5

Animaker is a professional video editing tool that can create very high-quality and unique videos. It is also one of the only tools that you can use to add subtitles to a video. You get to choose from a lot of professionally made templates and choose from a large library of images and videos to add to your project.
It also allows you to add audio to the video in the form of voiceover or music. You can also use the live editing feature to make changes to a video that is already uploaded to YouTube.
Powtoon
Best For: Animated YouTube Ads
Price: It doesn’t offer a free plan. Paid plans start at $20 a month
User Rating: 4/5

Powtoon is a great solution when the YouTube ad video that you want to create is an animated video. It has numerous features designed to help you create the most interactive animated videos. You have a lot of resources to choose from including various animation styles, whiteboards, and infographics.
It also has a very large library of templates, videos, images, and audio to choose from. But Powtoon doesn’t offer a free plan and hence there is no way for you to test its function before purchasing it.
Magisto
Best For: All Types of YouTube Ads
Price: It doesn’t offer a free plan. Paid plans start at $34.99 a month
User Rating: 4.4/5

Magisto is an online video editing tool that you can use to create video ads very quickly. It is completely deployed on the cloud which means that you don’t have to download any software on your computer. The user interface is very easy to use, allowing users to create professional-quality videos in a matter of minutes.
If you are using it to create longer videos, you can edit the scenes of the video individually and add as many effects as are relevant to your project. It can also be used to create and edit videos on Android and iOS devices.
Creatopy
Best For: All Types of YouTube Ads
Price: A free plan is available. Paid plans start at $17 a month
User Rating: 4.3/5

Creatopy is a simple to use and highly effective video editor that can come in handy when creating YouTube video ads. It offers you the chance to create videos of any size, making it an ideal choice not just for video ads but all types of video ads.
You can upload your images and audio files to add to the video project, or you can choose from the built-in library. Then you can use one or more of the many effects to add the finishing touch.
Tips for Creating YouTube Ads
The following are just some tips to help you create effective and profitable YouTube Video ads;
- Choose the type of ad you would like to create wisely. Learn the different types of YouTube ads and select one based on your brand, advertising budget, and projected reach.
- Use the YouTube targeting options to give your ads the best chance at success. Ensure that you are choosing the right targets to avoid spending money on targets that will not engage with your ad.
- You may also want to use your videos in a remarketing campaign. Remarketing targets the same audience that you targeted before, increasing your chances of getting more engagement.
- When creating the ad, ensure that the content in the ad is compelling and feels natural. Even though the audience will be watching sponsored content it should feel just like any other video.
- You can also drive more engagement by adding interactive elements to the video. These can be calls-to-action, auto-end screens, and cards to showcase your products.
Related FAQs About YouTube Ads
**How do you create a YouTube Ad?
You can easily create a YouTube ad using one of the video editing tools that we have outlined above. Choose the type of YouTube video ad you want to create as it will inform the length of the video you will create.
**Is it Free to Make YouTube Ads?
It can be free. If you choose to use a free video editor, you can create a YouTube ad for free. But you should know that you will still have to pay for YouTube to serve the ad.
**What is a YouTube Ad Specialist?
A YouTube Ads Specialist is a professional who is responsible for creating a YouTube ads strategy and implementing the strategy by creating the YouTube video ads.
**Can I Put My Ads on YouTube?
Yes. YouTube allows you to run your ads and even choose the placement of the ads and target the audiences you want YouTube to serve the ads to.
YouTube video ads can be a great way to reach as many people as you can with your products and services. Now you have several options that you can use to create the ads.
For macOS 10.12 or later
It comes with a library of more than 300 templates, filters, overlays, and numerous other effects that you can use to create your video. You can even add audio and music to the video to make your ad stand out more.
Animoto
Best For: All Types of YouTube Video Ads
Price: A free plan is available with paid plans starting from $15 a month
User Rating: 4.3/5
Animoto is another great solution that you can use to create YouTube ads of all kinds and publish them directly on the video-sharing platform. It has a very simple drag-and-drop operation that can allow you to create your YouTube video ad in just a few minutes.
It offers you a lot of resources that you can use to create the video including a huge library of up to one million photos and video clips as well as licensed audio tracks that you can use freely. This is on top of the numerous effects that you can use to make your video ad stand out more.
Promo.com
Best For: All Types of YouTube Video Ads
Price: Free plan is available with paid plans starting at $39 a month
User Rating: 4.4/5
Promo.com is another great solution that you can use to create YouTube video ads to give your brand the upper hand. It simplifies the video creation process by providing you with pre-made templates that you can add elements to create the video. You also get a library of music, photos, and video clips that you can choose to add to the video.
It also allows you to publish the video directly on social media apps. Since it doesn’t limit the size of the video that you can create, it is also an ideal solution for creating other types of videos.
Biteable
Best For: All Types of YouTube Ads
Price: Free Plan is available with paid plans starting at $19 a month
User Rating: 4.3/5
Biteable is also a great choice when you want to create YouTube ad videos. It is a professional solution that gives you a lot of options when it comes to video creation with a rich resource of over 1.8 million photos, clips, and pre-made animations to choose from.
The videos that you create with Biteable are of very high resolution and you have unlimited exports so you can use the same video over and over again. It also doesn’t limit the size or length of the video that you can create making it an ideal solution to create all types of videos.
InVideo
Best For: All Types of YouTube Ads
Price: Free plan is available with paid plans from $10 a month
User Rating: 4.7/5
This is an online solution that is very easy to use and that creates stunning videos. The interface allows you to upload your images, video clips, and audio and then use one of the many templates to create the video. The templates are also customizable, giving you additional options to customize your video in many ways.
InVideo allows you to upload the video that you create directly to social media platforms. It also has a very large library of resources that you can use to create the video including more than 3000 professionally made templates and more than a million premium photos and videos to choose from.
Adobe Spark
Best For: All Types of YouTube Ad Videos
Price: Free Plan available with paid plans starting at $9.99 a month
User Rating: 4.5/5
If you are looking for a solution that will allow you to make unique and very high-quality video ads, then Adobe Spark is a great choice. It has a ton of resources that you can use to make your video ad stand out including multiple themes, layouts, storyboards, and unique fonts.
You also have access to thousands of free images to spice up your creation and exclusive templates that you will not find anywhere else. But like most Adobe software, it can be hard to get started with Adobe Spark, especially for beginner users.
Animaker
Best For: All Types of YouTube Ad videos
Price: It doesn’t offer a free plan. Paid plans start at $10 per month.
User Rating: 4.6/5
Animaker is a professional video editing tool that can create very high-quality and unique videos. It is also one of the only tools that you can use to add subtitles to a video. You get to choose from a lot of professionally made templates and choose from a large library of images and videos to add to your project.
It also allows you to add audio to the video in the form of voiceover or music. You can also use the live editing feature to make changes to a video that is already uploaded to YouTube.
Powtoon
Best For: Animated YouTube Ads
Price: It doesn’t offer a free plan. Paid plans start at $20 a month
User Rating: 4/5
Powtoon is a great solution when the YouTube ad video that you want to create is an animated video. It has numerous features designed to help you create the most interactive animated videos. You have a lot of resources to choose from including various animation styles, whiteboards, and infographics.
It also has a very large library of templates, videos, images, and audio to choose from. But Powtoon doesn’t offer a free plan and hence there is no way for you to test its function before purchasing it.
Magisto
Best For: All Types of YouTube Ads
Price: It doesn’t offer a free plan. Paid plans start at $34.99 a month
User Rating: 4.4/5
Magisto is an online video editing tool that you can use to create video ads very quickly. It is completely deployed on the cloud which means that you don’t have to download any software on your computer. The user interface is very easy to use, allowing users to create professional-quality videos in a matter of minutes.
If you are using it to create longer videos, you can edit the scenes of the video individually and add as many effects as are relevant to your project. It can also be used to create and edit videos on Android and iOS devices.
Creatopy
Best For: All Types of YouTube Ads
Price: A free plan is available. Paid plans start at $17 a month
User Rating: 4.3/5
Creatopy is a simple to use and highly effective video editor that can come in handy when creating YouTube video ads. It offers you the chance to create videos of any size, making it an ideal choice not just for video ads but all types of video ads.
You can upload your images and audio files to add to the video project, or you can choose from the built-in library. Then you can use one or more of the many effects to add the finishing touch.
Tips for Creating YouTube Ads
The following are just some tips to help you create effective and profitable YouTube Video ads;
- Choose the type of ad you would like to create wisely. Learn the different types of YouTube ads and select one based on your brand, advertising budget, and projected reach.
- Use the YouTube targeting options to give your ads the best chance at success. Ensure that you are choosing the right targets to avoid spending money on targets that will not engage with your ad.
- You may also want to use your videos in a remarketing campaign. Remarketing targets the same audience that you targeted before, increasing your chances of getting more engagement.
- When creating the ad, ensure that the content in the ad is compelling and feels natural. Even though the audience will be watching sponsored content it should feel just like any other video.
- You can also drive more engagement by adding interactive elements to the video. These can be calls-to-action, auto-end screens, and cards to showcase your products.
Related FAQs About YouTube Ads
**How do you create a YouTube Ad?
You can easily create a YouTube ad using one of the video editing tools that we have outlined above. Choose the type of YouTube video ad you want to create as it will inform the length of the video you will create.
**Is it Free to Make YouTube Ads?
It can be free. If you choose to use a free video editor, you can create a YouTube ad for free. But you should know that you will still have to pay for YouTube to serve the ad.
**What is a YouTube Ad Specialist?
A YouTube Ads Specialist is a professional who is responsible for creating a YouTube ads strategy and implementing the strategy by creating the YouTube video ads.
**Can I Put My Ads on YouTube?
Yes. YouTube allows you to run your ads and even choose the placement of the ads and target the audiences you want YouTube to serve the ads to.
YouTube video ads can be a great way to reach as many people as you can with your products and services. Now you have several options that you can use to create the ads.
Crafting Animation: Dynamic, Bouncy Text Techniques
How to Create Animated Bouncing Text

Liza Brown
Mar 27, 2024• Proven solutions
Earlier, you learned how to have a bounce text effect in Adobe After Effects . However, because AE is a complex application and has a steep learning curve, this section explains the two alternative ways to get the same effect on your existing video footage.
Method 1: How to Create Bouncing Text in Filmora Video Editor?
When talking about Wondershare Filmora , the application is populated with several presets for texts and titles, animations, effects, filters, and much more.
These pre-built templates not only make your task easier, they also save your decent amount of time that you would spend while working with After Effects or any other similar app that requires you to build things from scratch.
You can follow the instructions given below to add animated bounce text to any of your video footages with Filmora:
Step 1: Add a Footage to Timeline
Launch Wondershare Filmora on your Windows or Mac PC. By default, the aspect ratio of the project is set to 16:9. Click anywhere inside the Media window at the upper-left section, and select and import footage you want to add bounce text to.
Step 2: Insert Text and Add Bounce Effect
Click Titles from the standard toolbar at the top, and click and drag your preferred title template from the Library to the timeline. In case you don’t want any specific animation or style on the title, you can use the default title.
In the timeline, double-click the title you just added, use the upper-left section to edit the text, go to the Animation tab from the left pane, scroll down the list, and double-click the Up Down 1 or Up Down 2 preset to apply the bounce effect to the credits. Click OK to save the changes and to get back to the main window.

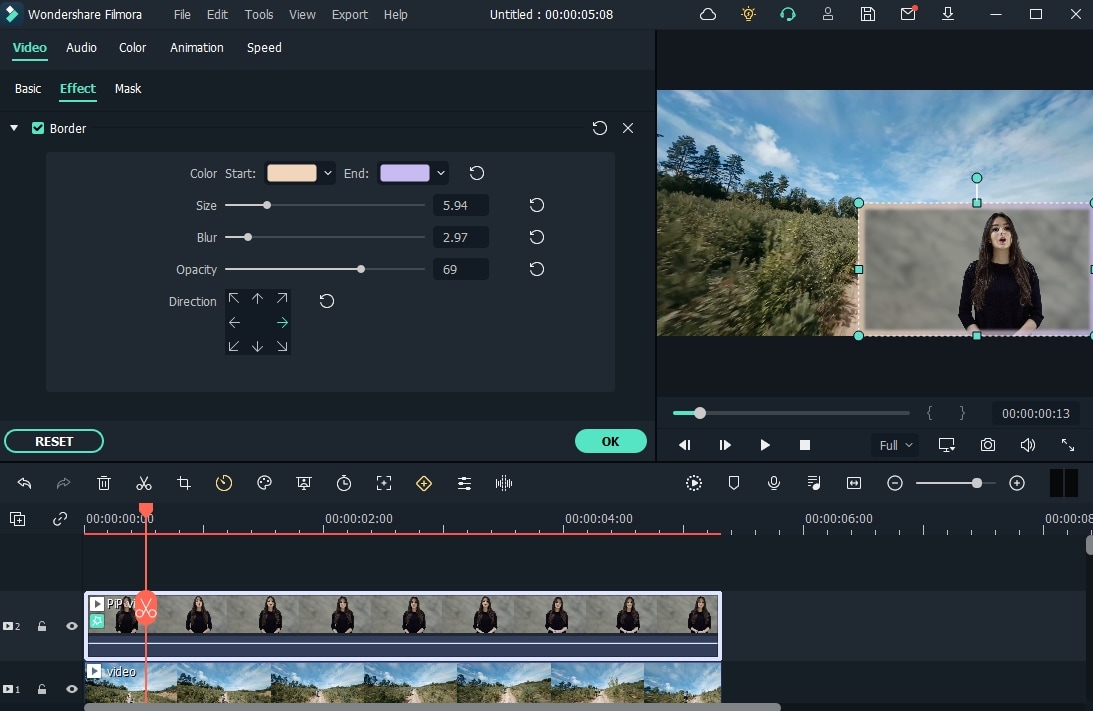
Step 3: Add Shake Filters
Go to Effects from the standard toolbar, expand the Filters category from the left pane, and click Shake. From the Library window, click and drag your preferred shake filter to the timeline. Here, I will choose Mild.

You can customize the default effect by double-clicking the shake filter in the timeline, using the sliders in the upper-left area of the interface to make necessary adjustments, and then clicking OK to save the changes and to get back to the previous interface.

Step 4: Export the Final Output
Click EXPORT from the top of the interface, go to the Local tab in the Export box, choose your preferred output format from the list in the left, make required customizations from the right pane, and click EXPORT from the bottom-right corner to export the video.

Now, you can add the bouncing text video and the background video to the timeline, and then place the bouncing text video above the background video track.
Double click the text track, go to the Chroma Key effect, select the Color Picker tool, and click anywhere in the Preview window to get things right. Finally, export the entire project to your preferred output format as explained in Step 4.
As explained before, Wondeshare Filmora makes the entire process of creating and adding bounce text effect pretty simple. With all the pre-build templates, and the versatility of the options that can be used to customize those presets, you can come up with the effects that are usually obtained when you start generating them from the scratch.


Method 2: Generate Animated Bouncing Texts Online
If you don’t want any heavy and resource-intensive app on your PC merely for some special text effects, you can try any of the online solutions instead. The benefit of using any such web app is that all the processing is done on site’s server, and it is only a web browser and an Internet connection that you need to have at your side.
Some most trusted websites to generate bounce text are listed below:
1. ENGFTO
Website: https://engfto.com/index/create%5Fanimated%5Fbouncing%5Ftext/0-26

You can follow the instructions given below to use Engfto to generate bouncing text for your footages:
Step 1: Get to the Animated Bouncing Text Page
Launch your favorite web browser, and go to the link given above to get to the Engfto’s animated bouncing text page.
Step 2: Customize Text and Preferences
Modify the values in the fields under the SIZE AREA and TEXT sections to customize the text area, the text itself, its size, and font. Next, adjust the values in the fields under the EFFECT PARAMETERS section to get the required bounce effect. Also, use the fields under the BACKGROUND section to either change the background color, or pick a background image from your PC.
Step 3: Obtain the Animated Text
Click the SAVE GIF ANIMATION button from the lower section of the page to download the animated text to your PC.
2. Loading.io
The instructions given below explain how to use Loading.io to get animated bounce text effect for your footages:
Step 1: Get to the Loading.io Webpage
Launch your favorite web browser and go to https://loading.io/animation/text/ .
Step 2: Customize the Text and Choose Animation Effect

Use the options available on the webpage to type your text, and change its font, color, background, transparency level etc. Select Bounce (or any of its variants) from the Animation drop-down list, and adjust the speed using the Speed slider.
Step 3: Obtain the Text
Click your preferred option from next to the Download As section to download the animated text to your PC.
Note: Regardless of the web solution you choose to generate and obtain animated bounce text, you will still need a post-production tool to add the downloaded text to your footage.
Conclusion
Generating bounce text effect is much simpler when you use Wondershare Filmora or any of the online solutions as explained in Method 2. While the former gives you more flexibility when it comes to customizations, the latter doesn’t require any app to be installed on your PC. In addition, many times the web apps offer their services for free, and therefore they are preferred by the novice users who are not much into post-production processes.
Liza Brown
Liza Brown is a writer and a lover of all things video.
Follow @Liza Brown
Liza Brown
Mar 27, 2024• Proven solutions
Earlier, you learned how to have a bounce text effect in Adobe After Effects . However, because AE is a complex application and has a steep learning curve, this section explains the two alternative ways to get the same effect on your existing video footage.
Method 1: How to Create Bouncing Text in Filmora Video Editor?
When talking about Wondershare Filmora , the application is populated with several presets for texts and titles, animations, effects, filters, and much more.
These pre-built templates not only make your task easier, they also save your decent amount of time that you would spend while working with After Effects or any other similar app that requires you to build things from scratch.
You can follow the instructions given below to add animated bounce text to any of your video footages with Filmora:
Step 1: Add a Footage to Timeline
Launch Wondershare Filmora on your Windows or Mac PC. By default, the aspect ratio of the project is set to 16:9. Click anywhere inside the Media window at the upper-left section, and select and import footage you want to add bounce text to.
Step 2: Insert Text and Add Bounce Effect
Click Titles from the standard toolbar at the top, and click and drag your preferred title template from the Library to the timeline. In case you don’t want any specific animation or style on the title, you can use the default title.
In the timeline, double-click the title you just added, use the upper-left section to edit the text, go to the Animation tab from the left pane, scroll down the list, and double-click the Up Down 1 or Up Down 2 preset to apply the bounce effect to the credits. Click OK to save the changes and to get back to the main window.
Step 3: Add Shake Filters
Go to Effects from the standard toolbar, expand the Filters category from the left pane, and click Shake. From the Library window, click and drag your preferred shake filter to the timeline. Here, I will choose Mild.
You can customize the default effect by double-clicking the shake filter in the timeline, using the sliders in the upper-left area of the interface to make necessary adjustments, and then clicking OK to save the changes and to get back to the previous interface.
Step 4: Export the Final Output
Click EXPORT from the top of the interface, go to the Local tab in the Export box, choose your preferred output format from the list in the left, make required customizations from the right pane, and click EXPORT from the bottom-right corner to export the video.
Now, you can add the bouncing text video and the background video to the timeline, and then place the bouncing text video above the background video track.
Double click the text track, go to the Chroma Key effect, select the Color Picker tool, and click anywhere in the Preview window to get things right. Finally, export the entire project to your preferred output format as explained in Step 4.
As explained before, Wondeshare Filmora makes the entire process of creating and adding bounce text effect pretty simple. With all the pre-build templates, and the versatility of the options that can be used to customize those presets, you can come up with the effects that are usually obtained when you start generating them from the scratch.
Method 2: Generate Animated Bouncing Texts Online
If you don’t want any heavy and resource-intensive app on your PC merely for some special text effects, you can try any of the online solutions instead. The benefit of using any such web app is that all the processing is done on site’s server, and it is only a web browser and an Internet connection that you need to have at your side.
Some most trusted websites to generate bounce text are listed below:
1. ENGFTO
Website: https://engfto.com/index/create%5Fanimated%5Fbouncing%5Ftext/0-26
You can follow the instructions given below to use Engfto to generate bouncing text for your footages:
Step 1: Get to the Animated Bouncing Text Page
Launch your favorite web browser, and go to the link given above to get to the Engfto’s animated bouncing text page.
Step 2: Customize Text and Preferences
Modify the values in the fields under the SIZE AREA and TEXT sections to customize the text area, the text itself, its size, and font. Next, adjust the values in the fields under the EFFECT PARAMETERS section to get the required bounce effect. Also, use the fields under the BACKGROUND section to either change the background color, or pick a background image from your PC.
Step 3: Obtain the Animated Text
Click the SAVE GIF ANIMATION button from the lower section of the page to download the animated text to your PC.
2. Loading.io
The instructions given below explain how to use Loading.io to get animated bounce text effect for your footages:
Step 1: Get to the Loading.io Webpage
Launch your favorite web browser and go to https://loading.io/animation/text/ .
Step 2: Customize the Text and Choose Animation Effect
Use the options available on the webpage to type your text, and change its font, color, background, transparency level etc. Select Bounce (or any of its variants) from the Animation drop-down list, and adjust the speed using the Speed slider.
Step 3: Obtain the Text
Click your preferred option from next to the Download As section to download the animated text to your PC.
Note: Regardless of the web solution you choose to generate and obtain animated bounce text, you will still need a post-production tool to add the downloaded text to your footage.
Conclusion
Generating bounce text effect is much simpler when you use Wondershare Filmora or any of the online solutions as explained in Method 2. While the former gives you more flexibility when it comes to customizations, the latter doesn’t require any app to be installed on your PC. In addition, many times the web apps offer their services for free, and therefore they are preferred by the novice users who are not much into post-production processes.
Liza Brown
Liza Brown is a writer and a lover of all things video.
Follow @Liza Brown
Also read:
- 2024 Approved Comparative Content Crusade Analyzing Your Videos Against Others'
- Optimize Video Audio Discovering Affordable WAV Extraction Methods
- The Secret Sauce to Outstanding Online Identity Creation
- Does Investing in Video Growth Pay Off on YT?
- The Economic Sphere of the Philanthropic Mr. Beast
- [New] Creating Engaging YouTube Trailers in Filmora
- [New] Accelerated Conversion of YT Content for MAC Screens
- Decoding Shorts Into Professional-Grade MP4 Videos for 2024
- 2024 Approved A Beginner’s Pathway Building a Simple YouTube Signup
- [New] Demystifying YouTube's Video Editing Power
- Transform Your Short-Form Video Content - Top Strategies Revealed
- Edit with Ease Prime 10 Converters Unveiled for 2024
- In 2024, A Symphony of Selection Assembling Your Best Music Choices on YouTube
- Prime Recording Option Elevate Your YouTube Channel
- Pro's Choice The Ultimate List of 7 Live Streaming Apps for YouTube (iOS/Android)
- Cross-Platform Multistreaming for Enhanced Viewership for 2024
- Unlock Creative Storytelling The Art of Jump Cutting
- [Updated] Complete Unpacking The World of Virtual Idols
- 2024 Approved 5 Next-Level Editors to Transcend the Standard Youtube Videos
- Your Step-by-Step Equipment Plan for YouTube Beginnings
- In 2024, 10 Mock Musicals That Bring Smiles
- Navigating the Nook How Jake Paul Snagged YouTube Success
- Beginning the Video Odyssey How to Create an Engaging YouTube Channel for 2024
- Ensuring Accurate Earnings Tracking for Creators for 2024
- Behind the Curtain How YouTube Tally's Its Views for 2024
- Elevate Your Video Profiles Using Smart Templates
- Best Composers for the Ultimate Video-Photographic Symphony for 2024
- In 2024, Essentials for Professionals Advanced Strategies in Video Tagging
- In 2024, Best YouTube Beginnings 15 Editing Samples
- [Updated] Annual Roundup Top No-Money Video Editing Software Reviewed
- YouTube Earning Masterclass Taking Your Streaming Business to New Heights
- In 2024, Become a YouTube Star Essential Skills Training
- Mastering YouTube Craft Your Ultimate Music Collection
- [New] Daily Vlogging Ideas What to Talk About While Vlogging?
- 2024 Approved Access High-Quality YouTube Images Without Paying a Dime
- BattleBuddies Channel Over a Hundred Friends in Games
- 2024 Approved Elevate Your Presence The Best 5 Practices for Max Viewers
- In 2024, Crafting a Personalized YouTube Pathway to Viewers
- In 2024, 10 Fastest Growing YouTube Channels to Light Up Your Mind
- How to Analyze Your and Competitor’s YouTube Video
- Unlocking the Secrets of YouTube’s Shorts Revenue Sharing
- 10 Best Free YouTube Channel Art Makers
- Demystifying YouTube Shorts Template Design Principles
- [Updated] Direct Your Media Essential Flv-to-YouTube Applications Ranked
- Convert Your YouTube Files Effortlessly to WebM for 2024
- 2024 Approved Essential Mobile Privacy The Best 7 AdBlocker Apps for Android
- [Updated] Decoding Earnings for Content Producers on Short-Form Platform
- Captivating Imagery with These 20 Top Video Thumbnail Fonts for 2024
- In 2024, How to Change your Samsung Galaxy S24 Ultra Location on Twitter | Dr.fone
- [Updated] 2024 Approved Become a Reel Pro in 30 Days or Less
- Mastery in Music Selection Enhancing Video Packages
- How to Hit the High Notes in Capturing Twitch Live Events
- In 2024, How to Unlock a Network Locked Realme Narzo N53 Phone?
- The Ultimate Guide to Video Brightening Apps for 2024
- In 2024, The Best iSpoofer Alternative to Try On Vivo V27 | Dr.fone
- [New] How to Edit Titles and Descriptions of IGTV Videos, In 2024
- In 2024, Hassle-Free Ways to Remove FRP Lock on Oppo Find X6with/without a PC
- Updated 15 Best Free MP4 Video Rotators Windows,Mac, Android, iPhone & Online
- In 2024, Logitech Webcam 101 A Beginner's Guide to Video
- Become a Pro at Networked Streams with VLC
- How To Activate and Use Life360 Ghost Mode On Honor Magic 6 Lite | Dr.fone
- New 2024 Approved Create a Sense of Anticipation 3 Steps to Add a Countdown Timer in FCPX
- In 2024, Correcting Failed Video Delivery on Mobile Platform's Social Network Apps
- 2024 Approved Get It Right Three Pro Tips for LOL Gameplay Captures
- In 2024, How To Unlock Stolen iPhone 7 Plus In Different Conditionsin
- Updated How to Translate TikTok Videos Top 5 Auto Translate Tools
- New 2024 Approved The Top-Rated Video Editing Tools for Mac In
- [Updated] In 2024, Blocking the Buzz No More FB Video Ads
- How To Exit Recovery Mode on Apple iPhone 14 Pro Max? | Dr.fone
- Revamping Your TikTok Videos Top 3 Background Changing Methods
- How to Bypass FRP from Infinix Note 30i?
- [New] Unlocking TikTok A Comprehensive Guide for Mac/PC
- Which is the Best Fake GPS Joystick App On Samsung Galaxy A14 4G? | Dr.fone
- In 2024, Strategies for Crafting a Smoothly Fading Sound Output
- [New] In 2024, Profile Makeover Tips for an Updated TikTok Presence
- [Updated] Perfecting Live Steam Playback A Step-by-Step Approach for 2024
- Illusory Motion Capture Guide
- Cellular Network Not Available for Voice Calls On Xiaomi Redmi Note 12T Pro | Dr.fone
- Ways to trade pokemon go from far away On Xiaomi Redmi Note 12 Pro 4G? | Dr.fone
- [Updated] Setting Up Discord Calls A Step-by-Step Device Approach
- Sim Unlock Samsung Galaxy F04 Phones without Code 2 Ways to Remove Android Sim Lock
- [New] 2024 Approved Enhancing Discord Communication Addition of Emoji-Based Statues
- 2024 Approved Dive Into the World of TikTok’s PFP Symbol - A Comprehensive Guide
- 2024 Approved Methods for Diminishing Delay Effects in Audio Production
- Use Device Manager to identify some outdated hardware drivers on Windows 11/10/7
- [Updated] Navigating Instagram Marketing Ultimate Guide to Video Success
- In 2024, Top 7 Skype Hacker to Hack Any Skype Account On your Oppo Reno 11 Pro 5G | Dr.fone
- [Updated] In 2024, Capturing the Essence Recording Conversations on WhatsApp Efficiently
- [New] 2024 Approved Cloaked Observer of Facebook Snapshots
- How to Remove a Previously Synced Google Account from Your Vivo T2 Pro 5G
- Tips and Tricks for Syncing Audio in Animated Windows GIFs
- How to Stop Google Chrome from Tracking Your Location On Asus ROG Phone 8 Pro? | Dr.fone
- Top 15 Booktok Books Recommendation [TikTok Books]
- Title: Mastery in Making Compelling YouTube Videos for Brands
- Author: Steven
- Created at : 2024-05-25 19:53:21
- Updated at : 2024-05-26 19:53:21
- Link: https://youtube-clips.techidaily.com/mastery-in-making-compelling-youtube-videos-for-brands/
- License: This work is licensed under CC BY-NC-SA 4.0.
