
:max_bytes(150000):strip_icc()/dash-camera-57d5ca313df78c58335c4402.jpg)
"Mastering YouTube List Mix A Step-by-Step Guide"
Mastering YouTube List Mix: A Step-by-Step Guide
We often create playlists on YouTube for different moods, genres, and occasions, but you may want to change the order of the videos or songs in your list. This is where the shuffling feature can help you.
Shuffling your YouTube playlist is an excellent way to mix things up and play various videos or songs from different channels without manually selecting each one.
But if you don’t know how to use the “Shuffle” feature, we’ll show you how to shuffle YouTube playlists on PCs, phones, and TVs. So, keep reading to start randomizing your YouTube playlist to mix up your music or video collection!
How To Shuffle YouTube Playlist On PCs/Phones/TVs?
Whether it’s a mix of our favorite songs, a set of dance videos to help get us through our workout, or a compilation of cat videos that never fail to make us smile, we all have that one go-to playlist we want to listen to over and over again.
But sometimes, even our favorite playlist can feel a little stale. That’s when it’s time to shuffle things up and give the playlist a fresh new feel.
To help you with this, we’ve provided step-by-step tutorials to help you shuffle Youtube playlists on your computer, phone, or Smart TV without having much trouble.
Part 1. How to Shuffle YouTube Playlist on PC?
Here is the step-by-step guide that can help you quickly shuffle your YouTube playlist on your PC, whether it’s before playback while watching, or from the Library:
How To Shuffle the Playlist Before Playlist Playback
The following is a quick rundown of the steps you need to take to shuffle the playlist before playback:
Step 1: First, open a browser on your PC to visit the YouTubewebsite and log in to your account using your credentials.
Step 2: Now, click the “Menu” (hamburger) icon on the top left of the YouTube home page and select your playlist from the menu.

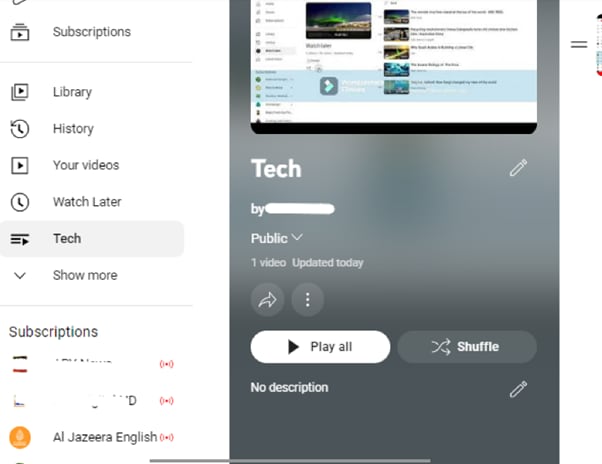
Step 3: On the next page, click the “Shuffle” button next to the “Play All” option in the playlist details section to randomize your YouTube playlist.
That’s about it! Your videos/songs will now play in random order.
How To Shuffle The Playlist While Listening
To learn how to shuffle a YouTube playlist while listening to your favorite songs, do the following steps in sequence:
Step 1: Launch your preferred browser on your PC and head to the “YouTube” homepage.
Step 2: Now, use the search icon to find your favorite song’s playlist or choose from the left “Menu” panel, and click “Play All” to listen to the music.
Step 3: When you start playing, you’ll find your playlist next to the video player. Click the crisscrossed arrows “Shuffle” icon below the playlist title, and the songs will start playing randomly instead of in proper order.

How To Shuffle The Playlist In the Library
If you want to randomize your YouTube playlist in the library section, follow these step-by-step instructions:
Step 1: In the first step, head to the YouTube website using your preferred browser on the PC and sign in to your account.
Step 2: Click the “Library” option from the left side panel on the YouTube homepage and scroll down to the “Playlists” section.
Step 3: In the next step, find your playlist and click the “View Full Playlist” option below. This will take you to the playlist page.
Step 4: Finally, on the playlist page, click the “Shuffle” option next to “Play All” in the details section. Now, when you start watching the videos in the playlist, they will play randomly.
Part 2. How To Shuffle YouTube Playlist On Handy?
It is possible to shuffle your YouTube playlist on your handy (iPhone or Android) with the following workarounds.
How To Shuffle The Playlist Before Playlist Playback/From Library
The following steps will help you shuffle your favorite playlists before playlist playback or from the Library:
Step 1: If the YouTube app is not installed on your phone, head to the “App Store “ or “GooglePlay Store “ and install the app.
Step 2: Now, launch the YouTube app on your handy and tap the “Library” option at the bottom right corner of the app’s home screen.
Step 3: Now, scroll down to the “Playlist” section and tap the playlist you want to shuffle. On the playlist screen, tap “Shuffle” next to the “Play All” option, and that’s it!

You can now enjoy your favorite videos and songs in a new order.
How To Shuffle The Playlist While Listening
To change the order of your favorite songs in the YouTube playlist while listening to it on your mobile device, do the following steps:
Step 1: First, open the “YouTube” app on your device and log into your account if you are not signed in already.
Step 2: On the app’s home screen, tap the “Search” bar, type the playlist name, and tap to open it to start listening to your favorite songs.
Step 3: You will find the playlist available under the video player. Simply tap the crisscrossed arrows “Shuffle” icon below the playlist’s title.

That’s all to it! Now you can enjoy your YouTube playlist in totally random order.
Part 3. How To Shuffle YouTube Playlist on TV?
The YouTube app is also available on smart TVs, which many people find to be a more enjoyable experience than watching YouTube videos on a small screen.
However, unfortunately, there is no way to shuffle a YouTube playlist on a Smart TV. This is a feature that is currently only available on the YouTube website and apps.
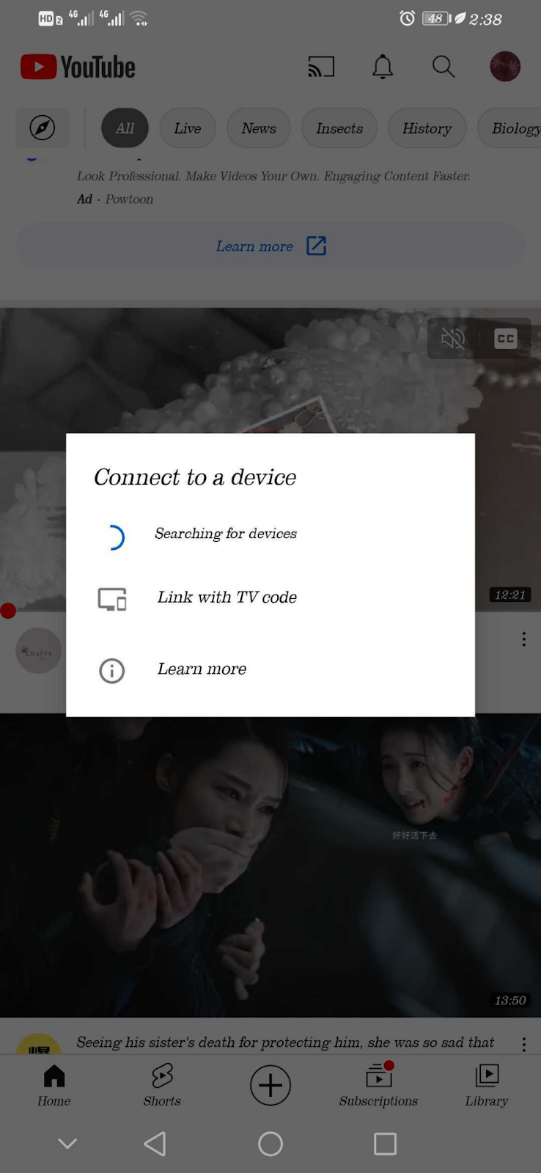
But if your Smart TV comes with a built-in Chromecast option, you can screen mirror the YouTube app on your TV and shuffle the playlist to your liking in the following way:
Step 1: In the first step, make sure your Smart TV and mobile device are connected to the same internet connection.
Step 2: In the next step, launch the YouTube app on your device, and access your playlist under the “Library” tab. Tap the “Shuffle” icon in the playlist details section and play your playlist
Step 3: In the final step, tap the “Cast” icon at the top-right of the screen and select your TV from the list to cast to.
Now you can enjoy randomly listen to your favorite songs on a more prominent display without getting bored.
Note:
You can also use other streaming devices like Firestick or Apple Airplay to cast YouTube on your Smart TV.
A Bouns Tip: How To Make a Music Video by Yourself?
We hope you have found appropriate solutions to shuffle your YouTube Playlist. Besides, supposing you are a music and YouTube lover, do you want to create videos with your favourite music? If yes, you can watch the video we have prepared for you. In this video, you will learn how to easily use a user-friendly video editor, Filmora, to make music videos!
In this comprehensive guide, we’ve provided a detailed step-by-step guide to show you how to shuffle YouTube playlists on your computer, mobile device, or Smart TV.
Hopefully, you’ve found this article informative and can now enjoy watching or listening to your favorite video/song in a random order in your YouTube playlist.
We often create playlists on YouTube for different moods, genres, and occasions, but you may want to change the order of the videos or songs in your list. This is where the shuffling feature can help you.
Shuffling your YouTube playlist is an excellent way to mix things up and play various videos or songs from different channels without manually selecting each one.
But if you don’t know how to use the “Shuffle” feature, we’ll show you how to shuffle YouTube playlists on PCs, phones, and TVs. So, keep reading to start randomizing your YouTube playlist to mix up your music or video collection!
How To Shuffle YouTube Playlist On PCs/Phones/TVs?
Whether it’s a mix of our favorite songs, a set of dance videos to help get us through our workout, or a compilation of cat videos that never fail to make us smile, we all have that one go-to playlist we want to listen to over and over again.
But sometimes, even our favorite playlist can feel a little stale. That’s when it’s time to shuffle things up and give the playlist a fresh new feel.
To help you with this, we’ve provided step-by-step tutorials to help you shuffle Youtube playlists on your computer, phone, or Smart TV without having much trouble.
Part 1. How to Shuffle YouTube Playlist on PC?
Here is the step-by-step guide that can help you quickly shuffle your YouTube playlist on your PC, whether it’s before playback while watching, or from the Library:
How To Shuffle the Playlist Before Playlist Playback
The following is a quick rundown of the steps you need to take to shuffle the playlist before playback:
Step 1: First, open a browser on your PC to visit the YouTubewebsite and log in to your account using your credentials.
Step 2: Now, click the “Menu” (hamburger) icon on the top left of the YouTube home page and select your playlist from the menu.
Step 3: On the next page, click the “Shuffle” button next to the “Play All” option in the playlist details section to randomize your YouTube playlist.
That’s about it! Your videos/songs will now play in random order.
How To Shuffle The Playlist While Listening
To learn how to shuffle a YouTube playlist while listening to your favorite songs, do the following steps in sequence:
Step 1: Launch your preferred browser on your PC and head to the “YouTube” homepage.
Step 2: Now, use the search icon to find your favorite song’s playlist or choose from the left “Menu” panel, and click “Play All” to listen to the music.
Step 3: When you start playing, you’ll find your playlist next to the video player. Click the crisscrossed arrows “Shuffle” icon below the playlist title, and the songs will start playing randomly instead of in proper order.
How To Shuffle The Playlist In the Library
If you want to randomize your YouTube playlist in the library section, follow these step-by-step instructions:
Step 1: In the first step, head to the YouTube website using your preferred browser on the PC and sign in to your account.
Step 2: Click the “Library” option from the left side panel on the YouTube homepage and scroll down to the “Playlists” section.
Step 3: In the next step, find your playlist and click the “View Full Playlist” option below. This will take you to the playlist page.
Step 4: Finally, on the playlist page, click the “Shuffle” option next to “Play All” in the details section. Now, when you start watching the videos in the playlist, they will play randomly.
Part 2. How To Shuffle YouTube Playlist On Handy?
It is possible to shuffle your YouTube playlist on your handy (iPhone or Android) with the following workarounds.
How To Shuffle The Playlist Before Playlist Playback/From Library
The following steps will help you shuffle your favorite playlists before playlist playback or from the Library:
Step 1: If the YouTube app is not installed on your phone, head to the “App Store “ or “GooglePlay Store “ and install the app.
Step 2: Now, launch the YouTube app on your handy and tap the “Library” option at the bottom right corner of the app’s home screen.
Step 3: Now, scroll down to the “Playlist” section and tap the playlist you want to shuffle. On the playlist screen, tap “Shuffle” next to the “Play All” option, and that’s it!
You can now enjoy your favorite videos and songs in a new order.
How To Shuffle The Playlist While Listening
To change the order of your favorite songs in the YouTube playlist while listening to it on your mobile device, do the following steps:
Step 1: First, open the “YouTube” app on your device and log into your account if you are not signed in already.
Step 2: On the app’s home screen, tap the “Search” bar, type the playlist name, and tap to open it to start listening to your favorite songs.
Step 3: You will find the playlist available under the video player. Simply tap the crisscrossed arrows “Shuffle” icon below the playlist’s title.
That’s all to it! Now you can enjoy your YouTube playlist in totally random order.
Part 3. How To Shuffle YouTube Playlist on TV?
The YouTube app is also available on smart TVs, which many people find to be a more enjoyable experience than watching YouTube videos on a small screen.
However, unfortunately, there is no way to shuffle a YouTube playlist on a Smart TV. This is a feature that is currently only available on the YouTube website and apps.
But if your Smart TV comes with a built-in Chromecast option, you can screen mirror the YouTube app on your TV and shuffle the playlist to your liking in the following way:
Step 1: In the first step, make sure your Smart TV and mobile device are connected to the same internet connection.
Step 2: In the next step, launch the YouTube app on your device, and access your playlist under the “Library” tab. Tap the “Shuffle” icon in the playlist details section and play your playlist
Step 3: In the final step, tap the “Cast” icon at the top-right of the screen and select your TV from the list to cast to.
Now you can enjoy randomly listen to your favorite songs on a more prominent display without getting bored.
Note:
You can also use other streaming devices like Firestick or Apple Airplay to cast YouTube on your Smart TV.
A Bouns Tip: How To Make a Music Video by Yourself?
We hope you have found appropriate solutions to shuffle your YouTube Playlist. Besides, supposing you are a music and YouTube lover, do you want to create videos with your favourite music? If yes, you can watch the video we have prepared for you. In this video, you will learn how to easily use a user-friendly video editor, Filmora, to make music videos!
In this comprehensive guide, we’ve provided a detailed step-by-step guide to show you how to shuffle YouTube playlists on your computer, mobile device, or Smart TV.
Hopefully, you’ve found this article informative and can now enjoy watching or listening to your favorite video/song in a random order in your YouTube playlist.
Quick Cure for That Persistent Green Pixel Problem (Mac Edition)
How to Fix the Green Screen on YouTube on Mac

Richard Bennett
Oct 26, 2023• Proven solutions
When you are watching YouTube, you might notice that the video is green while the sound keeps playing. This can be quite frustrating when you are watching something interesting and the YouTube green screen comes up.
There are various reasons as to why you have a green screen while watching videos on YouTube such as some problem with the GPU of Mac. No matter what the instance is, it can be quite overwhelming.
In case the YouTube green screen video issue while watching videos is bothering you and you are looking for a permanent fix to solve it, keep reading. In this guide, you can learn about the various issues that lead to the green screen problem on YouTube and how you can fix it.
But first, let’s take a look at the various issues that are causing the YouTube videos to turn green.
● Outdated Graphic Card Drivers: The issues associated with the graphics card can be a serious factor responsible for the green screen you are seeing while playing YouTube videos on your Mac device. This happens when the graphic drivers are outdated and can no longer support efficacious processing and playing of videos on the device. Graphics Card Drivers rendering is just the use of graphics cards for all rendering of functions such as videos. In case the drivers are outdated as the operating system, you will see a green screen error.
● Unreliable Third-Party Software: Any software from another source when used on Mac can lead to system errors. This will lead to green screen videos. It is more so when malware finds its way into the system when you are downloading the third-party software. This can even be a virus that comes with the software.
● Other Factors: Other factors might be responsible for the green screen videos such as a corrupt operating system.
How to Prevent Green Screen on YouTube on Mac?
In order to solve the YouTube video playing issue prior to moving on to the tricky troubleshooting methods, try out the simple hacks given below to prevent the problem altogether. These temporary hacks are usually quite helpful when you are in a hurry to watch a video.


● Play the YouTube video in some other browser. Often, a certain browser has a history of displaying a green screen on it when you play the videos on YouTube.
● Delete temporary files and cookies on Mac. This frees up space for the system.

● Close the other tabs and interfaces in the browser when you are watching the video online. This way the activities on the open window are not going to lead to an error while playing the video.
● Clear the cache data. By doing this, you can make sure that your system has enough space.
● Update the browser you are using to view videos on the latest browser.

● Reboot the Mac device if you are using it for a while. At times, rebooting the computer is all that you have to do to get the video working properly yet again after an error occurs.
How to Fix YouTube Green Screen?
As the video playing problem is primarily related to graphic drivers and hardware in the computer, further troubleshooting methods are for available for fixing these problems.
Hence, when the hacks fail to work and you keep seeing YouTube green screen, try out the following methods to fix this issue.
1. Disable Hardware Acceleration
The computer uses GPU rather than CPU for loading graphic intensive programs during hardware acceleration.

Nevertheless, some problems might occur when rendering the web pages from the Central Processing Unit to the Graphic Processing Unit. This causes performance problems. You might notice a green or blank screen while you are watching high-quality videos on YouTube.
In such a case, you need to disable hardware acceleration for resolving video playing problems.
● Right-click on the video which is displaying the green screen.
● Choose ‘Setting’ from the menu.
● Now, click to uncheck the option ‘Enable hardware acceleration’.
● Next, close the window to reload the page.
● To watch the video, reopen the website.
If you don’t find the ‘Settings’ option on the right-clicking the green video screen, disable the option of Hardware Acceleration on the web browser.
2. Update the Graphics Card Drivers
In case after establishing the hardware acceleration green screen in the YouTube videos to occur, update the graphics card driver. The video playing issue might have been caused due to the old AMD or NVIDIA graphics card.
Here are the steps to update the Graphics Card Drivers:
● Right-click on ‘My Computer’.
● Now, click on ‘Follow Manage’ and then ‘Device Manager’.
● Next, click on the option ‘Display Adapters’.
● Right-click on the graphics driver and then click on ‘Update Driver Software’.
● Choose ‘Search automatically for updated driver software’. The system will detect the graphics card and will find the latest driver. Restart the PC and the system.
3. Run a Troubleshooter
You can also try running a troubleshooter in the system to fix your green screen issue in YouTube videos.
Check out what you have to do.
● Open the computer ‘Settings’ app.
● Click on the ‘Update & Security’ section.
● Choose ‘Troubleshoot’ and then ‘Hardware and Devices’.
● As soon as the progress is complete, just restart the PC.
Now, you will have to view the videos once more to check if the problem has been resolved.
4. Adjust YouTube Settings
If you are persistently having this problem with YouTube videos, you can try to change the video quality to make it supported by the device. You need to do this in the following steps.
● Open the browser and play the YouTube video you prefer.
● Click on the ‘Gear’ icon and from the menu opt for ‘Quality’.

● Now, you can choose from different video quality options.
Conclusion
You might have seen how easy it is to solve the YouTube green screen issues while running YouTube videos on Mac. So, when you are encountering one, there is no reason to worry. Moreover, following the few hacks given above, you can easily resolve the YouTube green screen issue.
In case you are troubleshooting the issue, make sure that you begin with hardware acceleration and then move on to the other methods. If you want to create a video for YouTube using green screen, you can usevideo editor for Mac from Filmora. It offers various features that you can use to create a unique video.
Learn More: How do Beginners Make a Cool Video for YouTube on Mac>>>
Richard Bennett
Richard Bennett is a writer and a lover of all things video.
Follow @Richard Bennett
Richard Bennett
Oct 26, 2023• Proven solutions
When you are watching YouTube, you might notice that the video is green while the sound keeps playing. This can be quite frustrating when you are watching something interesting and the YouTube green screen comes up.
There are various reasons as to why you have a green screen while watching videos on YouTube such as some problem with the GPU of Mac. No matter what the instance is, it can be quite overwhelming.
In case the YouTube green screen video issue while watching videos is bothering you and you are looking for a permanent fix to solve it, keep reading. In this guide, you can learn about the various issues that lead to the green screen problem on YouTube and how you can fix it.
But first, let’s take a look at the various issues that are causing the YouTube videos to turn green.
● Outdated Graphic Card Drivers: The issues associated with the graphics card can be a serious factor responsible for the green screen you are seeing while playing YouTube videos on your Mac device. This happens when the graphic drivers are outdated and can no longer support efficacious processing and playing of videos on the device. Graphics Card Drivers rendering is just the use of graphics cards for all rendering of functions such as videos. In case the drivers are outdated as the operating system, you will see a green screen error.
● Unreliable Third-Party Software: Any software from another source when used on Mac can lead to system errors. This will lead to green screen videos. It is more so when malware finds its way into the system when you are downloading the third-party software. This can even be a virus that comes with the software.
● Other Factors: Other factors might be responsible for the green screen videos such as a corrupt operating system.
How to Prevent Green Screen on YouTube on Mac?
In order to solve the YouTube video playing issue prior to moving on to the tricky troubleshooting methods, try out the simple hacks given below to prevent the problem altogether. These temporary hacks are usually quite helpful when you are in a hurry to watch a video.
● Play the YouTube video in some other browser. Often, a certain browser has a history of displaying a green screen on it when you play the videos on YouTube.
● Delete temporary files and cookies on Mac. This frees up space for the system.
● Close the other tabs and interfaces in the browser when you are watching the video online. This way the activities on the open window are not going to lead to an error while playing the video.
● Clear the cache data. By doing this, you can make sure that your system has enough space.
● Update the browser you are using to view videos on the latest browser.
● Reboot the Mac device if you are using it for a while. At times, rebooting the computer is all that you have to do to get the video working properly yet again after an error occurs.
How to Fix YouTube Green Screen?
As the video playing problem is primarily related to graphic drivers and hardware in the computer, further troubleshooting methods are for available for fixing these problems.
Hence, when the hacks fail to work and you keep seeing YouTube green screen, try out the following methods to fix this issue.
1. Disable Hardware Acceleration
The computer uses GPU rather than CPU for loading graphic intensive programs during hardware acceleration.
Nevertheless, some problems might occur when rendering the web pages from the Central Processing Unit to the Graphic Processing Unit. This causes performance problems. You might notice a green or blank screen while you are watching high-quality videos on YouTube.
In such a case, you need to disable hardware acceleration for resolving video playing problems.
● Right-click on the video which is displaying the green screen.
● Choose ‘Setting’ from the menu.
● Now, click to uncheck the option ‘Enable hardware acceleration’.
● Next, close the window to reload the page.
● To watch the video, reopen the website.
If you don’t find the ‘Settings’ option on the right-clicking the green video screen, disable the option of Hardware Acceleration on the web browser.
2. Update the Graphics Card Drivers
In case after establishing the hardware acceleration green screen in the YouTube videos to occur, update the graphics card driver. The video playing issue might have been caused due to the old AMD or NVIDIA graphics card.
Here are the steps to update the Graphics Card Drivers:
● Right-click on ‘My Computer’.
● Now, click on ‘Follow Manage’ and then ‘Device Manager’.
● Next, click on the option ‘Display Adapters’.
● Right-click on the graphics driver and then click on ‘Update Driver Software’.
● Choose ‘Search automatically for updated driver software’. The system will detect the graphics card and will find the latest driver. Restart the PC and the system.
3. Run a Troubleshooter
You can also try running a troubleshooter in the system to fix your green screen issue in YouTube videos.
Check out what you have to do.
● Open the computer ‘Settings’ app.
● Click on the ‘Update & Security’ section.
● Choose ‘Troubleshoot’ and then ‘Hardware and Devices’.
● As soon as the progress is complete, just restart the PC.
Now, you will have to view the videos once more to check if the problem has been resolved.
4. Adjust YouTube Settings
If you are persistently having this problem with YouTube videos, you can try to change the video quality to make it supported by the device. You need to do this in the following steps.
● Open the browser and play the YouTube video you prefer.
● Click on the ‘Gear’ icon and from the menu opt for ‘Quality’.
● Now, you can choose from different video quality options.
Conclusion
You might have seen how easy it is to solve the YouTube green screen issues while running YouTube videos on Mac. So, when you are encountering one, there is no reason to worry. Moreover, following the few hacks given above, you can easily resolve the YouTube green screen issue.
In case you are troubleshooting the issue, make sure that you begin with hardware acceleration and then move on to the other methods. If you want to create a video for YouTube using green screen, you can usevideo editor for Mac from Filmora. It offers various features that you can use to create a unique video.
Learn More: How do Beginners Make a Cool Video for YouTube on Mac>>>
Richard Bennett
Richard Bennett is a writer and a lover of all things video.
Follow @Richard Bennett
Also read:
- The Ultimate Yogi Channel Guide to Stay Active
- In 2024, Chart a Course to Success YouTube Studio Blueprint
- 2024 Approved Earn Extra Bucks Maximizing YouTube's Mobile Revenue Opportunities
- [New] Crafting GIFs Like a Pro Industry Leaders' Tools
- 2024 Approved Building a Haul Vlog Empire Key Strategies
- Essential Guide to Upgrade Your Shorts Into Premium Mp4 Files for 2024
- 2024 Approved 4 Simplified Techniques to Embed YouTube Content in PowerPoint
- Leading YouTube Snack Seekers Free, Top Downloads
- [New] Elevate Your Content Strategy Prime Video Rank Monitors
- Dive Into the Depth of 4K Content Your Ultimate Guide for YouTube Submission
- [Updated] Adobe Premiere Power Enhancing Your YouTube Presence
- In 2024, Engage in Enlightening YouTube Exchanges
- [New] Efficiently Isolate Key Moments in YouTube Footage
- [Updated] Earning Estimates for YouTube Creators AdSense Pay-Out per 1,000 Viewers
- Directly Posting Your Videos From iDevice to YouTube for 2024
- 2024 Approved Enhance Your ASMR Experience with Top-Tier Mics
- Leading Video Makers in ASMR Sphere
- Experience the Virtual Reality Frontier on Youtube
- 2024 Approved Best Practices for YouTube Outro Design
- Channel Building Blueprint Reaching 1K Subs Rapidly
- YouTube Music Hits 2023'S Most Praised Video Responses
- [New] A Chill-Out Guide Selecting Inviting Winter Backgrounds
- 2024 Approved Easy Sound Transformation IOS Tools to Convert YouTube Songs to MP3 Files
- YouTube's Copyright Rules Simplified A Non-Legal Guide
- Essential Media Makers' Software Linux Edition
- [Updated] Counterclockwise Watch How to Unravel Your YouTube Sequence
- Essential YouTube Equipment For Starting Your Channel - What Do You Really Need for 2024
- The Ultimate Guide to Student-Centric Historical YT Channels
- A Step-by-Step Guide Through YouTube's Aspect Ratio Landscapes
- [New] Building a Powerhouse Business Channel in Under 5 Minutes
- 2024 Approved Audiovisual Interpretation Engine
- [Updated] Breaking Down T-Series Income Mechanism on YouTube
- In 2024, Capturing Live Sounds Directly From YouTube Videos
- [New] Essential 8 Linux Software for Editors
- Comparing TikTok & YouTube Shorts for Personal Content Creation for 2024
- [Updated] Choosing a Champion DSLR or Mirrorless Camera?
- View Count Rewards on YouTube – Per Million?
- Steps to Remove Unseen Portions in Streamed YouTube Videos
- A Step-by-Step Guide for Creating Channel Trailers that Convert Viewers Into Customers
- Post-Publish Editing Elevating Your YouTube Content
- [New] Daily Digest Guidelines Tips for Successful Vlogs
- In 2024, Behind the Scenes How Much Creators Earn From YouTube Shorts
- 2024 Approved A Beginner's Guide to Sony Vegas and YouTube Cutting
- Adapting Shorts Strategy for Multiple Platforms for 2024
- In 2024, Audiophiles Recommend Top 5 Headset Choices
- [New] Engineering Endgame Echoes
- [New] Advanced Tips for YouTube Commercial Making
- How to Turn Off Find My Apple iPhone SE when Phone is Broken?
- How To Unbrick a Dead Xiaomi 13T Pro | Dr.fone
- New 2024 Approved Capturing Memories A Guide to Sharing PS4 Screenshots Online
- The Ultimate Canva Guide to Incorporating and Refining Audio
- New In 2024, The Ultimate Guide on How to Promoting Music Videos on YouTube
- How To Open Your iPhone 14 Plus Without a Home Button
- Flickr Profile Picture Breakdown Area, Codec, Timeframe
- In 2024, Apple iPhone 8 Plus Asking for Passcode after iOS 17/14 Update, What to Do? | Dr.fone
- [New] In 2024, The Essential Guide to Snagging TikToks at Lightning Speed
- In 2024, Simple and Effective Ways to Change Your Country on YouTube App Of your Tecno Pova 6 Pro 5G | Dr.fone
- [New] In 2024, Boosting Connectivity with Creative FB Slideshow Ideas
- Game-Changing Trick Enter Mac, Apple Watch Style
- In 2024, 4 Ways to Transfer Messages from Apple iPhone 15 Pro Max to iPhone Including iPhone 15 | Dr.fone
- New 2024 Approved Audio-Free Video Formats Mastering the Art of Silence Removal in Popular File Types (MP4, MKV, AVI, MOV, WMV)
- [Updated] Masterclass in Creating Dynamic Facebook Slideshows for 2024
- In 2024, Easily Unlock Your Vivo V30 Device SIM
- 3 Solutions to Hard Reset Infinix GT 10 Pro Phone Using PC | Dr.fone
- Updated In 2024, 8 Best DAW for Hip-Hop Music Production
- In 2024, Can Life360 Track You When Your Tecno Camon 30 Pro 5G is off? | Dr.fone
- [New] Why Highlighted Content Flourishes on Instagram Stories for 2024
- How to get back lost photos from Honor Magic5 Ultimate.
- New Achieving Balanced Video Audios Four Essential Techniques for 2024
- Guide to Mirror Your Honor Magic 6 to Other Android devices | Dr.fone
- [Updated] 2024 Approved Mastering Quick Play TikTok Speed Skipping Guide
- In 2024, Easy Guide How To Bypass Honor 90 FRP Android 10/11/12/13
- In 2024, Mastering the Art of Social Media Videos for Maximum Reach
- New Installation & Uninstallation of Audacity on Chrome OS Explained Simply for 2024
- [New] Android Lens Mastery Techniques & Apps
- [Updated] Boosting Customer Engagement with Targeted TikTok Campaigns for 2024
- Edit Like a Pro Top-Rated Video Editing Software for Mac for 2024
- The way to get back lost messages from Oppo Find X7 Ultra
- [Updated] 2024 Approved Ultimate FB Media Downloader Optimized for Firefox Use
- [New] The Ultimate Song Guide for Newbies for 2024
- How to Bypass Activation Lock on Apple iPhone 14 Pro Max or iPad?
- [New] Audiophiles' Top 10 Podcast Apps for Mac OSX
- Top 6 Apps/Services to Trace Any Samsung Galaxy A05s Location By Mobile Number | Dr.fone
- Updated In 2024, Instagram Video Resolution What You Need to Know
- Updated Steady as a Rock How to Stabilize Your Video in FCPX
- [Updated] In 2024, Essential Fix Re-Emerge Missing Watch Icon, 2023
- New TikTok Video Reversal Made Easy A Beginners Guide 2023 Edition for 2024
- In 2024, Easy Steps for Enhanced Productivity Keyboard-Based Screen Recordings in OS X
- Flipping Photo Lightness for an Alternate Look
- Realme Narzo 60 Pro 5G Screen Unresponsive? Heres How to Fix It | Dr.fone
- [Updated] Industry Standard Guide Implementing Stopwatches in Video Streaming Software for 2024
- [New] Going From End to Start The Instagram Video Technique
- Title: "Mastering YouTube List Mix A Step-by-Step Guide"
- Author: Steven
- Created at : 2024-05-25 19:53:03
- Updated at : 2024-05-26 19:53:03
- Link: https://youtube-clips.techidaily.com/mastering-youtube-list-mix-a-step-by-step-guide/
- License: This work is licensed under CC BY-NC-SA 4.0.
