
"Mastering YouTube Engagement Optimal Video Formats Guide"
Mastering YouTube Engagement: Optimal Video Formats Guide
Best Video Format for YouTube Uploading

Richard Bennett
Feb 01, 2024• Proven solutions
Uploading your content in the best video format for YouTube can save you a lot of frustration. In this article, we will teach you about some of the best video formats and settings .
To upload a video to YouTube you have to make sure that you are using one of the video file formats that is supported by the platform itself. Here they are:
- MP4
- MOV
- AVI
- FLV
- 3GPP
- WMV
- WebM
- MPEGS
YouTube recommends uploading your videos as MP4 files. Some benefits of MP4s are that the files are not as large as AVIs, they provide better quality than FLVs, and they often display with the same quality or better as you would get watching the video on a native video player. Other file formats like 3GPP and MPEG-PS generally have resolutions too small for high-resolution tablets or desktop devices.
If your phone or video editing software does not output MP4 videos, consider getting video editing software or a conversion program that can (like Filmora Video Editor).
Filmora is an easy-to-use video editing program that can export to MP4, WMV, AVI, MOV, F4V, MKV, TS, 3GP, MPEG-2, WEBM, GIF, and MP3. You can convert a video to an MP4 simply by importing it into Filmora, dragging it into the timeline, and exporting it in the MP4 format.
The Best Upload Settings for YouTube
The best video code:
The best video format: MP4
Audio should be produced using the LC format and stereo 5.1 or standard stereo. You can upload separate MP3 audio format files for voiceovers if you need to.
The aspect ratio for a video should be 16:9 so that it won’t have black bars on the side when uploaded to YouTube. YouTube has also made it possible for 9:16 (portrait) style videos to be viewed without black bars, full screen, using their iOS app.
You should export in at least 30 frames per second. Many creators push that to 60 frames per second, which is better for most types of videos (although it may not make a noticeable difference for others).
The maximum size for quick upload and load time on YouTube is generally under 2gb. Luckily MP4 offers a great degree of compression without sacrificing too much image quality.
If you scale down the file size of the video by reducing the resolution or choosing a format with more compression, that can cause you to lose quality. If you need a smaller file, it’s always better to scale down the length of a video rather than continually compress the file or lose frames from the video.
Although a 2 GB file of a very long will easily upload to YouTube, it will probably be very low quality.
Do you agree that MP4 is the best video format for YouTube, or do you use something else?
Create Stunning Videos with a High-Quality Video Editor


Richard Bennett
Richard Bennett is a writer and a lover of all things video.
Follow @Richard Bennett
Richard Bennett
Feb 01, 2024• Proven solutions
Uploading your content in the best video format for YouTube can save you a lot of frustration. In this article, we will teach you about some of the best video formats and settings .
To upload a video to YouTube you have to make sure that you are using one of the video file formats that is supported by the platform itself. Here they are:
- MP4
- MOV
- AVI
- FLV
- 3GPP
- WMV
- WebM
- MPEGS
YouTube recommends uploading your videos as MP4 files. Some benefits of MP4s are that the files are not as large as AVIs, they provide better quality than FLVs, and they often display with the same quality or better as you would get watching the video on a native video player. Other file formats like 3GPP and MPEG-PS generally have resolutions too small for high-resolution tablets or desktop devices.
If your phone or video editing software does not output MP4 videos, consider getting video editing software or a conversion program that can (like Filmora Video Editor).
Filmora is an easy-to-use video editing program that can export to MP4, WMV, AVI, MOV, F4V, MKV, TS, 3GP, MPEG-2, WEBM, GIF, and MP3. You can convert a video to an MP4 simply by importing it into Filmora, dragging it into the timeline, and exporting it in the MP4 format.
The Best Upload Settings for YouTube
The best video code:
The best video format: MP4
Audio should be produced using the LC format and stereo 5.1 or standard stereo. You can upload separate MP3 audio format files for voiceovers if you need to.
The aspect ratio for a video should be 16:9 so that it won’t have black bars on the side when uploaded to YouTube. YouTube has also made it possible for 9:16 (portrait) style videos to be viewed without black bars, full screen, using their iOS app.
You should export in at least 30 frames per second. Many creators push that to 60 frames per second, which is better for most types of videos (although it may not make a noticeable difference for others).
The maximum size for quick upload and load time on YouTube is generally under 2gb. Luckily MP4 offers a great degree of compression without sacrificing too much image quality.
If you scale down the file size of the video by reducing the resolution or choosing a format with more compression, that can cause you to lose quality. If you need a smaller file, it’s always better to scale down the length of a video rather than continually compress the file or lose frames from the video.
Although a 2 GB file of a very long will easily upload to YouTube, it will probably be very low quality.
Do you agree that MP4 is the best video format for YouTube, or do you use something else?
Create Stunning Videos with a High-Quality Video Editor
Richard Bennett
Richard Bennett is a writer and a lover of all things video.
Follow @Richard Bennett
Time Taming: Learn YouTube Video Length Cuts
How to Edit the Length of a Video on YouTube
Richard Bennett
Mar 27, 2024• Proven solutions
Apart from providing video hosting and sharing features, the YouTube platform also has an online editor which is going to provide you with the possibility to make changes and additions online without having to download any particular program. In this guide, we are going to show you how to make your video shorter or longer with YouTube online video editor.
A Better Alternative on How to Edit YouTube Video Length - Wondershare Filmora is a perfect alternative to edit every single clip frame by frame. Not just to shorten or lengthen the video. It offers quite a lot of opportunities. Watch the video below to know more:
Download Mac Version ](https://tools.techidaily.com/wondershare/filmora/download/ )
For instance, the application is offering non-linear ripple video editing. This is going to allow you to combine multiple video clips and pin them together conveniently. What is more, you can also apply PIP and Green Screen professional effects with just a few clicks. Sure, the YouTube video editor is a perfect solution for those who don’t want to achieve professional quality, but if you do, Wondershare Filmora is without a doubt the far better alternative. This is something that’s going to enable you to edit and re-touch your videos as well as to size them appropriately. Instead of dragging two bars together, you will be able to touch every single frame and size it according to your own particular needs. This is going to result in flawless videos.
How to Edit YouTube Video Length Using the built-in Video Editor
The YouTube video editor is easy to use, and you can easily learn how to do all sorts of changes to your video. Let’s see the things that you need to go through in order to edit the length.
Note: From 20th September 2017 users will no longer be able to use the complimentary editing suite. Check the best YouTube video editor alternatives from this complete guide.
Step 1 Get to the video editor

In order to do so, you would have to go ahead and login into your account. Then, go to the “My Channel” panel and select the video that you want to cut. Once you’ve done this, click on the “Video manager” option and click on the “create” tab which should be located on the right side for the page. There, you will be able to find the “Video Editor”. Of course, you can also add “/editor” to YouTube’s URL, and you would be good to go.
Step 2 Import Your Video
Once you’ve done all of the above, you would have to drag your video in order to cut it’s time. Keep in mind that the videos are made out of a maximum of 50 clips. The site is going to save every single video that you upload as a particular clip which could be properly combined with the rest in order to make one larger video. This is important.
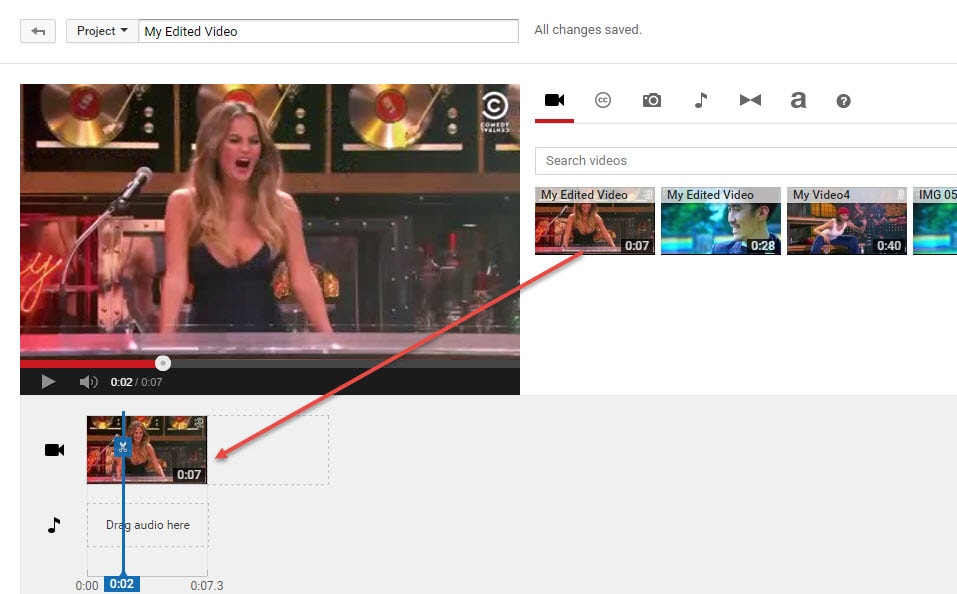
Step 3 Edit the Length
This is the part where you actually get to edit the length of your video. In order to do so effectively, you have to drag the bar at either end of your clip towards the other end in order to shorten the clip conveniently.
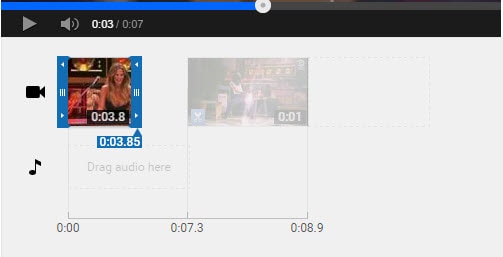
What is more, if you want to increase the length, you have to drag the bar to the opposite end – outwards. There is going to be an indicator which is going to appear at the bottom of the clip, and it’s going to show you the overall duration of the file, and it’s going to adjust itself as you slide the bars accordingly.
Step 4 Save the Clip
Of course, you would have to save the clip in order for the changes to reflect. Even though this might seem like a particularly obvious thing to do, you would be surprise to find out that a lot of people get everything done and then discard the changes by forgetting to save them and their effort goes to waste.
Richard Bennett
Richard Bennett is a writer and a lover of all things video.
Follow @Richard Bennett
Richard Bennett
Mar 27, 2024• Proven solutions
Apart from providing video hosting and sharing features, the YouTube platform also has an online editor which is going to provide you with the possibility to make changes and additions online without having to download any particular program. In this guide, we are going to show you how to make your video shorter or longer with YouTube online video editor.
A Better Alternative on How to Edit YouTube Video Length - Wondershare Filmora is a perfect alternative to edit every single clip frame by frame. Not just to shorten or lengthen the video. It offers quite a lot of opportunities. Watch the video below to know more:
Download Mac Version ](https://tools.techidaily.com/wondershare/filmora/download/ )
For instance, the application is offering non-linear ripple video editing. This is going to allow you to combine multiple video clips and pin them together conveniently. What is more, you can also apply PIP and Green Screen professional effects with just a few clicks. Sure, the YouTube video editor is a perfect solution for those who don’t want to achieve professional quality, but if you do, Wondershare Filmora is without a doubt the far better alternative. This is something that’s going to enable you to edit and re-touch your videos as well as to size them appropriately. Instead of dragging two bars together, you will be able to touch every single frame and size it according to your own particular needs. This is going to result in flawless videos.
How to Edit YouTube Video Length Using the built-in Video Editor
The YouTube video editor is easy to use, and you can easily learn how to do all sorts of changes to your video. Let’s see the things that you need to go through in order to edit the length.
Note: From 20th September 2017 users will no longer be able to use the complimentary editing suite. Check the best YouTube video editor alternatives from this complete guide.
Step 1 Get to the video editor
In order to do so, you would have to go ahead and login into your account. Then, go to the “My Channel” panel and select the video that you want to cut. Once you’ve done this, click on the “Video manager” option and click on the “create” tab which should be located on the right side for the page. There, you will be able to find the “Video Editor”. Of course, you can also add “/editor” to YouTube’s URL, and you would be good to go.
Step 2 Import Your Video
Once you’ve done all of the above, you would have to drag your video in order to cut it’s time. Keep in mind that the videos are made out of a maximum of 50 clips. The site is going to save every single video that you upload as a particular clip which could be properly combined with the rest in order to make one larger video. This is important.
Step 3 Edit the Length
This is the part where you actually get to edit the length of your video. In order to do so effectively, you have to drag the bar at either end of your clip towards the other end in order to shorten the clip conveniently.
What is more, if you want to increase the length, you have to drag the bar to the opposite end – outwards. There is going to be an indicator which is going to appear at the bottom of the clip, and it’s going to show you the overall duration of the file, and it’s going to adjust itself as you slide the bars accordingly.
Step 4 Save the Clip
Of course, you would have to save the clip in order for the changes to reflect. Even though this might seem like a particularly obvious thing to do, you would be surprise to find out that a lot of people get everything done and then discard the changes by forgetting to save them and their effort goes to waste.
Richard Bennett
Richard Bennett is a writer and a lover of all things video.
Follow @Richard Bennett
Also read:
- [New] 2024 Approved Ultimate Choice 10 Excellent Camera Lenses
- [New] Crack the Code of Content Top 6 YouTuber Personality Tests Revealed
- [New] In 2024, Calculating Earnings The Essence of YouTube Short Revenue Split
- [Updated] Youtubers Spotlighting Niche Gaming Subcultures
- Elevating Your Channel's Ranking Simple Strategies Unveiled
- How To Prevent Rainbow Six Extraction From Crashing While Playing on Your Computer
- In 2024, Epic Playlist Over a Hundred Top-Tier Titles
- In 2024, Unlock Your Xiaomi Redmi Note 12T Pro Phone with Ease The 3 Best Lock Screen Removal Tools
- Innovator of Cinematic Soundscapes & Imagery
- Reinventing Realm Residences: The Future of Island Living
- Step-By Step Fixes For Windows 10'S Asus Drivers
- The Complete Blueprint to Tally Your YouTube Growth and Income
- Title: Mastering YouTube Engagement Optimal Video Formats Guide
- Author: Steven
- Created at : 2024-12-31 17:24:10
- Updated at : 2025-01-03 16:18:15
- Link: https://youtube-clips.techidaily.com/mastering-youtube-engagement-optimal-video-formats-guide/
- License: This work is licensed under CC BY-NC-SA 4.0.