
:max_bytes(150000):strip_icc():format(webp)/GettyImages-917461864-7141ebd3ec944ce6a431b8d485cc9cdb.jpg)
"Mastering Your Setup Essential Shooting Accessories"
Mastering Your Setup: Essential Shooting Accessories
YouTube Video Shooting Equipment List: What You Need to Start Recording Videos

Richard Bennett
Mar 27, 2024• Proven solutions
Shooting a video has never been easier because there are so many different cameras you can use to capture the footage for your YouTube video. In the past, professional video equipment has been expensive and difficult to operate, but all of this has changed with the invention of digital cameras.
On the other hand, buying the most expensive microphones, lighting equipment or cameras doesn’t guarantee that your videos will be a major success once you post them on YouTube. Instead, you should look for the equipment that is best suited for the type of videos you want to create. Let’s explore the equipment that is necessary for running a successful YouTube channel.
What Equipment Will You Need to Start Your New YouTube Channel?
The process of creating a video can be divided into three different stages, the pre-production, production, and post-production. Each stage has its own tools, without which completing a video would be impossible. In this article, we will be covering the equipment that will make the production stage of the process much smoother, and it will also help you to go through post-production much faster.
Equipment 1: Camera
You can’t shoot a video without a camera, but which camera you’re going to use depends on the type of the video you want to produce. Sometimes the camera that offers the most shooting options is not the best choice, and different factors like size or the weight of the camera can be much more important than the sheer quality of the footage.
1. Cellphone Cameras
If you own a smartphone , you already have a camera you can use to create a YouTube video. Mobile phone cameras are easy to operate and they are perfect for shooting videos while you are on the go. However, most phones are incredibly light and holding the device in your hand while shooting may produce camera shakes that ruin the video. You’ll also need a third-party app in order to control all of the camera settings manually.
You can also make YouTube videos with just your phone , check this video for more details.


2. Action Cameras
If you are a fan of outdoor activities and you want to shoot your YouTube videos while you’re having an adventure action cam may be your best choice. The GoPro and all similar types of cameras are small, lightweight, and they can produce videos in high resolution. Most of these cameras come with mounts and accessories that enable you to shoot perfectly stable footage while you are climbing, running or walking.
We have composed some useful tips and trick of buying and using action camera, in cast that you want to buy an action camera for shooting videos, do check out this ultimate action camera guide .
3. Camcorders
YouTubers that often shoot videos on different locations, can hardly go wrong if they decide to capture their videos with a camcorder. The best models on the market enable you to shoot 4K videos, even in less than perfect light conditions and you can also adjust the camera settings manually. Camcorders are a great choice if you want to make sure that your footage always looks great, regardless of the location on which you recorded it.
If you want to buy a camcorder to shoot your YouTube vlog video, please do check this list of best 4k camcorders that you can buy.
4. Mirrorless Cameras
Besides offering superb image quality, mirrorless cameras also let you change lenses so you get the best shot in every scene you want to include in your video. These types of cameras are a popular choice for vlogging or capturing footage for all types of YouTube videos because they feature professional video recording options while remaining relatively lightweight and easy to carry around. However, the best mirrorless cameras on the market can be quite expensive, and you must be prepared to invest money in lenses and other equipment.
If you want to buy a mirrorless camera to shoot your YouTube vlog video, please do check this list of best 4k mirrorless cameras.
5. DSLR Cameras
Seasoned professionals, as well as the newcomers to the world of video production, can benefit from using a DSLR camera for shooting the content for their YouTube channel. These types of cameras allow you to change lenses, pull focus manually, shoot at different frame rates or capture the footage in 4K and Full HD quality. What’s more, you can use a DSLR camera even in challenging light conditions, because most models support ISO sensitivity values that enable the camera to produce remarkable image quality even when the amount of light in a shot is far from perfect.
With a DSLR camera, you can also use it a webcam for recording your face and your desktop screen at the same time, check how to use a DSLR camera as a webcam .
Equipment 2: Microphones
Moving images are less effective without sound, which is the reason why you should pay close attention to this aspect of the video making process. All cameras have built-in microphones, but the audio quality they produce is often not good enough to actually use it in a YouTube video. That’s why recording sound with an external microphone is a common practice among the most successful YouTubers.
The location at which you’re shooting the video will help you determine which microphone you should use for that project. If you are recording your YouTube video in the exterior an omnidirectional microphone is your best choice because it will eliminate the wind noise. Furthermore, as their name suggests these microphones can pick up sounds from all directions so people in your videos don’t have to speak directly into the microphone.
Shotgun or unidirectional mics are frequently used in studio conditions when you want to eliminate all other sounds except the narrator’s voice. Gamers, tutorial makers and all other YouTube content creators that rely heavily on narration in their videos use shotgun mics because they produce great audio quality. Even though it is easy to overlook the importance of sound for the overall quality of the video you’re working on, a video with great audio quality may actually help you attract more followers on YouTube.
Check: best microphones for YouTube vloggers.
Equipment 3: Video Stabilization Equipment
Holding a camera in your hand while shooting a video is often not the best idea, because even breathing may cause the camera to move and produce camera shakes. That’s where tripods , steadicams, gimbals , rigs and other video stabilization equipment comes in. As a matter of fact, you should only shoot handheld videos when you want to achieve this effect, while all another camera movement should be avoided without the use of appropriate equipment.
Shaky videos are not very pleasant to watch and they can reduce your chances of attracting more followers on YouTube. The video stabilization equipment offers a great solution, and you can get a professional tripod or gimbal at a very reasonable price. However, which video stabilization equipment you are going to use depends on the camera you have and the type of shot you want to get.
Check our list of best camera stabilizer for YouTubers in 2018 .
Equipment 4: Lighting Equipment
Instead of struggling with natural light sources and having to deal with shadows, you can simply use the lighting equipment to equalize the light values in a shot. Of course, whether or not you will use artificial light in your video depends on a number of factors, including the location and the visual style you’re trying to achieve.
Whether you will use an on-camera LED light, ring light or softbox video lights is yet another creative decision you will have to make during the process of shooting your YouTube video. The great majority of video lighting equipment produces the best results in controlled, studio-like conditions, so before you go ahead and buy an on-camera light or a softbox make sure that you know how the equipment will perform on the interior and exterior locations.
Conclusion
Producing YouTube videos on a constant basis requires you to have the right equipment for the job. You don’t have to shoot your videos with the most expensive camera out there or have the best microphone on the market in order to create a great YouTube video, but having the equipment capable of delivering a professional level of video and audio quality won’t hurt your chances of becoming a successful YouTuber.
We’d love to hear all about the gear you’re using to capture your videos, so leave a comment and let us know.
Richard Bennett
Richard Bennett is a writer and a lover of all things video.
Follow @Richard Bennett
Richard Bennett
Mar 27, 2024• Proven solutions
Shooting a video has never been easier because there are so many different cameras you can use to capture the footage for your YouTube video. In the past, professional video equipment has been expensive and difficult to operate, but all of this has changed with the invention of digital cameras.
On the other hand, buying the most expensive microphones, lighting equipment or cameras doesn’t guarantee that your videos will be a major success once you post them on YouTube. Instead, you should look for the equipment that is best suited for the type of videos you want to create. Let’s explore the equipment that is necessary for running a successful YouTube channel.
What Equipment Will You Need to Start Your New YouTube Channel?
The process of creating a video can be divided into three different stages, the pre-production, production, and post-production. Each stage has its own tools, without which completing a video would be impossible. In this article, we will be covering the equipment that will make the production stage of the process much smoother, and it will also help you to go through post-production much faster.
Equipment 1: Camera
You can’t shoot a video without a camera, but which camera you’re going to use depends on the type of the video you want to produce. Sometimes the camera that offers the most shooting options is not the best choice, and different factors like size or the weight of the camera can be much more important than the sheer quality of the footage.
1. Cellphone Cameras
If you own a smartphone , you already have a camera you can use to create a YouTube video. Mobile phone cameras are easy to operate and they are perfect for shooting videos while you are on the go. However, most phones are incredibly light and holding the device in your hand while shooting may produce camera shakes that ruin the video. You’ll also need a third-party app in order to control all of the camera settings manually.
You can also make YouTube videos with just your phone , check this video for more details.
2. Action Cameras
If you are a fan of outdoor activities and you want to shoot your YouTube videos while you’re having an adventure action cam may be your best choice. The GoPro and all similar types of cameras are small, lightweight, and they can produce videos in high resolution. Most of these cameras come with mounts and accessories that enable you to shoot perfectly stable footage while you are climbing, running or walking.
We have composed some useful tips and trick of buying and using action camera, in cast that you want to buy an action camera for shooting videos, do check out this ultimate action camera guide .
3. Camcorders
YouTubers that often shoot videos on different locations, can hardly go wrong if they decide to capture their videos with a camcorder. The best models on the market enable you to shoot 4K videos, even in less than perfect light conditions and you can also adjust the camera settings manually. Camcorders are a great choice if you want to make sure that your footage always looks great, regardless of the location on which you recorded it.
If you want to buy a camcorder to shoot your YouTube vlog video, please do check this list of best 4k camcorders that you can buy.
4. Mirrorless Cameras
Besides offering superb image quality, mirrorless cameras also let you change lenses so you get the best shot in every scene you want to include in your video. These types of cameras are a popular choice for vlogging or capturing footage for all types of YouTube videos because they feature professional video recording options while remaining relatively lightweight and easy to carry around. However, the best mirrorless cameras on the market can be quite expensive, and you must be prepared to invest money in lenses and other equipment.
If you want to buy a mirrorless camera to shoot your YouTube vlog video, please do check this list of best 4k mirrorless cameras.
5. DSLR Cameras
Seasoned professionals, as well as the newcomers to the world of video production, can benefit from using a DSLR camera for shooting the content for their YouTube channel. These types of cameras allow you to change lenses, pull focus manually, shoot at different frame rates or capture the footage in 4K and Full HD quality. What’s more, you can use a DSLR camera even in challenging light conditions, because most models support ISO sensitivity values that enable the camera to produce remarkable image quality even when the amount of light in a shot is far from perfect.
With a DSLR camera, you can also use it a webcam for recording your face and your desktop screen at the same time, check how to use a DSLR camera as a webcam .
Equipment 2: Microphones
Moving images are less effective without sound, which is the reason why you should pay close attention to this aspect of the video making process. All cameras have built-in microphones, but the audio quality they produce is often not good enough to actually use it in a YouTube video. That’s why recording sound with an external microphone is a common practice among the most successful YouTubers.
The location at which you’re shooting the video will help you determine which microphone you should use for that project. If you are recording your YouTube video in the exterior an omnidirectional microphone is your best choice because it will eliminate the wind noise. Furthermore, as their name suggests these microphones can pick up sounds from all directions so people in your videos don’t have to speak directly into the microphone.
Shotgun or unidirectional mics are frequently used in studio conditions when you want to eliminate all other sounds except the narrator’s voice. Gamers, tutorial makers and all other YouTube content creators that rely heavily on narration in their videos use shotgun mics because they produce great audio quality. Even though it is easy to overlook the importance of sound for the overall quality of the video you’re working on, a video with great audio quality may actually help you attract more followers on YouTube.
Check: best microphones for YouTube vloggers.
Equipment 3: Video Stabilization Equipment
Holding a camera in your hand while shooting a video is often not the best idea, because even breathing may cause the camera to move and produce camera shakes. That’s where tripods , steadicams, gimbals , rigs and other video stabilization equipment comes in. As a matter of fact, you should only shoot handheld videos when you want to achieve this effect, while all another camera movement should be avoided without the use of appropriate equipment.
Shaky videos are not very pleasant to watch and they can reduce your chances of attracting more followers on YouTube. The video stabilization equipment offers a great solution, and you can get a professional tripod or gimbal at a very reasonable price. However, which video stabilization equipment you are going to use depends on the camera you have and the type of shot you want to get.
Check our list of best camera stabilizer for YouTubers in 2018 .
Equipment 4: Lighting Equipment
Instead of struggling with natural light sources and having to deal with shadows, you can simply use the lighting equipment to equalize the light values in a shot. Of course, whether or not you will use artificial light in your video depends on a number of factors, including the location and the visual style you’re trying to achieve.
Whether you will use an on-camera LED light, ring light or softbox video lights is yet another creative decision you will have to make during the process of shooting your YouTube video. The great majority of video lighting equipment produces the best results in controlled, studio-like conditions, so before you go ahead and buy an on-camera light or a softbox make sure that you know how the equipment will perform on the interior and exterior locations.
Conclusion
Producing YouTube videos on a constant basis requires you to have the right equipment for the job. You don’t have to shoot your videos with the most expensive camera out there or have the best microphone on the market in order to create a great YouTube video, but having the equipment capable of delivering a professional level of video and audio quality won’t hurt your chances of becoming a successful YouTuber.
We’d love to hear all about the gear you’re using to capture your videos, so leave a comment and let us know.
Richard Bennett
Richard Bennett is a writer and a lover of all things video.
Follow @Richard Bennett
[3-Step Formula] How To Check YouTube Income
There have been lots of user queries similar to the one above about how to check YouTube income lately. Honestly, YouTube has made it easy for users to track their revenue analytics on the platform, thus making it easy for creators to track how much they make and other revenue data.
So, if you don’t know how to check YouTube income, don’t worry, this article will teach you the simple steps to check your YouTube. Plus, you’ll find out how your YouTube earnings are calculated. Just stick with us.
Part 1: Follow the steps below to check your YouTube earnings
The process of checking YouTube income is pretty straightforward. So, regardless of what device you’re using to check, we’ve briefly explained the step-by-step instructions to carry out your YouTube income check within a few clicks.
Check on a computer
To check YouTube income on your PC or Mac, you just have to do the following;
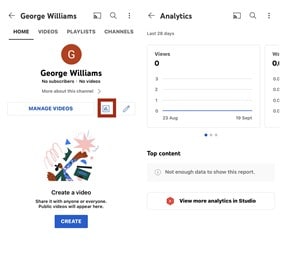
Step1 Open the browser app on your computer and sign in to your YouTube Studio .
Step2 Click Analytics from the left side of the screen.

Step3 On the Analytics screen, select Revenue from the top side of the screen to check your YouTube income.
There, you’ll find your YouTube income and other necessary data that you might need.
Check on a Mobile Device
The process of checking YouTube income on an Android or iOS device is also straightforward, and you can use either the YouTube app or the YouTube Studio app to perform the operation. The steps below explain the procedure;
YouTube App
Step1 Make sure you have the latest version of the YouTube app on your phone. If not, you can install it from Google Play Store or App Store.

Step2 Log in to your YouTube account and tap on the Profile icon at the top side. Then, select Your Channel.

Step3 Tap the Analytics icon from the middle menu. Your YouTube channel income and other data will be displayed on your phone screen.
YouTube Studio App
Step1 Launch the YouTube Studio app on your Android or iPhone.

Step2 Tap Analytics from the bottom menu and select Revenue from the top of the screen.

The information that you’ll find in the YouTube revenue analytics includes the following;
- RPM (Revenue Per Mile); This is the metric that displays how much a creator has earned per 1000 video views.
- Playback-based CPM; This shows the average gross revenue per 1000 playbacks where an AD or more is displayed.
- Monthly Estimated Revenue; This report shows how much a YouTuber has earned from his/her channel in the last six months.
- Revenue Sources: Just as the name suggests, this shows you the data of how much is earned from each revenue source used on your YouTube channel.
- Transaction Revenue; The transaction revenue metric is a breakdown of how much a creator has earned from membership and merch.
- Top Earnings; It shows the data of the video with the highest estimated revenue.
- Ad Type; This displays the percentage of revenue earned from the different types of ads.
Part 2: How your YouTube earnings are calculated
Having known how to check YouTube income, if you’re still wondering how your earnings are calculated, here, we’ve discussed all the necessary information you need to know about how YouTube earnings are calculated.
YouTube earnings are calculated based on different factors. From CPC to CPM, estimated gross earnings per view, and more. Keep reading to find out more about how these factors affect your YouTube earnings;
CPM (Cost Per Mile): CPM is the amount an advertiser pays for every one thousand views of their ads. This means if an advertiser is paying you $10CPM, you’ll earn $10 on every 1000 views of their ads.
CPC (Cost Per Click): Most people think CPC is the same as CPM, but no they are not. Cost Per Click is the amount an advertiser pays for every viewer that clicks on their ads. If an advertiser is willing to pay $10, then you’ll earn $10 on every ad click.
Estimated Gross Earning Per Subscriber: You’ll notice whenever you watch a YouTube video, the creator always emphasizes you click the Subscribe button to get a notification on every new video he/she uploads. Well, they do this because the more subscribers they get, the more likely their videos appear in search results.
Also, if you have a huge Subscriber base, your videos tend to get more views, thereby increasing ad views, ad clicks, and your earnings.
All the factors explained above will determine how your YouTube earnings are calculated. However, keep in mind that you’ll receive only 55% of the total dollar advertisers pays while YouTube keeps the remaining 45%. If you get an average of $5 from an advertiser on every 1000 ad view, you’ll earn $5 x 55% which is approximately $2.75.
You can also calculate your YouTube channel total earnings by using the YouTube calculator .

Part 3: How do you increase your YouTube earnings?
1. Post quality videos
If your video is of low quality, then viewers might not find it interesting. For this reason, it’s important you post quality videos, and you need the Wondershare Filmora software for such an operation.
Filmora is one of the best video editing software that is trusted by millions of users globally because of its high efficiency. It supports lots of advanced tools that anyone can utilize to edit and spice up their videos. From adding transitions to applying effects, and more. It even offers a high-quality built-in preset that users can utilize for free to give their video the best quality they can ever think of.
Free Download For Win 7 or later(64-bit)
Free Download For macOS 10.14 or later
Step1 Install Filmora software on your computer.
Step2 Use the Import button to upload the video you created for your YouTube channel. You can also drag-n-drop it to the interface of the software.
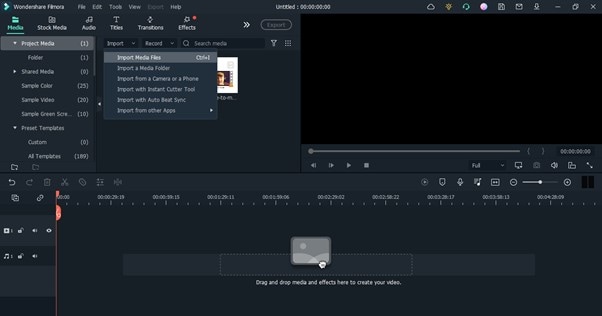
Step3 Drag-n-drop the video you uploaded to the Timeline.

Step4 To remove unwanted background from your video, click Effects from the top side of the screen. Select AI Portrait from the left side of the screen and select a preferred AI Portrait effect that you’ll like to use in the video.

Step5 Next, drag-n-dop the chosen AI Portrait effect to the timeline. After that, adjust the AI Portrait effect from the timeline. You can also add multiple effects by dragging and dropping them to the timeline.
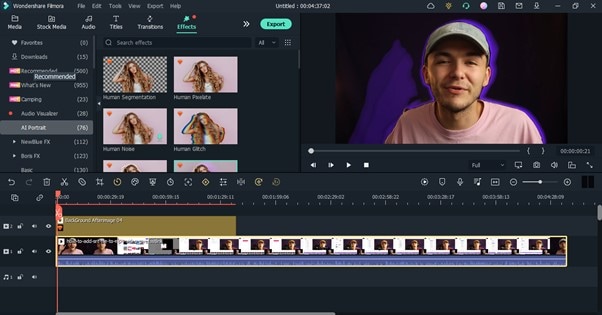
Step6 Double-click the AI Portrait effect from the Timeline. From the pop-up that appears, adjust the settings according to your requirements.

Step7 You can add Subscribe watermark by clicking the >> icon at the top of the screen, then select Element.

Choose the ‘Social Media Show Element 07’ Effects. Drag-n-drop the selected effect to the Timeline.

Step8 Preview the edited video. If you’re satisfied with the output, click the Export button at the top bar and choose Burn DVD from the drop-down list.

Step9 Enter file name in the box next to Label. Then, navigate to Folder Path and choose where you want the file to be saved. Afterward, click Export to Finish.

2. Upload videos regularly
Starting a YouTube channel can be quite hard from start, but make it a priority to upload at least two quality videos every week. Yes, the more quality videos you post, the more you attract the viewer to like your videos, and the higher your chances of getting new subscribers, thereby increasing your YouTube earnings.
3. Promote your Videos
Promoting your YouTube videos is a great way to increase your YouTube earnings. Once you post a new video on YouTube, you can share it to your other social media profiles or websites to increase views and attract new folks to watch the video. The more views you get the more money you’ll make.
Part 4: Hot FAQs on YouTube channel earnings check
Let’s take a look at some frequently asked questions from users like you.
1. Is monetizing on YouTube different from Google AdSense?
YouTube monetization involves making money from videos you upload on your YouTube channel. And Google AdSense is a means of monetizing your YouTube channel.
2. Why should you consider monetizing on YouTube creator?
Monetizing YouTube as a creator is a great way to earn passive income just by uploading videos. Research shows that an average YouTuber has the potential of earning $10,000 in revenue per year.
3. Which category is best for YouTube earnings?
The average CPM you earn from videos you upload on YouTube all depends on the niche of your video. The following are the best 5 categories best for YouTube earnings in 2022;
Make Money Online - $13.52
Social Media Marketing - $12.41
Finance & Investing - $12.25
Educational Videos - $9.89
Photography & Film Making - $7.31
Final Words
Checking YouTube income is not a big deal. This article has covered every necessary detail you need to know about checking your YouTube income on a PC or mobile phone. Also, if you don’t understand how YouTube earnings are calculated, we touched on that, and don’t hesitate to employ the tips discussed to increase your YouTube earnings.
Free Download For Win 7 or later(64-bit)
Free Download For macOS 10.14 or later
Part 1: Follow the steps below to check your YouTube earnings
The process of checking YouTube income is pretty straightforward. So, regardless of what device you’re using to check, we’ve briefly explained the step-by-step instructions to carry out your YouTube income check within a few clicks.
Check on a computer
To check YouTube income on your PC or Mac, you just have to do the following;
Step1 Open the browser app on your computer and sign in to your YouTube Studio .
Step2 Click Analytics from the left side of the screen.
Step3 On the Analytics screen, select Revenue from the top side of the screen to check your YouTube income.
There, you’ll find your YouTube income and other necessary data that you might need.
Check on a Mobile Device
The process of checking YouTube income on an Android or iOS device is also straightforward, and you can use either the YouTube app or the YouTube Studio app to perform the operation. The steps below explain the procedure;
YouTube App
Step1 Make sure you have the latest version of the YouTube app on your phone. If not, you can install it from Google Play Store or App Store.
Step2 Log in to your YouTube account and tap on the Profile icon at the top side. Then, select Your Channel.
Step3 Tap the Analytics icon from the middle menu. Your YouTube channel income and other data will be displayed on your phone screen.
YouTube Studio App
Step1 Launch the YouTube Studio app on your Android or iPhone.
Step2 Tap Analytics from the bottom menu and select Revenue from the top of the screen.
The information that you’ll find in the YouTube revenue analytics includes the following;
- RPM (Revenue Per Mile); This is the metric that displays how much a creator has earned per 1000 video views.
- Playback-based CPM; This shows the average gross revenue per 1000 playbacks where an AD or more is displayed.
- Monthly Estimated Revenue; This report shows how much a YouTuber has earned from his/her channel in the last six months.
- Revenue Sources: Just as the name suggests, this shows you the data of how much is earned from each revenue source used on your YouTube channel.
- Transaction Revenue; The transaction revenue metric is a breakdown of how much a creator has earned from membership and merch.
- Top Earnings; It shows the data of the video with the highest estimated revenue.
- Ad Type; This displays the percentage of revenue earned from the different types of ads.
Part 2: How your YouTube earnings are calculated
Having known how to check YouTube income, if you’re still wondering how your earnings are calculated, here, we’ve discussed all the necessary information you need to know about how YouTube earnings are calculated.
YouTube earnings are calculated based on different factors. From CPC to CPM, estimated gross earnings per view, and more. Keep reading to find out more about how these factors affect your YouTube earnings;
CPM (Cost Per Mile): CPM is the amount an advertiser pays for every one thousand views of their ads. This means if an advertiser is paying you $10CPM, you’ll earn $10 on every 1000 views of their ads.
CPC (Cost Per Click): Most people think CPC is the same as CPM, but no they are not. Cost Per Click is the amount an advertiser pays for every viewer that clicks on their ads. If an advertiser is willing to pay $10, then you’ll earn $10 on every ad click.
Estimated Gross Earning Per Subscriber: You’ll notice whenever you watch a YouTube video, the creator always emphasizes you click the Subscribe button to get a notification on every new video he/she uploads. Well, they do this because the more subscribers they get, the more likely their videos appear in search results.
Also, if you have a huge Subscriber base, your videos tend to get more views, thereby increasing ad views, ad clicks, and your earnings.
All the factors explained above will determine how your YouTube earnings are calculated. However, keep in mind that you’ll receive only 55% of the total dollar advertisers pays while YouTube keeps the remaining 45%. If you get an average of $5 from an advertiser on every 1000 ad view, you’ll earn $5 x 55% which is approximately $2.75.
You can also calculate your YouTube channel total earnings by using the YouTube calculator .
Part 3: How do you increase your YouTube earnings?
1. Post quality videos
If your video is of low quality, then viewers might not find it interesting. For this reason, it’s important you post quality videos, and you need the Wondershare Filmora software for such an operation.
Filmora is one of the best video editing software that is trusted by millions of users globally because of its high efficiency. It supports lots of advanced tools that anyone can utilize to edit and spice up their videos. From adding transitions to applying effects, and more. It even offers a high-quality built-in preset that users can utilize for free to give their video the best quality they can ever think of.
Free Download For Win 7 or later(64-bit)
Free Download For macOS 10.14 or later
Step1 Install Filmora software on your computer.
Step2 Use the Import button to upload the video you created for your YouTube channel. You can also drag-n-drop it to the interface of the software.
Step3 Drag-n-drop the video you uploaded to the Timeline.
Step4 To remove unwanted background from your video, click Effects from the top side of the screen. Select AI Portrait from the left side of the screen and select a preferred AI Portrait effect that you’ll like to use in the video.
Step5 Next, drag-n-dop the chosen AI Portrait effect to the timeline. After that, adjust the AI Portrait effect from the timeline. You can also add multiple effects by dragging and dropping them to the timeline.
Step6 Double-click the AI Portrait effect from the Timeline. From the pop-up that appears, adjust the settings according to your requirements.
Step7 You can add Subscribe watermark by clicking the >> icon at the top of the screen, then select Element.
Choose the ‘Social Media Show Element 07’ Effects. Drag-n-drop the selected effect to the Timeline.
Step8 Preview the edited video. If you’re satisfied with the output, click the Export button at the top bar and choose Burn DVD from the drop-down list.
Step9 Enter file name in the box next to Label. Then, navigate to Folder Path and choose where you want the file to be saved. Afterward, click Export to Finish.
2. Upload videos regularly
Starting a YouTube channel can be quite hard from start, but make it a priority to upload at least two quality videos every week. Yes, the more quality videos you post, the more you attract the viewer to like your videos, and the higher your chances of getting new subscribers, thereby increasing your YouTube earnings.
3. Promote your Videos
Promoting your YouTube videos is a great way to increase your YouTube earnings. Once you post a new video on YouTube, you can share it to your other social media profiles or websites to increase views and attract new folks to watch the video. The more views you get the more money you’ll make.
Part 4: Hot FAQs on YouTube channel earnings check
Let’s take a look at some frequently asked questions from users like you.
1. Is monetizing on YouTube different from Google AdSense?
YouTube monetization involves making money from videos you upload on your YouTube channel. And Google AdSense is a means of monetizing your YouTube channel.
2. Why should you consider monetizing on YouTube creator?
Monetizing YouTube as a creator is a great way to earn passive income just by uploading videos. Research shows that an average YouTuber has the potential of earning $10,000 in revenue per year.
3. Which category is best for YouTube earnings?
The average CPM you earn from videos you upload on YouTube all depends on the niche of your video. The following are the best 5 categories best for YouTube earnings in 2022;
Make Money Online - $13.52
Social Media Marketing - $12.41
Finance & Investing - $12.25
Educational Videos - $9.89
Photography & Film Making - $7.31
Final Words
Checking YouTube income is not a big deal. This article has covered every necessary detail you need to know about checking your YouTube income on a PC or mobile phone. Also, if you don’t understand how YouTube earnings are calculated, we touched on that, and don’t hesitate to employ the tips discussed to increase your YouTube earnings.
Free Download For Win 7 or later(64-bit)
Free Download For macOS 10.14 or later
Also read:
- 2024 Approved Creating Classical Cinematography A Modern Tutorial
- In 2024, Efficient Techniques Sharing Video Content From YouTube FB
- [New] A Beginner's Guide to YouTube Shorts Nuances
- Channel-Specific Audio Excellence Top 156 Character Titles For YT Sound Solutions for 2024
- Bypass Latency with AV1 in YouTube Settings
- From Idea to Execution A Comprehensive YouTube Video Guide
- Architects Crafting Fantasy Realms for Marvel for 2024
- Nailing Your Online Visibility with Optimal YouTube Thumbnail Dimensions
- [Updated] Ascending with Expertise Mastering The Art & Science of ASMR Production
- Step-by-Step Guide to Youtube Sound Placement
- [New] Elevate Engagement Crafting Anime Subscribe Bars for YouTube Content
- Old Hollywood Techniques for Modern Filmmakers
- [Updated] Break Free From YouTube with These Best 27 Video Streamers
- [Updated] Brightening Up Your Online Videos
- [New] Direct Streamline The Most Efficient Flv-to-YouTube Tools Ranked
- Curbing Common Mishaps YouTube Short Edition for 2024
- Comprehensive Guide to YouTube Video Editing Tools for 2024
- Earning in the Limelight without Ads A Comprehensive Guide to YouTube Income
- In 2024, Discovering the Most Reliable YouTube Downloader Apps for Android
- From One-Off to Firm Follower An Ethical Approach
- 8 Essential Tools for Your YouTube-to-AVI Needs for 2024
- Harness the Full Potential of Your YouTube Content Using WMM
- Unwind with YouTube Tricks for Reducing Playback Velocity (49 Chars)
- Essential Steps to Producing a YouTube Hit Music Reaction Video Guide
- [New] Best Biz YouTubes Top 10 for Quick Channel Setup
- In 2024, Dive Deep Into Video Creation with These Top 12 Vlogger-Friendly Cameras
- In 2024, BattleBuddies Channel Over a Hundred Friends in Games
- In 2024, A Closer Look at Earnings Comparing Dailymotion and YouTube Revenues
- The Key to Video Marketing Dominance YouTube's SEO Secrets
- YouTube Soundwaves Flow Into iMovie Effortlessly
- In 2024, Content Composer Arena
- [New] In 2024, The Delicate Process of Unjoining Discords
- In 2024, 4 Most-Known Ways to Find Someone on Tinder For Motorola Moto G84 5G by Name | Dr.fone
- A How-To Guide on Bypassing the Apple iPhone 7 Plus iCloud Lock
- [New] In 2024, Cutting Ties with Instagram Navigating a Permanent Exit Strategy
- Guide to Mirror Your Vivo S17e to Other Android devices | Dr.fone
- [Updated] 2024 Approved Top Mac Screen Recorders Ranked A Comprehensive Analysis
- [Updated] In 2024, The Ultimate Guide to Digital Audio Streaming & Recording
- New Steps to Create Gold Text Effects After Effects for 2024
- New Free AVI Video Rotator Software and Apps for All Devices for 2024
- [Updated] 2024 Approved Capture Games Effortlessly with NVIDIA
- Elevating Your Visuals Mastering Instagram Edits in FCPX
- [Updated] The Essentials of WhatsApp Room Setup for 2024
- Unlocking the Purpose and Function of Facebook's Status Emoji for 2024
- 2024 Approved Crafting Professional PPT Video Content
- Updated In 2024, Auditory Tranquility Techniques to Achieve Gentle Sound Reduction
- Wit Wave Twitter's Funniest Content
- In 2024, Unlock Apple iPhone 12 Pro With Forgotten Passcode Different Methods You Can Try | Dr.fone
- How to Transfer Data from Vivo V30 to BlackBerry | Dr.fone
- Want to Uninstall Google Play Service from Honor 90? Here is How | Dr.fone
- Expert Techniques for High-Quality Xbox Screenshots for 2024
- [New] Best Templates, No Cost! Explore Premiere Pro Samples (FREE)
- Altering Images A Photographer's Toolkit for 2024
- New In 2024, Transform Your Videos with 3D Effects A Windows Users Guide
- 2024 Approved Want to Find a High-Quality Video Editing Tool for Your 64 Bit Operating System? Youve Come to the Right Place
- [New] 2024 Approved Key Aspects of ZDSoft Vision Recorder
- [Updated] Mastering the Art of HTML Formatting and Styling for 2024
- Title: "Mastering Your Setup Essential Shooting Accessories"
- Author: Steven
- Created at : 2024-05-25 19:52:55
- Updated at : 2024-05-26 19:52:55
- Link: https://youtube-clips.techidaily.com/mastering-your-setup-essential-shooting-accessories/
- License: This work is licensed under CC BY-NC-SA 4.0.
