Mastering the Art of Joining YouTube Clips
Mastering the Art of Joining YouTube Clips
How to Merge/Combine/Join YouTube (FLV) Videos

Richard Bennett
Mar 27, 2024• Proven solutions
YouTube is the most popular video sites in the world. You may have downloaded loads of videos from this website. But how to merge them together so that you can play all YouTube videos as one either on a PC, device, or TV? Here a professional YouTube merger is introduced in part 1 for you to easily complete the job. If you just want to merge the videos that have been already uploaded to YouTube, the YouTube Video Editor can help you with that.
Part 1: How to Merge Downloaded YouTube Videos
Part 2: How to Merge YouTube Videos Online
Part 1: How to Merge Downloaded YouTube Videos

Tool you need: Wondershare Filmora video editor
Wondershare Filmora is an easy-to-use video editing tool. With it, YouTube videos will be automatically merged orderly without interrupts. On top of that, you can add transitions between two YouTube videos to make your videos more harmonious. It also enables you to easily make a picture-in-picture (PIP) video , which is definitely another creative way to merge YouTube videos.
Sounds good? Download it now and use this YouTube merger to merge all your YouTube videos.


Below is the details about how to merge YouTube video in Filmora
Step 1.Import YouTube files to the program
Download and install Wondershare Filmora. It gives good support to the downloaded YouTube videos (usually in FLV or MP4 format). You can either click “Import” on the primary windows and select YouTube video files from your computer, or simply drag and drop YouTube video files from File Explorer to the User’s Album.

Step 2. Drag and drop YouTube videos to merge
To merge YouTube videos, select multiple YouTube videos in the User’s Album by holding down Ctrl or Shift key, and then drag and drop them to the video track on the Timeline. All YouTube files will join one after another without interrupts and there is none transition by default, but you can add transitions between video clips as you want. This will be introduced in Step 3.

Step 3. Merge YouTube videos with transition
By adding transitions, YouTube videos will flow nicely from one to the next. To do so, switch to Transition tab, and drag the desired transition to the Timeline. Alternatively, right click any transition and choose “Apply to All” and “Random to All” from the popup menu to add transitions between YouTube videos in seconds.

Step 4. Merge multiple YouTube files into one
Make sure you are satisfied with everything. You can click Play button to preview how YouTube videos will be merged. If the result is good, click “Export” button to save the YouTube video as one.

Therefore, go to the “Format” tab and select one desired format and click Create to start merging YouTube videos. By the way, if you want to play the merged YouTube files on iPod, iPhone, iPad, choose “Device” and select your device from the list. You can also directly upload back to YouTube for sharing or burn to DVD for playing on TV.
Part 2: How to Merge YouTube Videos Online

Tool you need: YouTube Video Editor
YouTube Video Editor is a browser-based video editor released by YouTube itself. It enables users to make minor edits to videos they’ve uploaded onto YouTube, as well as merge several clips together into one. It requires no additional software, or browser plug-ins (besides Adobe’s Flash), which makes it convenient to use. However, it lacks many basic features of modern day consumer video editing software and often crashes while dealing with large video files.

Get access to the editor
Sign in to your YouTube (or Google) account. Click “Upload”>> “Edit” to the Video Editor tab.

Place videos on the timeline
Simply drag the videos that need merge onto the timeline or hit the plus icon in the top right hand corner of each clip.

Save the settings
Review the result. If satisfied, hit the “Publish” button to save the settings.
Richard Bennett
Richard Bennett is a writer and a lover of all things video.
Follow @Richard Bennett
Richard Bennett
Mar 27, 2024• Proven solutions
YouTube is the most popular video sites in the world. You may have downloaded loads of videos from this website. But how to merge them together so that you can play all YouTube videos as one either on a PC, device, or TV? Here a professional YouTube merger is introduced in part 1 for you to easily complete the job. If you just want to merge the videos that have been already uploaded to YouTube, the YouTube Video Editor can help you with that.
Part 1: How to Merge Downloaded YouTube Videos
Part 2: How to Merge YouTube Videos Online
Part 1: How to Merge Downloaded YouTube Videos
Tool you need: Wondershare Filmora video editor
Wondershare Filmora is an easy-to-use video editing tool. With it, YouTube videos will be automatically merged orderly without interrupts. On top of that, you can add transitions between two YouTube videos to make your videos more harmonious. It also enables you to easily make a picture-in-picture (PIP) video , which is definitely another creative way to merge YouTube videos.
Sounds good? Download it now and use this YouTube merger to merge all your YouTube videos.
Below is the details about how to merge YouTube video in Filmora
Step 1.Import YouTube files to the program
Download and install Wondershare Filmora. It gives good support to the downloaded YouTube videos (usually in FLV or MP4 format). You can either click “Import” on the primary windows and select YouTube video files from your computer, or simply drag and drop YouTube video files from File Explorer to the User’s Album.
Step 2. Drag and drop YouTube videos to merge
To merge YouTube videos, select multiple YouTube videos in the User’s Album by holding down Ctrl or Shift key, and then drag and drop them to the video track on the Timeline. All YouTube files will join one after another without interrupts and there is none transition by default, but you can add transitions between video clips as you want. This will be introduced in Step 3.
Step 3. Merge YouTube videos with transition
By adding transitions, YouTube videos will flow nicely from one to the next. To do so, switch to Transition tab, and drag the desired transition to the Timeline. Alternatively, right click any transition and choose “Apply to All” and “Random to All” from the popup menu to add transitions between YouTube videos in seconds.
Step 4. Merge multiple YouTube files into one
Make sure you are satisfied with everything. You can click Play button to preview how YouTube videos will be merged. If the result is good, click “Export” button to save the YouTube video as one.
Therefore, go to the “Format” tab and select one desired format and click Create to start merging YouTube videos. By the way, if you want to play the merged YouTube files on iPod, iPhone, iPad, choose “Device” and select your device from the list. You can also directly upload back to YouTube for sharing or burn to DVD for playing on TV.
Part 2: How to Merge YouTube Videos Online
Tool you need: YouTube Video Editor
YouTube Video Editor is a browser-based video editor released by YouTube itself. It enables users to make minor edits to videos they’ve uploaded onto YouTube, as well as merge several clips together into one. It requires no additional software, or browser plug-ins (besides Adobe’s Flash), which makes it convenient to use. However, it lacks many basic features of modern day consumer video editing software and often crashes while dealing with large video files.
Get access to the editor
Sign in to your YouTube (or Google) account. Click “Upload”>> “Edit” to the Video Editor tab.
Place videos on the timeline
Simply drag the videos that need merge onto the timeline or hit the plus icon in the top right hand corner of each clip.
Save the settings
Review the result. If satisfied, hit the “Publish” button to save the settings.
Richard Bennett
Richard Bennett is a writer and a lover of all things video.
Follow @Richard Bennett
Breaking Into the Digital Realm: The WireCast Approach for YouTube Streamers
How to live stream to youtube with wirecast?
Richard Bennett
Mar 27, 2024• Proven solutions
Are you trying to use wirecast to stream to youtube? You are in the right place, here is our step by step guide to go live on youtube with wirecast.
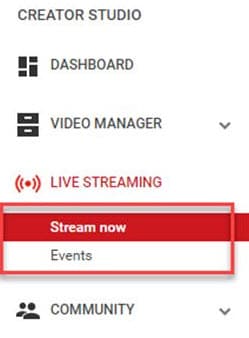
Step 1: First of all you need to login to your YouTube Creator Studio and then select Live Streaming option from available options on your screen.
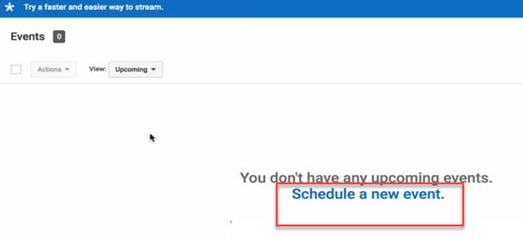
Step 2: Once you enter into the live streaming option then your application will ask you to schedule a new event; follow this option.
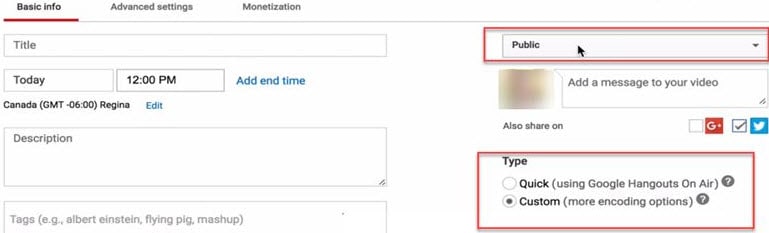
Step 3: Now you need to enter few basic details about your video that you are going to live stream. Do not forget to choose custom option under the Type category available on bottom right side of screen.
Step 4: It is time to hit the create event option.

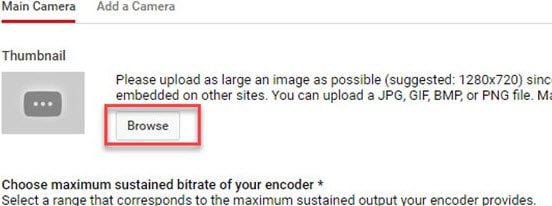
Step 5: Your system will now take you to the camera settings; here you need to enter your thumbnail. It can be done directly by using browse option.
Step 6: Now you need to select ‘basic ingestion’ option and secondly select ‘other encoders’ option from second set of information.

Step 7: Once you have completed above settings then you need to save all the changes and then move to the live control room on your screen.
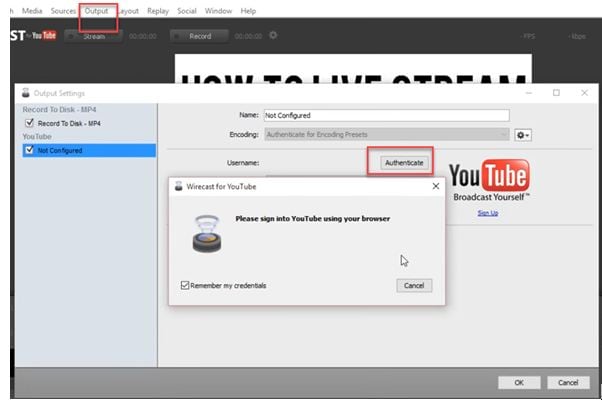
Step 8: Open the wirecast software tool on your device and then simply move to the output settings. Hit the authenticate option, it will soon ask you to enter the YouTube login detail.
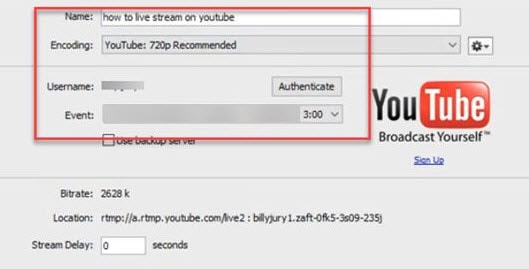
Step 9: As soon as you sign in with your account using browser, then your settings will be ready on screen. Simply hit Ok.
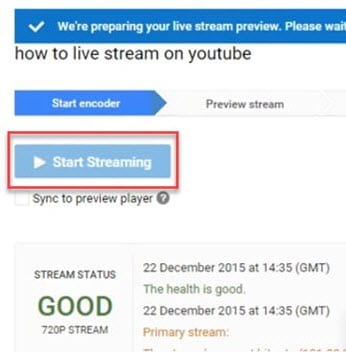
Step 10: It is time to make your video source or content ready for streaming. You need to hit on the stream button that is available on top portion of screen.

Step 11: Now simply move to the YouTube event page and start streaming your content.
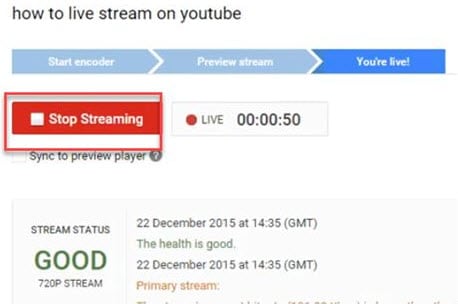
Step 12: Once you content for streaming is finished then click the stop streaming button that appears in red color on screen. You will also get information about duration of your video that is going live.
Step 13: When your streaming process ends then video will be saved to video manager. You can view it easily at later stage.
Richard Bennett
Richard Bennett is a writer and a lover of all things video.
Follow @Richard Bennett
Richard Bennett
Mar 27, 2024• Proven solutions
Are you trying to use wirecast to stream to youtube? You are in the right place, here is our step by step guide to go live on youtube with wirecast.
Step 1: First of all you need to login to your YouTube Creator Studio and then select Live Streaming option from available options on your screen.
Step 2: Once you enter into the live streaming option then your application will ask you to schedule a new event; follow this option.
Step 3: Now you need to enter few basic details about your video that you are going to live stream. Do not forget to choose custom option under the Type category available on bottom right side of screen.
Step 4: It is time to hit the create event option.
Step 5: Your system will now take you to the camera settings; here you need to enter your thumbnail. It can be done directly by using browse option.
Step 6: Now you need to select ‘basic ingestion’ option and secondly select ‘other encoders’ option from second set of information.
Step 7: Once you have completed above settings then you need to save all the changes and then move to the live control room on your screen.
Step 8: Open the wirecast software tool on your device and then simply move to the output settings. Hit the authenticate option, it will soon ask you to enter the YouTube login detail.
Step 9: As soon as you sign in with your account using browser, then your settings will be ready on screen. Simply hit Ok.
Step 10: It is time to make your video source or content ready for streaming. You need to hit on the stream button that is available on top portion of screen.
Step 11: Now simply move to the YouTube event page and start streaming your content.
Step 12: Once you content for streaming is finished then click the stop streaming button that appears in red color on screen. You will also get information about duration of your video that is going live.
Step 13: When your streaming process ends then video will be saved to video manager. You can view it easily at later stage.
Richard Bennett
Richard Bennett is a writer and a lover of all things video.
Follow @Richard Bennett
Also read:
- [New] 2024 Approved Expert Routines for Volume Balancing in FL Studio
- [New] Easy Steps to Install Windows Movie Maker 6
- [New] Pure Image, No Clutter - Webcam Recording Edit for 2024
- [Updated] CarryMinati The YouTube Money Trail of Ajey Nagar
- [Updated] Direct Approaches to Documenting Google Voice Interactions
- [Updated] Elevate Your Content YouTube Movie Maker 101
- Discover the Joy of Portable Gaming on Steam Deck
- Educator’s Digital Guide: 4 Essential GPT Validation Tools
- Effortlessly Stream MP3 to YouTube with 3 Key Steps for 2024
- Free Video Embedding for Dynamic Online Articles
- Hacks Create YouTube Shorts Thumbnails That Stand Out Quickly
- How to Throw a Memorable Labor Day Celebration - Expert Advice and Essentials From ZDNet
- How to Track Itel A70 Location without Installing Software? | Dr.fone
- In 2024, Earning Mastery Executing a 3-Step Procedure to Evaluate Your YouTube Income
- In 2024, Essential Tips for YouTube Edits with Sony Vegas
- The Virality of Jake Paul A YouTube Odyssey
- Unveiling the GoPro SuperView: A Deep Dive Into Its Features - Clarity, Speed, Adjustments & Scope
- Title: Mastering the Art of Joining YouTube Clips
- Author: Steven
- Created at : 2024-12-29 20:36:37
- Updated at : 2025-01-03 19:33:40
- Link: https://youtube-clips.techidaily.com/mastering-the-art-of-joining-youtube-clips/
- License: This work is licensed under CC BY-NC-SA 4.0.