Mastering the Art of Crafting Engaging YouTube Screen Closures
Mastering the Art of Crafting Engaging YouTube Screen Closures
How to Add YouTube End Screen and Cards Effectively

Richard Bennett
Mar 27, 2024• Proven solutions
The traditional annotation’s features are replaced by its successor YouTube Cards and End Screen. The annotations performed poorly on mobile and thus, the new changes are for good. The annotations had become outdated and were completely unbefitting. On the contrary, the YouTube cards and end screen offers great access to both desktop and mobiles with easier and faster implementation. Are you still looking for Annotations? Stop your search and try considering YouTube end screen. In this article, learn how to use Youtube end screen and cards.
- Part1: Why You Need to Add End Screens To Videos
- Part2: How To Use Youtube End Screen
- Part3: How To Use Youtube Cards
Wondershare Filmstock Gaming Video Editing Skils ](https://filmstock.wondershare.com/creative-theme-game?source%5Fchannel=seo%5Farticle&spm=rs.filmora%5Fweb )
Part 1: Why You Need to Add End Screens and Cards to Videos
There are several reasons that make the YouTube end screen and cards a great tool when added to the videos. The new channel builtin features, donation choices, embedded polls and more are some of the best interactive and powerful features of YouTube end screen that’s when added to the video can drive in users to your channel. It is a strong tool to build viewership of your channel. When you use YouTube end screen at the end of the video, it helps in directing the users to other channels, playlists, and videos and also helps in promoting crowdfunding campaigns, merchandise and website. The YouTube end screen is a part of the video and to have an end screen on your video, it must be around 25seconds long.
Part 2: How To Use Youtube End Screen
Do you wish to add YouTube end screen to your video? Just follow the steps and get going.
- Go to Creator Studio and check the left side to find the Video Manager, click on it.
- Wherever you wish to add the end screen on the video, click on it.
- Click End Screen & Annotations at the top.
- From end screen and annotations, you can add or configure elements.
- Check how the end screen will appear to the visitors.
- Click on blue color add element’s button to find four options available there:
Playlist or Videos- This element allows to play the suggested video on the same tab when the user clicks on it.
Subscribe- This allows the users to quickly subscribe to the channel. You may change the appearance of the icon and how your brand name looks.
Channel- Click on this element to promote other YouTube Channel. You may also customize it with a message.
Link- This element helps in sending the users directly to your website. Although, Google has restricted other link addition in the video. In order to add, you must have an Adsense account and permit monetization.
Part 3: How To Use Youtube Cards
YouTube Cards is more interactive. Users can add images and other linkes. Here are the steps.
- Click on the “Video Manager” tab.
- If you want to add cards, Click “Edit” tab under it. Then click “cards”.
- Choose the cards type you want to make on “Add Card” drop down menu.
- Click “create” button. Select the timeline. In the end, apply.
The types of YouTube cards
- Video or playlist: links to other videos/the complete palylist on YouTube related or non-related to that specific videolinks to further purchase websites or specific product.
- Channel: promote another YouTube channel, one of the most common methods to collaborate with other YouTubers
- Poll: Encourage viewers to participate in a poll (vote)
- Link: links to a website which compliments whatever content is in the video.
4 Tips for Using YouTube Cards
1. You might be used to pointing to the part of your screen where you intend to put an annotation, but when you use YouTube Cards they might switch locations depending on what device a viewer is watching on.
2. Use three or less cards per video. Viewers are more likely to click your cards if there are fewer of them, and more likely to start ignoring them if it seems like they’re always popping up. Also, do not have all three of these cards appear at once and make people choose between them. Stagger them throughout your video.
3. Your cards should be related to what you are saying in your vlog. Avoid posting completely random links in the middle of your video because a viewer who clicks on them will get confused. You can post any type of link you want at the very end of your video, though.
4. The end of your video is always a great place to link viewers to another of your videos, whether you use a card or an end screen. If somebody liked your video enough to watch until the end they’ll probably welcome a chance to consume similar content.
Conclusion
Now, that you are aware how to add YouTube end screen to your video, make use of the amazing features of YouTube end screen and cards and let driving in traffic to your site be easy and fruitful.
Richard Bennett
Richard Bennett is a writer and a lover of all things video.
Follow @Richard Bennett
Richard Bennett
Mar 27, 2024• Proven solutions
The traditional annotation’s features are replaced by its successor YouTube Cards and End Screen. The annotations performed poorly on mobile and thus, the new changes are for good. The annotations had become outdated and were completely unbefitting. On the contrary, the YouTube cards and end screen offers great access to both desktop and mobiles with easier and faster implementation. Are you still looking for Annotations? Stop your search and try considering YouTube end screen. In this article, learn how to use Youtube end screen and cards.
- Part1: Why You Need to Add End Screens To Videos
- Part2: How To Use Youtube End Screen
- Part3: How To Use Youtube Cards
Wondershare Filmstock Gaming Video Editing Skils ](https://filmstock.wondershare.com/creative-theme-game?source%5Fchannel=seo%5Farticle&spm=rs.filmora%5Fweb )
Part 1: Why You Need to Add End Screens and Cards to Videos
There are several reasons that make the YouTube end screen and cards a great tool when added to the videos. The new channel builtin features, donation choices, embedded polls and more are some of the best interactive and powerful features of YouTube end screen that’s when added to the video can drive in users to your channel. It is a strong tool to build viewership of your channel. When you use YouTube end screen at the end of the video, it helps in directing the users to other channels, playlists, and videos and also helps in promoting crowdfunding campaigns, merchandise and website. The YouTube end screen is a part of the video and to have an end screen on your video, it must be around 25seconds long.
Part 2: How To Use Youtube End Screen
Do you wish to add YouTube end screen to your video? Just follow the steps and get going.
- Go to Creator Studio and check the left side to find the Video Manager, click on it.
- Wherever you wish to add the end screen on the video, click on it.
- Click End Screen & Annotations at the top.
- From end screen and annotations, you can add or configure elements.
- Check how the end screen will appear to the visitors.
- Click on blue color add element’s button to find four options available there:
Playlist or Videos- This element allows to play the suggested video on the same tab when the user clicks on it.
Subscribe- This allows the users to quickly subscribe to the channel. You may change the appearance of the icon and how your brand name looks.
Channel- Click on this element to promote other YouTube Channel. You may also customize it with a message.
Link- This element helps in sending the users directly to your website. Although, Google has restricted other link addition in the video. In order to add, you must have an Adsense account and permit monetization.
Part 3: How To Use Youtube Cards
YouTube Cards is more interactive. Users can add images and other linkes. Here are the steps.
- Click on the “Video Manager” tab.
- If you want to add cards, Click “Edit” tab under it. Then click “cards”.
- Choose the cards type you want to make on “Add Card” drop down menu.
- Click “create” button. Select the timeline. In the end, apply.
The types of YouTube cards
- Video or playlist: links to other videos/the complete palylist on YouTube related or non-related to that specific videolinks to further purchase websites or specific product.
- Channel: promote another YouTube channel, one of the most common methods to collaborate with other YouTubers
- Poll: Encourage viewers to participate in a poll (vote)
- Link: links to a website which compliments whatever content is in the video.
4 Tips for Using YouTube Cards
1. You might be used to pointing to the part of your screen where you intend to put an annotation, but when you use YouTube Cards they might switch locations depending on what device a viewer is watching on.
2. Use three or less cards per video. Viewers are more likely to click your cards if there are fewer of them, and more likely to start ignoring them if it seems like they’re always popping up. Also, do not have all three of these cards appear at once and make people choose between them. Stagger them throughout your video.
3. Your cards should be related to what you are saying in your vlog. Avoid posting completely random links in the middle of your video because a viewer who clicks on them will get confused. You can post any type of link you want at the very end of your video, though.
4. The end of your video is always a great place to link viewers to another of your videos, whether you use a card or an end screen. If somebody liked your video enough to watch until the end they’ll probably welcome a chance to consume similar content.
Conclusion
Now, that you are aware how to add YouTube end screen to your video, make use of the amazing features of YouTube end screen and cards and let driving in traffic to your site be easy and fruitful.
Richard Bennett
Richard Bennett is a writer and a lover of all things video.
Follow @Richard Bennett
The Art of Arranging YouTube Video Elements
How to structure YouTube videos
Richard Bennett
Mar 27, 2024• Proven solutions
Creating a YouTube channel and uploading video content is only one part of the key to your success. With so much competition on the platform, it’s crucial that you stand out from the crowd with efficient, professional videos that are a pleasure to watch.
Without some planning and structure in mind before you begin filming, it’s all too easy to get a bit lost and start to ramble or fumble your words. Video’s filled with ‘umm’ and ‘err’ are neither pleasant to watch nor engaging.
If you’re serious about making a great YouTube channel and developing a loyal fan base, you’re going to need a workable structure for every video to help you stay on track. Here’s what you need to know:
Quick Jump Menu
- Why is structuring your video important?
- How should you structure YouTube Video Content?
- Ready to go out and make amazing videos?
Why is structuring your video important?
The structure of your video can make all the difference between a successful YouTube channel and a big waste of time. Your objective is to get people watching more and watching all the way to the end. A great structure can:
- Build interest and engagement: By keeping something in reserve and naturally building interest as you go along, people will be compelled to watch longer and interact more with your channel.
- Helps you rank higher: Longer and higher numbers of views will demonstrate your position as an authority well. The YouTube algorithm uses these metrics as part of their ranking factor, so the more and longer views you get, the higher you’ll rank in search.
- Builds consistency and familiarity: If all your videos follow a typical structure, your fans will come to be familiar with your format. They’ll know what to expect from your content and will watch more regularly as a result.
So, now you understand why structure is so important to your channel, let’s take a look at ways in which you can create an amazing structure for every video you produce.
How should you structure YouTube video content?
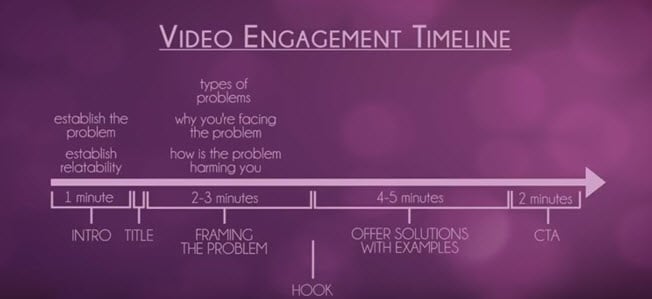
There are some key elements of a YouTube video’s structure which can make it more natural, more engaging and more fun to watch. When you’re planning your structure, you should follow a logical timeline to take the viewer from start to finish easily, and to ensure you get the actions you want at the end.
Intro
People love to be told what’s about to happen, and an intro can be a crucial step in ensuring they are going to continue watching your content. By explaining clearly what they are about to see, why it’s important to them and what problems you’re aiming to solve, you’ll keep them hooked and prevent them from browsing away to the next search result.
An introduction doesn’t need to be long or particularly involved. Remember, you don’t want to give away all your information here, as what you want is to encourage them to watch until the end. Something like “I’m going to show you … which will help you to …” is fine.
Your idea and purpose need to be conveyed fast and effectively if you’re keen to get their interest. Most viewers will decide within the first three to five seconds of a video if they want to invest their time in watching, so it’s crucial you capture their interest and engage them fast to stop them drifting away.
Main content
Once you’ve introduced your video, it’s time to start working through your content. This should be done by:
- Framing the problem
What are the types of problems that your viewers will have encountered which your video can solve? How is the problem affecting you and your viewers? Take around two to three minutes to describe the problems that you hope your video will solve, and work on being empathetic so people can relate to you and the issue you’re discussing.
- Offer solutions with examples
Move on to your solution to the problem. How did you find this solution? Is it easy to implement? Take around four to five minutes to address your solution and give examples of how it works in practice.
Now you’ve addressed the issue that your video content will solve, you’re almost ready to ask them to take the next step. Almost. There’s one more key element in your structure that you need to remember to include.
Hook
The hook can be placed anywhere in your content, although it’s most successful when placed either in the introduction or while you are framing the problem. The hook is a tidbit that aims to encourage a full viewing of your video, so don’t give away your solutions but do give them a reason to carry on watching.
If there’s a particular point where you think they might become bored or distracted, this is a great time to insert your hook. Come up with a powerful hook, for instance ‘with my solution I managed to go from ten views to two hundred in an hour’ or ‘when you hear this solution you’ll understand how I tripled my profits overnight’. Give them a reason to want to stay to the end.
Outro
Your outro shouldn’t just be about signing off in your unique way with some lovely music and visuals. This is the point at which you can ask something back from your audience, whatever that may be. We call this a ‘call to action’, and it could eb something as simple as subscribing through to something more involved like visiting your website.
Think about what you want from your audience; what should they do next? Remember to ask via a strong call to action, otherwise you’ve simply given them some free advice with very little in the way of a return for you.
Script or no script?
Many YouTubers shy away from using any sort of script, feeling that this will make them less relatable and natural. Choosing whether or not to script is entirely up to you; some people feel more comfortable with a script to hand, whereas others prefer to just wing it as they go.
If you don’t feel a script would work for you, do consider having a very rough outline of your structure and the points you want to make readily available while filming. It will help you regain control if you do happen to lose your place and will ensure you get all the information across that you’d planned to.
If you do think a full script would work better for you, make sure you are able to come across as naturally as possible while reading it. Write your script the same way you speak and run through a few times so you’re not squinting at words while you’re on camera. If you regularly wander off script, this could be a sign that a freer flowing style is more your thing.
Read More to Get : How to Loop a YouTube Video >>
Ready to go out and make amazing videos?
Having a structure to your videos might seem a little unnatural at first, but there’s plenty of evidence to show that people who take the time to plan their content get far better results than those who just improvise. If you’re unsure of the best structure for your content, watch videos made by others in your niche to see how they organize theirs.
That’s not to say you have to copy the leaders to be a success; indeed, you’ll be far more successful on YouTube if you continue to be unique. But there’s always room to learn from the best and to take inspiration from those who’ve been getting the very best results.
Richard Bennett
Richard Bennett is a writer and a lover of all things video.
Follow @Richard Bennett
Richard Bennett
Mar 27, 2024• Proven solutions
Creating a YouTube channel and uploading video content is only one part of the key to your success. With so much competition on the platform, it’s crucial that you stand out from the crowd with efficient, professional videos that are a pleasure to watch.
Without some planning and structure in mind before you begin filming, it’s all too easy to get a bit lost and start to ramble or fumble your words. Video’s filled with ‘umm’ and ‘err’ are neither pleasant to watch nor engaging.
If you’re serious about making a great YouTube channel and developing a loyal fan base, you’re going to need a workable structure for every video to help you stay on track. Here’s what you need to know:
Quick Jump Menu
- Why is structuring your video important?
- How should you structure YouTube Video Content?
- Ready to go out and make amazing videos?
Why is structuring your video important?
The structure of your video can make all the difference between a successful YouTube channel and a big waste of time. Your objective is to get people watching more and watching all the way to the end. A great structure can:
- Build interest and engagement: By keeping something in reserve and naturally building interest as you go along, people will be compelled to watch longer and interact more with your channel.
- Helps you rank higher: Longer and higher numbers of views will demonstrate your position as an authority well. The YouTube algorithm uses these metrics as part of their ranking factor, so the more and longer views you get, the higher you’ll rank in search.
- Builds consistency and familiarity: If all your videos follow a typical structure, your fans will come to be familiar with your format. They’ll know what to expect from your content and will watch more regularly as a result.
So, now you understand why structure is so important to your channel, let’s take a look at ways in which you can create an amazing structure for every video you produce.
How should you structure YouTube video content?
There are some key elements of a YouTube video’s structure which can make it more natural, more engaging and more fun to watch. When you’re planning your structure, you should follow a logical timeline to take the viewer from start to finish easily, and to ensure you get the actions you want at the end.
Intro
People love to be told what’s about to happen, and an intro can be a crucial step in ensuring they are going to continue watching your content. By explaining clearly what they are about to see, why it’s important to them and what problems you’re aiming to solve, you’ll keep them hooked and prevent them from browsing away to the next search result.
An introduction doesn’t need to be long or particularly involved. Remember, you don’t want to give away all your information here, as what you want is to encourage them to watch until the end. Something like “I’m going to show you … which will help you to …” is fine.
Your idea and purpose need to be conveyed fast and effectively if you’re keen to get their interest. Most viewers will decide within the first three to five seconds of a video if they want to invest their time in watching, so it’s crucial you capture their interest and engage them fast to stop them drifting away.
Main content
Once you’ve introduced your video, it’s time to start working through your content. This should be done by:
- Framing the problem
What are the types of problems that your viewers will have encountered which your video can solve? How is the problem affecting you and your viewers? Take around two to three minutes to describe the problems that you hope your video will solve, and work on being empathetic so people can relate to you and the issue you’re discussing.
- Offer solutions with examples
Move on to your solution to the problem. How did you find this solution? Is it easy to implement? Take around four to five minutes to address your solution and give examples of how it works in practice.
Now you’ve addressed the issue that your video content will solve, you’re almost ready to ask them to take the next step. Almost. There’s one more key element in your structure that you need to remember to include.
Hook
The hook can be placed anywhere in your content, although it’s most successful when placed either in the introduction or while you are framing the problem. The hook is a tidbit that aims to encourage a full viewing of your video, so don’t give away your solutions but do give them a reason to carry on watching.
If there’s a particular point where you think they might become bored or distracted, this is a great time to insert your hook. Come up with a powerful hook, for instance ‘with my solution I managed to go from ten views to two hundred in an hour’ or ‘when you hear this solution you’ll understand how I tripled my profits overnight’. Give them a reason to want to stay to the end.
Outro
Your outro shouldn’t just be about signing off in your unique way with some lovely music and visuals. This is the point at which you can ask something back from your audience, whatever that may be. We call this a ‘call to action’, and it could eb something as simple as subscribing through to something more involved like visiting your website.
Think about what you want from your audience; what should they do next? Remember to ask via a strong call to action, otherwise you’ve simply given them some free advice with very little in the way of a return for you.
Script or no script?
Many YouTubers shy away from using any sort of script, feeling that this will make them less relatable and natural. Choosing whether or not to script is entirely up to you; some people feel more comfortable with a script to hand, whereas others prefer to just wing it as they go.
If you don’t feel a script would work for you, do consider having a very rough outline of your structure and the points you want to make readily available while filming. It will help you regain control if you do happen to lose your place and will ensure you get all the information across that you’d planned to.
If you do think a full script would work better for you, make sure you are able to come across as naturally as possible while reading it. Write your script the same way you speak and run through a few times so you’re not squinting at words while you’re on camera. If you regularly wander off script, this could be a sign that a freer flowing style is more your thing.
Read More to Get : How to Loop a YouTube Video >>
Ready to go out and make amazing videos?
Having a structure to your videos might seem a little unnatural at first, but there’s plenty of evidence to show that people who take the time to plan their content get far better results than those who just improvise. If you’re unsure of the best structure for your content, watch videos made by others in your niche to see how they organize theirs.
That’s not to say you have to copy the leaders to be a success; indeed, you’ll be far more successful on YouTube if you continue to be unique. But there’s always room to learn from the best and to take inspiration from those who’ve been getting the very best results.
Richard Bennett
Richard Bennett is a writer and a lover of all things video.
Follow @Richard Bennett
Also read:
- [New] Elevate Your Game Strategies for Stellar Gaming YouTube Banners
- [New] Endless Creativity FREE YouTube Art Resources for 2024
- [New] In 2024, Quick Steps to Screen Recording via Ezvid Video Creator
- Astro A50 Silent Woes? Troubleshoot and Repair the Sound Issue Fast!
- Avoiding the Blank Thumbnail Scenario in Shorts for 2024
- Cross-Platform Comparison IPhone vs Android YouTube Viewing
- Data-Driven Decision Making in Your YouTube Shorts Strategy
- Eliminate PC Issues: Fixes for Elite Dangerous Game Crashes
- Embedding YT Playlists Seamlessly on Webpages for 2024
- How ChatGPT Can Help You Understand PDF Content in Just Four Steps
- In 2024, 4 Best Websites For Downloading Skype Ringtone
- In 2024, Building a Stronger Presence with Effective YouTube Pairings
- In 2024, Controlling YouTube's Playback Speed - Mobile and PC
- In 2024, Crafting Perfect YouTube Thumbnails on macOS
- In 2024, How to Bypass FRP on Vivo V27 Pro?
- Patching the Full-Screen Problem in OBS for 2024
- Unveiling the Hidden Gem: Exceptional Design and Performance in a Budget-Friendly Android Phone Under $200 (Not Samsung) | Insights From ZDNET
- Title: Mastering the Art of Crafting Engaging YouTube Screen Closures
- Author: Steven
- Created at : 2025-01-01 20:31:38
- Updated at : 2025-01-03 22:58:26
- Link: https://youtube-clips.techidaily.com/mastering-the-art-of-crafting-engaging-youtube-screen-closures/
- License: This work is licensed under CC BY-NC-SA 4.0.