:max_bytes(150000):strip_icc()/apple-tvplus-now-available-11119-ba2bae7efdf54e1080db7b14cc5608d1.jpg)
"Mastering Privacy in Media Cutting Out Unwanted Visibility"
Mastering Privacy in Media: Cutting Out Unwanted Visibility
How to Blur Faces or Objects in YouTube Videos

Richard Bennett
Mar 27, 2024• Proven solutions
Suppose you are interested in preserving the identity of people in your YouTube videos, or you are simply interested in luring out some of the faces of the objects in your YouTube videos to retain filming rights. In that case, you can do it quite easily. With the help of a proper editing application and some online tools, you can very quickly blur out faces or objects from your YouTube videos.
Blur Faces With the Best YouTube Video Editing Software
Wondershare Filmora is one of the best video editing tools for YouTube videos. Through the Filmora editing suite, you can quickly import the video and then go to the power town to blur out faces, distort objects, and more.
 Download Mac Version ](https://tools.techidaily.com/wondershare/filmora/download/ )
- You first need to download and install Wondershare Filmora
- Then it is time to load the video you wish to edit
- You can either browse the tape from your computer or drag and drop it
- Once loading is finished, you can drag and drop the video to the Video Timeline
- Afterward, you must target the exact video on the timeline
- Right-click and choose the Power Tool available
- A pop-up window will appear, where you must choose Face-Off and then Apply Face Off to the Clip
- The effect you want is the first option you get, or else the mosaic
- By clicking on the mosaic, it will be applied to your video
- Click OK
- Now you must choose Export to save the video
- Please choose the right format and the save option of your choosing (instant post on YouTube, burn the video on CD/DVD or save it on your PC)
If you are recording your tutorial for YouTube or your demonstration videos, you may need to blur or hide the private and sensitive information. Click to check how did I hide the personal info in the video .
How to Blur Faces or Objects in Videos With YouTube Video Editor
YouTube has offered the chance to blur out images, faces, and more since 2012. The face blur tool available on YouTube works quite well.
Here is what you need to do:
- First of all, open YouTube Video Manager
- Click on the Edit button
- Choose the Enhancements
- Click on the Blurring option (it is on the right of your screen)
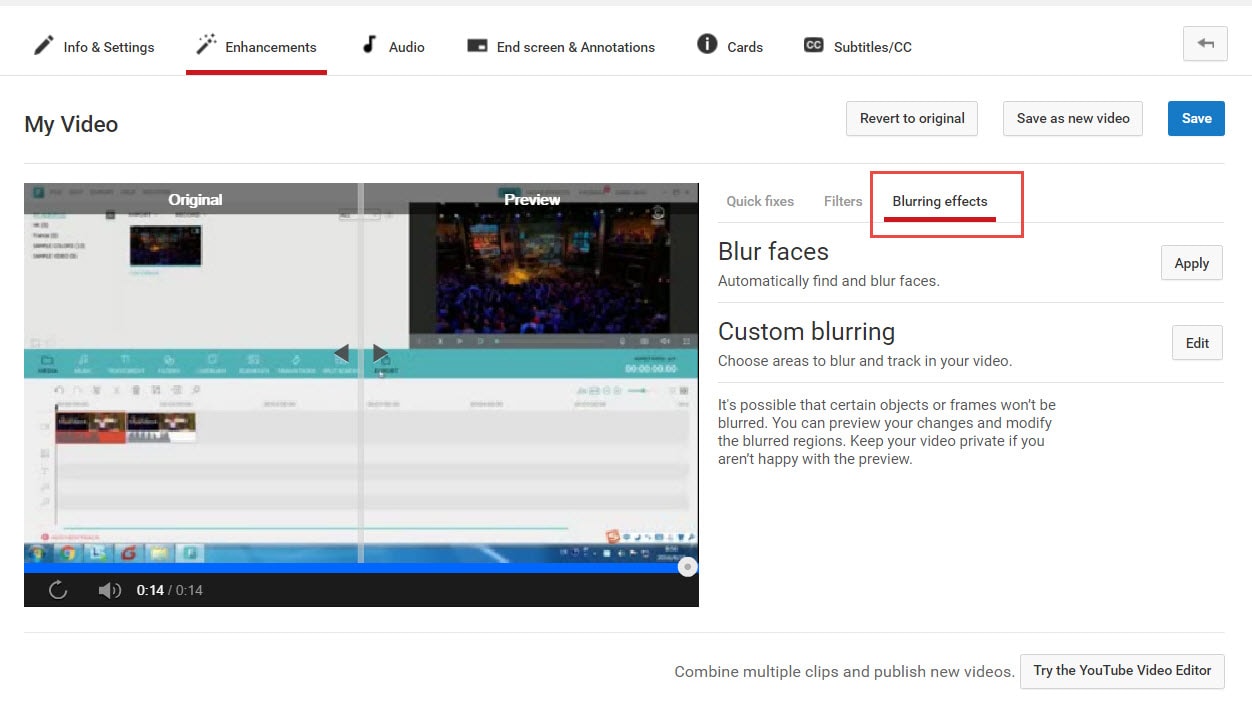
- Click on the Edit button of the Custom blurring option
- This time, a pop-up window will appear
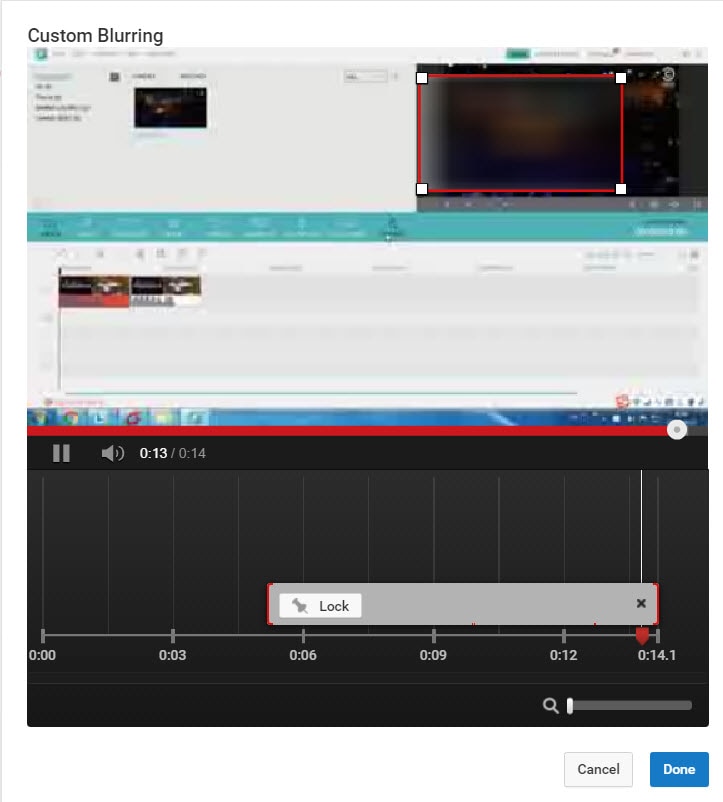
- With the use of click and drag properties, you can create the blurred content
- Click on Done
- Save the video, as per your preferences (Save as new video, revert to the original or overwrite)
Here is a tutorial video for how to blur faces or objects on YouTube:
Richard Bennett
Richard Bennett is a writer and a lover of all things video.
Follow @Richard Bennett
Richard Bennett
Mar 27, 2024• Proven solutions
Suppose you are interested in preserving the identity of people in your YouTube videos, or you are simply interested in luring out some of the faces of the objects in your YouTube videos to retain filming rights. In that case, you can do it quite easily. With the help of a proper editing application and some online tools, you can very quickly blur out faces or objects from your YouTube videos.
Blur Faces With the Best YouTube Video Editing Software
Wondershare Filmora is one of the best video editing tools for YouTube videos. Through the Filmora editing suite, you can quickly import the video and then go to the power town to blur out faces, distort objects, and more.
Download Mac Version ](https://tools.techidaily.com/wondershare/filmora/download/ )
- You first need to download and install Wondershare Filmora
- Then it is time to load the video you wish to edit
- You can either browse the tape from your computer or drag and drop it
- Once loading is finished, you can drag and drop the video to the Video Timeline
- Afterward, you must target the exact video on the timeline
- Right-click and choose the Power Tool available
- A pop-up window will appear, where you must choose Face-Off and then Apply Face Off to the Clip
- The effect you want is the first option you get, or else the mosaic
- By clicking on the mosaic, it will be applied to your video
- Click OK
- Now you must choose Export to save the video
- Please choose the right format and the save option of your choosing (instant post on YouTube, burn the video on CD/DVD or save it on your PC)
If you are recording your tutorial for YouTube or your demonstration videos, you may need to blur or hide the private and sensitive information. Click to check how did I hide the personal info in the video .
How to Blur Faces or Objects in Videos With YouTube Video Editor
YouTube has offered the chance to blur out images, faces, and more since 2012. The face blur tool available on YouTube works quite well.
Here is what you need to do:
- First of all, open YouTube Video Manager
- Click on the Edit button
- Choose the Enhancements
- Click on the Blurring option (it is on the right of your screen)
- Click on the Edit button of the Custom blurring option
- This time, a pop-up window will appear
- With the use of click and drag properties, you can create the blurred content
- Click on Done
- Save the video, as per your preferences (Save as new video, revert to the original or overwrite)
Here is a tutorial video for how to blur faces or objects on YouTube:
Richard Bennett
Richard Bennett is a writer and a lover of all things video.
Follow @Richard Bennett
Champion of Chiseled Cheeks: Starting Your YouTube Aesthetic Venture
How To Be A Beauty Guru on YouTube: Beauty Vlogger Set Up
Richard Bennett
Mar 27, 2024• Proven solutions
Beauty Vlogs are some of the most popular channels on YouTube. These vlogs are all about aesthetics, so it is important that the videos themselves are beautiful. When you are giving out tips on makeup or hair you want to use a setup that will make your results look their very best.
YouTube Beauty Vlogger Set Up
It’s easy to put together your own Beauty Vlog setup. There are four main elements; lighting, beauty supplies, backgrounds, and audio. Here are some tips on building your beauty guru set:
1. Light It Up

Beauty Vlogs need to have great lighting so that everyone can clearly see what you are doing and how amazing it looks. Make sure you have even light over your whole face by ‘front lighting’ your vlog. Front lighting means having a light source right in front of you.
Depending on your budget, you can either use a window as a front light or buy a diva ring light.
Using a Window: Face the window while you vlog and be careful that the camera’s shadow is not visible in your shot. Avoid using a window the sun is shining directly into. You want softer, more diffused, light for a beauty vlog.
Using a Ring Light: Mount your camera either inside the ring or right behind it on a tripod. Ring lights are powerful options for illuminating your entire face, and they are very popular with makeup vloggers.
Front lighting can make you appear flat against your background, so it is also a good idea to set up a backlight behind you to make you pop out. Setting up lights on either side of you can also help add dimension to your shot.
Check this tutorial to know more details:
2. Organize Your Makeup
Having to search for makeup or reach across to where you are storing your curling iron will kill your vlogging momentum. Creating a great look is the fun part of beauty vlogging, and probably the part you want to focus on. Not looking for your missing brush. The best way to set yourself up for a beauty vlog is at a desk or table where you can lay everything out neatly right in front of you.
3. Alter Your Background
Making your vlog look more professional can be as easy as dressing up your background. You do not want there to be a lot of clutter behind you, but you don’t want to shoot with your back to a plain beige wall either. One simple way to keep your background beautiful, but not distracting, is to use a backdrop. Just hang a sheet or other piece of fabric behind you. You can even use patterns and change your backdrop to match your makeup in different videos.
Another great way to disguise the room you are vlogging in, and make sure nothing behind you distracts your viewers, is to blur your background. You really stand out when your background is blurry and you are in perfect focus.
4. Be Audible
You have a lot to say, so make sure people can hear you. Most cameras do not have great microphones, so you will need to use an external mic. To see what kinds of options you have make sure to read and watch “Best Microphone for YouTube - Top 5 Mics for YouTube Videos ”.
If you do not have access to an external mic then you may be able to get by without one for a while using software. Make sure there is no background noise competing with your voice, and download a free audio editing program called Audacity from Audacityteam.org. Using Audacity you will be able to improve a mediocre audio recording from your camera and make it usable. This is a popular option among YouTube gamers who record both video and audio from their webcams, but there is no reason it should not be useful for beauty gurus too.
Richard Bennett
Richard Bennett is a writer and a lover of all things video.
Follow @Richard Bennett
Richard Bennett
Mar 27, 2024• Proven solutions
Beauty Vlogs are some of the most popular channels on YouTube. These vlogs are all about aesthetics, so it is important that the videos themselves are beautiful. When you are giving out tips on makeup or hair you want to use a setup that will make your results look their very best.
YouTube Beauty Vlogger Set Up
It’s easy to put together your own Beauty Vlog setup. There are four main elements; lighting, beauty supplies, backgrounds, and audio. Here are some tips on building your beauty guru set:
1. Light It Up
Beauty Vlogs need to have great lighting so that everyone can clearly see what you are doing and how amazing it looks. Make sure you have even light over your whole face by ‘front lighting’ your vlog. Front lighting means having a light source right in front of you.
Depending on your budget, you can either use a window as a front light or buy a diva ring light.
Using a Window: Face the window while you vlog and be careful that the camera’s shadow is not visible in your shot. Avoid using a window the sun is shining directly into. You want softer, more diffused, light for a beauty vlog.
Using a Ring Light: Mount your camera either inside the ring or right behind it on a tripod. Ring lights are powerful options for illuminating your entire face, and they are very popular with makeup vloggers.
Front lighting can make you appear flat against your background, so it is also a good idea to set up a backlight behind you to make you pop out. Setting up lights on either side of you can also help add dimension to your shot.
Check this tutorial to know more details:
2. Organize Your Makeup
Having to search for makeup or reach across to where you are storing your curling iron will kill your vlogging momentum. Creating a great look is the fun part of beauty vlogging, and probably the part you want to focus on. Not looking for your missing brush. The best way to set yourself up for a beauty vlog is at a desk or table where you can lay everything out neatly right in front of you.
3. Alter Your Background
Making your vlog look more professional can be as easy as dressing up your background. You do not want there to be a lot of clutter behind you, but you don’t want to shoot with your back to a plain beige wall either. One simple way to keep your background beautiful, but not distracting, is to use a backdrop. Just hang a sheet or other piece of fabric behind you. You can even use patterns and change your backdrop to match your makeup in different videos.
Another great way to disguise the room you are vlogging in, and make sure nothing behind you distracts your viewers, is to blur your background. You really stand out when your background is blurry and you are in perfect focus.
4. Be Audible
You have a lot to say, so make sure people can hear you. Most cameras do not have great microphones, so you will need to use an external mic. To see what kinds of options you have make sure to read and watch “Best Microphone for YouTube - Top 5 Mics for YouTube Videos ”.
If you do not have access to an external mic then you may be able to get by without one for a while using software. Make sure there is no background noise competing with your voice, and download a free audio editing program called Audacity from Audacityteam.org. Using Audacity you will be able to improve a mediocre audio recording from your camera and make it usable. This is a popular option among YouTube gamers who record both video and audio from their webcams, but there is no reason it should not be useful for beauty gurus too.
Richard Bennett
Richard Bennett is a writer and a lover of all things video.
Follow @Richard Bennett
Also read:
- [Updated] Choosing Between DJI, GoPro, and Insta360 A Comprehensive Gadget Showdown
- [Updated] Cultivating a Sustainable Advertising Ecosystem FameBit’s Strategies
- [Updated] DIY Tips to Cut Unwanted Sounds From Your Videos
- [Updated] Elevate Your Videos - Luminous Techniques for Android Users for 2024
- [Updated] How to Boost Your Instagram Vids' Visibility for 2024
- 2024 Approved Advanced Guide to Virtual Backgrounds in Videography
- 2024 Approved Contemplating if Video Selfies Need Validation On Instagram
- Aesthetic Ambitions Launching a YouTube Channel for Makeup Maven for 2024
- Charting a Course Through YouTube's Maker Domain for 2024
- Crafting Compelling FreeFire Vids with Strategy Guide for 2024
- FB Status: Active or Offline - Discover & Track
- Guide to Producing Effective YouTube Promo Videos
- Mastering Summation: The Ultimate Guide to Adding Numbers with Microsoft Excel
- MKV stutters on Redmi A2+ and stops randomly
- Monthly Revenue Streams for Video Content Creators
- Title: Mastering Privacy in Media Cutting Out Unwanted Visibility
- Author: Steven
- Created at : 2025-01-02 19:56:28
- Updated at : 2025-01-03 20:12:29
- Link: https://youtube-clips.techidaily.com/mastering-privacy-in-media-cutting-out-unwanted-visibility/
- License: This work is licensed under CC BY-NC-SA 4.0.