:max_bytes(150000):strip_icc()/lg-screen-share-menu-yellow-819f174e11fa46eb9ab39a80d20a6872.jpg)
"Making a Visual Impact Neon-Borded YouTube Thumbnails Guide"

Making a Visual Impact: Neon-Borded YouTube Thumbnails Guide
Your YouTube video, or any other clip published on any forum, gets a larger number of hits if it has an attractive thumbnail. And, the fact is, a thumbnail becomes 10x more attractive when the main character that the image has have a neon border around it.
With that said, in the following sections, you will learn a couple of methods on how to add a YouTube thumbnail border around the main characters and/or objects that are significant to the clip.
In this article
01 Add Glowing Neon Border to YouTube Thumbnail with Filmora
02 Add a Glowing Neon Border in YouTube Thumbnail with Canva
03 Outline a Person in a YouTube Thumbnail with Photoshop
Part 1: How to Add Neon Border to YouTube Thumbnail for Free with Filmora
Being one of the most versatile and intuitive post-production tools available in the market today, Wondershare Filmora X allows you to add a neon border to a YouTube thumbnail quite conveniently. You can learn how to get this done on Windows or Mac by following the steps given below.
For Win 7 or later (64-bit)
For macOS 10.12 or later
Step 1: Define Project Settings and Add Image to the Timeline
Launch Wondershare Filmora X on your PC (a MacBook Pro M1 is used here), ensure that the project aspect ratio is set to 16:9 (Widescreen) on the splash screen, and click New Project. On the main interface, click the Preview quality and display settings icon from the upper-right area of the Timeline, click Change Project Aspect Ratio, click to select 1280 x 720 (HD) from the Resolution menu of the Project Settings box, and click OK to save the custom project settings.

Then select My Media from the menu bar if not already selected, click Project Media from the navigation pane, and click Import from the Media box to select and import the image of the main character or object that you want to use in the thumbnail.

Now, drag the image from the Media box to the Timeline at the bottom.

Step 2: Clear Image Background, Add Border, and Add Custom Background
Go to Effects from the menu bar, click to select the Default tab and then AI Portrait from the navigation pane, and click and drag the Human Segmentation preset from the right box, and place it over the image track in the Timeline.

Double-click the image layer, scroll down the upper-left box to the Video Effects section, and use the Edge Thickness and Edge Feather sliders to adjust the character’s edges to make them as realistic as possible. Click OK when done.

Next, click and drag the Human Border preset over the image track in the Timeline, and follow the same procedure to customize the border. This will give the character a neon border effect.

Now, use the method explained earlier to import a custom image for the background, and drag and place it under the previous track in the Timeline.

If you are running the latest version of Filmora, you will find there are some neon light effects available under AI Portrait as well.

Step 3: Add Titles to Thumbnail
Go to Titles from the menu bar, click to select the Default tab and then Lower 3rds from the navigation pane, and click and drag your preferred lower-third preset from the right window to a separate layer in the Timeline. Double-click the lower-third layer, and use the available options in the upper-left window to change the text, its color, etc., and drag the textbox to place it to your preferred position on the image as well. Click OK to save the changes.
Next, click to select Titles from the navigation pane, and drag your preferred title from the right window to the upper-most track in the Timeline. Now use the method explained earlier to edit the text, its color, position, etc. to make it look professional.

For more tips and tricks for creating YouTube thumbnail, you can check this You Tube thumbnail creating guide.
Step 4: Get the Neon Border Thumbnail
Click the Snapshot (Camera) icon from the upper-right area of the Timeline, go to My Media from the menu bar, right-click the thumbnail of the screenshot you captured, and click Reveal in Finder (on Mac) or Reveal in Explorer (on Windows) to get to the folder the YouTube thumbnail border is saved in.

Part 2: How to Add a Glowing Neon Border in Your YouTube Thumbnail with Canva
Canva is another intuitive editing program that works on the web interface rather than having you download and install an app on your PC. You can add a neon border for YouTube thumbnails using Canva by following the instructions given below:
Step 1: Define Project Settings and Add a Background
After signing in to your Canva account, click Create a design from the top-right corner of the page, click Custom size from the bottom, define 1280 and 720 in the Width and Height fields on the box that appears respectively, and click Create new design.

Now, click to select Background from the navigation bar on the left (if the Background tool is not visible, click More and then choose Background from the expanded list), and click to select a background from the images available in the center pane.

Step 2: Upload an Image and Add Effects
Click Uploads from the navigation bar, click the More icon from the right of the Upload media button present at the top of the center pane, choose your preferred method to upload the image (with the transparent background) that you want to use, upload the image, and drag it from the center pane to the Canvas.
Note: You can use any of the tools available online to remove the background from your image for free.

To add a YouTube thumbnail border, make sure that the image that you added to the Canvas is selected, click the Duplicate icon from the upper-right area, and use the scaling handles of the copy of the image to increase its size a bit. Reposition the image back to its original location as well.
Then, click Edit image from the upper-left corner of the Canvas, click Duotone from the Edit image pane at the center, if need be, click See all, choose your preferred duotone effect to apply on the image, choose your preferred highlight and shadow colors from the box that appears next, and click Back from the top of the pane.

Next, click See all next to the Adjust section from the center pane, and drag the Blur slider to the right to increase the blur effect on the image.

Step 3: Position the Layers
While keeping the duplicate image selected, click the Position button from the upper-right area of the Canvas, and click Background to send the second image behind the first one to get the neon border effect for the photo.

Part 3: How to Outline a Person in a YouTube Thumbnail with Photoshop
Because YouTube thumbnails are nothing but static images, creating YouTube thumbnail border with Adobe Photoshop is comparatively easier. The process of doing this is given below:
Step 1: Define Document Preferences and Import an Image
Launch Adobe Photoshop on your PC, click Create new, and on the New Document customization box, define the width and height values to 1280 and 720 pixels respectively. Select Transparent from the Background Contents menu as well if not already selected. Click Create from the bottom to create a new Photoshop document with the specified document settings. Next, open the folder that contains the source image, drag the photo to Photoshop, and press Enter to place the photo.

Step 2: Remove Background from the Image
Make sure that the image layer is selected in the Layers panel on the right, go to Select from the menu bar at the top, and click Subject. From the bottom of the Layers panel, click the Add a mask icon to get rid of the background, leaving only the human on the Canvas.

Step 3: Add a Custom Background and an Outline Around the Subject
Use the method explained earlier to import a background image of your choice to Photoshop. Drag the background image layer to the bottom in the Layers panel. Double-click the masked layer, click to select Stroke from the left pane of the Layer Style box, and use the options available on the right to manage the size, color, position, etc. of the stroke that has been added around the human subject. Click OK when done, and then export the image normally to use it as a YouTube thumbnail border.

Summary
It is important to know that the default resolution of a YouTube thumbnail is 1280 x 720 pixels that is usually written and referred to as 720p. While adding a YouTube thumbnail border, it is also imperative to have a good sense of color combination and fonts. Furthermore, a decent tool like Wondershare Filmora X must be used to add an appealing neon border around the main subject in the thumbnail image easily and quickly.
02 Add a Glowing Neon Border in YouTube Thumbnail with Canva
03 Outline a Person in a YouTube Thumbnail with Photoshop
Part 1: How to Add Neon Border to YouTube Thumbnail for Free with Filmora
Being one of the most versatile and intuitive post-production tools available in the market today, Wondershare Filmora X allows you to add a neon border to a YouTube thumbnail quite conveniently. You can learn how to get this done on Windows or Mac by following the steps given below.
For Win 7 or later (64-bit)
For macOS 10.12 or later
Step 1: Define Project Settings and Add Image to the Timeline
Launch Wondershare Filmora X on your PC (a MacBook Pro M1 is used here), ensure that the project aspect ratio is set to 16:9 (Widescreen) on the splash screen, and click New Project. On the main interface, click the Preview quality and display settings icon from the upper-right area of the Timeline, click Change Project Aspect Ratio, click to select 1280 x 720 (HD) from the Resolution menu of the Project Settings box, and click OK to save the custom project settings.

Then select My Media from the menu bar if not already selected, click Project Media from the navigation pane, and click Import from the Media box to select and import the image of the main character or object that you want to use in the thumbnail.

Now, drag the image from the Media box to the Timeline at the bottom.

Step 2: Clear Image Background, Add Border, and Add Custom Background
Go to Effects from the menu bar, click to select the Default tab and then AI Portrait from the navigation pane, and click and drag the Human Segmentation preset from the right box, and place it over the image track in the Timeline.

Double-click the image layer, scroll down the upper-left box to the Video Effects section, and use the Edge Thickness and Edge Feather sliders to adjust the character’s edges to make them as realistic as possible. Click OK when done.

Next, click and drag the Human Border preset over the image track in the Timeline, and follow the same procedure to customize the border. This will give the character a neon border effect.

Now, use the method explained earlier to import a custom image for the background, and drag and place it under the previous track in the Timeline.

If you are running the latest version of Filmora, you will find there are some neon light effects available under AI Portrait as well.

Step 3: Add Titles to Thumbnail
Go to Titles from the menu bar, click to select the Default tab and then Lower 3rds from the navigation pane, and click and drag your preferred lower-third preset from the right window to a separate layer in the Timeline. Double-click the lower-third layer, and use the available options in the upper-left window to change the text, its color, etc., and drag the textbox to place it to your preferred position on the image as well. Click OK to save the changes.
Next, click to select Titles from the navigation pane, and drag your preferred title from the right window to the upper-most track in the Timeline. Now use the method explained earlier to edit the text, its color, position, etc. to make it look professional.

For more tips and tricks for creating YouTube thumbnail, you can check this You Tube thumbnail creating guide.
Step 4: Get the Neon Border Thumbnail
Click the Snapshot (Camera) icon from the upper-right area of the Timeline, go to My Media from the menu bar, right-click the thumbnail of the screenshot you captured, and click Reveal in Finder (on Mac) or Reveal in Explorer (on Windows) to get to the folder the YouTube thumbnail border is saved in.

Part 2: How to Add a Glowing Neon Border in Your YouTube Thumbnail with Canva
Canva is another intuitive editing program that works on the web interface rather than having you download and install an app on your PC. You can add a neon border for YouTube thumbnails using Canva by following the instructions given below:
Step 1: Define Project Settings and Add a Background
After signing in to your Canva account, click Create a design from the top-right corner of the page, click Custom size from the bottom, define 1280 and 720 in the Width and Height fields on the box that appears respectively, and click Create new design.

Now, click to select Background from the navigation bar on the left (if the Background tool is not visible, click More and then choose Background from the expanded list), and click to select a background from the images available in the center pane.

Step 2: Upload an Image and Add Effects
Click Uploads from the navigation bar, click the More icon from the right of the Upload media button present at the top of the center pane, choose your preferred method to upload the image (with the transparent background) that you want to use, upload the image, and drag it from the center pane to the Canvas.
Note: You can use any of the tools available online to remove the background from your image for free.

To add a YouTube thumbnail border, make sure that the image that you added to the Canvas is selected, click the Duplicate icon from the upper-right area, and use the scaling handles of the copy of the image to increase its size a bit. Reposition the image back to its original location as well.
Then, click Edit image from the upper-left corner of the Canvas, click Duotone from the Edit image pane at the center, if need be, click See all, choose your preferred duotone effect to apply on the image, choose your preferred highlight and shadow colors from the box that appears next, and click Back from the top of the pane.

Next, click See all next to the Adjust section from the center pane, and drag the Blur slider to the right to increase the blur effect on the image.

Step 3: Position the Layers
While keeping the duplicate image selected, click the Position button from the upper-right area of the Canvas, and click Background to send the second image behind the first one to get the neon border effect for the photo.

Part 3: How to Outline a Person in a YouTube Thumbnail with Photoshop
Because YouTube thumbnails are nothing but static images, creating YouTube thumbnail border with Adobe Photoshop is comparatively easier. The process of doing this is given below:
Step 1: Define Document Preferences and Import an Image
Launch Adobe Photoshop on your PC, click Create new, and on the New Document customization box, define the width and height values to 1280 and 720 pixels respectively. Select Transparent from the Background Contents menu as well if not already selected. Click Create from the bottom to create a new Photoshop document with the specified document settings. Next, open the folder that contains the source image, drag the photo to Photoshop, and press Enter to place the photo.

Step 2: Remove Background from the Image
Make sure that the image layer is selected in the Layers panel on the right, go to Select from the menu bar at the top, and click Subject. From the bottom of the Layers panel, click the Add a mask icon to get rid of the background, leaving only the human on the Canvas.

Step 3: Add a Custom Background and an Outline Around the Subject
Use the method explained earlier to import a background image of your choice to Photoshop. Drag the background image layer to the bottom in the Layers panel. Double-click the masked layer, click to select Stroke from the left pane of the Layer Style box, and use the options available on the right to manage the size, color, position, etc. of the stroke that has been added around the human subject. Click OK when done, and then export the image normally to use it as a YouTube thumbnail border.

Summary
It is important to know that the default resolution of a YouTube thumbnail is 1280 x 720 pixels that is usually written and referred to as 720p. While adding a YouTube thumbnail border, it is also imperative to have a good sense of color combination and fonts. Furthermore, a decent tool like Wondershare Filmora X must be used to add an appealing neon border around the main subject in the thumbnail image easily and quickly.
02 Add a Glowing Neon Border in YouTube Thumbnail with Canva
03 Outline a Person in a YouTube Thumbnail with Photoshop
Part 1: How to Add Neon Border to YouTube Thumbnail for Free with Filmora
Being one of the most versatile and intuitive post-production tools available in the market today, Wondershare Filmora X allows you to add a neon border to a YouTube thumbnail quite conveniently. You can learn how to get this done on Windows or Mac by following the steps given below.
For Win 7 or later (64-bit)
For macOS 10.12 or later
Step 1: Define Project Settings and Add Image to the Timeline
Launch Wondershare Filmora X on your PC (a MacBook Pro M1 is used here), ensure that the project aspect ratio is set to 16:9 (Widescreen) on the splash screen, and click New Project. On the main interface, click the Preview quality and display settings icon from the upper-right area of the Timeline, click Change Project Aspect Ratio, click to select 1280 x 720 (HD) from the Resolution menu of the Project Settings box, and click OK to save the custom project settings.

Then select My Media from the menu bar if not already selected, click Project Media from the navigation pane, and click Import from the Media box to select and import the image of the main character or object that you want to use in the thumbnail.

Now, drag the image from the Media box to the Timeline at the bottom.

Step 2: Clear Image Background, Add Border, and Add Custom Background
Go to Effects from the menu bar, click to select the Default tab and then AI Portrait from the navigation pane, and click and drag the Human Segmentation preset from the right box, and place it over the image track in the Timeline.

Double-click the image layer, scroll down the upper-left box to the Video Effects section, and use the Edge Thickness and Edge Feather sliders to adjust the character’s edges to make them as realistic as possible. Click OK when done.

Next, click and drag the Human Border preset over the image track in the Timeline, and follow the same procedure to customize the border. This will give the character a neon border effect.

Now, use the method explained earlier to import a custom image for the background, and drag and place it under the previous track in the Timeline.

If you are running the latest version of Filmora, you will find there are some neon light effects available under AI Portrait as well.

Step 3: Add Titles to Thumbnail
Go to Titles from the menu bar, click to select the Default tab and then Lower 3rds from the navigation pane, and click and drag your preferred lower-third preset from the right window to a separate layer in the Timeline. Double-click the lower-third layer, and use the available options in the upper-left window to change the text, its color, etc., and drag the textbox to place it to your preferred position on the image as well. Click OK to save the changes.
Next, click to select Titles from the navigation pane, and drag your preferred title from the right window to the upper-most track in the Timeline. Now use the method explained earlier to edit the text, its color, position, etc. to make it look professional.

For more tips and tricks for creating YouTube thumbnail, you can check this You Tube thumbnail creating guide.
Step 4: Get the Neon Border Thumbnail
Click the Snapshot (Camera) icon from the upper-right area of the Timeline, go to My Media from the menu bar, right-click the thumbnail of the screenshot you captured, and click Reveal in Finder (on Mac) or Reveal in Explorer (on Windows) to get to the folder the YouTube thumbnail border is saved in.

Part 2: How to Add a Glowing Neon Border in Your YouTube Thumbnail with Canva
Canva is another intuitive editing program that works on the web interface rather than having you download and install an app on your PC. You can add a neon border for YouTube thumbnails using Canva by following the instructions given below:
Step 1: Define Project Settings and Add a Background
After signing in to your Canva account, click Create a design from the top-right corner of the page, click Custom size from the bottom, define 1280 and 720 in the Width and Height fields on the box that appears respectively, and click Create new design.

Now, click to select Background from the navigation bar on the left (if the Background tool is not visible, click More and then choose Background from the expanded list), and click to select a background from the images available in the center pane.

Step 2: Upload an Image and Add Effects
Click Uploads from the navigation bar, click the More icon from the right of the Upload media button present at the top of the center pane, choose your preferred method to upload the image (with the transparent background) that you want to use, upload the image, and drag it from the center pane to the Canvas.
Note: You can use any of the tools available online to remove the background from your image for free.

To add a YouTube thumbnail border, make sure that the image that you added to the Canvas is selected, click the Duplicate icon from the upper-right area, and use the scaling handles of the copy of the image to increase its size a bit. Reposition the image back to its original location as well.
Then, click Edit image from the upper-left corner of the Canvas, click Duotone from the Edit image pane at the center, if need be, click See all, choose your preferred duotone effect to apply on the image, choose your preferred highlight and shadow colors from the box that appears next, and click Back from the top of the pane.

Next, click See all next to the Adjust section from the center pane, and drag the Blur slider to the right to increase the blur effect on the image.

Step 3: Position the Layers
While keeping the duplicate image selected, click the Position button from the upper-right area of the Canvas, and click Background to send the second image behind the first one to get the neon border effect for the photo.

Part 3: How to Outline a Person in a YouTube Thumbnail with Photoshop
Because YouTube thumbnails are nothing but static images, creating YouTube thumbnail border with Adobe Photoshop is comparatively easier. The process of doing this is given below:
Step 1: Define Document Preferences and Import an Image
Launch Adobe Photoshop on your PC, click Create new, and on the New Document customization box, define the width and height values to 1280 and 720 pixels respectively. Select Transparent from the Background Contents menu as well if not already selected. Click Create from the bottom to create a new Photoshop document with the specified document settings. Next, open the folder that contains the source image, drag the photo to Photoshop, and press Enter to place the photo.

Step 2: Remove Background from the Image
Make sure that the image layer is selected in the Layers panel on the right, go to Select from the menu bar at the top, and click Subject. From the bottom of the Layers panel, click the Add a mask icon to get rid of the background, leaving only the human on the Canvas.

Step 3: Add a Custom Background and an Outline Around the Subject
Use the method explained earlier to import a background image of your choice to Photoshop. Drag the background image layer to the bottom in the Layers panel. Double-click the masked layer, click to select Stroke from the left pane of the Layer Style box, and use the options available on the right to manage the size, color, position, etc. of the stroke that has been added around the human subject. Click OK when done, and then export the image normally to use it as a YouTube thumbnail border.

Summary
It is important to know that the default resolution of a YouTube thumbnail is 1280 x 720 pixels that is usually written and referred to as 720p. While adding a YouTube thumbnail border, it is also imperative to have a good sense of color combination and fonts. Furthermore, a decent tool like Wondershare Filmora X must be used to add an appealing neon border around the main subject in the thumbnail image easily and quickly.
02 Add a Glowing Neon Border in YouTube Thumbnail with Canva
03 Outline a Person in a YouTube Thumbnail with Photoshop
Part 1: How to Add Neon Border to YouTube Thumbnail for Free with Filmora
Being one of the most versatile and intuitive post-production tools available in the market today, Wondershare Filmora X allows you to add a neon border to a YouTube thumbnail quite conveniently. You can learn how to get this done on Windows or Mac by following the steps given below.
For Win 7 or later (64-bit)
For macOS 10.12 or later
Step 1: Define Project Settings and Add Image to the Timeline
Launch Wondershare Filmora X on your PC (a MacBook Pro M1 is used here), ensure that the project aspect ratio is set to 16:9 (Widescreen) on the splash screen, and click New Project. On the main interface, click the Preview quality and display settings icon from the upper-right area of the Timeline, click Change Project Aspect Ratio, click to select 1280 x 720 (HD) from the Resolution menu of the Project Settings box, and click OK to save the custom project settings.

Then select My Media from the menu bar if not already selected, click Project Media from the navigation pane, and click Import from the Media box to select and import the image of the main character or object that you want to use in the thumbnail.

Now, drag the image from the Media box to the Timeline at the bottom.

Step 2: Clear Image Background, Add Border, and Add Custom Background
Go to Effects from the menu bar, click to select the Default tab and then AI Portrait from the navigation pane, and click and drag the Human Segmentation preset from the right box, and place it over the image track in the Timeline.

Double-click the image layer, scroll down the upper-left box to the Video Effects section, and use the Edge Thickness and Edge Feather sliders to adjust the character’s edges to make them as realistic as possible. Click OK when done.

Next, click and drag the Human Border preset over the image track in the Timeline, and follow the same procedure to customize the border. This will give the character a neon border effect.

Now, use the method explained earlier to import a custom image for the background, and drag and place it under the previous track in the Timeline.

If you are running the latest version of Filmora, you will find there are some neon light effects available under AI Portrait as well.

Step 3: Add Titles to Thumbnail
Go to Titles from the menu bar, click to select the Default tab and then Lower 3rds from the navigation pane, and click and drag your preferred lower-third preset from the right window to a separate layer in the Timeline. Double-click the lower-third layer, and use the available options in the upper-left window to change the text, its color, etc., and drag the textbox to place it to your preferred position on the image as well. Click OK to save the changes.
Next, click to select Titles from the navigation pane, and drag your preferred title from the right window to the upper-most track in the Timeline. Now use the method explained earlier to edit the text, its color, position, etc. to make it look professional.

For more tips and tricks for creating YouTube thumbnail, you can check this You Tube thumbnail creating guide.
Step 4: Get the Neon Border Thumbnail
Click the Snapshot (Camera) icon from the upper-right area of the Timeline, go to My Media from the menu bar, right-click the thumbnail of the screenshot you captured, and click Reveal in Finder (on Mac) or Reveal in Explorer (on Windows) to get to the folder the YouTube thumbnail border is saved in.

Part 2: How to Add a Glowing Neon Border in Your YouTube Thumbnail with Canva
Canva is another intuitive editing program that works on the web interface rather than having you download and install an app on your PC. You can add a neon border for YouTube thumbnails using Canva by following the instructions given below:
Step 1: Define Project Settings and Add a Background
After signing in to your Canva account, click Create a design from the top-right corner of the page, click Custom size from the bottom, define 1280 and 720 in the Width and Height fields on the box that appears respectively, and click Create new design.

Now, click to select Background from the navigation bar on the left (if the Background tool is not visible, click More and then choose Background from the expanded list), and click to select a background from the images available in the center pane.

Step 2: Upload an Image and Add Effects
Click Uploads from the navigation bar, click the More icon from the right of the Upload media button present at the top of the center pane, choose your preferred method to upload the image (with the transparent background) that you want to use, upload the image, and drag it from the center pane to the Canvas.
Note: You can use any of the tools available online to remove the background from your image for free.

To add a YouTube thumbnail border, make sure that the image that you added to the Canvas is selected, click the Duplicate icon from the upper-right area, and use the scaling handles of the copy of the image to increase its size a bit. Reposition the image back to its original location as well.
Then, click Edit image from the upper-left corner of the Canvas, click Duotone from the Edit image pane at the center, if need be, click See all, choose your preferred duotone effect to apply on the image, choose your preferred highlight and shadow colors from the box that appears next, and click Back from the top of the pane.

Next, click See all next to the Adjust section from the center pane, and drag the Blur slider to the right to increase the blur effect on the image.

Step 3: Position the Layers
While keeping the duplicate image selected, click the Position button from the upper-right area of the Canvas, and click Background to send the second image behind the first one to get the neon border effect for the photo.

Part 3: How to Outline a Person in a YouTube Thumbnail with Photoshop
Because YouTube thumbnails are nothing but static images, creating YouTube thumbnail border with Adobe Photoshop is comparatively easier. The process of doing this is given below:
Step 1: Define Document Preferences and Import an Image
Launch Adobe Photoshop on your PC, click Create new, and on the New Document customization box, define the width and height values to 1280 and 720 pixels respectively. Select Transparent from the Background Contents menu as well if not already selected. Click Create from the bottom to create a new Photoshop document with the specified document settings. Next, open the folder that contains the source image, drag the photo to Photoshop, and press Enter to place the photo.

Step 2: Remove Background from the Image
Make sure that the image layer is selected in the Layers panel on the right, go to Select from the menu bar at the top, and click Subject. From the bottom of the Layers panel, click the Add a mask icon to get rid of the background, leaving only the human on the Canvas.

Step 3: Add a Custom Background and an Outline Around the Subject
Use the method explained earlier to import a background image of your choice to Photoshop. Drag the background image layer to the bottom in the Layers panel. Double-click the masked layer, click to select Stroke from the left pane of the Layer Style box, and use the options available on the right to manage the size, color, position, etc. of the stroke that has been added around the human subject. Click OK when done, and then export the image normally to use it as a YouTube thumbnail border.

Summary
It is important to know that the default resolution of a YouTube thumbnail is 1280 x 720 pixels that is usually written and referred to as 720p. While adding a YouTube thumbnail border, it is also imperative to have a good sense of color combination and fonts. Furthermore, a decent tool like Wondershare Filmora X must be used to add an appealing neon border around the main subject in the thumbnail image easily and quickly.
Just Initial Acquisition
Yes, you are right. Social media is the platform that no one can refrain from in the current world of technology, news, events, and friends. One such platform gained so much popularity in the last few years. That is YouTube, a platform that is used worldwide for a multitude of purposes. Such as watching videos, uploading or sharing videos, tutorials, trends, series, coaching, serials, shorts videos, news, events, displaying ads, and lots more. No doubt, the list is endless.
Well, while dealing with YouTube videos, there is one most crucial point to keep in mind. If you have a vision or some thought, you can create a new genre of video under YouTube. And that is the YouTube Aspect Ratio, to have the best visual experience for the users worldwide.
Aspect ratio is simply the width to the height ratio for the screen. But it holds great value to create a difference while displaying YouTube Shorts Videos with proper ratio and size as it is only then that it will get proper attention and get trends.
In this article
01 [Aspect Ratio for YouTube Videos](#Part 1)
02 [YouTube Shorts Aspect Ratio](#Part 2)
03 [Aspect Ratios for YouTube Ads](#Part 3)
04 [Think More about YouTube Aspect Ratio](#Part 4)
Part 1 Aspect Ratio for YouTube Videos
YouTube is the platform that demands perfection, not in terms of the content of the video only, but there are some other aspects that one needs to consider. So, what could be the right approach while dealing with YouTube Video or Photo size? Thinking what could that be? Well, friends, it is the YouTube Video Ratio or, in simple terms, YouTube Aspect Ratio that tells a lot about the visual representation of the video. If YouTube Video dimension size is not as per the required parameter or according to the device screen, it is so. Then YouTube itself makes adjustments to the rest of the video corners filled with either white or grey bar, which is not the right approach for an appropriate user experience. For that, you must be aware of the required width and height of YouTube Video, that is, YouTube Video Aspect Ratio. Below are covered prime devices with their YouTube Aspect Ratio and related information. Go through them to get the basic idea:
Note: YouTube Video Player can adjust the video size automatically to make it fit into the screen. Sometimes, doing so results in a bar’s white or grey/black area along the edges.
● YouTube Aspect Ratio for Desktop/PC Version:
If you are a desktop, PC, or laptop user, the standard YouTube Aspect ratio is 16:9, which is for landscape view. In the case of vertical video with a YouTube Aspect Ratio of 9:16, YouTube will make some adjustments by providing padding to the corner of the video. (That is not the right way for the optimum view as it may result in interfering with the dynamic vision of the YouTube Video.)
● YouTube Video Aspect Ratio for Android devices:
There is an interesting fact about the YouTube Video Ratio for Android devices. Actually, in the case of Android mobile devices, the YouTube app will make an auto adjustment to the video file size and set the video as per the screen space.
● YouTube Video Ratio for iOS Version
Like Android phones, iOS devices such as iPhone, iPad, YouTube App player will also automatically adjust the Video file size to fit the screen. It does not matter whether the video is in Square, horizontal or vertical format; it will auto-adjust the aspect ratio.
Let’s take the example of Vertical Video display in YouTube Screen:
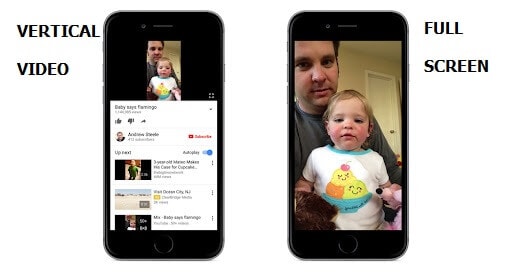
Also, by selecting the Expand option, the video will adjust itself to fill the entire screen.
Part 2 YouTube Shorts Aspect Ratio
The world is moving swiftly, and with day passing, people want to complete their tasks as quickly as possible. The impact is seen in the field of the YouTube Video making process also with the introduction of YouTube Shorts. After following the short video trends of TikTok, this time YouTube appeared with its new feature YouTube Shorts, which allows a user to create a short video that ranges from 15 to 60 seconds. The only need is for a Smartphone and YouTube Application Shorts camera. And then you are good to go. Note that YouTube Shorts videos get searched and watched by people mainly through their phones.
Here also comes the concept of YouTube Shorts Ratio as YouTube Videos primarily follows Vertical format. Following are the requirement for YouTube Shorts Ratio:
Aspect Ratio: Vertical format standard ratio is 9:16 (That fill up the entire screen vertically)
Resolution: To comply with vertical format, the required resolution is 1920X1080 px.
Note: There is also provision for square videos with a 1:1 ratio for YouTube Shorts. But that results in extra white or black padding at the top and bottom areas.
Other possible YouTube Shorts ratios are 4:5, 2:3, 1:2.
Part 3 Aspect Ratios for YouTube Ads
If you want to monetize from your video or Shorts, use YouTube Ads to generate additional income. Or, if you are already in some business and want to grow your business, do it with YouTube Ads.

Now, you might be wondering, what would be the possible YouTube Outro size or YouTube Video Aspect Ratio for YouTube Ads? Check here:
YouTube Video Aspect ratio and Proportions: 19:9 (640X360), 4:3 (480X360)
Aspect Ratio for Desktop Ads: 16:9
Sponsor Card Ads Ratio: 1:1
True View Discovery Ads Ratio: 16:9 or 4:3
Part 4 Think More about YouTube Aspect Ratio
You have been listening about YouTube Screen size or YouTube Aspect Ratio so far many times. Now the biggest question is, how to adjust the Aspect Ratio of YouTube Video or Shorts?
Are you puzzled?
Yeah! Wait, there is the solution. Edit the aspect ratio of your video before uploading it under the YouTube Platform. For that purpose, there is one option named Wondershae Filmora Video Editor That is used to provide you with the Aspect ratio editing and modification option.
Let’s understand how you can do so with Wondershare Filmora that most YouTubers are using to edit and adjust the Aspect Ratio of YouTube Videos.
You need to download and launch the software from the main window. There is a drop-down choice to select the desired aspect ratio for the video.
Wondershare Filmora
Get started easily with Filmora’s powerful performance, intuitive interface, and countless effects!
Try It Free Try It Free Try It Free Learn More about Filmora >

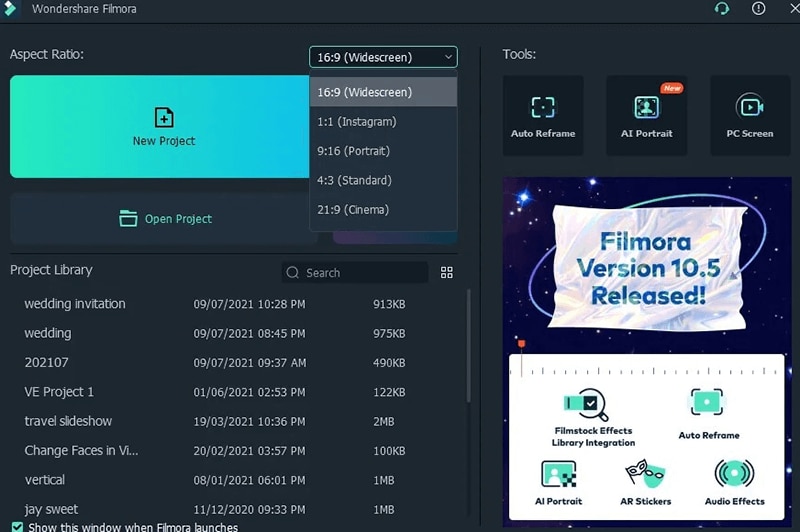
There is another option also, after launching the software, upload your project video. Then, under Project settings, change and set the required aspect ratio.
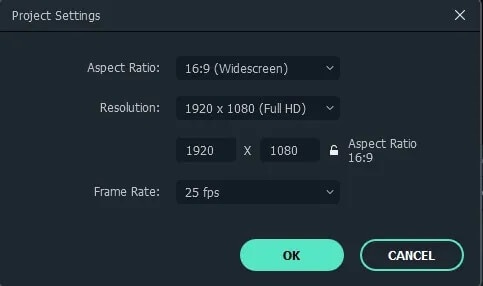
Simple isn’t it. Yes, the process is quite simple. You can easily change YouTube Video size dimensions without any hassle using Wondershare Filmora editor and that quickly. So, get up and record some interesting YouTube videos or Shorts, mix them up with colors, spicy talk, and change the aspect ratio with ease. You are ready to rock the world of YouTube videos with these simple steps, the right approach that most YouTube Videomakers follow worldwide.
Conclusion
● So guys, finally, I hope now you are pretty sure about what is YouTube video ratio, its importance while dealing with videos, shorts, or posting any ads to promote your business. YouTube file size is something that is changing its dimensions as per the user experience and needs. In the last few years, the user base shifted from TV, desktop to phone, laptops, and smart devices. As a result, the aspect ratio also gets changed with time. Thus, having a proper understanding of adjusting the width and height of YouTube Videos to bring the dynamic vision to the video will create a real difference. Also, using Wondershare Filmora will open the door of options to modify your YouTube file size and many editing options along with.
Aspect ratio is simply the width to the height ratio for the screen. But it holds great value to create a difference while displaying YouTube Shorts Videos with proper ratio and size as it is only then that it will get proper attention and get trends.
In this article
01 [Aspect Ratio for YouTube Videos](#Part 1)
02 [YouTube Shorts Aspect Ratio](#Part 2)
03 [Aspect Ratios for YouTube Ads](#Part 3)
04 [Think More about YouTube Aspect Ratio](#Part 4)
Part 1 Aspect Ratio for YouTube Videos
YouTube is the platform that demands perfection, not in terms of the content of the video only, but there are some other aspects that one needs to consider. So, what could be the right approach while dealing with YouTube Video or Photo size? Thinking what could that be? Well, friends, it is the YouTube Video Ratio or, in simple terms, YouTube Aspect Ratio that tells a lot about the visual representation of the video. If YouTube Video dimension size is not as per the required parameter or according to the device screen, it is so. Then YouTube itself makes adjustments to the rest of the video corners filled with either white or grey bar, which is not the right approach for an appropriate user experience. For that, you must be aware of the required width and height of YouTube Video, that is, YouTube Video Aspect Ratio. Below are covered prime devices with their YouTube Aspect Ratio and related information. Go through them to get the basic idea:

Note: YouTube Video Player can adjust the video size automatically to make it fit into the screen. Sometimes, doing so results in a bar’s white or grey/black area along the edges.
● YouTube Aspect Ratio for Desktop/PC Version:
If you are a desktop, PC, or laptop user, the standard YouTube Aspect ratio is 16:9, which is for landscape view. In the case of vertical video with a YouTube Aspect Ratio of 9:16, YouTube will make some adjustments by providing padding to the corner of the video. (That is not the right way for the optimum view as it may result in interfering with the dynamic vision of the YouTube Video.)
● YouTube Video Aspect Ratio for Android devices:
There is an interesting fact about the YouTube Video Ratio for Android devices. Actually, in the case of Android mobile devices, the YouTube app will make an auto adjustment to the video file size and set the video as per the screen space.
● YouTube Video Ratio for iOS Version
Like Android phones, iOS devices such as iPhone, iPad, YouTube App player will also automatically adjust the Video file size to fit the screen. It does not matter whether the video is in Square, horizontal or vertical format; it will auto-adjust the aspect ratio.
Let’s take the example of Vertical Video display in YouTube Screen:

Also, by selecting the Expand option, the video will adjust itself to fill the entire screen.
Part 2 YouTube Shorts Aspect Ratio
The world is moving swiftly, and with day passing, people want to complete their tasks as quickly as possible. The impact is seen in the field of the YouTube Video making process also with the introduction of YouTube Shorts. After following the short video trends of TikTok, this time YouTube appeared with its new feature YouTube Shorts, which allows a user to create a short video that ranges from 15 to 60 seconds. The only need is for a Smartphone and YouTube Application Shorts camera. And then you are good to go. Note that YouTube Shorts videos get searched and watched by people mainly through their phones.

Here also comes the concept of YouTube Shorts Ratio as YouTube Videos primarily follows Vertical format. Following are the requirement for YouTube Shorts Ratio:
Aspect Ratio: Vertical format standard ratio is 9:16 (That fill up the entire screen vertically)
Resolution: To comply with vertical format, the required resolution is 1920X1080 px.
Note: There is also provision for square videos with a 1:1 ratio for YouTube Shorts. But that results in extra white or black padding at the top and bottom areas.
Other possible YouTube Shorts ratios are 4:5, 2:3, 1:2.
Part 3 Aspect Ratios for YouTube Ads
If you want to monetize from your video or Shorts, use YouTube Ads to generate additional income. Or, if you are already in some business and want to grow your business, do it with YouTube Ads.

Now, you might be wondering, what would be the possible YouTube Outro size or YouTube Video Aspect Ratio for YouTube Ads? Check here:
YouTube Video Aspect ratio and Proportions: 19:9 (640X360), 4:3 (480X360)
Aspect Ratio for Desktop Ads: 16:9
Sponsor Card Ads Ratio: 1:1
True View Discovery Ads Ratio: 16:9 or 4:3
Part 4 Think More about YouTube Aspect Ratio
You have been listening about YouTube Screen size or YouTube Aspect Ratio so far many times. Now the biggest question is, how to adjust the Aspect Ratio of YouTube Video or Shorts?
Are you puzzled?

Yeah! Wait, there is the solution. Edit the aspect ratio of your video before uploading it under the YouTube Platform. For that purpose, there is one option named Wondershae Filmora Video Editor That is used to provide you with the Aspect ratio editing and modification option.
Let’s understand how you can do so with Wondershare Filmora that most YouTubers are using to edit and adjust the Aspect Ratio of YouTube Videos.
You need to download and launch the software from the main window. There is a drop-down choice to select the desired aspect ratio for the video.
Wondershare Filmora
Get started easily with Filmora’s powerful performance, intuitive interface, and countless effects!
Try It Free Try It Free Try It Free Learn More about Filmora >


There is another option also, after launching the software, upload your project video. Then, under Project settings, change and set the required aspect ratio.

Simple isn’t it. Yes, the process is quite simple. You can easily change YouTube Video size dimensions without any hassle using Wondershare Filmora editor and that quickly. So, get up and record some interesting YouTube videos or Shorts, mix them up with colors, spicy talk, and change the aspect ratio with ease. You are ready to rock the world of YouTube videos with these simple steps, the right approach that most YouTube Videomakers follow worldwide.
Conclusion
● So guys, finally, I hope now you are pretty sure about what is YouTube video ratio, its importance while dealing with videos, shorts, or posting any ads to promote your business. YouTube file size is something that is changing its dimensions as per the user experience and needs. In the last few years, the user base shifted from TV, desktop to phone, laptops, and smart devices. As a result, the aspect ratio also gets changed with time. Thus, having a proper understanding of adjusting the width and height of YouTube Videos to bring the dynamic vision to the video will create a real difference. Also, using Wondershare Filmora will open the door of options to modify your YouTube file size and many editing options along with.
Aspect ratio is simply the width to the height ratio for the screen. But it holds great value to create a difference while displaying YouTube Shorts Videos with proper ratio and size as it is only then that it will get proper attention and get trends.
In this article
01 [Aspect Ratio for YouTube Videos](#Part 1)
02 [YouTube Shorts Aspect Ratio](#Part 2)
03 [Aspect Ratios for YouTube Ads](#Part 3)
04 [Think More about YouTube Aspect Ratio](#Part 4)
Part 1 Aspect Ratio for YouTube Videos
YouTube is the platform that demands perfection, not in terms of the content of the video only, but there are some other aspects that one needs to consider. So, what could be the right approach while dealing with YouTube Video or Photo size? Thinking what could that be? Well, friends, it is the YouTube Video Ratio or, in simple terms, YouTube Aspect Ratio that tells a lot about the visual representation of the video. If YouTube Video dimension size is not as per the required parameter or according to the device screen, it is so. Then YouTube itself makes adjustments to the rest of the video corners filled with either white or grey bar, which is not the right approach for an appropriate user experience. For that, you must be aware of the required width and height of YouTube Video, that is, YouTube Video Aspect Ratio. Below are covered prime devices with their YouTube Aspect Ratio and related information. Go through them to get the basic idea:

Note: YouTube Video Player can adjust the video size automatically to make it fit into the screen. Sometimes, doing so results in a bar’s white or grey/black area along the edges.
● YouTube Aspect Ratio for Desktop/PC Version:
If you are a desktop, PC, or laptop user, the standard YouTube Aspect ratio is 16:9, which is for landscape view. In the case of vertical video with a YouTube Aspect Ratio of 9:16, YouTube will make some adjustments by providing padding to the corner of the video. (That is not the right way for the optimum view as it may result in interfering with the dynamic vision of the YouTube Video.)
● YouTube Video Aspect Ratio for Android devices:
There is an interesting fact about the YouTube Video Ratio for Android devices. Actually, in the case of Android mobile devices, the YouTube app will make an auto adjustment to the video file size and set the video as per the screen space.
● YouTube Video Ratio for iOS Version
Like Android phones, iOS devices such as iPhone, iPad, YouTube App player will also automatically adjust the Video file size to fit the screen. It does not matter whether the video is in Square, horizontal or vertical format; it will auto-adjust the aspect ratio.
Let’s take the example of Vertical Video display in YouTube Screen:

Also, by selecting the Expand option, the video will adjust itself to fill the entire screen.
Part 2 YouTube Shorts Aspect Ratio
The world is moving swiftly, and with day passing, people want to complete their tasks as quickly as possible. The impact is seen in the field of the YouTube Video making process also with the introduction of YouTube Shorts. After following the short video trends of TikTok, this time YouTube appeared with its new feature YouTube Shorts, which allows a user to create a short video that ranges from 15 to 60 seconds. The only need is for a Smartphone and YouTube Application Shorts camera. And then you are good to go. Note that YouTube Shorts videos get searched and watched by people mainly through their phones.

Here also comes the concept of YouTube Shorts Ratio as YouTube Videos primarily follows Vertical format. Following are the requirement for YouTube Shorts Ratio:
Aspect Ratio: Vertical format standard ratio is 9:16 (That fill up the entire screen vertically)
Resolution: To comply with vertical format, the required resolution is 1920X1080 px.
Note: There is also provision for square videos with a 1:1 ratio for YouTube Shorts. But that results in extra white or black padding at the top and bottom areas.
Other possible YouTube Shorts ratios are 4:5, 2:3, 1:2.
Part 3 Aspect Ratios for YouTube Ads
If you want to monetize from your video or Shorts, use YouTube Ads to generate additional income. Or, if you are already in some business and want to grow your business, do it with YouTube Ads.

Now, you might be wondering, what would be the possible YouTube Outro size or YouTube Video Aspect Ratio for YouTube Ads? Check here:
YouTube Video Aspect ratio and Proportions: 19:9 (640X360), 4:3 (480X360)
Aspect Ratio for Desktop Ads: 16:9
Sponsor Card Ads Ratio: 1:1
True View Discovery Ads Ratio: 16:9 or 4:3
Part 4 Think More about YouTube Aspect Ratio
You have been listening about YouTube Screen size or YouTube Aspect Ratio so far many times. Now the biggest question is, how to adjust the Aspect Ratio of YouTube Video or Shorts?
Are you puzzled?

Yeah! Wait, there is the solution. Edit the aspect ratio of your video before uploading it under the YouTube Platform. For that purpose, there is one option named Wondershae Filmora Video Editor That is used to provide you with the Aspect ratio editing and modification option.
Let’s understand how you can do so with Wondershare Filmora that most YouTubers are using to edit and adjust the Aspect Ratio of YouTube Videos.
You need to download and launch the software from the main window. There is a drop-down choice to select the desired aspect ratio for the video.
Wondershare Filmora
Get started easily with Filmora’s powerful performance, intuitive interface, and countless effects!
Try It Free Try It Free Try It Free Learn More about Filmora >


There is another option also, after launching the software, upload your project video. Then, under Project settings, change and set the required aspect ratio.

Simple isn’t it. Yes, the process is quite simple. You can easily change YouTube Video size dimensions without any hassle using Wondershare Filmora editor and that quickly. So, get up and record some interesting YouTube videos or Shorts, mix them up with colors, spicy talk, and change the aspect ratio with ease. You are ready to rock the world of YouTube videos with these simple steps, the right approach that most YouTube Videomakers follow worldwide.
Conclusion
● So guys, finally, I hope now you are pretty sure about what is YouTube video ratio, its importance while dealing with videos, shorts, or posting any ads to promote your business. YouTube file size is something that is changing its dimensions as per the user experience and needs. In the last few years, the user base shifted from TV, desktop to phone, laptops, and smart devices. As a result, the aspect ratio also gets changed with time. Thus, having a proper understanding of adjusting the width and height of YouTube Videos to bring the dynamic vision to the video will create a real difference. Also, using Wondershare Filmora will open the door of options to modify your YouTube file size and many editing options along with.
Aspect ratio is simply the width to the height ratio for the screen. But it holds great value to create a difference while displaying YouTube Shorts Videos with proper ratio and size as it is only then that it will get proper attention and get trends.
In this article
01 [Aspect Ratio for YouTube Videos](#Part 1)
02 [YouTube Shorts Aspect Ratio](#Part 2)
03 [Aspect Ratios for YouTube Ads](#Part 3)
04 [Think More about YouTube Aspect Ratio](#Part 4)
Part 1 Aspect Ratio for YouTube Videos
YouTube is the platform that demands perfection, not in terms of the content of the video only, but there are some other aspects that one needs to consider. So, what could be the right approach while dealing with YouTube Video or Photo size? Thinking what could that be? Well, friends, it is the YouTube Video Ratio or, in simple terms, YouTube Aspect Ratio that tells a lot about the visual representation of the video. If YouTube Video dimension size is not as per the required parameter or according to the device screen, it is so. Then YouTube itself makes adjustments to the rest of the video corners filled with either white or grey bar, which is not the right approach for an appropriate user experience. For that, you must be aware of the required width and height of YouTube Video, that is, YouTube Video Aspect Ratio. Below are covered prime devices with their YouTube Aspect Ratio and related information. Go through them to get the basic idea:

Note: YouTube Video Player can adjust the video size automatically to make it fit into the screen. Sometimes, doing so results in a bar’s white or grey/black area along the edges.
● YouTube Aspect Ratio for Desktop/PC Version:
If you are a desktop, PC, or laptop user, the standard YouTube Aspect ratio is 16:9, which is for landscape view. In the case of vertical video with a YouTube Aspect Ratio of 9:16, YouTube will make some adjustments by providing padding to the corner of the video. (That is not the right way for the optimum view as it may result in interfering with the dynamic vision of the YouTube Video.)
● YouTube Video Aspect Ratio for Android devices:
There is an interesting fact about the YouTube Video Ratio for Android devices. Actually, in the case of Android mobile devices, the YouTube app will make an auto adjustment to the video file size and set the video as per the screen space.
● YouTube Video Ratio for iOS Version
Like Android phones, iOS devices such as iPhone, iPad, YouTube App player will also automatically adjust the Video file size to fit the screen. It does not matter whether the video is in Square, horizontal or vertical format; it will auto-adjust the aspect ratio.
Let’s take the example of Vertical Video display in YouTube Screen:

Also, by selecting the Expand option, the video will adjust itself to fill the entire screen.
Part 2 YouTube Shorts Aspect Ratio
The world is moving swiftly, and with day passing, people want to complete their tasks as quickly as possible. The impact is seen in the field of the YouTube Video making process also with the introduction of YouTube Shorts. After following the short video trends of TikTok, this time YouTube appeared with its new feature YouTube Shorts, which allows a user to create a short video that ranges from 15 to 60 seconds. The only need is for a Smartphone and YouTube Application Shorts camera. And then you are good to go. Note that YouTube Shorts videos get searched and watched by people mainly through their phones.

Here also comes the concept of YouTube Shorts Ratio as YouTube Videos primarily follows Vertical format. Following are the requirement for YouTube Shorts Ratio:
Aspect Ratio: Vertical format standard ratio is 9:16 (That fill up the entire screen vertically)
Resolution: To comply with vertical format, the required resolution is 1920X1080 px.
Note: There is also provision for square videos with a 1:1 ratio for YouTube Shorts. But that results in extra white or black padding at the top and bottom areas.
Other possible YouTube Shorts ratios are 4:5, 2:3, 1:2.
Part 3 Aspect Ratios for YouTube Ads
If you want to monetize from your video or Shorts, use YouTube Ads to generate additional income. Or, if you are already in some business and want to grow your business, do it with YouTube Ads.

Now, you might be wondering, what would be the possible YouTube Outro size or YouTube Video Aspect Ratio for YouTube Ads? Check here:
YouTube Video Aspect ratio and Proportions: 19:9 (640X360), 4:3 (480X360)
Aspect Ratio for Desktop Ads: 16:9
Sponsor Card Ads Ratio: 1:1
True View Discovery Ads Ratio: 16:9 or 4:3
Part 4 Think More about YouTube Aspect Ratio
You have been listening about YouTube Screen size or YouTube Aspect Ratio so far many times. Now the biggest question is, how to adjust the Aspect Ratio of YouTube Video or Shorts?
Are you puzzled?

Yeah! Wait, there is the solution. Edit the aspect ratio of your video before uploading it under the YouTube Platform. For that purpose, there is one option named Wondershae Filmora Video Editor That is used to provide you with the Aspect ratio editing and modification option.
Let’s understand how you can do so with Wondershare Filmora that most YouTubers are using to edit and adjust the Aspect Ratio of YouTube Videos.
You need to download and launch the software from the main window. There is a drop-down choice to select the desired aspect ratio for the video.
Wondershare Filmora
Get started easily with Filmora’s powerful performance, intuitive interface, and countless effects!
Try It Free Try It Free Try It Free Learn More about Filmora >


There is another option also, after launching the software, upload your project video. Then, under Project settings, change and set the required aspect ratio.

Simple isn’t it. Yes, the process is quite simple. You can easily change YouTube Video size dimensions without any hassle using Wondershare Filmora editor and that quickly. So, get up and record some interesting YouTube videos or Shorts, mix them up with colors, spicy talk, and change the aspect ratio with ease. You are ready to rock the world of YouTube videos with these simple steps, the right approach that most YouTube Videomakers follow worldwide.
Conclusion
● So guys, finally, I hope now you are pretty sure about what is YouTube video ratio, its importance while dealing with videos, shorts, or posting any ads to promote your business. YouTube file size is something that is changing its dimensions as per the user experience and needs. In the last few years, the user base shifted from TV, desktop to phone, laptops, and smart devices. As a result, the aspect ratio also gets changed with time. Thus, having a proper understanding of adjusting the width and height of YouTube Videos to bring the dynamic vision to the video will create a real difference. Also, using Wondershare Filmora will open the door of options to modify your YouTube file size and many editing options along with.
Also read:
- Elite' Writes on 10 Free Video Transcript Extractors for 2024
- In 2024, Discover Essential List of 7 High-Performance Mobile Video Streaming Tools (iPhone/Android)
- Get Premium Banners - No Cost, Just Click
- Download YouTube Icons Quickly Web, OS-Specific Options Explained
- [New] 10 Best Video Streaming Alternatives to YouTube for Smartphone Users
- Infuse Vibrancy YouTube Thumbnails with Neon Borders
- Chrome to iPhone A Guide to Stripping YouTube Ads
- [New] How to Edit YouTube Videos in Sony Vegas
- Creating Profit on YouTube The Ultimate List of Top Business Channels
- Elevating Your Earning Game with YouTube Monetization Strategies for 2024
- [Updated] Comprehensible Guide to High-Quality Audios on YouTube
- 2024 Approved A Treasure Trove of 9 Complete Holiday Flicks, Free Streaming
- In 2024, Elevate Your Content SEO Mastery Starts Here
- [New] Audiovisual Experts' Choices The Ultimate Video Editing Gear
- Unmasking How To Locate My Comments Posts Online
- Maximizing Engagement with YouTube Shorts Content
- [New] Earnings in the Age of Streaming How YouTube Pays Creators
- Prospects and Pitfalls Are Paid Likes a Sound Channel Strategy?
- Tunes Takeover Transitioning Tracks to YouTube
- In 2024, Enhance Engagement with Effective YT Summary Writing
- [New] 2024 Approved Enhancing Video Performance in Instagram Reels (Mobile)
- How to Screen Share Mac to Apple iPhone 12 Pro Max? | Dr.fone
- Free Cam Screen Recorder Review and Best Alternative for 2024
- Top 10 Gionee F3 Pro Android SIM Unlock APK
- In 2024, How to Migrate Android Data From Infinix Hot 40 to New Android Phone? | Dr.fone
- Maximize Your FB Watching with Top Firefox Addons and Downloaders
- [New] In 2024, The Dos and Don'ts of Creating an Authentic TikTok Version of Ourselves
- New 2024 Approved VLC Tutorial Playing Videos in Slow Mo Made Easy
- [Updated] 2024 Approved Stellar Visuals Enhancing Google Meet Collaboration
- [New] Step Into the Spotlight on Instagram with These Tricks for 2024
- Updated 2024 Approved Video Editors Toolkit 10 Must-Have Software
- How to remove Google FRP Lock on Red Magic 8S Pro
- 2024 Approved Flip and Float Instagram's Guide to Crafting Versatile Visual Content
- [Updated] Effective Approaches to Capturing High-Def Live Games for 2024
- In 2024, Distracted Boyfriend Meme Generator
- The Dark Art of Night Photography Best Practices Revealed
- Repair Video Tool - Repair all your damaged video files of Realme Narzo N53 on Mac
- Most Used Aspect Ratio Adjustment Tools Online
- [New] Crescendo of Creativity Adding Audio to IG Stories for 2024
- Title: "Making a Visual Impact Neon-Borded YouTube Thumbnails Guide"
- Author: Steven
- Created at : 2024-05-25 19:51:22
- Updated at : 2024-05-26 19:51:22
- Link: https://youtube-clips.techidaily.com/making-a-visual-impact-neon-borded-youtube-thumbnails-guide/
- License: This work is licensed under CC BY-NC-SA 4.0.

