
Luminous Techniques for Engaging Vlogs
Luminous Techniques for Engaging Vlogs
Lighting Tips for Vlogging: How to Light

Richard Bennett
Mar 27, 2024• Proven solutions
One of the best things you can do for your video quality is to ensure you have great lighting. Viewers find poor lighting distracting and it’s hard for them to see how great your content is if they are busy thinking about why your video is so dark. By creating a great lighting set up you can ensure that the people watching your videos are only thinking about how much they’re enjoying them.
Going outside and using natural light is the cheapest way to get a lot of light for your videos. If your vlog is not suited to the great outdoors then you need to get more strategic. You can turn on all the lights in your living room and still end up with a dark, grainy, video.
Video Lighting Basics: Three Point Lighting

The most common technique of lighting a scene is called three-point lighting. It involves three different sources of light in the shot and is used by portrait photographers, which is also a great method for lighting your vlog.
The brightest source of light is also known as the key light which need to be high quality. A window will work, but if you do not have access to one where you are filming then consider an LED panel light or a softbox light like the ones used in portrait photography.
This first light will create a dramatic shadow across half of your face. You want to reduce this shadow, but not get rid of it completely.
Rather than setting up another light source on the opposite side of the camera, put up a reflector to bounce some light back onto your face. This reflector is called your ‘Fill Light’.
The fill light is less bright than the primary source of light and it is placed on the side opposite to the key light. Its purpose is to reduce shadows produced by the key light and the reflector will need to be mounted on a stand.
The final step to creating three point lighting is to set up another light behind you. This is your ‘Backlight’, and it will help you stand out from your background. Backlight or Hair light is always placed behind and above the subject to create separation between the subject in the shot and the background. This basic lighting technique can be applied in almost every scene you shoot, which is why it is important to keep an open mind and to continue experimenting with possible light setups.
Watch Video! Top Lighting Tips for Vlogging
Lightning Tips for Aspiring YouTube Videographers
Becoming the master of light will take some time and practice, so it is crucial to remain curious and anxious to learn new tricks throughout that process if you want to continually become better. These tips will help you make the first steps on that journey.
1. Focus Your Key Light
Try to focus your Key Light so that it lights only you and not your background. Do this by mounting anything that can cast a shadow onto your Key Light to control the area where the light hits. If you are using a window for your Key Light then you can use a curtain. If you use a softbox light then your light will already be somewhat focused.
2. Use Natural Lighting
The light provided by the Sun is still the best light source, you can have in your video. The trouble is that natural light changes quickly, which makes it highly unpredictable. The best way to deal with this challenge is to come prepared to the set and to get the shot you want as quickly as you can.
3. Try DIY Lightning
Literally, anything from candles to LED light bulbs can serve as a source of light in a shot. You just need to pay attention to the light temperature, because warmer light sources may highlight reds and yellows that can make your footage look less realistic.
4. Use Lightning Kits
This is by far the best option if you want to be in complete control of the light on your set. You can adjust the intensity of the lights, use filters, diffusers and all sorts of other accessories to create the light that flatters the subjects of your videos. The only downside is that you’ll have to spend a considerable amount of money if you want to have a professional lighting kit.
5. Set up reflectors
Sets of reflectors are often under $50, so they are fairly affordable. However, some vloggers choose to forgo purchasing reflectors and make their own out of tinfoil.

If your strong main light is too hard on your eyes then you can use a translucent ‘reflector’ to soften it. Set your translucent reflector, or other screen, up in front of your main light to diffuse it.
If you are hosting a beauty vlog then you might consider a slightly different set up. Instead of having your main light off to one side set it up directly in front of you so your entire face is lit evenly. It is still a good idea to use fill lights in this set up to give you some dimension, and a backlight is even more essential for helping you stand out from the background. The even light hitting your face will also make you look flat if you do not use a backlight.

If you are using all of the lighting options available to you and your video still looks too dark then you can try brightening it by opening up the aperture of your camera lens/setting a lower f-stop. Letting more light into your camera can help your footage look brighter, although you also run the risk of making things look overexposed/ washed out if you are not careful.
If you are stuck shooting in low light conditions it is best to use a lens with a wider aperture/lower f-stop. This will make the best of the light you do have.
Richard Bennett
Richard Bennett is a writer and a lover of all things video.
Follow @Richard Bennett
Richard Bennett
Mar 27, 2024• Proven solutions
One of the best things you can do for your video quality is to ensure you have great lighting. Viewers find poor lighting distracting and it’s hard for them to see how great your content is if they are busy thinking about why your video is so dark. By creating a great lighting set up you can ensure that the people watching your videos are only thinking about how much they’re enjoying them.
Going outside and using natural light is the cheapest way to get a lot of light for your videos. If your vlog is not suited to the great outdoors then you need to get more strategic. You can turn on all the lights in your living room and still end up with a dark, grainy, video.
Video Lighting Basics: Three Point Lighting
The most common technique of lighting a scene is called three-point lighting. It involves three different sources of light in the shot and is used by portrait photographers, which is also a great method for lighting your vlog.
The brightest source of light is also known as the key light which need to be high quality. A window will work, but if you do not have access to one where you are filming then consider an LED panel light or a softbox light like the ones used in portrait photography.
This first light will create a dramatic shadow across half of your face. You want to reduce this shadow, but not get rid of it completely.
Rather than setting up another light source on the opposite side of the camera, put up a reflector to bounce some light back onto your face. This reflector is called your ‘Fill Light’.
The fill light is less bright than the primary source of light and it is placed on the side opposite to the key light. Its purpose is to reduce shadows produced by the key light and the reflector will need to be mounted on a stand.
The final step to creating three point lighting is to set up another light behind you. This is your ‘Backlight’, and it will help you stand out from your background. Backlight or Hair light is always placed behind and above the subject to create separation between the subject in the shot and the background. This basic lighting technique can be applied in almost every scene you shoot, which is why it is important to keep an open mind and to continue experimenting with possible light setups.
Watch Video! Top Lighting Tips for Vlogging
Lightning Tips for Aspiring YouTube Videographers
Becoming the master of light will take some time and practice, so it is crucial to remain curious and anxious to learn new tricks throughout that process if you want to continually become better. These tips will help you make the first steps on that journey.
1. Focus Your Key Light
Try to focus your Key Light so that it lights only you and not your background. Do this by mounting anything that can cast a shadow onto your Key Light to control the area where the light hits. If you are using a window for your Key Light then you can use a curtain. If you use a softbox light then your light will already be somewhat focused.
2. Use Natural Lighting
The light provided by the Sun is still the best light source, you can have in your video. The trouble is that natural light changes quickly, which makes it highly unpredictable. The best way to deal with this challenge is to come prepared to the set and to get the shot you want as quickly as you can.
3. Try DIY Lightning
Literally, anything from candles to LED light bulbs can serve as a source of light in a shot. You just need to pay attention to the light temperature, because warmer light sources may highlight reds and yellows that can make your footage look less realistic.
4. Use Lightning Kits
This is by far the best option if you want to be in complete control of the light on your set. You can adjust the intensity of the lights, use filters, diffusers and all sorts of other accessories to create the light that flatters the subjects of your videos. The only downside is that you’ll have to spend a considerable amount of money if you want to have a professional lighting kit.
5. Set up reflectors
Sets of reflectors are often under $50, so they are fairly affordable. However, some vloggers choose to forgo purchasing reflectors and make their own out of tinfoil.
If your strong main light is too hard on your eyes then you can use a translucent ‘reflector’ to soften it. Set your translucent reflector, or other screen, up in front of your main light to diffuse it.
If you are hosting a beauty vlog then you might consider a slightly different set up. Instead of having your main light off to one side set it up directly in front of you so your entire face is lit evenly. It is still a good idea to use fill lights in this set up to give you some dimension, and a backlight is even more essential for helping you stand out from the background. The even light hitting your face will also make you look flat if you do not use a backlight.
If you are using all of the lighting options available to you and your video still looks too dark then you can try brightening it by opening up the aperture of your camera lens/setting a lower f-stop. Letting more light into your camera can help your footage look brighter, although you also run the risk of making things look overexposed/ washed out if you are not careful.
If you are stuck shooting in low light conditions it is best to use a lens with a wider aperture/lower f-stop. This will make the best of the light you do have.
Richard Bennett
Richard Bennett is a writer and a lover of all things video.
Follow @Richard Bennett
Demystifying the Journey to Knowing Who Watches You
How to See Your Subscribers on YouTube?
Richard Bennett
Oct 26, 2023• Proven solutions
In this article, we will show you how to simply check your list of subscribers on YouTube and how to use that information to gain more subscribers.
- How to See Your YouTube Subscribers List
- How to See Which of Your Subscribers are Most Popular
- How to See Other People’s Subscribers
A YouTube channel is like a small, or not so small, community of like-minded people who share an interest in a topic. Growing and developing your channel will require you to know who your subscribers are because when you understand who the people that support your work are you can better tailor your content to them and get more subscribers for YouTube.
Click here to learn how to subscribe on YouTube.
Part 1: How to See Your YouTube Subscribers List?
Finding out who your subscribers are on YouTube is a simple process that takes a minimum amount of time and effort.
1. In order to do so, you first need to go to your channel’s home page and then click on the Creator Studio icon located in the upper right corner of the screen next to your profile picture.
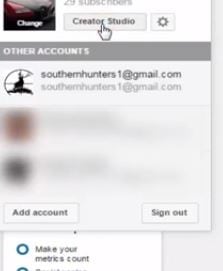
You can also access the Creator Studio by clicking on your icon in the top right corner of any screen on YouTube and selecting it from the drop-down menu.
2. Once the Creator Studio opens, you’ll be able to see different menus such as Analytics and Video Manager.
3. You’ll need to click on the Community menu, which provides insight into messages or comments among other things.
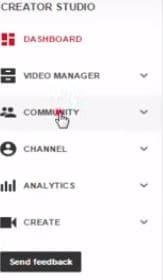
4. Select the Subscribers option from the menu and wait for the list of the subscribers to appear on your screen. You’ll be able to see a list of YouTube users that have subscribed to your channel.
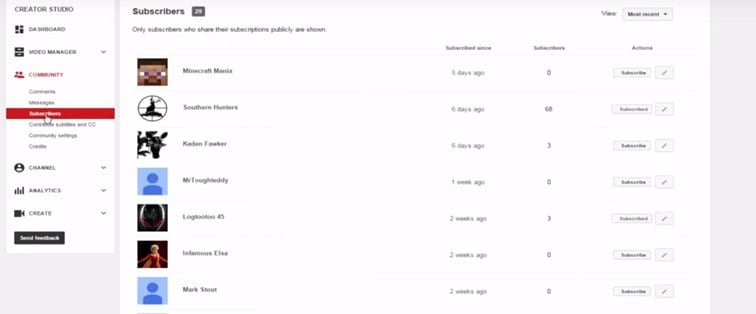
Constantly checking the list of subscribers is a great way to keep track of new subscribers to your channel, which is important if you want to know how many new subscribers you got within a day or a week.
If you would like to go through a more detailed tutorial about how to see who your subscribers are, click here and learn each step of this simple process.
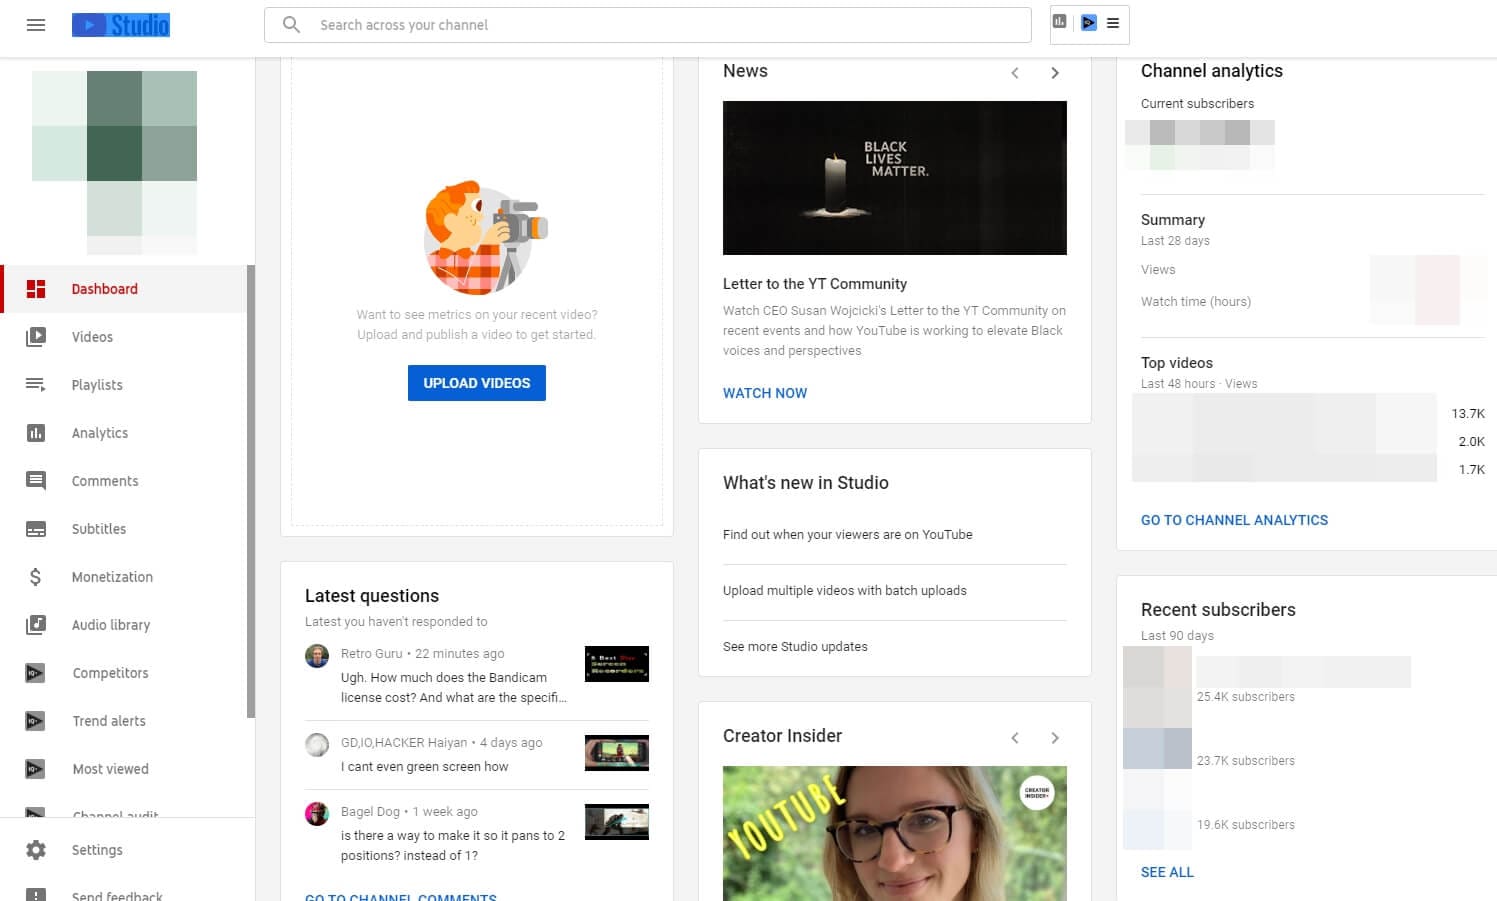
If you’re using YouTube Studio, you can go to the Recent subscribers card on the Dashboard, and then click SEE ALL to check the list of the recent subscribers.
Part 2: How to See Which of Your Subscribers are the Most Popular
The list of subscribers to your channel offered by YouTube’s Creator Studio can be used for a variety of different purposes. You can compare your channel to channels with a similar number of subscribers, or you can find out how many users that have subscribed to your channel have around the same (or even more) subscribers than you do. If you are thinking about creating a collab video , your list of subscribers can be a great source of potential partners.
So in order to see which of your subscribers are the most popular, you simply need to change the settings in the Subscribers panel from most recent to most popular.
Part 3: How to See Other People’s Subscribers
Seeing the list of subscribers on other people’s channels is no longer possible on YouTube, even though it was a common feature in the past.
What you can do is select one of your subscribers from the subscriber list on your channel, and go to their channel and then click on the About option that will show you the number of subscribers and the total number of views to the channel (or use one of these tools to see the sub count of any channel in real-time ).
Unfortunately, YouTube channel owners can no longer browse through other people’s subscribers and for that reason, their interactions with potential subscribers are somewhat limited.
If you want to get more subscribers, you must consider your channel’s branding. Want to improve your branding? Click here to see examples from popular channels that have nailed their brand.
Touch Up Your YouTube Videos with Filmora
As one of the most widely used video editing software in YouTube video editing, Filmora provides lots of templates and effects, so you don’t have to look somewhere else.


Richard Bennett
Richard Bennett is a writer and a lover of all things video.
Follow @Richard Bennett
Richard Bennett
Oct 26, 2023• Proven solutions
In this article, we will show you how to simply check your list of subscribers on YouTube and how to use that information to gain more subscribers.
- How to See Your YouTube Subscribers List
- How to See Which of Your Subscribers are Most Popular
- How to See Other People’s Subscribers
A YouTube channel is like a small, or not so small, community of like-minded people who share an interest in a topic. Growing and developing your channel will require you to know who your subscribers are because when you understand who the people that support your work are you can better tailor your content to them and get more subscribers for YouTube.
Click here to learn how to subscribe on YouTube.
Part 1: How to See Your YouTube Subscribers List?
Finding out who your subscribers are on YouTube is a simple process that takes a minimum amount of time and effort.
1. In order to do so, you first need to go to your channel’s home page and then click on the Creator Studio icon located in the upper right corner of the screen next to your profile picture.
You can also access the Creator Studio by clicking on your icon in the top right corner of any screen on YouTube and selecting it from the drop-down menu.
2. Once the Creator Studio opens, you’ll be able to see different menus such as Analytics and Video Manager.
3. You’ll need to click on the Community menu, which provides insight into messages or comments among other things.
4. Select the Subscribers option from the menu and wait for the list of the subscribers to appear on your screen. You’ll be able to see a list of YouTube users that have subscribed to your channel.
Constantly checking the list of subscribers is a great way to keep track of new subscribers to your channel, which is important if you want to know how many new subscribers you got within a day or a week.
If you would like to go through a more detailed tutorial about how to see who your subscribers are, click here and learn each step of this simple process.
If you’re using YouTube Studio, you can go to the Recent subscribers card on the Dashboard, and then click SEE ALL to check the list of the recent subscribers.
Part 2: How to See Which of Your Subscribers are the Most Popular
The list of subscribers to your channel offered by YouTube’s Creator Studio can be used for a variety of different purposes. You can compare your channel to channels with a similar number of subscribers, or you can find out how many users that have subscribed to your channel have around the same (or even more) subscribers than you do. If you are thinking about creating a collab video , your list of subscribers can be a great source of potential partners.
So in order to see which of your subscribers are the most popular, you simply need to change the settings in the Subscribers panel from most recent to most popular.
Part 3: How to See Other People’s Subscribers
Seeing the list of subscribers on other people’s channels is no longer possible on YouTube, even though it was a common feature in the past.
What you can do is select one of your subscribers from the subscriber list on your channel, and go to their channel and then click on the About option that will show you the number of subscribers and the total number of views to the channel (or use one of these tools to see the sub count of any channel in real-time ).
Unfortunately, YouTube channel owners can no longer browse through other people’s subscribers and for that reason, their interactions with potential subscribers are somewhat limited.
If you want to get more subscribers, you must consider your channel’s branding. Want to improve your branding? Click here to see examples from popular channels that have nailed their brand.
Touch Up Your YouTube Videos with Filmora
As one of the most widely used video editing software in YouTube video editing, Filmora provides lots of templates and effects, so you don’t have to look somewhere else.
Richard Bennett
Richard Bennett is a writer and a lover of all things video.
Follow @Richard Bennett
Also read:
- [New] Conveniently Connect with Others via Your Playlist
- [New] Solutions for Missing Shorts Thumbnails on YouTube
- [Updated] In 2024, Unveiling Secrets to Great GoPro Time-Lapses
- Accelerated Learning for Chromakey Artistry for 2024
- ASMR Mastery in Action Strategies for Dynamic and Effective Videos
- Creating Memorable Beginnings IMovie Tips for YouTube Videos
- Digital Detox Ignoring Negativity on YouTube for 2024
- How To Enable USB Debugging on a Locked Itel A60s Phone
- How To Repair 'lib4eay32.dll Is Absent or Unavailable' Glitches
- In 2024, Deciphering the Sideways Photo Puzzle on IG
- Simplifying the Process of Creating a High-Quality RSS Feed for 2024
- User's Insight: Taming the Home Network Chaos with Powerful Linksys Velop Mesh Routers
- YouTube to Dailymotion Transferring Videos Seamlessly
- Title: Luminous Techniques for Engaging Vlogs
- Author: Steven
- Created at : 2025-01-01 17:29:35
- Updated at : 2025-01-03 19:18:22
- Link: https://youtube-clips.techidaily.com/luminous-techniques-for-engaging-vlogs/
- License: This work is licensed under CC BY-NC-SA 4.0.