:max_bytes(150000):strip_icc()/delete-text-messages-from-iphone-2000548-1538ff10388f4876bcbe18bad9f43f33.png)
Learn to Purge Your Device's YouTube Content Easily
Learn to Purge Your Device’s YouTube Content Easily
How to Remove YouTube Videos

Richard Bennett
Mar 27, 2024• Proven solutions
There are quite a few different reasons for which you might want to consider removing your YouTube video. From outdated content to mistakes in editing – the reasons are quite extensive. In the part 1, we will teach you how to remove your own videos on YouTube and things you should note when removing. The part 2 will tell you how to remove the videos from other YouTube channel.
If you need more advanced features like PIP, Green Screen, or audio mixing, check this easy to use and powerful video editor-Wondershare Filmora , and ignite your video by clicks.
 Download Mac Version ](https://tools.techidaily.com/wondershare/filmora/download/ )
You may also like:What is YouTube Creative Commons and How to Use it >>
Part 1: How to Remove YouTube Videos that You’ve Uploaded
You may also like:How to Edit Uploaded YouTube Videos >>
The first thing that we are going to show you is how to remove your own videos. This might be needed if you have uploaded content quite some time ago and it is already outdated. Or, if you have too many videos on your channel and you need to clear up those who aren’t that interesting.
The fact of the matter is that it’s quite easy to remove YouTube videos. The first thing that you would need to do is going ahead and hop on the website and log into your account. Afterwards, you need to go to the “My Channel” option and click on the “Video Manager”.
Upon doing this, a new page is going to pop up, and you are going to see a list of all the videos that you’ve uploaded.

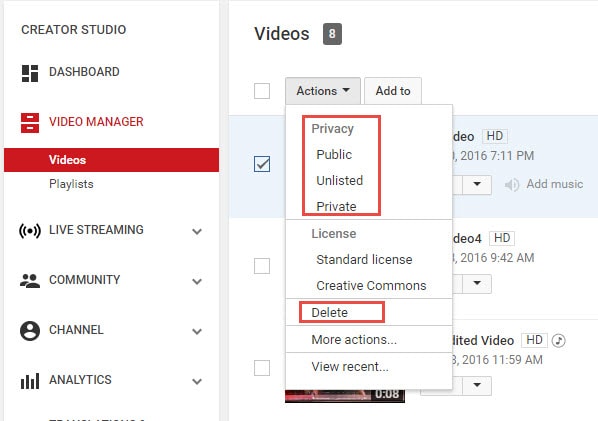
There are little tick boxes on the left side which you can click in order to mark. Mark the videos that you want to edit and click on the “Actions” button on top. There is going to be a drop-down menu, and you can click on the delete option to remove the video permanently. Furthermore, you can also hide the video if you don’t want to delete it but only to hide it away from your subscribers. In order to do so, you should simply click on the Private or Unlisted button.
That’s pretty much it – there’s nothing further to it, and the entire thing is rather comprehensive and easy to carry out, which makes it convenient to go through.
Part 2: How to Remove YouTube Videos on Other Channels
Now that we’ve covered how to remove videos from your own channel, it’s time to dig a little bit deeper. There are certain instances in which you might want to remove YouTube videos from other channels as well. The reasons for this are usually rather personal. For instance – someone has uploaded a video including you or something yours without your consent, and this harms your reputation. Furthermore, it may display sensitive information that you don’t want to reveal to anyone else – the reasons are rather different, but they are related to your own individual privacy which is an important legal right.
You may also like:How to Blur Faces in YouTube Videos >>
The first thing you can do is contact the person who uploaded the video and kindly asks him to remove it using the procedure that we described above. This is going to be the best choice because it’s going to achieve the result quickly and without any hassle. However, in certain cases, the person might not be active, or he might disagree with you and keep the video posted. If that’s the case, you have one option which is likely to be the best alternative.
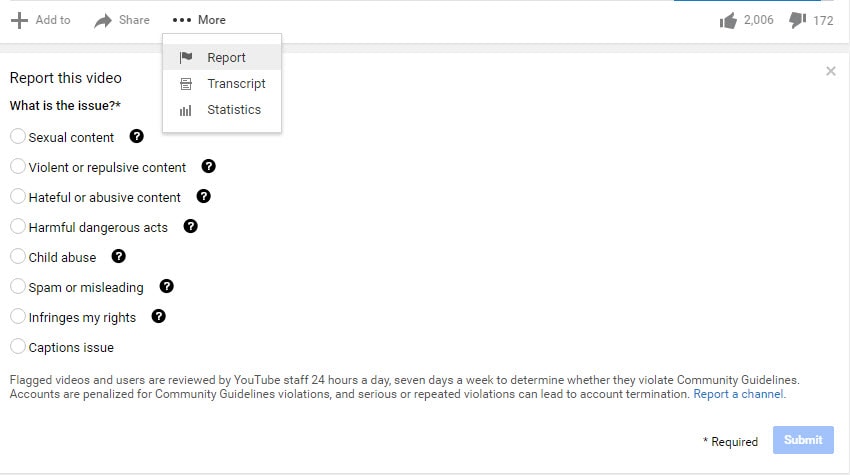
You need to report the video as an inappropriate and flag it with the remark that it’s invading your privacy. This is going to lead you to the page of the YouTube Safety Center. You will have to explain the issue in details in a six-step wizard which extensively asks you about how the video is invasive to your privacy rights. The process is quite comprehensive, and it’s easy to go through. However, you will have to wait for the YouTube support team to assess it and make the decision for the removal.
The truth is that being able to remove YouTube videos is something important that you should be able to do. It’s going to ensure that your channel is perfectly updated, aligned and structured while at the same time making sure that everything is in line with your privacy. YouTube is a powerful website, and you need to be able to stay in control in order to be protected.
Richard Bennett
Richard Bennett is a writer and a lover of all things video.
Follow @Richard Bennett
Richard Bennett
Mar 27, 2024• Proven solutions
There are quite a few different reasons for which you might want to consider removing your YouTube video. From outdated content to mistakes in editing – the reasons are quite extensive. In the part 1, we will teach you how to remove your own videos on YouTube and things you should note when removing. The part 2 will tell you how to remove the videos from other YouTube channel.
If you need more advanced features like PIP, Green Screen, or audio mixing, check this easy to use and powerful video editor-Wondershare Filmora , and ignite your video by clicks.
Download Mac Version ](https://tools.techidaily.com/wondershare/filmora/download/ )
You may also like:What is YouTube Creative Commons and How to Use it >>
Part 1: How to Remove YouTube Videos that You’ve Uploaded
You may also like:How to Edit Uploaded YouTube Videos >>
The first thing that we are going to show you is how to remove your own videos. This might be needed if you have uploaded content quite some time ago and it is already outdated. Or, if you have too many videos on your channel and you need to clear up those who aren’t that interesting.
The fact of the matter is that it’s quite easy to remove YouTube videos. The first thing that you would need to do is going ahead and hop on the website and log into your account. Afterwards, you need to go to the “My Channel” option and click on the “Video Manager”.
Upon doing this, a new page is going to pop up, and you are going to see a list of all the videos that you’ve uploaded.
There are little tick boxes on the left side which you can click in order to mark. Mark the videos that you want to edit and click on the “Actions” button on top. There is going to be a drop-down menu, and you can click on the delete option to remove the video permanently. Furthermore, you can also hide the video if you don’t want to delete it but only to hide it away from your subscribers. In order to do so, you should simply click on the Private or Unlisted button.
That’s pretty much it – there’s nothing further to it, and the entire thing is rather comprehensive and easy to carry out, which makes it convenient to go through.
Part 2: How to Remove YouTube Videos on Other Channels
Now that we’ve covered how to remove videos from your own channel, it’s time to dig a little bit deeper. There are certain instances in which you might want to remove YouTube videos from other channels as well. The reasons for this are usually rather personal. For instance – someone has uploaded a video including you or something yours without your consent, and this harms your reputation. Furthermore, it may display sensitive information that you don’t want to reveal to anyone else – the reasons are rather different, but they are related to your own individual privacy which is an important legal right.
You may also like:How to Blur Faces in YouTube Videos >>
The first thing you can do is contact the person who uploaded the video and kindly asks him to remove it using the procedure that we described above. This is going to be the best choice because it’s going to achieve the result quickly and without any hassle. However, in certain cases, the person might not be active, or he might disagree with you and keep the video posted. If that’s the case, you have one option which is likely to be the best alternative.
You need to report the video as an inappropriate and flag it with the remark that it’s invading your privacy. This is going to lead you to the page of the YouTube Safety Center. You will have to explain the issue in details in a six-step wizard which extensively asks you about how the video is invasive to your privacy rights. The process is quite comprehensive, and it’s easy to go through. However, you will have to wait for the YouTube support team to assess it and make the decision for the removal.
The truth is that being able to remove YouTube videos is something important that you should be able to do. It’s going to ensure that your channel is perfectly updated, aligned and structured while at the same time making sure that everything is in line with your privacy. YouTube is a powerful website, and you need to be able to stay in control in order to be protected.
Richard Bennett
Richard Bennett is a writer and a lover of all things video.
Follow @Richard Bennett
Streamlining Video Production: Merging YouTube Editing & iMovie’s Best Practices
Easy Way to Edit YouTube Videos in iMovie
Richard Bennett
Mar 27, 2024• Proven solutions
iMovie is the built-in video editor that allows you to combine several video clips. It is available for both Mac and iOS devices. This app was first released in 1999 when it came with the iMac DV model.
With the use of the iMovie, you are able to create movies that include sound effects, menus, transitions, titles, themes, and music, just to name a few. The resulting movie can be saved onto physical media or as a file on the hard drive.
If you are a Mac user, then you can easily edit YouTube videos in iMovie. All you need to do is to follow the simple steps below. In this article, you will learn how to import videos, organize videos, add YouTube titles and add transitions.
Part 1. Steps on Editing YouTube Videos Using iMovie
To edit a video for YouTube with iMovie, you can follow these steps.
Step 1: Import Video Clips into iMovie
If you have recorded the video clips with the use of a videocam, then connect the camera to the Mac and open the app. You can import the videos by manually selecting the clips that will be part of the YouTube video.
Note: If you want to import videos that you have already published on your YouTube channel, then you can download them from the channel, and save them as MP4. However, if the videos were uploaded by other users, then you need to use a video converter, this article will let you know the 8 best video converters to convert video to MP4.
Step 2: Edit the Video Clips
Once you have all the clips that you need, the next step is to edit YouTube videos in iMovie. When you import the clips, you have created an Event in the app. If you want to include a clip in your final video, just drag the file to the project browser, where you can edit the video.

You can also add videos from other Events into the current project. You can select the parts of the video by dragging across the video from the chosen start to stop points. Edit the video until you are satisfied with the results.
Step 3: Enhance the Video
Once you have edited the video, you can then add background music, themes, sound effects, onscreen text, transitions between clips, and photos. The best thing about iMovie is that it comes with a sound effects library. It also allows you to upload audio from your iTunes library, iLife, and GarageBand.
iMovie allows you to add text to any part of the video, whether it is a title screen at the start, credits at the end, and everything in between. Try to enhance the video until you think it is ready to be uploaded to YouTube.
- Add YouTube title : If you want to add a title for YouTube Video, all you need to do is click Title in the toolbar, and then highlight My Movie on the left. From here, enter the title you like.
- Organize videos : You also can rearrange video clips in the timeline. Just drag the video on the timeline to wherever you want.
- Add transitions : If you have more than one video clip, you definitely need transitions between them. Click the Transitions tab, and then select one transition you like. In the end, drag it to stop between two clips.
Step 4: Export and Upload the Video to YouTube

When you edit YouTube videos in iMovie, you have the option to export the video straight to the video streaming website. All you need to do is to click on the Share button found at the top of the screen. Then select YouTube. Add your YouTube account in iMovie by entering your username and password. Then you choose a title, description, and tags for the video.
You can choose the resolution and size of the video that includes HD 720p and HD 1080p, mobile, medium, and large. Click on Publish to upload the video to YouTube. Uploading the video will take several minutes to a couple of hours, depending on the resolution and size of the video.
Part 2. A Better Choice to Edit YouTube Videos
There’s a better way to edit YouTube videos. It involves the use of Wondershare Filmora . It is user-friendly and allows beginners to make videos professional-looking videos.

This software has more than 300 video effects for family, weddings, love, and travel, etc. You can also add animated captions to photos that will help tell the story. It comes with an array of intro and credit templates that will enhance your video.
Lastly, you can easily share the resulting movie on YouTube, DVD, other devices, and a lot more.
Richard Bennett
Richard Bennett is a writer and a lover of all things video.
Follow @Richard Bennett
Richard Bennett
Mar 27, 2024• Proven solutions
iMovie is the built-in video editor that allows you to combine several video clips. It is available for both Mac and iOS devices. This app was first released in 1999 when it came with the iMac DV model.
With the use of the iMovie, you are able to create movies that include sound effects, menus, transitions, titles, themes, and music, just to name a few. The resulting movie can be saved onto physical media or as a file on the hard drive.
If you are a Mac user, then you can easily edit YouTube videos in iMovie. All you need to do is to follow the simple steps below. In this article, you will learn how to import videos, organize videos, add YouTube titles and add transitions.
Part 1. Steps on Editing YouTube Videos Using iMovie
To edit a video for YouTube with iMovie, you can follow these steps.
Step 1: Import Video Clips into iMovie
If you have recorded the video clips with the use of a videocam, then connect the camera to the Mac and open the app. You can import the videos by manually selecting the clips that will be part of the YouTube video.
Note: If you want to import videos that you have already published on your YouTube channel, then you can download them from the channel, and save them as MP4. However, if the videos were uploaded by other users, then you need to use a video converter, this article will let you know the 8 best video converters to convert video to MP4.
Step 2: Edit the Video Clips
Once you have all the clips that you need, the next step is to edit YouTube videos in iMovie. When you import the clips, you have created an Event in the app. If you want to include a clip in your final video, just drag the file to the project browser, where you can edit the video.
You can also add videos from other Events into the current project. You can select the parts of the video by dragging across the video from the chosen start to stop points. Edit the video until you are satisfied with the results.
Step 3: Enhance the Video
Once you have edited the video, you can then add background music, themes, sound effects, onscreen text, transitions between clips, and photos. The best thing about iMovie is that it comes with a sound effects library. It also allows you to upload audio from your iTunes library, iLife, and GarageBand.
iMovie allows you to add text to any part of the video, whether it is a title screen at the start, credits at the end, and everything in between. Try to enhance the video until you think it is ready to be uploaded to YouTube.
- Add YouTube title : If you want to add a title for YouTube Video, all you need to do is click Title in the toolbar, and then highlight My Movie on the left. From here, enter the title you like.
- Organize videos : You also can rearrange video clips in the timeline. Just drag the video on the timeline to wherever you want.
- Add transitions : If you have more than one video clip, you definitely need transitions between them. Click the Transitions tab, and then select one transition you like. In the end, drag it to stop between two clips.
Step 4: Export and Upload the Video to YouTube
When you edit YouTube videos in iMovie, you have the option to export the video straight to the video streaming website. All you need to do is to click on the Share button found at the top of the screen. Then select YouTube. Add your YouTube account in iMovie by entering your username and password. Then you choose a title, description, and tags for the video.
You can choose the resolution and size of the video that includes HD 720p and HD 1080p, mobile, medium, and large. Click on Publish to upload the video to YouTube. Uploading the video will take several minutes to a couple of hours, depending on the resolution and size of the video.
Part 2. A Better Choice to Edit YouTube Videos
There’s a better way to edit YouTube videos. It involves the use of Wondershare Filmora . It is user-friendly and allows beginners to make videos professional-looking videos.
This software has more than 300 video effects for family, weddings, love, and travel, etc. You can also add animated captions to photos that will help tell the story. It comes with an array of intro and credit templates that will enhance your video.
Lastly, you can easily share the resulting movie on YouTube, DVD, other devices, and a lot more.
Richard Bennett
Richard Bennett is a writer and a lover of all things video.
Follow @Richard Bennett
Also read:
- [New] Champion Toolkit 10 Budget-Friendly Caption Extractors
- [New] The Art of Audio Amalgamation in Vimeo Videos
- [Updated] 2024 Approved Discover the Best Voice Interpretation Tech for Mac Users
- 2024 Approved Attracting Watchers Discover the Top 6 Video Types
- 2024 Approved Boost Visibility Selecting the Right YouTube Thumbnail Dimensions
- Architects Crafting Fantasy Realms for Marvel for 2024
- Comprehensive Guide to Crafting Engaging YouTube Outros for 2024
- Decoding YouTube's Algorithm Behind Prominent Comments
- How can I get more stardust in pokemon go On Itel A60? | Dr.fone
- In 2024, Change Location on Yik Yak For your Apple iPhone 7 Plus to Enjoy More Fun | Dr.fone
- The Best Android Unlock Software For Samsung Galaxy A05s Device Top 5 Picks to Remove Android Locks
- The Finest High-Performance Laptops & Elite Ultrabooks of the Year 2Am
- Winning the Race Against Time: How to Speed Up Windows 1N's Initial Boot Sequence
- Title: Learn to Purge Your Device's YouTube Content Easily
- Author: Steven
- Created at : 2024-12-31 22:04:12
- Updated at : 2025-01-03 16:08:53
- Link: https://youtube-clips.techidaily.com/learn-to-purge-your-devices-youtube-content-easily/
- License: This work is licensed under CC BY-NC-SA 4.0.