
:max_bytes(150000):strip_icc()/LifewireClubhousePrimary-6ea7cf41b0884f88b419ec23bc3c35be.jpg)
Leading Links to Google's Advertising Networks on Videos
Leading Links to Google’s Advertising Networks on Videos
FameBit Alternatives for Finding YouTube Sponsorships

Richard Bennett
Oct 26, 2023• Proven solutions
Famebit is the most popular influencer marketing platform, but there are lots of sites like Famebit where YouTube creators can find sponsorships. The key is to find one where you won’t be reduced to a database entry listing your channel’s genre and your subscriber count.
If you want to be valued for your talent then FameBit is a great choice, but it’s not your only choice. If you are serious about finding sponsorships and creating branded content then there is no reason you shouldn’t be on multiple platforms.
4 Alternatives to FameBit
Here are four influencer marketing platforms besides FameBit that cater to creators, not just brands.
Revfluence
Revfluence promises creators they will be able to ‘create content on their terms’. They work with both YouTubers and Instagrammers.
A lot of big fashion brands like Calvin Klein, Madewell, and Gap can be found on Revfluence. This platform is a must if you have a lifestyle, beauty, or fashion channel.
On Revfluence you can browse through brands instead of waiting for them to contact you. You choose which companies you want to endorse, so you never have to worry about losing your integrity in the eyes of your subscribers. Once you find a sponsor, you maintain control over how you choose to collaborate with them.

TapInfluence
TapInfluence might initially seem more brand-focused than equal, like FameBit, because it makes you wait for brands to select you. You are not simply on-call for any brand willing to pay, though.
After a brand approaches you, you get to examine their offer and decide whether you would feel proud to be associated with them.
The main thing that sets TapInfluence apart from other platforms where brands approach you is their attitude towards influencers and the way they define influence.
Some creators get turned off by the word ‘influencer’, and it is easy to understand why. Your subscriber count is important when you want to participate in an ad campaign, but your subscribers are not just numbers and you are not some kind of puppetmaster ‘influencing’ them for monetary gain.
TapInfluence values authenticity and works with brands that hold that same value. Your ability to be genuine with your audience is never compromised because it is that honest relationship that makes you valuable to brands.
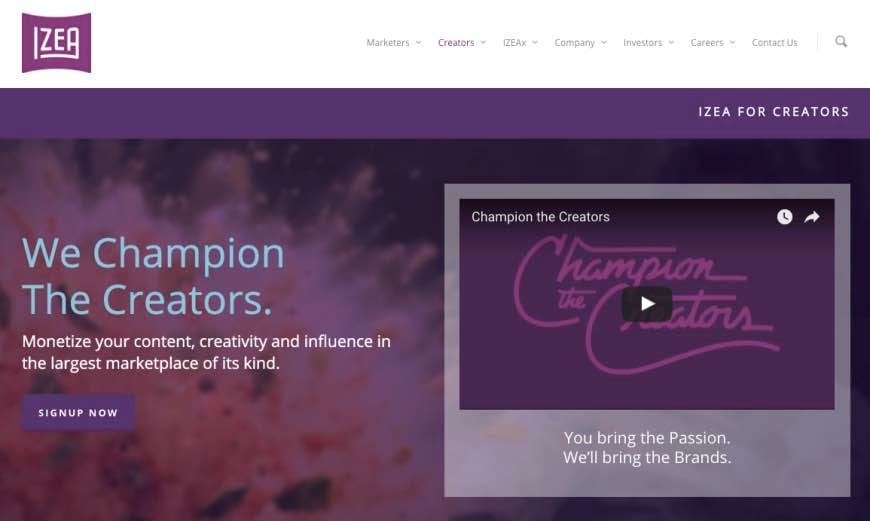
Izea
Izea’s motto states that they champion the creators. They value you for whatever it is you already do, be it ranting vlogs or educational content.
When you create your profile on Izea you connect your YouTube account, and any other social media account you open to use for branded content. You also describe your audience and state your asking price.
Brands distribute their sponsorship opportunities to select groups of creators based on what they are looking for. Sponsors may approach you, or you can take matters into your own hands and approach brands with creative pitches.
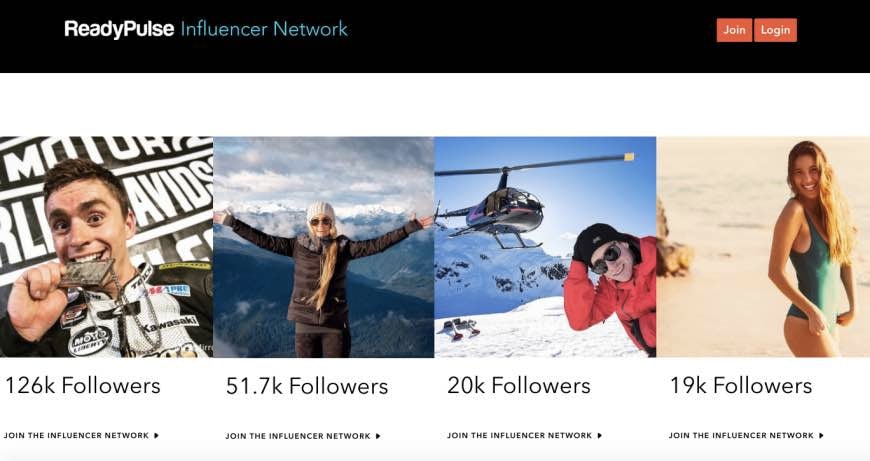
ReadyPulse
ReadyPulse is different from both FameBit and the other platforms on this list because you do not join brands for specific campaigns, you become a brand ambassador.
The idea is that you continue being you – creating the same style of content you already do – but you also have a relationship with a brand that you openly support and advocate for. The trust your subscribers have in you is supposed to be extended to your associated brands.
This is excellent if you have the opportunity to become a brand ambassador for a company you respect and are excited to work with. You can get all kinds of perks – like discounts and early releases – from your partner brand, and there is no reason you should not want your subscribers to trust the brand that you trust.
It becomes problematic if you find yourself matched with brands you do not have total confidence in, although ReadyPulse does try to match brands with influencers who are already fans of them.
Only you can decide if becoming a brand ambassador is right for you and your audience.
Do you know about any other sites like Famebit?
If you want to find a video editing solution that empowers your imagination and creativity yet takes less effort, please try this robust and user-friendly video editing software Wondershare Filmora, which will definitely enhance your productivity and helps you to make money by making videos much easier.


Richard Bennett
Richard Bennett is a writer and a lover of all things video.
Follow @Richard Bennett
Richard Bennett
Oct 26, 2023• Proven solutions
Famebit is the most popular influencer marketing platform, but there are lots of sites like Famebit where YouTube creators can find sponsorships. The key is to find one where you won’t be reduced to a database entry listing your channel’s genre and your subscriber count.
If you want to be valued for your talent then FameBit is a great choice, but it’s not your only choice. If you are serious about finding sponsorships and creating branded content then there is no reason you shouldn’t be on multiple platforms.
4 Alternatives to FameBit
Here are four influencer marketing platforms besides FameBit that cater to creators, not just brands.
Revfluence
Revfluence promises creators they will be able to ‘create content on their terms’. They work with both YouTubers and Instagrammers.
A lot of big fashion brands like Calvin Klein, Madewell, and Gap can be found on Revfluence. This platform is a must if you have a lifestyle, beauty, or fashion channel.
On Revfluence you can browse through brands instead of waiting for them to contact you. You choose which companies you want to endorse, so you never have to worry about losing your integrity in the eyes of your subscribers. Once you find a sponsor, you maintain control over how you choose to collaborate with them.
TapInfluence
TapInfluence might initially seem more brand-focused than equal, like FameBit, because it makes you wait for brands to select you. You are not simply on-call for any brand willing to pay, though.
After a brand approaches you, you get to examine their offer and decide whether you would feel proud to be associated with them.
The main thing that sets TapInfluence apart from other platforms where brands approach you is their attitude towards influencers and the way they define influence.
Some creators get turned off by the word ‘influencer’, and it is easy to understand why. Your subscriber count is important when you want to participate in an ad campaign, but your subscribers are not just numbers and you are not some kind of puppetmaster ‘influencing’ them for monetary gain.
TapInfluence values authenticity and works with brands that hold that same value. Your ability to be genuine with your audience is never compromised because it is that honest relationship that makes you valuable to brands.
Izea
Izea’s motto states that they champion the creators. They value you for whatever it is you already do, be it ranting vlogs or educational content.
When you create your profile on Izea you connect your YouTube account, and any other social media account you open to use for branded content. You also describe your audience and state your asking price.
Brands distribute their sponsorship opportunities to select groups of creators based on what they are looking for. Sponsors may approach you, or you can take matters into your own hands and approach brands with creative pitches.
ReadyPulse
ReadyPulse is different from both FameBit and the other platforms on this list because you do not join brands for specific campaigns, you become a brand ambassador.
The idea is that you continue being you – creating the same style of content you already do – but you also have a relationship with a brand that you openly support and advocate for. The trust your subscribers have in you is supposed to be extended to your associated brands.
This is excellent if you have the opportunity to become a brand ambassador for a company you respect and are excited to work with. You can get all kinds of perks – like discounts and early releases – from your partner brand, and there is no reason you should not want your subscribers to trust the brand that you trust.
It becomes problematic if you find yourself matched with brands you do not have total confidence in, although ReadyPulse does try to match brands with influencers who are already fans of them.
Only you can decide if becoming a brand ambassador is right for you and your audience.
Do you know about any other sites like Famebit?
If you want to find a video editing solution that empowers your imagination and creativity yet takes less effort, please try this robust and user-friendly video editing software Wondershare Filmora, which will definitely enhance your productivity and helps you to make money by making videos much easier.
Richard Bennett
Richard Bennett is a writer and a lover of all things video.
Follow @Richard Bennett
Brighten Up Your Image Previews: Introducing Luminous Frames
Your YouTube video, or any other clip published on any forum, gets a larger number of hits if it has an attractive thumbnail. And, the fact is, a thumbnail becomes 10x more attractive when the main character that the image has have a neon border around it.
With that said, in the following sections, you will learn a couple of methods on how to add a YouTube thumbnail border around the main characters and/or objects that are significant to the clip.
In this article
01 Add Glowing Neon Border to YouTube Thumbnail with Filmora
02 Add a Glowing Neon Border in YouTube Thumbnail with Canva
03 Outline a Person in a YouTube Thumbnail with Photoshop
Part 1: How to Add Neon Border to YouTube Thumbnail for Free with Filmora
Being one of the most versatile and intuitive post-production tools available in the market today, Wondershare Filmora X allows you to add a neon border to a YouTube thumbnail quite conveniently. You can learn how to get this done on Windows or Mac by following the steps given below.
For Win 7 or later (64-bit)
For macOS 10.12 or later
Step 1: Define Project Settings and Add Image to the Timeline
Launch Wondershare Filmora X on your PC (a MacBook Pro M1 is used here), ensure that the project aspect ratio is set to 16:9 (Widescreen) on the splash screen, and click New Project. On the main interface, click the Preview quality and display settings icon from the upper-right area of the Timeline, click Change Project Aspect Ratio, click to select 1280 x 720 (HD) from the Resolution menu of the Project Settings box, and click OK to save the custom project settings.

Then select My Media from the menu bar if not already selected, click Project Media from the navigation pane, and click Import from the Media box to select and import the image of the main character or object that you want to use in the thumbnail.

Now, drag the image from the Media box to the Timeline at the bottom.

Step 2: Clear Image Background, Add Border, and Add Custom Background
Go to Effects from the menu bar, click to select the Default tab and then AI Portrait from the navigation pane, and click and drag the Human Segmentation preset from the right box, and place it over the image track in the Timeline.

Double-click the image layer, scroll down the upper-left box to the Video Effects section, and use the Edge Thickness and Edge Feather sliders to adjust the character’s edges to make them as realistic as possible. Click OK when done.

Next, click and drag the Human Border preset over the image track in the Timeline, and follow the same procedure to customize the border. This will give the character a neon border effect.

Now, use the method explained earlier to import a custom image for the background, and drag and place it under the previous track in the Timeline.

If you are running the latest version of Filmora, you will find there are some neon light effects available under AI Portrait as well.

Step 3: Add Titles to Thumbnail
Go to Titles from the menu bar, click to select the Default tab and then Lower 3rds from the navigation pane, and click and drag your preferred lower-third preset from the right window to a separate layer in the Timeline. Double-click the lower-third layer, and use the available options in the upper-left window to change the text, its color, etc., and drag the textbox to place it to your preferred position on the image as well. Click OK to save the changes.
Next, click to select Titles from the navigation pane, and drag your preferred title from the right window to the upper-most track in the Timeline. Now use the method explained earlier to edit the text, its color, position, etc. to make it look professional.

For more tips and tricks for creating YouTube thumbnail, you can check this You Tube thumbnail creating guide.
Step 4: Get the Neon Border Thumbnail
Click the Snapshot (Camera) icon from the upper-right area of the Timeline, go to My Media from the menu bar, right-click the thumbnail of the screenshot you captured, and click Reveal in Finder (on Mac) or Reveal in Explorer (on Windows) to get to the folder the YouTube thumbnail border is saved in.

Part 2: How to Add a Glowing Neon Border in Your YouTube Thumbnail with Canva
Canva is another intuitive editing program that works on the web interface rather than having you download and install an app on your PC. You can add a neon border for YouTube thumbnails using Canva by following the instructions given below:
Step 1: Define Project Settings and Add a Background
After signing in to your Canva account, click Create a design from the top-right corner of the page, click Custom size from the bottom, define 1280 and 720 in the Width and Height fields on the box that appears respectively, and click Create new design.

Now, click to select Background from the navigation bar on the left (if the Background tool is not visible, click More and then choose Background from the expanded list), and click to select a background from the images available in the center pane.

Step 2: Upload an Image and Add Effects
Click Uploads from the navigation bar, click the More icon from the right of the Upload media button present at the top of the center pane, choose your preferred method to upload the image (with the transparent background) that you want to use, upload the image, and drag it from the center pane to the Canvas.
Note: You can use any of the tools available online to remove the background from your image for free.

To add a YouTube thumbnail border, make sure that the image that you added to the Canvas is selected, click the Duplicate icon from the upper-right area, and use the scaling handles of the copy of the image to increase its size a bit. Reposition the image back to its original location as well.
Then, click Edit image from the upper-left corner of the Canvas, click Duotone from the Edit image pane at the center, if need be, click See all, choose your preferred duotone effect to apply on the image, choose your preferred highlight and shadow colors from the box that appears next, and click Back from the top of the pane.

Next, click See all next to the Adjust section from the center pane, and drag the Blur slider to the right to increase the blur effect on the image.

Step 3: Position the Layers
While keeping the duplicate image selected, click the Position button from the upper-right area of the Canvas, and click Background to send the second image behind the first one to get the neon border effect for the photo.

Part 3: How to Outline a Person in a YouTube Thumbnail with Photoshop
Because YouTube thumbnails are nothing but static images, creating YouTube thumbnail border with Adobe Photoshop is comparatively easier. The process of doing this is given below:
Step 1: Define Document Preferences and Import an Image
Launch Adobe Photoshop on your PC, click Create new, and on the New Document customization box, define the width and height values to 1280 and 720 pixels respectively. Select Transparent from the Background Contents menu as well if not already selected. Click Create from the bottom to create a new Photoshop document with the specified document settings. Next, open the folder that contains the source image, drag the photo to Photoshop, and press Enter to place the photo.

Step 2: Remove Background from the Image
Make sure that the image layer is selected in the Layers panel on the right, go to Select from the menu bar at the top, and click Subject. From the bottom of the Layers panel, click the Add a mask icon to get rid of the background, leaving only the human on the Canvas.

Step 3: Add a Custom Background and an Outline Around the Subject
Use the method explained earlier to import a background image of your choice to Photoshop. Drag the background image layer to the bottom in the Layers panel. Double-click the masked layer, click to select Stroke from the left pane of the Layer Style box, and use the options available on the right to manage the size, color, position, etc. of the stroke that has been added around the human subject. Click OK when done, and then export the image normally to use it as a YouTube thumbnail border.

Summary
It is important to know that the default resolution of a YouTube thumbnail is 1280 x 720 pixels that is usually written and referred to as 720p. While adding a YouTube thumbnail border, it is also imperative to have a good sense of color combination and fonts. Furthermore, a decent tool like Wondershare Filmora X must be used to add an appealing neon border around the main subject in the thumbnail image easily and quickly.
02 Add a Glowing Neon Border in YouTube Thumbnail with Canva
03 Outline a Person in a YouTube Thumbnail with Photoshop
Part 1: How to Add Neon Border to YouTube Thumbnail for Free with Filmora
Being one of the most versatile and intuitive post-production tools available in the market today, Wondershare Filmora X allows you to add a neon border to a YouTube thumbnail quite conveniently. You can learn how to get this done on Windows or Mac by following the steps given below.
For Win 7 or later (64-bit)
For macOS 10.12 or later
Step 1: Define Project Settings and Add Image to the Timeline
Launch Wondershare Filmora X on your PC (a MacBook Pro M1 is used here), ensure that the project aspect ratio is set to 16:9 (Widescreen) on the splash screen, and click New Project. On the main interface, click the Preview quality and display settings icon from the upper-right area of the Timeline, click Change Project Aspect Ratio, click to select 1280 x 720 (HD) from the Resolution menu of the Project Settings box, and click OK to save the custom project settings.
Then select My Media from the menu bar if not already selected, click Project Media from the navigation pane, and click Import from the Media box to select and import the image of the main character or object that you want to use in the thumbnail.
Now, drag the image from the Media box to the Timeline at the bottom.
Step 2: Clear Image Background, Add Border, and Add Custom Background
Go to Effects from the menu bar, click to select the Default tab and then AI Portrait from the navigation pane, and click and drag the Human Segmentation preset from the right box, and place it over the image track in the Timeline.
Double-click the image layer, scroll down the upper-left box to the Video Effects section, and use the Edge Thickness and Edge Feather sliders to adjust the character’s edges to make them as realistic as possible. Click OK when done.
Next, click and drag the Human Border preset over the image track in the Timeline, and follow the same procedure to customize the border. This will give the character a neon border effect.
Now, use the method explained earlier to import a custom image for the background, and drag and place it under the previous track in the Timeline.
If you are running the latest version of Filmora, you will find there are some neon light effects available under AI Portrait as well.
Step 3: Add Titles to Thumbnail
Go to Titles from the menu bar, click to select the Default tab and then Lower 3rds from the navigation pane, and click and drag your preferred lower-third preset from the right window to a separate layer in the Timeline. Double-click the lower-third layer, and use the available options in the upper-left window to change the text, its color, etc., and drag the textbox to place it to your preferred position on the image as well. Click OK to save the changes.
Next, click to select Titles from the navigation pane, and drag your preferred title from the right window to the upper-most track in the Timeline. Now use the method explained earlier to edit the text, its color, position, etc. to make it look professional.
For more tips and tricks for creating YouTube thumbnail, you can check this You Tube thumbnail creating guide.
Step 4: Get the Neon Border Thumbnail
Click the Snapshot (Camera) icon from the upper-right area of the Timeline, go to My Media from the menu bar, right-click the thumbnail of the screenshot you captured, and click Reveal in Finder (on Mac) or Reveal in Explorer (on Windows) to get to the folder the YouTube thumbnail border is saved in.
Part 2: How to Add a Glowing Neon Border in Your YouTube Thumbnail with Canva
Canva is another intuitive editing program that works on the web interface rather than having you download and install an app on your PC. You can add a neon border for YouTube thumbnails using Canva by following the instructions given below:
Step 1: Define Project Settings and Add a Background
After signing in to your Canva account, click Create a design from the top-right corner of the page, click Custom size from the bottom, define 1280 and 720 in the Width and Height fields on the box that appears respectively, and click Create new design.
Now, click to select Background from the navigation bar on the left (if the Background tool is not visible, click More and then choose Background from the expanded list), and click to select a background from the images available in the center pane.
Step 2: Upload an Image and Add Effects
Click Uploads from the navigation bar, click the More icon from the right of the Upload media button present at the top of the center pane, choose your preferred method to upload the image (with the transparent background) that you want to use, upload the image, and drag it from the center pane to the Canvas.
Note: You can use any of the tools available online to remove the background from your image for free.
To add a YouTube thumbnail border, make sure that the image that you added to the Canvas is selected, click the Duplicate icon from the upper-right area, and use the scaling handles of the copy of the image to increase its size a bit. Reposition the image back to its original location as well.
Then, click Edit image from the upper-left corner of the Canvas, click Duotone from the Edit image pane at the center, if need be, click See all, choose your preferred duotone effect to apply on the image, choose your preferred highlight and shadow colors from the box that appears next, and click Back from the top of the pane.
Next, click See all next to the Adjust section from the center pane, and drag the Blur slider to the right to increase the blur effect on the image.
Step 3: Position the Layers
While keeping the duplicate image selected, click the Position button from the upper-right area of the Canvas, and click Background to send the second image behind the first one to get the neon border effect for the photo.
Part 3: How to Outline a Person in a YouTube Thumbnail with Photoshop
Because YouTube thumbnails are nothing but static images, creating YouTube thumbnail border with Adobe Photoshop is comparatively easier. The process of doing this is given below:
Step 1: Define Document Preferences and Import an Image
Launch Adobe Photoshop on your PC, click Create new, and on the New Document customization box, define the width and height values to 1280 and 720 pixels respectively. Select Transparent from the Background Contents menu as well if not already selected. Click Create from the bottom to create a new Photoshop document with the specified document settings. Next, open the folder that contains the source image, drag the photo to Photoshop, and press Enter to place the photo.
Step 2: Remove Background from the Image
Make sure that the image layer is selected in the Layers panel on the right, go to Select from the menu bar at the top, and click Subject. From the bottom of the Layers panel, click the Add a mask icon to get rid of the background, leaving only the human on the Canvas.
Step 3: Add a Custom Background and an Outline Around the Subject
Use the method explained earlier to import a background image of your choice to Photoshop. Drag the background image layer to the bottom in the Layers panel. Double-click the masked layer, click to select Stroke from the left pane of the Layer Style box, and use the options available on the right to manage the size, color, position, etc. of the stroke that has been added around the human subject. Click OK when done, and then export the image normally to use it as a YouTube thumbnail border.
Summary
It is important to know that the default resolution of a YouTube thumbnail is 1280 x 720 pixels that is usually written and referred to as 720p. While adding a YouTube thumbnail border, it is also imperative to have a good sense of color combination and fonts. Furthermore, a decent tool like Wondershare Filmora X must be used to add an appealing neon border around the main subject in the thumbnail image easily and quickly.
Also read:
- Massive Followings The Highest Subscribers Chart
- 2024 Approved Enchanting Backgrounds for YouTube Thumbnails
- Analytics Unlocked Your Step-by-Step YouTube Guide for 2024
- [New] Elite 10 Volume Augmenters for All OS
- [New] 10 Must-See VR Videos on YouTube for Deep Immersion
- 2024 Approved Content Creation in Today’s Revenue Landscape
- [New] Audience Alchemy Converting Shorts to Sensations
- In 2024, A Global Perspective Your Favorite Travel Youtubers
- Dual-Watch Dynamics Navigating YouTube in Parallel for 2024
- Monthly Income for Content Creators on YouTube?
- 2024 Approved Earning Potential Unveiled YouTube AdSense Earning per Thousand Video Observations
- [Updated] Decoding YouTube Premium Complete Information Inside
- Auto Subscribe URL Creation for YouTube Enthusiasts
- Sprinkle Some Smiles Emojis on YouTube
- [New] Convenient Cornerstone Building Your Online Channel, Anywhere & Everytime
- In 2024, Edu-Stream 100 Cutting-Edge Learning YT
- In 2024, Elevate Engagement Crafting Anime Subscribe Bars for YouTube Content
- Ideal Screen Reporter Tech Boosting YouTubing Experience
- Navigating Common YouTube Short Hurdles
- 2024 Approved Cultivate Inner Peace & Physical Strength with These Channels
- [New] Channel Upgrade Smartphone Techniques for Professional Videos
- Outlining Key Elements in YouTube Trailer Creation
- Charting YouTube's Course for Video Short Growth with Funding for 2024
- In 2024, Cutting the Excess A Guide to Shortening YouTube Videos
- 2024 Approved Audience’ Market Leaders in YouTube's Short Clips Downloads
- Best Free YouTube to MP3 Converters You Should Know [Online/Win/Mac]
- Perfecting Your Video's Farewell Scene
- [Updated] Boosting Engagement How to Optimize Multi-Streams Across Youtube & Twitch Platforms
- In 2024, Apex Chart Seeker Monitor Most Viewed Videos
- [New] Cost-Free Translation Made Easy with These Subtitle Downloader Apps
- Top 10 Globally Acclaimed Video Sensations on YouTube
- Avoid Commonplace Channel Titles Finding Uniqueness with Filmora for 2024
- The Stepwise Route to Discovering Elusive YouTube Footage
- [Updated] Crafting Timeless Videos with Historical Flair
- In 2024, Top-Notch Solutions for Disabled Apple ID From iPhone 6 Making It Possible
- 2024 Approved The Ultimate Playlist TikTok Hits that Stick in Your Memory
- [Updated] The Best 10 PC Cameras & Recording Software on Win 10 for 2024
- Updated In 2024, Adjust Image Dimensions Accurately
- The Best Android Unlock Software For Samsung Galaxy Z Fold 5 Device Top 5 Picks to Remove Android Locks
- In 2024, How to Transfer Data from Nokia 150 (2023) to Other Android Devices? | Dr.fone
- [New] In 2024, Tranquility Trove PC's Best Bets
- In 2024, The Essential Guide for Proficiently Playing Games with Switch Pro in Steam
- [New] 2024 Approved The Ultimate Guide to Preserving iTunes Content
- The Perfect Blend of Relaxation and Growth Podcast Multi-Tasking Tips
- Top 10 AirPlay Apps in OnePlus Nord N30 SE for Streaming | Dr.fone
- [Updated] In 2024, Best Screen Grabbers for Win10 PCs
- [Updated] A Step-by-Step Guide to Using Polarr for Stunning Images
- Motorola Data Retrieval tool – restore lost data from Motorola Moto G Stylus 5G (2023)
- Title: Leading Links to Google's Advertising Networks on Videos
- Author: Steven
- Created at : 2024-05-25 19:50:19
- Updated at : 2024-05-26 19:50:19
- Link: https://youtube-clips.techidaily.com/leading-links-to-googles-advertising-networks-on-videos/
- License: This work is licensed under CC BY-NC-SA 4.0.
